

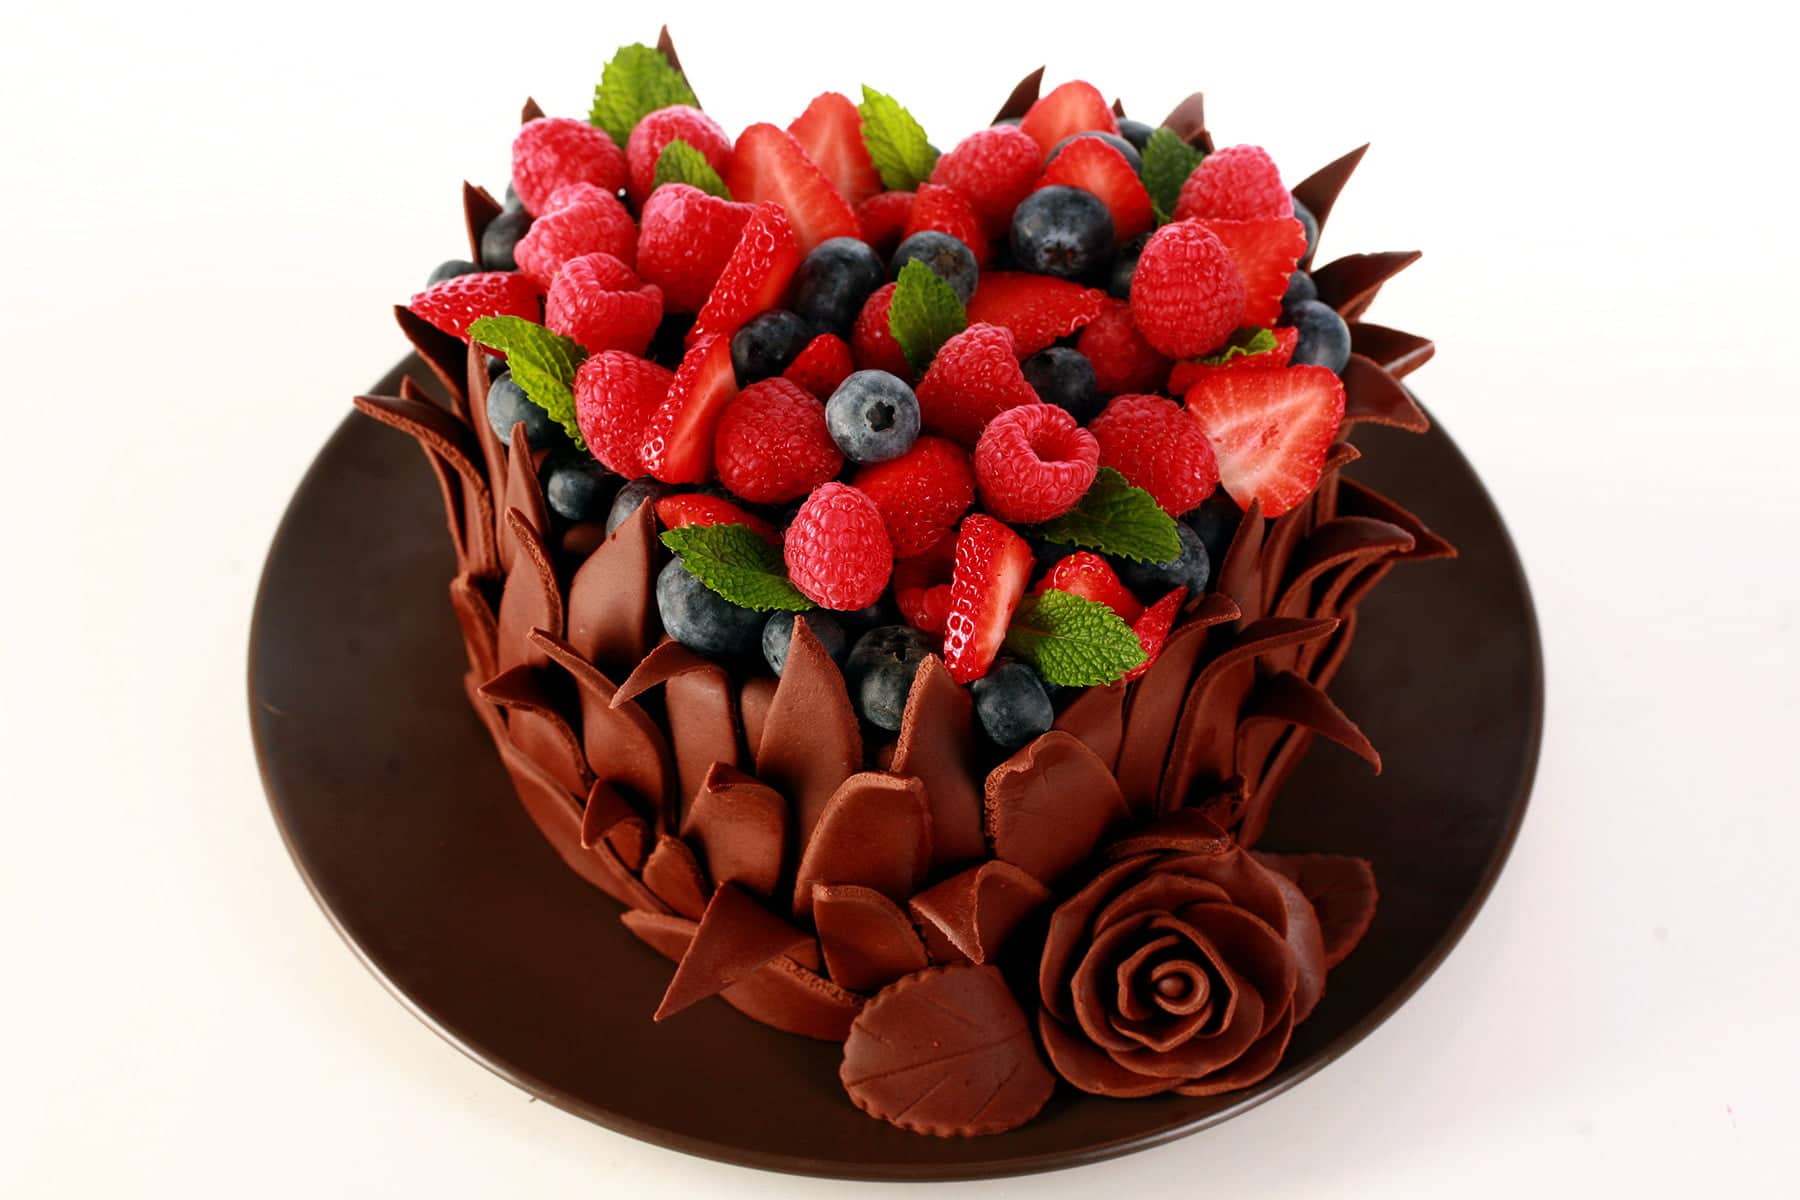
This Chocolate Leaves Cake Tutorial is a fun project for any level of cake decorating experience - even beginner! Great for Valentine's Day.

This one is for a scaled down version of a design I came up with many years ago, when working as a cake decorator.
I’ve done it in multiple different styles - usually chocolate, but a few times I did it in basic white fondant.
At other times, I’ve done it with round, heart, square, and oval cakes, and I’ve topped it with different sets of fruit.


I’ve done the sugared fruits exclusively with the white base, as a gorgeous winter cake option. Not sure it would work as well with the chocolate leaves.
ANYWAY...
While this cake is visually stunning and always a pleaser, it’s also *incredibly* easy to make. Let’s get to it!
Supplies Needed
A Cake
You can use any cake you’d like, really. I have a bunch of recipes on this very site - see further down for a few links!
However you go with it, you’re going to want to chill the cake, frost it, smooth the frosting, and chill until you’re ready to fondant it.
Fondant
This cake is covered and decorated with fondant, so be sure to use one that tastes great and is good to work with.
I recommend using my Marshmallow Fondant recipe - it’s beginner friendly, easy to worth with, tasty, and super customizable!
How much you’ll need will vary wildly based on the cake you’re starting with, the size of the leaves you’re making, how dense you’ll place them, etc.
I like to make a bit more fondant than I think I’ll need. The $3/batch or so is cheap insurance, really!
As an example, this cake is about 8" across, and it took less than a batch and a half of chocolate fondant.
Rolling Pin and Nonstick Work Surface
I’m grouping these two together, as that’s how I bought what I use!
For rolling the fondant, I like to use this rolling pin and the silicone mat it comes with, for rolling fondant.
It's nice and long, and also has adjustable height spacers to help ensure an even thickness.
Don’t have a silicone mat? As a backup, you can use a large sheet of plexiglass or something similar. This is NOT nonstick, though, so you’ll want to grease it with a thin coat of shortening, wherever your fondant may touch.
This is not an ideal setup, though - if you can get a silicone or other nonstick food mat, I highly recommend doing so!
Note: make sure your work area is *super* clean. Fondant is a bit like silly putty in that it will pick up ANY bit of fuzz, hair, or whatever else that is in the area.

Cutters
This is where you can go really free–form in how you do this.
In the older photos of cakes, I used one of the petal cutters from an old Wilton gumpaste flower making set that seems to have been discontinued. This set seems to be very similar - the more slender petal cutter in the foreground looks to be the same as what I used.
However, in looking for a link to what I used to use, I came across this Wilton Succulent Cutter Set, which is not only a fraction of the price of the other set, it also has several cutters that would work well for this design! I'll probably order this set, myself!
If you go this way, know that a small wheel cutter - as pictured - is a lot easier to manouever for this, than a large wheel. I keep one in my cake decorating stuff, just for fondant! Aside from this, I also use it to trim excess fondant from around the bottom of the cake, when covering it.
They're great not only for this, but for making various cookies and crackers. The smooth side is great for making roses, the scalloped side is great for making things like my Gluten-Free Imperial Cookies or homemade "Ritz" style crackers!
Water and a Brush
Have a small amount of water and a small, food safe brush on hand. This will be how you glue your leaves to the cake.
Chocolate Leaves Cake Technique
Cover the Cake
1. Soften (if applicable) and knead your fondant to make it more pliable. Be sure your hands are VERY clean!
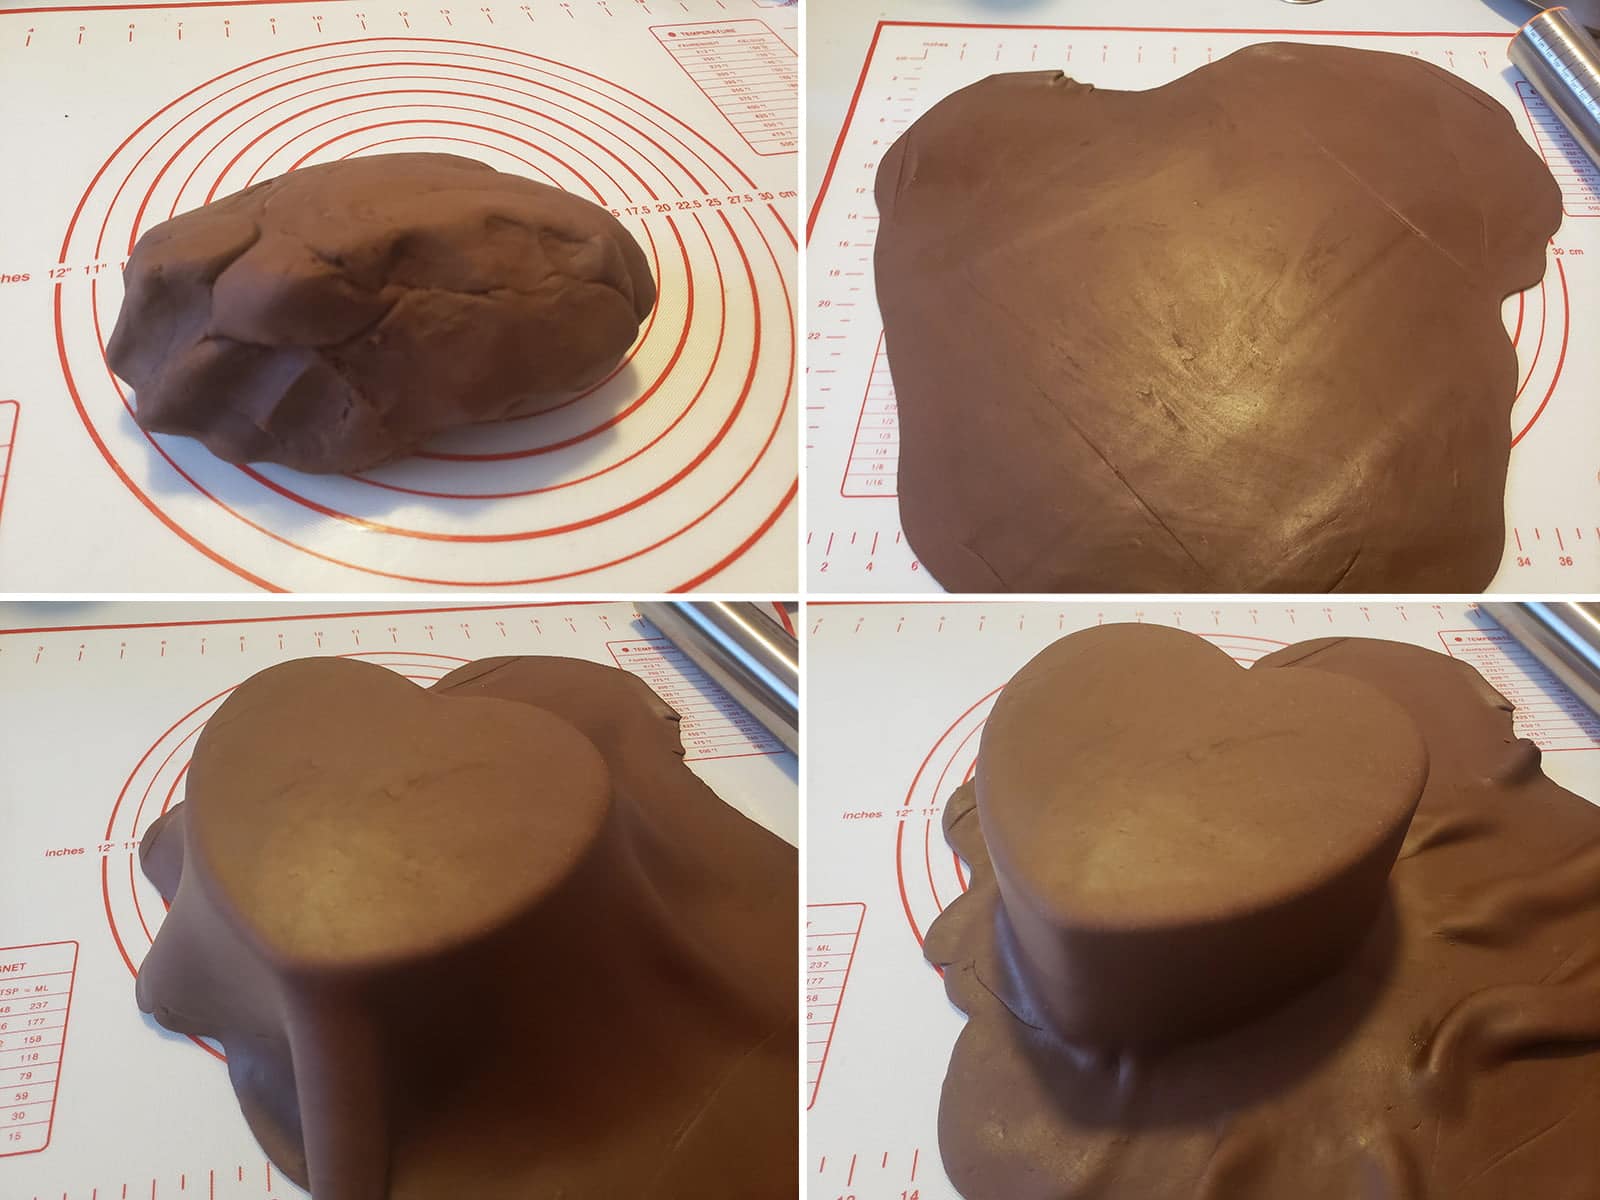
2. Roll out your fondant and cover your chilled cake, taking care to smooth it all out from the centre out and down, eliminating any air bubbles as you go.
3. Use your hands to carefully mold the fondant down around the sides, flaring out from the base.
4. Use a small wheel pizza cutter to trim the excess fondant from the base of the cake.
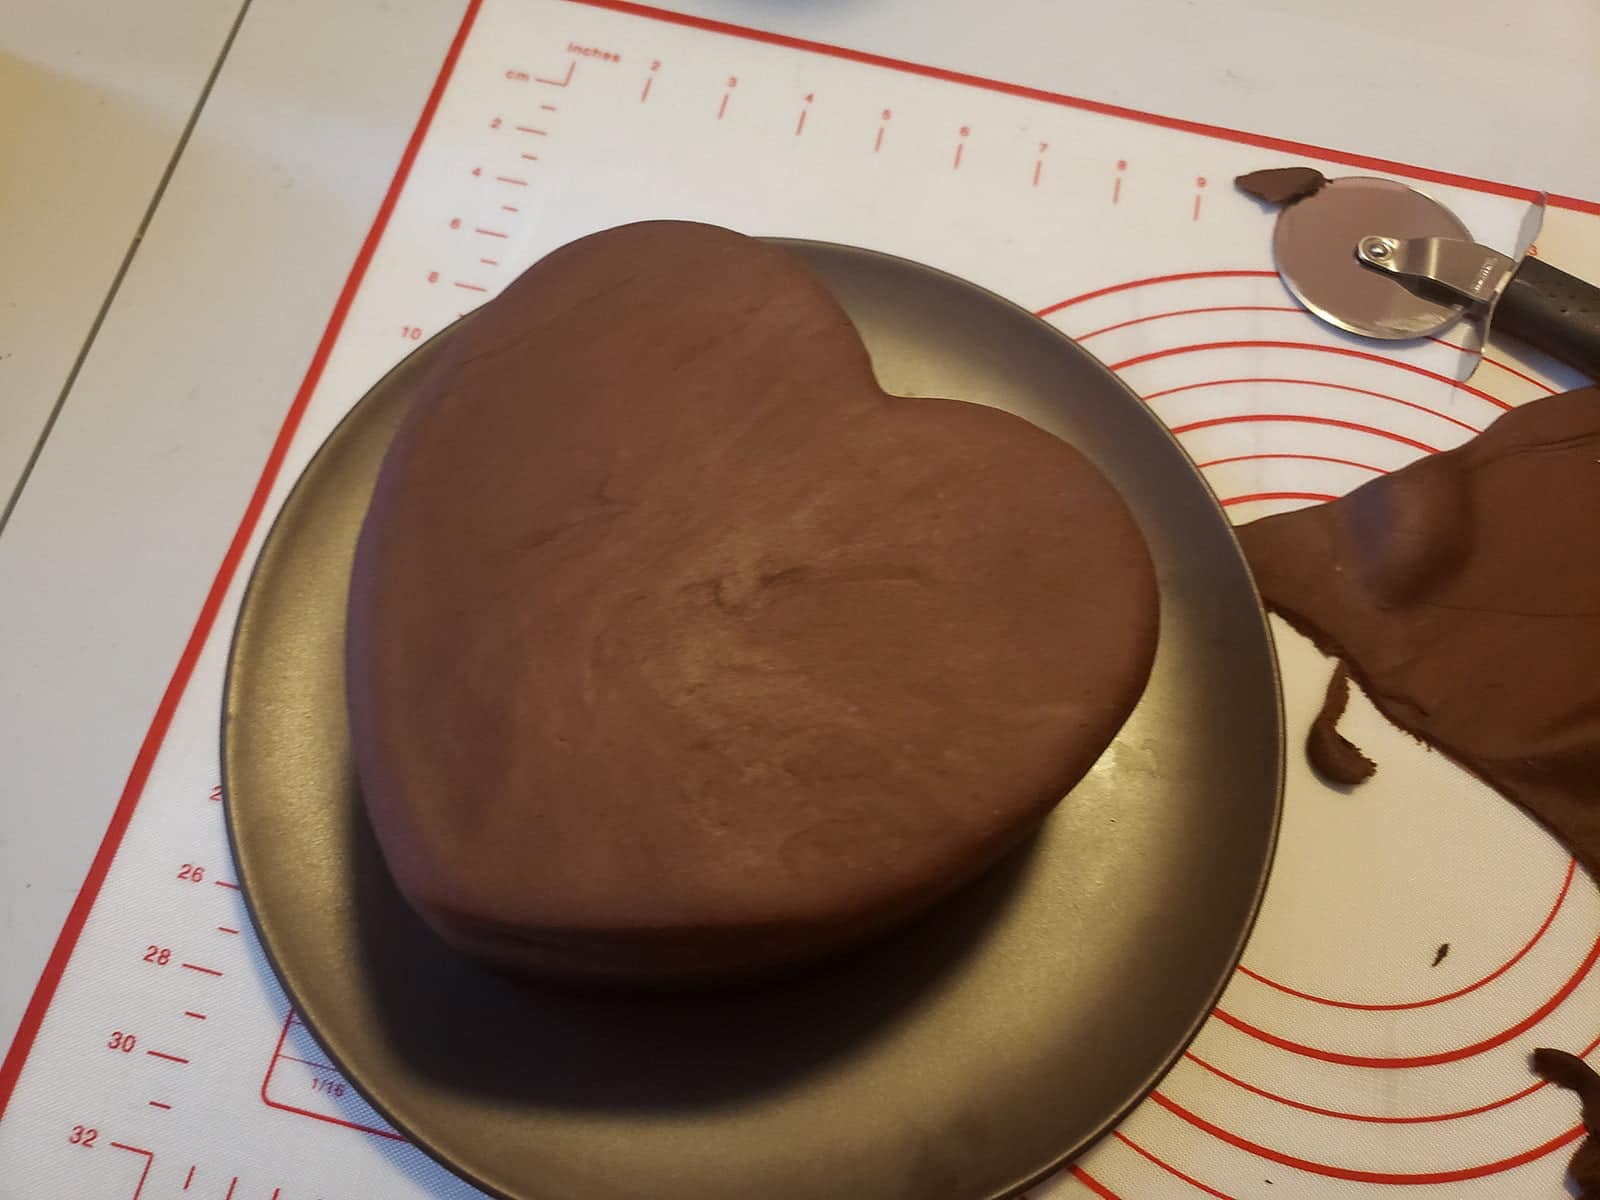
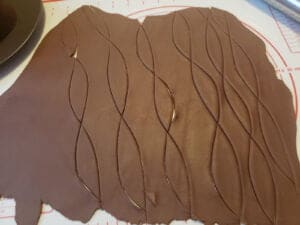
Cut your Leaves
5. Re-knead your fondant and roll it out quite thin - about ⅛" inch thick. You want to strike a balance between being strong enough to stand up, and thin enough to not look clunky.
6. Use your choice of cutter to cut out a bunch of leaf or petal shapes from the rolled fondant. Ball up the excess and wrap in plastic wrap - you’ll be re-rolling it and cutting more, as you run out!

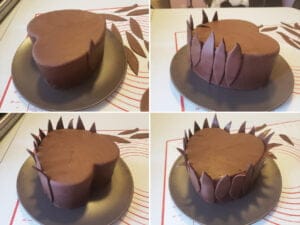
Decorate the Cake
7. Flip a couple of your leaves over, and brush the “lower” half of each with a little water.
8. Press each against the cake, so that the dry part of the underside is sticking up over the edge of the cake, as pictured below.

9. Repeat all the way around the cake, varying the angles of the leaves.
10. Once you’ve made it the whole way around, repeat with another layer, down a bit from the first - as pictured below:

Again, vary the angles of the leaves, overlap them randomly, etc.
11. For the final row of vertical leaves, use your pizza wheel or a knife to cut across the bottom of several leaves, before applying them. This straight edge will go along the bottom of the cake, touching the cake plate.

Alternatively, you can position whole leaves overlapping onto the plate, and just trim the excess when you’re done.
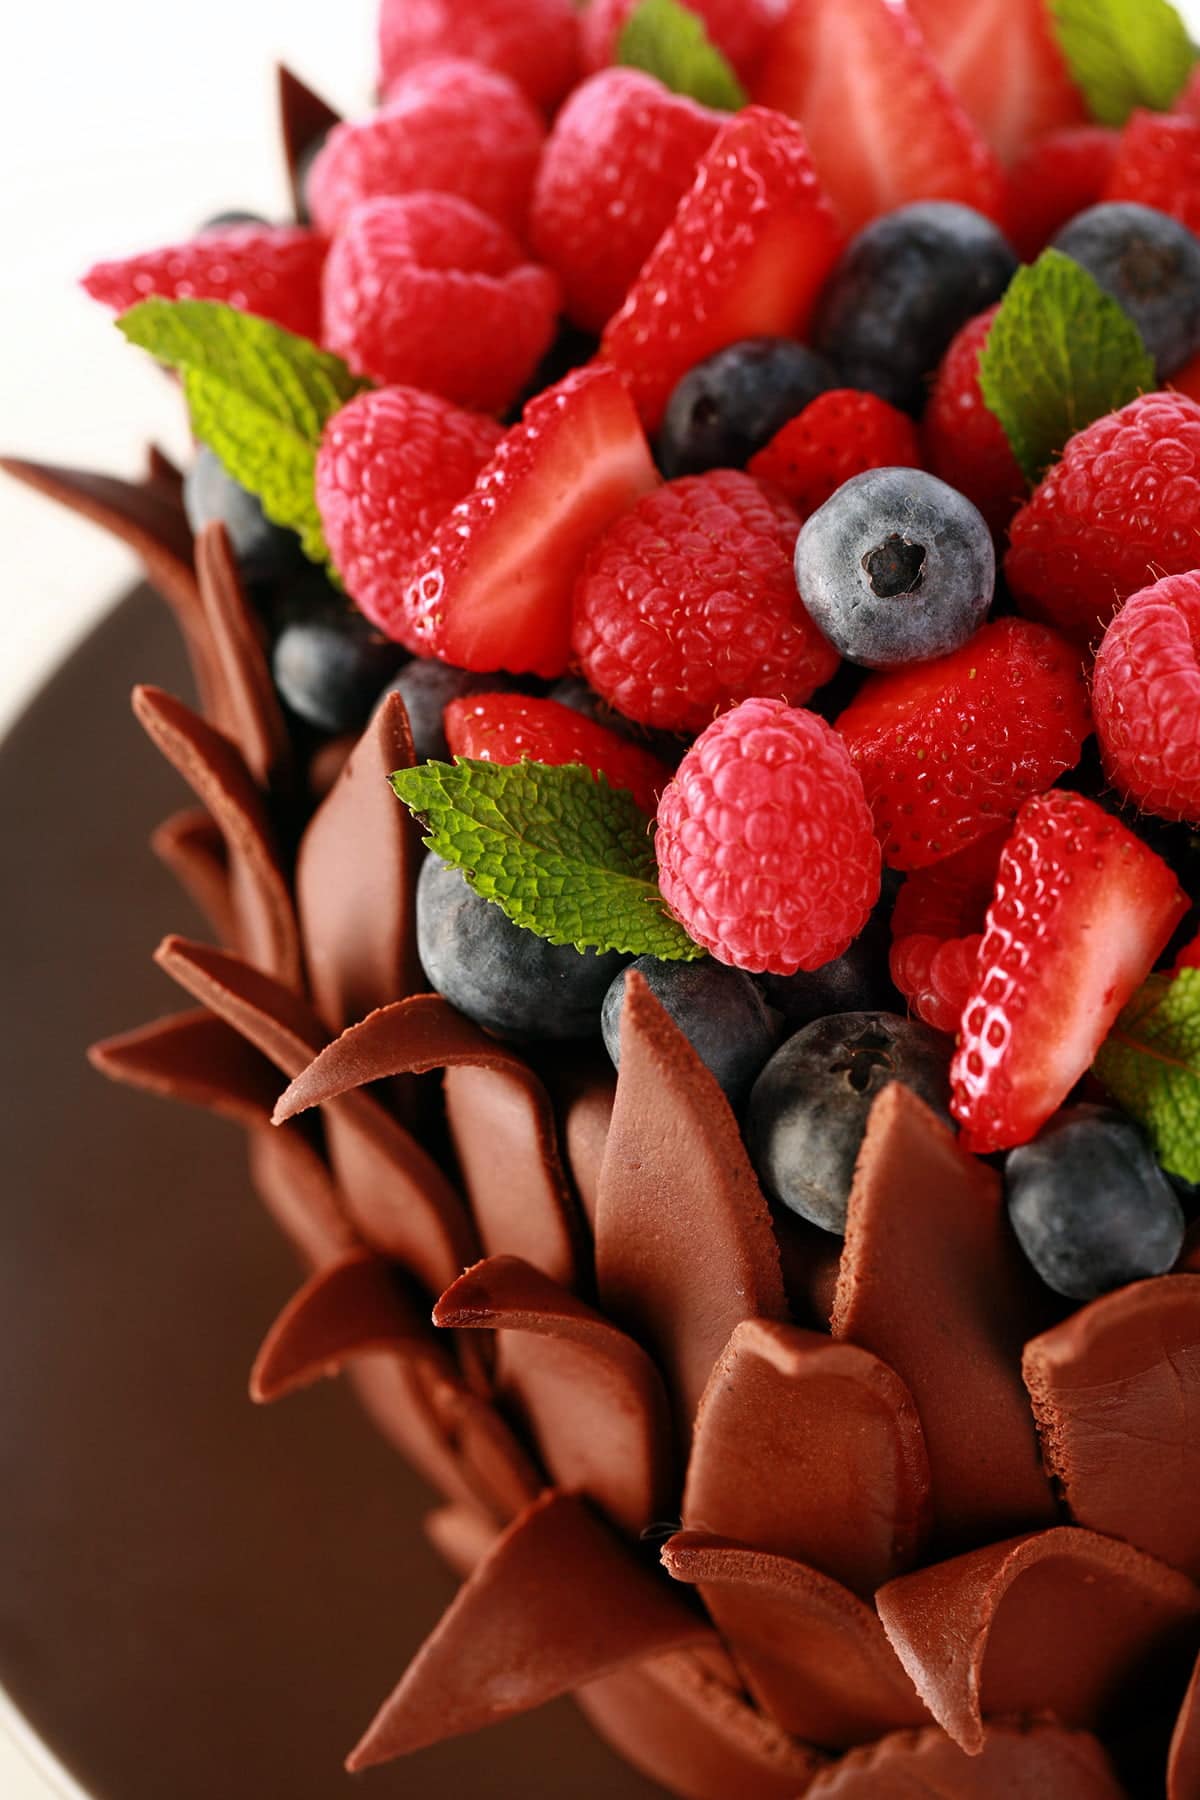
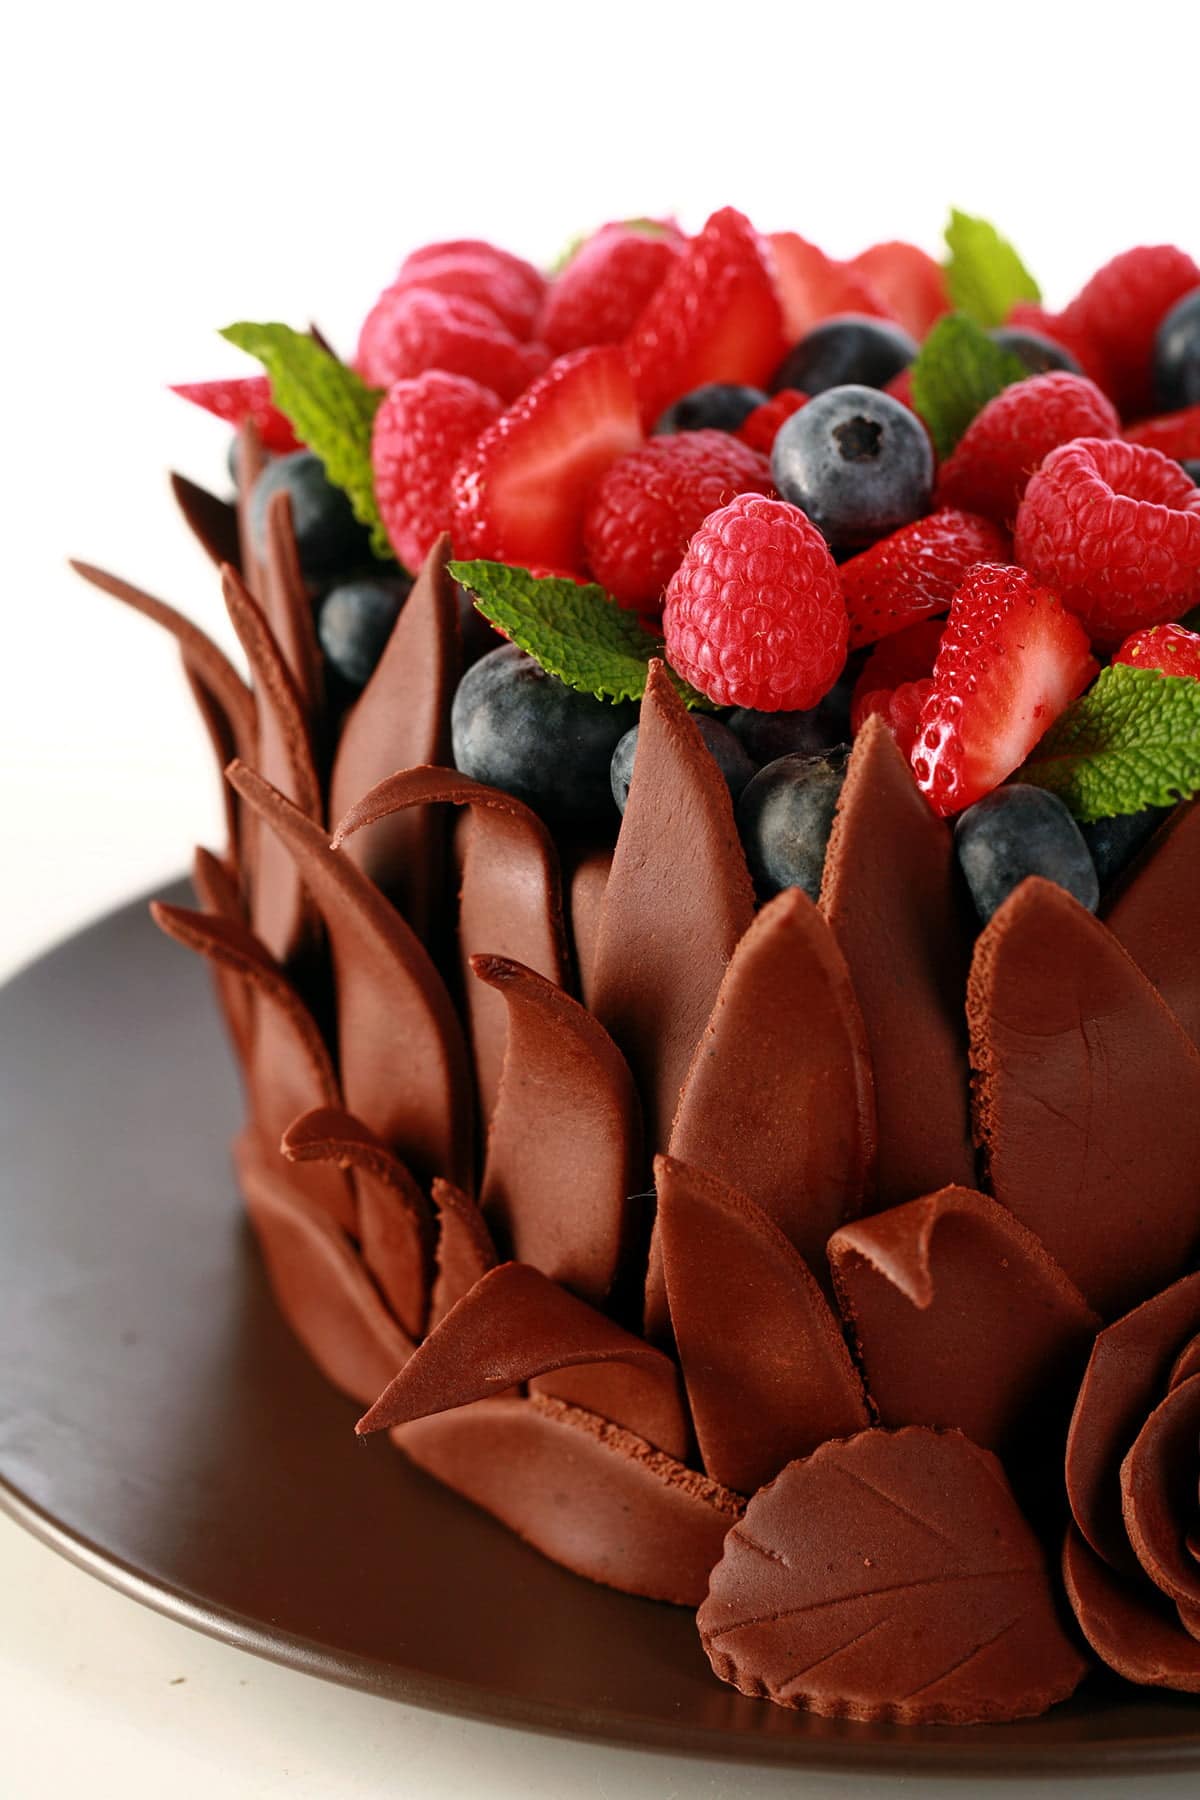
12. I like to go back with one final row of leaves to form a horizontal border, as shown below:

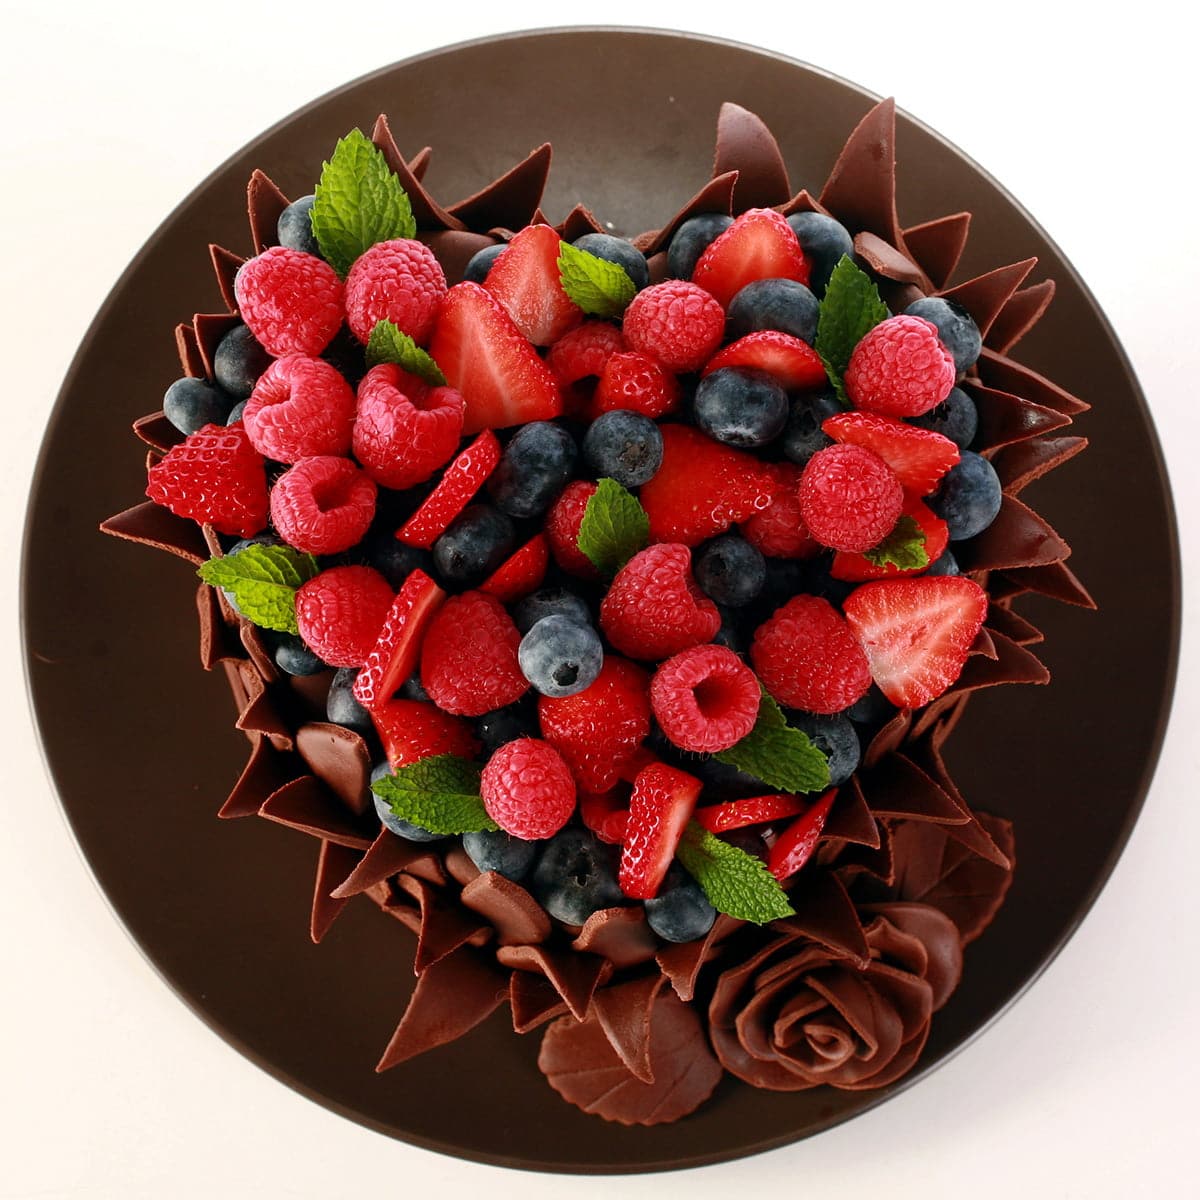
13. Shortly before serving, pile the top of the cake with fruit of your choice.
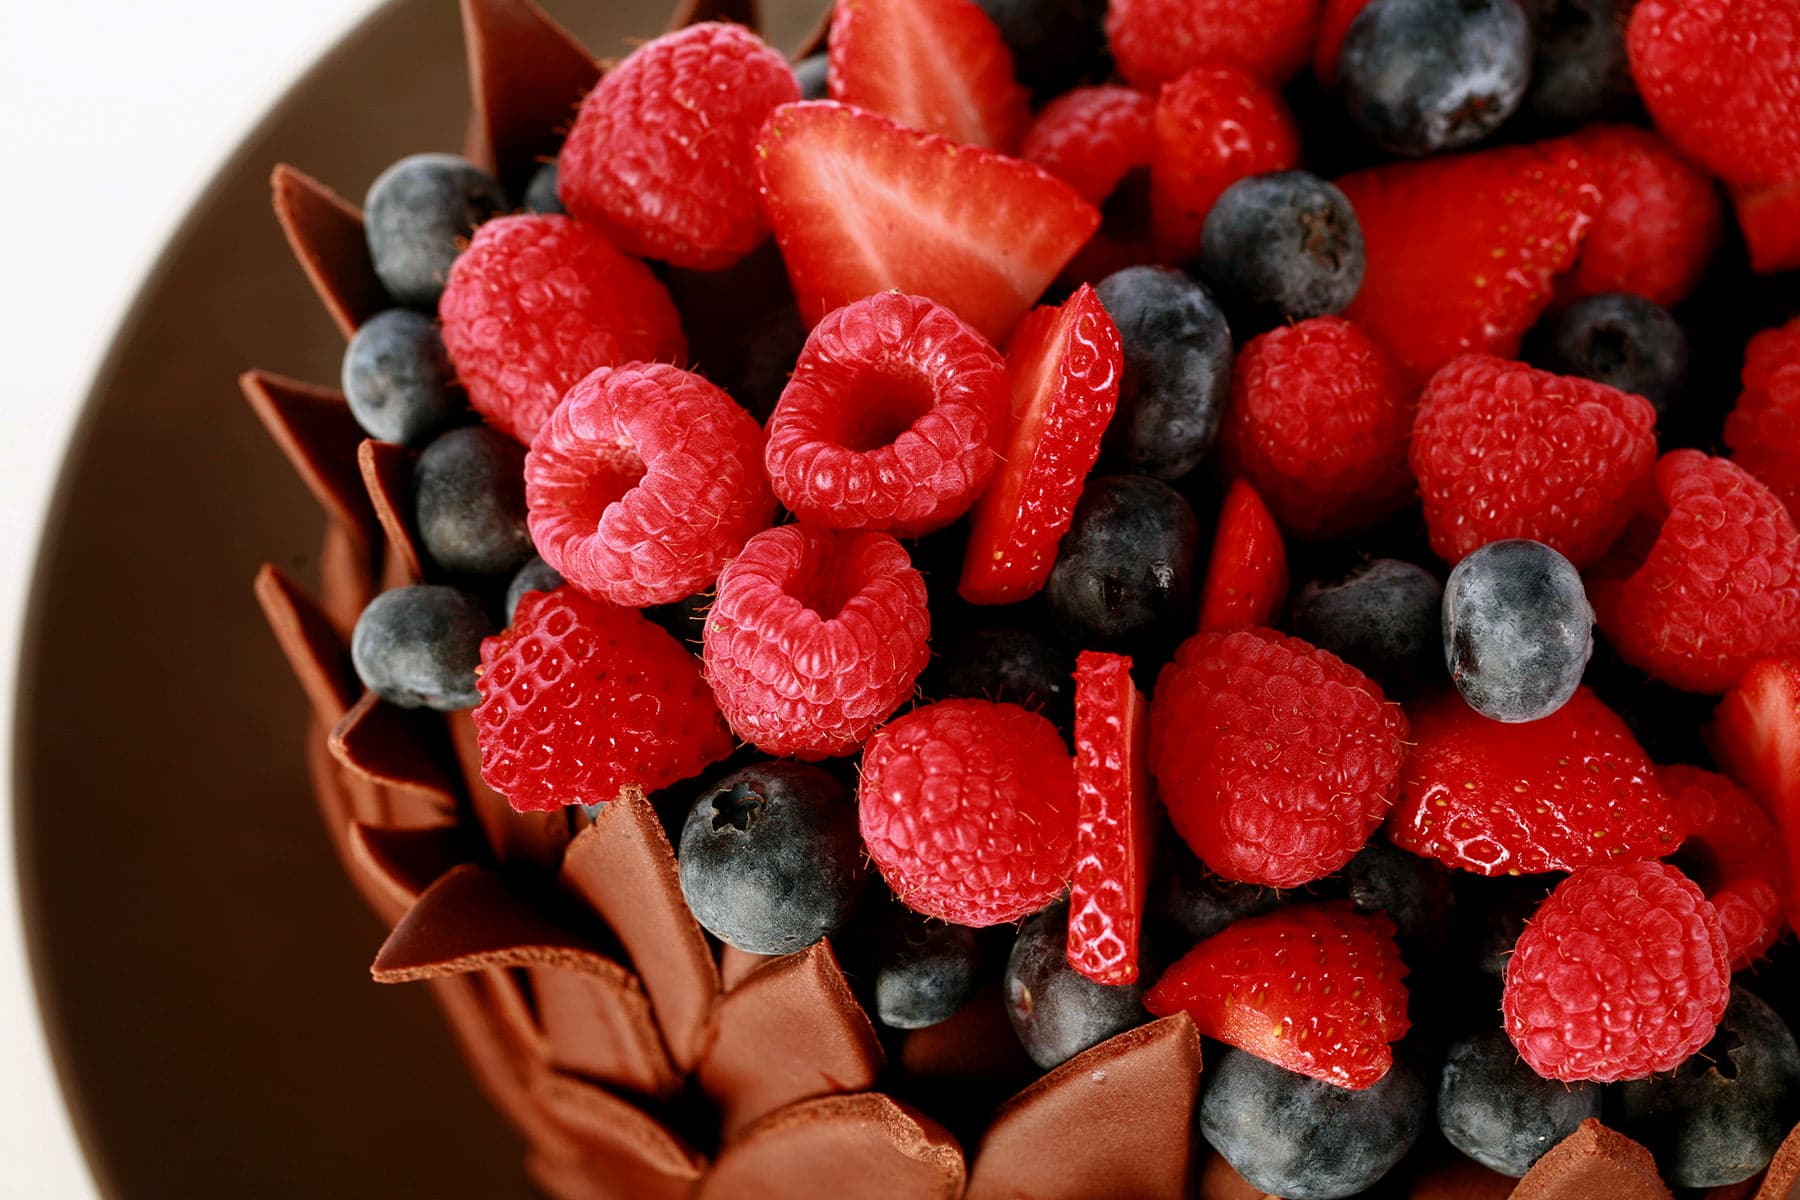
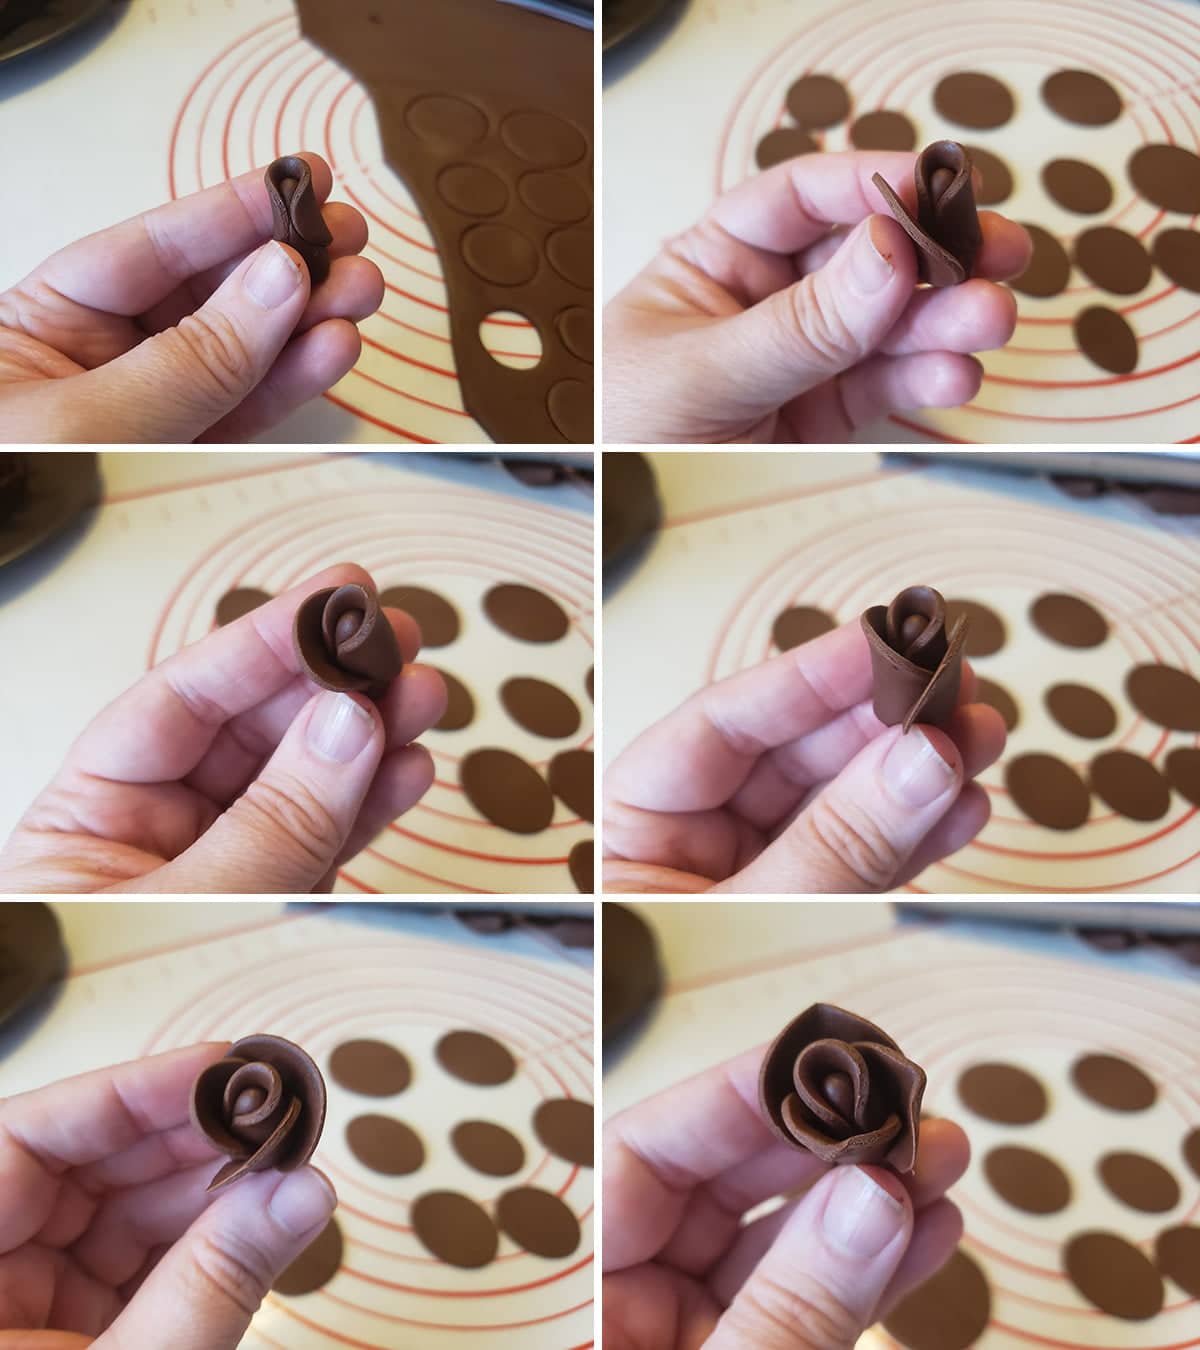
How to Make the Chocolate Rose
1. Roll some fondant very thin - ⅛" or less.
2. Cut some small circles in varying sizes, starting with about 1" diameter.
3. Use a small rolling pin to thin and slightly elongate each round of fondant.

5. Use one small elongated circle to wrap around the top (pointed) end of the cone, as shown.
6. One at a time, wrap 3 small elongated circles around the cone, as shown. The ovals should be be longer side to side, than up and down.
7. I like to pinch each petal at the mid point, as shown.
9. If desired, place another 5 - slightly bigger, yet - petals around the second row, as pictured.
10. Fuss with the petals to style them as desired.
11. Position on the cake, accent with fondant leaves, if you like.


Scaling This Cake Tutorial Up
Wanting to make a tiered cake, like those earlier photos? No problem - here’s how!
1. Fondant each cake layer.
2. Do the leaf design on the top layer.
3. Stack your cakes, making sure to use dowels if necessary.
4. Starting from the second layer (from the top down), do the leaf technique, all the way down to the border.
If you have more than 2 tiers, work your way down from the top. Finish one layer’s leaf design, before moving on to the layer beneath it.
5. Shortly before serving, pile the top of the cake - and the top of each lower layer - with fruit of your choice.

More Cake Decorating Posts
Looking to up your cake decorating game? I've got you covered!
3D Monarch Butterfly Cupcakes
American Buttercream Recipe
Frozen Buttercream Transfer Tutorial
How to Make Marshmallow Fondant
Poinsettia Cake Tutorial
Spider Web Halloween Cupcakes
Swiss Meringue Buttercream Recipe

Interested in making wickedly delicious cakes? You'll LOVE my second cookbook, Evil Cake Overlord!
We've long been known for our “ridiculously delicious” moist cakes and tasty, unique flavors. Now, you can have recipes for all of the amazing flavors on our former custom cake menu, and many more!
Bake your moist work of gastronomic art, then fill and frost your cake with any number of tasty possibilities. Milk chocolate cardamom pear, mango mojito.. even our famous Chai cake – the flavor that got us into “Every Day with Rachel Ray” magazine!
Feeling creative? Use our easy to follow recipe to make our yummy fondant. Forget everything you’ve heard about fondant – ours is made from marshmallows and powdered sugar, and is essentially candy – you can even flavor it!
Order your copy through Amazon, or through any major bookseller!

More Cake Photos
Interested in seeing - and reading - more details of some of my favourite cakes I’ve made over the years? Check out these links:
Bubble Bobble Wedding Cake
Clarice, Have the Lambs Stopped Screaming?
Dalek Cake for a Doctor
Lambeth Wedding Cake
Snowflakes Wedding Cake
SO.. I made a Cake for Amanda Palmer (NSFW)
Spumoni Cake & The Art of Trolling Cake Competitions
That Time I Made a Cake for a Pack of Klingons
The Story of Foopmallet
TARDIS for Wil Wheaton
Tremors Wedding Cake
Cake Recipes!
Looking for some ridiculously delicious cake recipes? As the "Evil Cake Overlord", I've got you covered! (Ps: Check out my instructions for making Marshmallow Fondant, as well!)
Tortes:
B-52 Torte
Bahama Mama Torte
Blood Orange Truffle Torte
Citrus Splendor Torte
Cookies N Cream Cake
Raspberry Tiramisu Torte
Schmoo Torte
Spumoni Cake
Tiger Tail Cake
Bundt, Sheet, & Upside Down Cakes
Bananas Foster Upside Down Cake
Brandied Apple Upside Down Cake
Deep N Delicious Cake
French Martini Bundt Cake
French Martini Upside Down Cake
Mango Mojito Upside Down Cake
Pina Colada Bundt Cake
Strawberry Mango Marble Cake
Cupcakes:
3D Monarch Butterfly Cupcakes
Chai Cupcakes
Easy Butterfly Cupcakes
Fat Elvis Cupcakes
Lynchburg Lemonade Cupcakes
Pink Grapefruit Daiquiri Cupcakes
Also: I have Cake Decorating Tutorials, and posts about previous Decorated Cakes that I've made.

Chocolate Leaves Cake Decorating Tutorial
Equipment
- Leaf Cutting Set, Optional
- Small Diameter Pizza Cutter
- Water and a Brush
Ingredients
- A Cake
- Fondant
Instructions
Cover the Cake
- Soften (if applicable) and knead your fondant to make it more pliable. Be sure your hands are VERY clean!
- Roll out your fondant and cover your chilled cake, taking care to smooth it all out from the centre out and down, eliminating any air bubbles as you go.
- Use your hands to carefully mold the fondant down around the sides, flaring out from the base.

- Use a small wheel pizza cutter to trim the excess fondant from the base of the cake.


Cut your Leaves
- Re-knead your fondant and roll it out quite thin - about ⅛" inch thick. You want to strike a balance between being strong enough to stand up, and thin enough to not look clunky.
- Use your choice of cutter to cut out a bunch of leaf or petal shapes from the rolled fondant. Ball up the excess and wrap in plastic wrap - you’ll be re-rolling it and cutting more, as you run out!
Decorate the Cake
- Flip a couple of your leaves over, and brush the “lower” half of each with a little water.
- Press each against the cake, so that the dry part of the underside is sticking up over the edge of the cake, as pictured.
- Repeat all the way around the cake, varying the angles of the leaves.
- Once you’ve made it the whole way around, repeat with another layer, down a bit from the first - as pictured.
- Again, vary the angles of the leaves, overlap them randomly, etc.
- For the final row of vertical leaves, use your pizza wheel or a knife to cut across the bottom of several leaves, before applying them. This straight edge will go along the bottom of the cake, touching the cake plate.
- Alternatively, you can position whole leaves overlapping onto the plate, and just trim the excess when you’re done.
- I like to go back with one final row of leaves to form a horizontal border, as shown.

- Shortly before serving, pile the top of the cake with fruit of your choice.


Leave a Reply