

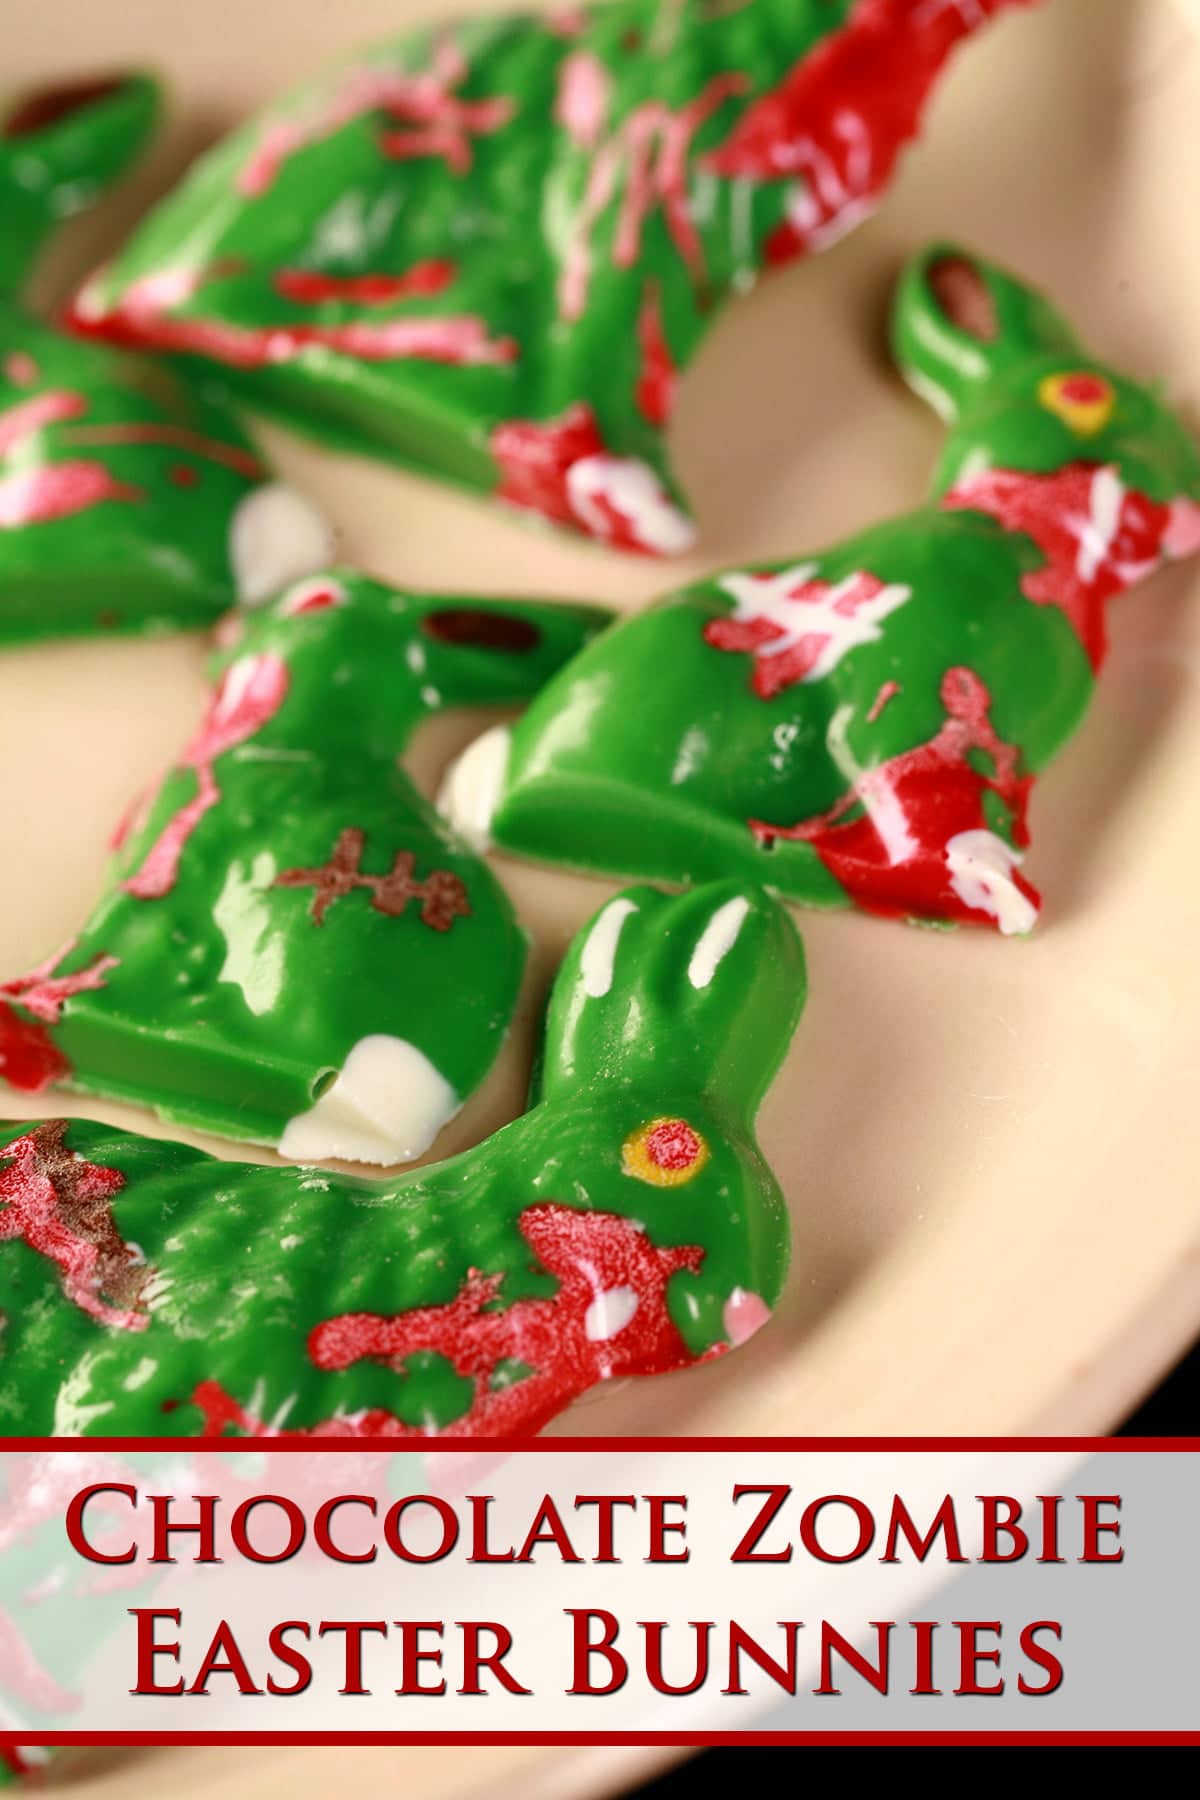
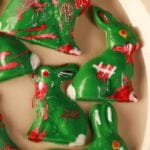
Not into the bright colours and pastels of the Easter season? This Chocolate Zombie Easter Bunnies tutorial may be right up your alley!
Originally posted April 21, 2011. Updated 1/26/2021
A decade ago, I was perusing my favorite online shop at the time (Think Geek, of course!), when I happened upon a new offering of theirs: Chocolate Zombie Bunnies.
Chocolate. Zombie. Bunnies!
They were out of stock, and I was still enjoying the memories of the fun evening I'd spend with my husband recently, creating easy Pysanky Easter eggs, and had an idea - we were going to make our own Chocolate Zombie Easter Bunnies, at home!

Seriously, this cost us under $20 for candy melts, molds, and everything. It's something I enjoyed doing as a kid, and even made a great date night thing. Have fun with it!
This year, I figured it’s time to revisit and update this post... mostly as an excuse to make more zombie bunnies!
Anyway, here's how we did it!

How to Make Chocolate Zombie Easter Bunnies
Equipment & Supplies Needed
- Bunny shaped candy molds*
- Something to melt the candy on. (We used a plate and a measuring cup)
- Small paint brushes, optional
- Toothpicks
- Candy Melts**, variety of colors.

* Bunny Shaped Candy Molds
When we first posted this blog, it was after wandering the aisles at our favourite cake decorating supply shop to pick our favourites from a variety of molds.
This year, in person shopping isn’t an option, so we purchased them from Amazon.
Amazon doesn’t have a great selection, so if cake decorating or craft shops are an option for you, I’d start there.
Otherwise, here are a few other options, online:
Candy Molds N More (USA)
McCall's (Canada)
Etsy (Everywhere)
** Candy Melts
When I first posted this tutorial, Wilton’s Candy Melts were pretty much *it* for this kind of thing, but several other brands have popped up over the years.
You’re looking for coloured disks of a chocolate like substance, sold in craft stores and cake decorating supply shops. They’re made to melt and use in molds. “Candy melts”, “molding chocolate”, etc.
Michaels sells it as “Sweet Tooth Fairy Meltables”, and you can usually find one brand or another in bulk food shops, such as Bulk Barn here in Canada. You can also buy them directly from Wilton
Amazon sells them also, but at a much higher cost than you can find them in person at cake and craft shops.

How to Melt the Candy
There are a few different techniques used for melting the candy disks, and which you choose depends on what you’re doing with them.
A double boiler or a candy melt appliance can be efficient when you’re dipping things, but for our purposes... the microwave method is best.
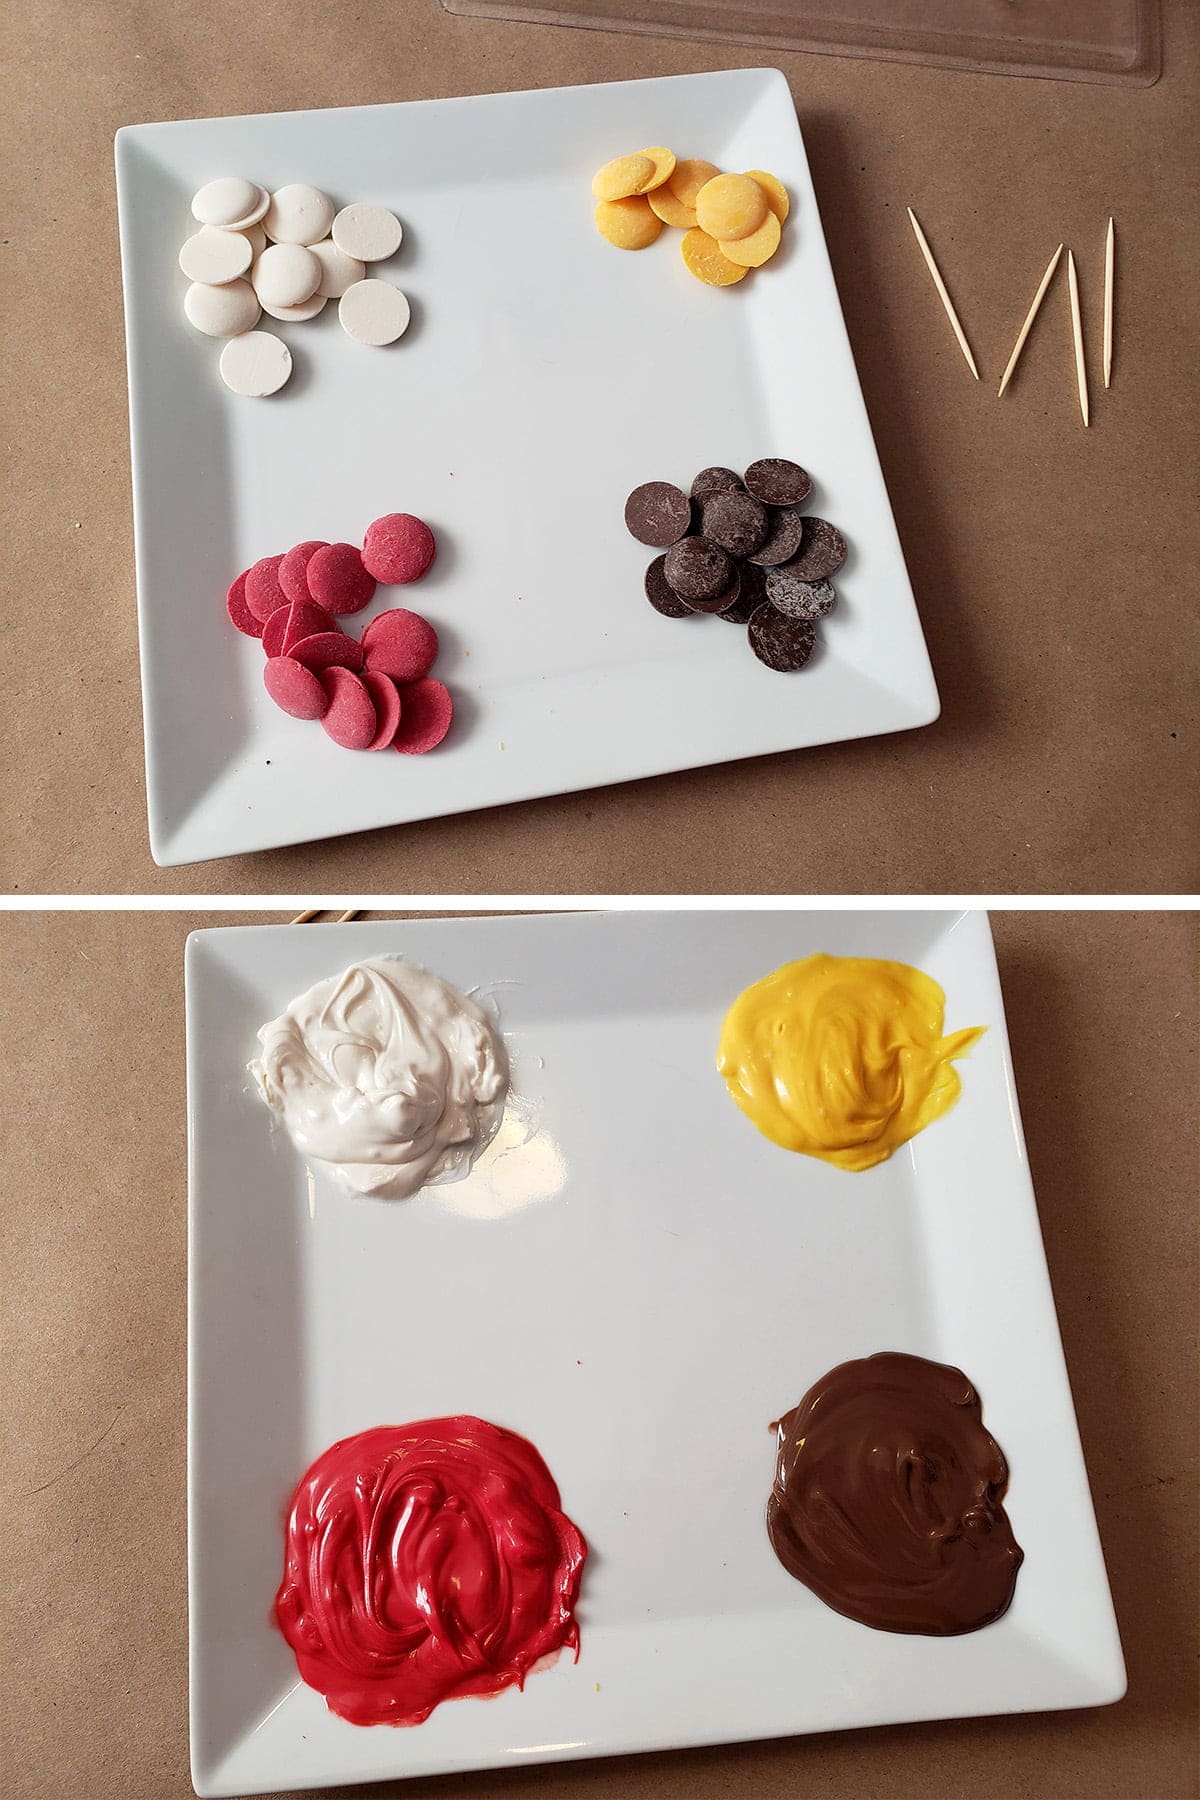
For the first step - the decorating - I like to arrange small piles of each colour on a microwave safe plate, as shown.
For things like pupils eyes, scars, and blood - even a REALLY bloody bunny - you really don’t need a ton of melted candy. You’ll be applying it with a toothpick!
So, microwave your plate for 30-45 seconds at 50% power, and use toothpicks to stir each pile. Repeat, 20 seconds at a time, until it’s all melted and smooth.
Once you’ve finished the initial decorations and are ready to fill the molds, you’ll need much more candy disks to melt.
For that, I like to use a microwave safe bowl or measuring cup.

Place your chips in the vessel, microwave for 1 minute at 50% power, and stir. From there, do 30-45 seconds at a time, stirring in between, until it’s all melted and smooth.
If the candy hardens before you can use it, you can reheat it - just remember to go low and slow with it.

Small amounts of candy can be mixed together to customize colours. Here, I mixed a little pink for their noses!
Important Candy Melt Notes
Don’t add any kind of liquid to the melted candy.
It may not be chocolate, but it does ACT like chocolate in this sense - liquid will make it seize.
Seizing is when chocolate - or candy melts - are unhappy with the situation, and break, clump, and generally go gross.
There is no coming back from seized chocolate, so really...just avoid liquid of any kind. This includes flavour extracts, water, milk, etc.

If you're running out of any particular colour - green was scarce when we did this! - you can use leftovers of other colours to bulk up areas after doing a base coat of whatever you want the outside to show.
Don’t Overheat the Candy
Again, much like chocolate, you can scorch the candy if you’re not careful. If this happens, it’s un-usable.
This is the reason for the 50% power when melting it!

Thinning the Candy
If even fully melted candy is too thick to deal with, you can mix in a VERY small amount of solid vegetable shortening to thin it out a little.
Start with ½ teaspoon per ½ cup of candy.

Running out of a colour? Mix your leftovers together as "filler" for behind the actual design.
Starting Your Zombie Bunny Decoration
Use a tooth brush or small craft paint brush to paint colored details directly onto cavity of candy molds.

If doing multiple layers, remember that the first color you put down will be the outermost color visible.
Ie: paint the pupil first, THEN the rest of the eye:
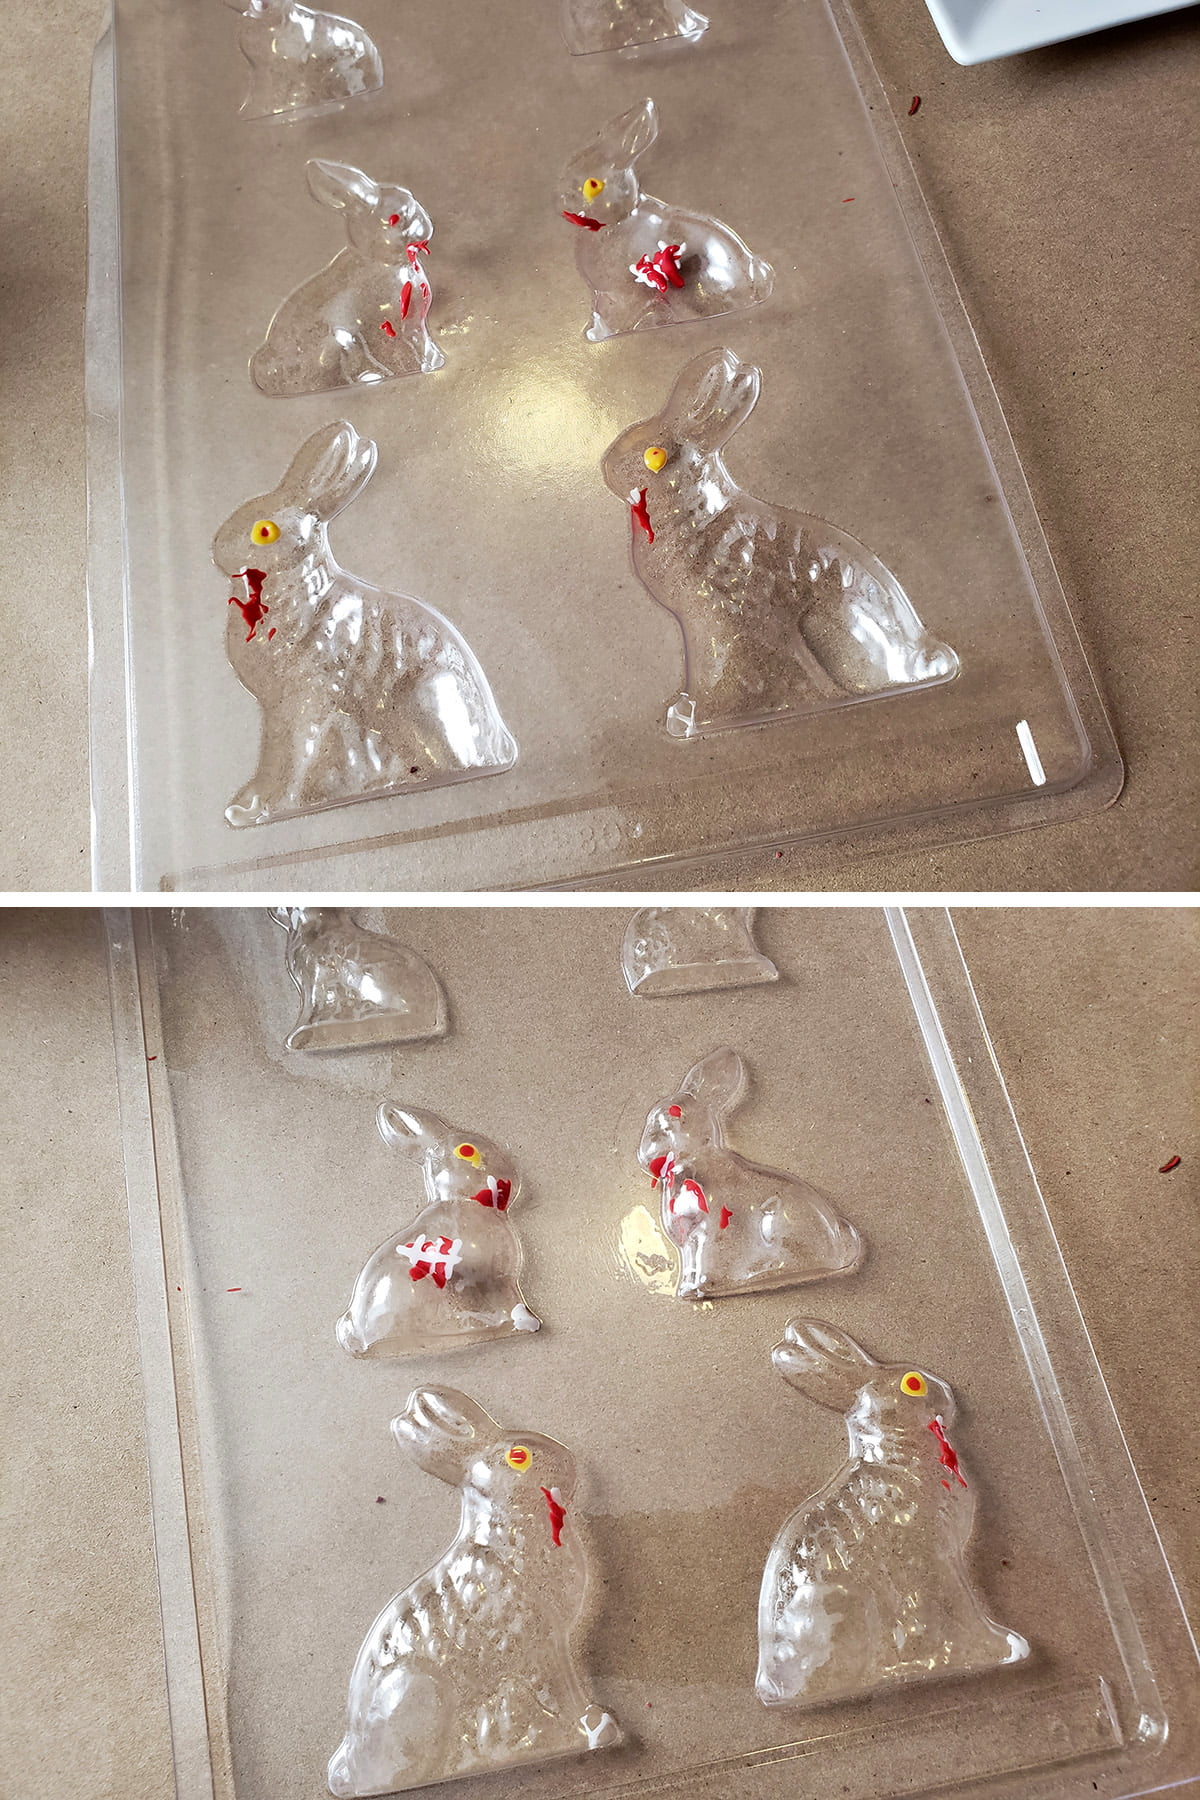
Once all of your detail work is finished and hardened, carefully spoon or pour your main color into the mold, filling to the edge.

Allow to harden at room temperature until completely set.
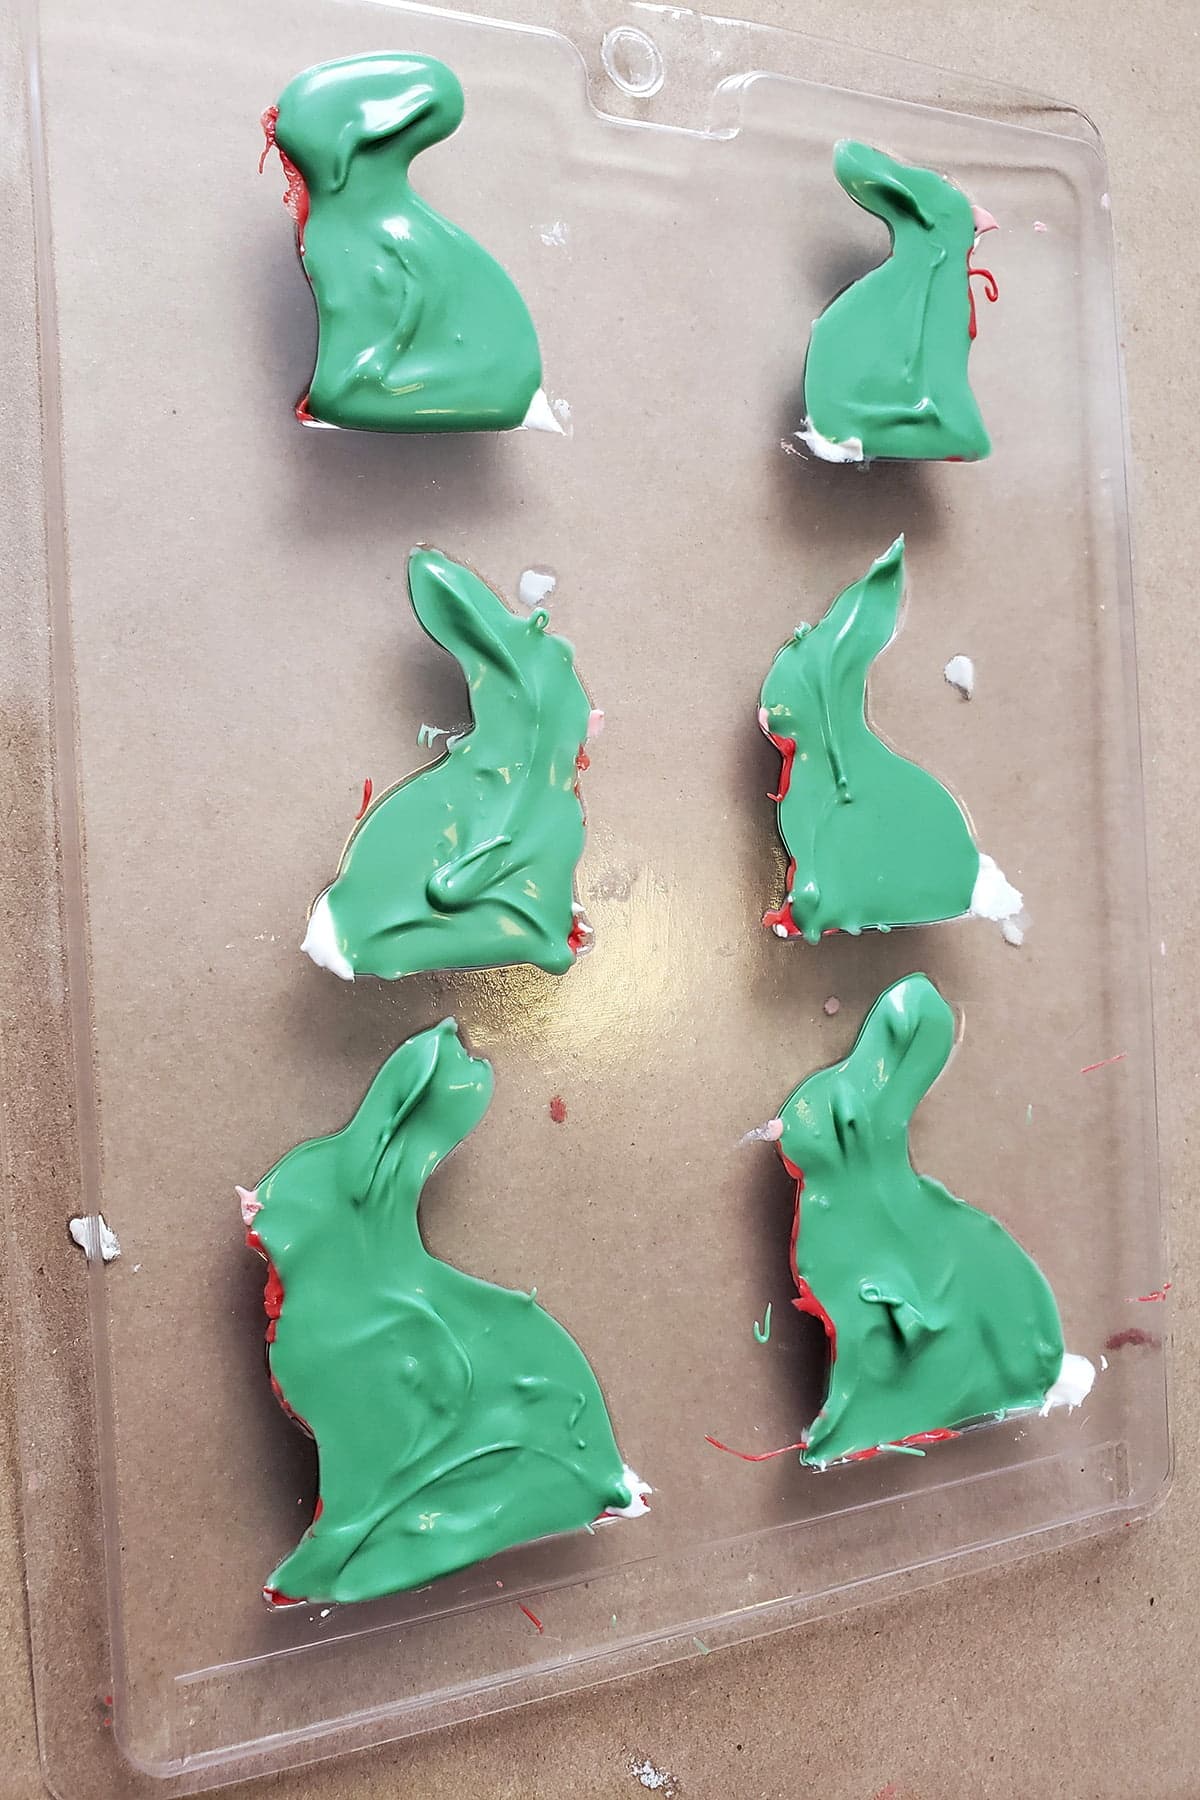
Once candy is set, gently flex the mold to release your creation.
If using a 2 piece (3D) mold:
Paint all details as noted above, on both halves of the mold.
For Hollow Candy
Fill one half of the mold. Attach the second half, secure with clips/clamps/elastic bands, and flip.
Turn the mold several times, ensuring that the entire cavity is covered inside.
Allow to harden, release as described above.
For Solid Candy
Fill both halves of the mold, carefully attach.
Secure with clips (etc), chill thoroughly before releasing.

Zombie Specific Decoration Tips
Yep, those are the basics for making any sort of candy mold creations.
We're not talking about "any sort" of candy creations though, we're talking about Zombie Bunnies!
Here are a few zombie-specific tips:
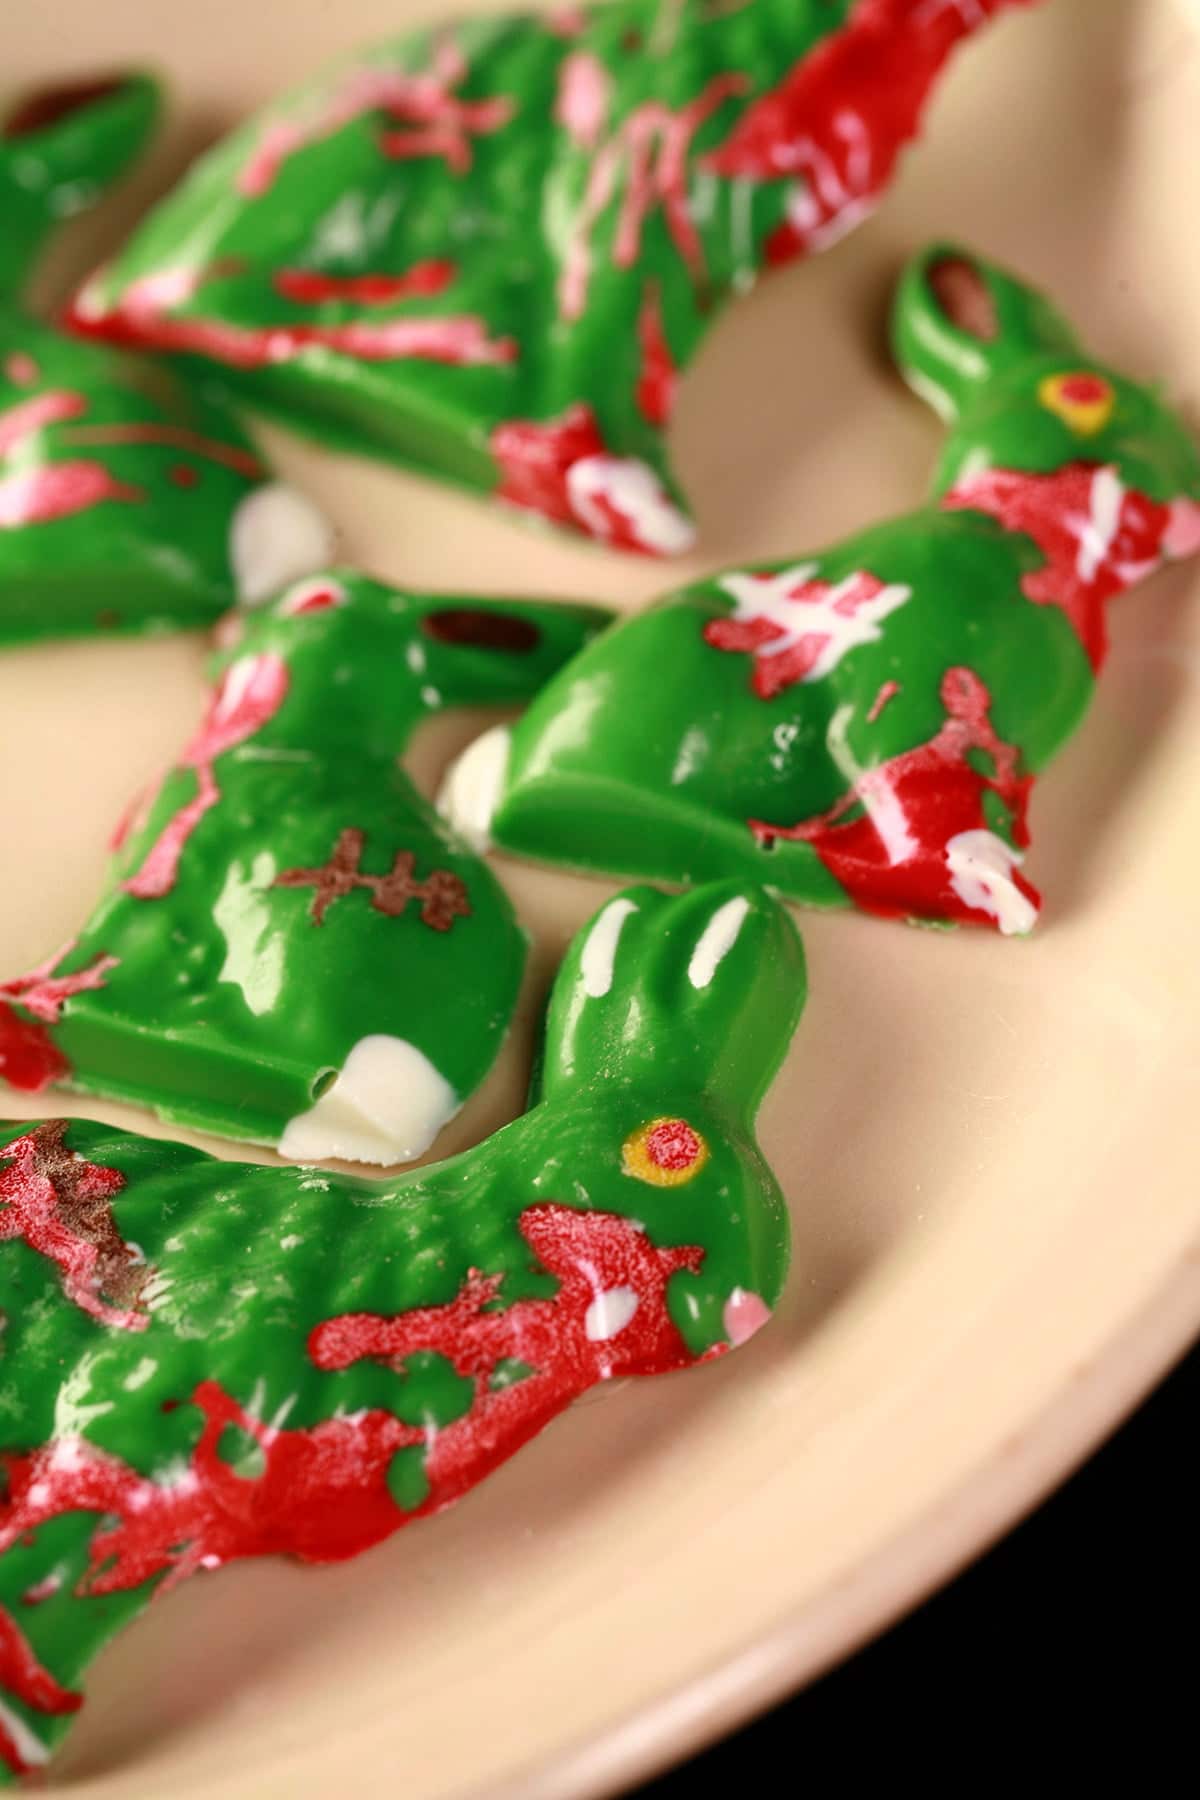
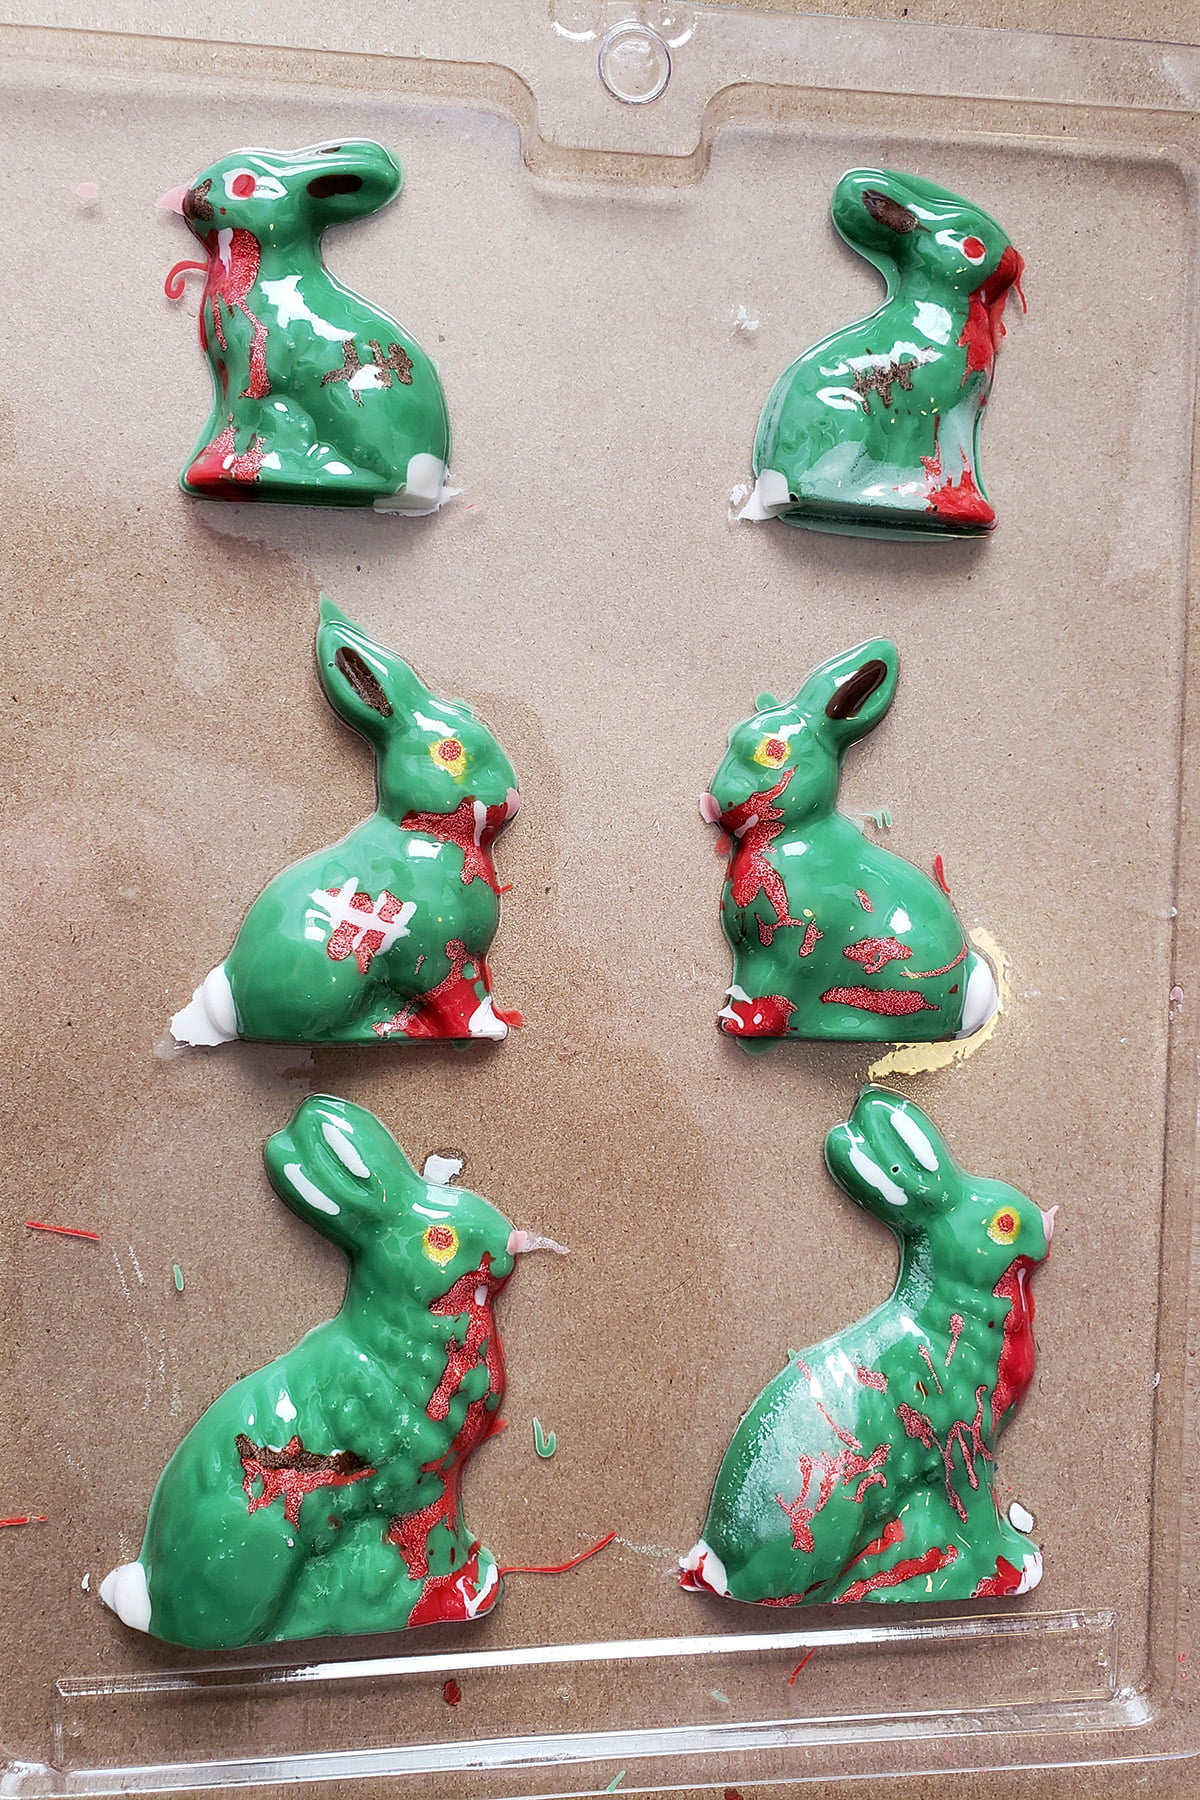
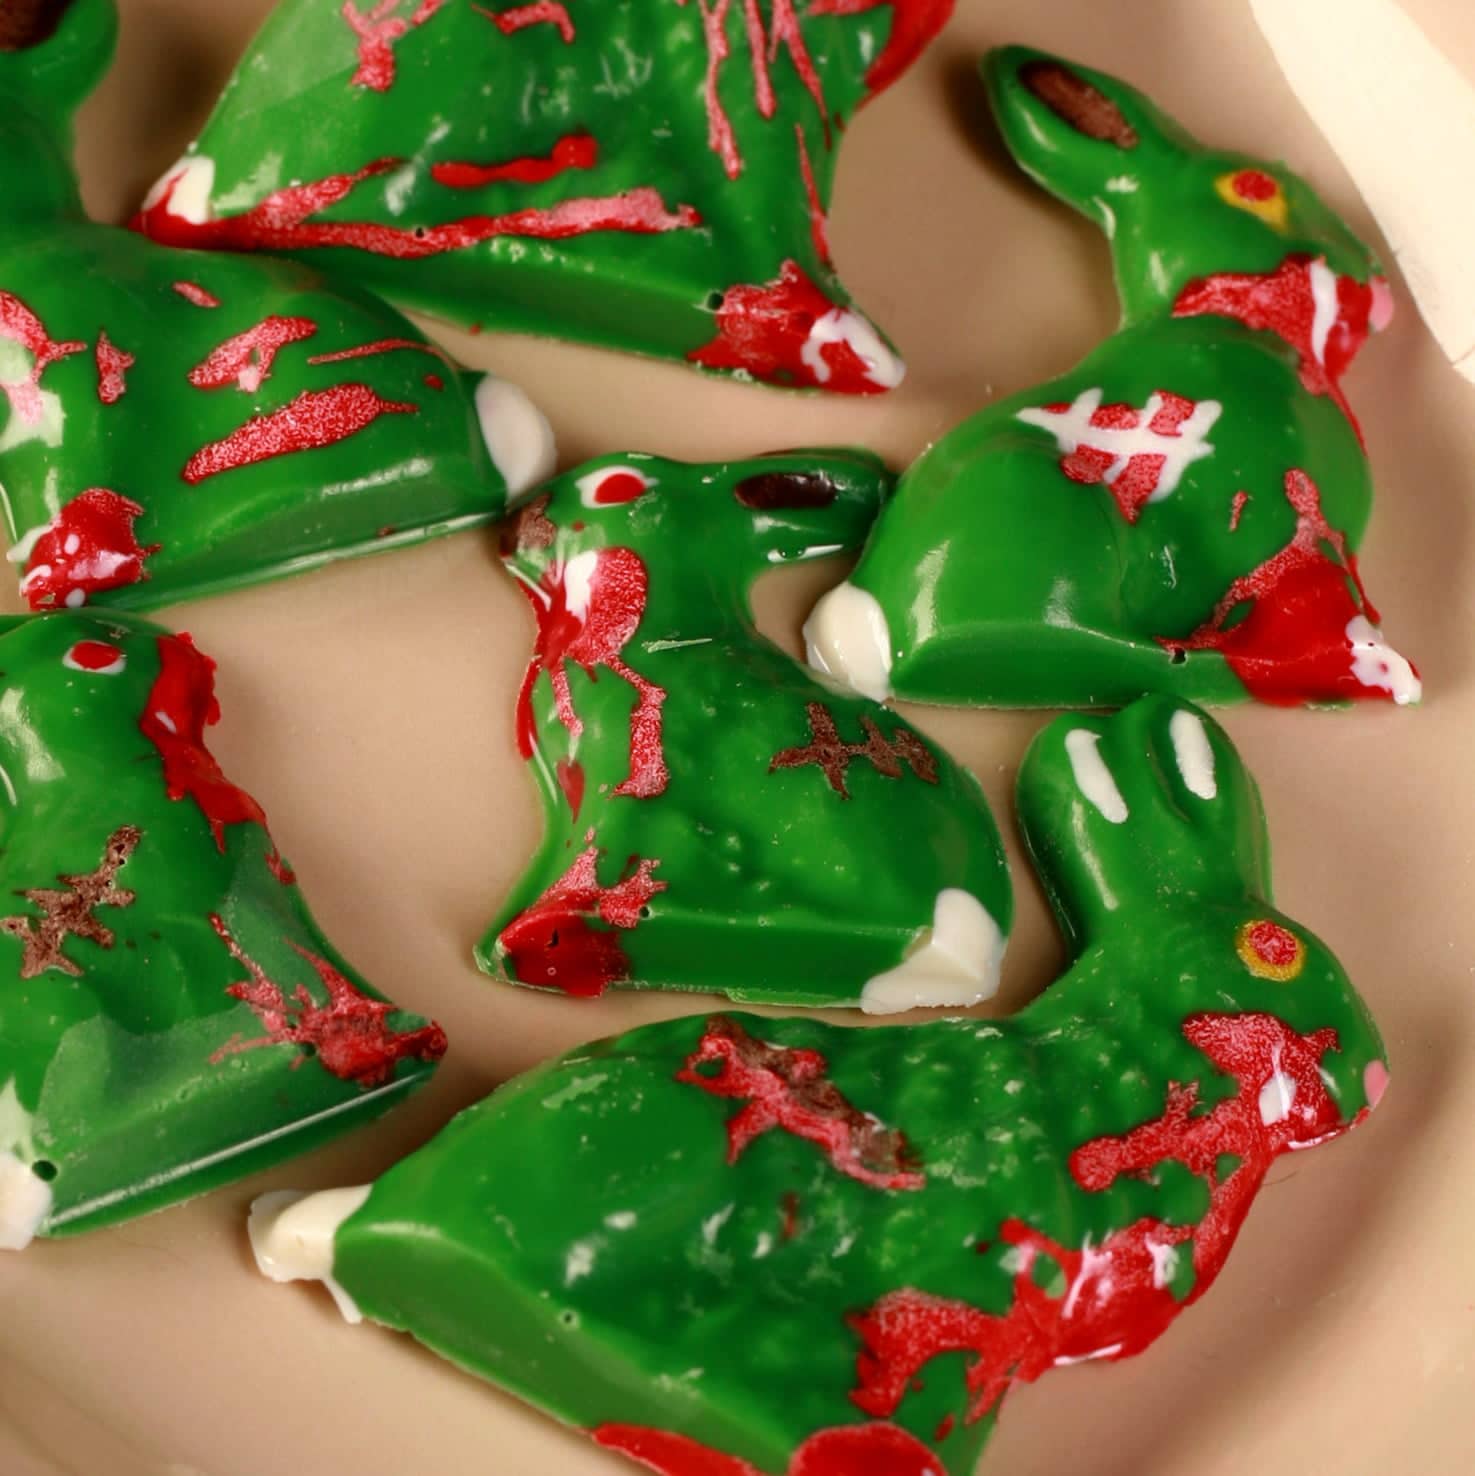
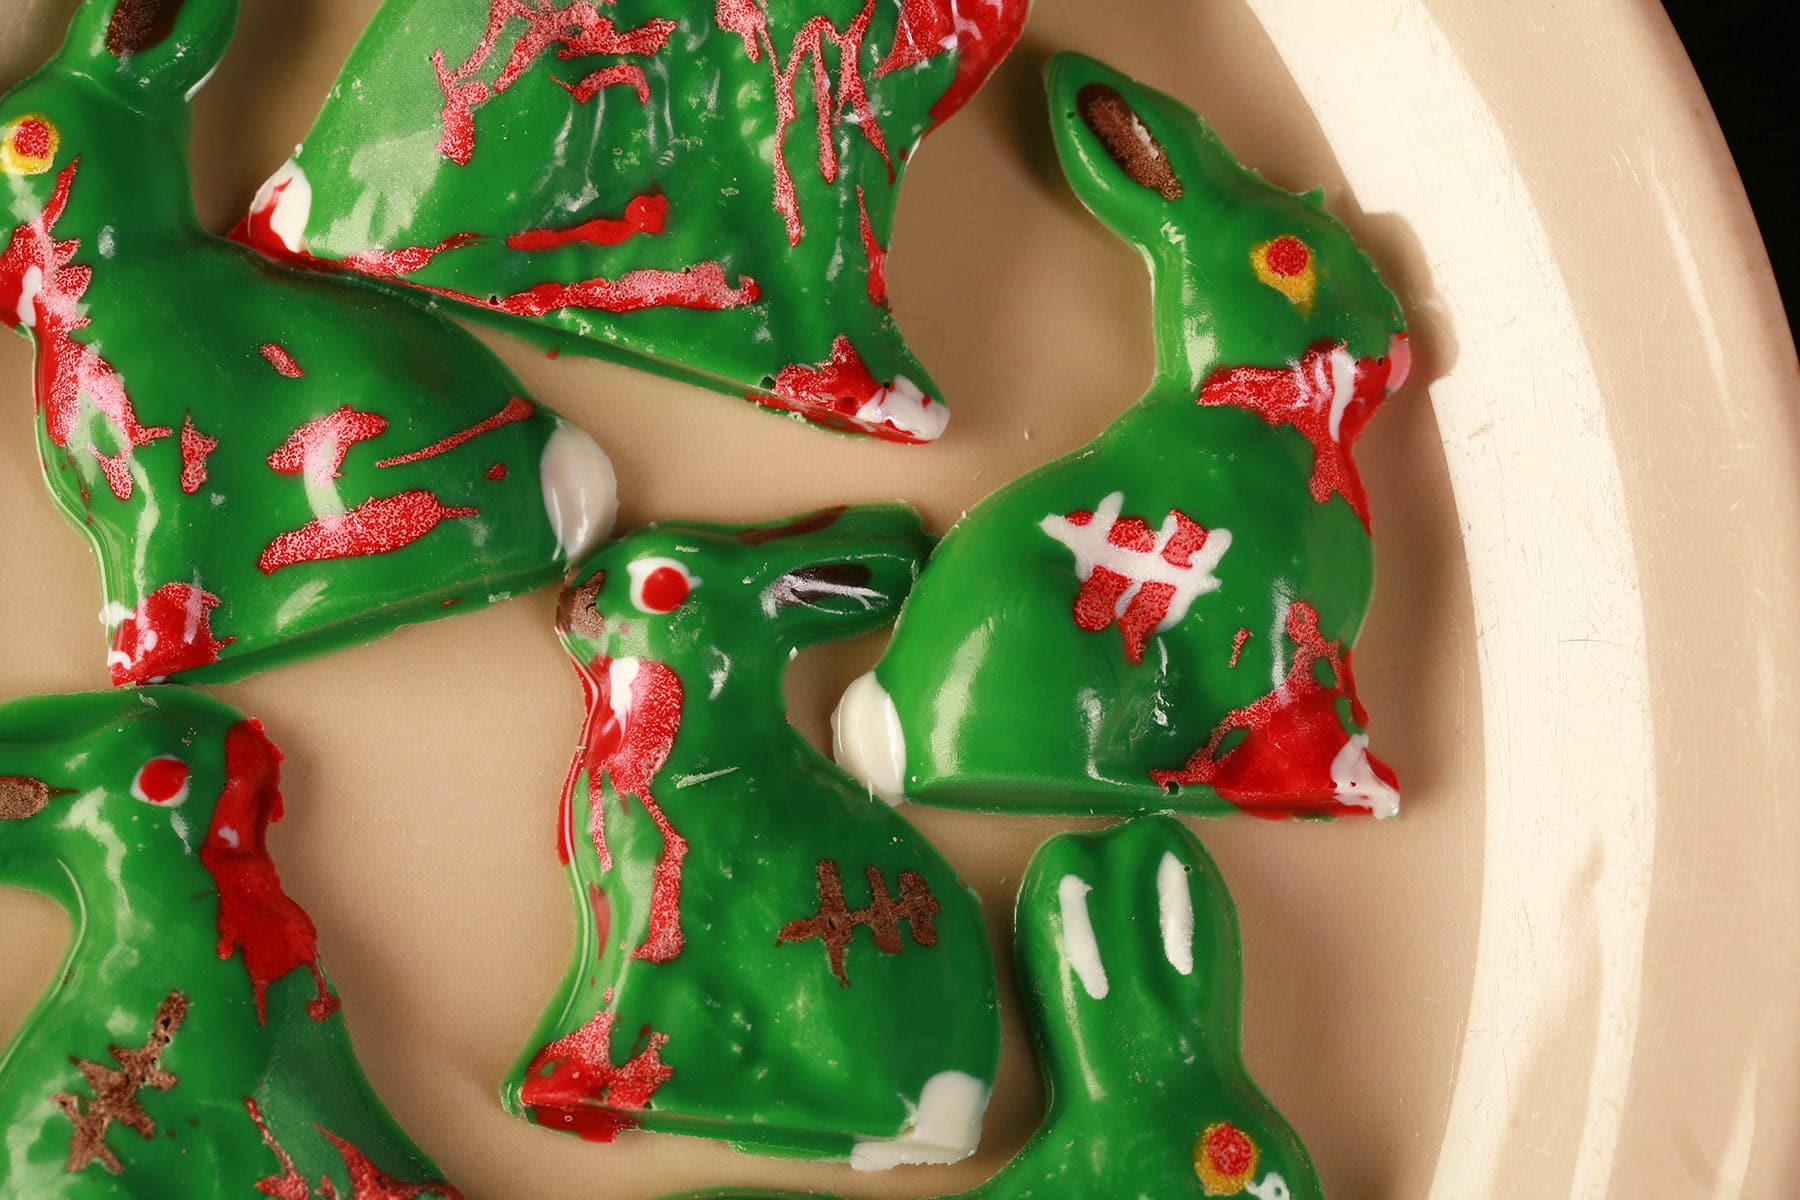
- Red pupils. Yellow eyes. Oh yes!
- "Blood" Splatter!
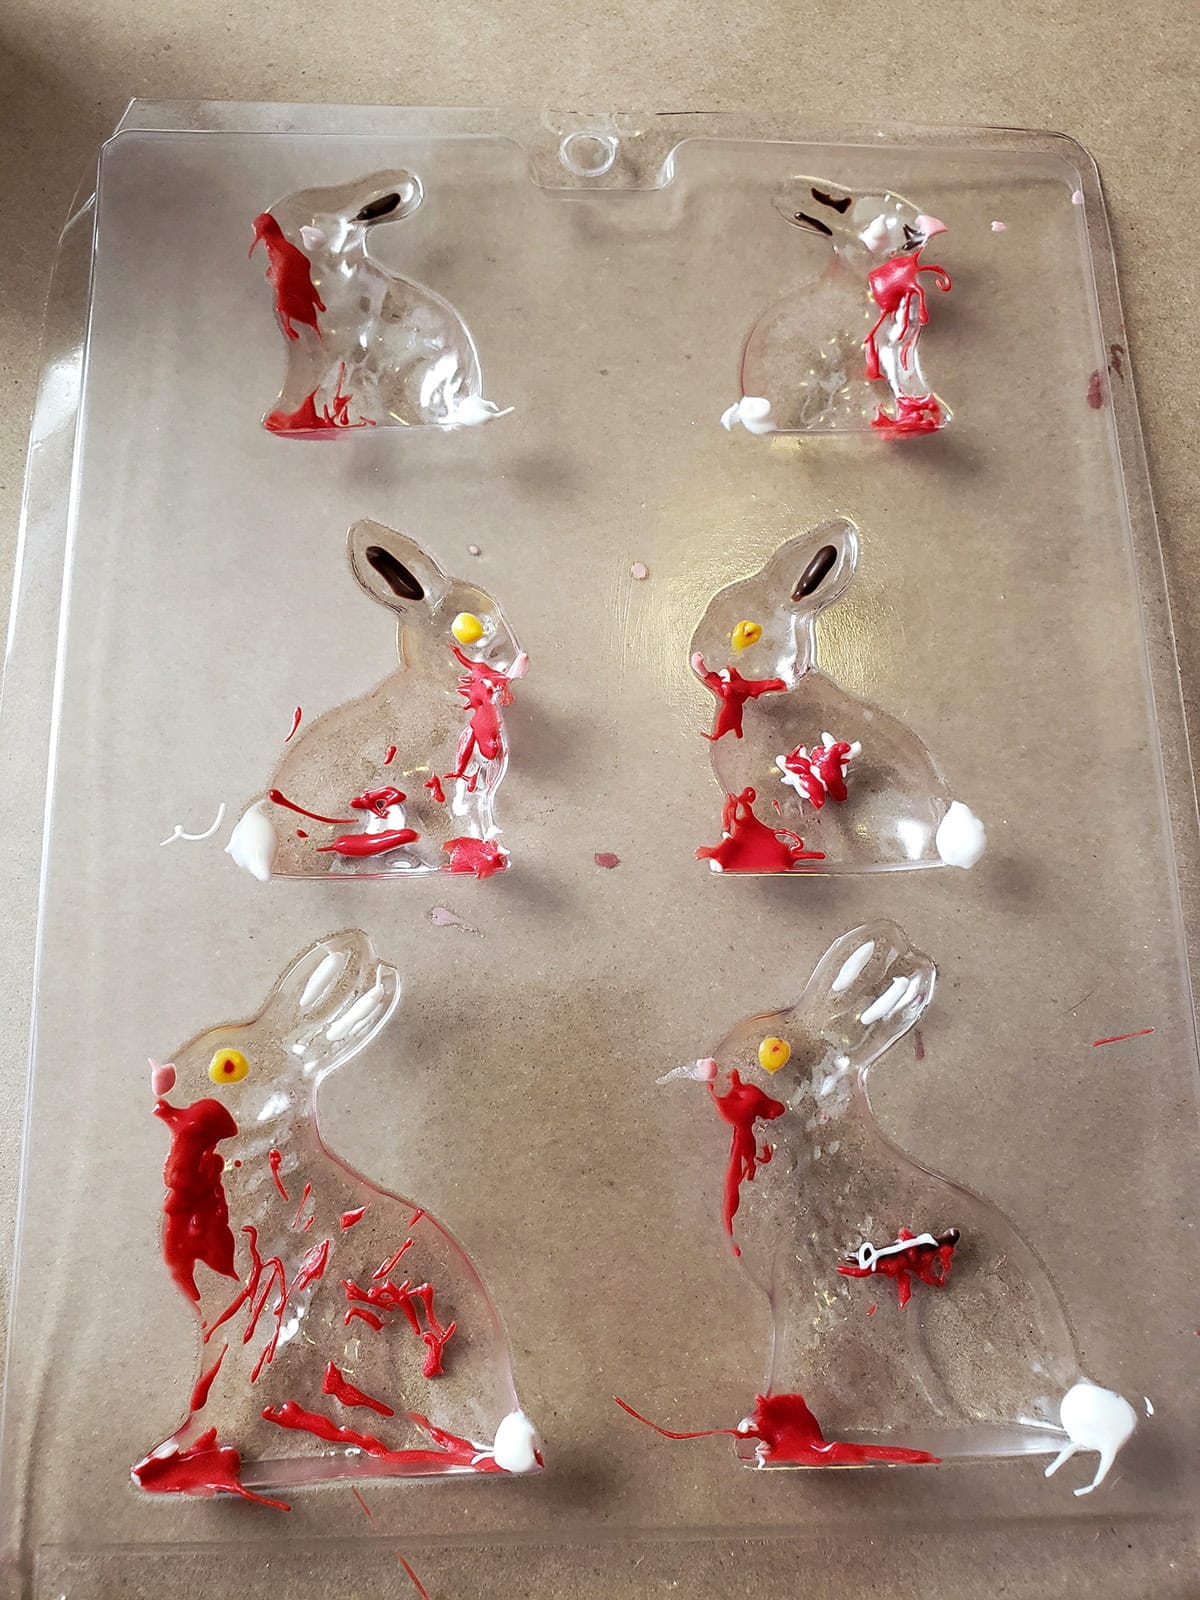
- We drew "stitches" with brown chocolate, let that dry, and then painted red candy "blood" around/dripping from them.
- For a "Shaun of the Dead" style bunny, paint on a red tie. Allow that to dry before painting on a white "shirt" over that.

Our "Shaun of the Dead" Zombie Easter Bunny
- If doing a brown or green colored zombie bunny, draw on white fangs with red blood. Same goes for claws on the feet!

A close up view of how the "bloomed" red chocolate looks. I think it makes the blood look frothy and gross - perfect!
More Easter Content!
Looking for more fun / tasty ways to observe Easter? Here are a few suggestions:
Easter Creme Egg Brownies
Easter Egg Pavlova
Easter No-Bake Chocolate Pie
Easy Pysanky [Epic Easter Eggs]
Gluten-Free Paska [Easter Bread]>
Paska - Ukrainian Easter Bread
Pastel Easter Charcuterie Board
Southern Comfort Glazed Ham

Share the Love!
Before you chow down, be sure to take some pics of your handiwork! If you post it to Bluesky, be sure to tag us - @CelebrationGen. We're also on Pinterest, so you can save all your favourite recipes to a board!
Also, be sure to follow me on Pinterest, and subscribe to my free monthly email newsletter, so you never miss out on any of my nonsense.
Well, the published nonsense, anyway!
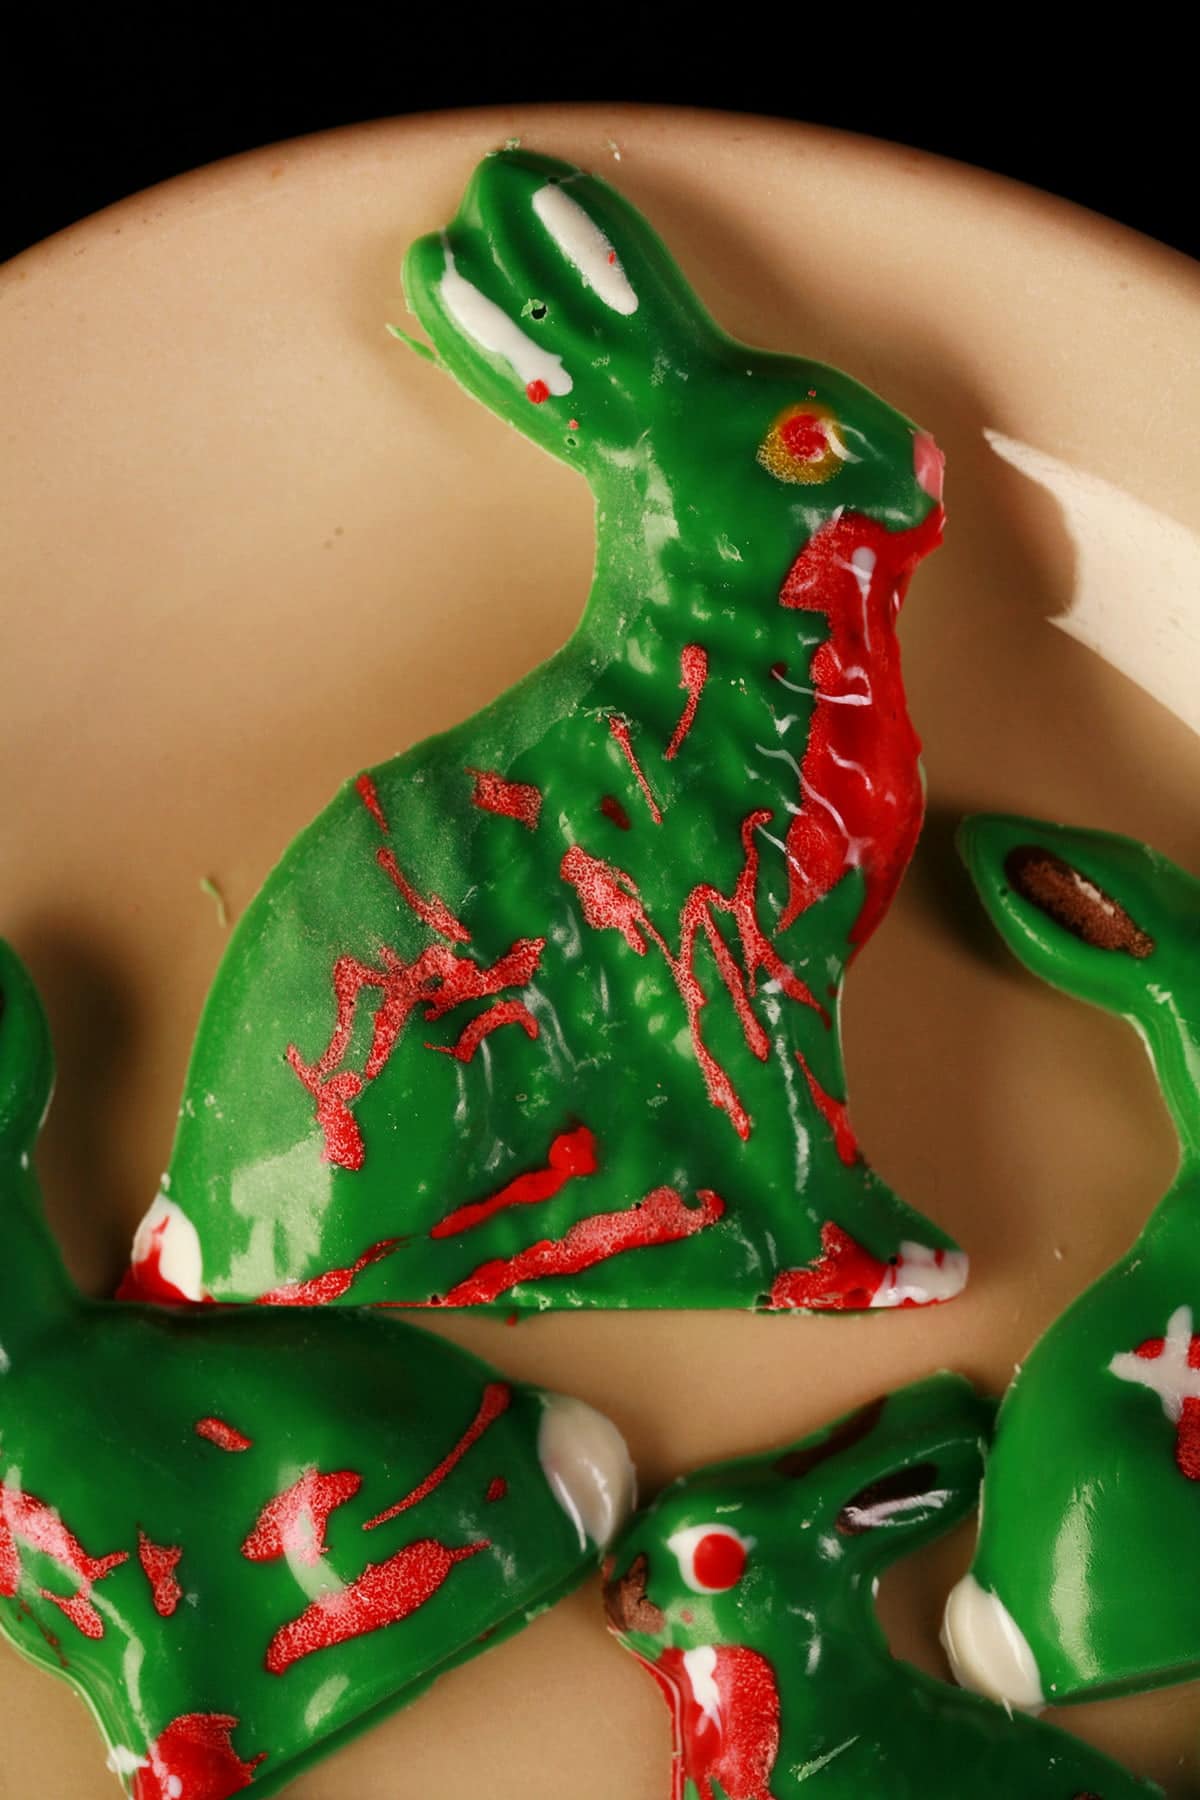
If you have some really bloom-y red, it can make a gross, frothy look. Perfect for zombie blood effects!
How to Make Chocolate Zombie Easter Bunnies
Equipment
- Bunny shaped candy molds
- Something to melt the candy on. (We used a plate and a measuring cup)
- Small paint brushes, optional
- Toothpicks
Ingredients
- Candy Melts variety of colors.
Instructions
How to Melt the Candy
- For the first step - the decorating - I like to arrange small piles of each colour on a microwave safe plate, as shown.
- For things like pupils eyes, scars, and blood - even a REALLY bloody bunny - you really don’t need a ton of melted candy. You’ll be applying it with a toothpick!
- So, microwave your plate for 30-45 seconds at 50% power, and use toothpicks to stir each pile. Repeat, 20 seconds at a time, until it’s all melted and smooth.
- Once you’ve finished the initial decorations and are ready to fill the molds, you’ll need much more candy disks to melt.
- For that, I like to use a microwave safe bowl or measuring cup.
- Place your chips in the vessel, microwave for 1 minute at 50% power, and stir. From there, do 30-45 seconds at a time, stirring in between, until it’s all melted and smooth.
- If the candy hardens before you can use it, you can reheat it - just remember to go low and slow with it.
Starting Your Zombie Bunny Decoration
- Use a tooth brush or small craft paint brush to paint colored details directly onto cavity of candy molds.
- If doing multiple layers, remember that the first color you put down will be the outermost color visible. Ie: paint the pupil first, THEN the rest of the eye.
- Once all of your detail work is finished and hardened, carefully pour your main color into the mold, filling to the edge.
- Allow to harden at room temperature until completely set.
- Once candy is set, gently flex the mold to release your creation.
If using a 2 piece (3D) mold:
- Paint all details as noted above, on both halves of the mold.
For Hollow Candy
- Fill one half of the mold. Attach the second half, secure with clips/clamps/elastic bands, and flip.
- Turn the mold several times, ensuring that the entire cavity is covered inside.
- Allow to harden, release as described above.
For Solid Candy
- Fill both halves of the mold, carefully attach.
- Secure with clips (etc), chill thoroughly before releasing.
Notes

Not into the bright colours and pastels of the Easter season? This Chocolate Zombie Easter Bunnies tutorial may be right up your alley!


Leave a Reply