

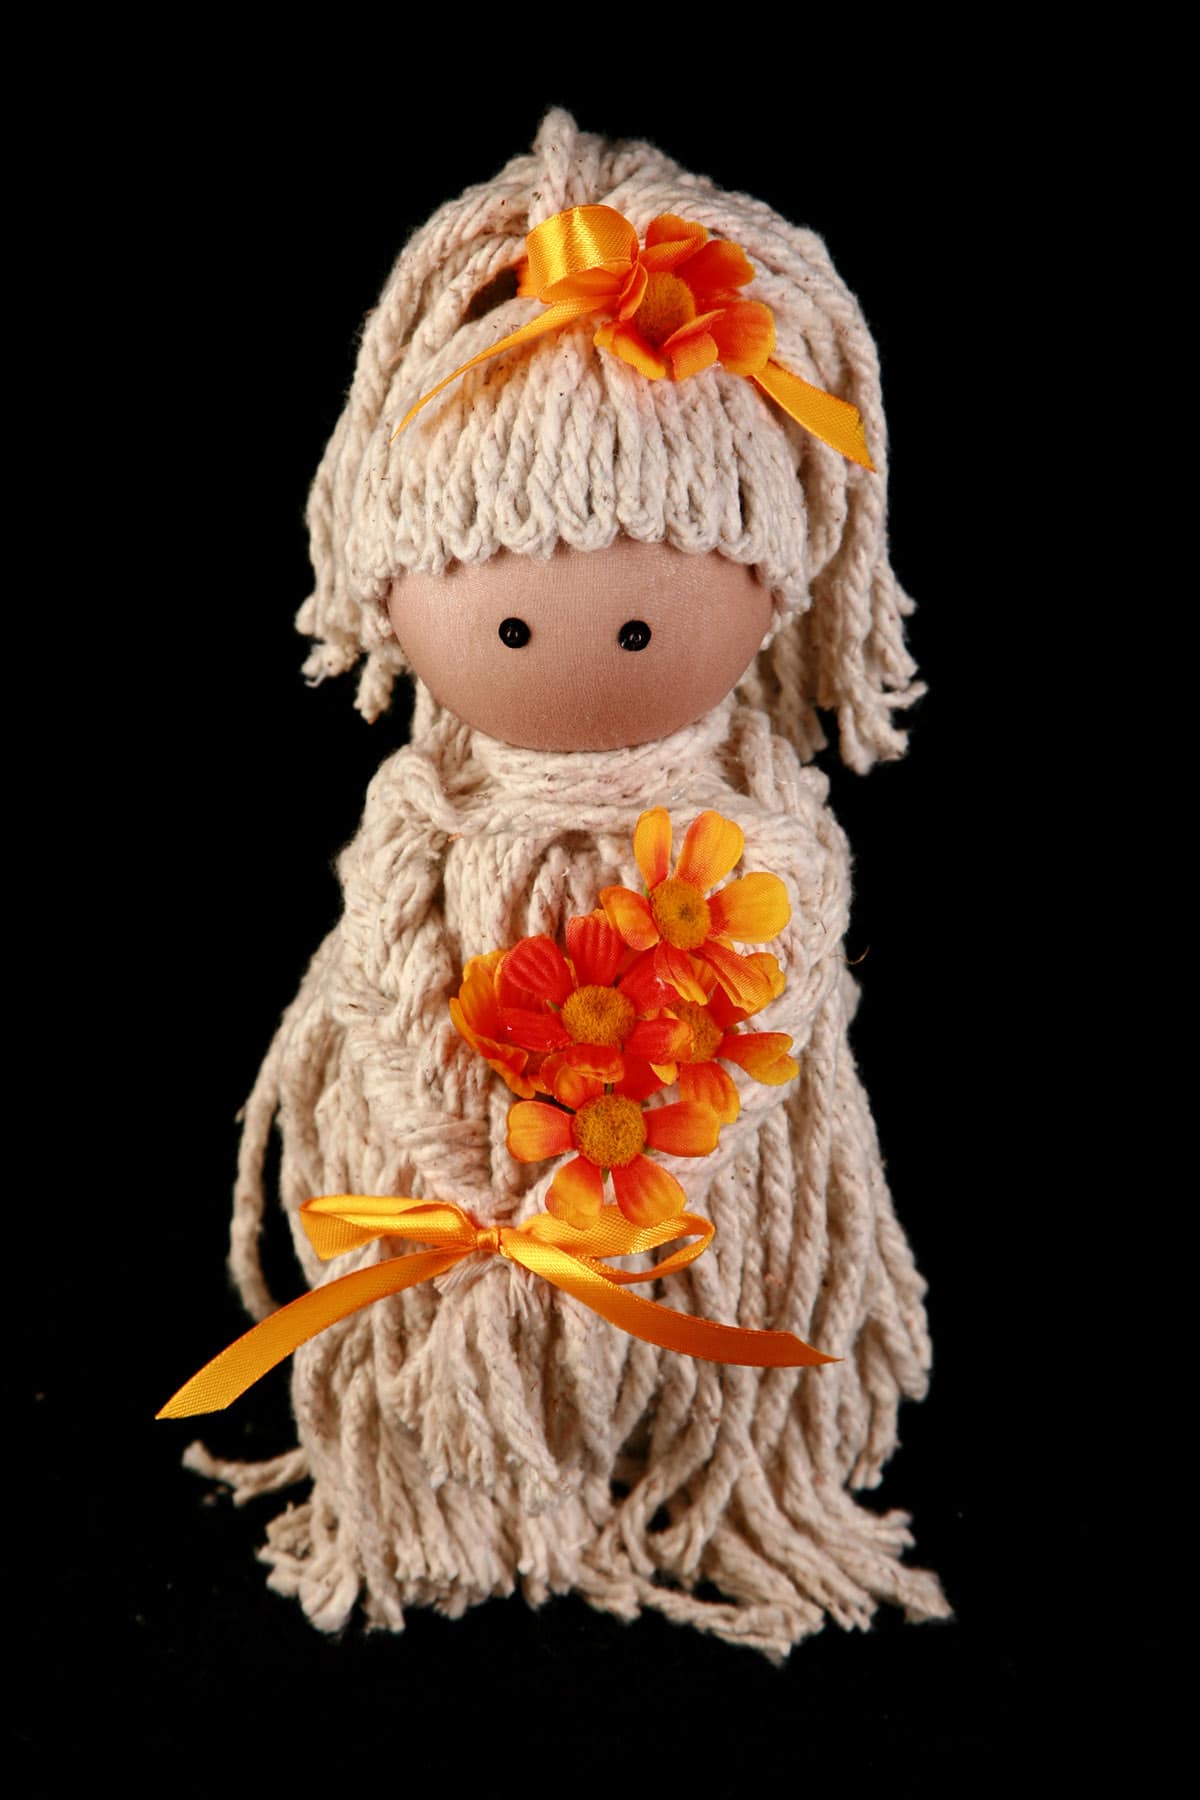
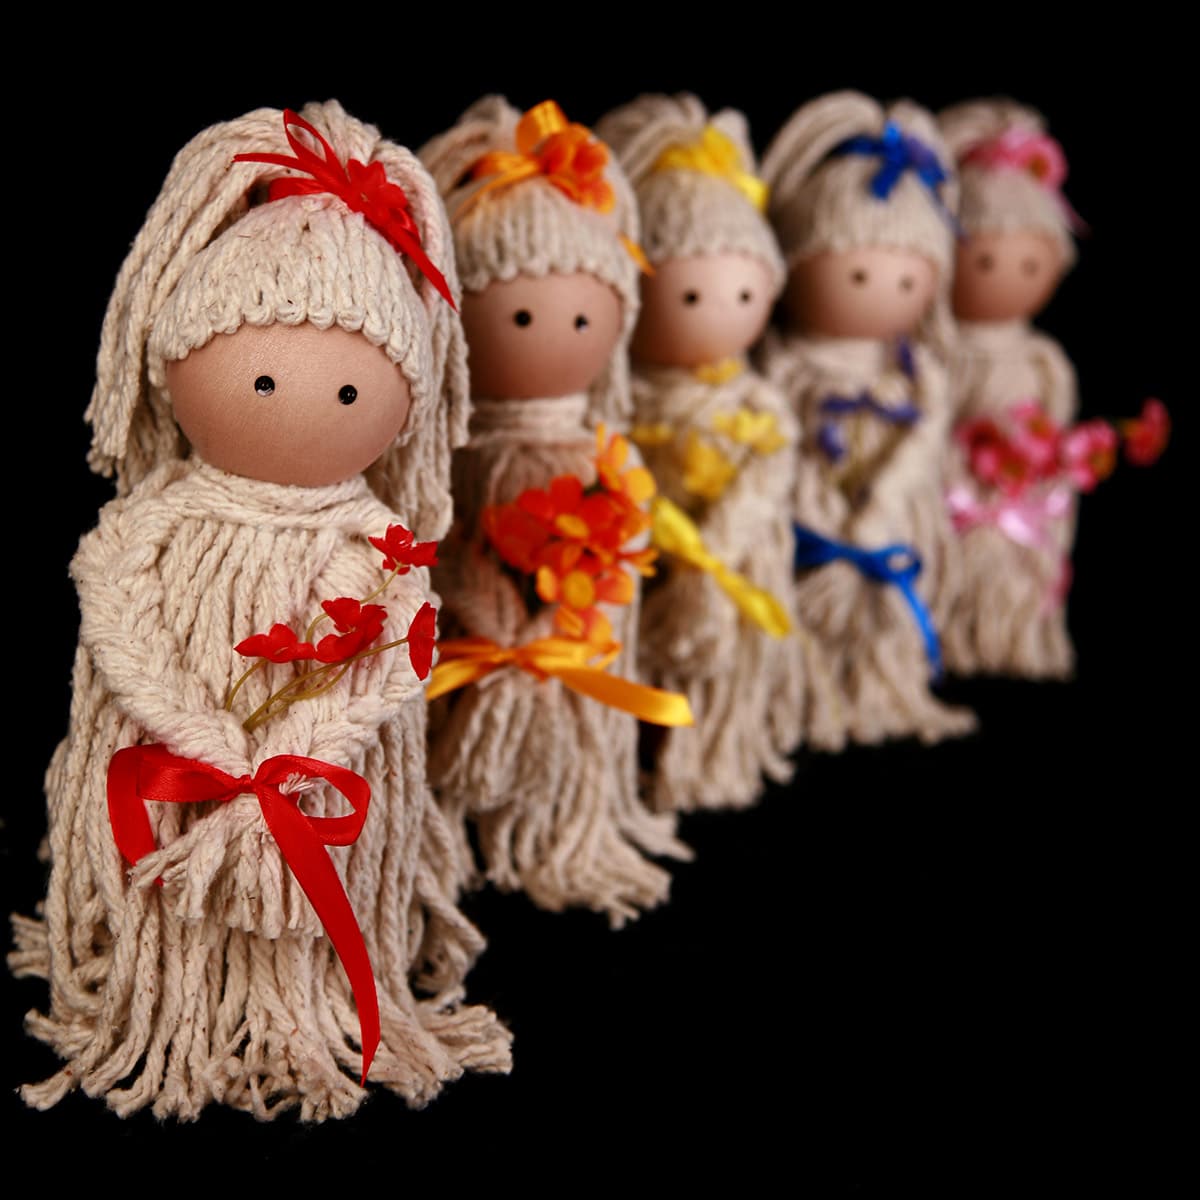
Mop Doll Air Freshener Cover
Originally published August 17, 2020. Updated on 8/3/2021

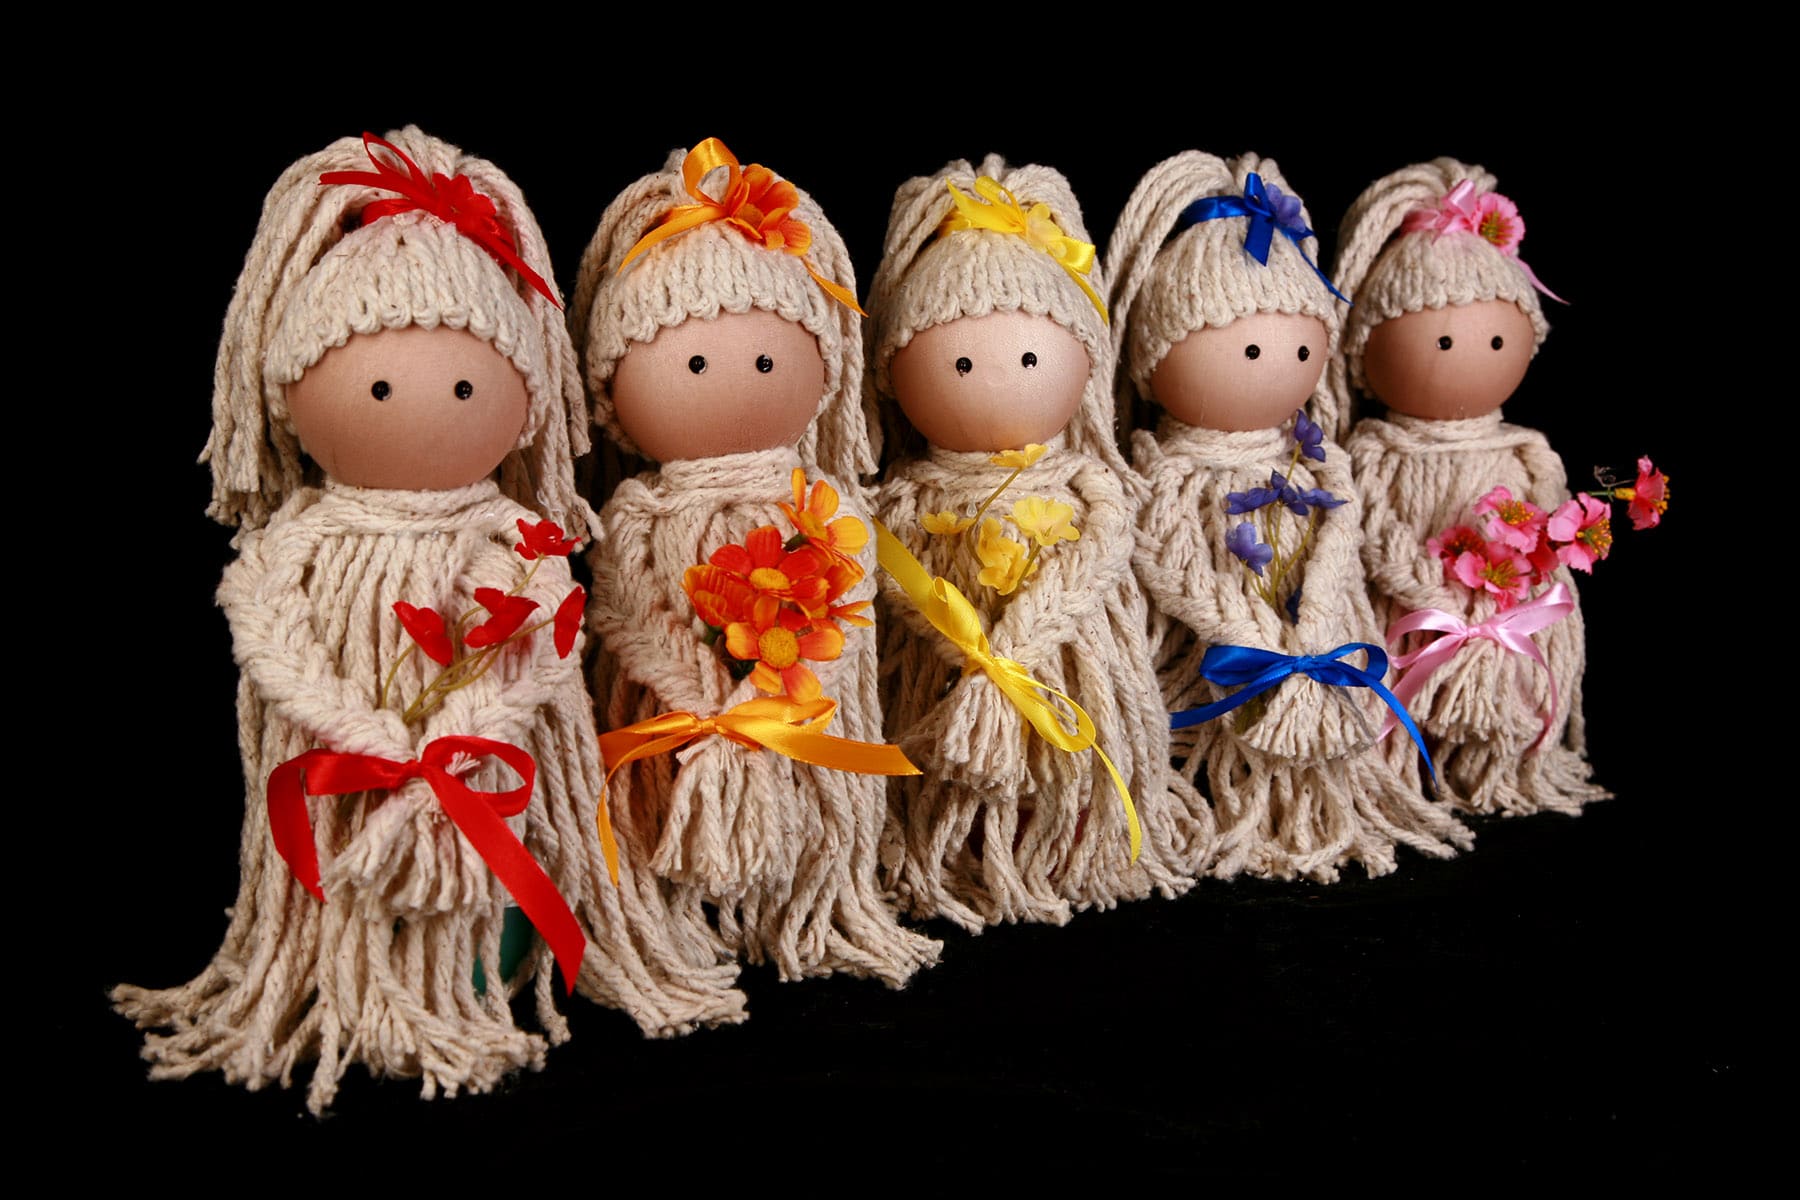
This Mop Doll Air Freshener Cover is super cute, makes a great, customizable gift ... only takes about 1 hour, costing only about $5 to make!
Back when I was a kid, my grandmother - who raised me - used to sell crafts for some extra money. She'd crochet little cat toys, knit little wash cloths, and make air freshener covers out of mops.
The dolls were super cute - Basically she crafted on the top portion of a solid air freshener tube - the kind that you pull up from a base, exposing an inner core of gelatinous air freshener.
It was a cute way to dress up an air freshener in the washroom, and it was reusable - once the included air freshener was exhausted, the customer would just discard the lower part, and replace it with the lower section of a new air freshener.
30 years later, I was shopping for some supplies for upcoming craft tutorials for this blog. I don't have a lot of gift type tutorials, beyond like... How to Sew A Cute Makeup / Toiletry Bag Travel Set and - of course - the Booze Bouquet Tutorial.

Making Mop Doll Air Fresheners
I can't remember if I was taught to make them - I’m not sure, as I don't have any memory of actually making one!
I did, however, remember everything about how they were made, aside from one small detail: the eyes!
I called my Great Aunt Esther, Gramma's sister. She was in on the whole crafts-to-sell side hustle thing, and is probably the only person on the planet right now who would know what I was talking about.
Luckily, she immediately remembered the eyes - sequins with pins. AHA!
She also gave me a bit of history about the Mop Doll Air Freshener Covers, as Google certainly wasn't turning up anything on that front.
Aunt Esther was the one who taught my grandmother how to make them, after learning it from her Mother-in-law, during a trip to Florida.
I told her what I was planning to do, and she not only gave her blessing, but was excited to hear that I'd be putting the tutorial out there.
I think Gramma would have been happy to see me do a tutorial for her little Mop Doll Air Freshener Covers, I just wish she was still around to see them on the internet!
Anyway, I mentally walked through making them, and picked up the few items I would need.
I was surprised that Walmart didn't have replacement mop head covers, so I ordered them here, from Amazon.
I was also surprised to see that air fresheners have changed a lot since the 90s - at first, I wasn't sure the newer style would work!
The new ones are shorter, fatter, and have an angled top... so I adjusted the technique a bit.
Equipment Needed
Seam Rippers
Scissors
Glue Gun
Materials Needed
On that note, let me talk about some of the materials (Full supply list in tutorial widget, further down!):
Per doll, you will need:
It looks like the current companies that make the "inner core of gel" type of air freshener are Glade and Renuzit. You can find them almost anywhere.
1 Cotton Mop Refill:
For the mop, you want the very plain style that is sewn up the middle. If you get any of the other styles, the strands won't be long enough for certain parts of these Mop Doll Air Fresheners. One mop makes about 3 air freshener dolls.
Hot Glue Sticks
You can use high temp or low temp for this. I recommend low temp, it's easy to burn yourself, if you're like me!
1 (New!) Knee-High Pantihose-Type Stocking
I buy the box of whatever is cheapest. I wanted to buy a variety of skin tones, but was only able to find - basically - pale and tan. Bah.
3" Styrofoam Craft Ball
This will be the head, covered by the pantihose. The smoother styrofoam you can find, the better!
Two 5 mm Black Sequins
These are part of the eyes. You can use faceted or unfaceted.
2 Sewing Pins
If I remember correctly, they used normal silver tone flat head sewing pins. I used the small ball-head ones.
I wanted black, only had white on hand, so used a Sharpie to colour them in. Worked like a charm!
Ribbon
I use ¼" double sided satin ribbon, in a variety of colours.
Small Silk Flowers
This can be a bit tricky to find.
I usually go to the craft store and hunt through the silk flowers to find ones with small enough blooms.
Then, I pull or cut the branches smaller flowers off and use them as-is.
Miscellaneous Supplies
Twine
Small elastics
Sharpie
That should be all the backgrounder info you need, to get started.
It's a great little craft - only costs about $5 in materials, takes about an hour to make, and is a SUPER cute gift for the right person.
How to Make Mop Doll Air Fresheners
Wrap the “Body”
Plug in your glue gun and turn it on, allowing it to start warming up
Remove the label from your air freshener, if applicable.
Using a seam ripper or scissors, carefully undo the stitching on the mop head, freeing all of the yarn strands. Do NOT cut the strands!

Starting at the bottom edge of the top section - that is, NOT gluing on the part that pulls out - run a line of melted glue just above the edge.
While the glue is hot, carefully adhere a strand of yarn to the air freshener, working it around the whole bottom edge of the top section of the air freshener.
As you come to the cut edge of the yarn, angle the yarn you’re working with upwards, to create a tight spiral of yarn.

Continue gluing and placing yarn in a spiral, working your way up to the top of the air freshener.
As you come to the end of one strand of yarn, place another one with the new edge putted up against the ending edge of the previous strand.
As you reach the top edge of the air freshener, apply glue to the top, and continue spiraling your yarn placement until it ends in a tight spiral, in the center of the top surface. Trim remaining yarn.

Make the Skirt
Under Layer
Take a good sized handful of yarn strands and cut them in half.

Pipe some hot glue on the outer top edge of the wrapped air freshener.
Bend one of the half lengths of yarn in half, forming a tight “U” at the bend.
Place the yarn, bend side up, in the glue on the top outer edge of the air freshener. Be careful to keep the bend tight, and the top edge of the bend lined up with the top edge of the air freshener.!
Repeat the last step, placing another “U” bend of yarn right next to the last, again adjusting to keep the bend tight.
Continue gluing and placing bent half-lengths of yarn right next to each other, around the entire top edge.

Over Layer
Place the air freshener so that the side that dips down at the top is right in front of you, and the highest point of the air freshener is straight behind it. The lower side is the front, the high point is the center back.
Pipe hot glue across the top surface of the air freshener. It doesn’t have to be a solid block of glue, but it should cover most of that top surface.
Pick out 8 or 9 strands of the half lengths of yarn and line them up so they’re roughly even.
Place the line of them centered over the glue, going from side to side, creating a single layer of yarn. Pull yarn ends downward to secure in the glue.

Repeat the last two steps, placing the new block of yarn perpendicular to the first block of yarn - so aimed front-back.
Repeat again, placing the block of yarn at a diagonal.
Repeat one last time, placing the block of yarn perpendicular to the last block. These last two blocks of yard should basically make an X over your front to back and side to side blocks.

Trim the bottom ends of the yarn. I usually keep them to about 1" longer then the air freshener.
Make the Arms
Select 9 strands of full length yarn.
Apply hot glue to the top surface of the air freshener, and center the 9 strands of full length yarn over it, going side to side. These strands will become the arms.
On one side, separate the 9 strands into 3 groups of 3 and braid until it’s about 6" long. I like to take the outer pieces and fold them over as I braid, I like the way it styles the “shoulder”.

Repeat on the other side.
Bring both braids forward, holding together at the center front. Fuss with it a bit to form the arms as you like - they won’t be anywhere near as long as you braided. (Braiding extra long prevents it from unraveling and messing this step up!)

When you’re happy with the length, position, and evenness of the arms, use a small piece of twine to tie them in place.
Trim the ends of the twine, then trim the braid lengths, this will form the “hands” tassel - I like to keep it about 1.5" long, from the twine down.

Your lower body is done - set it aside to make the head.
Make the Head
Carefully place the styrofoam ball inside the stocking, pulling the stocking tight over the ball to smooth it out.
Twist the stocking, then flip it inside out over the ball, so the ball now has 2 layers of stocking.
Pull the stocking tight and fuss with it to work out any bit bunches or lines.

When you’re happy with it, tie the top off with an elastic, more or less opposite from the bottom twist.
Trim excess hose back to less than an inch - this will be the base for the ponytail.
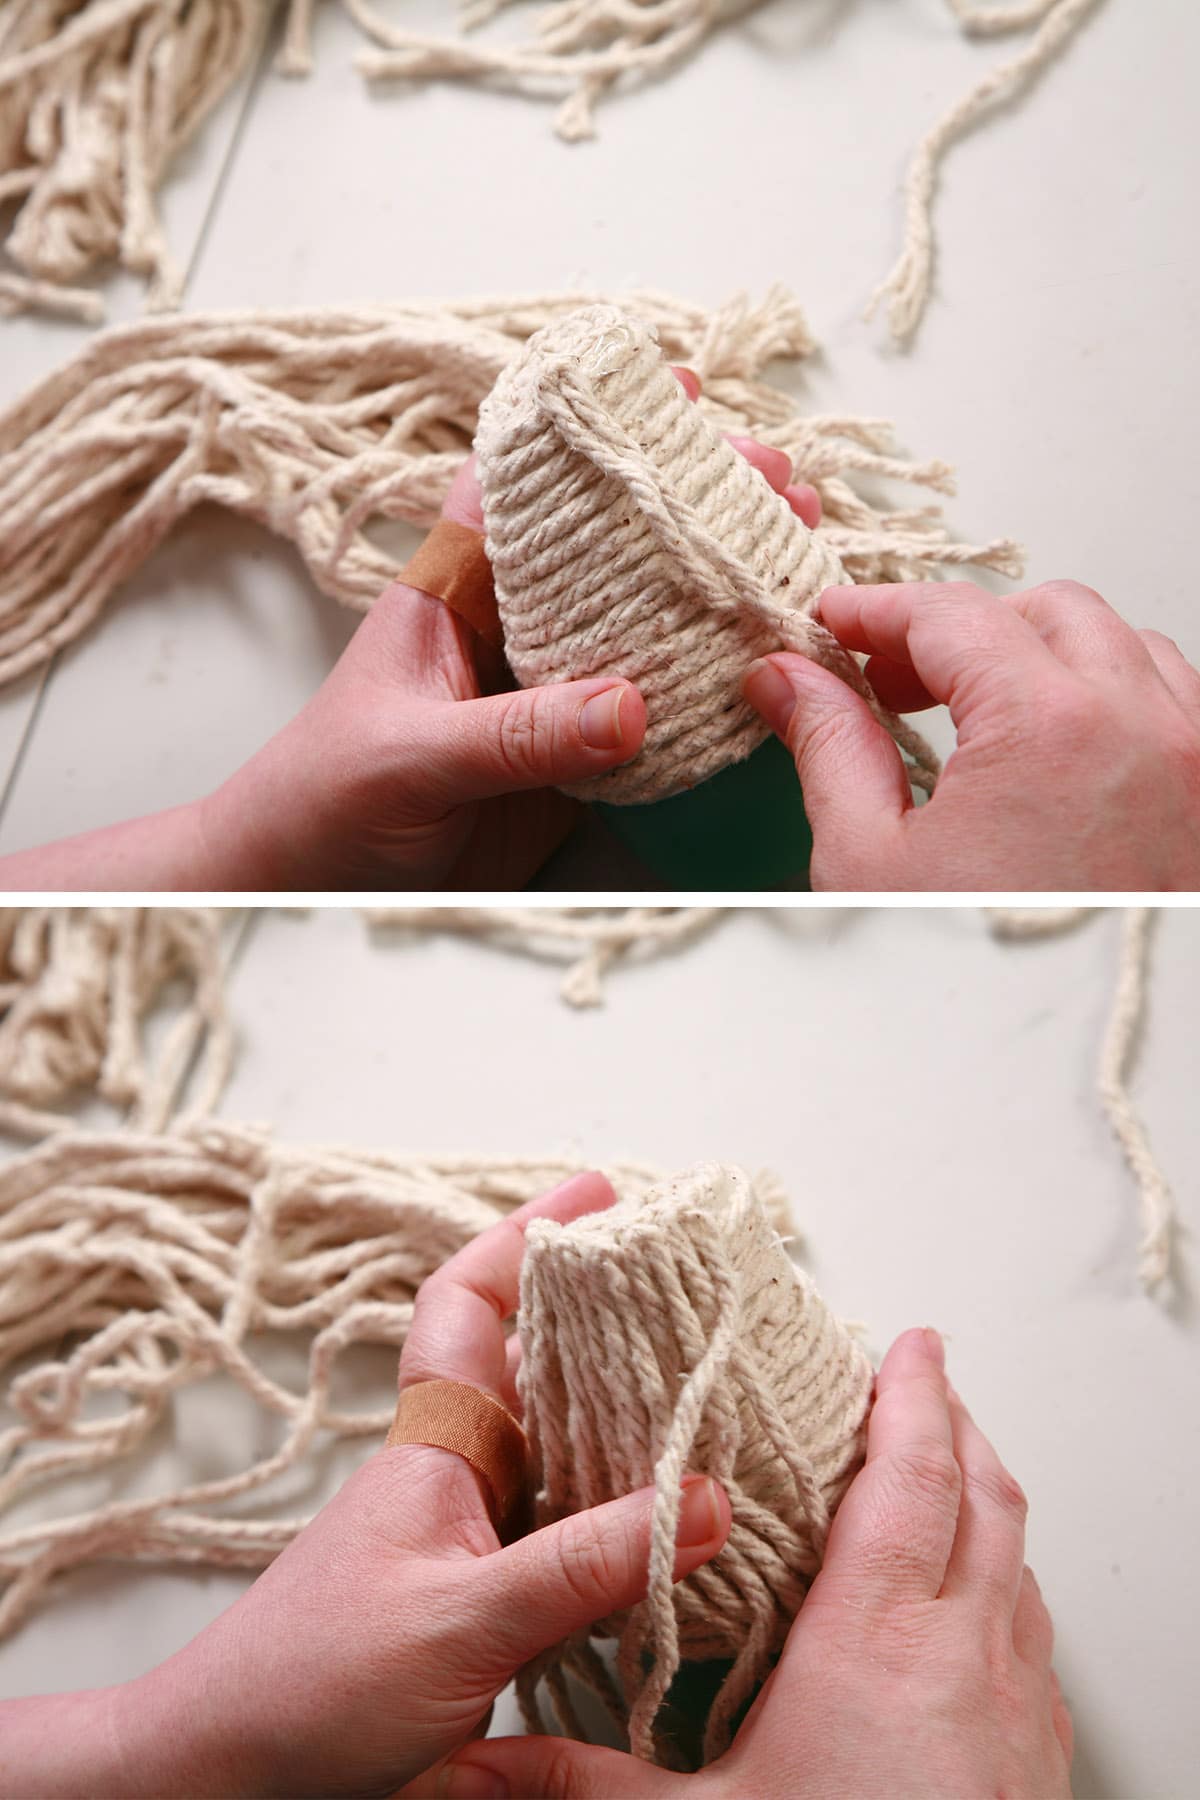
Make the Hair
Hold the ball over the body, figure out where you want the ponytail to be oriented. With this positioning in mind, use a Sharpie to draw on the hairline.
Keep in mind that you will have about ¼" of yarn hanging over the Sharpie line. I like to draw it such that a little more than half of the ball will be above the hairline.
Run a line of hot glue around the drawn hair line.

Using half lengths of yarn - cutting more as you need them - Bend them in half, form the tight “U” again, and affix them to the glue.
The bent side should be facing down, with the free ends of yarn extending up towards the ponytail stump.
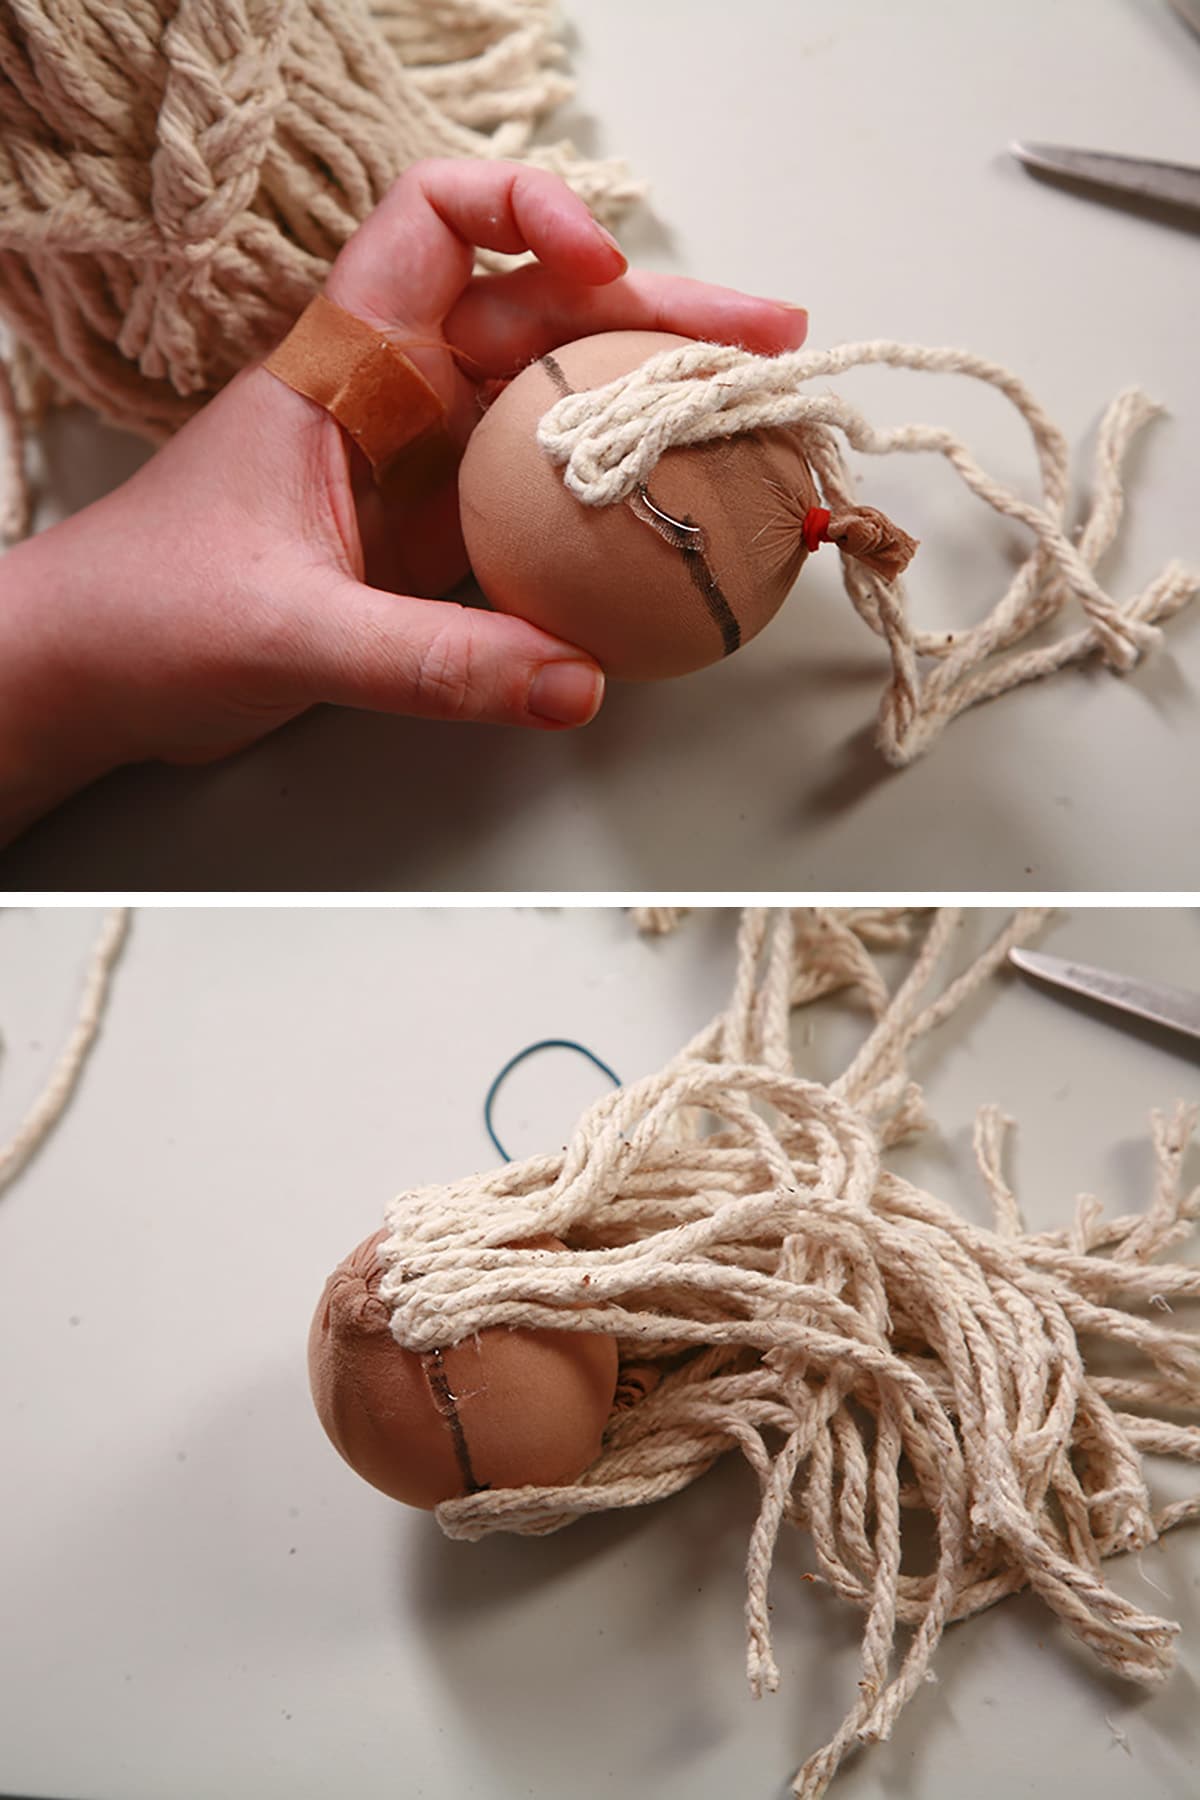
Continue placing folded half-lengths of yarn around the hairline, trying to keep the line smooth, even, and consistent.
Once you have the hair placed along the full circumference of the head, gather the strands up around the ponytail stump.
Take a moment to fuss with the placement a bit - you want the strands neat, even, and laying flat in a single layer as much as possible.
Secure ponytail with a length of twine. Trim the ends of the twine.

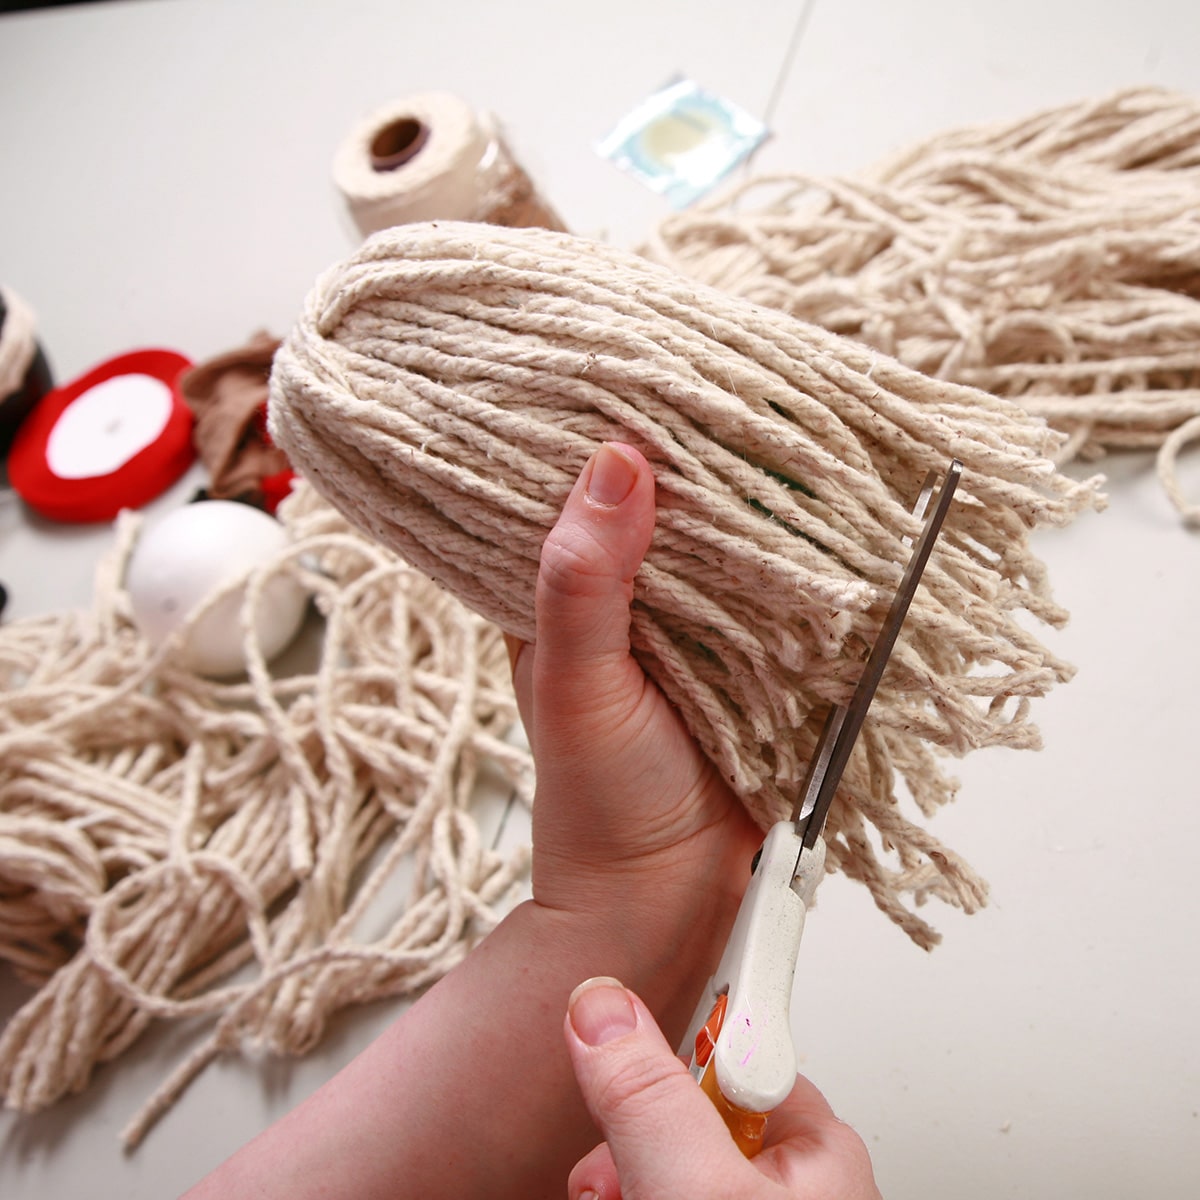
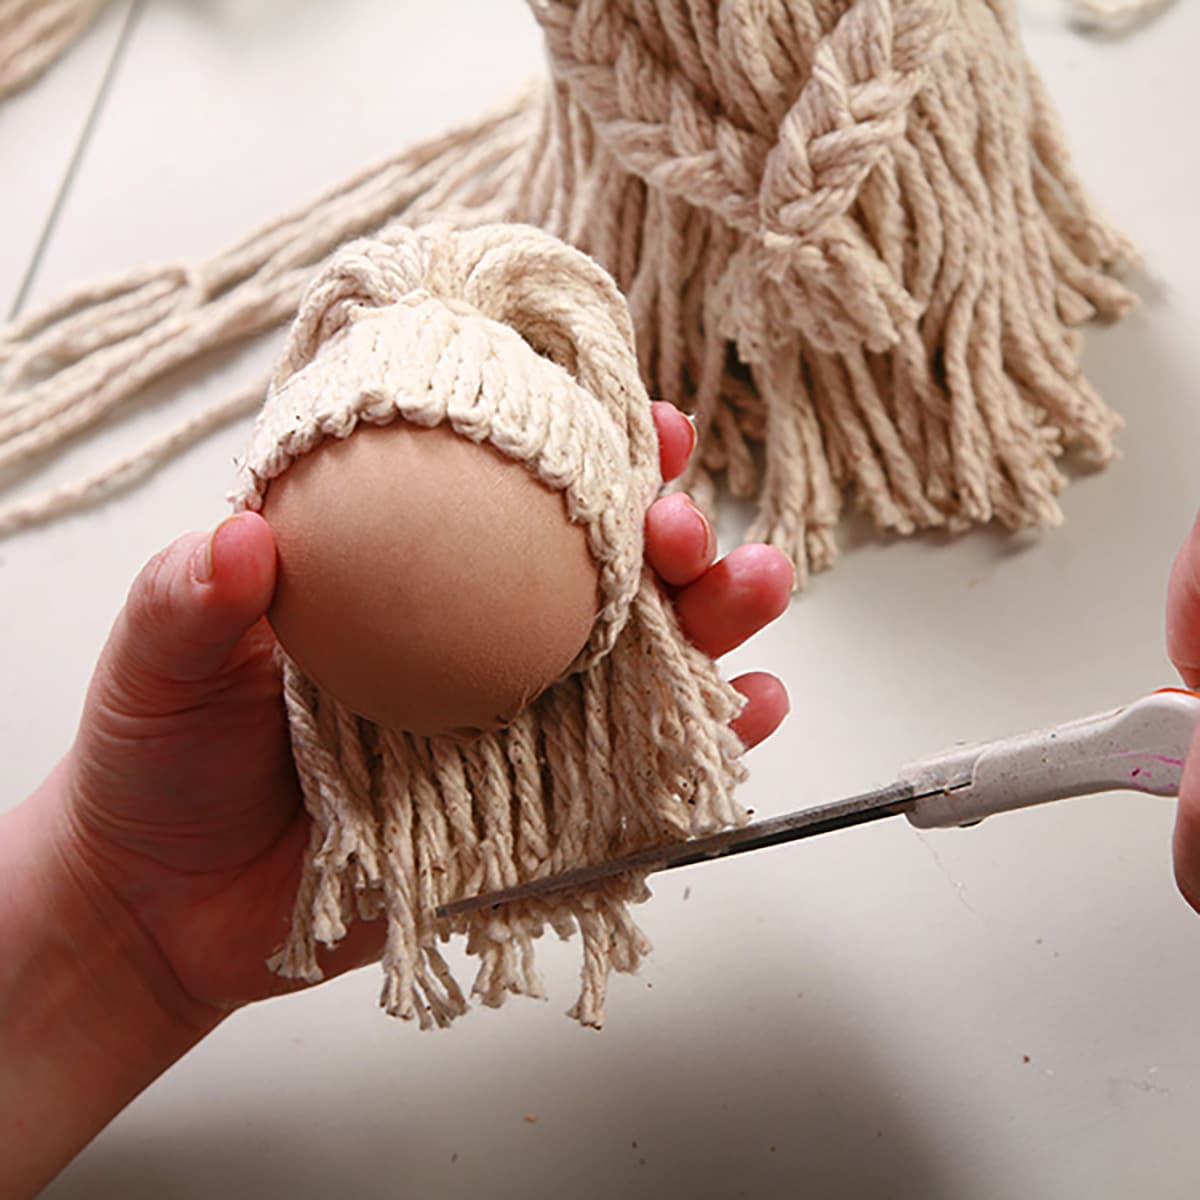
At this point, I like to hold the head up in about the position it will be, and give it a little bit of a hair cut, just to even things out a little.
It also takes the excess weight off, for the next step.
Attach the Head to the Body
Pipe a generous circle of hot glue to the center of the top of the body, about 1.5" in diameter. Orient the head the way you’d like it, and place the bottom of it into the glue.
Press down and hold in place for a couple of minutes, allowing the glue to set a bit.

As you’re holding it in place, grab a half length strand of yarn and wrap it around the “neck”. This will provide support AND hide the glue that should be seeping out.
Once you’ve wrapped it around a couple / few times, trim and glue it in place so that it ends at the center of the back.
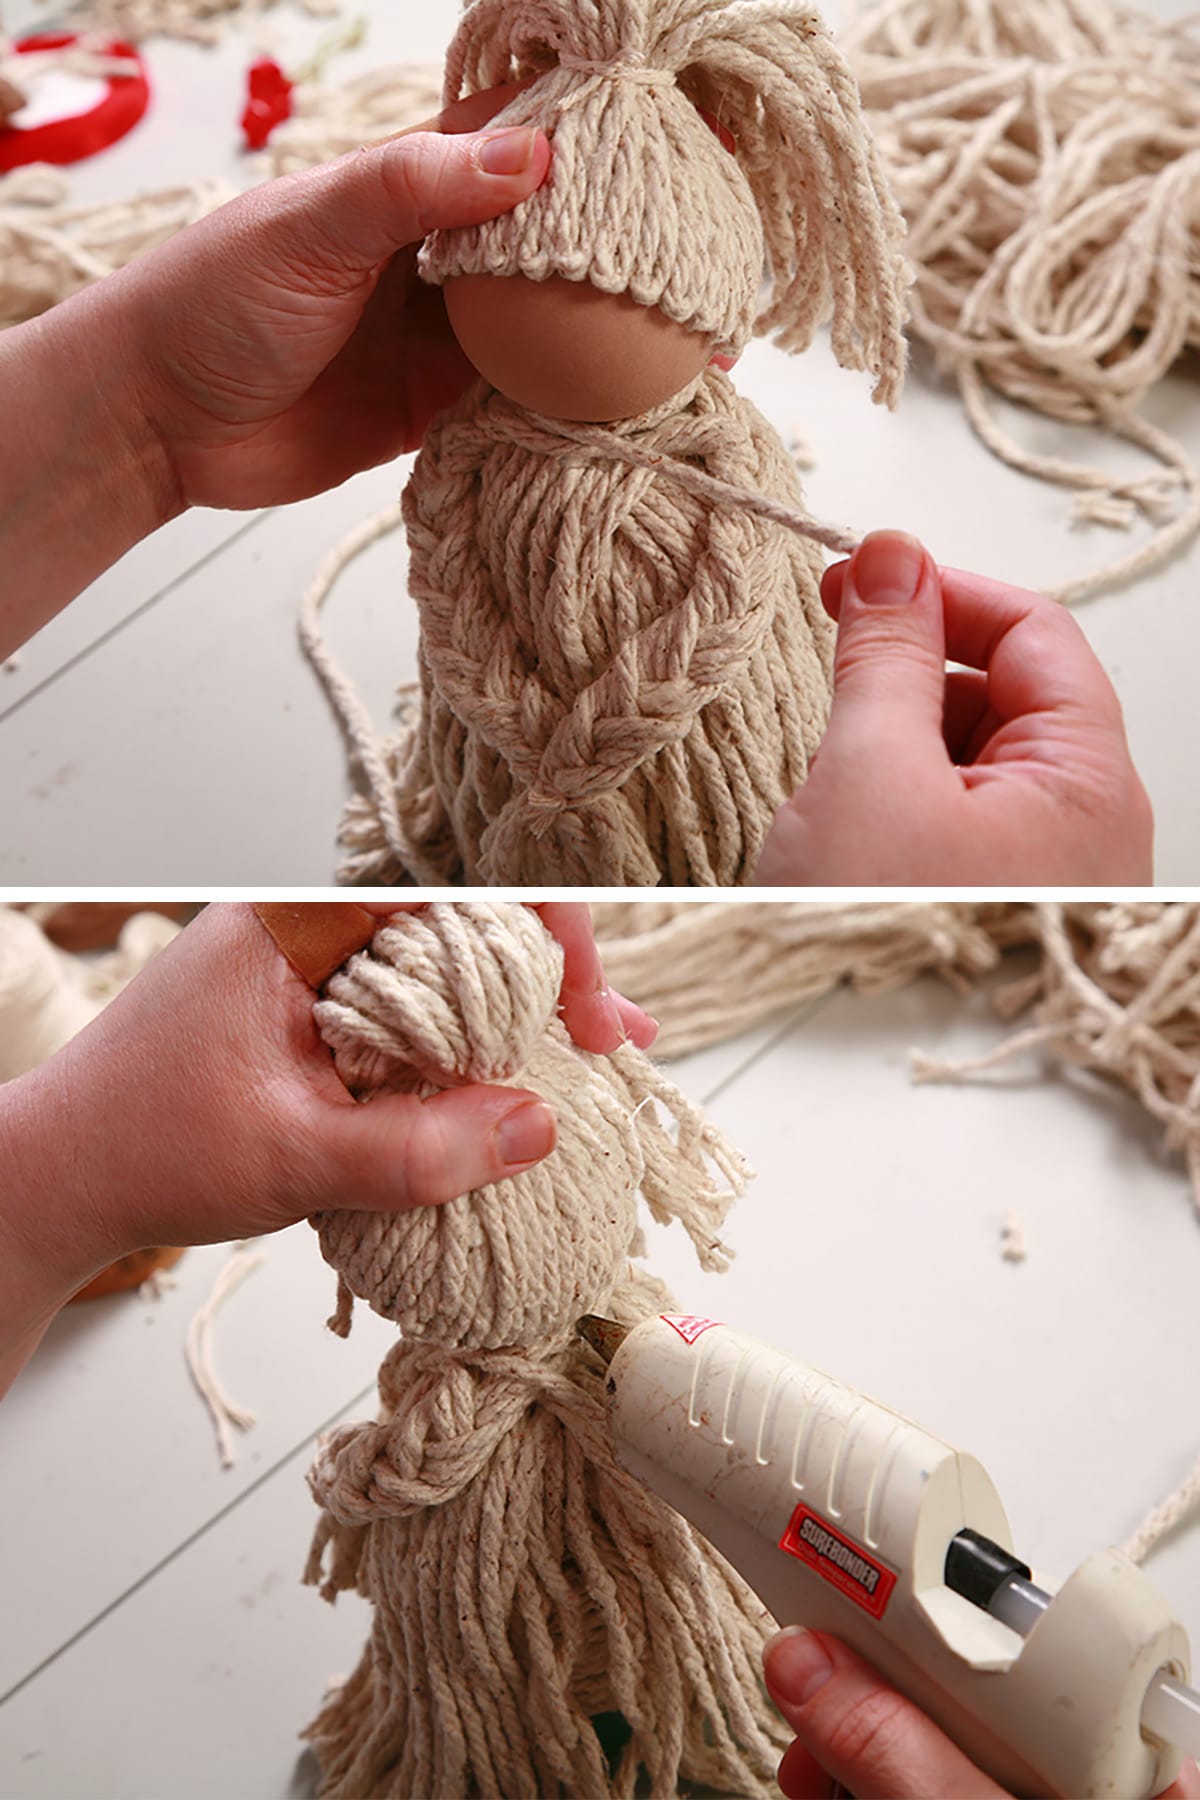
At this point, I like to flip the ponytail over the “face” to take the excess weight off the back, and allow the neck glue to cool until it feels more solid.
Once everything has firmed up a bit, it’s time to put on the finishing touches!
Finish it All Off!
First, give it a final hair cut. It will never be even/perfect, but if you set the ponytail about how you like it before trimming, you’ll get the nicest results.
Next, take a length of ribbon and tie a bow at the wrists, hiding the twine tie that’s holding the hands together.
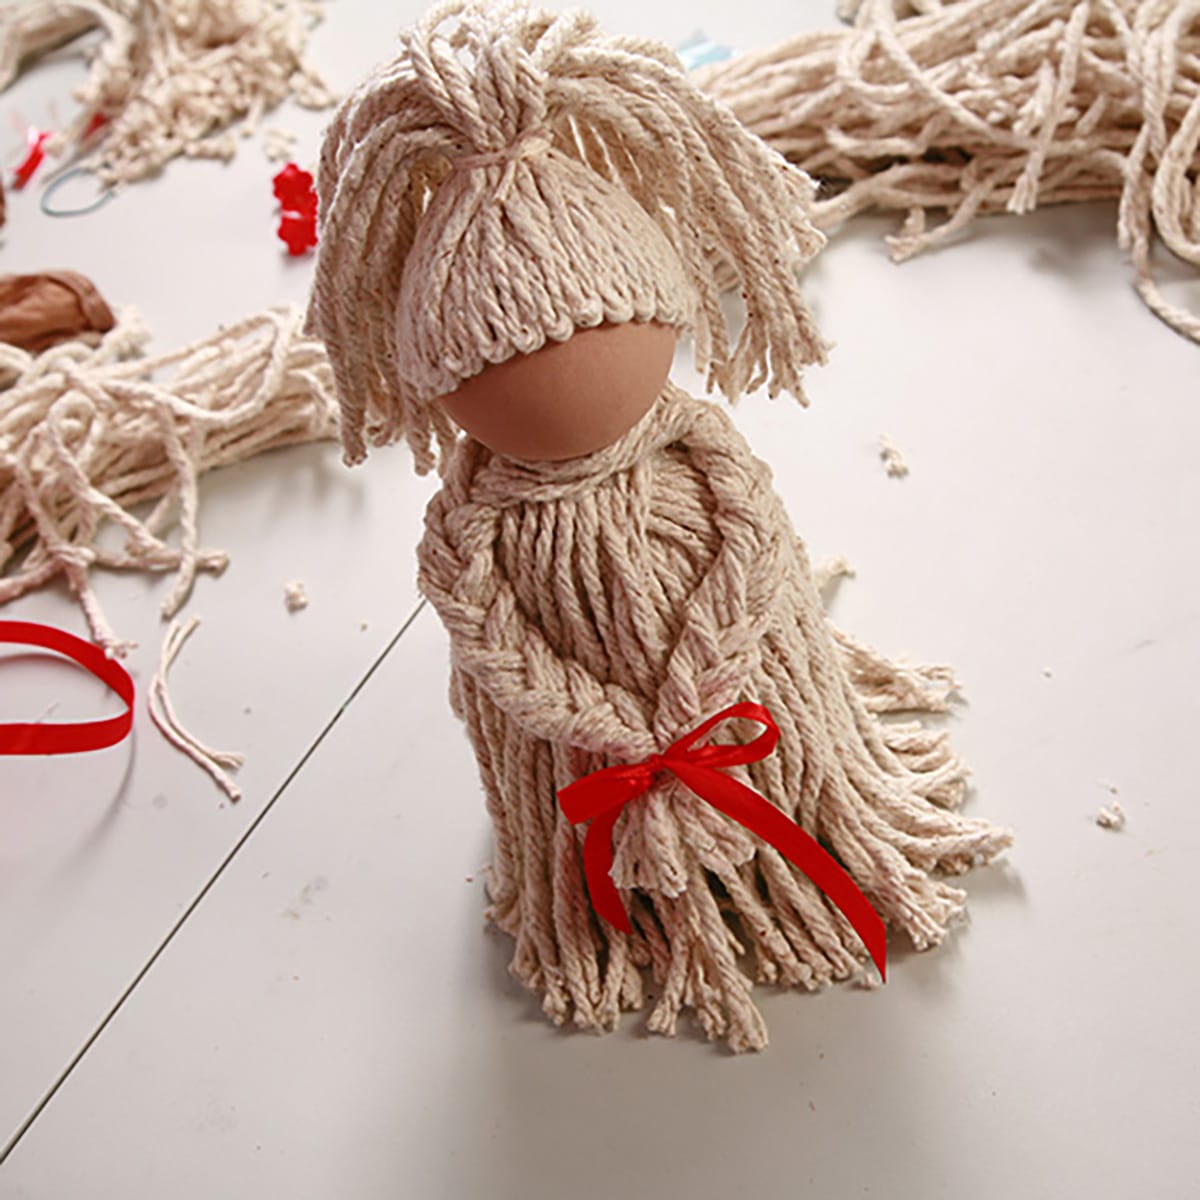
Next, take a second length of ribbon, and tie a bow around the base of her ponytail, hiding the twine there. I like to do it so that the bow is off to one side.

Take one flower, trim the back if needed, and hot glue in the center of the bow.
Figure out where you want the eyes - you can mark the spots with a Sharpie dot or pencil.

With the cup side of a sequin facing up (if applicable), poke one of the pins through the center hole of the sequin, and then into one of the marked eye spots.
Repeat with the second eye.

Place a small sprig of tiny silk flowers in the arms. You can affix with hot glue if you’d like, I usually don’t bother.

... And you’re done!
Here’s a video, if that helps:
Looking for More Homemade Gift Ideas?
We have a few DIY gift tutorials, with even more coming! For now, be sure to check out:
Booze Bouquet Tutorial.
DIY Citrus and Cedar Bath Set
DIY Cutting Board Tutorial - Colourful Squares
DIY Mustard Bath Gift Set
Homemade Cutting Board Tutorial - Log Cabin
Homemade Hop Spa Bath Set
Homemade Peppermint Eucalyptus Spa Set
How to Sew A Cute Makeup / Toiletry Bag Travel Set
DIY Ugly Christmas Sweater Masks
Share the Love!
Before you give away your mop doll air freshener, be sure to take some pics of your handiwork! If you post it to Bluesky, be sure to tag us - @CelebrationGen. We're also on Pinterest, so you can save all your favourite recipes to a board!
Also, be sure to subscribe to my free monthly email newsletter, so you never miss out on any of my nonsense.
Well, the published nonsense, anyway!

Mop Doll Air Freshener Cover
Equipment
- Seam ripper, optional
- Scissors
- Hot glue gun
Ingredients
Per doll, you will need:
- 1 Solid air freshener Like Glade or Renuzit
- 1 Cotton mop refill 1 mop does about 3 dolls
- Hot glue sticks
- Twine
- Small elastics
- 1 3" styrofoam craft ball the smoother, the better
- 1 new knee-high pantihose-type stocking
- 1 sharpie
- ¼" double sided satin ribbon
- Small silk flowers
- 2 5 mm black sequins
- 2 black headed pins
Instructions
- Plug in your glue gun and turn it on, allowing it to start warming up
- Remove the label from your air freshener, if applicable.
- Using a seam ripper or scissors, carefully undo the stitching on the mop head, freeing all of the yarn strands. Do NOT cut the strands!
- Starting at the bottom edge of the top section - that is, NOT gluing on the part that pulls out - run a line of melted glue just above the edge.
- While the glue is hot, carefully adhere a strand of yarn to the air freshener, working it around the whole bottom edge of the top section of the air freshener.
- As you come to the cut edge of the yarn, angle the yarn you’re working with upwards, to create a tight spiral of yarn.
- Continue gluing and placing yarn in a spiral, working your way up to the top of the air freshener. As you come to the end of one strand of yarn, place another one with the new edge putted up against the ending edge of the previous strand.
- As you reach the top edge of the air freshener, apply glue to the top, and continue spiraling your yarn placement until it ends in a tigh spiral, in the center of the top surface. Trim remaining yarn.
- Take a good sized handful of yarn strands and cut them in half.
- Pipe some hot glue on the outer top edge
- Bend one of the half lengths of yarn in half, forming a tight “U” at the bend.
- Place the yarn, bend side up, in the glue on the top outer edge of the air freshener. Be careful to keep the bend tight, and the top edge of the bend lined up with the top edge of the air freshener.!
- Repeat the last step, placing another “U” bend of yarn right next to the last, again adjusting to keep the bend tight.
- Continue gluing and placing bent half-lengths of yarn right next to each other, around the entire top edge.
- Place the air freshener so that the side that dips down at the top is right in front of you, and the highest point of the air freshener is straight behind it. The lower side is the front, the high point is the center back.
- Pipe hot glue across the top surface of the air freshener. It doesn’t have to be a solid block of glue, but it should cover most of that top surface.
- Pick out 8 or 9 strands of the half lengths of yarn and line them up so they’re roughly even. Place the line of them centered over the glue, going from side to side, creating a single layer of yarn. Pull yarn ends downward to secure in the glue.
- Repeat the last two steps, placing the new block of yarn perpendicular to the first block of yarn - so aimed front-back.
- Repeat again, placing the block of yarn at a diagonal.
- Repeat one last time, placing the block of yarn perpendicular to the last block. These last two blocks of yard should basically make an X over your front to back and side to side blocks.
- Trim the bottom ends of the yarn. I usually keep them to about 1" longer then the air freshener.
- Select 9 strands of full length yarn.
- Apply hot glue to the top surface of the air freshener, and center the 9 strands of full length yarn over it, going side to side. These strands will become the arms.
- On one side, separate the 9 strands into 3 groups of 3 and braid until it’s about 6" long. I like to take the outer pieces and fold them over as I braid, I like the way it styles the “shoulder”.
- Repeat on the other side.
- Bring both braids forward, holding together at the center front. Fuss with it a bit to form the arms as you like - they won’t be anywhere near as long as you braided. (Braiding extra long prevents it from unravelling and messing this step up!)
- When you’re happy with the length, position, and evenness of the arms, use a small piece of twine to tie them in place.
- Trim the ends of the twine, then trim the braid lengths, this will form the “hands” tassel - I like to keep it about 1.5" long, from the twine down.
- Your lower body is done - set it aside to make the head.
- Carefully place the styrofoam ball inside the stocking, pulling the stocking tight over the ball to smooth it out.
- Twist the stocking, then flip it inside out over the ball, so the ball now has 2 layers of stocking.
- Pull the stocking tight and fuss with it to work out any bit bunches or lines. When you’re happy with it, tie the top off with an elastic, more or less opposite from the bottom twist.
- Trim excess hose back to less than an inch - this will be the base for the ponytail.
- Hold the ball over the body, figure out where you want the ponytail to be oriented. With this positioning in mind, use a Sharpie to draw on the hairline. Keep in mind that you will have about ¼" of yarn hanging over the Sharpie line. I like to draw it such that a little more than half of the ball will be above the hairline.
- Run a line of hot glue around the drawn hair line.
- Using half lengths of yarn - cutting more as you need them - Bend them in half, form the tight “U” again, and affix them to the glue. The bent side should be facing down, with the free ends of yarn extending up towards the ponytail stump.
- Continue placing folded half-lengths of yarn around the hairline, trying to keep the line smooth, even, and consistent.
- Once you have the hair placed along the full circumference of the head, gather the strands up around the ponytail stump.
- Take a moment to fuss with the placement a bit - you want the strands neat, even, and laying flat in a single layer as much as possible.
- Secure ponytail with a length of twine. Trim the ends of the twine.
- At this point, I like to hold the head up in about the position it will be, and give it a little bit of a hair cut, just to even things out a little. It also takes the excess weight off, for the next step.
- Pipe a generous circle of hot glue to the center of the top of the body, about 1.5" in diameter. Orient the head the way you’d like it, and place the bottom of it into the glue.
- Press down and hold in place for a couple of minutes, allowing the glue to set a bit.
- As you’re holding it in place, grab a half length strand of yarn and wrap it around the “neck”. This will provide support AND hide the glue that should be seeping out.
- Once you’ve wrapped it around a couple / few times, trim and glue it in place so that it ends at the center of the back.
- At this point, I like to flip the ponytail over the “face” to take the excess weight off the back, and allow the neck glue to cool until it feels more solid.
- Once everything has firmed up a bit, it’s time to put on the finishing touches!
- First, give it a final hair cut. It will never be even/perfect, but if you set the ponytail about how you like it before trimming, you’ll get the nicest results.
- Next, take a length of ribbon and tie a bow at the wrists, hiding the twine tie that’s holding the hands together.
- Next, take a second length of ribbon, and tie a bow around the base of her ponytail, hiding the twine there. I like to do it so that the bow is off to one side.
- Take one flower, trim the back if needed, and hot glue in the center of the bow.
- Figure out where you want the eyes - you can mark the spots with a Sharpie dot or pencil.
- With the cup side of a sequin facing up (if applicable, poke one of the pins through the center hole of the sequin, and then into one of the marked eye spots.
- Repeat with the second eye.
- Place a small sprig of tiny silk flowers in the arms. You can affix with hot glue if you’d like, I usually don’t bother.
- And you’re done!


[…] Mop Doll Air Freshener Cover […]