

If you want to get extra about the coming Pi Day, consider making this Pi Day Pinata! It's fun, endlessly customizable, and great for puns!
Originally Posted March 7, 2009. Updated 1/21/2021

Note: If you are looking for our epic, "internet famous" Pi Backsplash, check it out here.
With Pi Day (March 14) coming up, my husband and I decided to just go crazy with it.
We'll blog about the festivities later, but for now... I want to blog about the piece de resistance.. our PInata!
Neither of us had ever been involved with making a pinata before, and it sounded like a fun - and wholly appropriate - challenge!
This pi day pinata would be a fun project for any couple or family to do together.
Or, hey, any pi-obsessed individual... but I will say that two sets of hands REALLY helped it go faster, and there were many times where the extra set of hands helped with handling.
Of course, the principles of design that we utilized in the creation of our Pi Day PInata could be applied to many different themes and shapes of pinatas, so go nuts with it.
If it's not in the cards for you to make one for this year's Pi day, consider other occasions that would/could call for a Pinata.
Traditionally, it seems that you're supposed to paper mache a balloon, and use that as your base.
We couldn't think of any possible way that would fit with our ideas, so we had to Macguyver a solution. Here is what we came up with.
Warning, this will be a fairly photo-heavy blog entry!
Supplies and Equipment to Make a PInata
Styrofoam slab(s)
Foam Glue
Large piece of bristol board or cardboard
Newspaper
Duct Tape
Flour
Water
Stuff to fill it with
Tissue Paper
Ribbon, string, twine, etc.
How to Make a Pi Shaped Pinata
Make Your Base Form
My husband had a large slab of 2" thick styrofoam in his workshop.
He cut two 2' x 2' squares, and glued them together to make one 4" thick square.
I drew an outline of a Pi symbol, being sure to not only keep the whole thing proportionate, but also make the leg sections wide enough to "hold a lot of stuff".
He then used both a table saw (to cut the rough shape) and a hand saw (to trim it close to the shape) to cut the shape out of the styro block, then fine tuned the edges with a sanding block.
Prepare your Materials and Work Space
I then covered the entire thing with plastic wrap, loosely. This was to make it easier to remove our pinata from the mould later on.
We cut out newspapers into 1-2" strips, and laid out some garbage bags as a drop cloth.
Then, we made our paper machee "glue" from about 2 parts flour to 3 parts water for our glue, then added a couple teaspoon of cinnamon because I hate the smell of flour water.
It really helped!
A little "do as I say, not as I do", here:
Before you start paper mache-ing (is that a word?), you should trace your styro shape out onto bristol board or cardboard. We didn't, and had to deal with some hassle as a result - more on that later.

Do the Papier-Mâché
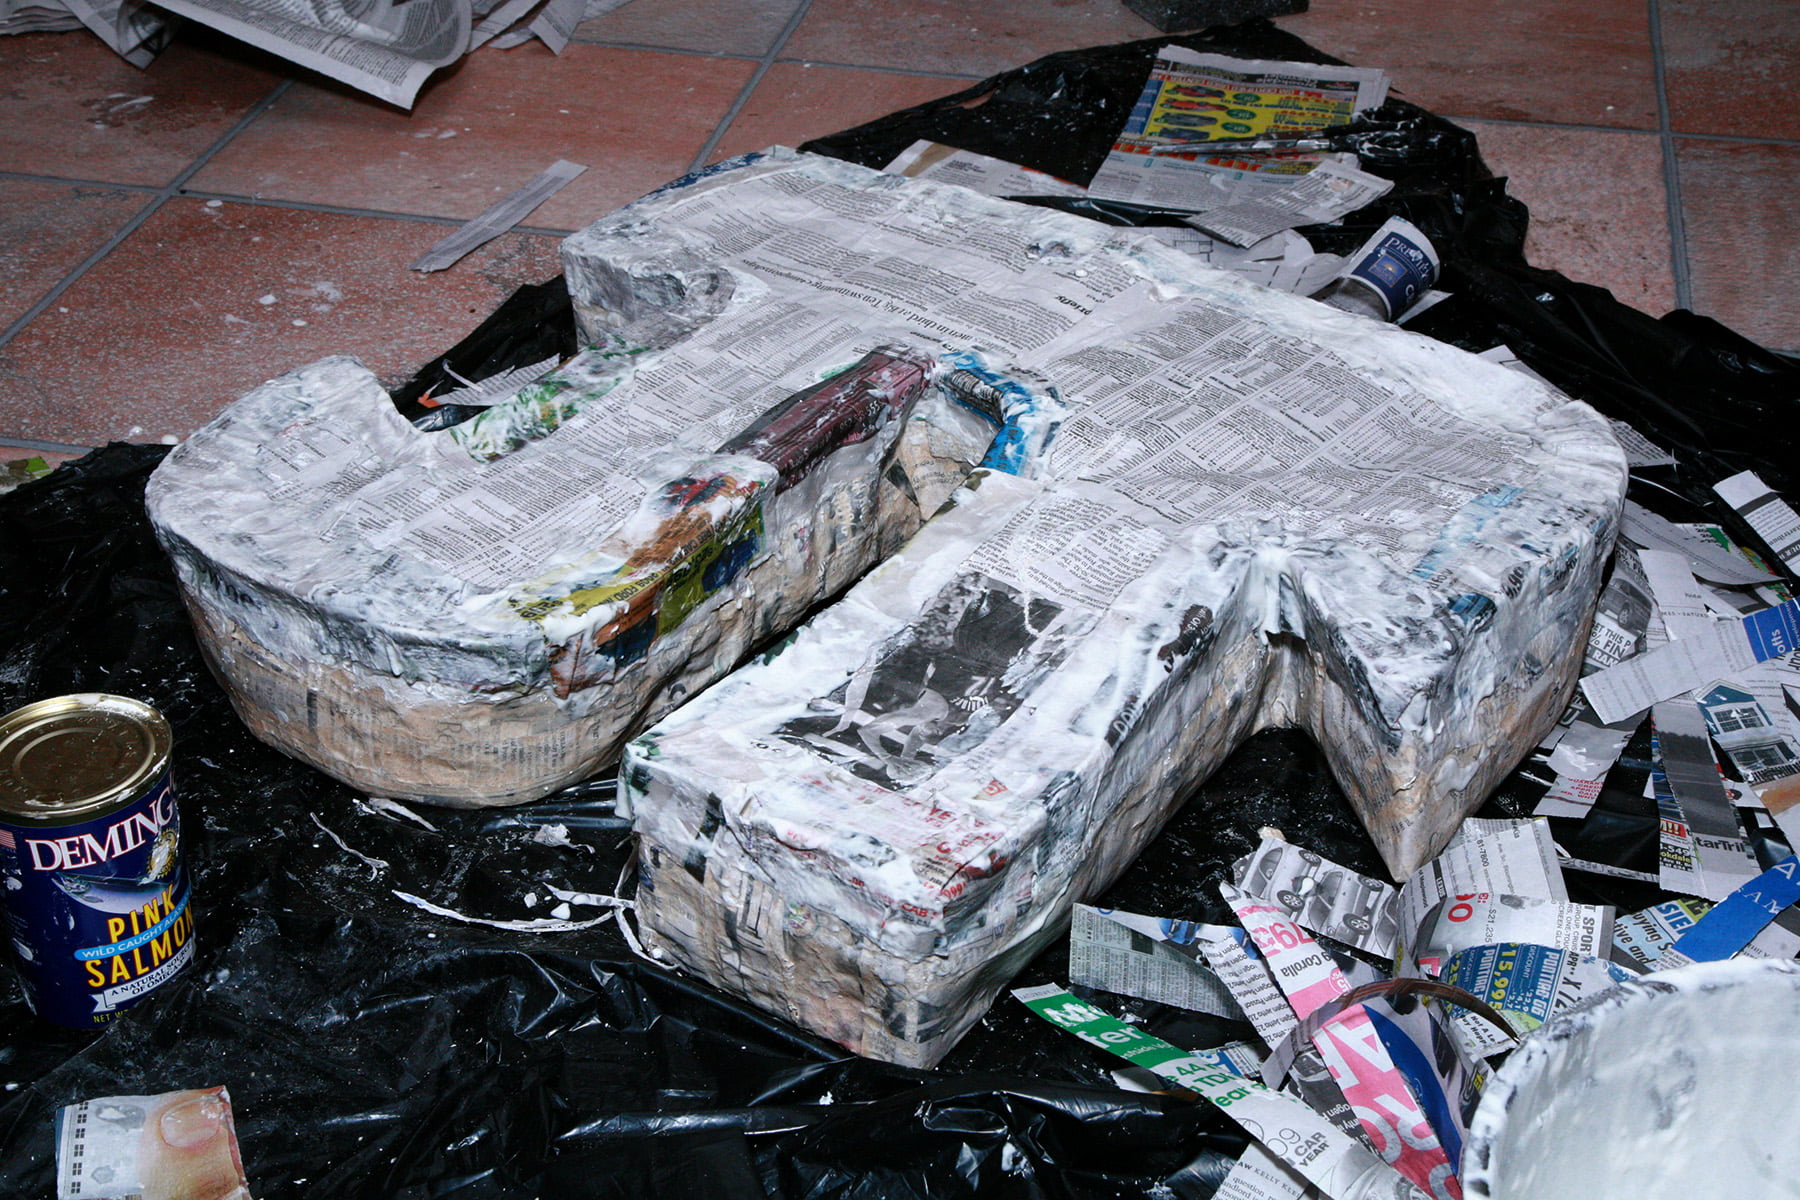
For our initial round of paper mache, we did a total of about 2 layers over 1 face and the whole way around our styrofoam shape, then let it dry completely.
We got impatient with it at this point and removed the shell from the styrofoam before adding another 2 layers of paper mache, but in hindsight.. I wouldn't suggest doing that.
Just add another couple layers over the ones you already did, and let it dry completely again.

Concurrently to all this, you should also be doing a total of 4 or so layers of paper mache to the shape you traced on the cardboard.
(We didn't! We traced our final, extracted shell onto newspaper and layered THAT.. but then it shrank and we had to Macguyver it some more!).
This will be the piece that seals off the other face of your pinata.
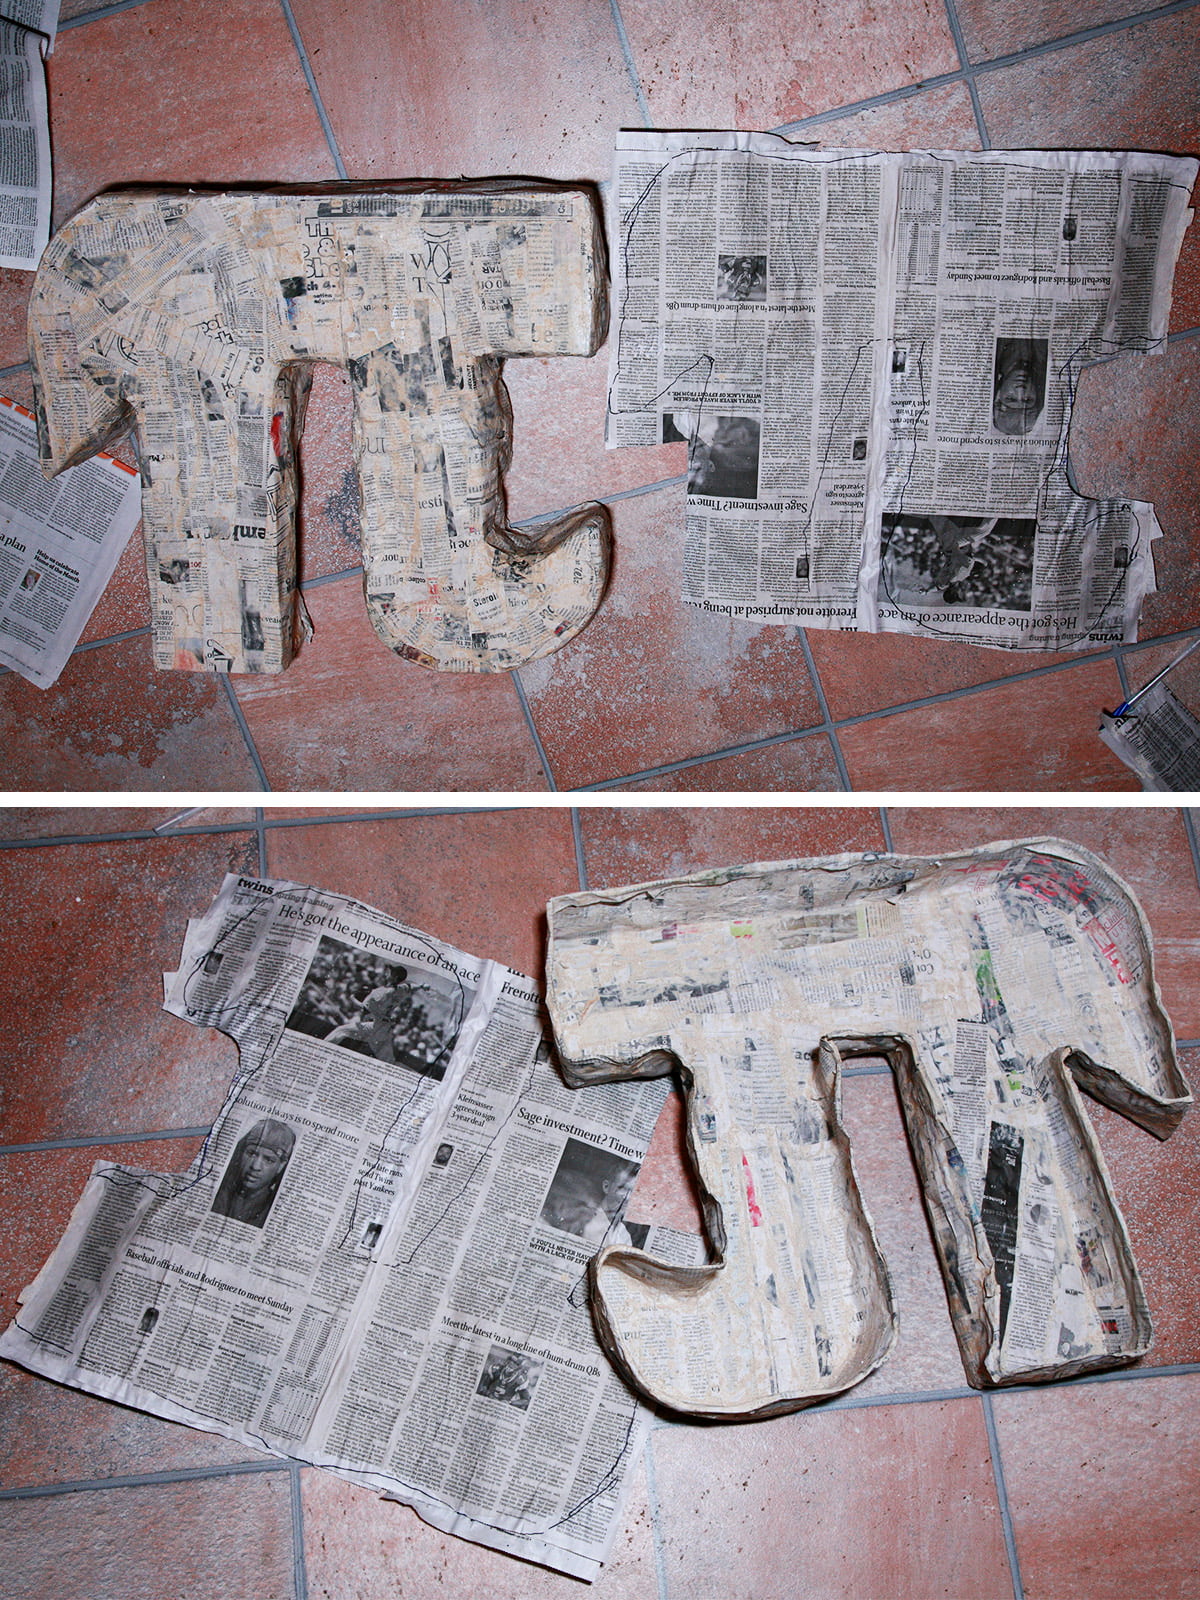
Once everything is dry, flip it over and carefully extract the styrofoam.
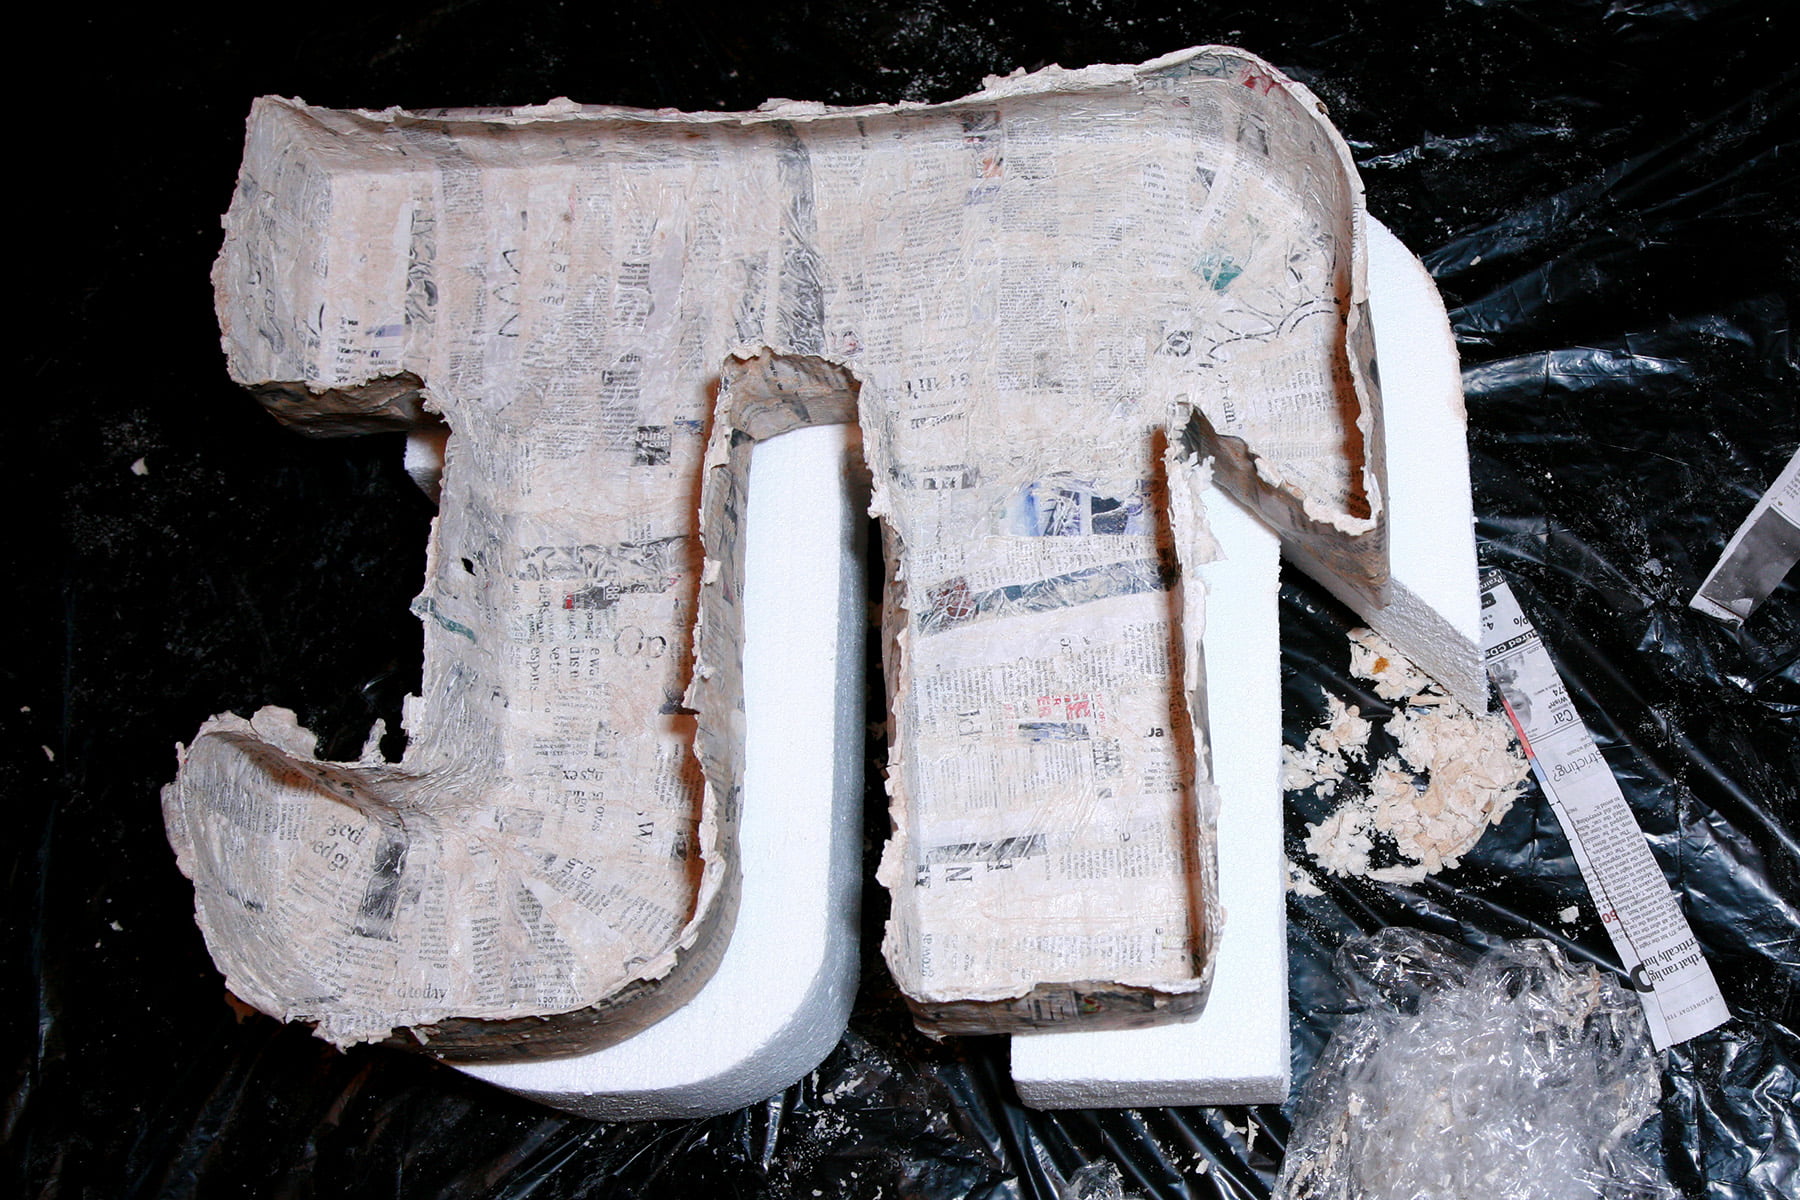
You may or may not need to let the inside dry some more. Or extract a kitten from it, as we found ourselves doing repeatedly!

Cut and Reinforce the Holes
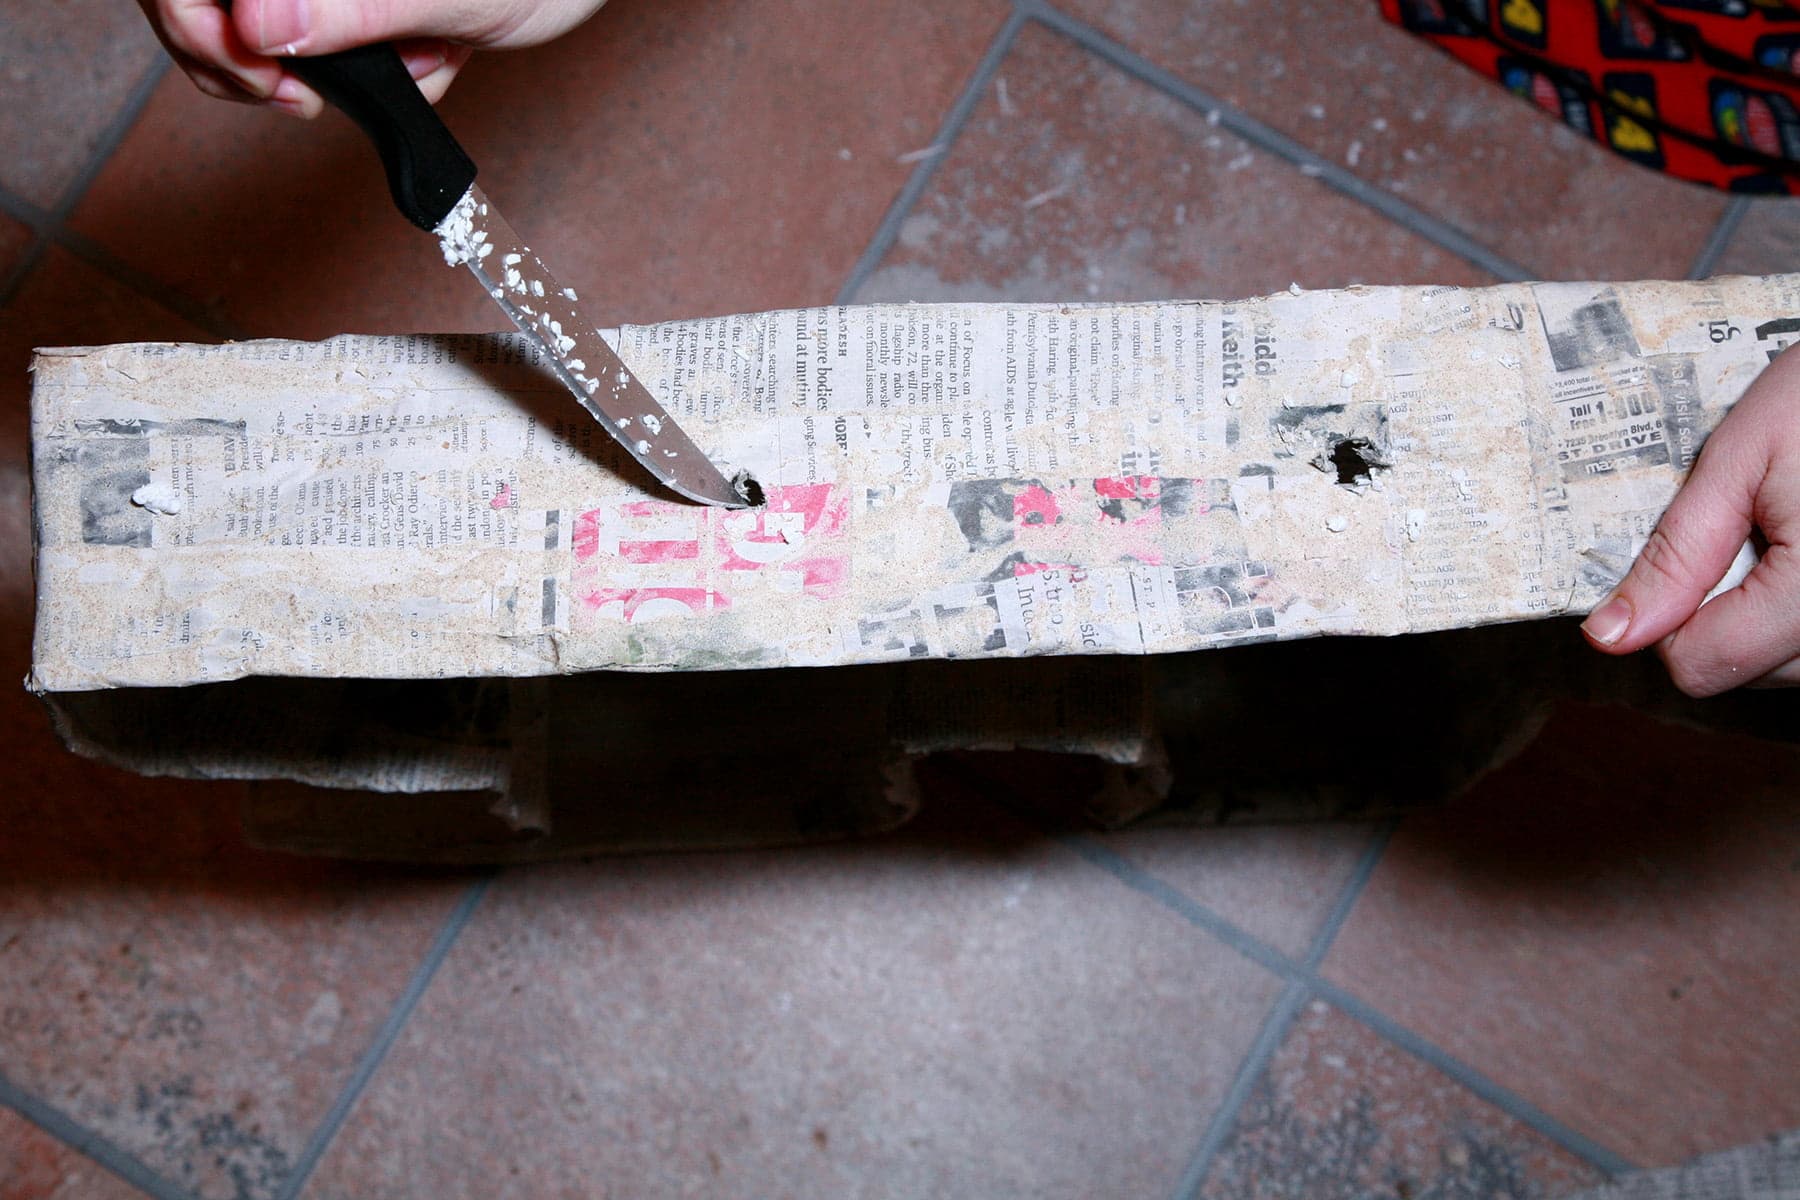
Another thing we didn't do was reinforce the holes that would hang the pinata.
I'd suggest doing that by figuring out approximately where you are going to cut the holes in the top, and run a bunch of duct tape across it, either from the inside of the top, the outside of the top, or both, then cut your holes.
Also, now is a good time to run a length of ribbon or string through those holes and tie off on the outside - it will help you run your string, rope, or whatever through the holes later, as doing so to a finished pinata would be really difficult.
Consider Your Filling
While all of that is drying, you're probably looking forward to stuffing it and getting this show on the road.
We took the time to go to the local Dollar Tree, which was an excellent source of all KINDS of weird stuff to pack into our PInata!
I wasn't much into the idea of using poufs of tissue paper to space out goodies, so I bought a pack of leis instead - double duty stuffing!

In addition to that, we included a kite (because it seemed hilarious to put a kite in a PInata!), candy, etc etc.
Also, we cut 3 or 4 rough 4" blocks from the scraps of foam that we had cut away from the main Pi shape earlier on, to use as structural support pillars inside the pinata.
When everything is dry - inside and out -, position your foam pillars inside your pinata cavity, then evenly stuff it with your.. stuff.

Seal in the Filling

Place the flat Pi shape on top, and weigh it down with something - we used cans of salmon and roasted red peppers, LOL.

Go ahead and paper mache your way around that whole edge a couple of times, and let that sucker dry completely.

How to Decorate a Pi Day Pinata
At this point, we were so excited to see the finished product that we forgot to continue taking photos, so I'll have to just describe how we went about decorating our pinata.
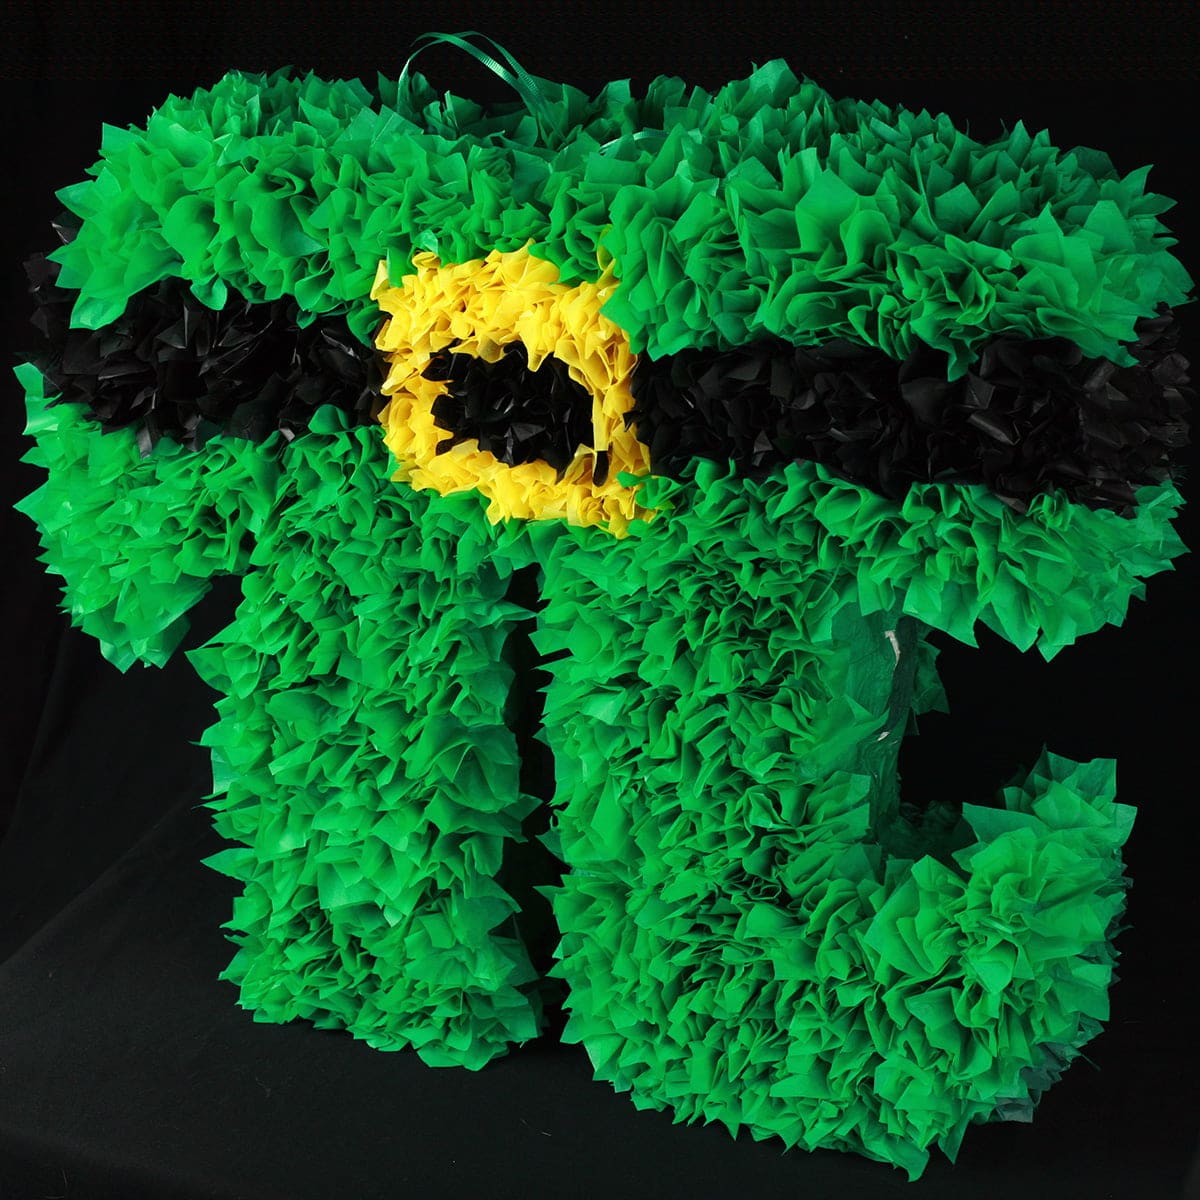
First of all, as it was a combined Pi Day - St Paddy's Day party, we decided that it should be bright green, and be wearing a black belt with a yellow buckle.
We cut up a ton of tissue paper into roughly 2" wide strips, and then into 2" x 2" squares. Then, we drew the lines for the belt and buckle
Using a wide paintbrush and some regular white Elmer's Glue, we painted the entire back and sides of the pinata with glue, and covered it with a layer of tissue squares.
Green squares over most of it, black squares within the lines of the belt. This helped prevent any show-through of the paper mache between the poufs.
IF we were truly smart, we would have either left it like this, or at least done the traditional fringe thing.. but NO.
Tissue Paper Puffs Pinata Decoration
We decided to get fancy, and harken back to our kindergarten days with some .. I have no idea what you call it.
Tissue paper pouf?
Basically, we:
Cut a bunch of squares from tissue paper - maybe 2.5" square?

Took a square of tissue paper, centered it around the end of a pencil...

... dipped it in glue, and stuck it to the PInata.

Repeat with another pouf pretty close to it..,

... and reapeat, ad nauseum.

Once you've got the back and sides covered and they've dried, flip it over and repeat with the front, starting with completely covering it with a layer of squares.
NB: We soon gave up on the pencil and just poked our fingers into roughly the center, and then dipped the resulting peak in the glue. While that helped it go faster, it was still a serious undertaking. The back side and sides took a couple evenings, and then the front took another evening..but in the end, it was totally worth it.

Finishing Your Homemade Pinata
Run your rope/string/whatever through the holes, using the earlier ribbon to pull it through, hang it up, and beat the crap out of it.
OR, be like us, and refuse to take part in the destruction of your labor of love, and just videotape your friends looking like goofballs 🙂


As a closing note, put more thought into what kinds of things will survive the bashing than we did. For the record, pixy stix may result in sugar everywhere. Toys and kazoos may break. Small and compact is best!
Enjoy!

Wanna Nerd out With Us Some More?
There's a LOT of nerdery - and geekery - going down on this blog. Here are some favourites...
Bubble Bobble Wedding Cake
Dalek Cake for a Doctor
Dalek Sugar Cookie Decorating
"Convention" Brownies
Convention Sloppy Joes
Gluten-Free Lembas
How to Make a Weeping Angel Costume
How to Design & Install a Nerdy Backsplash
Miruvor Recipe
My Convention Survival Guide
Partridgeberry Pie & Cosplay Geekery
Roasted Convention Chili Recipe
That Time I made a TARDIS Cake for Geek Royalty..
The Epic Klingon Cake
The One Cheese Ring
The Silence of the Lambs Cake
The Story of Foopmallet
Tremors Wedding Cake
Share the Love!
Before you chow down, be sure to take some pics of your handiwork! If you post it to Bluesky, be sure to tag us - @CelebrationGen. We're also on Pinterest, so you can save all your favourite recipes to a board!
Also, be sure to follow me on Pinterest, and subscribe to my free monthly email newsletter, so you never miss out on any of my nonsense.
Well, the published nonsense, anyway!

Pi Day PInata
Equipment
- Scissors
Ingredients
- Styrofoam slab s
- Large piece of bristol board or cardboard or multiple pieces taped together
- Newspaper
- Duct Tape
- Flour
- Water
- Stuff to fill it with
- Tissue Paper
- Ribbon string, twine, etc.
Instructions
Make Your Base Form
- My husband had a large slab of 2" thick styrofoam in his workshop.
- He cut two 2' x 2' squares, and glued them together to make one 4" thick square.
- I drew an outline of a Pi symbol, being sure to not only keep the whole thing proportionate, but also make the leg sections wide enough to "hold a lot of stuff".
- He then used both a table saw (to cut the rough shape) and a hand saw (to trim it close to the shape) to cut the shape out of the styro block, then fine tuned the edges with a sanding block.
Prepare your Materials and Work Space
- I then covered the entire thing with plastic wrap, loosely. This was to make it easier to remove our pinata from the mould later on.
- We cut out newspapers into 1-2" strips, and laid out some garbage bags as a drop cloth.
- Then, we made our paper machee "glue" from about 2 parts flour to 3 parts water for our glue, then added a couple teaspoon of cinnamon because I hate the smell of flour water.
- Before you start paper mache-ing (is that a word?), you should trace your styro shape out onto bristol board or cardboard. We didn't, and had to deal with some hassle as a result - more on that later.
Do the Papier-Mâché
- For our initial round of paper mache, we did a total of about 2 layers over 1 face and the whole way around our styrofoam shape, then let it dry completely.
- We got impatient with it at this point and removed the shell from the styrofoam before adding another 2 layers of paper mache, but in hindsight.. I wouldn't suggest doing that.
- Just add another couple layers over the ones you already did, and let it dry completely again.
- Concurrently to all this, you should also be doing a total of 4 or so layers of paper mache to the shape you traced on the cardboard.
- (We didn't! We traced our final, extracted shell onto newspaper and layered THAT.. but then it shrank and we had to Macguyver it some more!).
- This will be the piece that seals off the other face of your pinata.
- Once everything is dry, flip it over and carefully extract the styrofoam.
- You may or may not need to let the inside dry some more. Or extract a kitten from it, as we found ourselves doing repeatedly!
Cut and Reinforce the Holes
- Another thing we didn't do was reinforce the holes that would hang the pinata.
- I'd suggest doing that by figuring out approximately where you are going to cut the holes in the top, and run a bunch of duct tape across it, either from the inside of the top, the outside of the top, or both, then cut your holes.
- Also, now is a good time to run a length of ribbon or string through those holes and tie off on the outside - it will help you run your string, rope, or whatever through the holes later, as doing so to a finished pinata would be really difficult.
Consider Your Filling
- While all of that is drying, you're probably looking forward to stuffing it and getting this show on the road.
- We took the time to go to the local Dollar Tree, which was an excellent source of all KINDS of weird stuff to pack into our PInata!
- I wasn't much into the idea of using poufs of tissue paper to space out goodies, so I bought a pack of leis instead - double duty stuffing!
- In addition to that, we included a kite (because it seemed hilarious to put a kite in a PInata!), candy, etc etc.
- Also, we cut 3 or 4 rough 4" blocks from the scraps of foam that we had cut away from the main Pi shape earlier on, to use as structural support pillars inside the pinata.
- When everything is dry - inside and out -, position your foam pillars inside your pinata cavity, then evenly stuff it with your.. stuff.
Seal in the Filling
- Place the flat Pi shape on top, and weigh it down with something - we used cans of salmon and roasted red peppers, LOL.
- Go ahead and paper mache your way around that whole edge a couple of times, and let that sucker dry completely.
How to Decorate a Pi Day Pinata
- At this point, we were so excited to see the finished product that we forgot to continue taking photos, so I'll have to just describe how we went about decorating our pinata.
- First of all, as it was a combined Pi Day - St Paddy's Day party, we decided that it should be bright green, and be wearing a black belt with a yellow buckle.
- We cut up a ton of tissue paper into roughly 2" wide strips, and then into 2" x 2" squares. Then, we drew the lines for the belt and buckle
- Using a wide paintbrush and some regular white Elmer's Glue, we painted the entire back and sides of the pinata with glue, and covered it with a layer of tissue squares.
- Green squares over most of it, black squares within the lines of the belt. This helped prevent any show-through of the paper mache between the poufs.
- IF we were truly smart, we would have either left it like this, or at least done the traditional fringe thing.. but NO.
Tissue Paper Puffs Pinata Decoration
- We decided to get fancy, and harken back to our kindergarten days with some .. I have no idea what you call it.
- Tissue paper pouf. Basically, we took a square of tissue paper, centered it around the end of a pencil, dipped it in glue, and stuck it to the PInata. Repeat with another pouf pretty close to it.. ad nauseum.
- Once you've got the back and sides covered and they've dried, flip it over and repeat with the front, starting with completely covering it with a layer of squares.
- NB: We soon gave up on the pencil and just poked our fingers into roughly the center, and then dipped the resulting peak in the glue. While that helped it go faster, it was still a serious undertaking. The back side and sides took a couple evenings, and then the front took another evening..but in the end, it was totally worth it.
Finishing Your Homemade Pinata
- Run your rope/string/whatever through the holes, using the earlier ribbon to pull it through, hang it up, and beat the crap out of it.
- OR, be like us, and refuse to take part in the destruction of your labor of love, and just videotape your friends looking like goofballs 🙂
Notes


Leave a Reply