

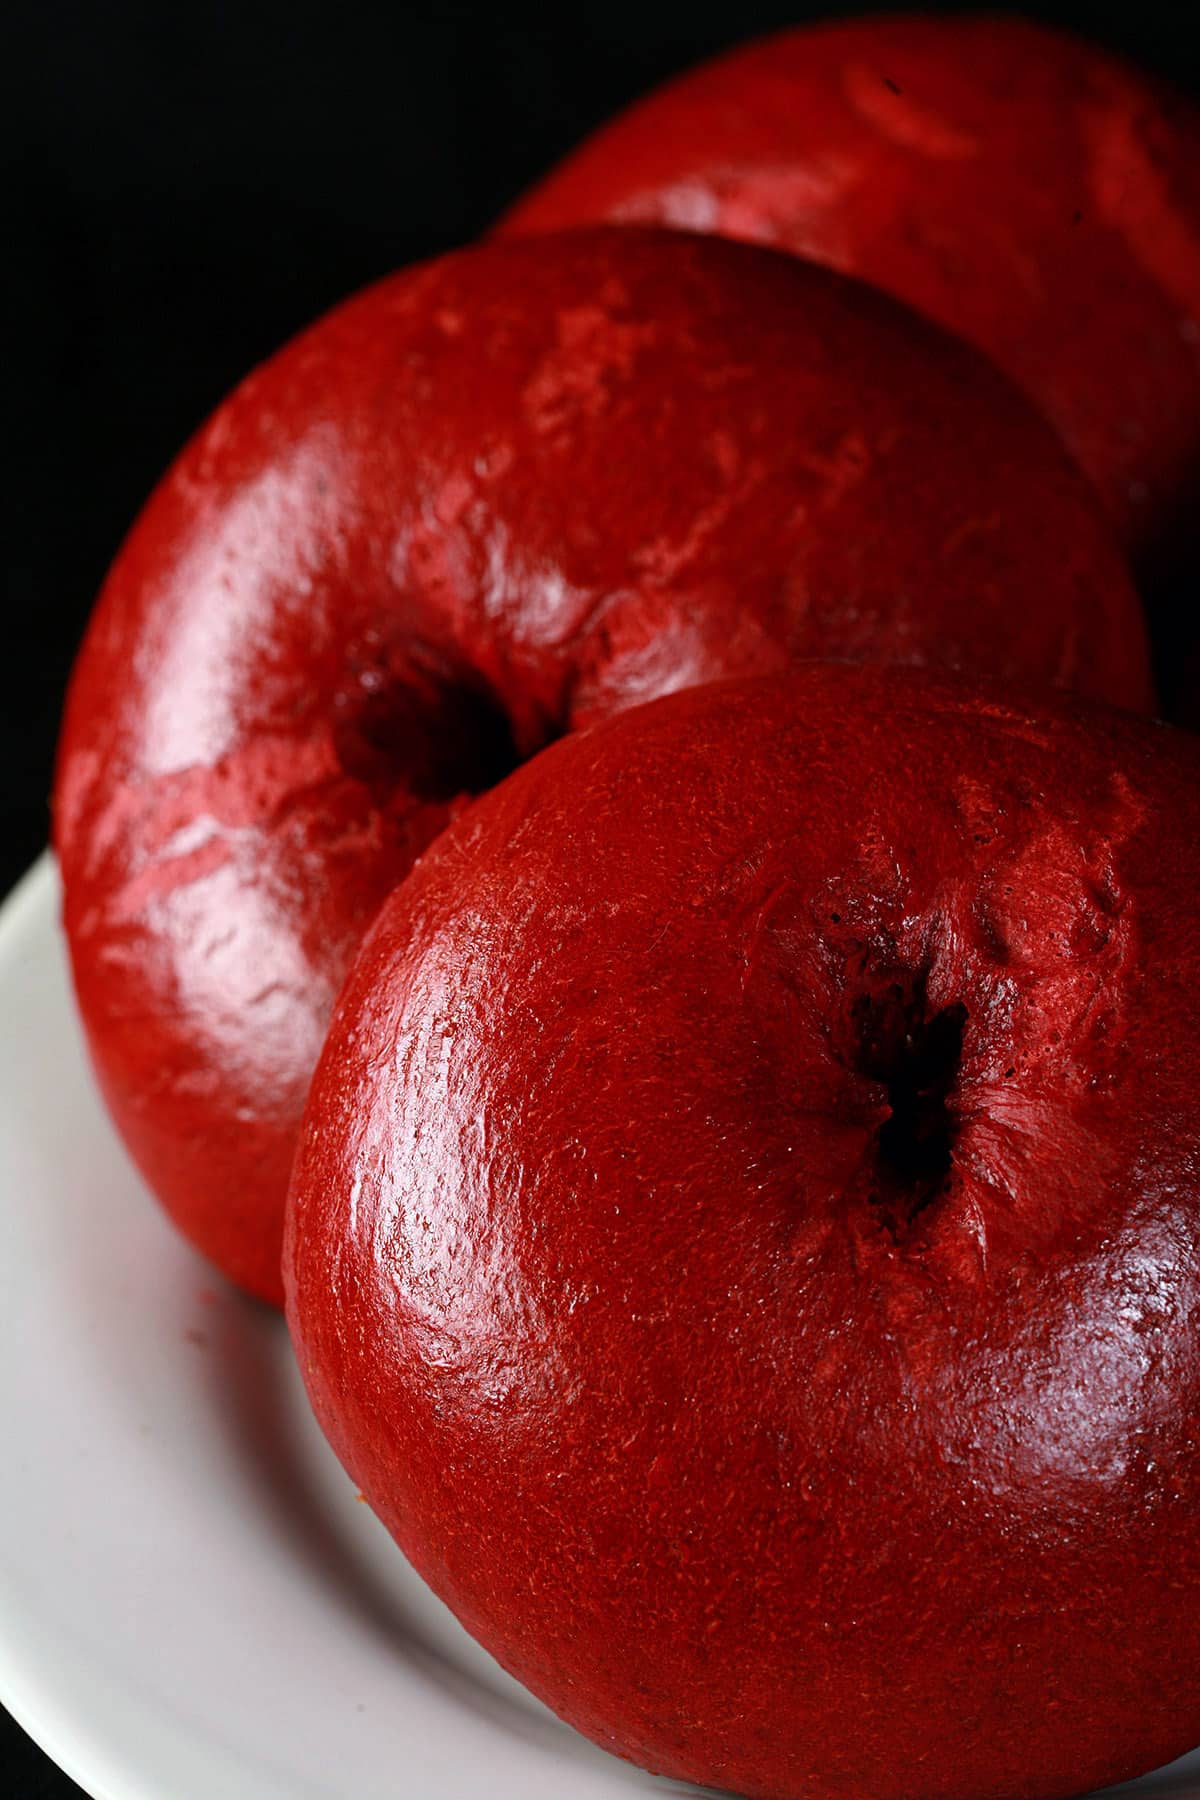
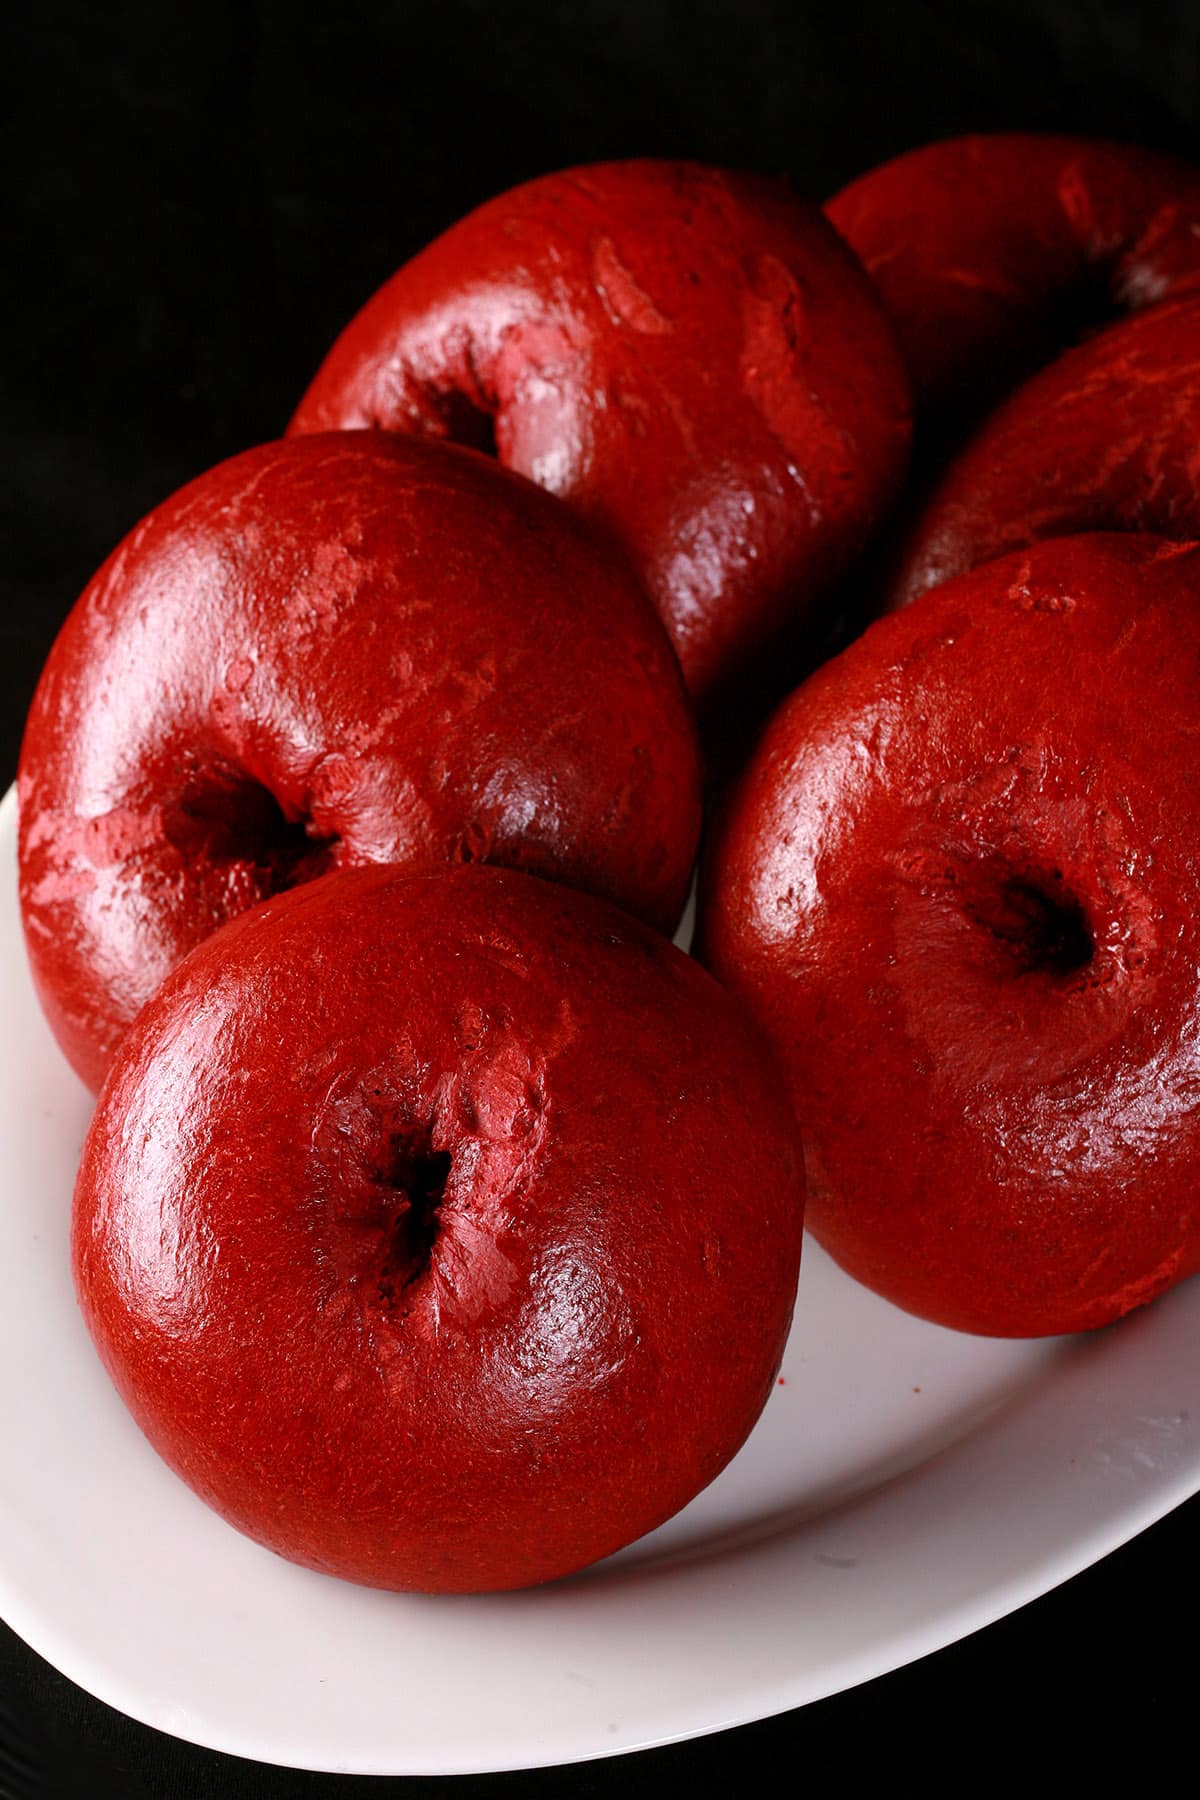
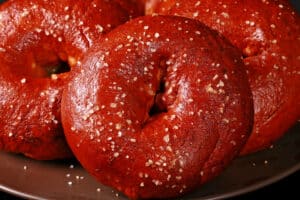
These Red Velvet Bagels are a flavourful, sweet, & fun departure from regular bagels. The perfect festive bagel for Valentine's Day or Christmas brunch!

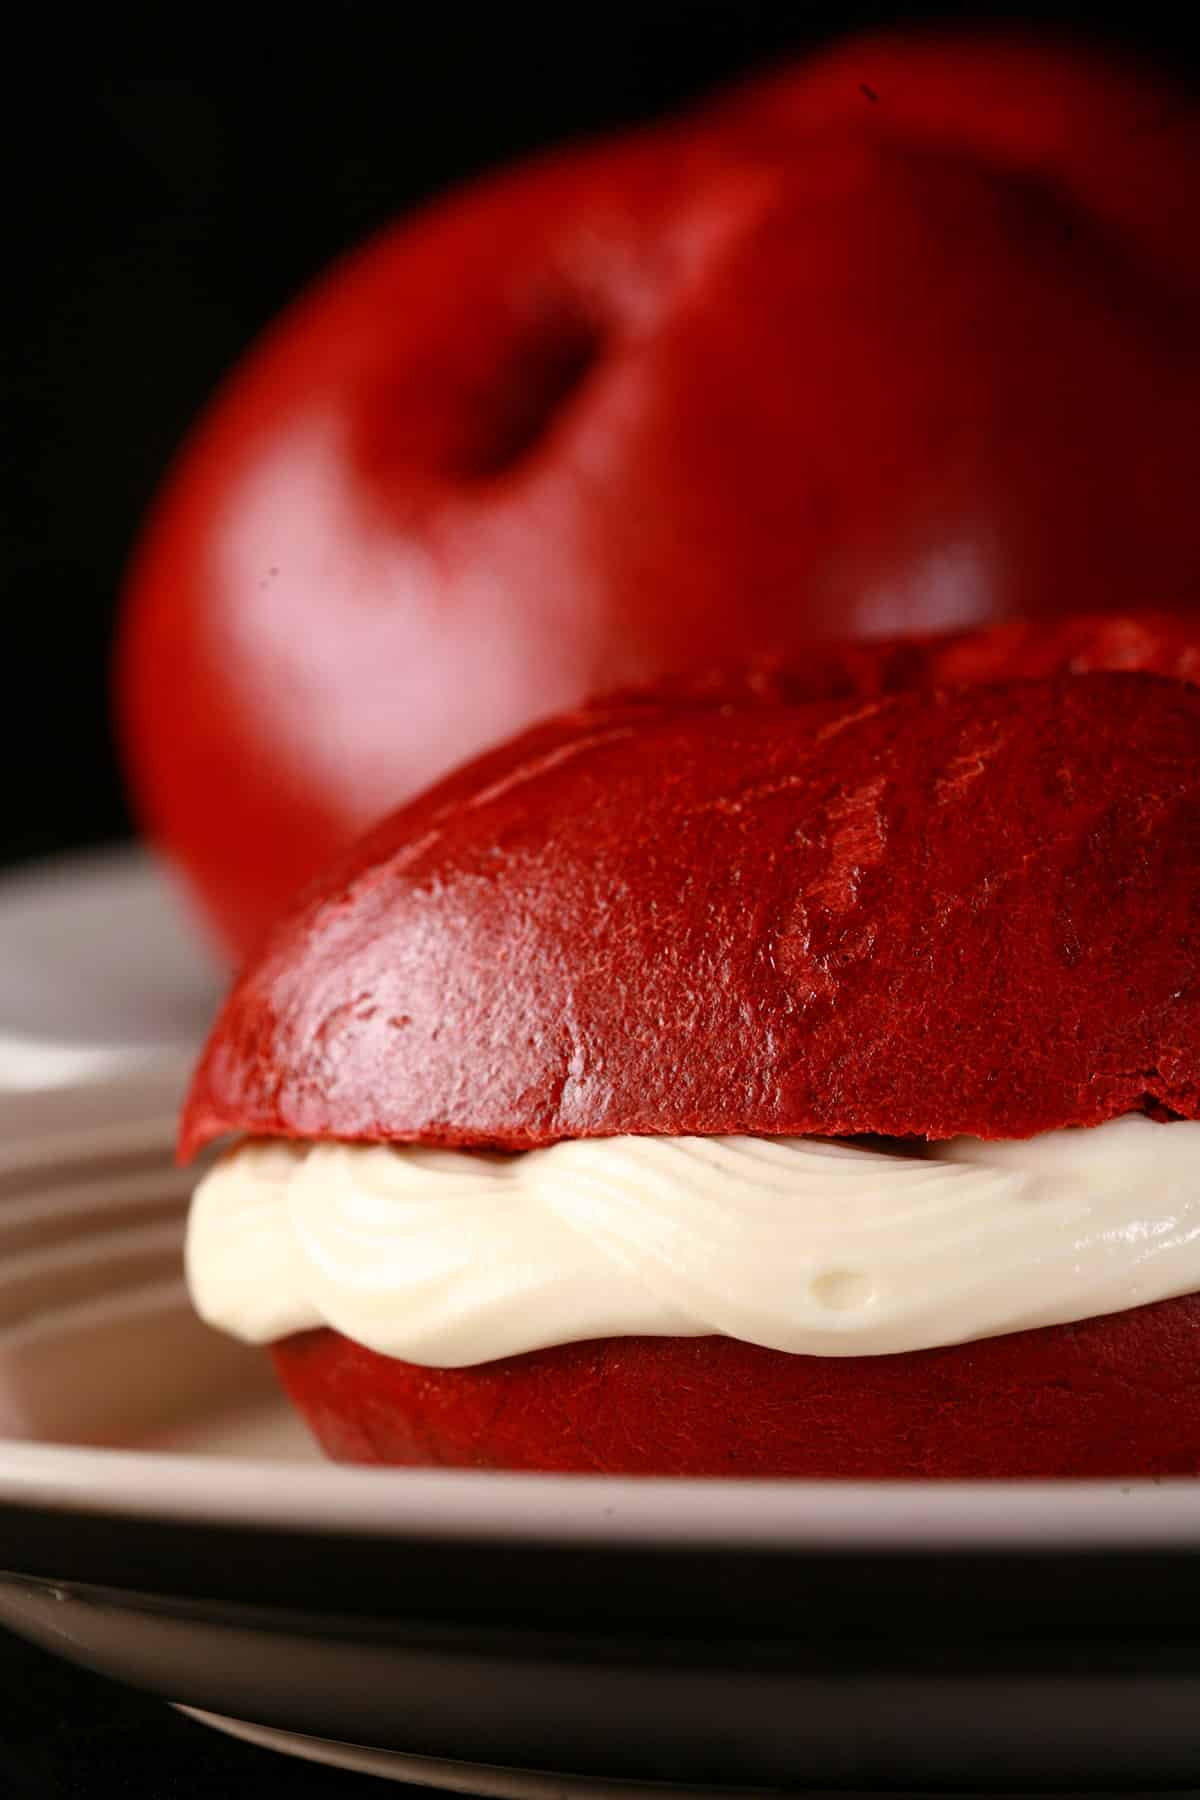
These sweet bagels have all the flavour of traditional red velvet cake ... just in a different format, and with cream cheese spread in place of the cream cheese frosting!
I’ve already done Red Vellvet Brownies, Red Velvet Biscotti and Gluten Free Red Velvet Cookies - with red velvet muffins coming - so I figure bagels were bound to happen!
This is another case of an idea I had that I didn’t think actually existed, until I was ready to post mine. I’ve certainly never seen any in any bagel place, after all!
As it turns out, though, Einstein Bros. Bagel store debuted a new red velvet bagel a few years ago, and Sara Lee had limited edition Red Velvet Deluxe Bagels (with chocolate chips) a few years ago.
Oh well!
Anyway, these rich bagels come together quickly (aside from the wait times!) and easily.
As pictured - and in the video we’ll add eventually - my husband made this batch, as a hand / arm injury made it too difficult for me, that day!
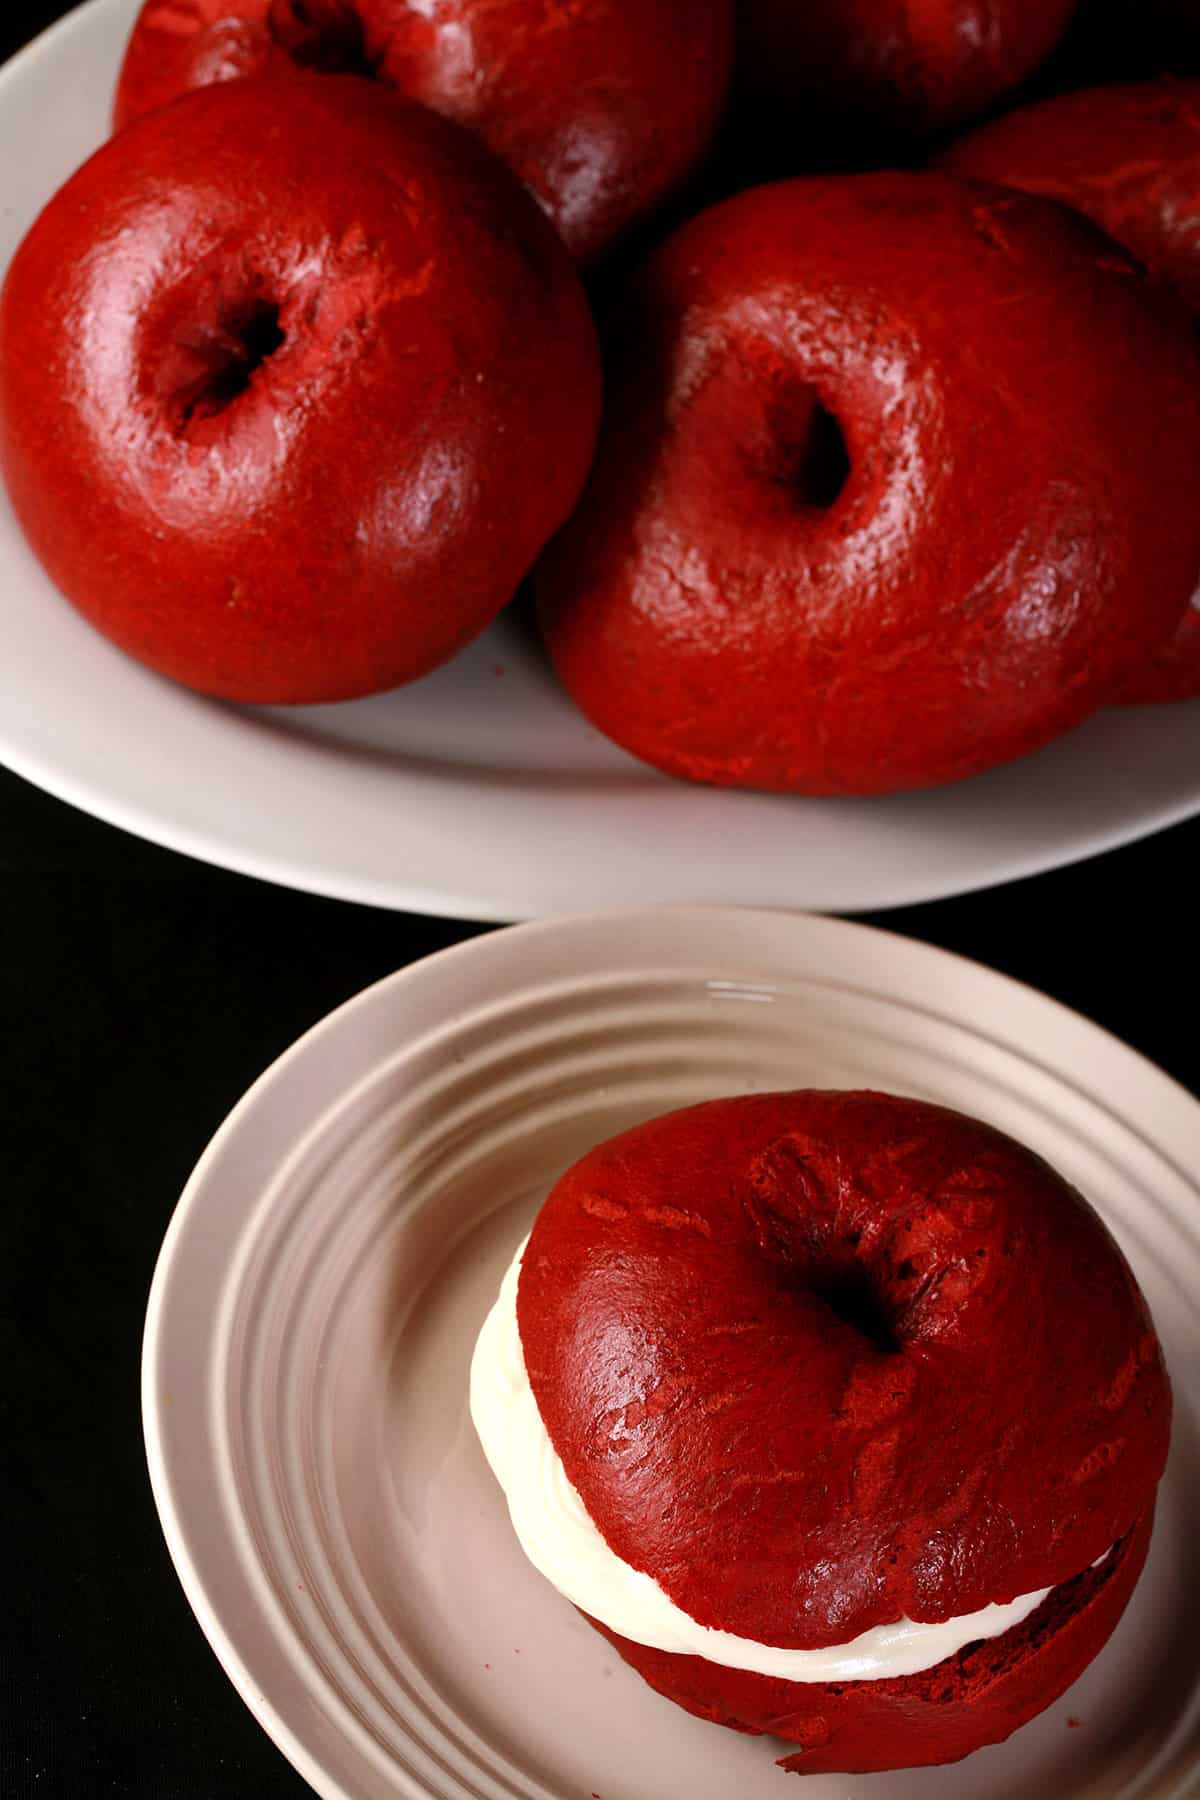
As festive or thematic as these bagels may be, they’re great any time of year. Serve them with a generous schmear of cream cheese, and a mug of hot tea or hot chocolate!
They’re a great way to add a bit of chocolate flavor to your morning 🙂

The basics you will need:
All Purpose Flour
Granulated Sugar
Cocoa Powder
Active Dry Yeast
Pure Vanilla Extract
Eggs
White Vinegar
Salt
.... not much to say, here!
There are two other ingredients that I’d like to talk about, though, as well as an optional one:
Milk
I never have buttermilk on hand, so I generally cook and bake with the “use milk and add acid” method. On top of that, we generally avoid dairy milk when we can.
So, I designed this recipe the same way - you can use whatever milk you like, as there’s the addition of vinegar in the dough.
Personally, I tend to use unsweetened almond milk, as that’s what I have on hand.
Food Coloring
You’ll need some red food colouring, to get that great colour. Food coloring comes in 3 main formats:
Liquid food coloring: Generally found in the baking aisle at the grocery store.
Paste food coloring: Usually Wilton brand, you can find this style in craft supply stores and cake decorating supply shops.
Gel food coloring: Comes in a few brands, also found in the larger craft supply chains (sometimes), and in cake decorating shops.
I always use gel colors, as they give the most intense colour, without adding a ton of liquid. This is especially important when dealing with baked goods.
Specifically, I recommend Americolor (what I used when I was in the USA), or ChefMaster (Which is the option more readily available here!).
It is MUCH easier to get uniform colour if you introduce the food colouring with the yeast mixture, right up front - so try to use as much food colouring as you think you’ll need.
If you have to add it after the dough has come together, it’ll need a LOT more kneading... and may still not come out totally even!
Optional: Coarse Sugar
I like to have some coarse sugar - generally sold as Pearl Sugar - on hand at all times.
It’s a fun finishing ingredient for a lot of baked goods - you’ll probably be most familiar with its use on things like my Homemade Apple Turnovers, or on some of the muffins you can buy in bakeries.
I use it on things like my Gingerbread Scones and even sprinkled on my Perfect Pie Crust sometimes. It brings a nice, sweet crunch to whatever you sprinkle it on.
When it comes to bagels, I use it in place of coarse salt, when making certain sweet bagels - you may have seen it on my Heart Shaped Bagels, Gingerbread Bagels or Banana Nut Bagels, before this recipe.
We generally don’t bother for this recipe, but it’s a fun option if you’d like a sweet, crystalline crunch on your bagels.
To use, just sprinkle over your bagels after the egg wash, right before baking.
How to Make Red Velvet Bagels
The full recipe is in the recipe card at the end of this post, here is the visual walk through.
Make the Dough
Measure warm milk into a glass measuring cup or bowl, stir in ¼ cup of the sugar until well combined. . Stir in yeast, allow to stand for 10 minutes – it should get very bubbly.

Pour in yeast mixture, vanilla, vinegar, and a copious amount of red gel food colouring, stir well to combine.

Alternatively, use a stand mixer with a dough hook for about 7 minutes, or until dough is smooth and elastic.
Note: Depending on how much - and what type of - food colouring you use, you may find the dough to be too wet / sticky. You can add a little more flour if this is the case - it should be a little sticky, but easily peeled away from the bowl.
Once dough is fully kneaded, place in a greased bowl, cover with plastic wrap, and allow to rise for one hour, or until doubled in size.

Form the Bagels
Once dough has doubled, dump it out on a clean work surface, and divide it out.
We divided the mixture into 8 equal sized balls, for medium-large bagels – but you can make them smaller or larger by dividing into 6, 10, or 12 equal sized pieces.
(My husband was making these as I directed him, he had to correct the sizes after he initially divided them into some very uneven balls!)

Once you have a hole made, stretch the ring of dough out a bit to enlarge the hole. Personally, I prefer the latter, as pictured.

As your bagels are resting, preheat oven to 350F, line 2 baking sheets with parchment paper.
Boil and Bake the Bagels
Bring a large pot of water to a boil, add the sugar, and stir well to combine.
Turn heat down a little, allowing water to simmer rather than boil.
2 or 3 at a time, drop your bagels into the simmering water, allow to cook for 1 minute, then flip each and allow to cook for another minute.
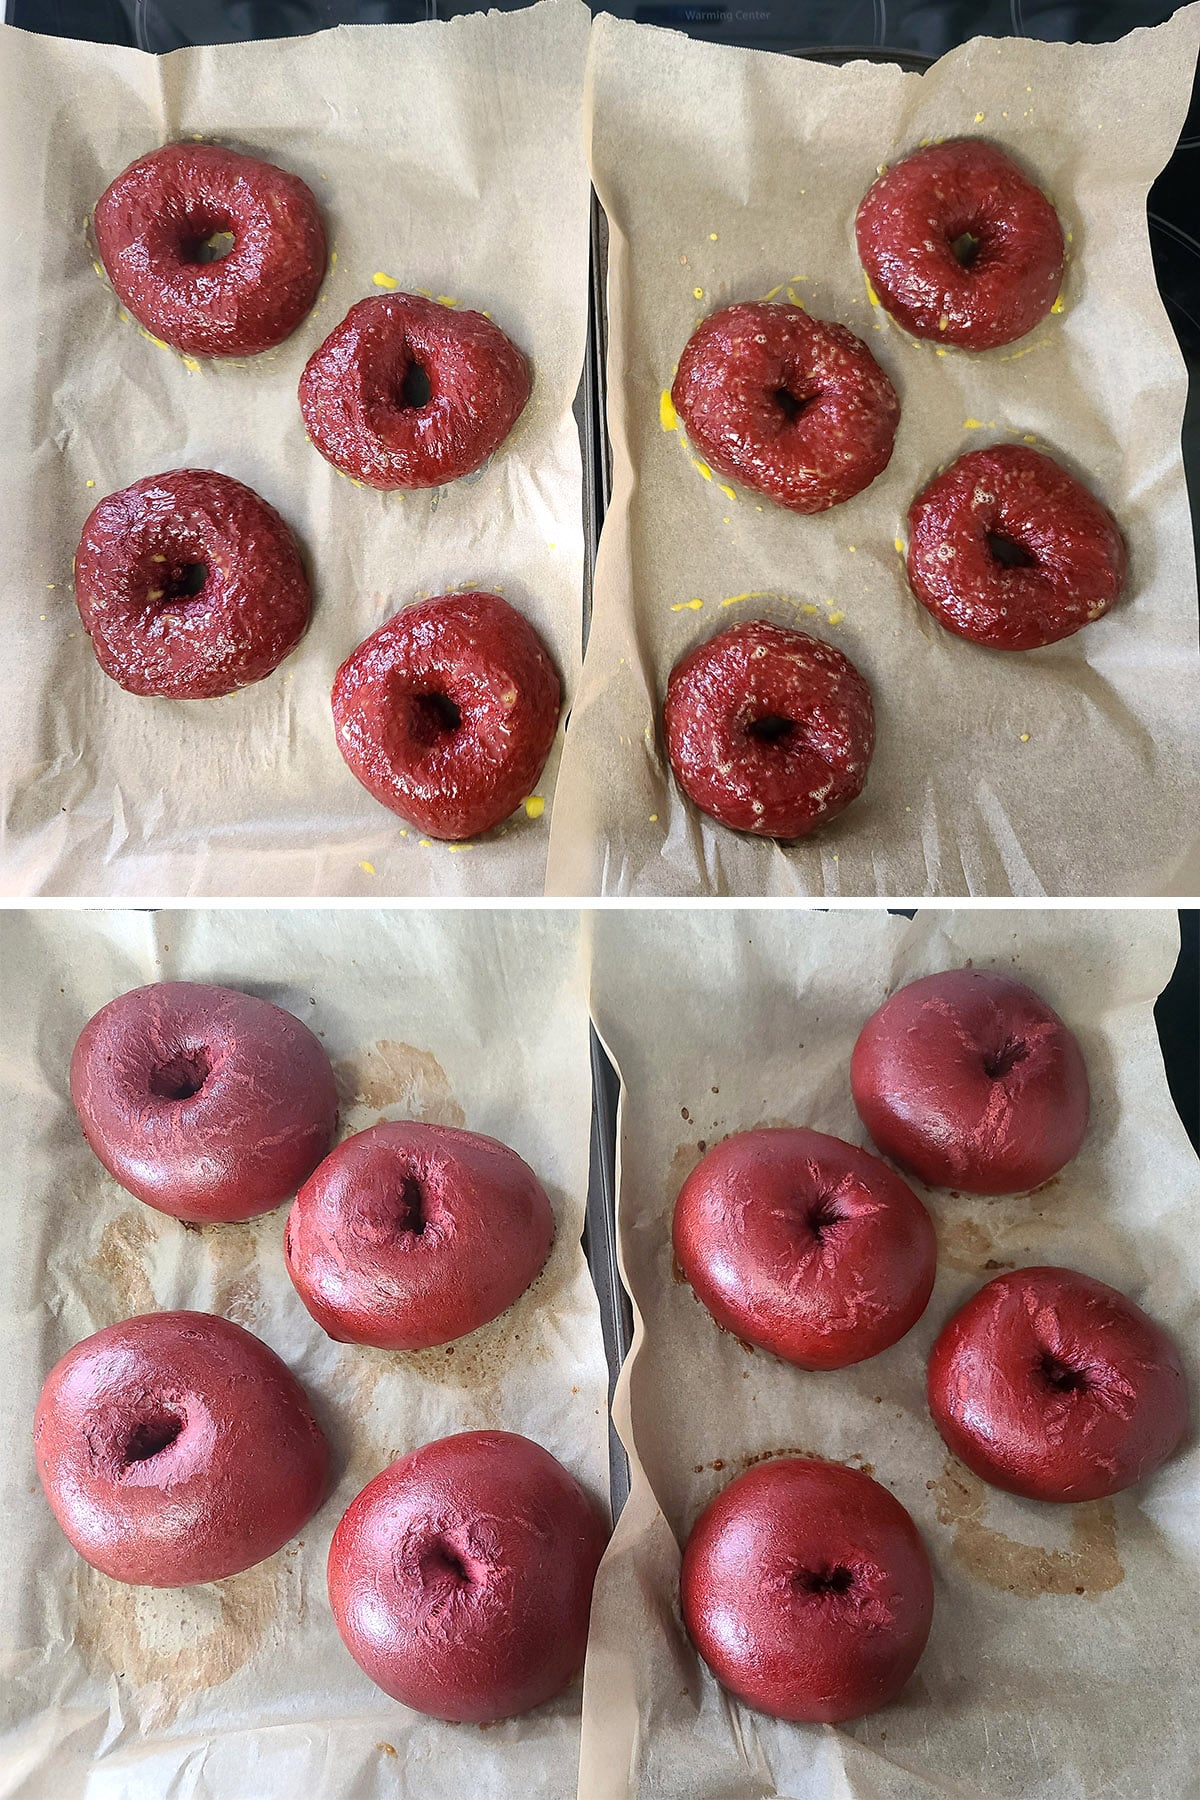
Use a slotted spoon to remove the bagels from the water, draining well before placing on lined baking sheets - 4 per cookie sheet.

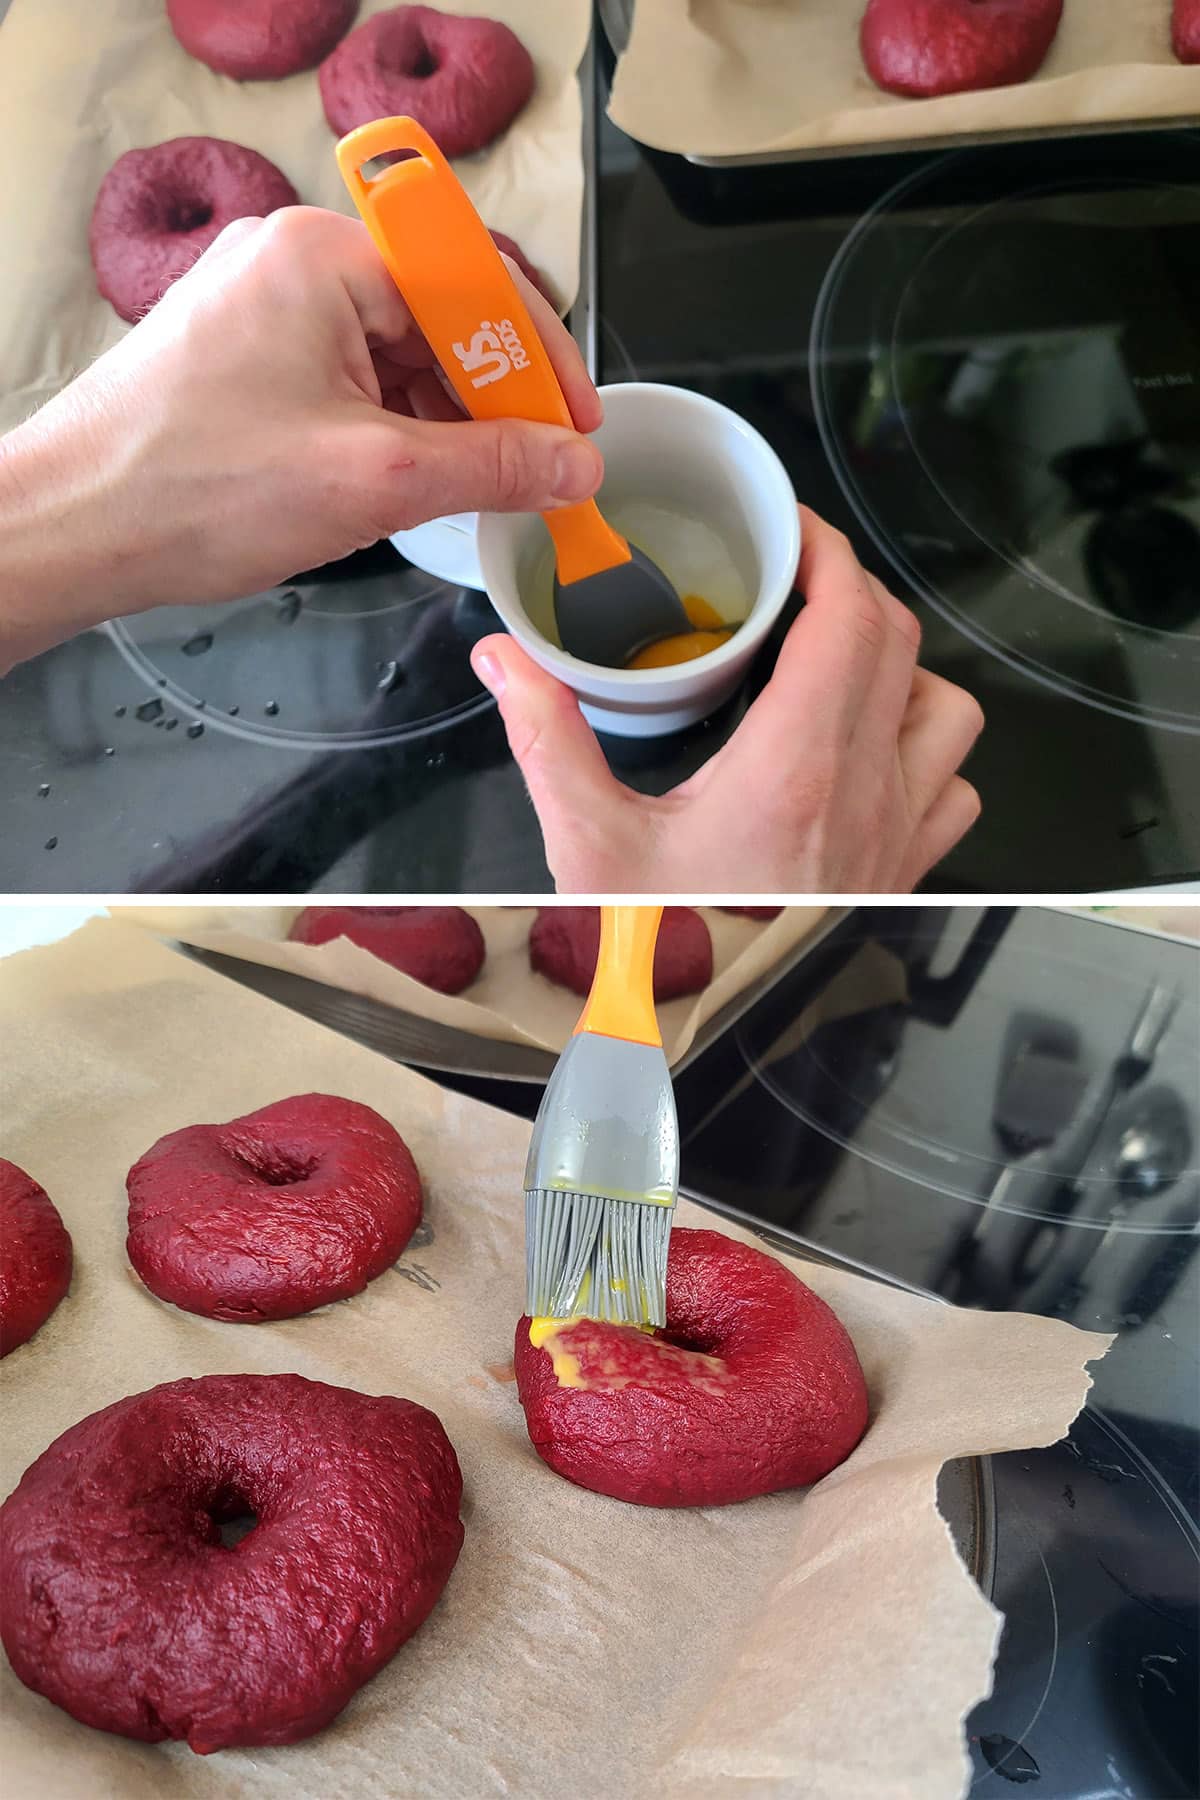
Whisk egg together with 1 tablespoon of water, brush over the tops and sides of each bagel.
Well... dark red, anyway!
Best served reheated - either in a microwave, air fryer, or toaster.
More Valentine's Day Ideas
Looking to do something a bit different for Valentine's Day? Here are a few ideas!
6 Inch Cheesecake
Baklava Cheesecake
Balsamic Mushroom Baked Brie
Booze Bouquet Tutorial
Chocolate Raspberry Pavlova
Chocolate Ravioli
Dark Chocolate Truffles
Deviled Strawberries
Fondant Chocolate Leaves Cake Tutorial
Heart Shaped Bagels
Heart Shaped Beer Pretzels with Jalapeno Jack Dip
Mini Eclairs
Mushroom Goat Cheese Braid
Pepper Crusted Tuna with Wasabi Cream Sauce
Phyllo Crab Triangles
Red Velvet Brownies
Savory Tomato Shortcake
Traditional Raspberry Mousse
Valentine's Day Charcuterie Board
Valentine's Day Deviled Eggs
Valentine’s Day Pavlova
Special Diet Treats
Need it gluten free* or low carb? Check out these Valentine's Day recipes on my other blogs:
Gluten-Free Crab Cakes
Gluten Free Crepes
Gluten-Free Fried Brie
Heart Fruit Skewers with Raspberry Cheesecake Dip
Keto Creme Brulee
Low Carb Chocolate Mousse
Keto Crab Cakes
Low Carb Tiramisu
Keto Cheesecake
Seafood Cobb Salad
* Some of the recipes in the first link section are inherently gluten free, too!
Share the Love!
Before you chow down, be sure to take some pics of your handiwork! If you post it to Bluesky, be sure to tag us - @CelebrationGen. We're also on Pinterest, so you can save all your favourite recipes to a board!
Also, be sure to subscribe to my free monthly email newsletter, so you never miss out on any of my nonsense. Well, the published nonsense, anyway!
Finally, if you love this recipe, please consider leaving a star rating and/or a comment below, and maybe even sharing this post on social media!


Red Velvet Bagels
Equipment
- 2 Baking Sheets
- Parchment Paper
Ingredients
Dough
- 1 ⅓ cups warm - not hot - Milk
- 1 ¼ cup Granulated Sugar
- 4 teaspoon Active Dry Yeast
- 3 ¼ cups All Purpose Flour
- ¼ cup Cocoa Powder
- 1 teaspoon Salt
- 1 tablespoon Vanilla Extract
- 1 Tablespoon White vinegar
- Red Gel Food Colouring
Assembly:
- ¼ cup Granulated sugar
- 1 Large Egg
Instructions
Make the Dough
- Measure warm milk into a glass measuring cup or bowl, stir in ¼ cup of the sugar until well combined. . Stir in yeast, allow to stand for 10 minutes – it should get very bubbly.
- In a large mixing bowl, combine flour, remaining sugar, cocoa powder, and salt. Pour in yeast mixture, vanilla, vinegar, and a copious amount of red gel food colouring, stir well to combine.
- Dump dough out onto a floured surface, knead until soft and elastic, 5-10 minutes.
- Alternatively, use a stand mixer with a dough hook for about 7 minutes, or until dough is smooth and elastic.
- Note: Depending on how much - and what type of - food colouring you use, you may find the dough to be too wet / sticky. You can add a little more flour if this is the case - it should be a little sticky, but easily peeled away from the bowl.
- Once dough is fully kneaded, place in a greased bowl, cover with plastic wrap, and allow to rise for one hour, or until doubled in size.
Form the Bagels
- Once dough has doubled, dump it out on a clean work surface, and divide it out.
- We divided the mixture into 8 equal sized balls, for medium-large bagels – but you can make them smaller or larger by dividing into 6, 10, or 12 equal sized pieces.
- There are two main ways of forming bagels – with roll each lump of dough into a thick “snake” and secure the ends together, or roll each lump into a smooth ball before poking a finger though.
- Once you have a hole made, stretch the ring of dough out a bit to enlarge the hole. Personally, I prefer the latter.
- Once you have all of your bagels formed, set them on a baking sheet to rise for another 10 minutes.
- As your bagels are resting, preheat oven to 350F, line 2 baking sheets with parchment paper.
Boil and Bake the Bagels
- Bring a large pot of water to a boil, add the sugar, and stir well to combine.
- Turn heat down a little, allowing water to simmer rather than boil.
- 2 or 3 at a time, drop your bagels into the simmering water, allow to cook for 1 minute, then flip each and allow to cook for another minute.
- Drain well, place on lined baking sheets.
- Whisk egg together with 1 tablespoon of water, brush over the tops and sides of each bagel.
- Bake for about 38-40 minutes if doing 8 bagels, or 35-37 minutes (small - 10/12 bagels) or 40-45 mins (large, 6 bagels), until golden brown.... well, darker red, anyway!
Notes
Nutrition


Leave a Reply