Adding a Recessed Outlet to Your Kitchen
Additional electrical outlets are always a good thing, but dealing with wiring, permits, and contractors is a headache. Here's an easy way to add outlets to your kitchen.
Servings: 1 New Outlet
Cost: $20
Equipment
- Pencil
- Saw: oscillating multi-tool, jig saw, or mini hack saw
- Drill and drill bits
- Zip ties and zip tie adhesive mounts
- Screwdriver
Ingredients
- 1 Recessed power strip
- 1 Outlet adapter Optional
Instructions
Select possible locations.
- By locating your existing outlets, you can determine where you can expand additional outlets. Keep in mind that most of these devices have a 6 foot / 2 meter long cable, but this is plenty long to install countertop outlets from an outlet located above the stove for the stove vent, for example.
- If installing in a cabinet, don’t install it too close to any structural support. By moving the device out from the edges by at least 2”/5cm, you’ll ensure you won’t impact the strength of the cabinet.
- Consider the way your kitchen is used, you don’t want the outlet to get splashed from sink water, or get steam from being directly over a burner. Your outlets should be GFCI protected, which ensures that there won’t be a safety issue for these issues, but having your device in a poor location will trip your GFCI repeatedly and cause a nuisance.
- If your outlet is already completely in use, you can install an outlet adapter to give you more outlets. You’re only going to be using one or two devices at a time, so it’s perfectly reasonable to split off the power in this manner. If your outlet has the two round-ish ports with the screw in the center, then I highly recommend an outlet adapter that screws in place. You simply remove the cover and replace it with the adapter. Unfortunately I have not seen this concept applied for decora outlets (the rectangular face outlets), which is likely what you have in the kitchen due to GFCI requirements.
- It might be tempting to install this into the back wall, but the concern here is that inside the wall are wood studs, possibly insulation and vapor barrier, and possibly water and/or electrical lines. The risk of damage to these systems and trying to avoid them is beyond the scope of this tutorial. Additionally, you won’t have access to the back side, so there is no good routing for the cable.
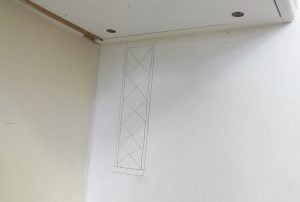
Mark the cut.
- If your device came with a paper cutout template, you can use this to mark out the required cut and the location of the mounting holes. If not, simple use a pencil to trace around the wide face of the device. Now turn the device around and you’ll see that the required cutout is slightly smaller. You can estimate the amount to move the line inward. Cutting a tiny bit larger than absolutely needed is an advantage, it will make installation simple and the front face plate will cover the edges. Just make sure not to cut out to the outer faceplate lines, or you’ll see the edge!
- Mark large X’s over the portion that will be cut out. This is always a good idea since it provides a constant reminder of what part is the garbage part.
Make the cut.
- If you have an oscillating tool, or can borrow one, this is a great tool for the job. Virtually all kitchen cabinets are made from either MDF (that compressed sawdust stuff) or plywood. The cuts will only take a couple of minutes with an oscillating tool. If you don’t have access to one, the next best tool is a jig saw. If you don’t have one of those, don’t worry, you can still easily install this, but it will take a little more manual labor. You’ll want a small hand saw to make the cuts. I recommend a mini hack saw with a course blade, say 18 teeth per inch. A hack saw is designed primarily for metal cuts, but it works great here because it has such a small profile. You’ll need to drill a hole in opposite corners of the cutout region to allow the saw to be inserted. If you have a ½” drill bit, it should provide enough room. If not, you’ll need to drill two holes right next to each other to provide enough room. It’s a bit tricky to do that though. Make sure to drill only into the cutout region!
- The blade on the mini hack saw is easily bent, so use care to make slow, short-stroke cuts that are close to the handle and it will work fine. You will have to cut out chunks at a time, which provides more and more clearance to get the final profile needed.
- Follow the lines with the saw until the entire cutout region is removed.
Test the fit; mark the mounting holes.
- Insert the outlet into the hole, making sure it fits all the way through properly. You might find that you need to remove a little more material from the cabinet if the cuts weren’t perfect.
- Once it fits properly, use a pencil to mark the location of the mounting holes.
Drill the pilot holes for the mounting screws.
- MDF will break apart in chunks if you try to insert screws directly into it, or it can. That’s bad. Plywood is better, but drilling without a pilot can cause some swelling, which will mean that your outlet device will be forced to have a small gap; it won’t sit tight against the cabinet no matter how hard you try to tighten the screws. The solution to both of these issues is the same; drill a pilot hole for each screw.
- Take a look at your mounting screws and select a drill bit that is the slightly smaller than the main shaft portion of the screw (not the outside of the threads). You’ll be removing the material with the body with go through, so only the threads have to force themselves into the wood, which it can handle.
- In this case, you can probably drill all the way through the cabinet wall without consequence, but if you want to get the exact depth needed then the way to do that is to hold the screw up to the drill bit and use a piece of tape for the correct length. The screw is likely a flat or oval head with a tapered head down to the screw portion. The length to select is where the head meets the screw, not the top of the screw head. Fold the tape across the drill bit and only drill to that depth.
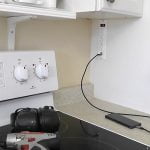
Install the outlet.
- Now you can screw the mounting screws in place and your device is in place!
Cable management.
- Plug your outlet in and determine the best path for the cable. Attach the adhesive-backed mounting plates where appropriate – at each corner and at least every 1 foot/0.3m.
- If your cable is longer that needed (and it likely is) and has slack, you can double-back the cable into a Z shape that folds on itself. Find the best location for this extra bulk so it won’t be in the way. Don’t zip tie at the very ends of the double-back spots, you want the cable to have a slight curve at the edges so the wire isn’t damaged.
- Use the zip ties to attach the cable nice and neat, then cut off the excess portion of the ties.
Enjoy!
- That’s it, your outlets are ready to use!
