
Homemade Cutting Board - Colourful Squares Style
Fancy boards - Cutting, charcuterie, cheese - make great gifts! Here's how to make a DIY Cutting Board - "Colourful Squares" Style!
Cost: $20
Equipment
- Table Saw
- Planer
- Sander
- Chisels
- Clamps
Ingredients
- 6 pieces Wood Your design may vary!
- 1 bottle Titebond III Or another Type 3 Glue
- 6 pieces Glue brushes
- Carpenter Pencils
- 3 pieces Sandpaper 80, 120, and 180 grit are recommended
- 1 tube 5-minute epoxy If repairs are needed
- Craft or Popsicle Sticks
- Disposable Mixing Containers
Instructions
Confirm your design
- Once you have your design and wood in hand, it’s always good to do a quick confirmation before cutting anything.
- Measure the widths and lengths required in your design for each wood, and measure what you have on hand. Make sure to include the kerf width for the cuts, as well as allowance for sanding. We use a thin kerf table saw blade, 0.094"(2.4mm) wide, but we use 0.125"(3.2mm) for total allowance, which is a generous allowance to ensure to issues.
Cutting and planing the boards
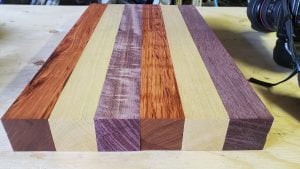
- Rip the pieces to rough squares, if necessary. Make sure to leave extra material for planing.
- Plane the boards to be the same dimensions. In our design we used a square profile, but equal height rectangles are a perfectly acceptable and normal design.
- It is generally a good idea to prepare some scrap pieces of wood - we use pine furring strips or studs - which will aid in clamping. Not only does this prevent the clamps from digging into the workpiece, it helps to displace the clamping force across the surface, providing even clamping force for optimal adhesion. We chose to skip this for some steps where the gluing surfaces were small.

- Note: before sanding or planing, clean your station very well. After sanding, scoop up the dust into a ziplock baggie and label it with the type of wood. This dust or chips will come in handy if you need to do repairs. You can create more later using scrap pieces, if needed, but it’s easier to collect it at this point. It is best to keep wood types/colours separate, but blends can be useful as well.

Glue up subassemblies if it will help
- In our design, we have a repeating pattern using three colors. By gluing together three of the six pieces before cutting them into blocks, it made subsequent steps a little easier. This is completely optional. This subassembly is seen above in the section discussing using scrap wood to prevent clamp damage. Make sure grain orientation or other features are in the direction of your design.
- Set up the clamps and assemble everything before gluing. This is important so you’re not fiddling around trying to get the clamp to the right spot when you’ve got glue on your parts and you struggle to manage everything. Leave a little extra room in your clamps so you can slip the pieces in an out easily.
Gluing the boards
- It’s easy to put on too much glue, but the key is to have a thin coat of glue on both sides. I like to use the resistance of the brush as a signal. If it’s easy to wipe the glue, it’s too wet and there is too much, I unload the glue from the brush onto a piece of scrap wood. There should be some significant resistance to brushing, it should feel like it’s pulling. Of course, you also want complete coverage, add some more glue if there are blank spots.

- The image below illustrates a proper amount of glue after brushing.

- You want to make sure to drive the glue into the grain, all of those tiny little grooves from sanding will be critical to get a good bond. Also make sure to get glue all the way to the edges. If you pieces come apart, they will begin to separate at the edges. If the edges are glued well, the pieces simply can’t separate.
Clamping the boards
- Set up the glued boards and the clamping boards and lightly clamp them together. Adjust the pieces so the edges line up as perfectly as possible - this will minimize the amount of planing and sanding you’ll do later, as well as minimize waste. Clamp a little tighter to secure, but don’t clamp too hard at this point or the glue will be squeezed out to the sides too much.

- It’s important to distribute the clamping force not only along the length, by using multiple clamps, but along the height as well. When we’ve got thin pieces like this, it’s not critical, but it becomes very important later as the workpiece becomes large. If you only clamp from the bottom, for example, the top of the boards won’t be held together properly and you’ll end up with gaps.

- Once you get all of your clamps in place, begin clamping tighter. Alternate around and tighten a little bit at a time. Verify the alignment of your pieces throughout this process - it’s common for the boards to slip a little bit and you don’t want to end up gluing it out of place.
Wait for the glue to dry
- Waiting is difficult! The pieces will be stuck together fairly well after an hour or so, but planing and sanding may tear them apart. While it’s best to wait overnight between each step, we will continue processing after around three hours, but be very careful since the glue is still fairly weak at this point.
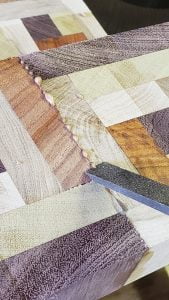
Remove excess glue
- After unclamping the workpiece, you’ll likely see a little excess glue was squeezed out from the joints. A chisel makes quick work of removing this. The planer could easily remove the material, but the little lumps on the bottom side could make the workpiece go through the planer at an angle, skewing the cut. Making the surfaces mostly flat ensures proper planing.
Cut to the correct height
- Since we're using the end grain as the face of the board, we want to cut all of our wood to the same length. At this point you'll have a lot of small pieces, and possibly some strips if you chose to use subassemblies.

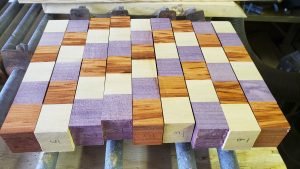
Confirm your design
- It's important to lay everything out to make sure it's going to end up exactly how you want it. In our case, we set the grain directions to be consistent across every cube.
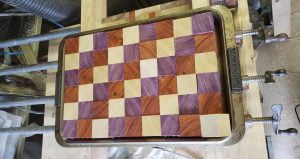
Glue up the strips in one direction.
- It might be tempting to try to be more efficient and glue/clamp in two directions. I highly recommend that you do not try this. It’s difficult enough to ensure everything is aligned and properly clamped in one direction, attempting this in two directions simply has too much risk of error. The way to do this properly is to have a clamping jig that is specifically designed to aid in this type of clamping. Unless you plan on making these as a full time job, it’s simply not worth the effort.
- In our design, we could have glued the strips in either direction, we chose to first glue the shorter direction since it makes clamping a little easier. Here we didn't use scrap wood, the clamp face takes up most of the cubes' surface area already.Maintain the same order and orientation from your layout

Number the strips as you unclamp them
- Once you take these to the sander or planer, it's very easy to get them mixed up. Simply number the ends of the strips as you remove them from the clamps. I like to underline the number to ensure I don't get any upside-down.
Plane or sand the ends of the strips
- Since I have a large drum sander, I chose to do this on my sander. You could easily use a planer to prepare the edges. You want perfectly flat surfaces, but a rough surface (such as what you get with 80 grit sandpaper) is best since you'll be gluing these edges.Don't bother to plane or sand the ends or faces, which will be the faces of the board. You'll take care of this once it's all glued together.
Repeat!
- At this point, glue and clamp the strips in the other direction. Here it's a good idea to use scrap wood on the ends while clamping.

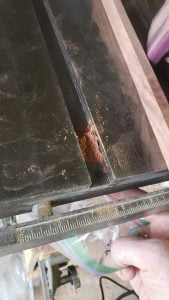
Oops.
- Even if you’re careful, mistakes can happen. If you end up with a gap somewhere in your piece, here's a good method to repair it. This example is from a different project, but the concepts are the same.

- Or, you may find that your wood has little wormholes or other blemishes.

- No worries, we can deal with this! Mixing sawdust - of the type of wood being patched - along with glue or epoxy, will result in a repair that blends in well. We prefer to use epoxy, but many woodworkers use wood glue for repairs.
Prep the tools needed for repair
- 5-minute epoxy, or wood glue
- Craft/popsicle stick
- Mixing container (we use disposable shot glasses from the dollar store)
- Sawdust of the wood you’re repairing
- Heat gun (a hair dryer will work)
- A razor blade and/or dental pick can be handy to scrape or move the patch into the seam
Have plenty of sawdust available
- It’s hard to know exactly how much sawdust you’ll need, so make sure you have plenty.
- For our Padouk example, we cleaned the table well then sanded a scrap piece with the palm sander with a course pad (80 grit).

- The palm sander will blow away a fair amount of the dust, so periodically you want to pause to scoop up the sand you’ve created. The groove in the table make convenient areas to scoop the dust for collection.
Prep the repair area
- If you’re patching wormholes or other natural defects, use the dental pick to scratch up the surface. This will remove any soft material that is barely holding on, and will create small scratches for better adhesion.
Mix the repair media and fill the piece
- If you’re using 2-part epoxy, first mix a small amount before adding any sawdust. This will ensure that the epoxy will cure properly.
- Add sawdust, a little bit at a time until it’s a thick mix. The idea here is that the epoxy or glue is coating the sawdust and holding it all together, which means it’s mostly sawdust.
- Smear the repair media over the gaps/holes and drive it into the workpiece as much as possible. Make sure there’s extra, both glue and epoxy (to a lesser extent) will shrink a small amount as it cures.

Drive the repair media into the workpiece as much as possible
- Using the heat gun, gently warm up the repair media. You’ll notice it soften and flow easier. That’s when you should remove the heat. Too much heat will cause epoxy to cure prematurely, and will cause glue to dry out.
- Now that the media is soft, you can use your tools to drive it even deeper into the workpiece. Add more repair media on top, if needed.
- For our gap, we used the craft stick to wedge the repair media as deep as possible.

- The repair looks dark, compared to the Padouk piece. The Padouk will get darker when the finishing oil is applied, and the repair will blend better.
Wait and scrape.
- Just like every glue step, wait for the adhesive to cure, scrape off the excess with a chisel.
Final planing and sanding!
- Now it is really looking like a cutting board! Perform the final planing and sanding. Lightly sanding the edges at a 45 degree angle will break the sharp edges. Do this manually, any power tool will remove edge material too quickly.Again I chose to do all of this final work on the drum sander, skipping the planer. Although this was time-consuming, it prevented any potential issues with tearout or snipe. On a planer, make sure to remove very thin slices on each pass, and use care when feeding your piece into the machine, to reduce the chance of these issues.

- For the edges of the cutting board, a joiner is a great way to finish the edge. If you don't have one, a hand planer can remove large bumps and a sander can take care of the rest.Make sure to keep the sander flat on the edge, and don't press too hard. Pressing hard to holding the sander at an angle will round off the edge of the board slightly.
- We like to finish off with a finer grit, 180. We used the palm sander for this final step, to prevent directional sanding marks left by the drum sander. This eliminates the visible scratches but leaves the wood grains somewhat open, allowing the finish to penetrate. The surface appears slightly shiny at this point.

Finishing
- Pour a bit of the Bio-Supra* on the surface of your cutting board, and use a small plastic scraper / squeegee to spread it around.

- Use a foam craft brush to apply the oil to the sides and ends of the board, in a THIN coat.
- Wait 5 minutes
- Using a clean, lint-free piece of cotton - a rag or an old shirt - wipe off excess oil. Continue wiping until there is no more finish coming off onto the rag as you wipe it.**
- Let it dry for 24 hours.
- Use a grey buffing pad to lightly abrade the surface of your project.
- Pour a very small amount of oil onto the surface of the cutting board - less than you needed for the first round, as this round will go further.
- Use a small piece of white puffing pad to work the oil into the first coat.
- Once more, use a clean, lint-free piece of cotton - a rag or an old shirt - wipe off excess oil. Continue wiping until there is no more finish coming off onto the rag as you wipe it.**
Notes
* If you are using a different finishing oil, follow the manufacturer’s directions for it.
** Carefully dispose of your oil soaked rags, as they are HIGHLY flammable. You can either lay them out on concrete - or hang them up in the outside air - until they are completely dry, or soak them overnight in water.
After drying or soaking, you can dispose of them in your regular garbage.
