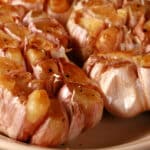
Roasted Garlic
Roasted Garlic is fantastic as an ingredient, or just spread on toast or crackers itself! This easy oven roasted garlic recipe shows you how!
Servings: 1 Bulb of Garlic
Calories: 42kcal
Equipment
- 1 Sharp Knife
- Heavy Duty Foil
- Baking Sheet
Ingredients
- 1 Whole Garlic Bulb
- Olive Oil
- Salt
- Pepper
Instructions
- Preheat oven to 400 degrees F. Line a baking sheet or a small baking dish with 2 long pieces of aluminum foil, slightly overlapping up the length of the pan.
- Peel all excess layers of the papery skin off each garlic bulb, discard the skins.
- Use a sharp knife to cut the top of the bulb off the garlic. You’ll want most - if not all - garlic cloves exposed.
- Arrange the cut garlic bulbs on the prepared baking sheet. Drizzle a little bit of olive oil across the top of the garlic heads, season with a pinch of salt and some ground black pepper.
- Pull up the two long ends of the foil pieces to tent and enclose the garlic bulbs, hold together and roll down, to secure.
- Seal both open ends by holding the layers of foil together, and rolling up to secure.
- Transfer pan with the foil packet of garlic to the heated oven, roast for 1 hour.
- Once an hour is up, check the status of the garlic. You want it to be golden brown and very mushy.
- If the garlic is ready, remove from the oven. If it needs more time, put it in for 10 more minutes at a time, until it’s the desired color and texture.
- Let garlic cool slightly.
- Once garlic is cool enough to handle - but still slightly warm - get the roasted garlic cloves out of the bulb. There are two main ways of doing this:
- 1 - Turn the garlic cut side down and just squeeze the roast garlic cloves out
- or
- 2 - Use a butter knife or cocktail fork to slide individual cloves out, whole.
- Personally, I the latter to be the best way. Less mess, less waste!
- Once cooled to room temperature, transfer roasted garlic cloves to an airtight container, keep in the fridge for up to a few days.
Notes
Cook times are approximate, and can vary wildly based on how you wrap your whole cloves of garlic, the size of the bulbs, the sizes of the cloves IN the bulbs, etc.
See post for more information on using roasted garlic, and other methods of storage.
Ingredients call for 1 garlic bulb just to be able to provide nutritional info. You can roast as many as will fit in your packet / in your oven!
Nutrition
Serving: 1whole head of garlic | Calories: 42kcal | Carbohydrates: 9g | Protein: 2g | Fat: 0.1g | Saturated Fat: 0.02g | Polyunsaturated Fat: 0.1g | Sodium: 5mg | Potassium: 112mg | Fiber: 1g | Sugar: 0.3g | Vitamin A: 3IU | Vitamin C: 9mg | Calcium: 51mg | Iron: 0.5mg
