

This Red Velvet Biscotti is incredibly easy to make, & produces a rich tasting, gorgeous biscotti. A unique accompaniment for your beverage!

So I’ve been on a biscotti making binge lately.
All KINDS of flavours and styles, because it’s just more efficient to do a bunch all at once... and I’m all about efficiency.
Also, now that my husband has graduated and is working in an office with a bunch of other people, I have somewhere to foist it all off to, which is a load off - literally!
I’d also been working on a recipe for https://celebrationgeneration.com/red-velvet-brownies/, as well as a gluten-free chewy red velvet chocolate chip cookie recipe for Beyond Flour, my gluten-free blog.
... So obviously, I needed to make a red velvet biscotti, at the same time!
Red Velvet Biscotti
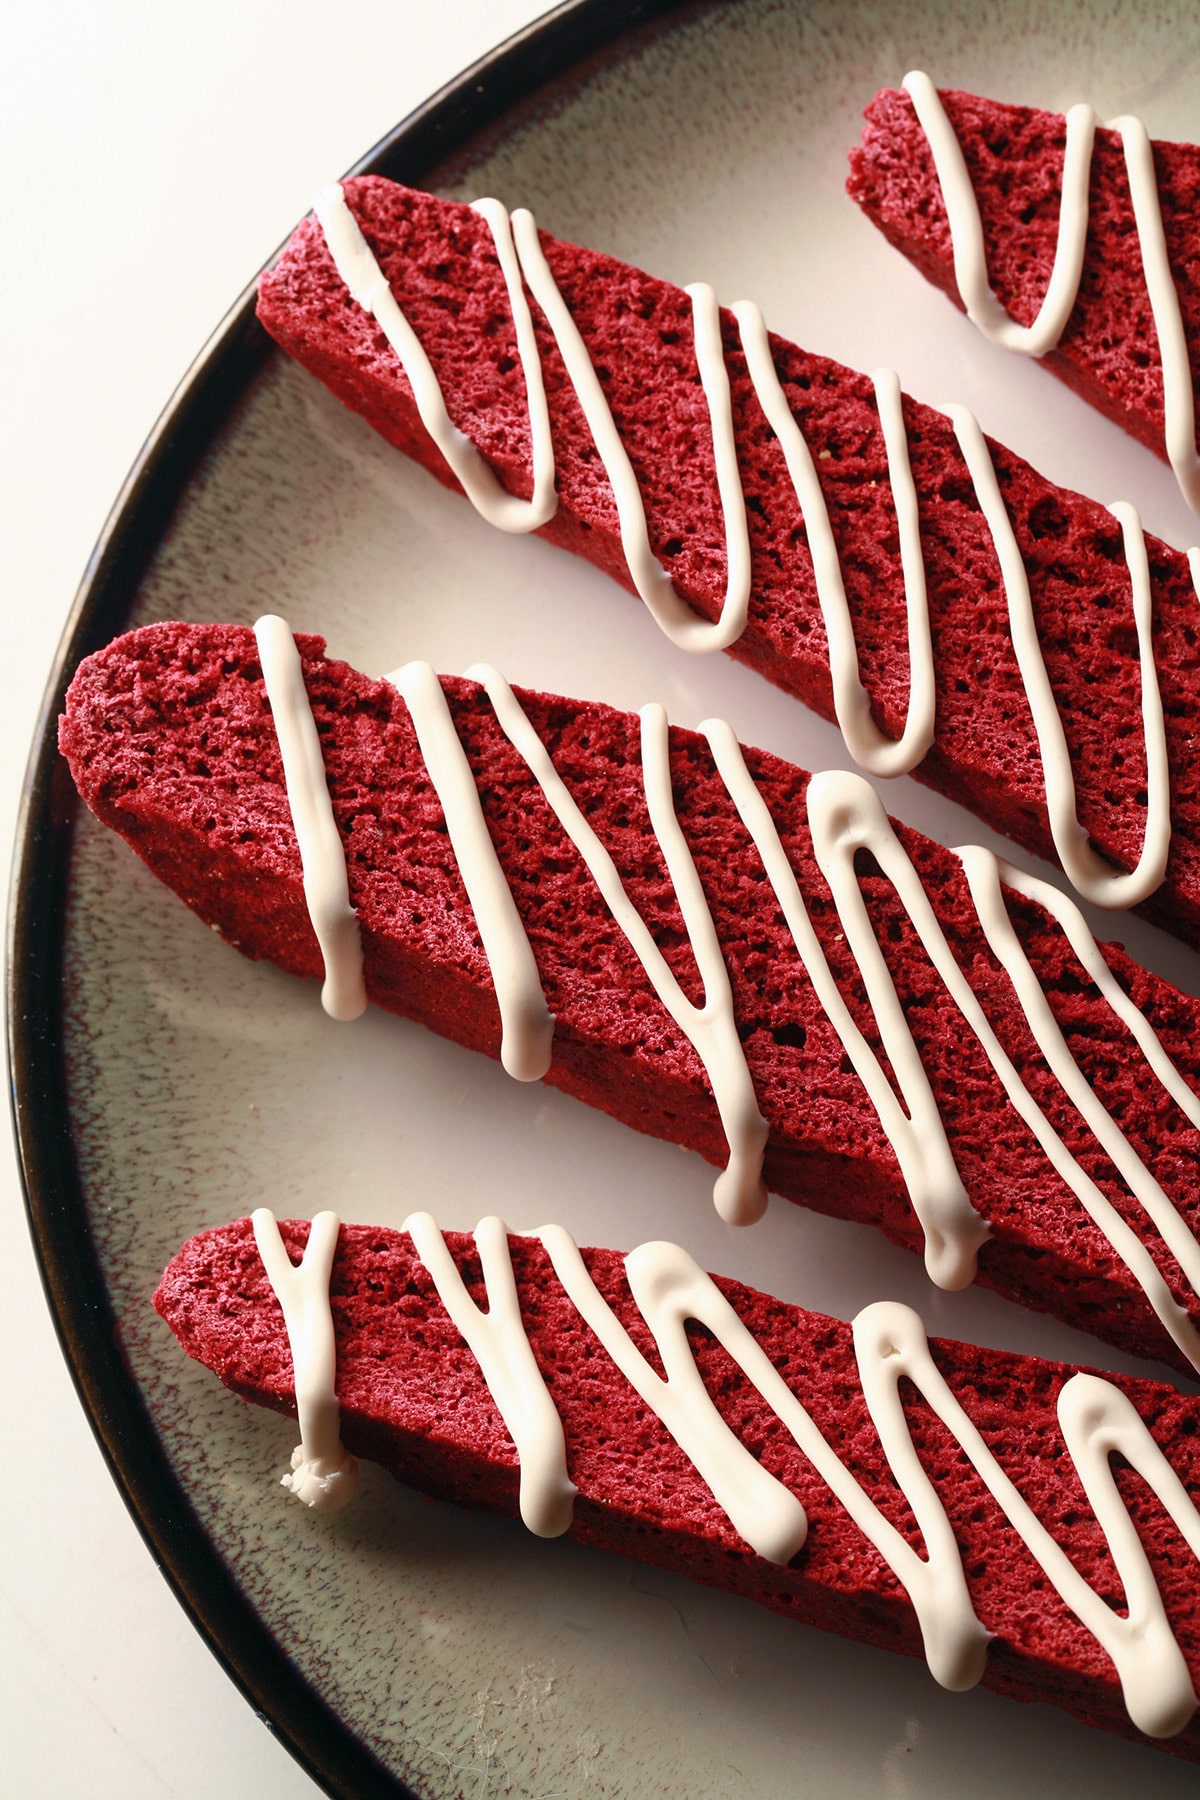
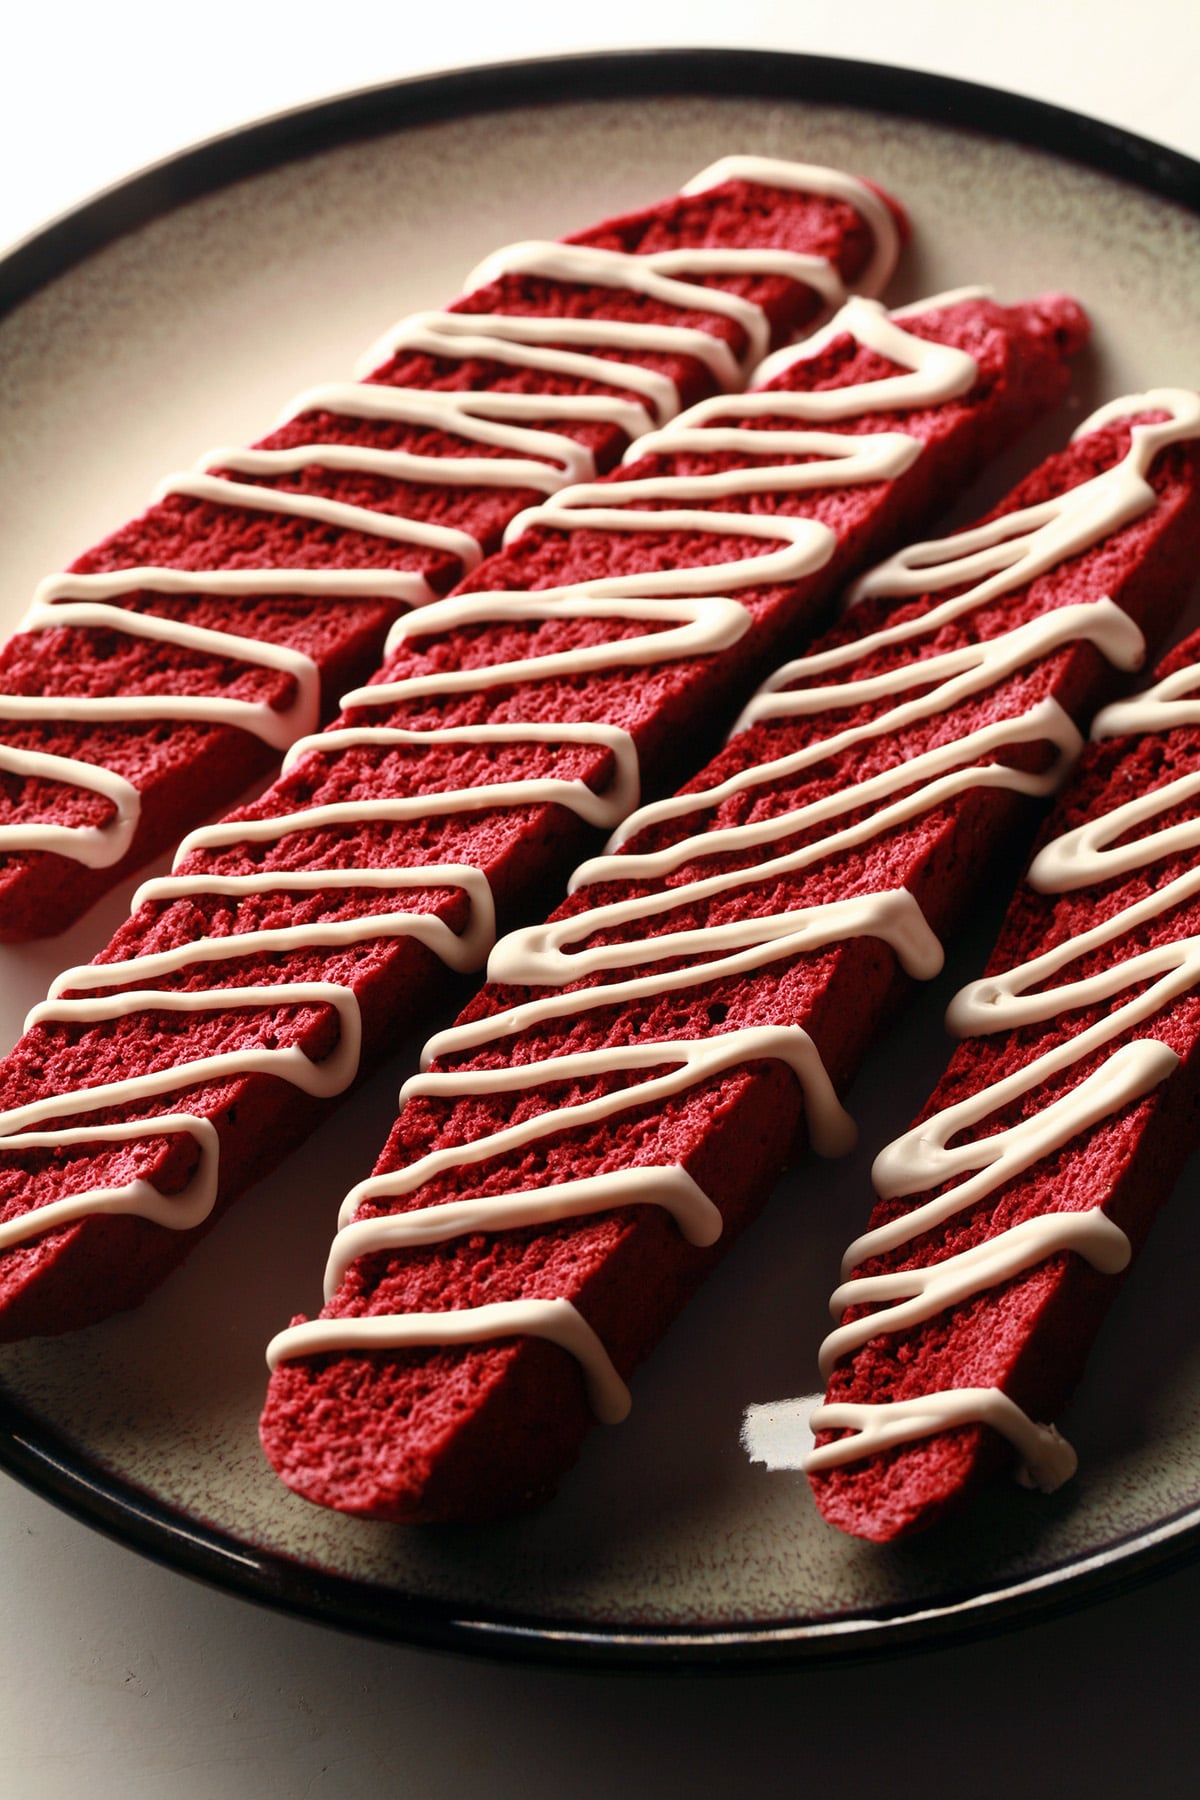
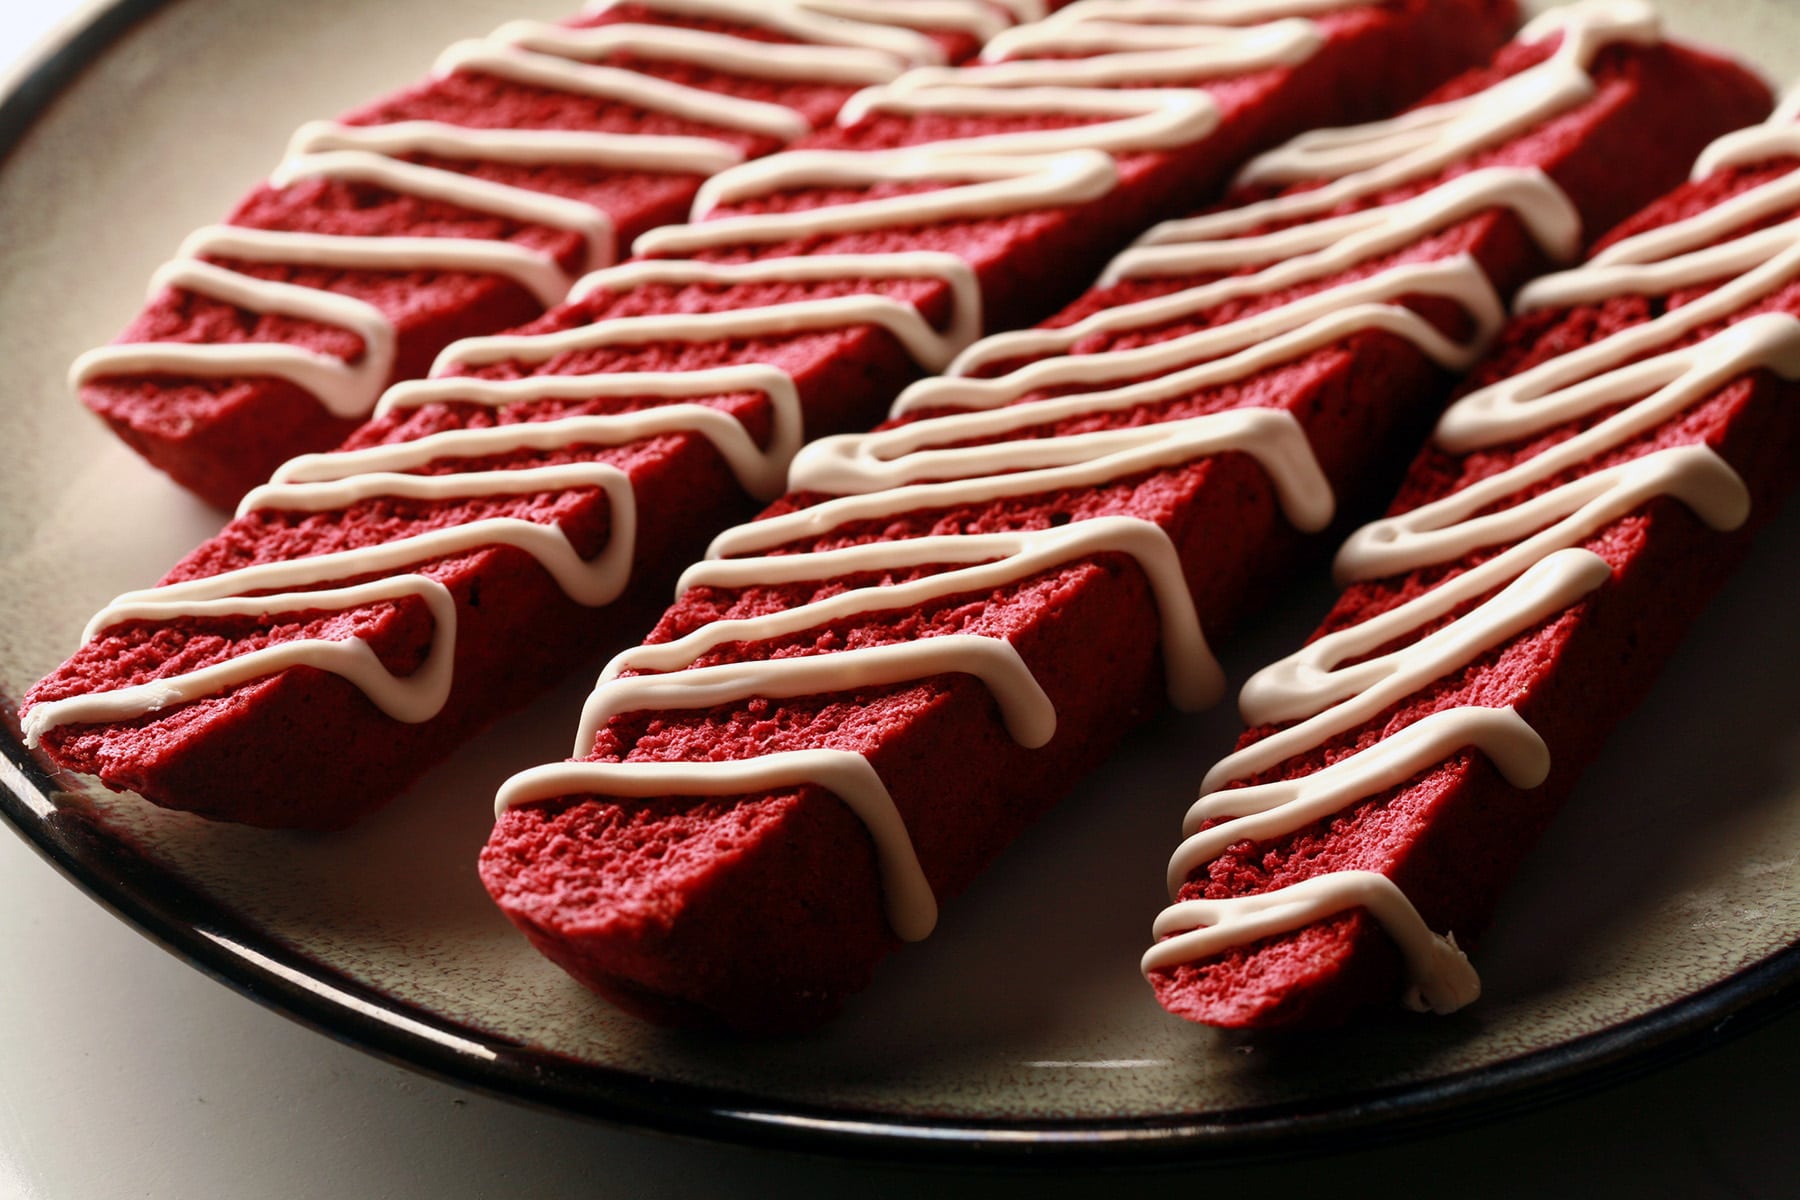
This biscotti is pretty traditionally red velvet flavoured.
That is, rather than just dying a vanilla dough, there’s the light use of cocoa and buttermilk, for actual “red velvet” flavour.
This - along with proper colouring, more on that in a minute - produces a richly coloured, nicely flavoured biscotti.
Add a bit of glaze drizzle, and you’ve got yourself a really pretty biscotti to share!
Anyway, while they’re super easy to make - the recipe is at the end of this post - there ARE a few things to go over that will make the whole process go smoothly.
And, you know, some general education type stuff, to appease the Google overlords 🙂
What are Biscotti?
Biscotti is a traditional Italian cookie that’s been around for a couple hundred years.
It’s a loose dough baked as a loaf, then sliced up and baked a second time, yielding a very dry, crunchy cookie.
They’re generally served with a beverage, with the intent of it being a cookie to dunk in the beverage.
In Italy, this is typically a fortified wine, served after dinner.
In North America, it’s more of a “with afternoon coffee” thing, though you can really eat them anytime.
Anyway.
In its original form, biscotti was just flour, sugar, eggs and nuts - with no yeast, other leavening agents, or fat.
These days, biscotti recipes can go in different directions, with leaveners, fat, and all/or kinds of other additions added to them. (Though generally not yeast!)
I like to make them fairly close to the traditional base ingredients - with no butter or oil added - but with the addition of baking powder and baking soda as leaveners.
... and all kinds of nonsense when it comes to flavour additions, obviously 🙂
You know, like cocoa, buttermilk, and frosting!
How do you Make Biscotti?
Making biscotti the traditional way is SUPER easy.
You really don’t need a mixer, or any kind of specialized equipment... and the dough literally takes like 5 minutes to make!
You have a bowl of the dry ingredients, and a bowl of eggs and sugar that you’ve beaten together. Mix them together - you can do this by hand! - form them into loaves, and bake.
Then you just slice them up into fingers and bake again - simple!
How do you Serve Biscotti?
As these are made the traditional way - as a VERY dry, crunchy cookie - you definitely want to serve this alongside a beverage to dunk it in!
Try it with coffee, hot chocolate, tea, or hot apple cider.
Or, you know, with fortified wine - as the Italians do!
For red velvet biscotti in particular, I like it best with hot chocolate, wine, or plain coffee... not so much with the tea or cider.
How Long Does Biscotti Last?
Due to its ingredients and dry finish, biscotti has a much longer shelf life than most cookies.
When kept in an airtight container, expect your biscotti to stay fresh for about 2 weeks.
Note: It doesn’t *spoil* after this, it can just go stale.
Alternately, you can put your (FULLY COOLED!) Biscotti into a freezer bag, suck most of the air out, and freeze it for a few months, if needed.
How to Freeze Biscotti
There are two ways to freeze biscotti:
- Freeze the finished biscotti
- Freeze the biscotti after the first baking / slicing.
Either way, when you’re taking the biscotti out of the freezer:
- If you froze biscotti after the first bake, just proceed with the second bake after they’ve fully thawed.
- If you froze fully cooked biscotti, you can eat them after they’ve thawed, or you can re-toast them.
To re-toast them - really more of a drying than a toasting - arrange them standing up on a baking sheet, rather than on a side.
Bake for 10-15 minutes or so, at 225 F.

Tips for Making this Red Velvet Biscotti
Biscotti may be very easy to make in general, but there are a few things you can do to ensure it goes smoothly:
- The dough will look kind of scraggly after you mix it together; it really does benefit from a LIGHT kneading.
Don’t over-handle it, though - you don’t want to develop the gluten in the same way you do when making bread or pasta.
I like to wear Nitrile Gloves when kneading it / transferring to the pan / forming the loaves.
Adding your food colouring to the wet ingredients first makes it easier to distribute the colour, and helps prevent over-handling the dough.
Use more than you think you need, as it can get more muted with baking.
Finally, I ABSOLUTELY recommend using gel colouring, rather than grocery store or Wilton food colouring.
I recommend Americolor (what I used when I was in the USA), or ChefMaster (Which is the option more readily available here!)
The red is just FAR more intense, and is so much better to work with. It’s red velvet, afterall... not pink velvet!
On that note, for WHITE drizzle, you can either use clear vanilla extract, or use white gel food colouring (Americolor or Chefmaster) to whiten it after using brown vanilla extract.
Personally, I don't like clear vanilla extract, as it doesn't taste as good.
As pictured, I used my regular Homemade Vanilla Extract, which rendered the glaze a light tan colour. Then, I brought it back to white with a bit of Chefmaster White
- Know that the dough is supposed to be sticky once it’s been kneaded together. Don’t add more flour!
- While parchment paper is generally nonstick, this dough WILL stick to it.
If you spray the parchment in your pan before putting the dough on it, you’ll have an easier time forming the loaves.
While pan spray is best for the parchment, wet hands work better for forming the dough than oiled hands do.
I’ll run my (gloved) hands under the tap, shake them off well, and then form the loaves.
How you form the loaves affects the final shape.
If you like long, narrow biscotti, aim for a relatively even thickness when forming your loaves.
If you like more of a curved top to your biscotti, form the loaf so it’s mounded up a bit more in the middle, along the length of the loaf.
Know that the biscotti with get a LOT harder and drier as they cool.
Don’t expect / wait for full hardness when you take them out of the oven after the toasting - if you do, you’ll end up with burnt biscotti in the end.

Biscotti Variations
Mini Red Velvet Biscotti
Instead of dividing the dough into 2 loaves, divide it into 4 loaves.
When forming them, keep them the same length as you would have, so you have 2 long skinny loaves.
These will require much less in the way of cooking time, so check for doneness at 12 minutes, and bake longer if needed.
Keep an eye on it!
Softer Biscotti
This recipe is for traditional style, VERY crunchy biscotti.
If you’d like softer biscotti, there are two ways you can do this:
The Easy Way
When toasting your sliced biscotti, do 5 minutes per side, rather than 15.
Decrease the eggs by 1.
When starting, instead of mixing the eggs with the sugar, beat the sugar with ¼ cup softened butter, until fluffy.
THEN add the eggs in, and continue with the rest of the recipe.
When doing it this way, let the baked loaves cool for at least 15 minutes before cutting.
Sugar Topped Biscotti
You can sprinkle coarse sugar - or coloured sugar - on top of the unbaked loaves, for extra crunch / texture / a pretty finish.
Be sure to pat down slightly on the sugar before baking.
Biscotti Gifting!
Biscotti - especially holiday themed versions like this recipe - make great holiday gifts!
Not only do they have a great shelf life - and are pretty durable! - they can look really pretty in the packages.
I like to buy long, thin clear plastic baggies, and package 1 biscotti per bag.
Some good options are 3" x 11" clear plastic bags or 2"x 10" clear plastic bags.
Then I tie it off and arrange a selection of these individually packaged biscotti in a gift bag with some tissue paper.
One nice thing about biscotti being so easy to make, is that you can make several varieties at once, and mix / match them for variety packages to gift!
I can make 4-5 batches in a morning, easily. I just make a batch, get it in the oven, and make the next batch while that’s baking.
When the first batch is done, I take it out of the oven, and put the second batch in.
While the second batch is cooking, I slice up the first batch and put it aside, then make the 3rd batch of dough.
I’ll continue this way until all of them have had the first cooking / slicing.
Then I turn the oven down and do the second bake for all of them, in batches.
More Fun Biscotti Recipes!
Looking for more fun variations on making biscotti at home? Here are some more easy recipes to try:
Birthday Cake Biscotti
Candy Cane Biscotti
Cranberry Orange Pistachio Biscotti
Fruitcake Biscotti
Gingerbread Biscotti
Keto Biscotti
Lemon Poppy Seed Biscotti
Mint Chocolate Chip Biscotti
Spumoni Biscotti
Tiger Tail Biscotti

How to Make Red Velvet Biscotti
Full recipe follows - at the end of this post - but here's the pictorial overview:
Biscotti:
Preheat oven to 350F, Line a large baking sheet with parchment paper, spray with pan spray. Set aside.
In a large bowl, combine the flour, cocoa, baking powder, baking soda, and salt. Set aside.
In a separate bowl, whisk together sugar, eggs, buttermilk, and vanilla until well combined and smooth. Add a little red food colouring, mix well to combine, then pour into the bowl with the dry mixture, stir to combine.
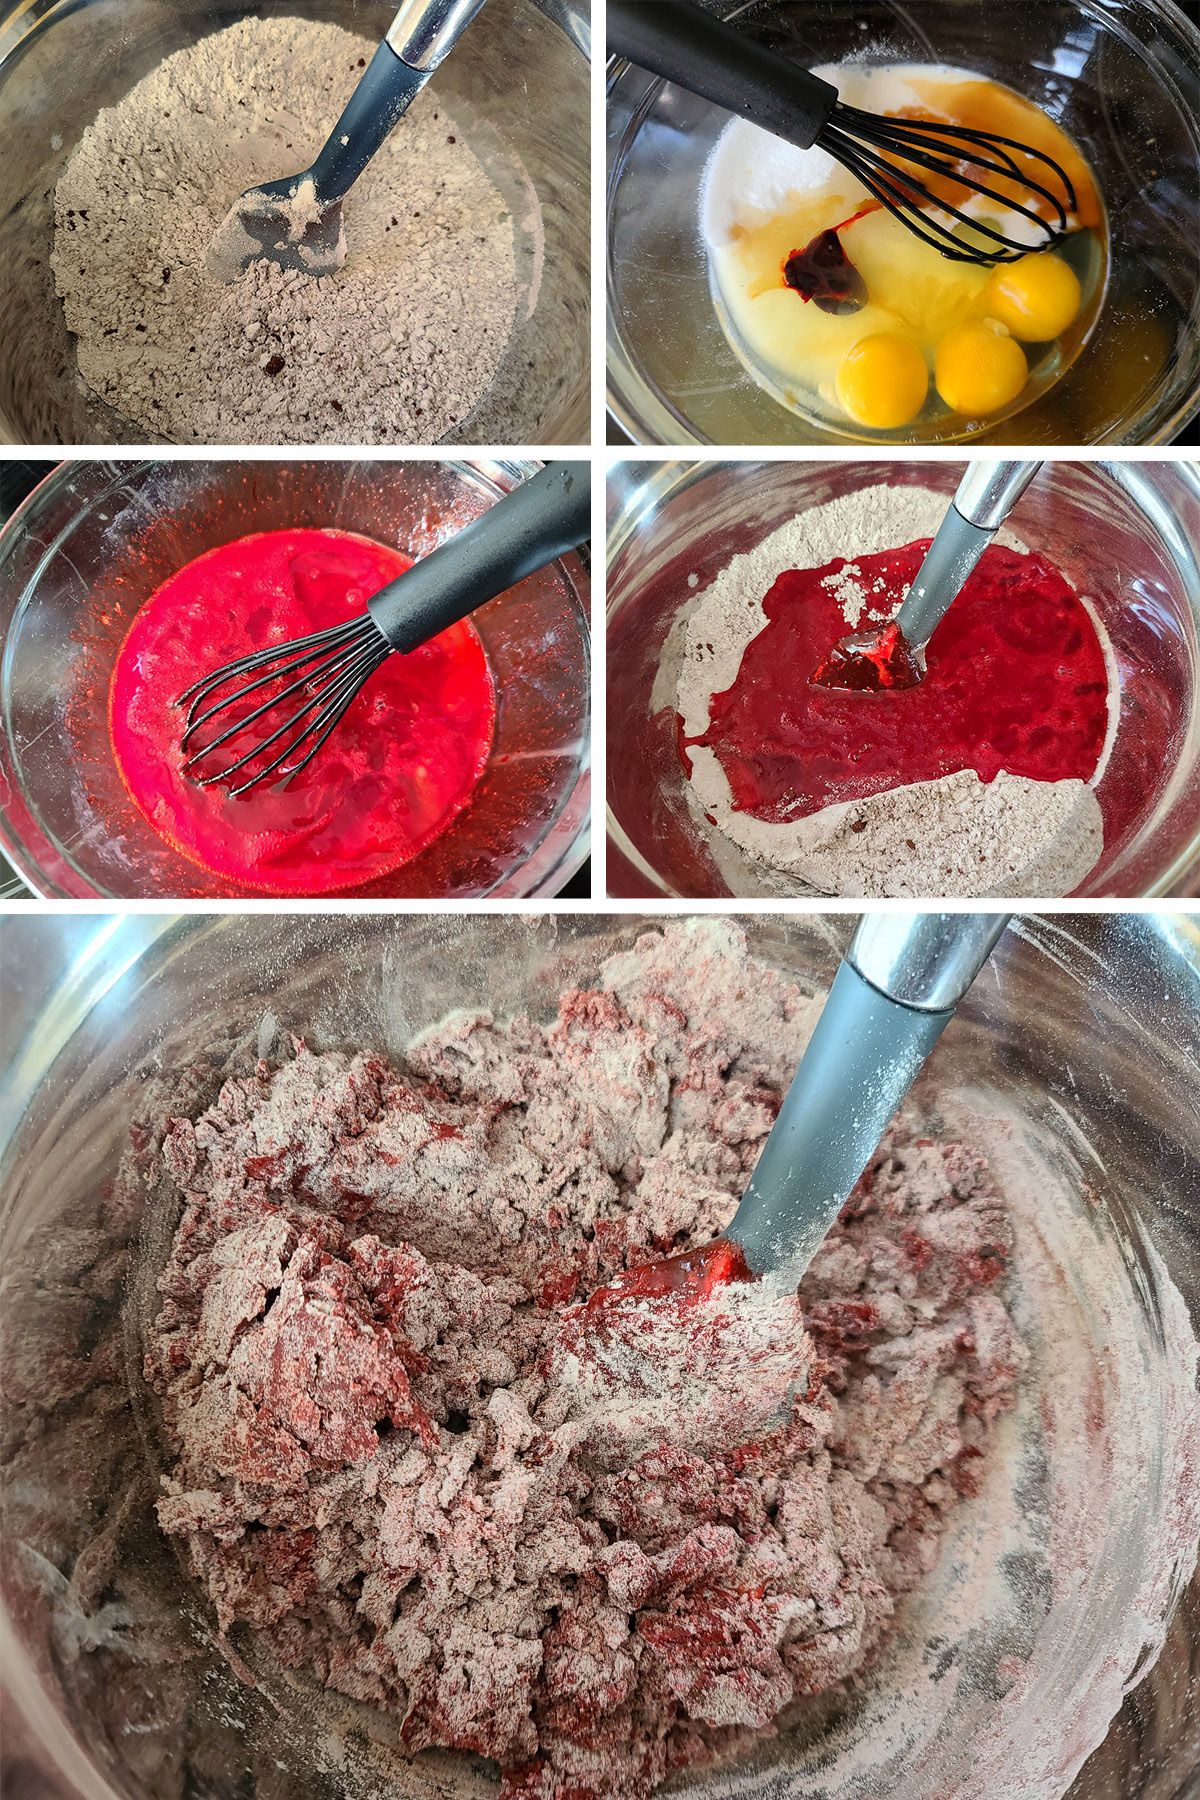
If you want more red food colouring, add it now and stir gently to combine.
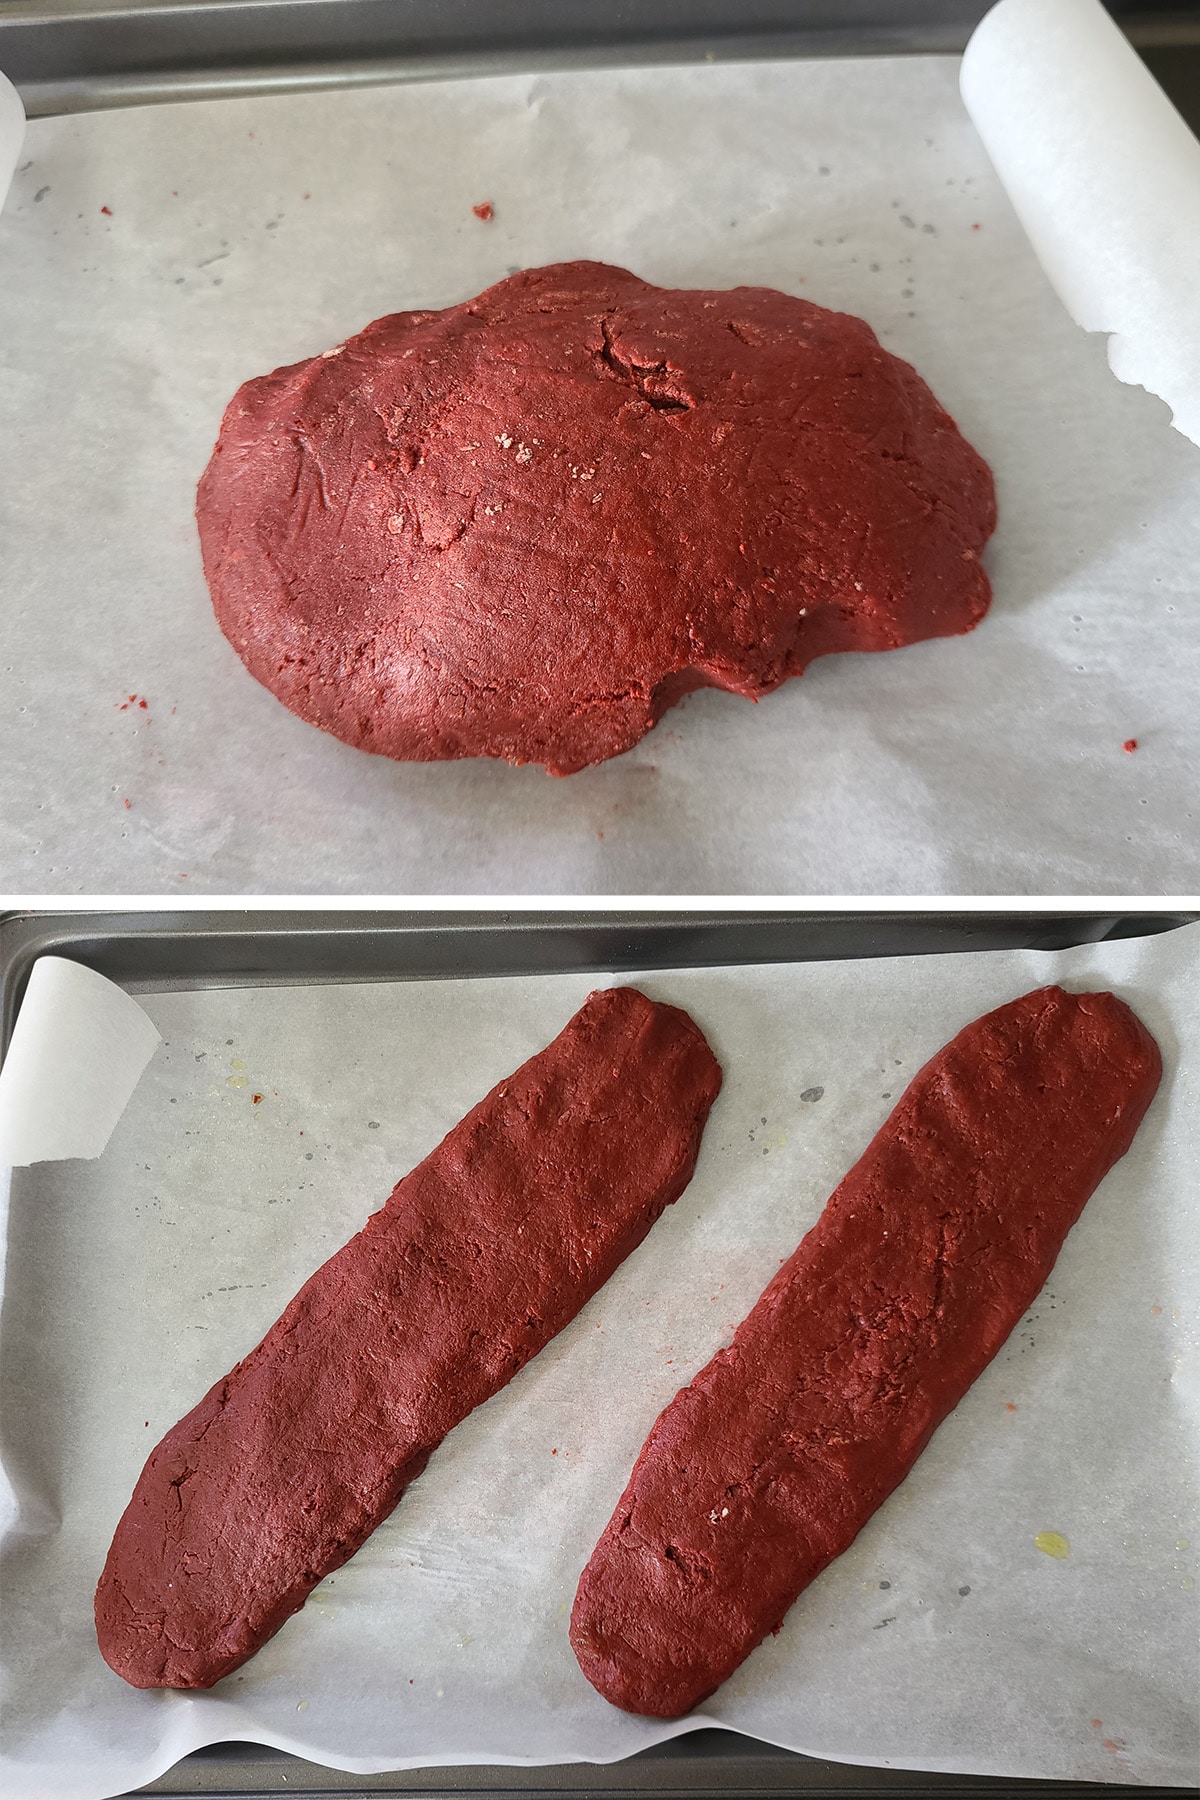
Divide dough in half, form into 2 long, wide loaves on the prepared pan.
Bake for 20-25 minutes, until golden brown on the outside. Remove from oven, turn heat down to 250F.
Allow loaves to cool for 5 minutes.
Cutting on a slight diagonal, slice each loaf into ½" slices. Arrange slices on the pans.

Bake for 15 minutes, flip each piece over and bake for another 15 minutes, or until desired texture.
Remove from oven, allow to fully cool.
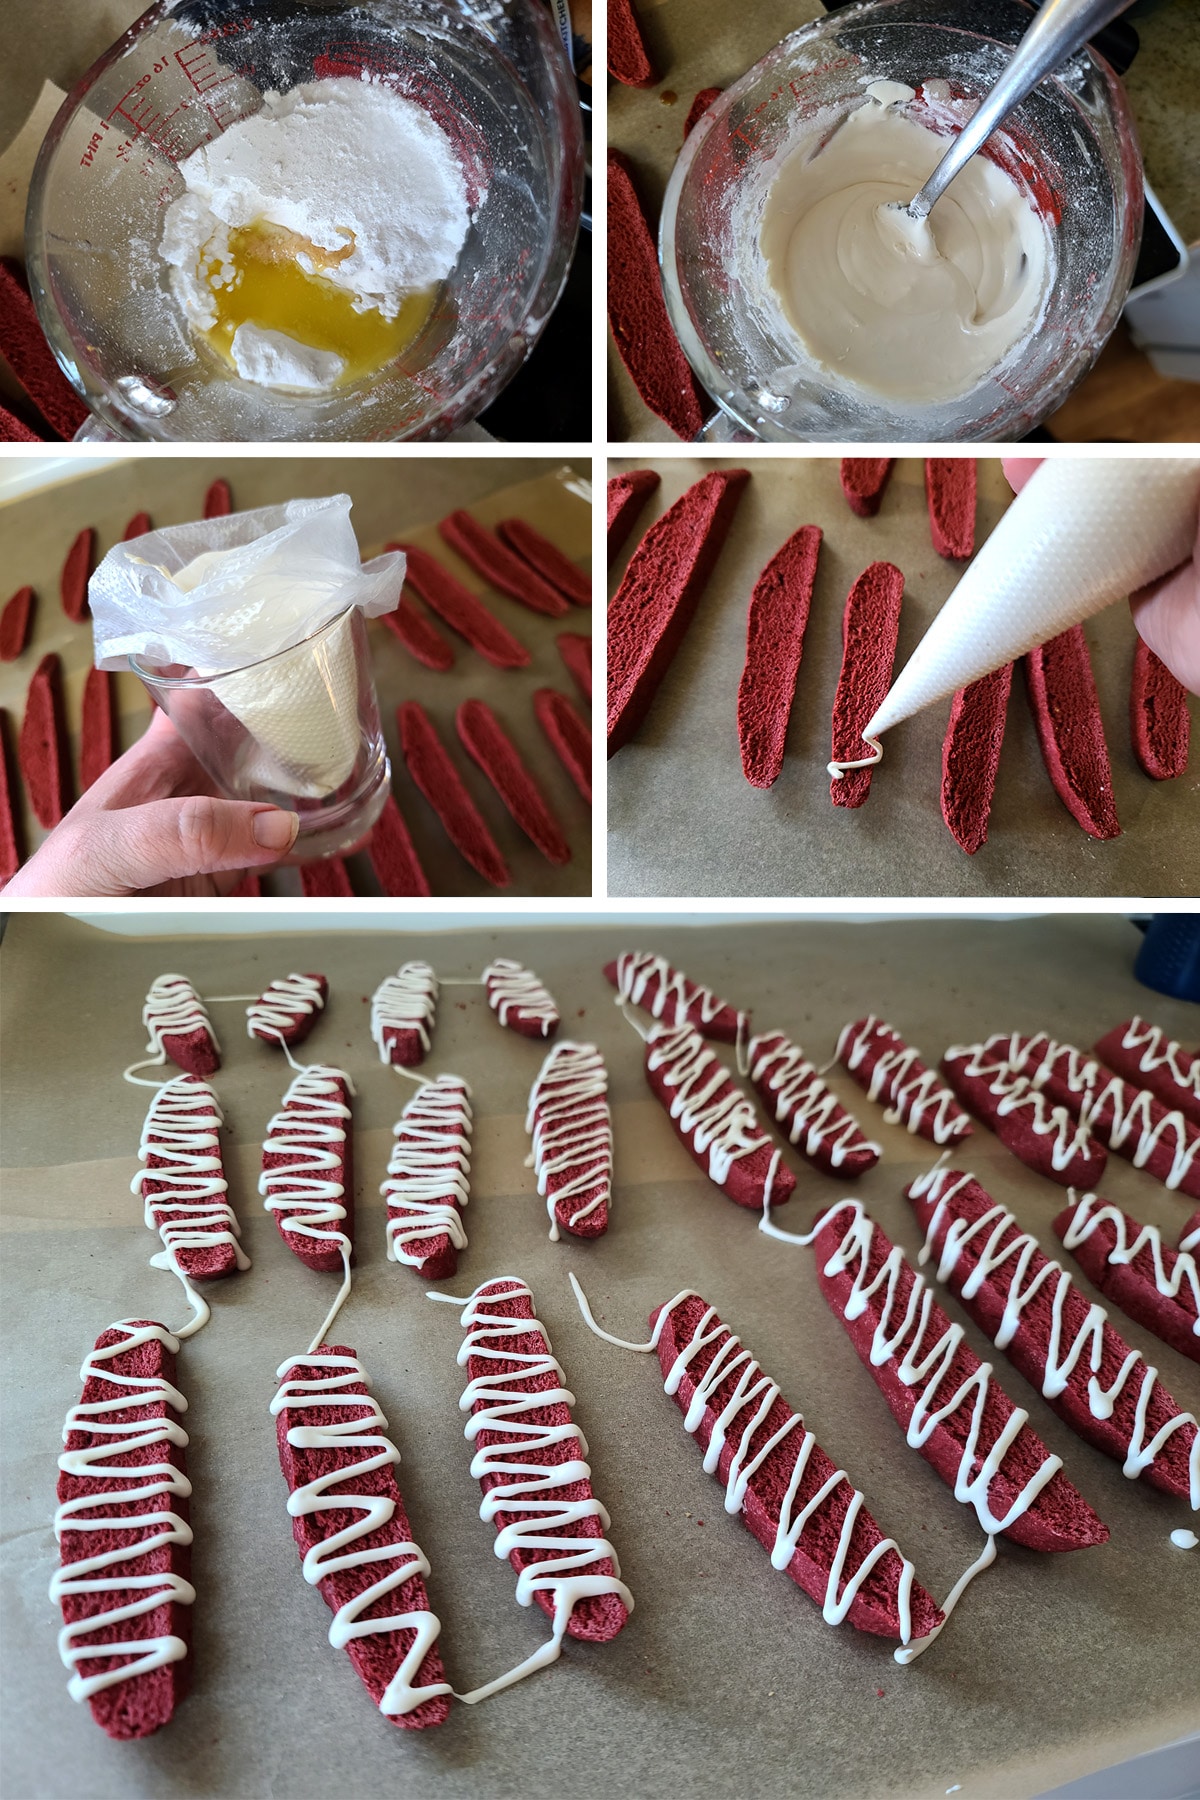
Glaze:
Whisk together glaze ingredients until smooth. If too thick to drizzle, microwave for 10 seconds at a time, stirring until runny.
Drizzle over cooled biscotti. Allow glaze to fully harden before transferring biscotti to an airtight container.
Share the Love!
Before you chow down, be sure to take some pics of your handiwork! If you post it to Bluesky, be sure to tag us - @CelebrationGen. We're also on Pinterest, so you can save all your favourite recipes to a board!
Also, be sure to subscribe to my free monthly email newsletter, so you never miss out on any of my nonsense.
Well, the published nonsense, anyway!


Red Velvet Biscotti
Equipment
- 2 Baking Sheets
- Parchment Paper
Ingredients
Biscotti:
- 2 ¼ cups All-purpose flour
- ¼ cup Cocoa powder
- 1 teaspoon Baking powder
- ½ teaspoon Baking soda
- ½ teaspoon Salt
- 1 cup Granulated sugar
- 3 Large eggs
- 2 tablespoon Buttermilk
- 1 teaspoon Vanilla extract
- Red food colouring
Glaze:
- 1 cup Powdered/Icing/Confectioner’s Sugar
- 1 tablespoon Melted butter
- 1 tablespoon Milk
- 1 teaspoon Vanilla extract
- Pinch salt
Instructions
Biscotti:
- Preheat oven to 350F, Line a large baking sheet with parchment paper, spray with pan spray. Set aside.
- In a large bowl, combine the flour, cocoa, baking powder, baking soda, and salt. Set aside.
- In a separate bowl, whisk together sugar, eggs, buttermilk, and vanilla until well combined and smooth. Add a little red food colouring, mix well to combine, then pour into the bowl with the dry mixture, stir to combine.
- If you want more red food colouring, add it now and stir gently to combine.
- Divide dough in half, form into 2 long, wide loaves on the prepared pan.
- Bake for 20-25 minutes, until golden brown on the outside. Remove from oven, turn heat down to 250F.
- Allow loaves to cool for 5 minutes.
- Cutting on a slight diagonal, slice each loaf into ½" slices.
- Arrange slices on the pans. Bake for 15 minutes, flip each piece over and bake for another 15 minutes, or until desired texture.
- Remove from oven, allow to fully cool.
Glaze:
- Whisk together glaze ingredients until smooth. If too thick to drizzle, microwave for 10 seconds at a time, stirring until runny.
- Drizzle over cooled biscotti. Allow glaze to fully harden before transferring biscotti to an airtight container.
Nutrition


Lori
No butter or oil? I make biscotti all the time and have never seen a recipe without one or the other.
Marie Porter
As I addressed in the post, this recipe is based on traditional biscotti, not american style biscotti.
Alessandra
Curious about the purpose of buttermilk - traditional Italian biscotti doesn't call for it. For the red food colouring - are you using a gel? I guess just add as much as you want....? Thank you!
Marie Porter
As mentioned in the post, buttermilk is traditional for red velvet, and yes, it's a gel food colouring.