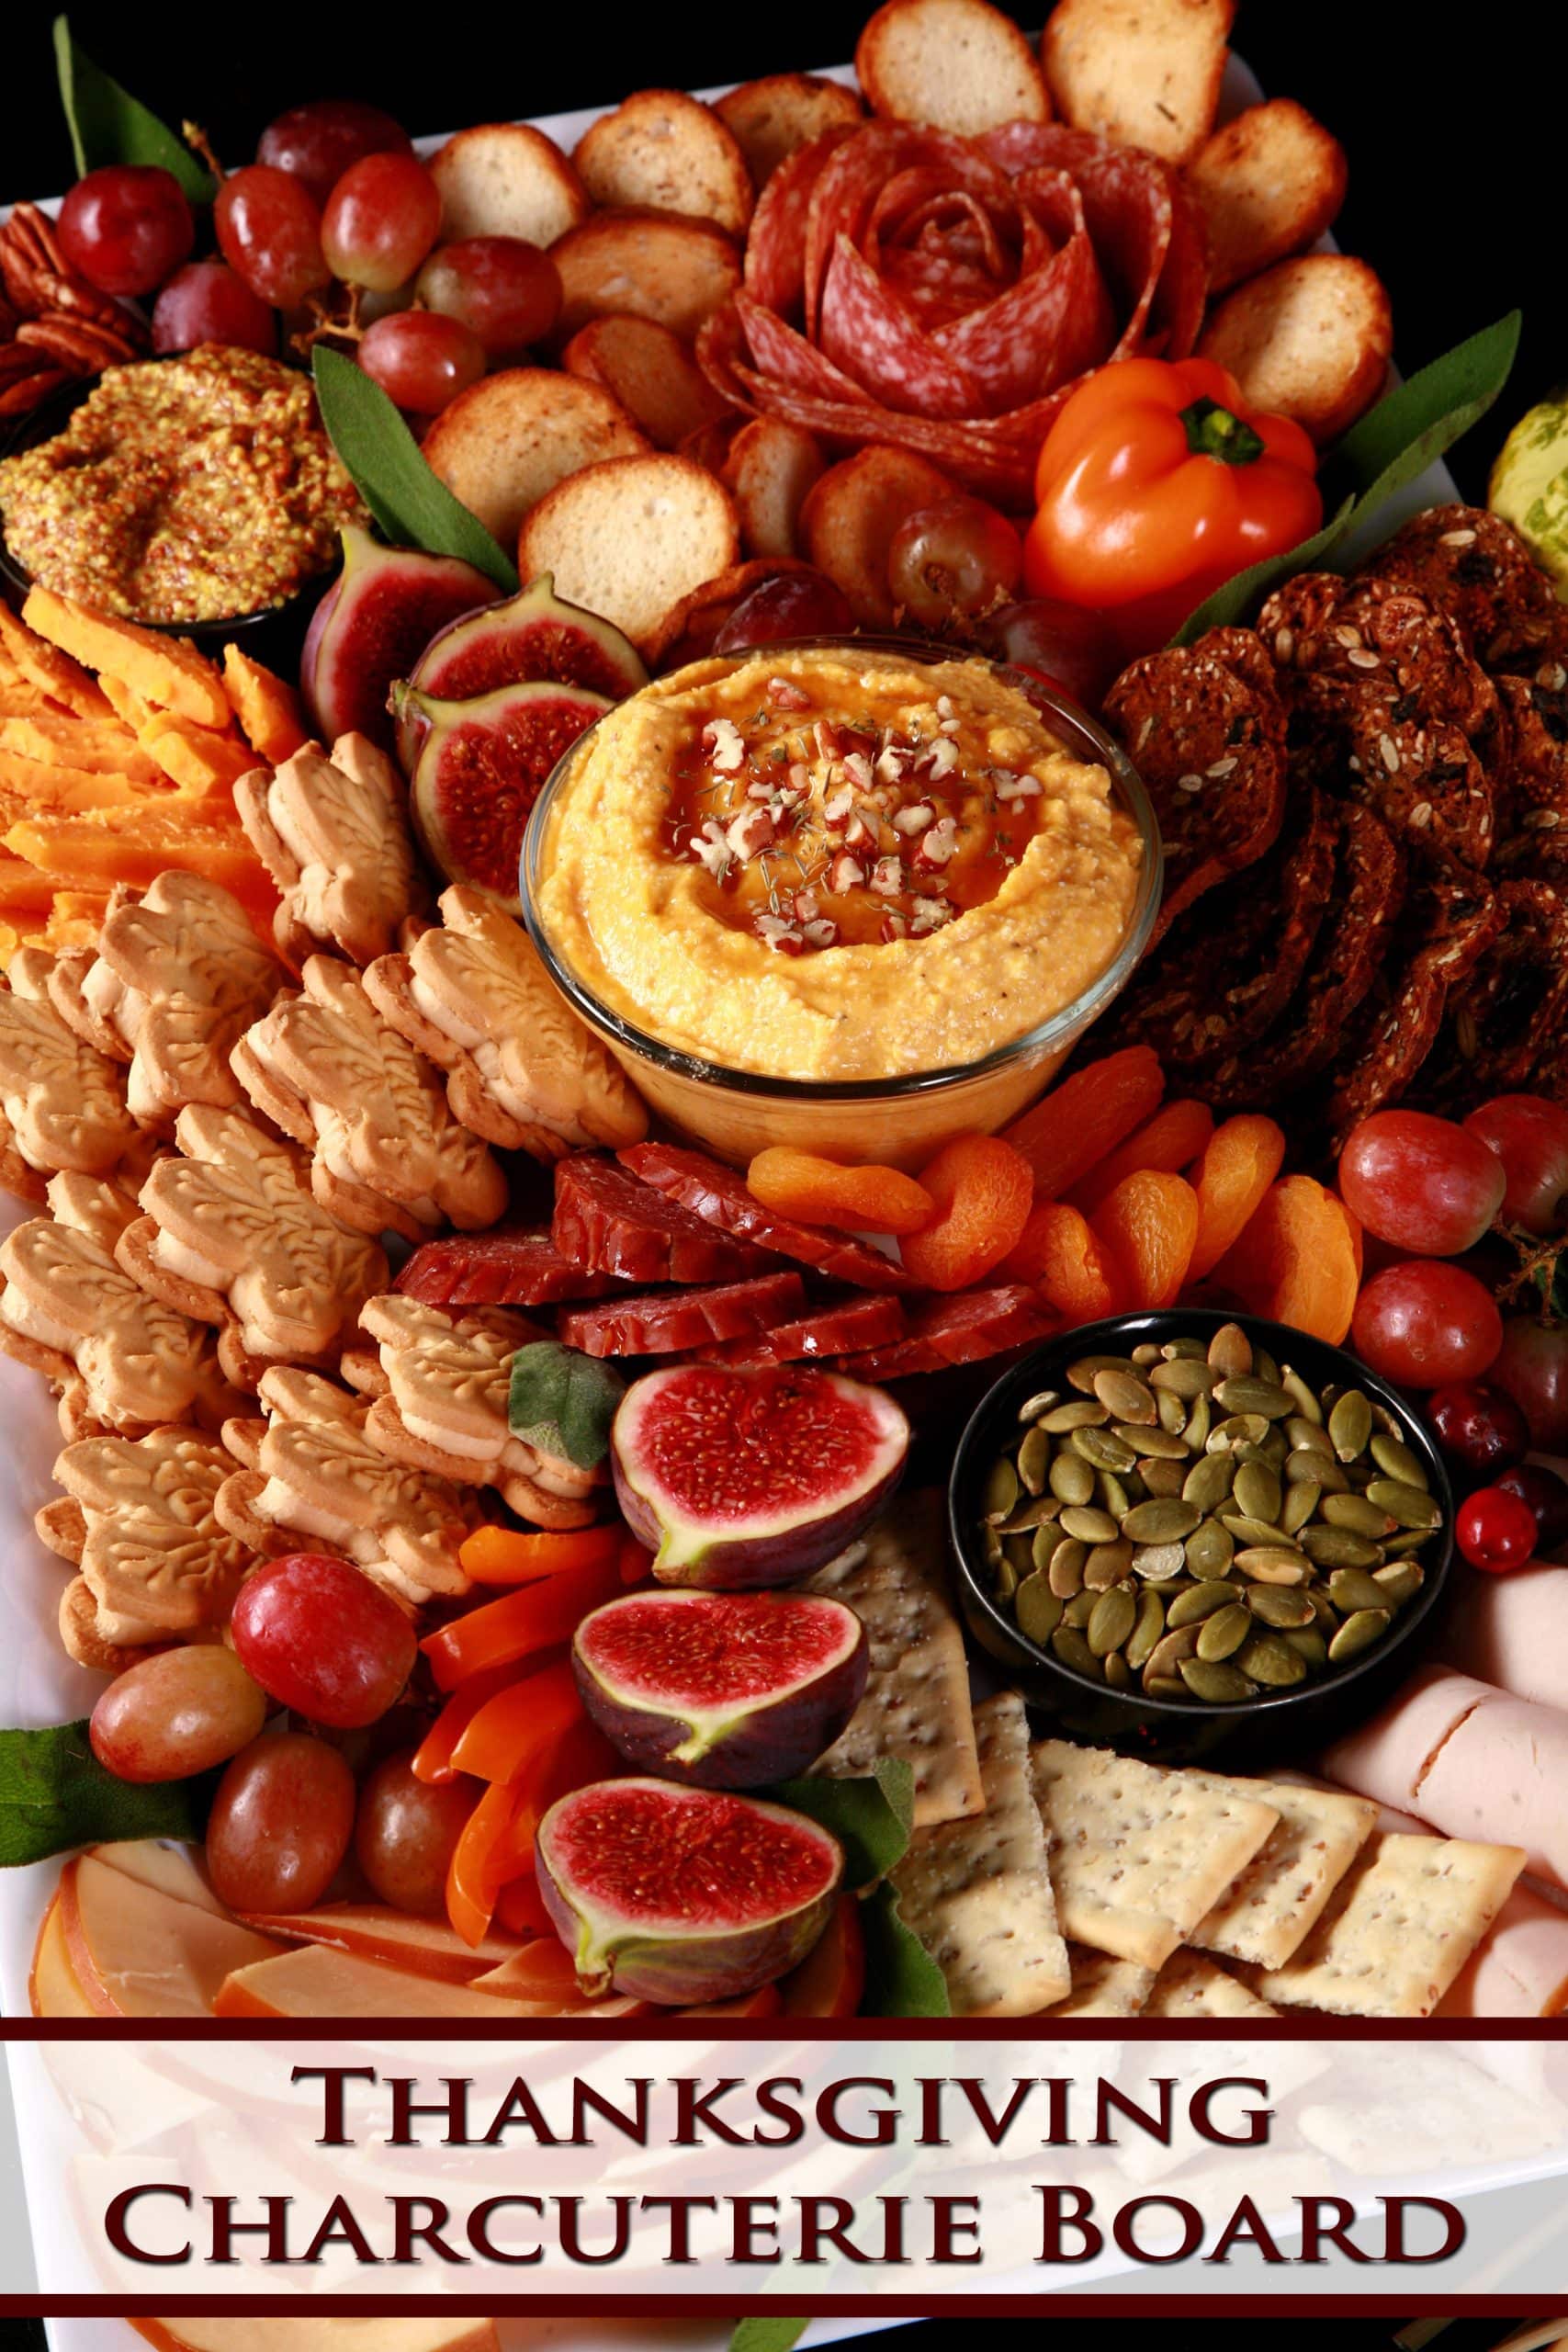
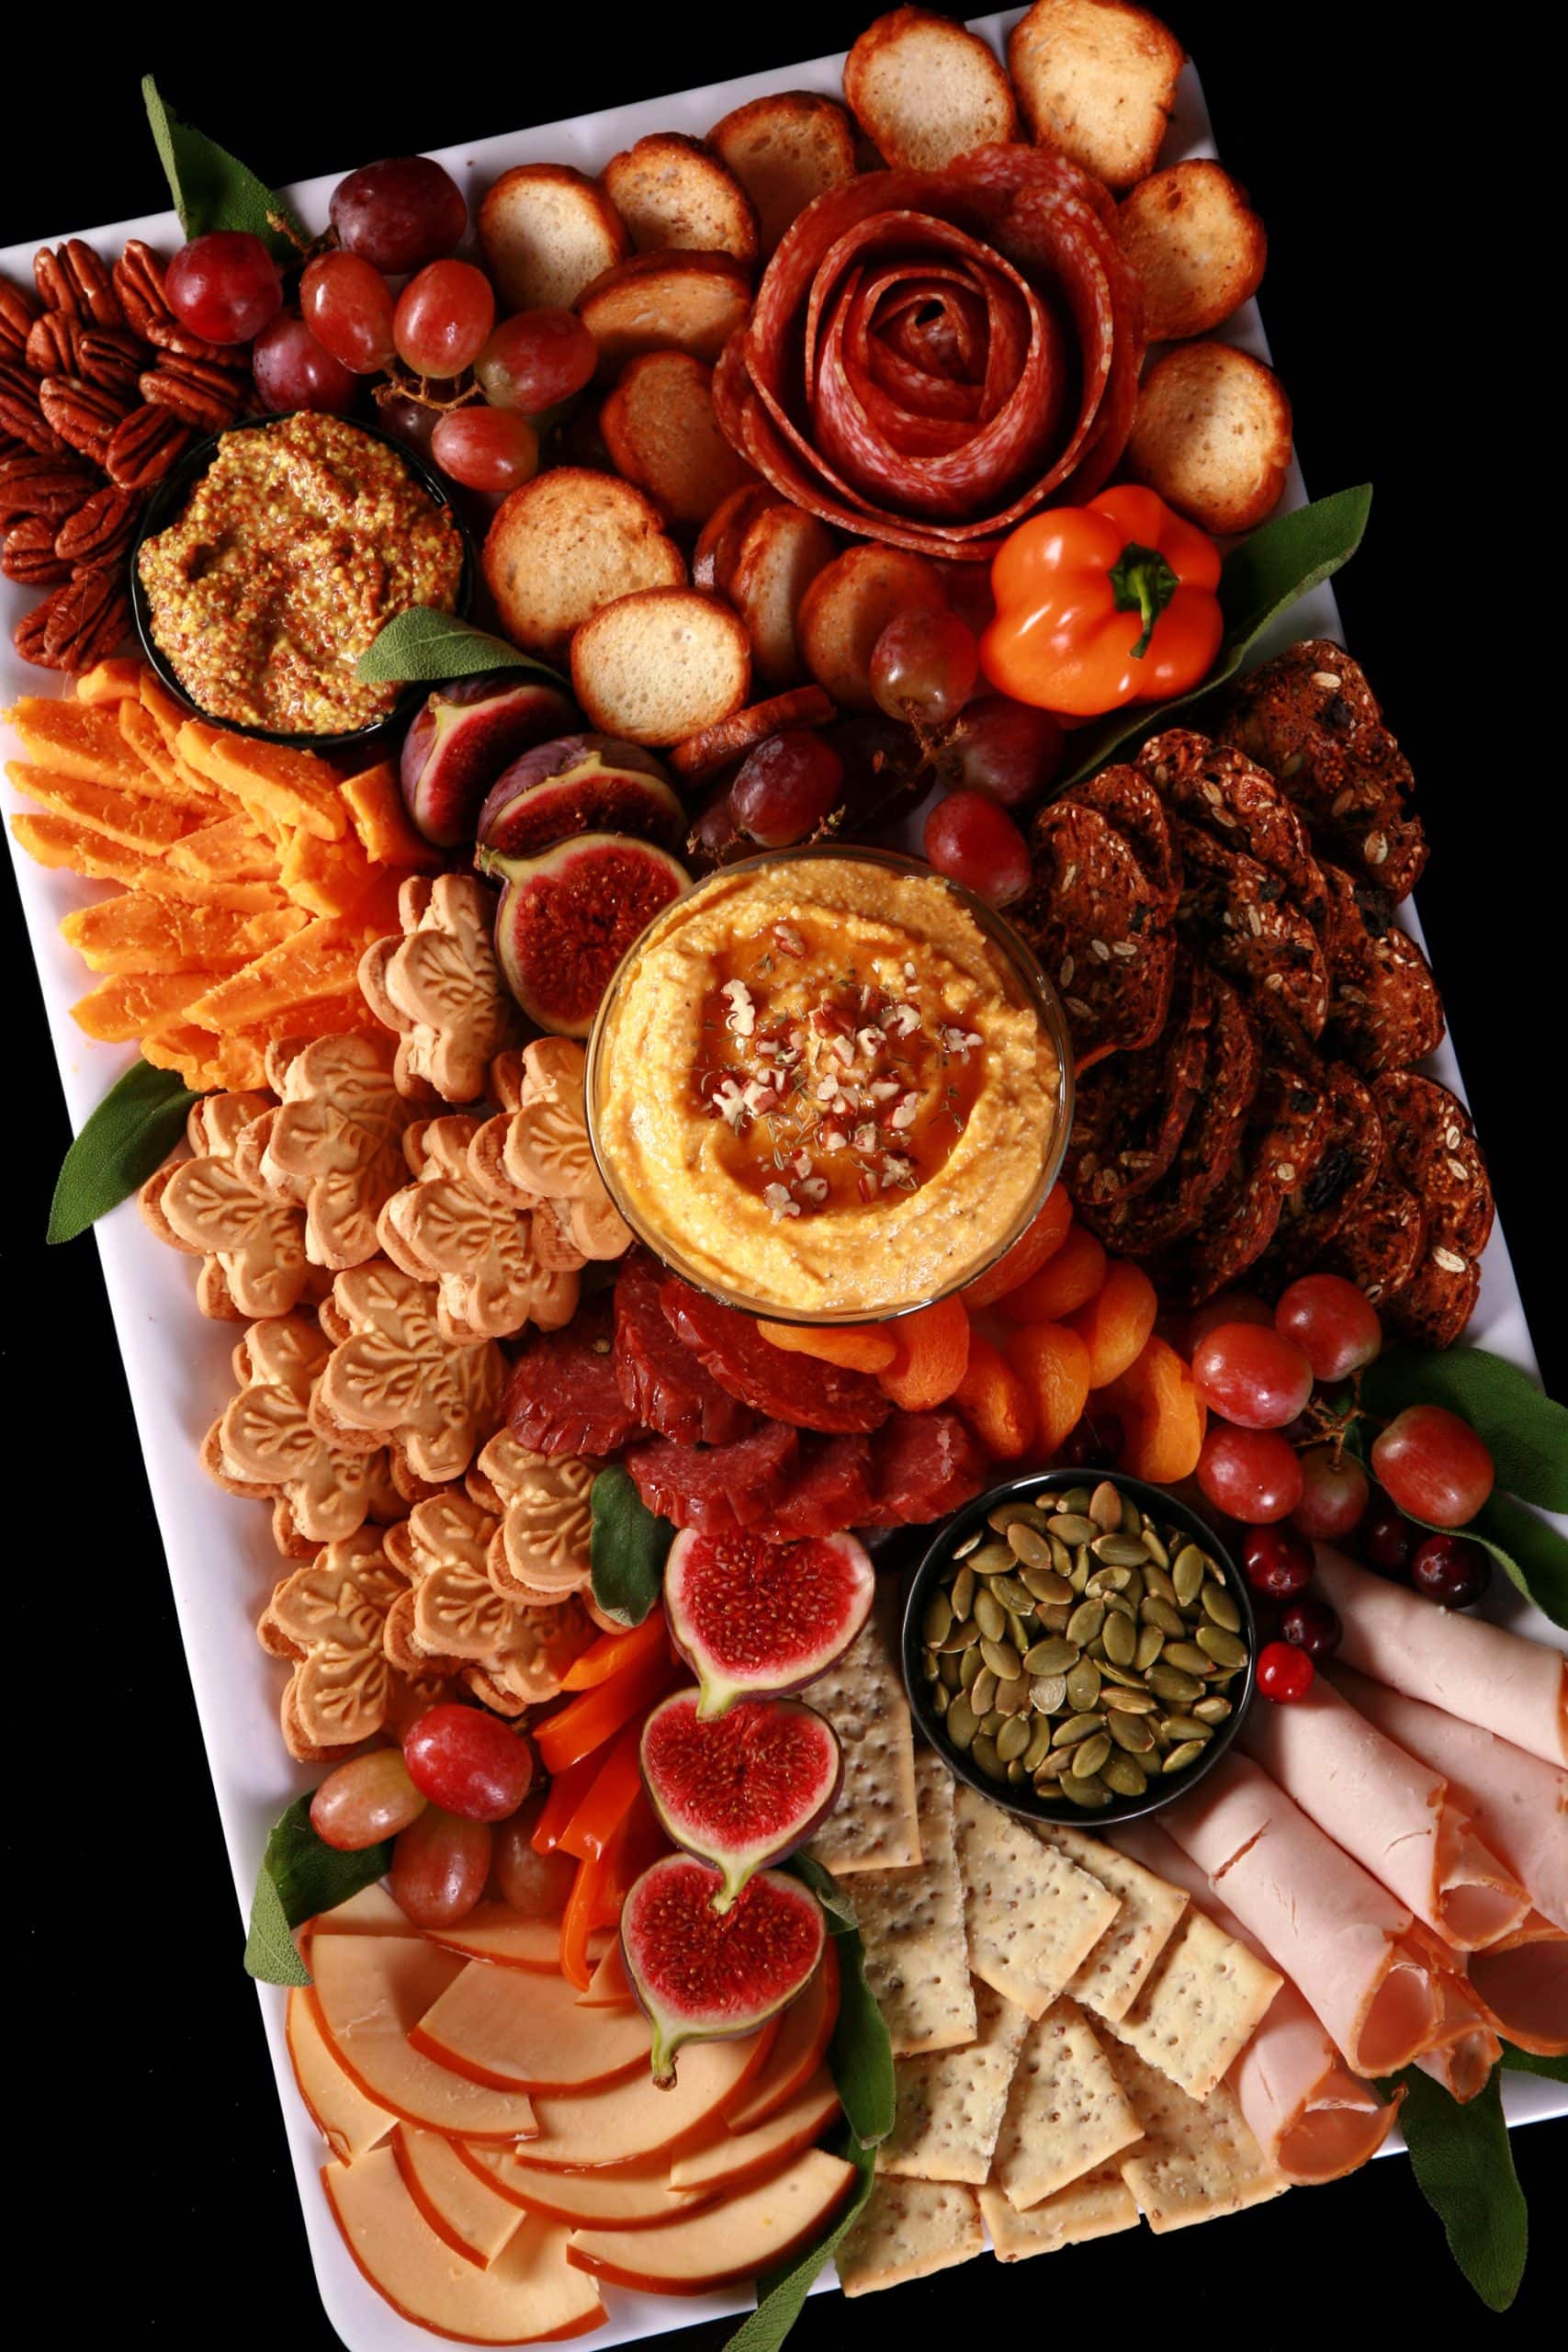
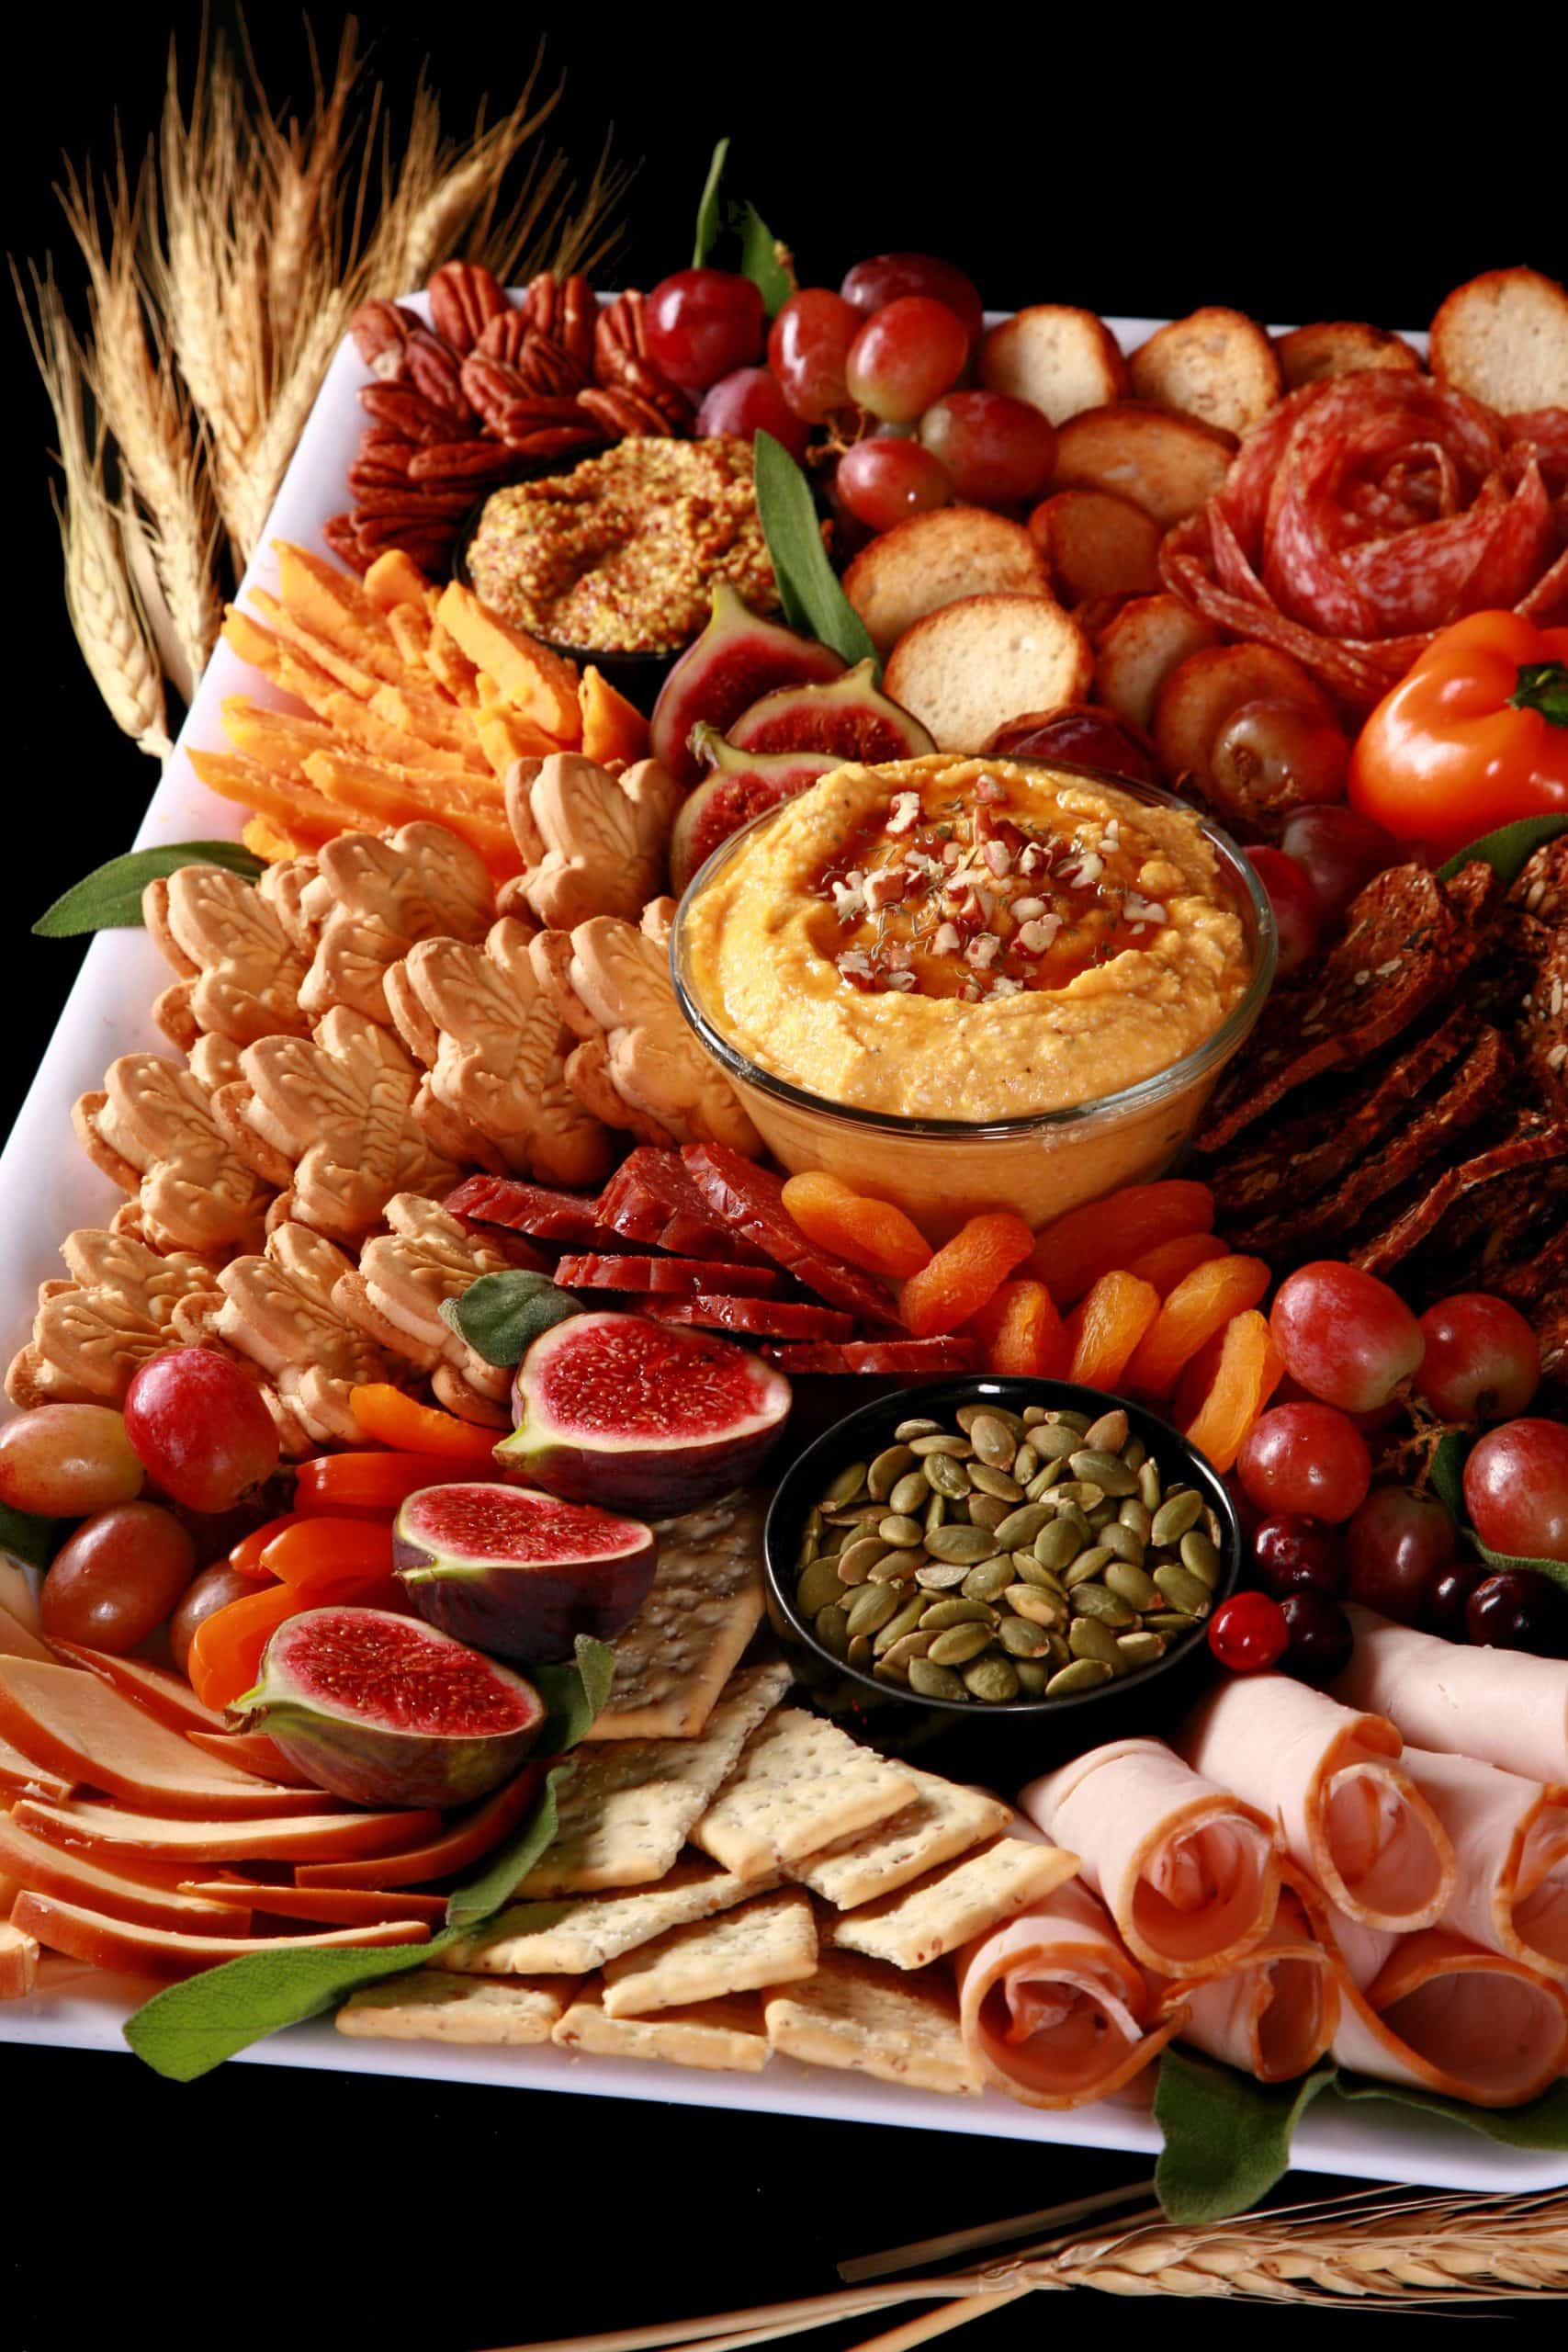
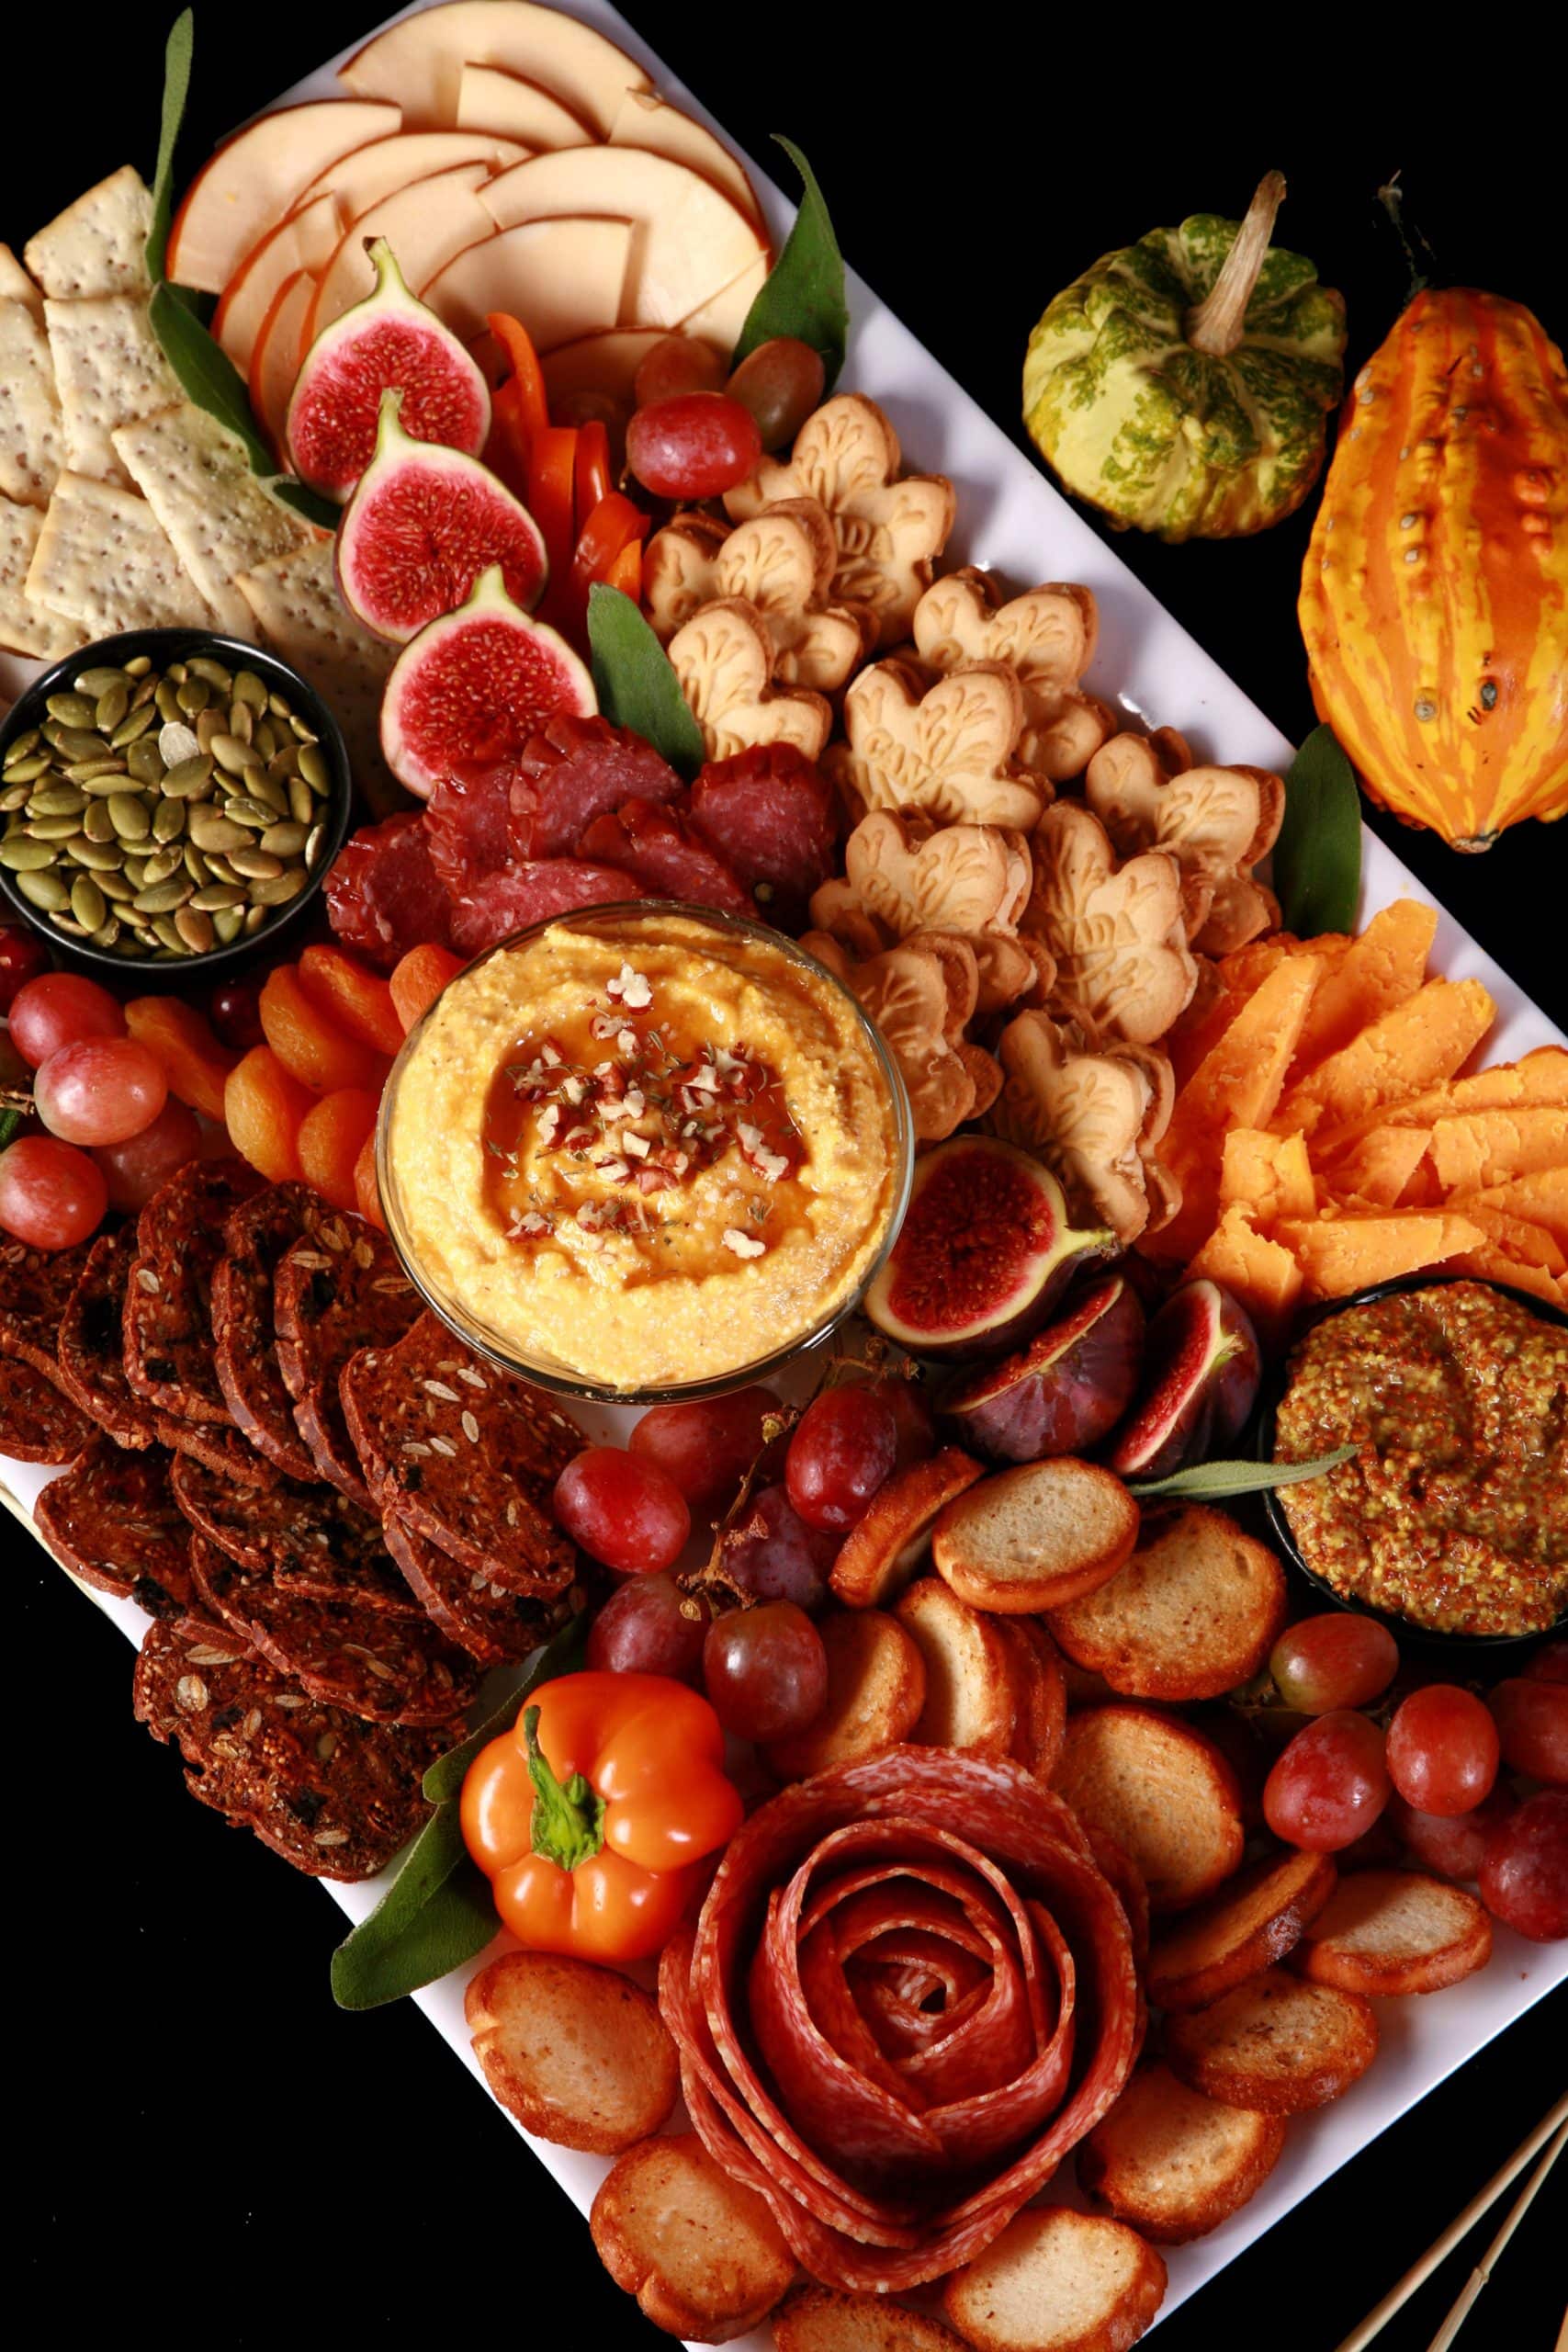
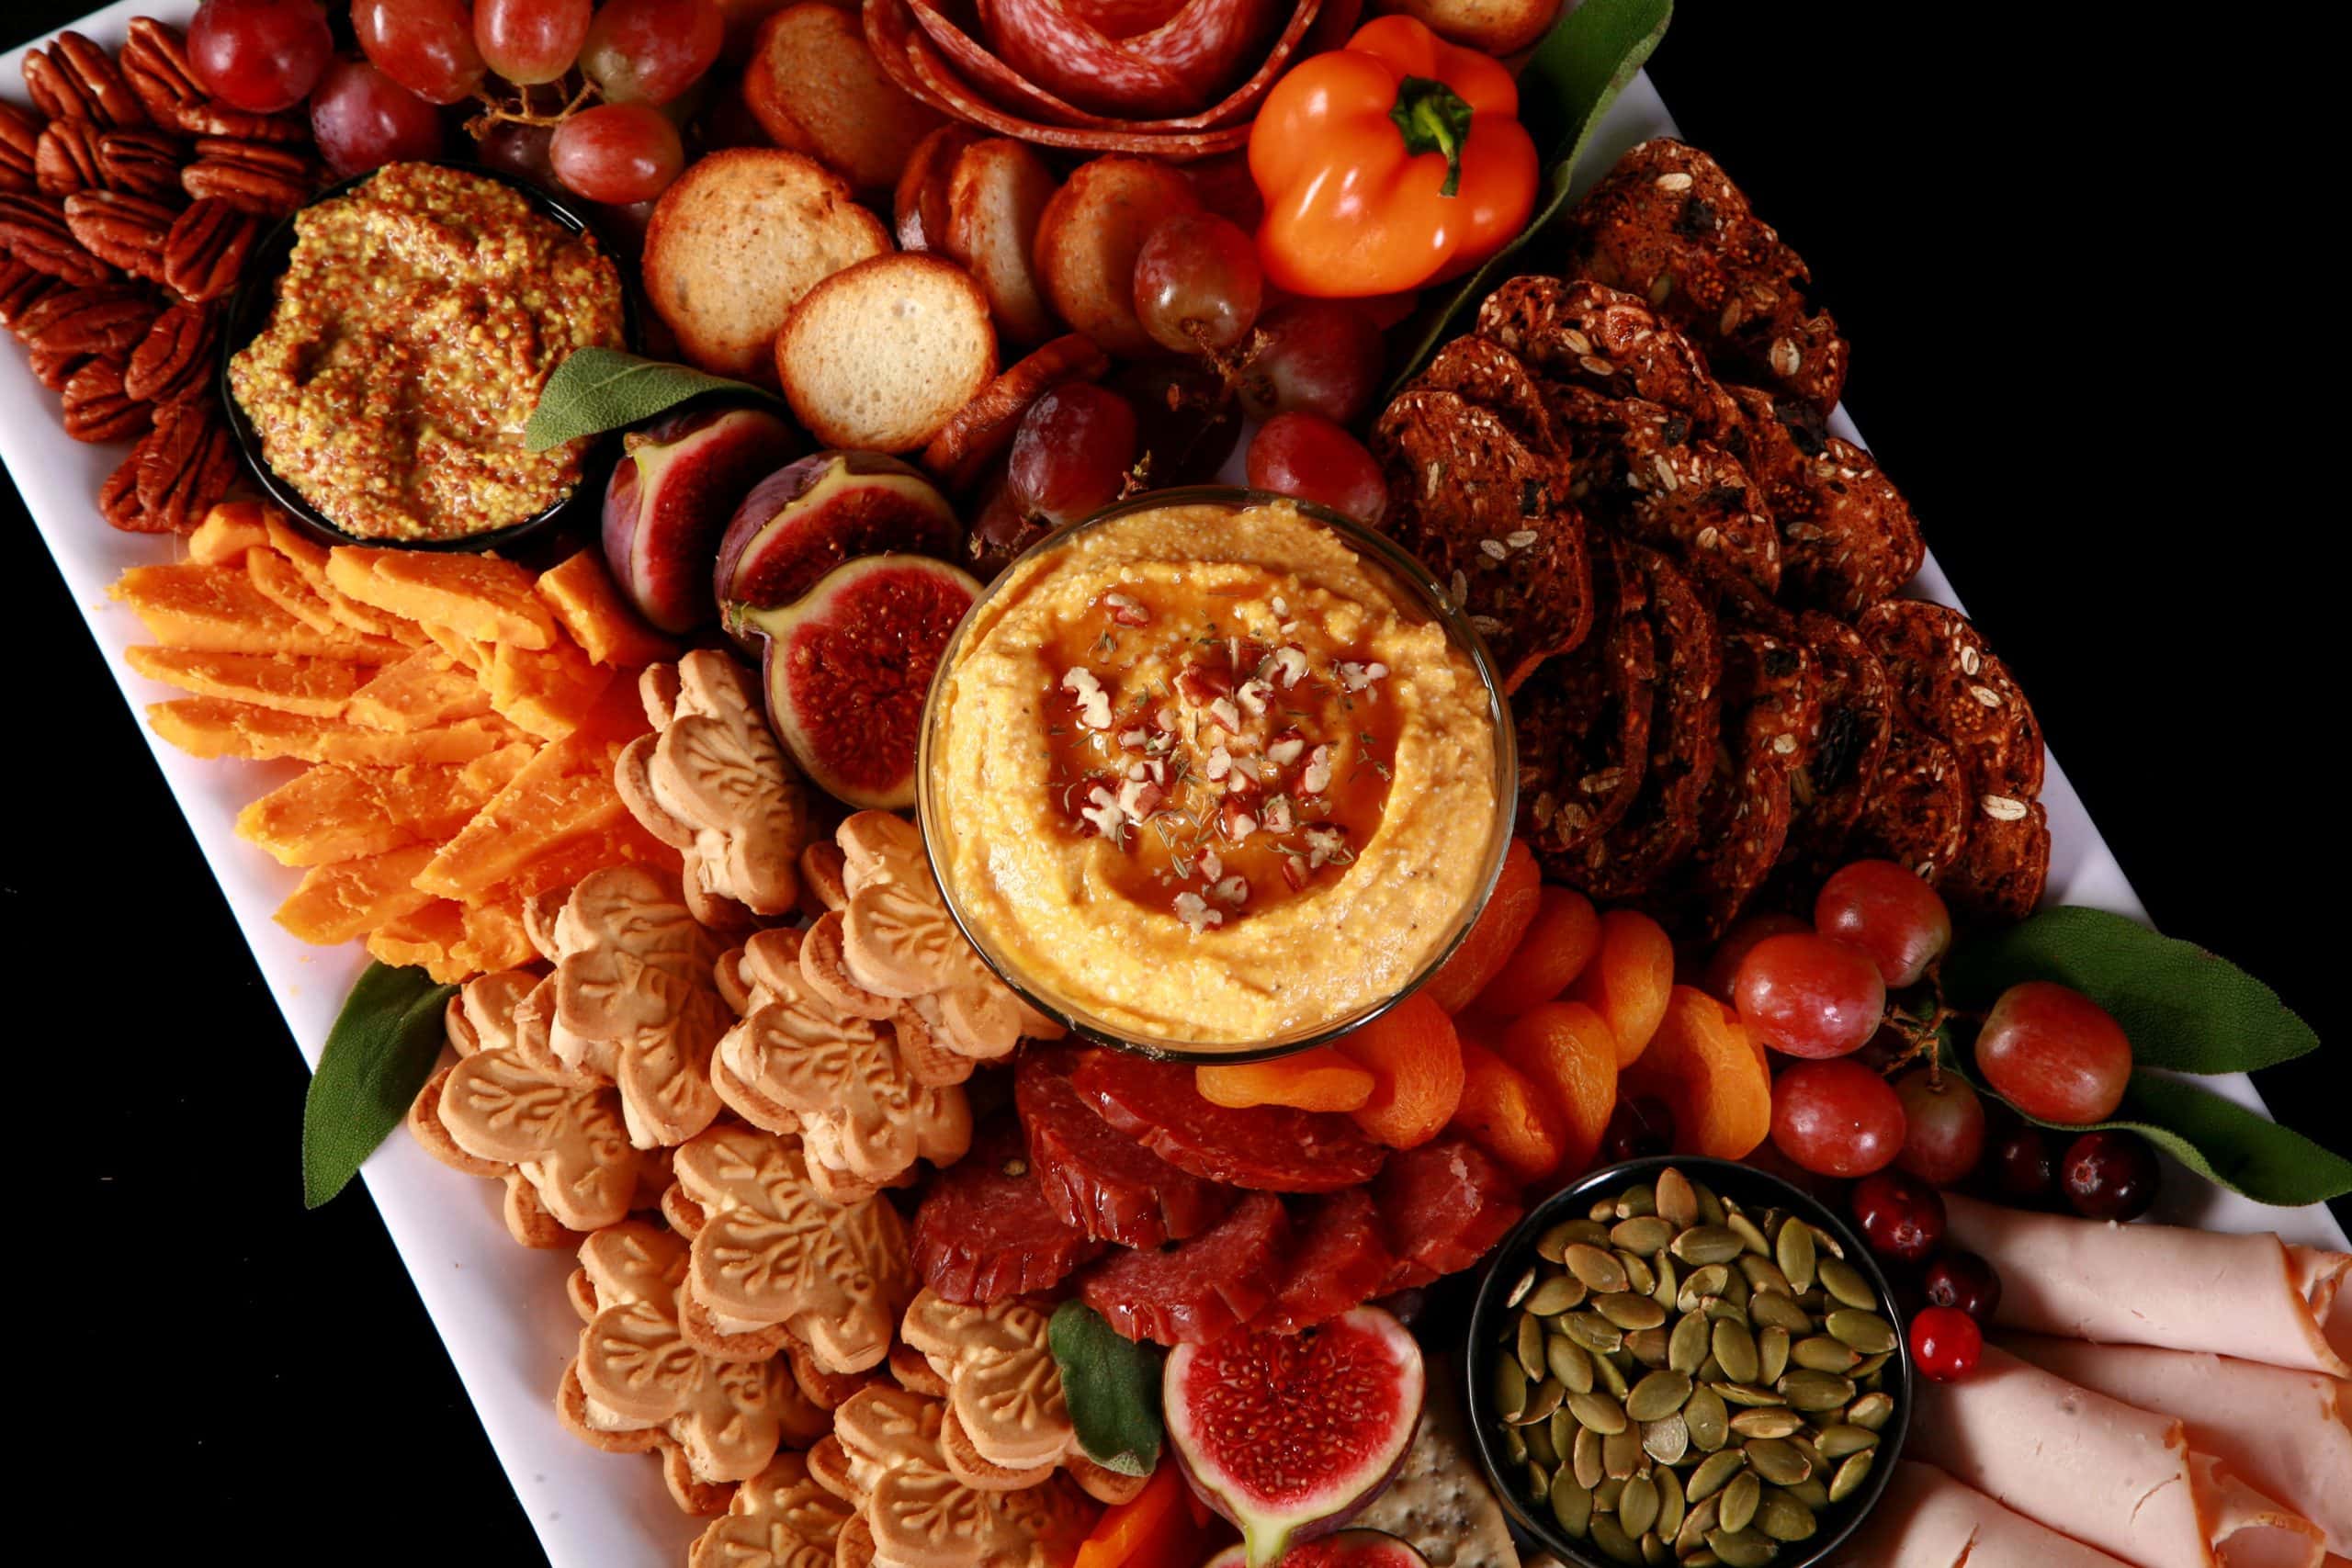
This gorgeous Thanksgiving Charcuterie Board is the perfect appetizer for your hungry guests this holiday season. An elegant fall charcuterie board, it’s easy to make and super customizable.
Yes, we’ll serve charcuterie as a main dish. Don’t judge!
Anyway, I recently went on a charcuterie designing mission, designing the best charcuterie boards for each of my favorite holidays - and then some!
Today, I’m sharing a bunch of Thanksgiving charcuterie board ideas, and the beautiful board I designed as (part of a?) Thanksgiving feast!
Truth be told, I may just remake this stunning board as the main course for our 2 person “Thanksgiving gathering”, and call it a day.
Really, it’s hearty AND pretty enough to serve as the entire Thanksgiving table, if you’re not feeling like cooking entire Thanksgiving menus this year.
... maybe I shouldn’t be blogging when I’m feeling munchy, and also not at all like cooking like supper, LOL.
Anyway...
My own current mood aside, these are more traditionally served as Thanksgiving appetizers.
Charcuterie is the perfect way to keep your guests entertained and fed a bit, while you’re finishing cooking up the main event.
They’re also SO much fun to design and make!
The best part? There’s no wrong way to make a Thanksgiving charcuterie board!
Arrange some delicious food on a platter, and you’re good to go.
I know that turkey shaped charcuterie boards are popular (for good reason - they’re a fun idea!), but I went in a different direction.
My vision for this board was more elegant - rich fall colours, a variety of textures, and others nods to the time of year, done up in more of a classic charcuterie board style.
This is a VERY customizable endevour, so I’ll go over what I did, my recommendations for other foods you can use, and my best tips for assembling YOUR perfect Thanksgiving charcuterie board.
So, Happy Thanksgiving ... let’s get to it!

Charcuturie Ingredients
Unlike the vast majority of my recipes, charcuterie doesn’t require a set list of ingredients.
Think more “choose your own adventure”, or “pick 3 from column A, and a few from column B”.
The nice thing is, you can generally find everything you need in any major grocery store!
Here are the major categories you’ll want represented, and some ideas of the kinds of ingredients I’ll use from each, to fit in with the Thanksgiving theme:
Meats
Charcuterie is, at the very heart of it, supposed to be a display of meats, so don’t skimp on the variety of meats you choose!
I like to have a mix of a dryer / harder cured meat, a “softer” cured meat, some kind of deli meat, and - sometimes - a pate of some sort.
I wasn’t feeling pate this time around - mostly a colour issue with this board - so I stuck to sliced up savory meats.
First off, I’ve been way into making charcuterie roses lately, so I put a salami rose in there as a focal point.
(See my tutorial on How to Make Salami Roses - they’re super quick and easy to make! I use salami, but they can be made with a few different Italian meats)
In terms of my “harder” cured sausage, I used the Peppercorn Dry Salami, from Great Canadian Meat Company.
They have several delicious meats to choose from, we picked this one up on a recent trip to Algonquin Provincial Park.
Finally, I went with some rolled up slices of deli turkey.
It’s for “turkey day”, after all. Can’t rightly do a Thanksgiving board, without a super on-the-nose reference to Thanksgiving dinner, right?
Cheeses
It’s considered a standard to have a few different types of cheeses represented in on a traditional charcuterie board.
Try to choose a mix of soft cheeses and hard cheese - ideally with flavours and colors that go along with your theme in general.
In this case, I used a creamy cheese spread as one of my options - more on that in a bit - as well as more traditional sliced cheeses.
A deep orange aged cheddar and a smoked Gouda rounded out my cheese selection on this board, but it took a while to narrow down my options!
I had also considered using a cranberry goat cheese (decided to use it for my Christmas charcuterie board instead!), Sage Derby cheese (Too green for my Thanksgiving aesthetic vision!), or some form of marinated cheese.
I was initially picturing a marinated Bocconcini, but my Marinated Feta was also on the table as a possibility.
Just aim to have a variety of flavors, textures, and colours!
Starches
For starches, I like to offer a variety of crackers in different textures, colours, and flavours.
In this case, I used Baguette Crackers, Raincoast Crisps, and Stoned Wheat Thins.
Some of my other favourite crackers to use include Vinta, Sociables, Water Crackers, Ritz Crackers, Bacon Dippers, and Rye Crispbread.
Rice Crackers, Mary's Gone Crackers, and Schar Entertainment Crackers are great options for your gluten-free guests.
Sometimes I’ll include a small basket of a sliced fresh baguette, but I generally will either do that OR baguette crackers.
I happened to be feeling the baguette crackers, when I designed this board!
Beyond that, cookies can be a fun way to expand on the Thanksgiving theme.
I love using Maple Leaf Cookies - you can even get Gluten-Free Maple Cookies - but fall themed sugar cookies - decorated in fall colors - are another great option.
Consider using my recipes for Cut Out Sugar Cookies, Pumpkin Spice Cookies, and/or Gluten-Free Sugar Cookies!
I also have a tutorial on Sugar Cookie Decorating, that can help.
Produce
I like to add some fresh fruits - and sometimes veggies - to my charcuterie boards. Mostly as a garnish and accompaniment- I don’t like veering too lose to being an actual fruit board!
When doing a Thanksgiving board, I like to keep it to seasonal fruits - I love the rich colours that things like fresh figs, cranberries, blood oranges, pomegranate seeds, etc can bring to this easy Thanksgiving appetizer.
This time around, I let fresh figs take center stage for the fruits, and used deep red grapes as accent. Both are great for adding color, texture, and richness to the spread.
This time around, I didn’t use much in the way of vegetables, as I wasn’t really feeling inspired to. There are some long slices of orange bell pepper, but that’s it.
If you’re feeling more vegetabley than I was at the time, some great options include broccoli, artichoke hearts, baby carrots, and cherry tomatoes.
Sauces, Spreads, and Dips
I will generally include some form of mustard on almost any charcuterie board I design, as it tends to go incredibly well with cured meats.
Kozlik’s Canadian Mustard is my absolute favourite brand, and it comes in all kinds of gourmet flavours that would be perfect for a Thanksgiving themed charcuterie board.
Consider seasonal jellies as well. Fig Jam, Ginger Preserve, even a Cranberry Relish.
I decided to skip the jellies / jams / sauces, and elected to go with more of a centerpiece spread for this particular board.
I remembered seeing a video short - I don’t know if it was random TikTok, or Facebook, or in a group - but the video subject stuck with me.
It was a pumpkin whipped feta spread, drizzled with honey and garnished with thyme. Literally the stuff of dreams.
So, when designing this Thanksgiving charcuterie platter, I Googled and found this Pumpkin Whipped Feta Dip.
I don’t know if this is the actual one I saw, but I threw together a version loosely based on it - Oh, it was good!
Didn’t measure anything, though. Whoops!
Hummus is another great option, especially in some of the flavored varieties. Using a beet hummus, carrot hummus, or roasted red pepper hummus is a delicious way to bring more seasonal colour to your board.
Munchies
I like to offer a selection of “munchies” on each of my charcuterie boards.
For me, this is usually dried fruit - Dried Apricots in this case - some form of nuts (toasted Pecan Halves on this fall board!), and some form of pickle.
Cornichons - tiny pickles - are traditional grazing board fare, but... they’re sweet pickles. Not my bag.
Instead, I got my pop of green in the form of Pepitas, this time around.
Pickled Red Onions can be a fantastic accompaniment for meats and cheeses, but I found my board was leaning pretty red as it was, so skipped it.
Figs > Onions, IMHO!
Depending on the aesthetic you’re going for - and what you’re already serving - there are all kinds of options you can go with, on this theme.
Pieces of a Dark Chocolate, Sweetened Dried Cranberries, Corn Nuts, Medjool Dates, Dried Figs, Pickled Green Beans, Pickled Mushrooms, Roasted Red Peppers, etc.
Candied Nuts can be a fun addition to your board - try my recipes for Honey Jeow Glazed Cashews or Everything Honey Glazed Cashews!
Whichever way you go, the goals are: tasty, pretty, on-theme, and go well with your meats and cheeses.
Have fun with it!
Garnish and “Other”
I kept the garnish pretty simple on this - fresh sage leaves throughout the actual food, and a few ornamental mini pumpkins - in different sizes and shapes - and some wheat as table accessories.
Oh, and a random orange mini bell pepper, thrown in for good measure. I needed to fill in a spot, and I liked that it was sort of evocative of a pumpkin!
I don’t usually bother with table accessorizing, but I liked it for this seasonal spread.
Situating a cornucopia beside / behind it, so that the charcuterie board is an extension of the fall fruit pouring out of it could be cute, too.
Anyway, as far as garnish goes, I like to keep it simple - usually just fresh herbs, to bring a pop of colour to the charcuterie platter.
Sage is a particularly great option for a Thanksgiving charcuterie board, as it’s very much associated with the holiday - stuffing, seasoning a turkey, etc.
The 3 3 3 3 Rule
You may have heard of the 3 3 3 rule - or the 3 3 3 3 rule - when it comes to charcuterie.
This is a “rule” that says that a board should have 3 meats, 3 cheeses, 3 crackers, and 3 “other” items (sauces, munchies, etc).
I ... am not in love with the use of “rule” here - consider it more of a suggestion.
If you want a very meat-centric board, do it.
If you can’t decide between a short list of 5 different cheeses, TRUST ME... no one is going to complain about too much cheese.
And really, if they do... you don’t need that person in your life, right?
Anyway, balance can mean all sorts of different things, in the context of a Thanksgiving charcuterie board. Textures, colours, flavours, having enough crackers for the cheese and meat...
Just freestyle it. Lay your favorite things out in a reasonably pleasing manner, it’s all good.
Charcuterie Supplies
Aside from the actual ingredients you’ll be serving to your guests, there are a few other supplies you’ll want for your seasonal charcuterie board.
A Charcuterie Tray
Charcuterie Boards
can be almost anything, as long as it’s food safe.
The size and shape you get are pretty wide open, and will depend on how many people you’re serving, the amount of space you have to serve it on, etc.
A Large Cutting Board will work for smaller displays, and most party supply and dollar stores have plastic platters that work really well for mid range charcuterie displays.
If you’re looking to do a LARGE display, you’re probably going to need to buy a big board that’s specifically intended as a catering platter.
In terms of colour, I like using a very neutral coloured tray. Sure, going with a seasonal colour can be fun - but it can also distract from the food being served, and/or make it look weird.
Maybe I’m boring, but 9 times out of 10, I’m serving my seasonal charcuterie boards on a plain white tray.
Dip Bowls, Ramekins
If you’re serving a dip, you’ll want some sort of Small Dip Bowl.
Be sure to size it on your tray before actually using it - you’d be surprised how much real estate some bowls can take up!
Best to use a somewhat little bowl, and aim to refill it.
For smaller servings of spreads - mustard, jelly, etc - or to contain smaller items like nuts, I recommend using small bowls or small ramekins. 2 oz Ceramic Ramekins work perfectly!
Serving Utensils
Depending on what you’re serving, you may need certain utensils.
If you’re not slicing all of your cheese, have some appropriate Cheese Knives on hand.
Have some small spoons on hand for things like sauces and dip - Espresso Spoons are perfectly sized for this..
If you’re serving to a crowd - rather than, say, a small board for 2 - I recommend having several Cocktail Picks, Cocktail Tongs, or even Bamboo Cocktail Forks on hand.
This will help people keep their fingers out of food that others will eventually be eating!
Cheese Markers are little signs you can stick in your cheeses, to let people know what they are.
I generally skip them - just as a matter of aesthetics.
Finally, having small plates and napkins on hand is always a great idea!

How to Make a Thanksgiving Charcuterie Board
Much like with the ingredients, putting together a Thanksgiving board is more of a free form thing, rather than a set of directions that *has* to be followed, and done in the right order.
Here’s how I do my Thanksgiving charcuterie board, step by step:
Place the Main Items
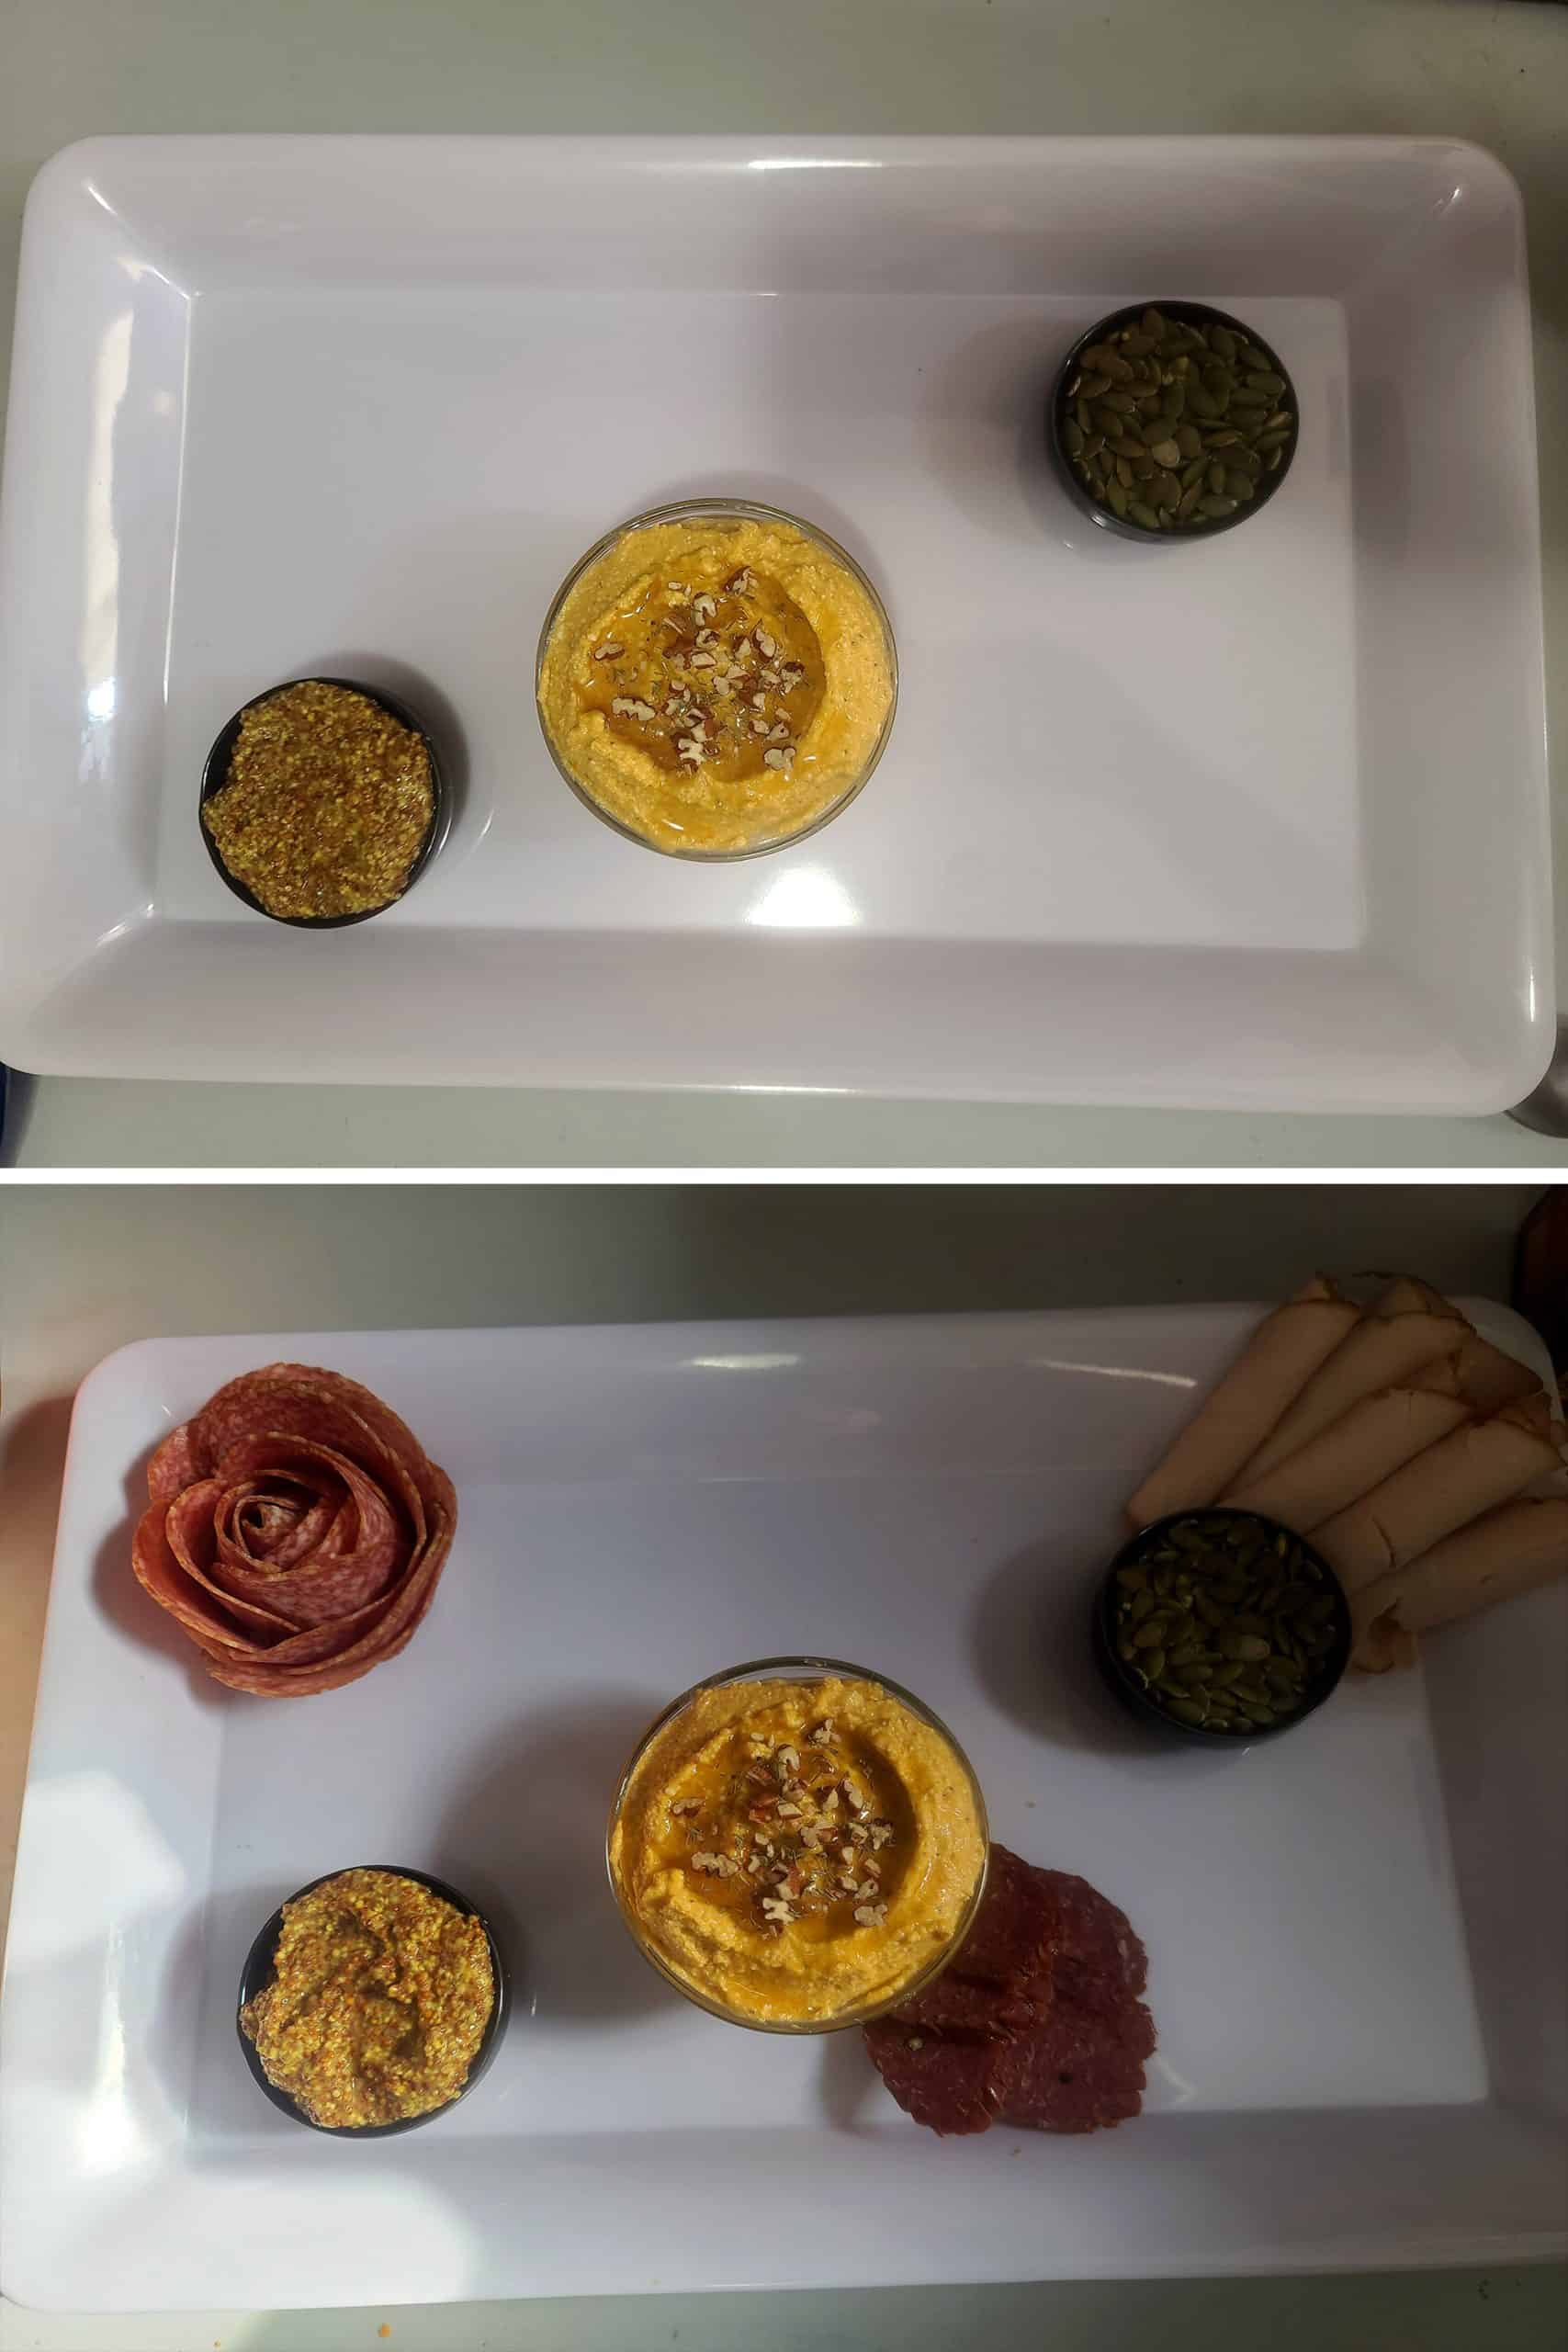
1. Figure out what your “solid” focal points are. This is generally things like sauce ramekins and dips, but could also be a cheese or meat - depending on the presentation
If you are including a wheel of brie, log of goat cheese, some kind of cheese ball, or a pate / terrine of some kind, that would count.
Place those focal points on your charcuterie board, leaving space between. I like to keep colour and texture in mind when placing, not placing things that are too similar next to each other.
Note: If any of your focal points is a bowl of dip, place the bowl - add the dip later!
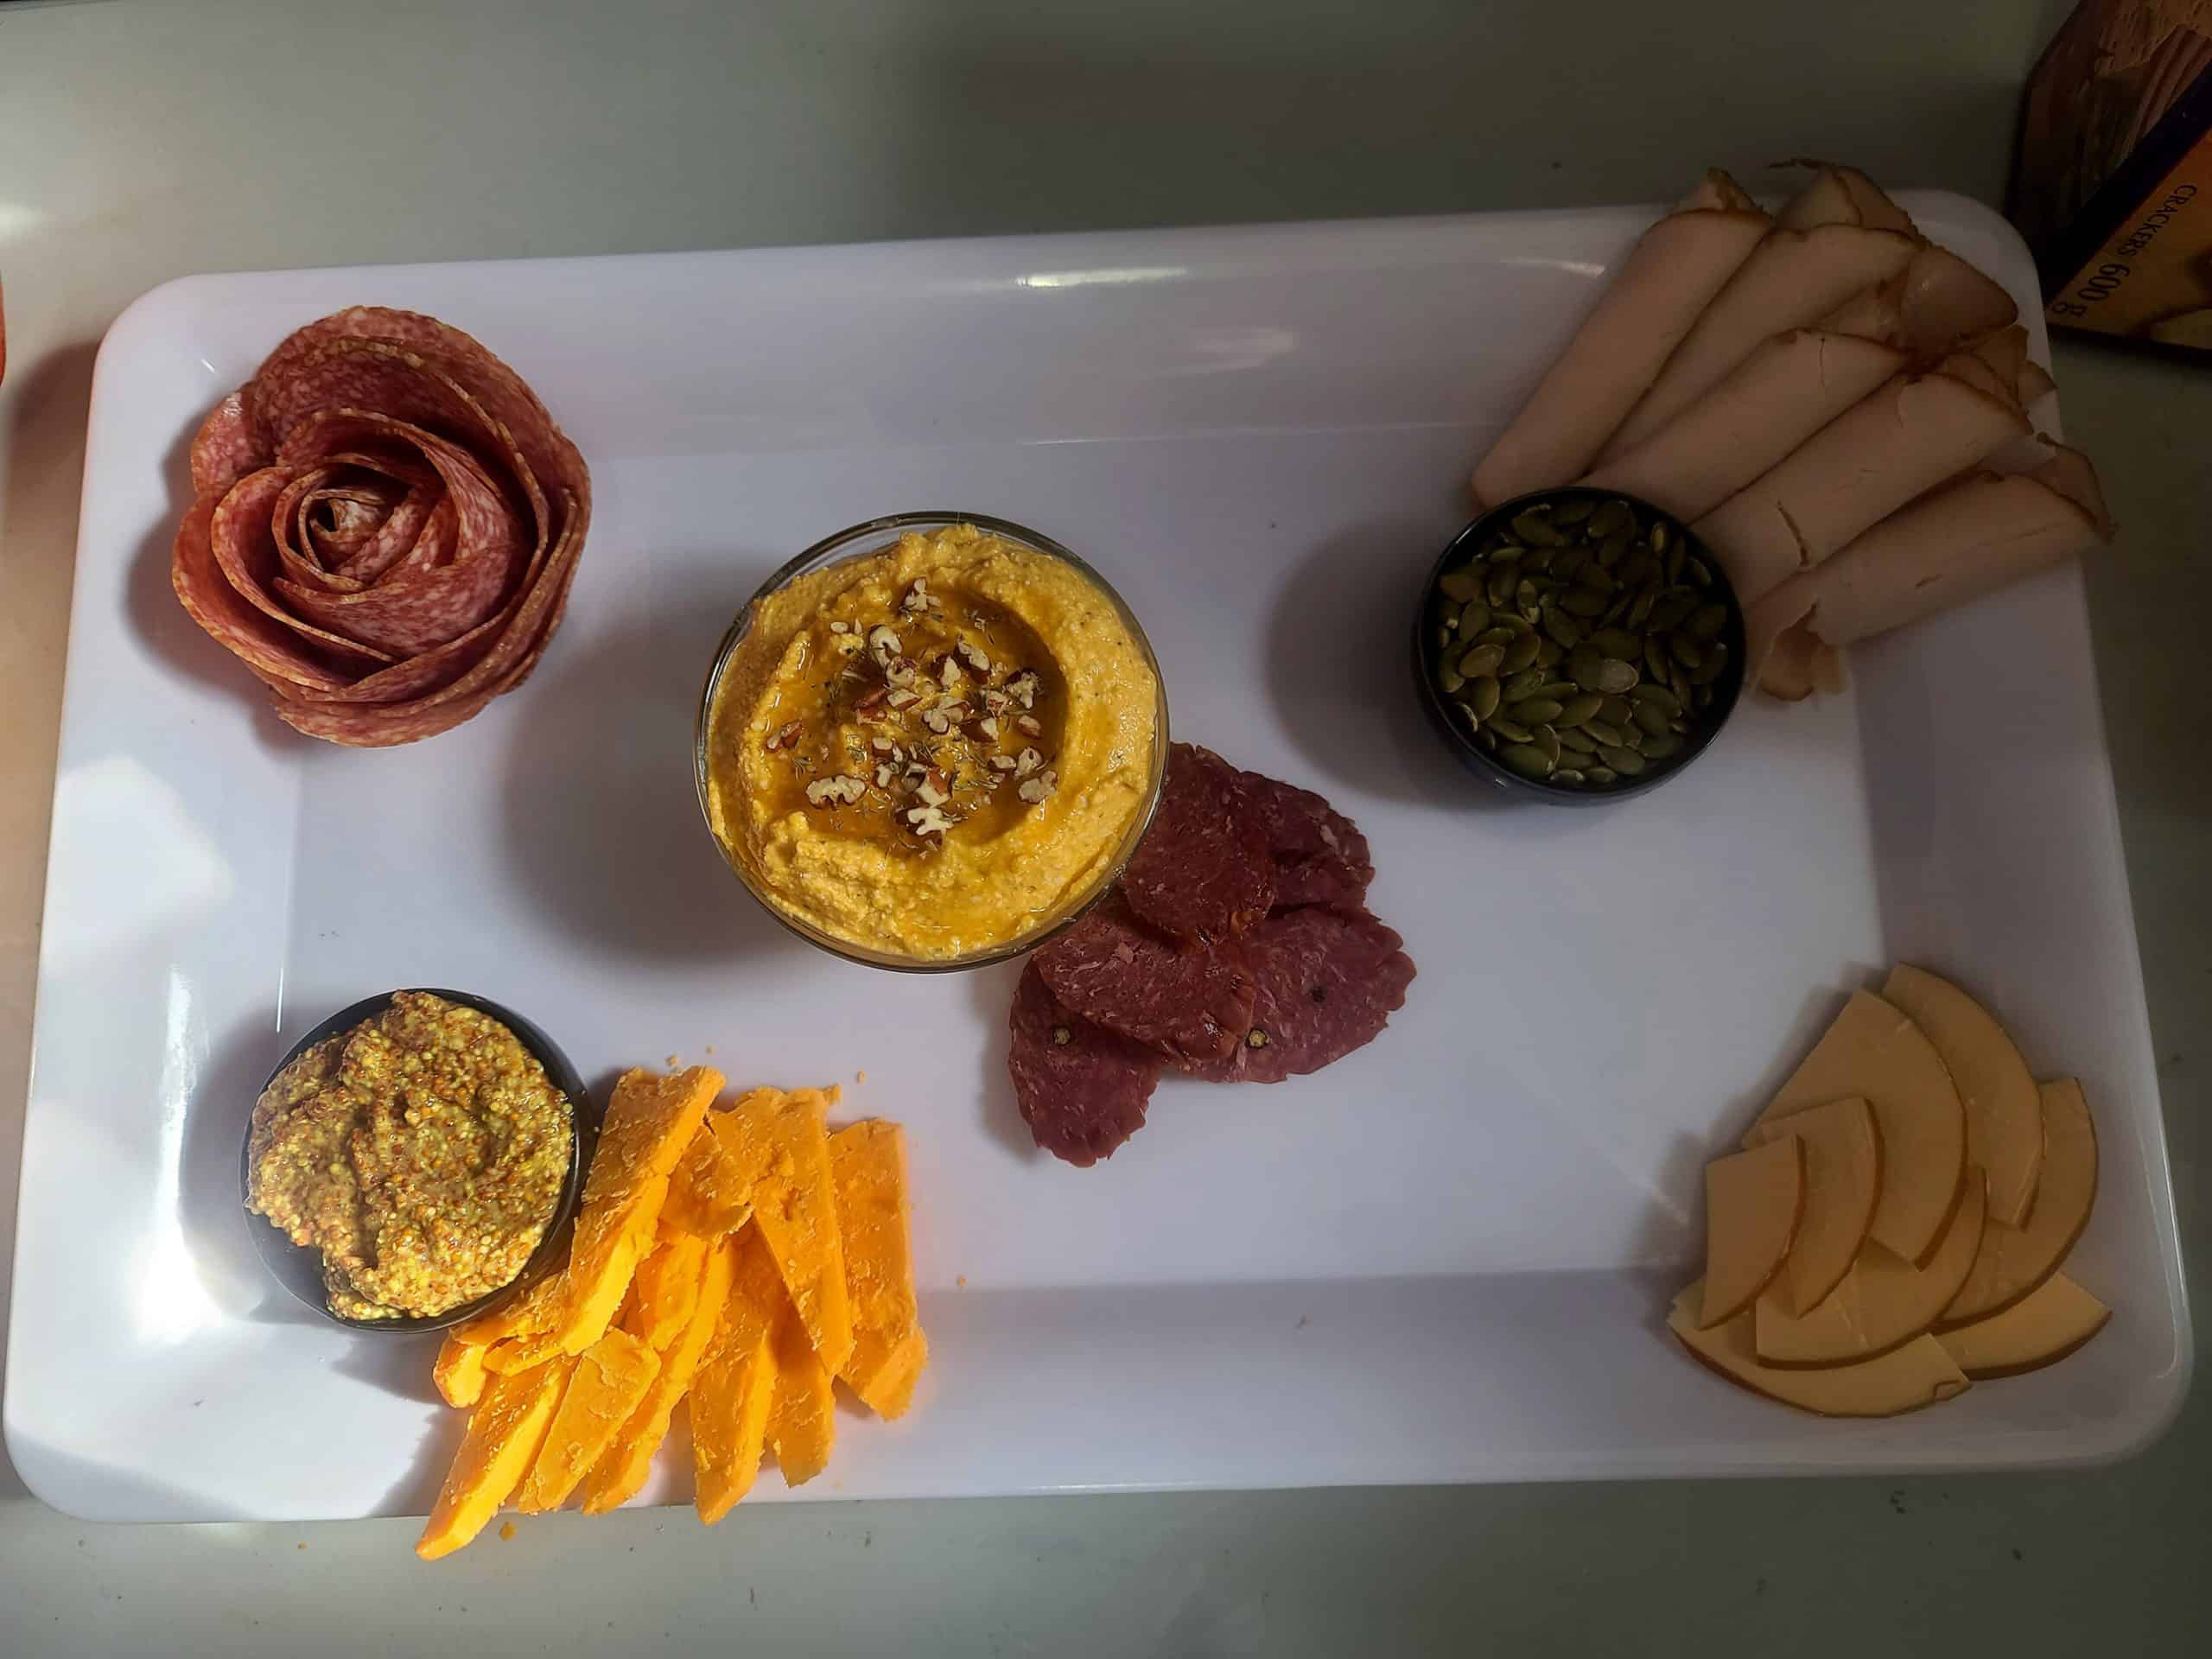
2. Place your meats roughly where you’d like them to go. They don’t have to be “artfully” arranged at this point, but I do try to space them out, relative to each other.
3. Place your cheeses roughly where you’d like them, spacing them out relative to each other. I’ll usually use space between each meat and cheese.
Fill in the Secondary Items
4. Arrange sections of your starches. I like to keep the types of crackers - and cookies, if using - separate from each other.

In this example, that means placing the grapes, figs, and orange bell pepper slices now, leaving the sage leaves for a finishing touch.

Final Touches
7. If you haven’t arranged your meat slices and cheese slices the way you want to yet, do so now. I’ll usually use more meat / cheese / surrounding items to prop slices up, if needed.
8. Fill in any sparsely covered areas with more meat, cheese, produce, or munchies - whatever makes sense for that space on your specific board.
10. Do any last minute fussing you may need to.
11. If you were holding off on adding dips to the bowls, do so just before serving.
12. If you’re adding any fresh herbs as garnish, place them now.
13. Serve and enjoy!

Tips for Charcuterie Success
Because of the different types of ingredients - and the different ways they need to be handled and stored - timing is really important when it comes to serving a Thanksgiving Charcuterie plate.
Here are some things to keep in mind:
Food Safety
1. Make sure your charcuterie tray itself is food safe. Some boards are meant more for display, using woods or finishes that aren’t food safe.
That’s not to say you CAN’T use them for charcuterie - just be sure to line them with parchment paper, so the food doesn’t directly touch the surface.
2. Observe good food handling hygiene: Wash your hands frequently and/or wear gloves while preparing your charcuterie board. Change gloves / wash hands after touching your face, using the washroom, touching your phone, etc.
Wash all produce, and work with clean equipment.
This is a cumulative time - it includes the amount of time you’re preparing the foods and working on your plate.
So, you’ll want to minimize the amount of time your meats and cheeses are out of the fridge.
I recommend preparing each meat or cheese separately, when possible: Take one from the fridge, slice it up, cover and return it to the fridge.
Keep everything chilled until you start assembling your board. Assemble it as close to serving time as possible.
If you anticipate the board being out for more than a few hours, make it smaller than needed, and keep rounds of refill items in baggies - in the fridge. Cycle food out as its time expires.
Food Quality
1. Be sure to check expiration dates on things like packaged cheeses and meats, and use them well before the expiry date. When you buy a cut wedge of cheese, it should be used within 2 weeks of purchase - generally speaking.
2. Check all produce for blemishes, mold, etc before using. Use only ripe produce.
3. Don’t let cheeses be exposed to the air for too long before use - whether in the fridge or not. Wrap in plastic wrap or bag everything when not in use.
4. Keep cheeses separate when stored. Ideally you’ll be serving cheeses in a variety of flavours - when stored together, those flavours can mingle. Not a great thing, in this case!
Presentation
1. Try to assemble your charcuterie board as close to the time you’ll serve it, as possible. This will prevent flavours from mingling, produce from bleeding, moisture from spreading, etc.
Aside from food safety issues mentioned above, it’ll also keep things the proper texture. If you make your board, wrap it, and chill it ... you’re going to end up with soggy crackers.
2. I like to leave dips OUT of the bowls until the last minute. It’s really easy to accidentally get a hand in the dip, as you’re assembling your board. Get it all assembled - with empty bowls - THEN spoon the dips in.
4. Try to be inclusive, when you’re serving a mixed crowd. If you know that some people are gluten free, leave the crackers off the board altogether, and provide some gluten free cracker options on the side. Minimize cross contamination wherever possible.
More Charcuterie Fun!
Looking for more cheese board, charcuterie board, and grazing board ideas? Sweet or savoury, I've got you covered:
Charcuterie Christmas Tree
Charcuterie Wreath
Christmas Charcuterie Board
Colourful Squares Cutting Board
Cutting Boards 101
Log Cabin Cutting Board
How to Make Salami Roses
Pavlova Dessert Board
Share the Love!
Before you chow down, be sure to take some pics of your handiwork! If you post it to Bluesky, be sure to tag us - @CelebrationGen. We're also on Pinterest, so you can save all your favourite recipes to a board!
Also, be sure to subscribe to my free monthly email newsletter, so you never miss out on any of my nonsense. Well, the published nonsense, anyway!
Finally, if you love this recipe, please consider leaving a star rating and/or a comment below, and maybe even sharing this post on social media!
Thanksgiving Charcuterie Board
Equipment
- Charcuterie Board
- Ramekins and Dip Bowls
- Cheese Knives, etc
Ingredients
- 3 oz Cured or smoked meats see post for suggestions
- 3 oz Cheese see post for suggestions
- Crackers see post for suggestions
- Produce Sauces, Snack Items, and Garnishes as desired - see post for suggestions.
Instructions
Place the Main Items
- Place your focal point items - wheels or chunks of cheese, sauce ramekins, dip bowls, etc - on the charcuterie tray.
- Situate your meats roughly where you’d like them to go, then place your cheeses.
Fill in the Secondary Items
- Arrange sections of your starches - crackers, cookies, bread.
- Fill in your sections of the more “snacky” produce, leaving more “garnish” produce for a later step. In this example, that means placing the figs, orange bell pepper slices, and grapes now, and saving the fresh sage for the finishing touches.
- Place sections of your “Munchies” items, filling in any larger empty spaces. This is the toasted pecans and dried apricots.
Final Touches
- Arrange your meat and cheese slices more artfully, if desired.
- Fill in any sparsely covered areas with more meat, cheese, produce, etc.
- Add dips to the bowls, if applicable, then garnish as desired - I used sage leaves.
- Serve and enjoy!
Notes
Nutrition






Leave a Reply