

Fancy boards - Cutting, charcuterie, cheese - make great gifts! This Cutting Board Tutorial shows you how to make a "Log Cabin" style board.

Hey, Marie here!
This cutting board tutorial was actually a joint effort, but WordPress only allows one “author” designation, apparently.
So, as my husband did the bulk of the work for this, it’s in his name... however, I’m writing the background and first bit of the tutorial. Cool? Cool.
A little while ago, we were brainstorming on cool tutorials we could work on together, and settled on cutting / charcuterie / cheese boards.
It was something fun we could do together, and a good blend of our interests and skills. I’m into cooking and design, and he loves woodworking. The collaboration resulted in our “Homemade Cutting Boards 101" post, recently, and we have a few tutorials planned - this one being the first!
After we did our little field trip to Exotic Woods Inc, he gave me a bit of a primer on what all would be involved on his end, etc. I asked questions, he provided answers, and I went ahead with designing something beautiful and unique: This “Log Cabin” inspired board!
This homemade cutting board tutorial design has a bit of a weird genesis - it was roughly fashioned after an afghan I crocheted back in Grade 5!
The Log Cabin Cutting Board Inspiration
That year, I had a home room teacher that I ADORED. As an autistic girl growing up in the late 80s, school life was... fraught.
Kids were terrible to me, half my teachers actively terrorized me and/or generally made things worse for me (See: holding up my 4th grade spelling/literacy results - “somewhere beyond grade 12" and actively shaming the other kids with it!), and I was surviving an incredibly abusive home situation. Kindness was a rarity.
... and Mrs Eliuk was an ANGEL in my eyes. She was the equal and opposite to everything else I had been experiencing up to that point, and basically my only refuge from it, outside of my grandmother.
To this day, I still have no idea if she actually had a wildly high capacity for patience, empathy, and kindness... or if she was just a normal person who treated me like a human for the first time in my life. The contrast to everything else I was experiencing was definitely memorable... even 30 years later.
At some point - maybe it was Christmas, maybe the end of the year, maybe as a “just because” thing, I decided to crochet her an afghan.
My mother had ended up with a crochet book, I think from some kind of craft book subscription, like an adult version of Scholastic books. I can still picture the cover, and remember some of the projects and names in it.
My mom and/or grandmother had made one called “northern lights” at one point. As an adult, I later made the same style, from memory!
I remember one called “Café au Lait”, which was a loose - almost fishnet - style made from triple or double triple crochet (I think DTC) with chains between. I remember making one, but for the life of me I can’t picture what colour I made it.
I wonder if I could even find that book, not knowing the name. I have no idea if it's even still around.
Oh wow, there it is. “Weekend Afghans” by Jean Leinhauser & Rita Weiss. I should order a copy for the hell of it - I remember really liking it!
Of course, now that I’m good and distracted by the walk down memory lane, I’ve found an Etsy listing for it, with a bunch of photos from it... and I’m not seeing the one I made, nor a name that sounds familiar for that particular one. I AM seeing quite a few that I had made, so now I’m wondering if I am misremembering the source of the design. FUN.
Ok, so whether from that book or somewhere else (Did I make it up as I went along? I DON’T KNOW NOW!), somehow I was inspired to crochet an afghan as a gift for Mrs Eliuk.
I may not remember where it came from, now - as of the last 5 minutes! - but I know exactly what it looked like.
It started out with 2 rectangles, one red and one yellow. Then a third was crocheted perpendicular to the short edges of the original two, in emerald green. A 4th was crocheted directly opposite that, in blue.
The 5th rectangle was red, and crocheted along the second (yellow) side. 6th was red, yellow, crocheted directly opposite from that one. Lather, rinse, repeat.
I know exactly what it looked like, because I remember the colours clearly, and I know how I was about colour use. Even when playing with Legos at a very young age, everything had to go in roughly “rainbow” order - red, yellow, green, blue. I was always adamant about this.
As an aside: parents of autistic kids? When your kids line up their toys, group by size, or fixate on colour patterns? LET THEM. I will never understand why this sort of thing - which feels right and brings us joy - is pathologized and trained out in favour of “appropriate” play. There is nothing inappropriate about pattern based autistic play!
Anyway, this is what it looked like (well, as a Photoshop graphic depiction!)

This is what my afghan looked like, 30 odd years ago!
I presented it to her and told her she could use it for her horse, if she liked!
Log Cabin Cutting Board Design Evolution
Anyway, that afghan was what I had in mind when I originally designed this cutting board.
... and then I saw the prices of the wood, realized what logistics would be involved, and altered course a little.
So I decided to go with the basic idea, of progressively adding rectangles, but decided to treat it more like a granny square - We’d make it as a block - with an end grain design - and cut it up into smaller pieces.
Due to the nature of the wood widths involved - and as a result of using 5 different wood colours - the design morphed from being a direct - but tiled - representation of that original crocheted afghan design, to being something more akin to what is known as a “Log Cabin” style in crocheting and knitting.
Rather than the blocks of colour basically being added in sets of two, always equal and opposite from each other, this was worked up in a round, almost.
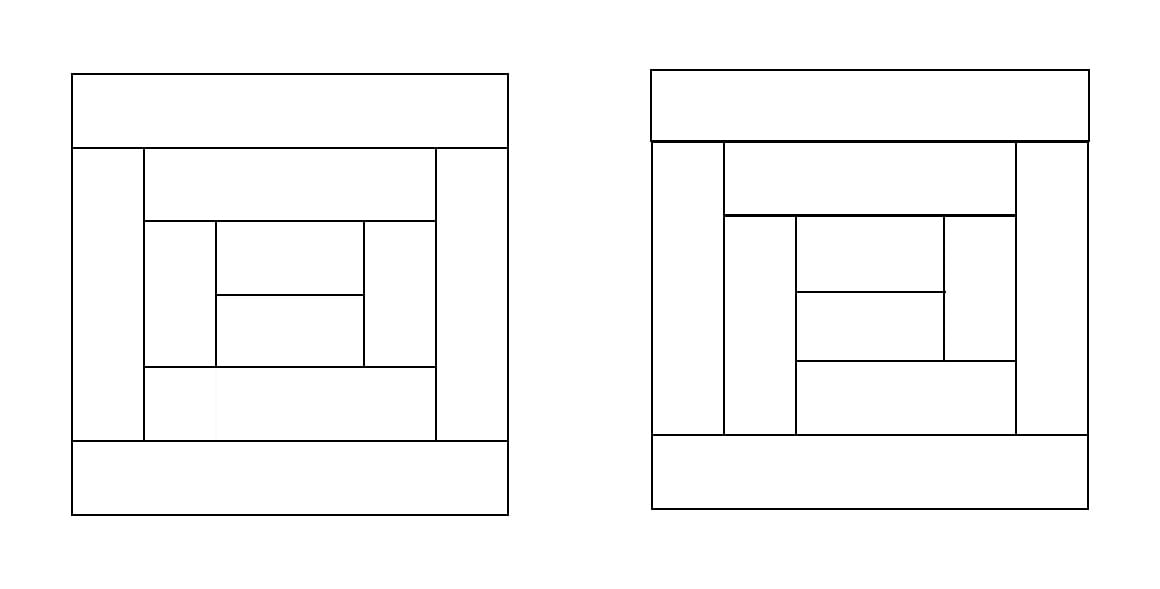
The original design, vs the "in the round" design that we ended up doing. Doesn't look that much different, right?
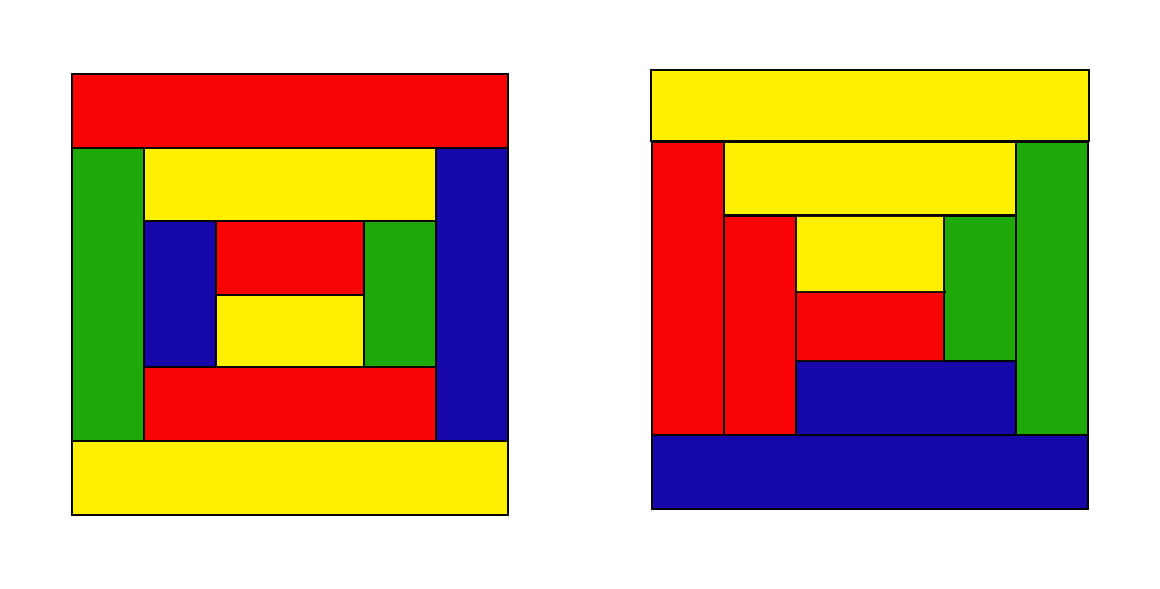
As you can see, a very slight change to placement yields a wildly different result
I started with a center square, rather than 2 tiny rectangles to make up that small center. (I didn’t want to make my husband hate me!).
The second block of colour was glued to one side of the square, the third piece was glued across the next side of the square PLUS the end of the second piece.
This continued around that square until the 4 other colours had completely surrounded the initial block.
Due to the widths of the remainders of each board piece, after that first round, we deviated slightly from this pattern, as shown:

This created a dreaded “inside corner”, as my husband will discuss in his tutorial... but was the most efficient use of the wood we had.
As you can see, a plank of purple was added to one side - so that there were two pieces of each colour, and so that the finished piece would be distinctly rectangular.
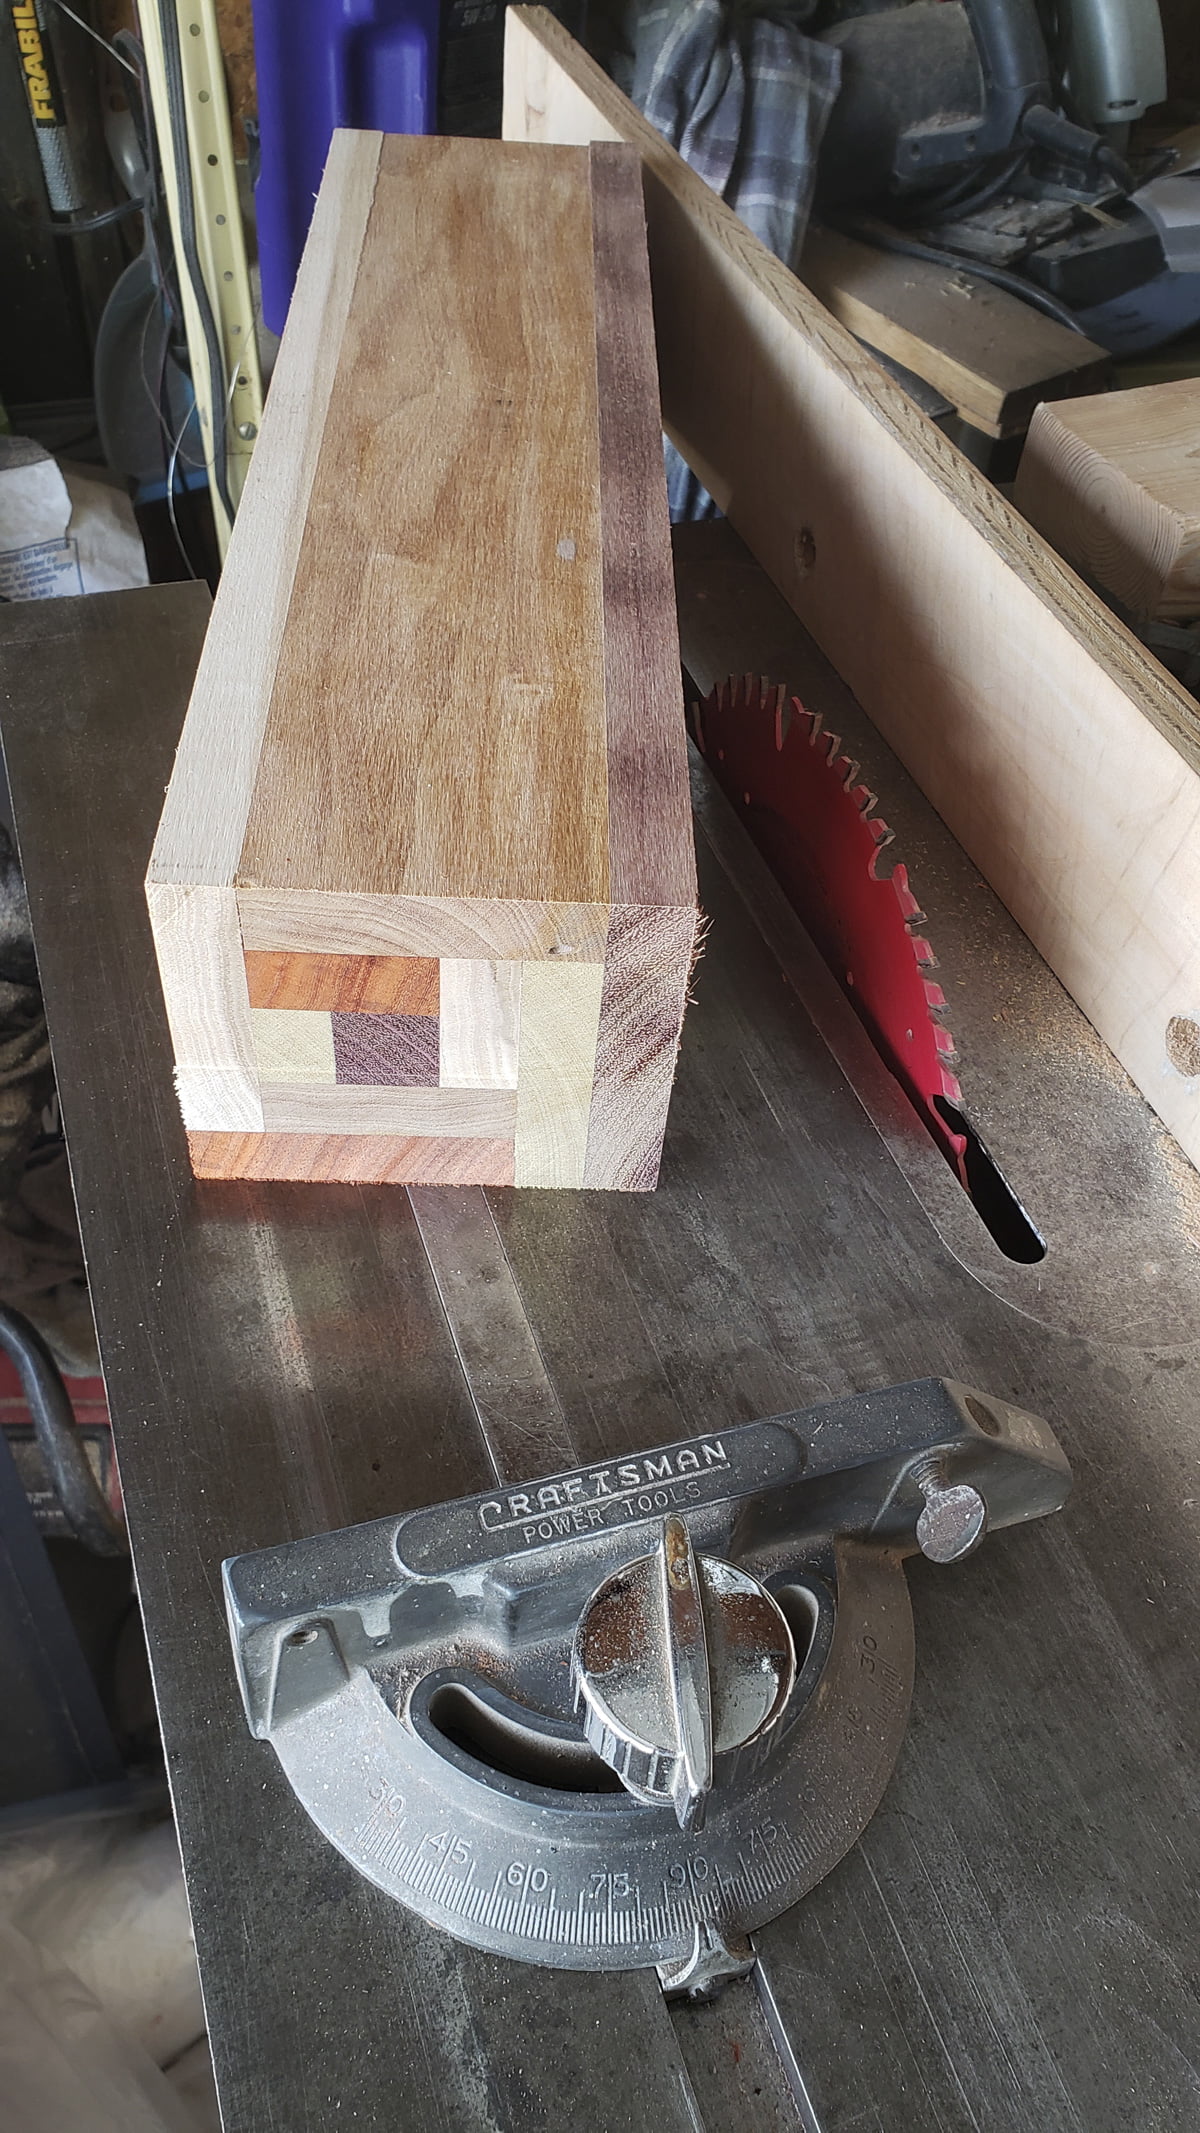
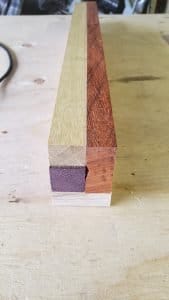
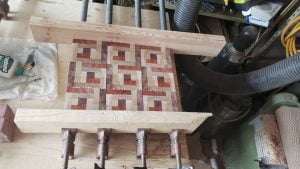
This is what our basic block looked like, before slicing up:
Designing Your Log Cabin Cutting Board
As with many of my recipes, consider this to be more of a guideline, than hard and fast rules or an exact design to go on. What you end up with will vary wildly with any minor change:
Number of colours used - We used 5, but for the sake of illustration, I’m going to show 4.
Thickness of the boards used - our boards were about ¾" thick, so it only took a couple rounds to build up a decent sized block. You could use 1" thick, or ¼" thick - the final result would be very different from each other!
Orientation - Once you have your block made and cut up, you’ll want to play around with the orientation of the boards. Rotating and/or flipping them over and arranging them changes up the designs possible, so just have fun with it.
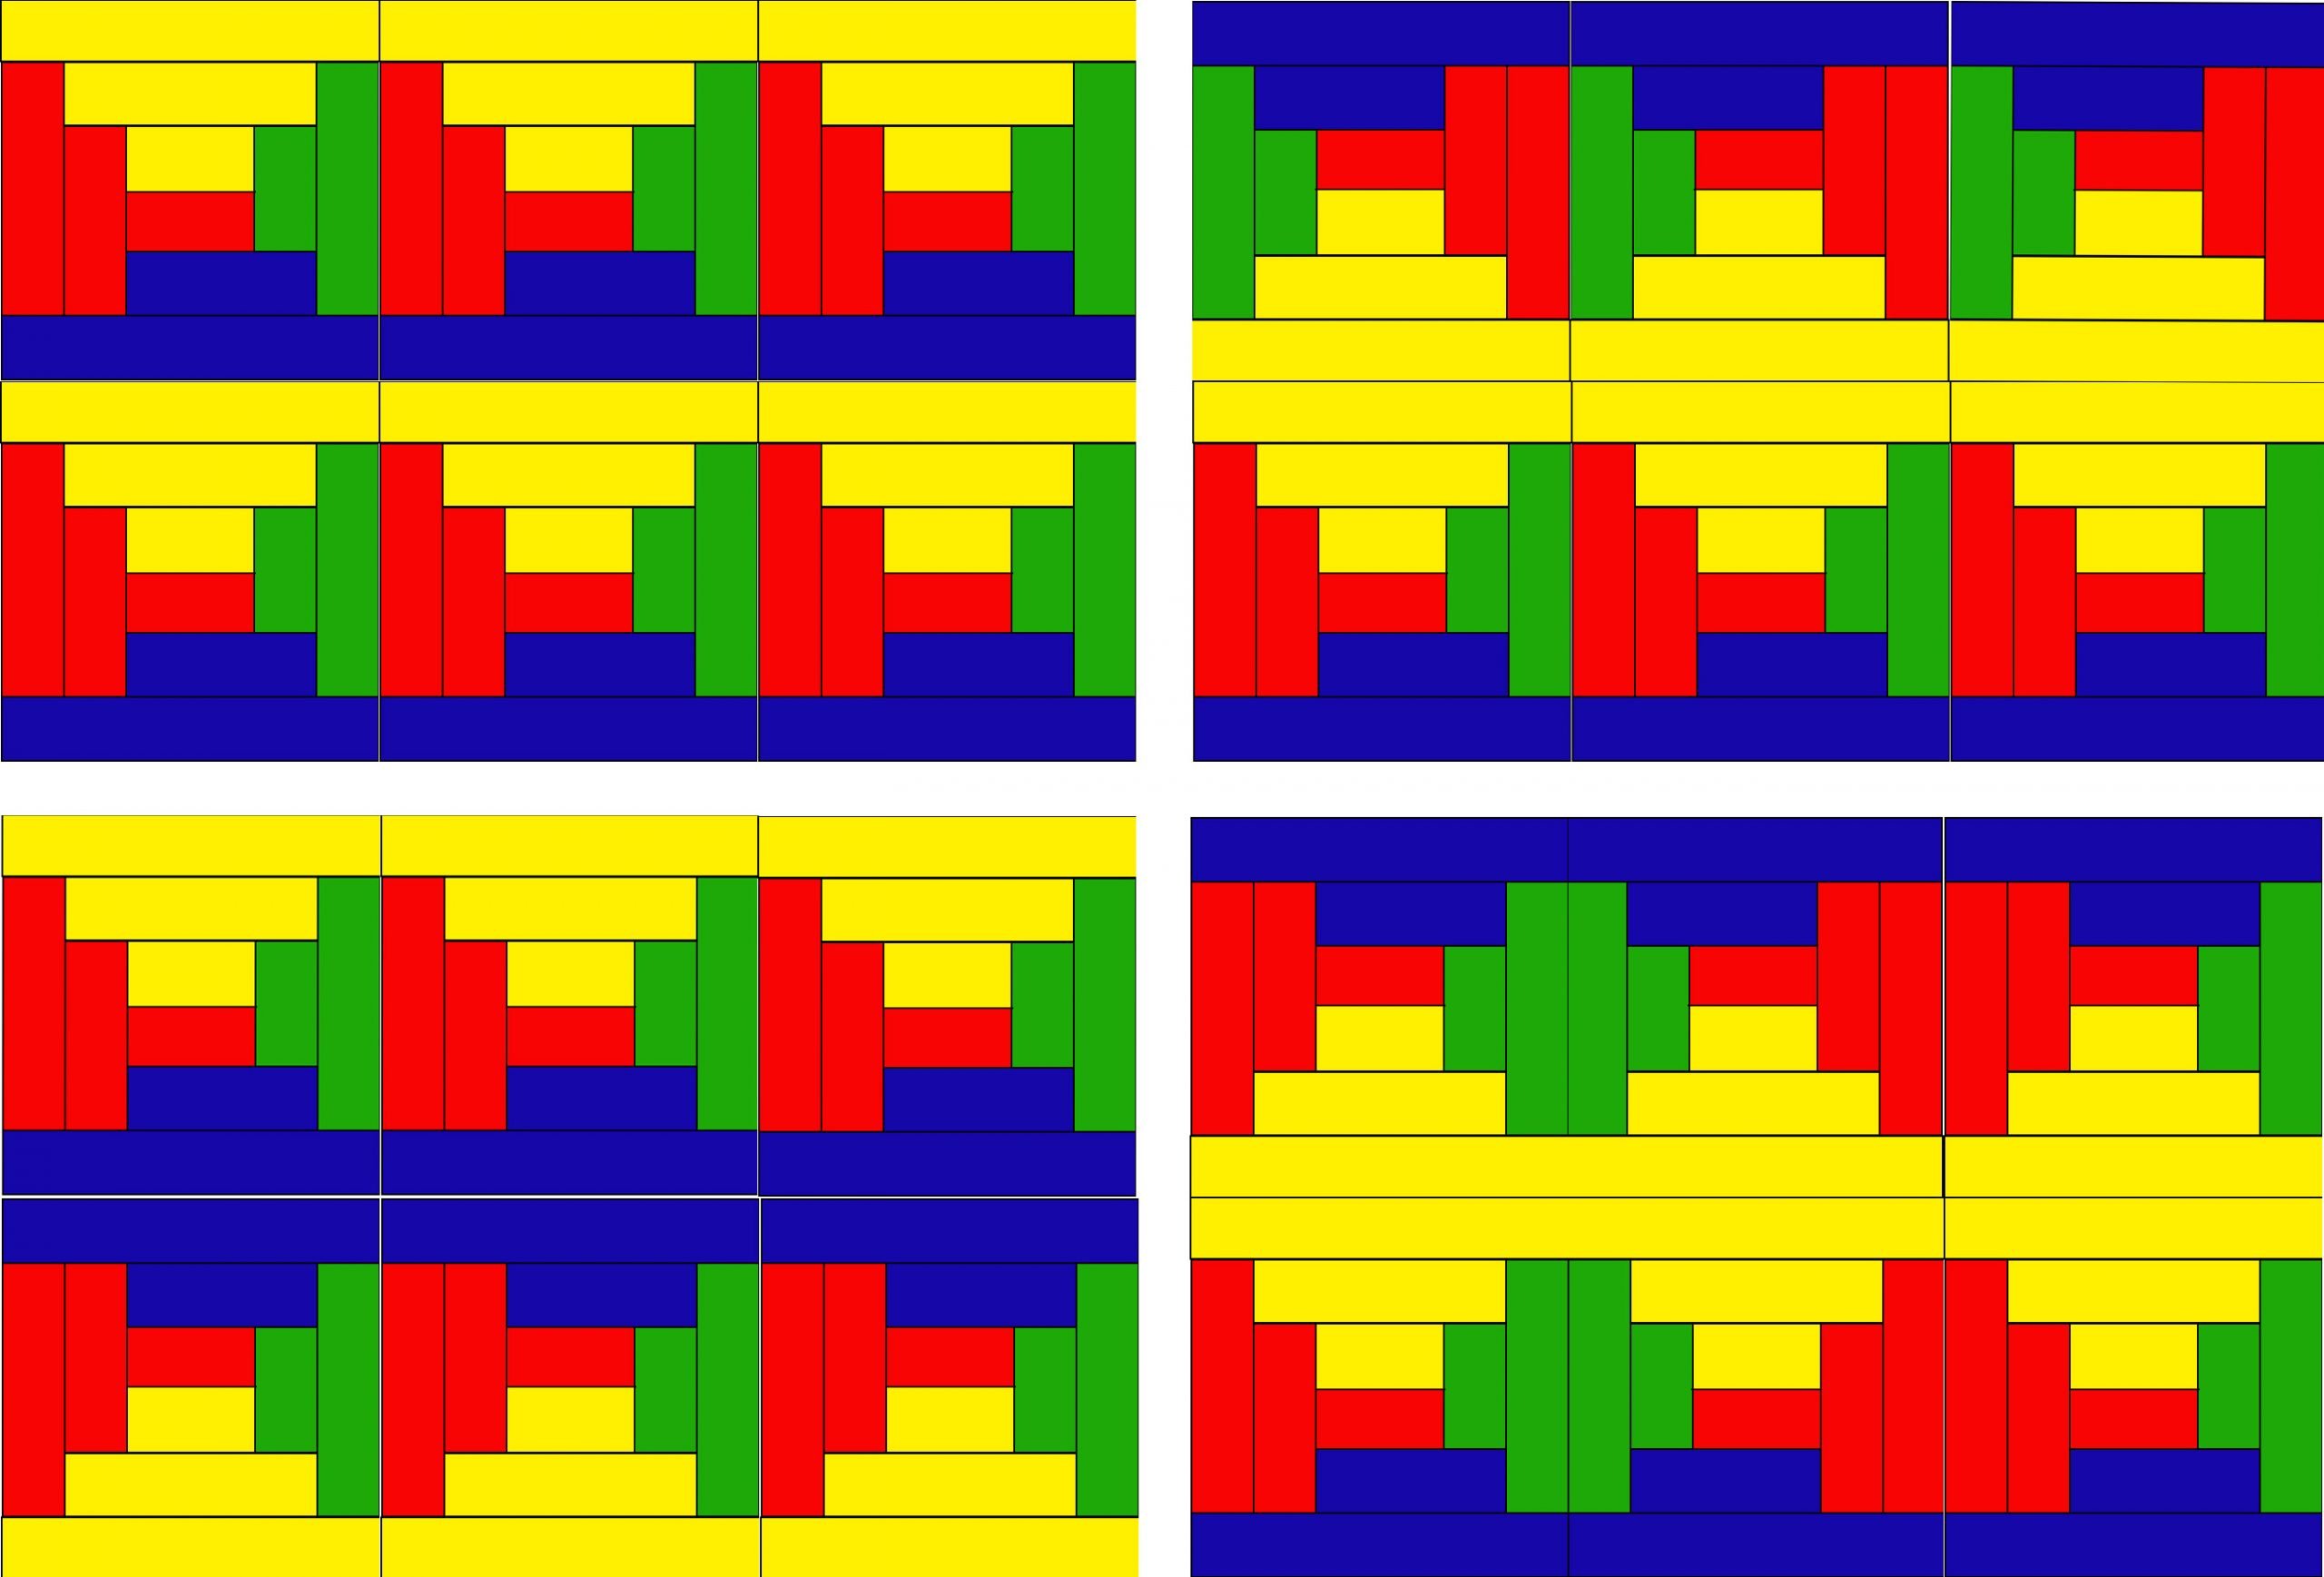
As an example, here are 4 different versions of a 6 piece cutting board that could be made from the example block, just by rotation and flipping:
How to Design the Base Block
The first thing you’ll need to do is design your “square” - in this case, a rectangle. This will be your base block.
You can start out with a square or a rectangular center piece. The chunk we started out with was 1.5" x 1.5" x 18". The bigger your center piece, the wider the planks of wood you’ll end up needing, the whole way around.
I took the widths of the planks we had and did scale representations of them in Photoshop. For each plank of wood, I wrote down a width measurement that was ¼" shorter than the actual width of each, to allow for kerf. (The amount of wood lost to the sawing process). I knew we’d only end up getting 2 colour blocks from each plank, so ¼" was plenty to leave for kerf.
If you’re dealing with wider planks, plan on losing ⅛" of wood for each cut you’d make. For example, if you have a 12" wide plank and plan for 3 pieces (2 cuts), consider yourself to have an 11.25" width, for the purposes of laying it out.
While I made “blocks” in photoshop and “cut” them up to lay out the initial design, you could always do it on paper, also - I just find that having a measured out representation makes layout easier to visualize and plan for. You could slice up colourful paper to size, for instance.
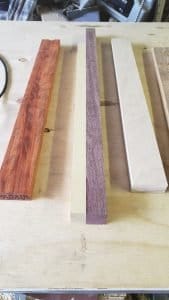
Anyway, when it came to planning the order, the wood we hand on hand was the first consideration.
The pieces of wood we’d bought to make this from were all slightly different widths, so I let that determine design to a degree - The center colour was set. I used the next biggest colour for the first add-on colour, the next biggest one after that for the following colour, and so on. This would leave the biggest pieces of each colour for the second round.
As a note, we started out with 5 colours, so we had an extra rectangle at the end, in order to use each colour twice. This gave us a rectangle as a final shape, rather than a square. How many colours you use will factor in to your final design.
In the end, due to the widths of our wood - and a complete lack of desire to go back and buy more - I altered the original intended design sizing slightly, and had Porter cut that original block down to 1" x 1" x 18". That ½" cut off the original square made a HUGE difference, when it came to being able to use up the widths of wood on hand.
Anyway, after messing around in Photoshop, here is what I came up with, as a “final” design:
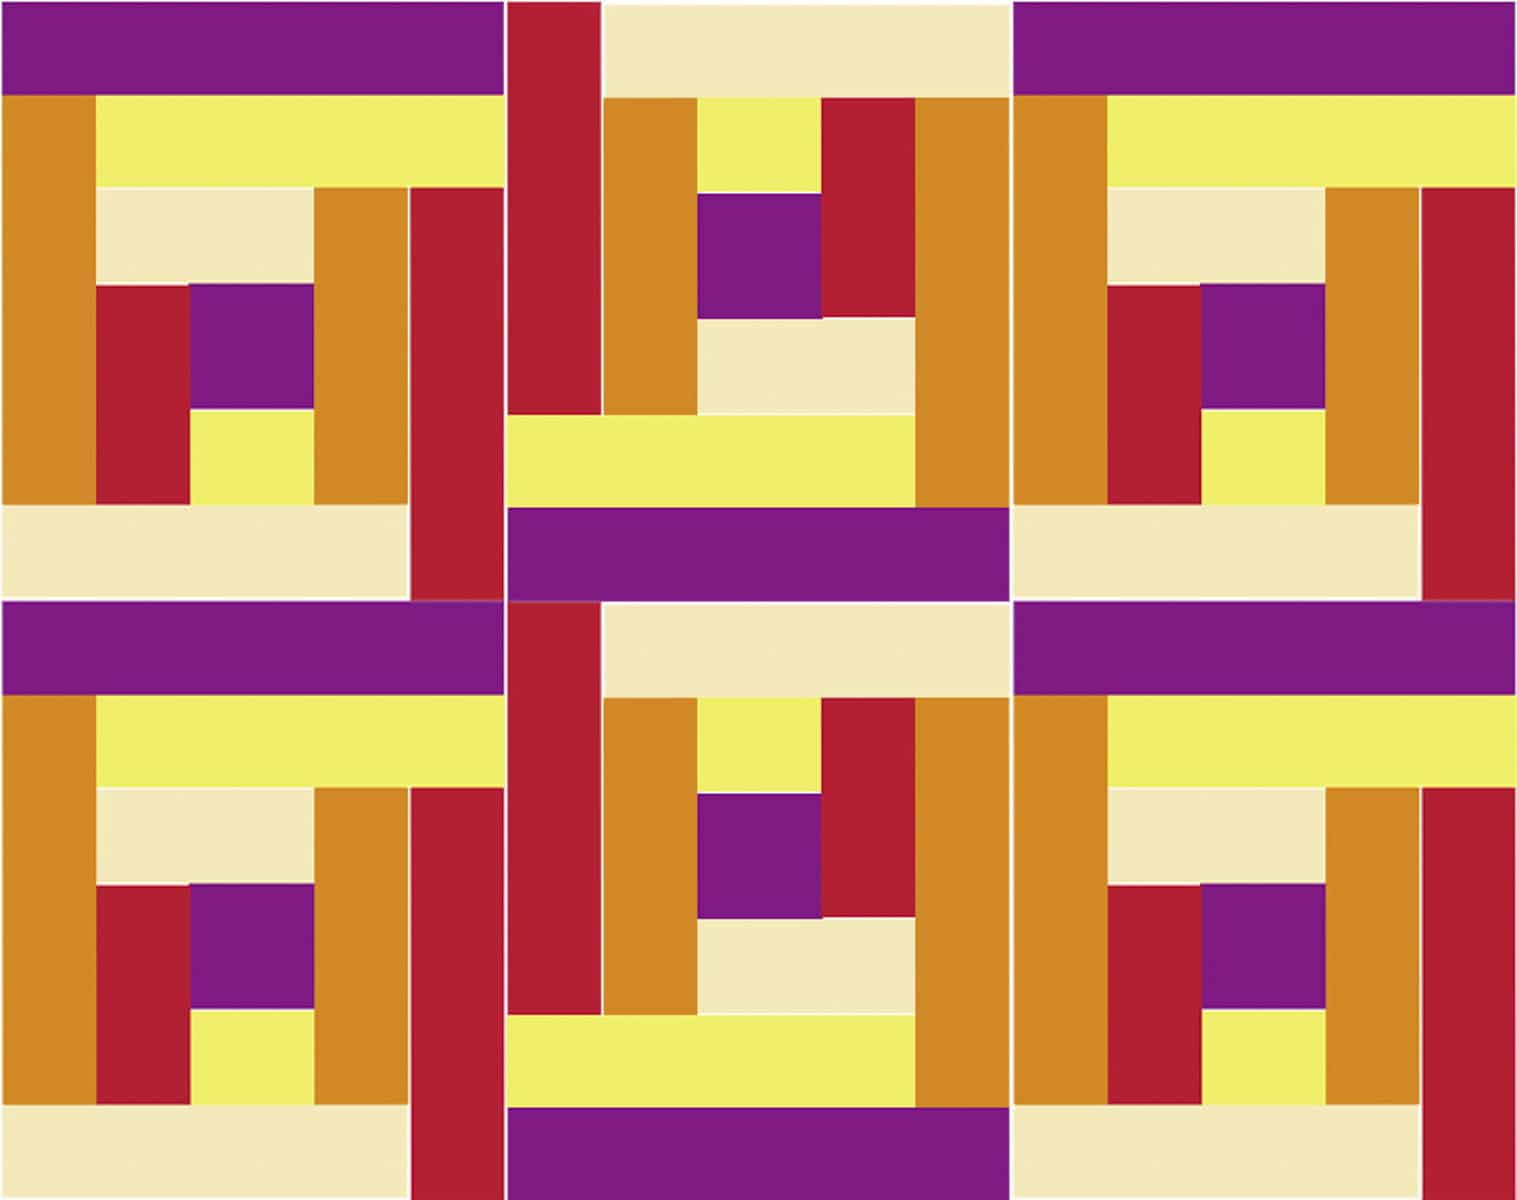
In this design, a rectangle is formed then rotated in an array.
Spoilers: it would not end up to be the final design. When doing the Photoshop representation, I only rotated the pieces. When I was playing around with the actual cut blocks to arrange them, I decided to flip some.
However, it did accurately represent the best usage of the wood widths we had on hand, so my husband was able to take it from there.
Here's the assembled and sanded cutting board, before finishing:
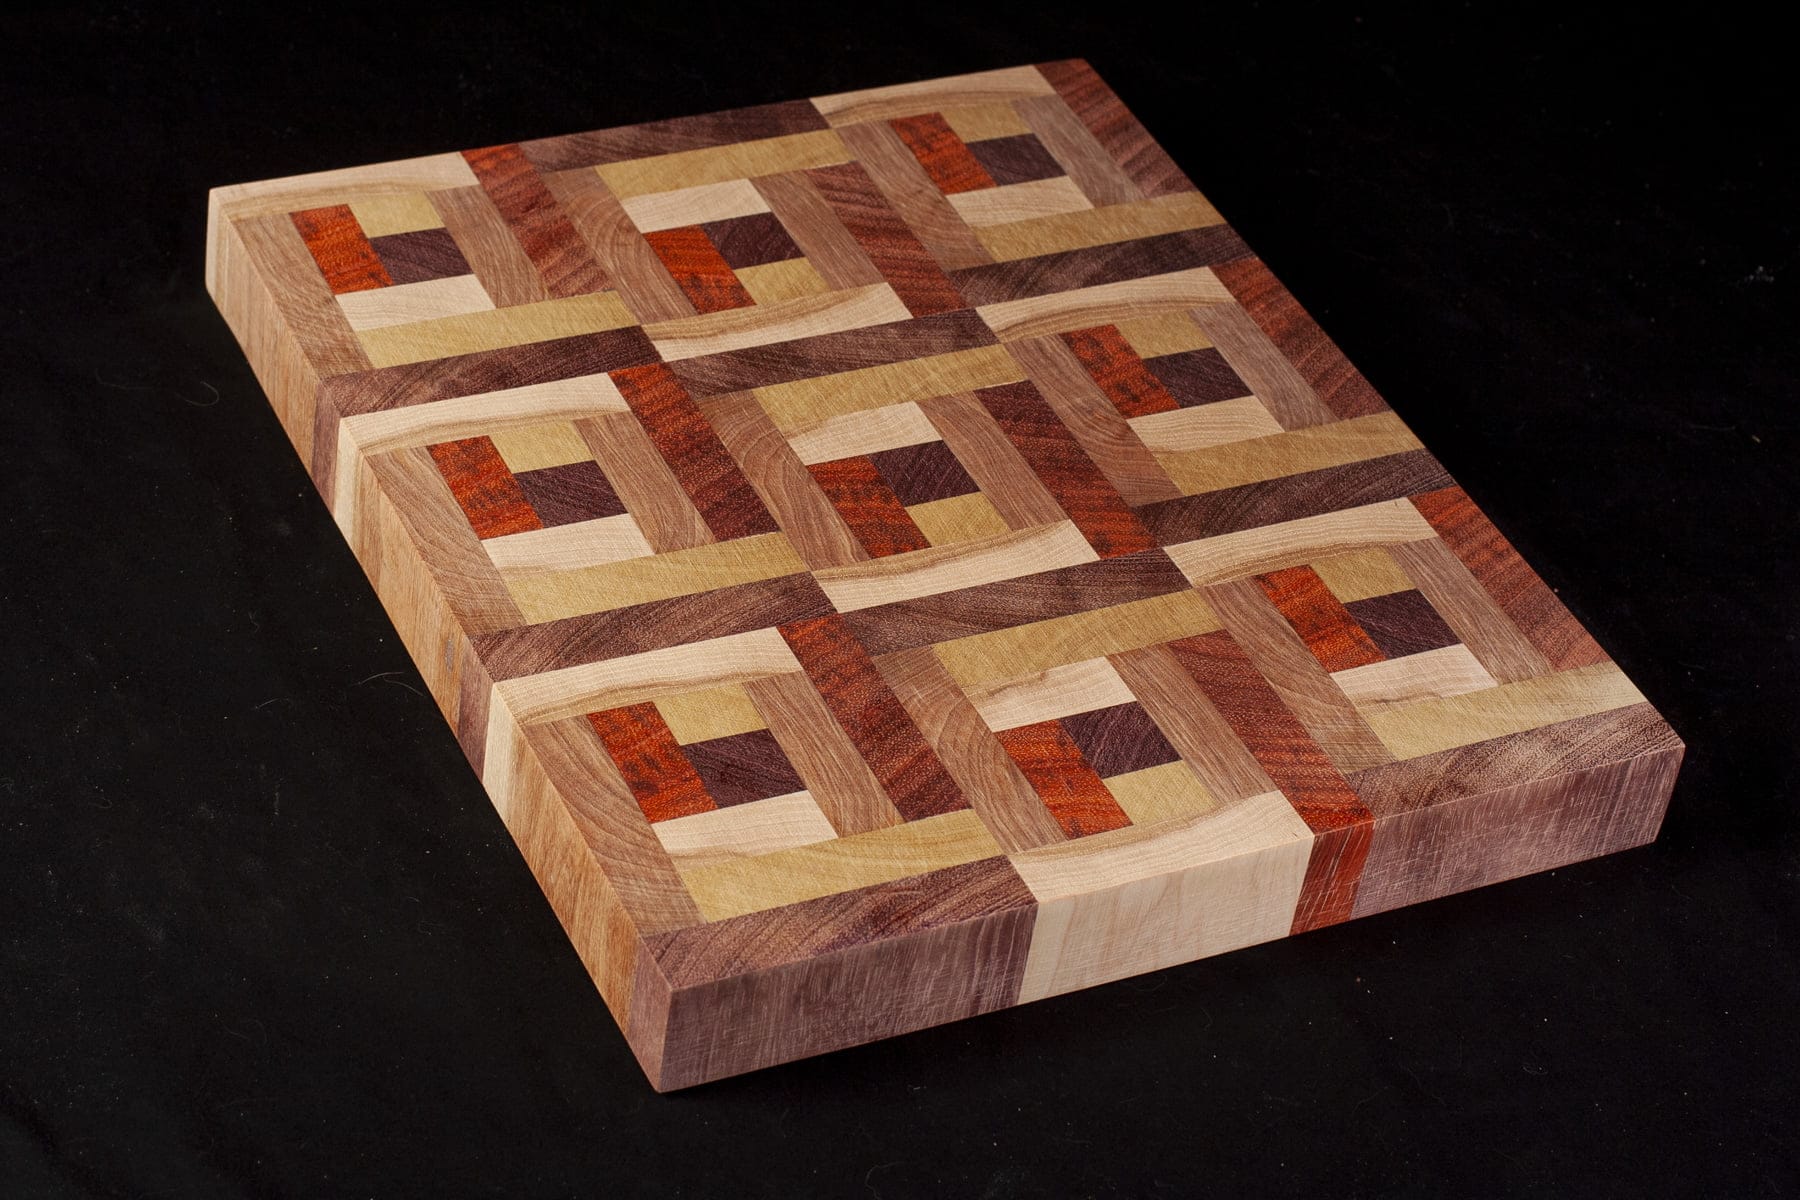
And here's the completely finished, oiled up cutting board:


Isn't it gorgeous? It - or a cutting board based on the same idea - would make a FABULOUS gift!
Looking for More Homemade Gift Ideas?
We have a few DIY gift tutorials, with even more coming! For now, be sure to check out:
Booze Bouquet Tutorial.
DIY Citrus and Cedar Bath Set
DIY Cutting Board Tutorial - Colourful Squares
DIY Mustard Bath Gift Set
Homemade Hop Spa Bath Set
Homemade Peppermint Eucalyptus Spa Set
How to Sew A Cute Makeup / Toiletry Bag Travel Set
Mop Doll Air Freshener Covers
DIY Ugly Christmas Sweater Masks
Share the Love!
Before you give away your cutting board, be sure to take some pics of your handiwork! If you post it to Bluesky, be sure to tag us - @CelebrationGen. We're also on Pinterest, so you can save all your favourite recipes to a board!
Also, be sure to subscribe to my free monthly email newsletter, so you never miss out on any of my nonsense.
Well, the published nonsense, anyway!
Want to make one yourself? Guess we should get on to his cutting board tutorial!
Note: This site is a participant in the Amazon Associates Program, an affiliate advertising program designed to provide a means for the site to earn fees by linking to Amazon and affiliated sites. While I’ll only ever link to items that I, personally, wholeheartedly recommend, I do need to put that disclosure out there!


Homemade Cutting Board - Log Cabin Style
Equipment
- Table Saw
- Planer
- Sander
- Chisels
- Clamps
Ingredients
- 5 pieces Wood Your design may vary!
- 1 bottle Titebond III Or another Type 3 Glue
- 6 pieces Glue brushes
- Carpenter Pencils
- 3 pieces Sandpaper 80, 120, and 180 grit are recommended
- 1 tube 5-minute epoxy If repairs are needed
- Craft or Popsicle Sticks
- Disposable Mixing Containers
Instructions
Confirm your design
- Once you have your design and wood in hand, it’s always good to do a quick confirmation before cutting.

- Measure the widths required in your design for each wood, and measure what you have on hand. Make sure to include the kerf width for the cuts, as well as allowance for sanding. We use a thin kerf table saw blade, 0.094"(2.4mm) wide, but we use 0.125"(3.2mm) for total allowance, which is a generous allowance to ensure to issues.


Begin from the center
- We’re going to build this from the center and build outward, so we can cut the first couple of pieces and glue them together. It might be tempting to cut several boards and have them ready, but I prefer to cut one or two at a time as needed. After sanding, the dimensions will change by a tiny amount, I prefer to minimize waste. Even a small sliver of leftover wood can become very handy, for repairs or an accent to another piece.
Cutting the boards
- Rip the first two pieces and sand the two sides that will be glued together. The other sides will be sanded in subsequent steps; you may sand them but it’s not necessary.
- Note: before sanding, clean your station very well. After sanding, scoop up the dust into a ziplock baggie and label it with the type of wood. This dust will come in handy if you need to do repairs. You can create more later using scrap pieces, if needed, but it’s easier to collect it at this point.
- Prepare some scrap pieces of wood - we use pine furring strips or studs - which will aid in clamping. Not only does this prevent the clamps from digging into the workpiece, it helps to displace the clamping force across the surface, providing even clamping force for optimal adhesion.
Dry-fit the pieces
- Set up the clamps and assemble everything before gluing. This is important so you’re not fiddling around trying to get the clamp to the right spot when you’ve got glue on your parts and you struggle to manage everything. Leave a little extra room in your clamps so you can slip the pieces in an out easily.
Gluing the boards
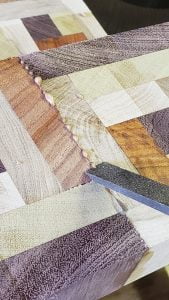
- It’s easy to put on too much glue, but the key is to have a thin coat of glue on both sides. I like to use the resistance of the brush as a signal. If it’s easy to wipe the glue, it’s too wet and there is too much, I unload the glue from the brush onto a piece of scrap wood. There should be some significant resistance to brushing, it should feel like it’s pulling. Of course, you also want complete coverage, add some more glue if there are blank spots.

- The image below illustrates a proper amount of glue after brushing.
- You want to make sure to drive the glue into the grain, all of those tiny little grooves from sanding will be critical to get a good bond. Also make sure to get glue all the way to the edges. If you pieces come apart, they will begin to separate at the edges. If the edges are glued well, the pieces simply can’t separate.


Clamping the boards
- Set up the glued boards and the clamping boards and lightly clamp them together. Adjust the pieces so the edges line up as perfectly as possible - this will minimize the amount of planing and sanding you’ll do later, as well as minimize waste. Clamp a little tighter to secure, but don’t clamp too hard at this point or the glue will be squeezed out to the sides too much.
- It’s important to distribute the clamping force not only along the length, by using multiple clamps, but along the height as well. When we’ve got thin pieces like this, it’s not critical, but it becomes very important later as the workpiece becomes large. If you only clamp from the bottom, for example, the top of the boards won’t be held together properly and you’ll end up with gaps.
- Once you get all of your clamps in place, begin clamping tighter. Alternate around and tighten a little bit at a time. Verify the alignment of your pieces throughout this process - it’s common for the boards to slip a little bit and you don’t want to end up gluing it out of place.


Wait for the glue to dry
- Waiting is difficult! The pieces will be stuck together fairly well after an hour or so, but planing and sanding may tear them apart. While it’s best to wait overnight between each step, we will continue processing after around three hours, but be very careful since the glue is still fairly weak at this point.
Remove excess glue
- After unclamping the workpiece, you’ll likely see a little excess glue was squeezed out from the joints. A chisel makes quick work of removing this. The planer could easily remove the material, but the little lumps on the bottom side could make the workpiece go through the planer at an angle, skewing the cut. Making the surfaces mostly flat ensures proper planing.
Plane and sand the next face
- Although we are mostly concerned about the next face that will be glued, it is often necessary to also plane the reverse face a little, for the same reason we removed excess glue. High spots should be taken down manually or with a joiner to ensure proper planing.
- If you do have access to a large sander, you can actually do the planing and sanding together.

Cut the next one or two boards
- For every piece added, make sure the board added is slightly larger than the workpiece. Somewhere around 1/16"(1.5mm) is sufficient. This ensures that you won’t need to plane down the entire workpiece to match the new piece, and allows room for slight alignment error while the parts are glued together.
Repeat!
- At this point, the steps are the same, simply repeat the process and build out the rectangle.
- It might be tempting to try to be more efficient and glue/clamp in two directions. I highly recommend that you do not try this. It’s difficult enough to ensure everything is aligned and properly clamped in one direction, attempting this in two directions simply has too much risk of error. The way to do this properly is to have a clamping jig that is specifically designed to aid in this type of clamping. Unless you plan on making these as a full time job, it’s simply not worth the effort.
- With every piece added, confirm your layout. It’s easy to mix things up, and once the glue cures you’re pretty much stuck.
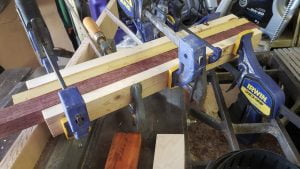
- Your clamping setup will get more and more complicated as your workpiece gets larger. Have plenty of clamps on hand! Also, your clamping boards will need to get wider, you can see we’ve switched to 2x4 studs at this point.

The dreaded inside corner
- Building out a rectangle is straightforward, but what do you do if you end up with an inside corner to deal with? In our design we had to deal with this twice.
- The primary concern of an inside corner is getting the excess glue out of the corner. Any leftover pieces will mean you can’t get the next piece clamped into place properly. Make sure to dry fit the pieces to make sure they’re fitting properly.
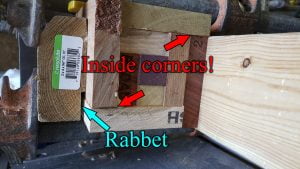
- When clamping a board with an inside corner, vertical clamps should be added also, to ensure proper clamping in both directions.
- Note the rabbet cut on the clamping board, which ensures the clamping force extends to the board being glued. Without that, the bottom part would not be clamped properly. You could simply raise the board to prevent this, but when you’re dealing with a handful of clamps and trying to hurry before the glue dries, it’s convenient to simply set the clamping board in place and know it will work properly.
Oops.
- Even if you’re careful, mistakes happen. We ended up having a gap on one side of the workpiece, at one of the inside corner boards. Either we didn’t get all of the glue out of the corner properly, or the board slipped during clamping.
- Or, you may find that your wood has little wormholes or other blemishes.
- No worries, we can deal with this! Mixing sawdust - of the type of wood being patched - along with glue or epoxy, will result in a repair that blends in well. We prefer to use epoxy, but many woodworkers use wood glue for repairs.


Prep the tools needed for repair
- 5-minute epoxy, or wood glue
- Craft/popsicle stick
- Mixing container (we use disposable shot glasses from the dollar store)
- Sawdust of the wood you’re repairing
- Heat gun (a hair dryer will work)
- A razor blade and/or dental pick can be handy to scrape or move the patch into the seam
Have plenty of sawdust available
- It’s hard to know exactly how much sawdust you’ll need, so make sure you have plenty.
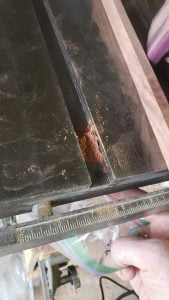
- For our Padouk repair, we cleaned the table well then sanded a scrap piece with the palm sander with a course pad (80 grit).
- The palm sander will blow away a fair amount of the dust, so periodically you want to pause to scoop up the sand you’ve created. The groove in the table make convenient areas to scoop the dust for collection.

Prep the repair area
- If you’re patching wormholes or other natural defects, use the dental pick to scratch up the surface. This will remove any soft material that is barely holding on, and will create small scratches for better adhesion.
Mix the repair media and fill the piece
- If you’re using 2-part epoxy, first mix a small amount before adding any sawdust. This will ensure that the epoxy will cure properly.
- Add sawdust, a little bit at a time until it’s a thick mix. The idea here is that the epoxy or glue is coating the sawdust and holding it all together, which means it’s mostly sawdust.
- Smear the repair media over the gaps/holes and drive it into the workpiece as much as possible. Make sure there’s extra, both glue and epoxy (to a lesser extent) will shrink a small amount as it cures.

Drive the repair media into the workpiece as much as possible
- Using the heat gun, gently warm up the repair media. You’ll notice it soften and flow easier. That’s when you should remove the heat. Too much heat will cause epoxy to cure prematurely, and will cause glue to dry out.
- Now that the media is soft, you can use your tools to drive it even deeper into the workpiece. Add more repair media on top, if needed.
- For our gap, we used the craft stick to wedge the repair media as deep as possible.
- The repair looks dark, compared to the Padouk piece. The Padouk will get darker when the finishing oil is applied, and the repair will blend better.

Wait, scrap, plane, sand
- Just like every glue step, wait for the adhesive to cure, scrape off the excess with a chisel, and plane then sand the piece smooth.
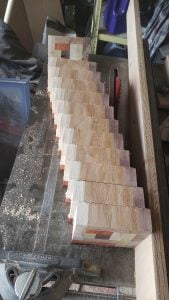
Slice up the block
- Now that you’ve created a fancy block of wood, let’s slice it up! Using the miter gauge and fence is not recommended because the piece can bind. For my setup, the fence clamps along the front and back, so I simply make sure the back side is clamped a little wider than the front. You should also make sure to use the riving knife and blade cover for safety.
- If you want to be as efficient as possible with your wood, trim the ends and measure the resulting block. Subtract the sum of the kerfs from the cuts. Remember that you’ll have one less cut than pieces - if you want nine pieces for a 3X3 grid, you will make eight cuts to get the nine pieces. Now take the resulting length and divide it by the number of pieces, nine in our example.
- Our table saw uses a 10" blade, which allows for a cut a little over 4" thick. Our workpiece is larger, so we had to do two passes to complete the cut. A large bandsaw would have been able to make the cut in one pass, but we do not have a bandsaw.
- For multiple pass cutting, set the blade slightly over halfway through the workpiece. By only cutting as far as needed instead of the maximum blade height, we minimize any error due to slight angle of the blade. It’s best to test the cut with some scrap wood first, since any error in angle of the miter gauge or saw blade will result in more planing needed, and wasted wood.
- It’s best practice to number the pieces. Depending on your design, this may allow you to bookmatch pieces, where the pieces from a cut are placed mirror-imaged against each other. This makes for a really cool visual effect like we did on our Walnut cabinets


Glue and clamp in one direction
- Since I use a thickness planer and drum sander, our pieces are the exact same thickness. This allowed me to clamp up the three rows at the same time, using less clamps and space. As before, it might be tempting to glue up the assembly in both directions, but it’s not recommended.
- To get the pieces aligned properly, you could use a board slightly thinner than the final workpiece to keep everything straight, but cover it in plastic or parchment paper to prevent your cutting board from getting glued to it. We chose to align the clamps such that they formed a base that hold the pieces roughly in place, with manual fine-tuning occurring when clamping force is applied.
- Confirm your layout! It’s easy to accidentally get something the wrong direction as you glue and place the pieces.
- As before, lightly clamp the assembly, then confirm the correct position of the individual pieces. Slowly tighten the clamps to gradually increase the force applied.

Plane, sand, and glue the other direction
- When you unclamp your assemblies, it’s best to mark their orientation again. We marked the rows as L, M, and R, with an underline just to really confirm the correct orientation.
- Scrape off excess glue, plane and sand the ends that will be glued, and glue/clamp up the assembly again.
Final plane and sand
- Now it is really looking like a cutting board! Perform the final planing and sanding. We like to finish off with a finer grit, 180. This eliminates the visible scratches but leaves the wood grains somewhat open, allowing the finish to penetrate. Lightly sanding the edges at a 45 degree angle will break the sharp edges.
Finishing
- Sand project smooth, using no more than a 180-220 grit sandpaper.
- Pour a bit of the Bio-Supra* on the surface of your cutting board, and use a small plastic scraper / squeegee to spread it around.
- Use a foam craft brush to apply the oil to the sides and ends of the board, in a THIN coat.
- Wait 5 minutes
- Using a clean, lint-free piece of cotton - a rag or an old shirt - wipe off excess oil. Continue wiping until there is no more finish coming off onto the rag as you wipe it.**
- Let it dry for 24 hours.
- Use a grey buffing pad to lightly abrade the surface of your project.
- Pour a very small amount of oil onto the surface of the cutting board - less than you needed for the first round, as this round will go further.
- Use a small piece of white puffing pad to work the oil into the first coat.
- Once more, use a clean, lint-free piece of cotton - a rag or an old shirt - wipe off excess oil. Continue wiping until there is no more finish coming off onto the rag as you wipe it.**


Leave a Reply