
Christmas Poinsettia Cakes Tutorial
Want to decorate a festive Christmas cake, not feeling artistic? This poinsettia cake tutorial covers 3 techniques - total beginner projects!
Servings: 1 Cake
Cost: $10
Equipment
- 1 cake, covered in fondant
Ingredients
Sketched Poinsettias
- Edible markers
Watercolour Poinsettia Cake
- Gel food colouring
- Vodka or another clear liquor
- Mini Shot cups, small bowls, etc
- Food safe craft paint brushes
Brush Embroidery Poinsettia Cake
- Frosting
- Gel food colouring
- Food safe craft paint brushes
- Paper towels
Instructions
Sketched Cake Technique
- - Use the thick tip of the yellow marker to draw a cluster of yellow dots somewhere on the cake. I like to start on the top, as the flat surface makes it easier to get my bearings.- Use the thin tip of the red marker to draw three petals coming out from the cluster of yellow dots, as shown.- Add 3 more petals coming from “behind” the original 3 petals, as shown.- Add some veining to the first 6 petals.- Realize that you were supposed to add another row of petal tips in between each of the original 6 petals, go ahead and add them, along with some veining.

- - Decide that the whole thing would look better if the petals had been drawn with the thick tip instead. Draw over all the outlines.
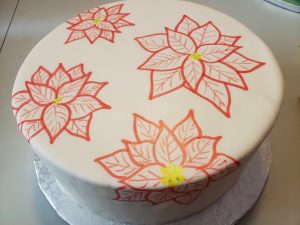
- - Decide to just throw caution to the wind and do all the outlining in the thick red tip right off the bat.

- - Repeat the last few steps to cover the cake in poinsettias.
- - Use the thick tip of the bright green marker to draw leaves in, over the whole cake.

- - Use the thin tip of the bright green marker to draw veining on the leaves, and a bit of outlining around the yellow dots.

- - Use the thin tip of the dark green marker to draw “pine” greenery to fill in any excess white space.

- - Stand back and Admire your work

Watercolour Poinsettia Cake Tutorial
- - Mix up some food colouring “paint” with gel colour and vodka. At minimum, you’ll want one each of yellow, red, and green.

- - Use the yellow paint to draw little clusters of yellow dots all over your cake. Each set will be the center of a “poinsettia”, so be sure to leave enough space between each set for the petals of each flower.

- - Paint three petals coming out from the cluster of yellow dots, as shown.- Add 3 more petals coming from “behind” the original 3 petals, as shown.- Add another row of petal “tips” peeking out from behind each set of petals from the first 6 painted, as shown.- Fill in each petal, as desired. I liked to do it in a rough “veining” style, outward from a center line up the middle of each petal. I left white spaces for visual interest.

- - Repeat to cover the whole cake in poinsettias.
- - Use a more intense red (darker colour, or just thinned with less vodka) to outline all of the petals.

- - With green paint, add leaves and “pine” greenery to fill in the white space, as shown.

- - If you’re like me, decide that you hate it and need to go back and outline the petals AGAIN, even darker this time.

- - Stand back and admire your work

Brush Embroidery Poinsettia Cake Tutorial
- - Tint your buttercream. I like to aim for really vibrant colours when doing this technique on a coloured fondant base, as I did in this case... but lighter, more pastel colours also work really well when the base is white or pale.If your buttercream is very thick, thin it out with a bit of milk - NOT water. You’ll want it thick enough to hold its shape when piped, but soft enough for the frosting to be easily brushed. Spoon your tinted buttercream into pastry bags. You can use a coupler and round tip if you’d like, but I generally don’t bother for this technique. Be careful to avoid creating air pockets.- Cut the tip of the bag off to allow for a smallish sized hole. You don’t want it to be super fine, and you don’t want TOO much frosting to come out, either.

- - Use red frosting to start piping out a petal in a spot where you’d like a poinsettia. Unlike the other two cake techniques in this tutorial, the yellow gets piped AFTER the poinsettias are established.

- - I tend to pipe 3 interior petals, a half petal between each of those, and then a smaller petal tip in between each of the original 6 petals, as shown.

- - Using a small, flat head brush, gently drag the frosting inward and down towards the center of the poinsettia, as shown. I start at the outer peak, work my way down one side, then go back to the peak and brush the other side in the same way.

- - Repeat on other petals, going around the poinsettia.

- - At this point, I remembered that it was best to start at the outside and work my way inward, so employ a bit of “do as I say, not as I do” when you do these.Start with the 6 petal tips, then do the row of 3 half petals, and finish up with the 3 interior petals.Doing it in this order allows you to better distribute any extra frosting that results from pulling the outer petal frosting, and makes for a much cleaner design.

- - Continue piping and brushing poinsettias all over the cake. I like to only pipe 1-2 poinsettias at a time, brushing them out before proceeding. This is because the buttercream can crust slightly, and that makes it more difficult / ugly to do the brush embroidery technique.

- - Transfer some red (I had tinted mine a bit darker than the main red, this is optional) to another pastry bag. Cut a smaller tip off this one, as you’ll be doing detailing with it.- Pipe veining over each of the brushed petals.

- - Tint some frosting yellow. This frosting does NOT need to be thinned out. Spoon into a pastry bag, being careful to avoid creating air pockets.- Cut a small tip off the end of the pastry bag. Alternatively, you can use a coupler and a small round tip - say a #3 or so.- Pipe little clusters of yellow dots in the center of each poinsettia, as shown.

- - Tint some frosting green, thin it out if necessary. This frosting will be brushed, same as the red.- Carefully spoon the green frosting into a pastry bag, trying to avoid creating air holes. Cut the tip off to a similar degree that you did for the red. Not too big, not too small.- Pipe leaves all over the cake, as shown.- Clean your brush off, then brush out the leaf frosting in the same way as the red was - starting at the outer peak, going down one side, going back to the peak and working your way back towards the poinsettia.
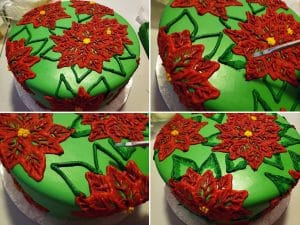
- - Tint some frosting darker green. This frosting does NOT need to be thinned out. Spoon into a pastry bag, being careful to avoid creating air pockets.- Cut a small tip off the end of the pastry bag. Alternatively, you can use a coupler and a small round tip - say a #3 or so.- Pipe little “pine” greens, as shown. I like to do this randomly to fill in any extra white (green!) space left around the poinsettias

- - Stand back and admire your handiwork!

Video
