

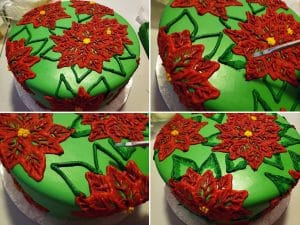
Want to decorate a festive Christmas cake, not feeling artistic? This poinsettia cake tutorial covers 3 techniques - total beginner projects!

I’ll be honest - it’s been probably the better part of a decade since I last did a fondant cake. I think 2012? 2013? I may be forgetting once since, but yeah - it’s been a WHILE.
Also: It’s been since 2012 since I painted on a cake, and since at least 2010 since I did brush embroidery on a cake.
I’m a bit rusty, but hear me out: That puts me in a good position to demonstrate easy techniques that anyone can do!
How to Make Marshmallow Fondant recipe and tutorial.
I honestly didn’t feel like making a ton of fondant - these were going to be used on styrofoam cake rounds, purely to demonstrate technique - so I made the smallest batches I could get away with.
I didn’t bother frosting the rounds, because I want to use them again. Yes, I’m lazy AND cheap!
That said ... the fondant job isn’t perfect.
Which, you know... is kind of perfect. Unless you’re doing this professionally or otherwise have a bunch of experience, you’re probably not going to roll it perfectly. You may have a few bumps, you may tear it, etc.
It’s a cake. Don’t worry!
The nice thing about the three Christmas Poinsettia Cake tutorials I’m sharing today is that not only do they not require any real skill to do, but they can really cover up any imperfections on your fondanted cake. (This is especially true of the brush embroidery technique, btw.)
So, these are great ways to be able to practice doing a fondanted cake, with very little risk - any mistakes will be camouflaged by everything else you do *after* fondanting the cake.
I’m really not very good at drawing or painting, whether on a cake or otherwise... but the poinsettia design is very easy and forgiving to work with. You, too, can pop out a fairly decent looking cake using any one of these techniques!
They’re pretty quick, too. After fondanting these cakes, the actual decorating took between 40-60 minutes per cake. You know, MUCH less time than, say, my Lambeth Wedding Cake!
When the time comes, pour yourself a bit of eggnog, put on a bit of holiday music if you like, and just have some fun trying one of these cake decorating techniques!
Share the Love!
Before you slice your cake, be sure to take some pics of your handiwork! If you post it to Bluesky, be sure to tag us - @CelebrationGen. We're also on Pinterest, so you can save all your favourite recipes to a board!
Also, be sure to subscribe to my free monthly email newsletter, so you never miss out on any of my nonsense.
Well, the published nonsense, anyway!
Sketched Poinsettia Cake Tutorial

Markers filled with food colouring can be a LOT of fun when it comes to cake decorating... especially as you can completely bypass the mess of mixing anything, dealing with frosting/bags/tips/ etc!
The first time I started playing around with edible markers was back in... 2008?... with this Sketched Orchids wedding cake:
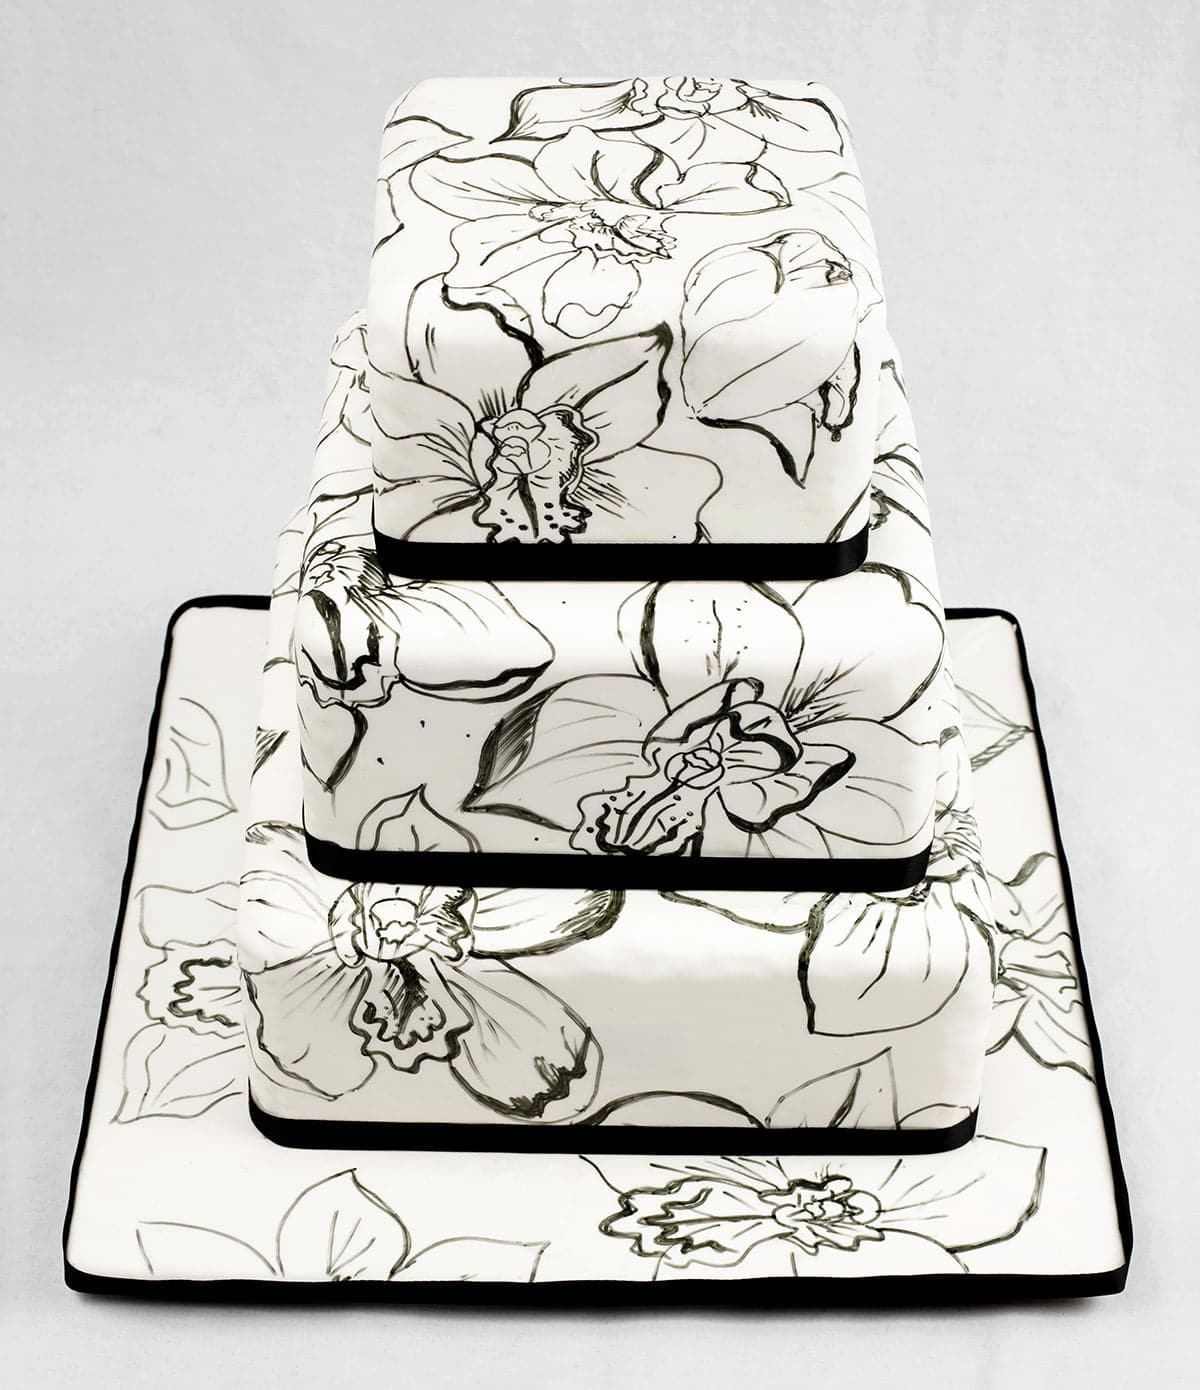
I sat there with a very realistic silk cymbidium orchid on hand, and just agonized - and cursed, constantly! - over trying to draw what I saw.
This Sketched Poinsettias Cake is monumentally easier to do, and really shouldn’t take much - any? - drawing talent at all. If you can draw a sort of pointed oblong shape, you’re good to go!
Also: If you’re not liking how it’s looking, just keep going.
Adding more veining or leaves or whatever provides visual distraction from whatever it is that you’re not liking!
Simplicity requires a lot more perfection than just overwhelming the viewer does. 🙂
Supplies Needed
1 cake, covered in white or a pale colour of fondant
Edible markers.

The Cake
For this technique, you’re definitely going to want to cover your cake in fondant, before drawing on it. Markers won’t work on frosting, even if it’s crusted over to some degree.
Ideally, you’ll want to fondant your cake one day, allow it to dry out a bit, and then draw on it the next day.
Fondant that’s dried/hardened a little is a lot easier to draw on than fresh fondant is.
Also: While chilling a fondanted cake is fine, you’re going to want to let it come to room temperature and dry out a bit before drawing on it. Chilled fondanted cakes tend to end up with condensation on the surface once removed from the fridge - your markers won’t work well on wet fondant.
Edible Markers
There are several brands of edible / food colouring markers out there, I use these Edible Markers, personally.
I definitely preferred this brand to the Wilton markers I used to use back in the day. The colour is more vibrant, and I loved that each marker had two different tips. Having a thick and thin line option for each colour definitely expands possibilities!
Sketched Cake Technique
- Use the thick tip of the yellow marker to draw a cluster of yellow dots somewhere on the cake. I like to start on the top, as the flat surface makes it easier to get my bearings.
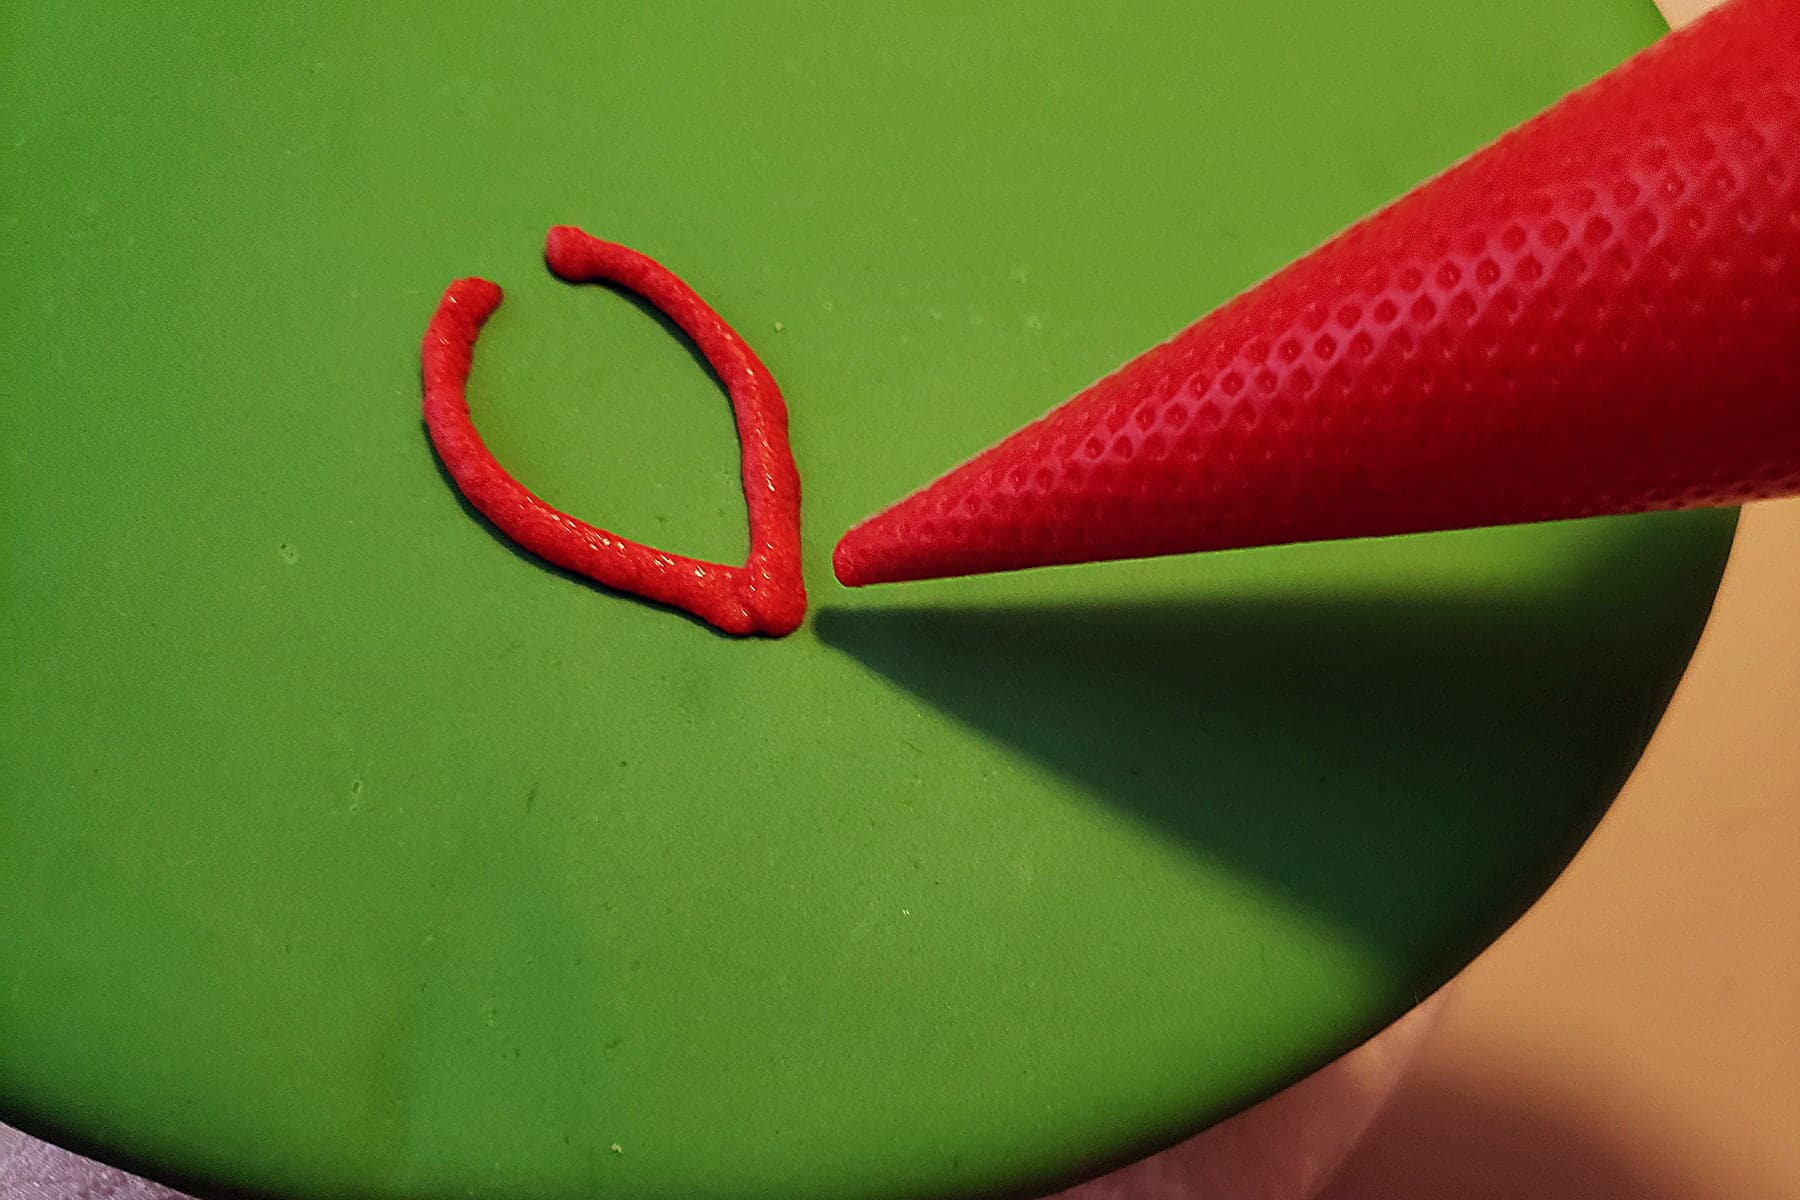
- Use the thin tip of the red marker to draw three petals coming out from the cluster of yellow dots, as shown.
- Add 3 more petals coming from “behind” the original 3 petals, as shown.
- Add some veining to the first 6 petals.
- Realize that you were supposed to add another row of petal tips in between each of the original 6 petals, go ahead and add them, along with some veining.


- Repeat the last few steps to cover the cake in poinsettias.


Watercolour Poinsettia Cake Tutorial

Painting on cakes is a lot of fun, even when you’re not very good at it, LOL. Usually I’d use food colouring, sometimes I’d get creative and make “paints” out of cocoa powder.

I never claimed to be good at painting, just so we’re clear.
Much like with the sketched poinsettias cake, you really don’t need to have a ton of skill to make a halfway decent looking “Watercolour” Poinsettia Cake.
Same advice applies: If you don’t like how it’s looking, keep going!
Supplies Needed
1 cake, covered in white or a pale colour of fondant
Gel food colouring
Vodka or another clear liquor
Mini shot cups, etc
Food safe craft paint brushes

The Cake
As with the sketched cake, this technique also needs the cake to be covered in fondant, before painting on it.
It’s a little bit less important to worry about the hardening / chilling / condensation issues on this one, though.
The Food Colouring
There are 3 main options when it comes to food colouring - liquid, gel, and paste.
Liquid is what you tend to see in grocery stores, paste is something like Wilton’s colouring.
When it comes to painting with food colouring, I prefer to use a nice quality gel based colour, such as Americolor (what I used when I was in the USA), or ChefMaster (Which is the option more readily available here!).
I find that liquid doesn’t come in enough colours - and isn’t nearly as concentrated - and paste is too clumpy and annoying when it comes to thinning it.
The Vodka
Here’s the thing: Vodka - or any other clear coloured POTABLE spirit - is going to evaporate and dry on the cake a lot faster than water will.
This makes for a much nicer “paint” to work with, and one that’s less likely to result in running / drips... even at the same viscosity that a water based mix would be.
I like to start with about 1 part gel colour to 2-3 parts vodka, and adjust from there. More vodka means a lighter, more transparent colour.
I’ll usually use an intense mix for outlining and details, and thin it out from there for filling in, etc. It’s easiest to do this in a few cups, so you can go back and forth.
Mini Shot Cups
I like to keep little plastic shot cups - these ones, or the clear plastic ones - on hand as little disposable mixing bowls.
You don’t need to mix a ton of paint, so even these red ones are a bit bigger than needed - I just couldn’t find my clear ones!
Food-Safe Craft Paint Brushes
Find yourself some food safe craft paint brushes, such as these ones. You can usually find something in the cake decorating aisle at your local craft store, or cake decorating supply stores.
Watercolour Cake Decorating Technique
- Mix up some food colouring “paint” with gel colour and vodka. At minimum, you’ll want one each of yellow, red, and green.


- Add 3 more petals coming from “behind” the original 3 petals, as shown.
- Add another row of petal “tips” peeking out from behind each set of petals from the first 6 painted, as shown.
- Fill in each petal, as desired. I liked to do it in a rough “veining” style, outward from a center line up the middle of each petal. I left white spaces for visual interest.
- Repeat to cover the whole cake in poinsettias.


Brush Embroidery Poinsettia Cake Tutorial

Brush embroidery is a fun technique that I really didn’t have enough opportunity to play with, back in the day. Here’s an example from well over a decade ago.

The nice thing about this cake is that you really don’t have to have great piping skills.
If you hesitate, wobble, don’t have perfectly even lines? It’s all good - you’re going to be mucking those lines up with the brush, anyway!
Supplies Needed
1 cake, ideally covered in fondant
Frosting
Gel food colouring
Food safe craft paint brushes
Paper towels
The Cake
Where the other two techniques really require the cake to be covered in fondant, this one doesn’t... sort of.
This technique is MUCH easier to do on a cake covered with fondant. *MUCH* easier.
... However, it *can* be done on a cake that’s been covered with a crusting buttercream, and allowed to dry/crust a bit.
You’d still want to be incredibly gentle with it, and it won’t turn out quiet as clean as with fondant, but it can theoretically be done.
I just wouldn’t recommend it, and definitely wouldn’t do it, myself. I value my mental health too much, thankyouverymuch.
The Frosting
While I prefer Swiss Meringue Buttercream in general, I prefer to use American Buttercream for this technique.
You'll want to thin it out a bit, though. It should be thick enough to hold its shape when piped, but soft enough that it's easily dragged out with a thin paint brush.
When in doubt, test it out on some parchment paper to ensure you've got a good consistency going, before piping directly on the cake.
Don't make the brain fart I did: American buttercream needs to be thinned with milk, NOT water.
In my defence, it's been over a decade since I had to thin American buttercream for piping, AND I've most recently been working with royal icing (which IS thinned with water).
So, when you see the photos here and notice that my frosting looks a bit weird? It's because somehow I managed to forget that fat (like the butter in BUTTERCREAM) doesn't mix well with water.
The Food Colouring
When it comes to painting with food colouring, I prefer to use a nice quality gel based colour, such as Americolor (what I used when I was in the USA), or ChefMaster (Which is the option more readily available here!).
That said, you can use liquid or paste colouring for this, if you like!
You’ll want at least yellow, red, and green.
The Paint Brushes
Find yourself some food safe craft paint brushes, such as these ones. You can usually find something in the cake decorating aisle at your local craft store, or cake decorating supply stores.
I like to use a fairly narrow head with a flat edge. I’m sure there’s an actual name for this style, but - as I’d mentioned - I’m no painter!
Paper Towels
I like to keep some paper towels on hand, for cleaning the brush off.
Not only do I fully clean the brush between colours, but this technique tends to cause a build up of frosting on the brush from time to time - just wipe the excess away when it happens.
There’s no rule that says that everything piped onto the cake has to *stay* on the cake!
Technique
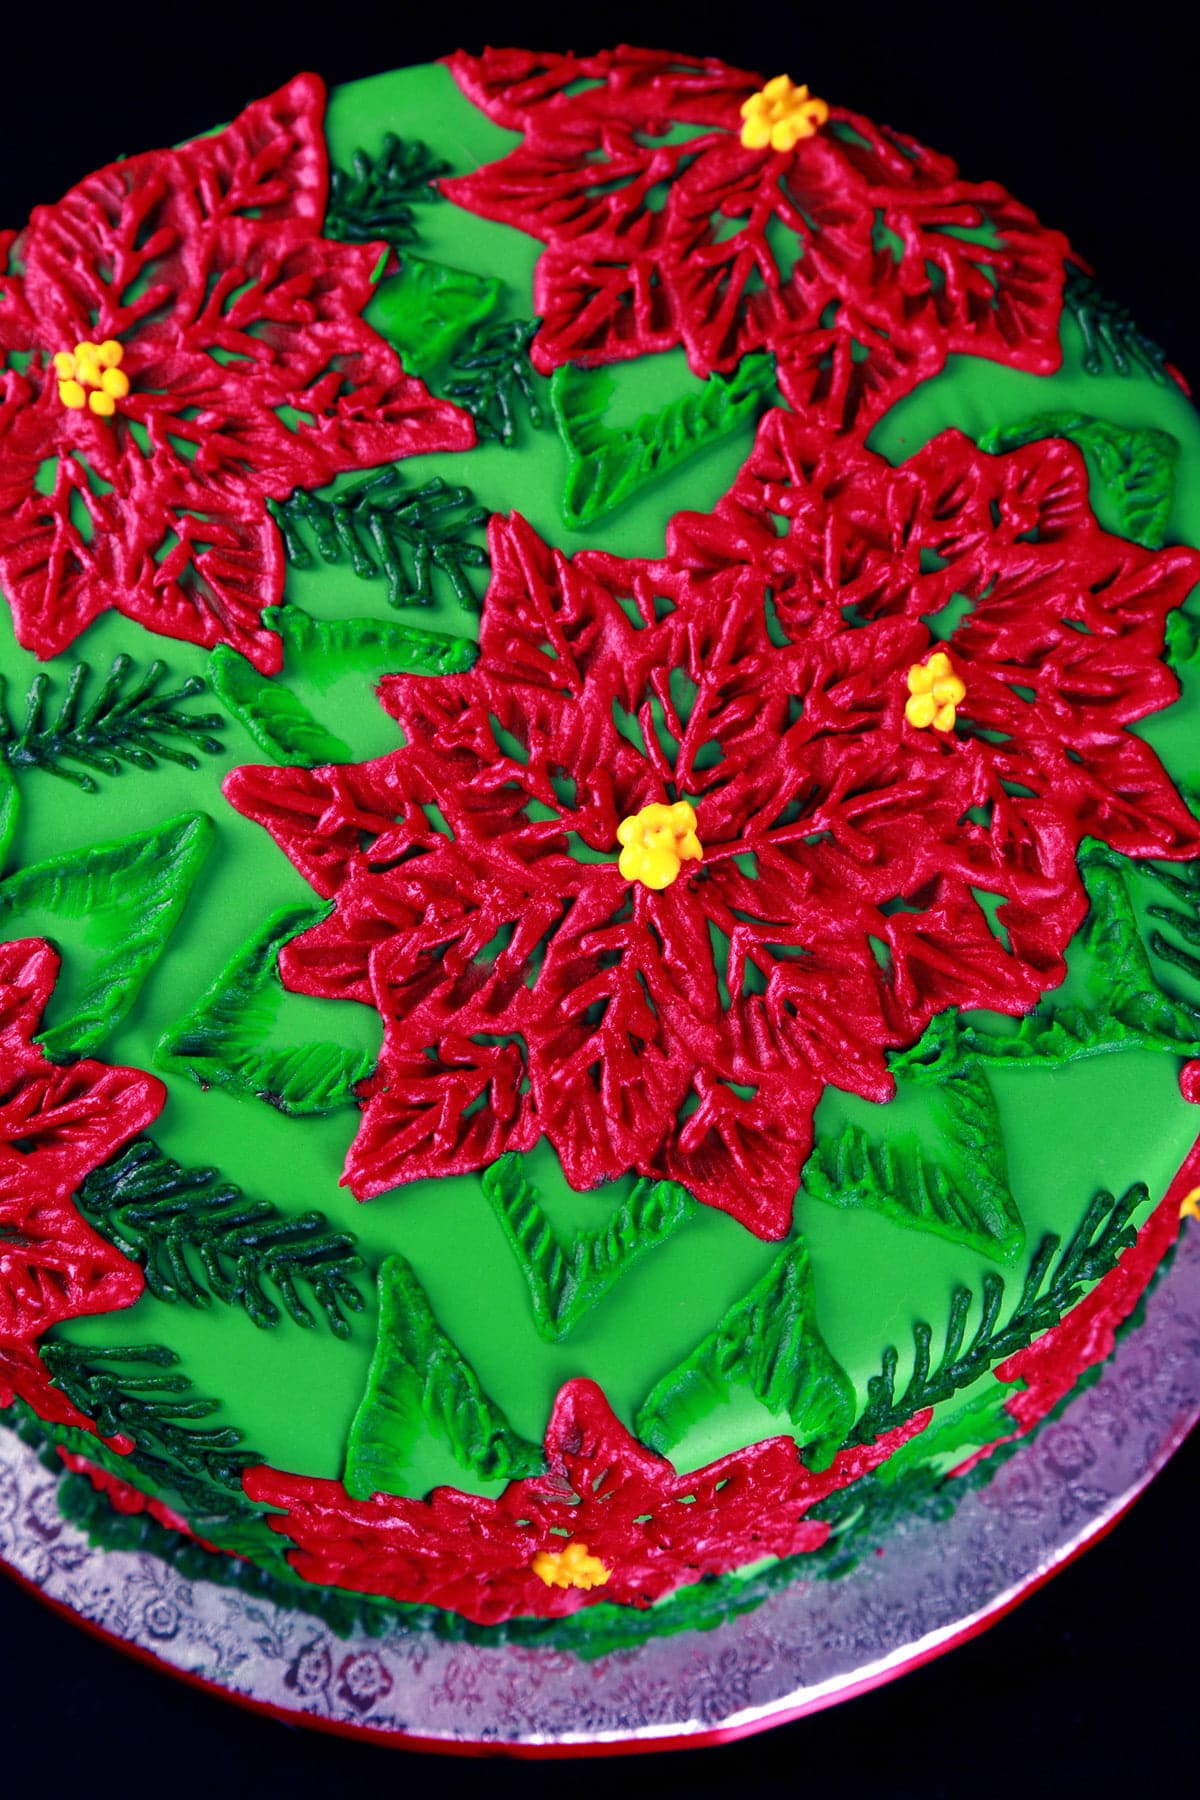
- Tint your buttercream. I like to aim for really vibrant colours when doing this technique on a coloured fondant base, as I did in this case... but lighter, more pastel colours also work really well when the base is white or pale.
- If your buttercream is very thick, thin it out with a bit of milk - NOT water. You’ll want it thick enough to hold its shape when piped, but soft enough for the frosting to be easily brushed.
- Spoon your tinted buttercream into pastry bags. You can use a coupler and round tip if you’d like, but I generally don’t bother for this technique. Be careful to avoid creating air pockets.
- Cut the tip of the bag off to allow for a smallish sized hole. You don’t want it to be super fine, and you don’t want TOO much frosting to come out, either.


Start with the 6 petal tips, then do the row of 3 half petals, and finish up with the 3 interior petals.
Doing it in this order allows you to better distribute any extra frosting that results from pulling the outer petal frosting, and makes for a much cleaner design.


- Pipe veining over each of the brushed petals.

- Cut a small tip off the end of the pastry bag. Alternatively, you can use a coupler and a small round tip - say a #3 or so.
- Pipe little clusters of yellow dots in the center of each poinsettia, as shown.

- Carefully spoon the green frosting into a pastry bag, trying to avoid creating air holes. Cut the tip off to a similar degree that you did for the red. Not too big, not too small.
- Pipe leaves all over the cake, as shown.
- Clean your brush off, then brush out the leaf frosting in the same way as the red was - starting at the outer peak, going down one side, going back to the peak and working your way back towards the poinsettia.

- Cut a small tip off the end of the pastry bag. Alternatively, you can use a coupler and a small round tip - say a #3 or so.
- Pipe little “pine” greens, as shown. I like to do this randomly to fill in any extra white (green!) space left around the poinsettias

More Cake Decorating Posts
Looking to up your cake decorating game? I've got you covered!
3D Monarch Butterfly Cupcakes
American Buttercream Recipe
Chocolate Leaves Cake Tutorial
Frozen Buttercream Transfer Tutorial
How to Make Marshmallow Fondant
Spider Web Halloween Cupcakes
Swiss Meringue Buttercream Recipe

Interested in making wickedly delicious cakes? You'll LOVE my second cookbook, Evil Cake Overlord!
We've long been known for our “ridiculously delicious” moist cakes and tasty, unique flavors. Now, you can have recipes for all of the amazing flavors on our former custom cake menu, and many more!
Bake your moist work of gastronomic art, then fill and frost your cake with any number of tasty possibilities. Milk chocolate cardamom pear, mango mojito.. even our famous Chai cake – the flavor that got us into “Every Day with Rachel Ray” magazine!
Feeling creative? Use our easy to follow recipe to make our yummy fondant. Forget everything you’ve heard about fondant – ours is made from marshmallows and powdered sugar, and is essentially candy – you can even flavor it!
Order your copy directly through my site, through Amazon, or through any major bookseller!
More Cake Photos
Interested in seeing - and reading - more details of some of my favourite cakes I’ve made over the years? Check out these links:
Bubble Bobble Wedding Cake
Clarice, Have the Lambs Stopped Screaming?
Dalek Cake for a Doctor
Lambeth Wedding Cake
Snowflakes Wedding Cake
SO.. I made a Cake for Amanda Palmer (NSFW)
Spumoni Cake & The Art of Trolling Cake Competitions
That Time I Made a Cake for a Pack of Klingons
The Story of Foopmallet
TARDIS for Wil Wheaton
Tremors Wedding Cake
Cake Recipes!
Looking for some ridiculously delicious cake recipes? As the "Evil Cake Overlord", I've got you covered! (Ps: Check out my instructions for making Marshmallow Fondant, as well!)
Tortes:
B-52 Torte
Bahama Mama Torte
Blood Orange Truffle Torte
Citrus Splendor Torte
Cookies N Cream Cake
Raspberry Tiramisu Torte
Schmoo Torte
Spumoni Cake
Tiger Tail Cake
Bundt, Sheet, & Upside Down Cakes
Bananas Foster Upside Down Cake
Brandied Apple Upside Down Cake
Deep N Delicious Cake
French Martini Bundt Cake
French Martini Upside Down Cake
Mango Mojito Upside Down Cake
Pina Colada Bundt Cake
Strawberry Mango Marble Cake
Cupcakes:
3D Monarch Butterfly Cupcakes
Chai Cupcakes
Easy Butterfly Cupcakes
Fat Elvis Cupcakes
Lynchburg Lemonade Cupcakes
Pink Grapefruit Daiquiri Cupcakes
Also: I have Cake Decorating Tutorials, and posts about previous Decorated Cakes that I've made.

Christmas Poinsettia Cakes Tutorial
Equipment
- 1 cake, covered in fondant
Ingredients
Sketched Poinsettias
- Edible markers
Watercolour Poinsettia Cake
- Gel food colouring
- Vodka or another clear liquor
- Mini Shot cups, small bowls, etc
- Food safe craft paint brushes
Brush Embroidery Poinsettia Cake
- Frosting
- Gel food colouring
- Food safe craft paint brushes
- Paper towels
Instructions
Sketched Cake Technique
- - Use the thick tip of the yellow marker to draw a cluster of yellow dots somewhere on the cake. I like to start on the top, as the flat surface makes it easier to get my bearings.- Use the thin tip of the red marker to draw three petals coming out from the cluster of yellow dots, as shown.- Add 3 more petals coming from “behind” the original 3 petals, as shown.- Add some veining to the first 6 petals.- Realize that you were supposed to add another row of petal tips in between each of the original 6 petals, go ahead and add them, along with some veining.

- - Decide that the whole thing would look better if the petals had been drawn with the thick tip instead. Draw over all the outlines.

- - Decide to just throw caution to the wind and do all the outlining in the thick red tip right off the bat.
- - Repeat the last few steps to cover the cake in poinsettias.
- - Use the thick tip of the bright green marker to draw leaves in, over the whole cake.
- - Use the thin tip of the bright green marker to draw veining on the leaves, and a bit of outlining around the yellow dots.
- - Use the thin tip of the dark green marker to draw “pine” greenery to fill in any excess white space.
- - Stand back and Admire your work


Watercolour Poinsettia Cake Tutorial
- - Mix up some food colouring “paint” with gel colour and vodka. At minimum, you’ll want one each of yellow, red, and green.
- - Use the yellow paint to draw little clusters of yellow dots all over your cake. Each set will be the center of a “poinsettia”, so be sure to leave enough space between each set for the petals of each flower.
- - Paint three petals coming out from the cluster of yellow dots, as shown.- Add 3 more petals coming from “behind” the original 3 petals, as shown.- Add another row of petal “tips” peeking out from behind each set of petals from the first 6 painted, as shown.- Fill in each petal, as desired. I liked to do it in a rough “veining” style, outward from a center line up the middle of each petal. I left white spaces for visual interest.
- - Repeat to cover the whole cake in poinsettias.
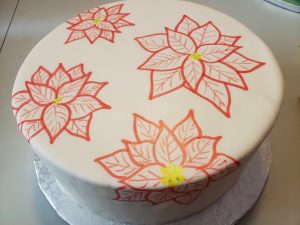
- - Use a more intense red (darker colour, or just thinned with less vodka) to outline all of the petals.
- - With green paint, add leaves and “pine” greenery to fill in the white space, as shown.
- - If you’re like me, decide that you hate it and need to go back and outline the petals AGAIN, even darker this time.
- - Stand back and admire your work


Brush Embroidery Poinsettia Cake Tutorial
- - Tint your buttercream. I like to aim for really vibrant colours when doing this technique on a coloured fondant base, as I did in this case... but lighter, more pastel colours also work really well when the base is white or pale.If your buttercream is very thick, thin it out with a bit of milk - NOT water. You’ll want it thick enough to hold its shape when piped, but soft enough for the frosting to be easily brushed. Spoon your tinted buttercream into pastry bags. You can use a coupler and round tip if you’d like, but I generally don’t bother for this technique. Be careful to avoid creating air pockets.- Cut the tip of the bag off to allow for a smallish sized hole. You don’t want it to be super fine, and you don’t want TOO much frosting to come out, either.
- - Use red frosting to start piping out a petal in a spot where you’d like a poinsettia. Unlike the other two cake techniques in this tutorial, the yellow gets piped AFTER the poinsettias are established.
- - I tend to pipe 3 interior petals, a half petal between each of those, and then a smaller petal tip in between each of the original 6 petals, as shown.
- - Using a small, flat head brush, gently drag the frosting inward and down towards the center of the poinsettia, as shown. I start at the outer peak, work my way down one side, then go back to the peak and brush the other side in the same way.
- - Repeat on other petals, going around the poinsettia.
- - At this point, I remembered that it was best to start at the outside and work my way inward, so employ a bit of “do as I say, not as I do” when you do these.Start with the 6 petal tips, then do the row of 3 half petals, and finish up with the 3 interior petals.Doing it in this order allows you to better distribute any extra frosting that results from pulling the outer petal frosting, and makes for a much cleaner design.
- - Continue piping and brushing poinsettias all over the cake. I like to only pipe 1-2 poinsettias at a time, brushing them out before proceeding. This is because the buttercream can crust slightly, and that makes it more difficult / ugly to do the brush embroidery technique.
- - Transfer some red (I had tinted mine a bit darker than the main red, this is optional) to another pastry bag. Cut a smaller tip off this one, as you’ll be doing detailing with it.- Pipe veining over each of the brushed petals.
- - Tint some frosting yellow. This frosting does NOT need to be thinned out. Spoon into a pastry bag, being careful to avoid creating air pockets.- Cut a small tip off the end of the pastry bag. Alternatively, you can use a coupler and a small round tip - say a #3 or so.- Pipe little clusters of yellow dots in the center of each poinsettia, as shown.
- - Tint some frosting green, thin it out if necessary. This frosting will be brushed, same as the red.- Carefully spoon the green frosting into a pastry bag, trying to avoid creating air holes. Cut the tip off to a similar degree that you did for the red. Not too big, not too small.- Pipe leaves all over the cake, as shown.- Clean your brush off, then brush out the leaf frosting in the same way as the red was - starting at the outer peak, going down one side, going back to the peak and working your way back towards the poinsettia.
- - Tint some frosting darker green. This frosting does NOT need to be thinned out. Spoon into a pastry bag, being careful to avoid creating air pockets.- Cut a small tip off the end of the pastry bag. Alternatively, you can use a coupler and a small round tip - say a #3 or so.- Pipe little “pine” greens, as shown. I like to do this randomly to fill in any extra white (green!) space left around the poinsettias
- - Stand back and admire your handiwork!


Kristen
Oh wow, this cake is gorgeous. The poinsettias are so detailed. I would love to do something like this, but man I don’t know if I have the patience. You have inspired me to think about it though. It is amazing.