


Originally posted August 12, 2020. Updated 8/4/2022
Halloween has always been my favorite time of year.
It’s after the summer has come and gone, and the weather has gotten nicer. The crisp, cool air, crunchy leaves underfoot... bright colours, candy, costumes, Halloween parties - what’s not to love?
Many years ago, I designed a bunch of Halloween Themed Shooters - a ton of fun, with varying degrees of difficulty or ingredient investment.
I certainly loved Halloween themed treats - such as my Black Velvet Easy Halloween Bat Cupcakes - long before I was old enough to even be considering doing shooters, after all!
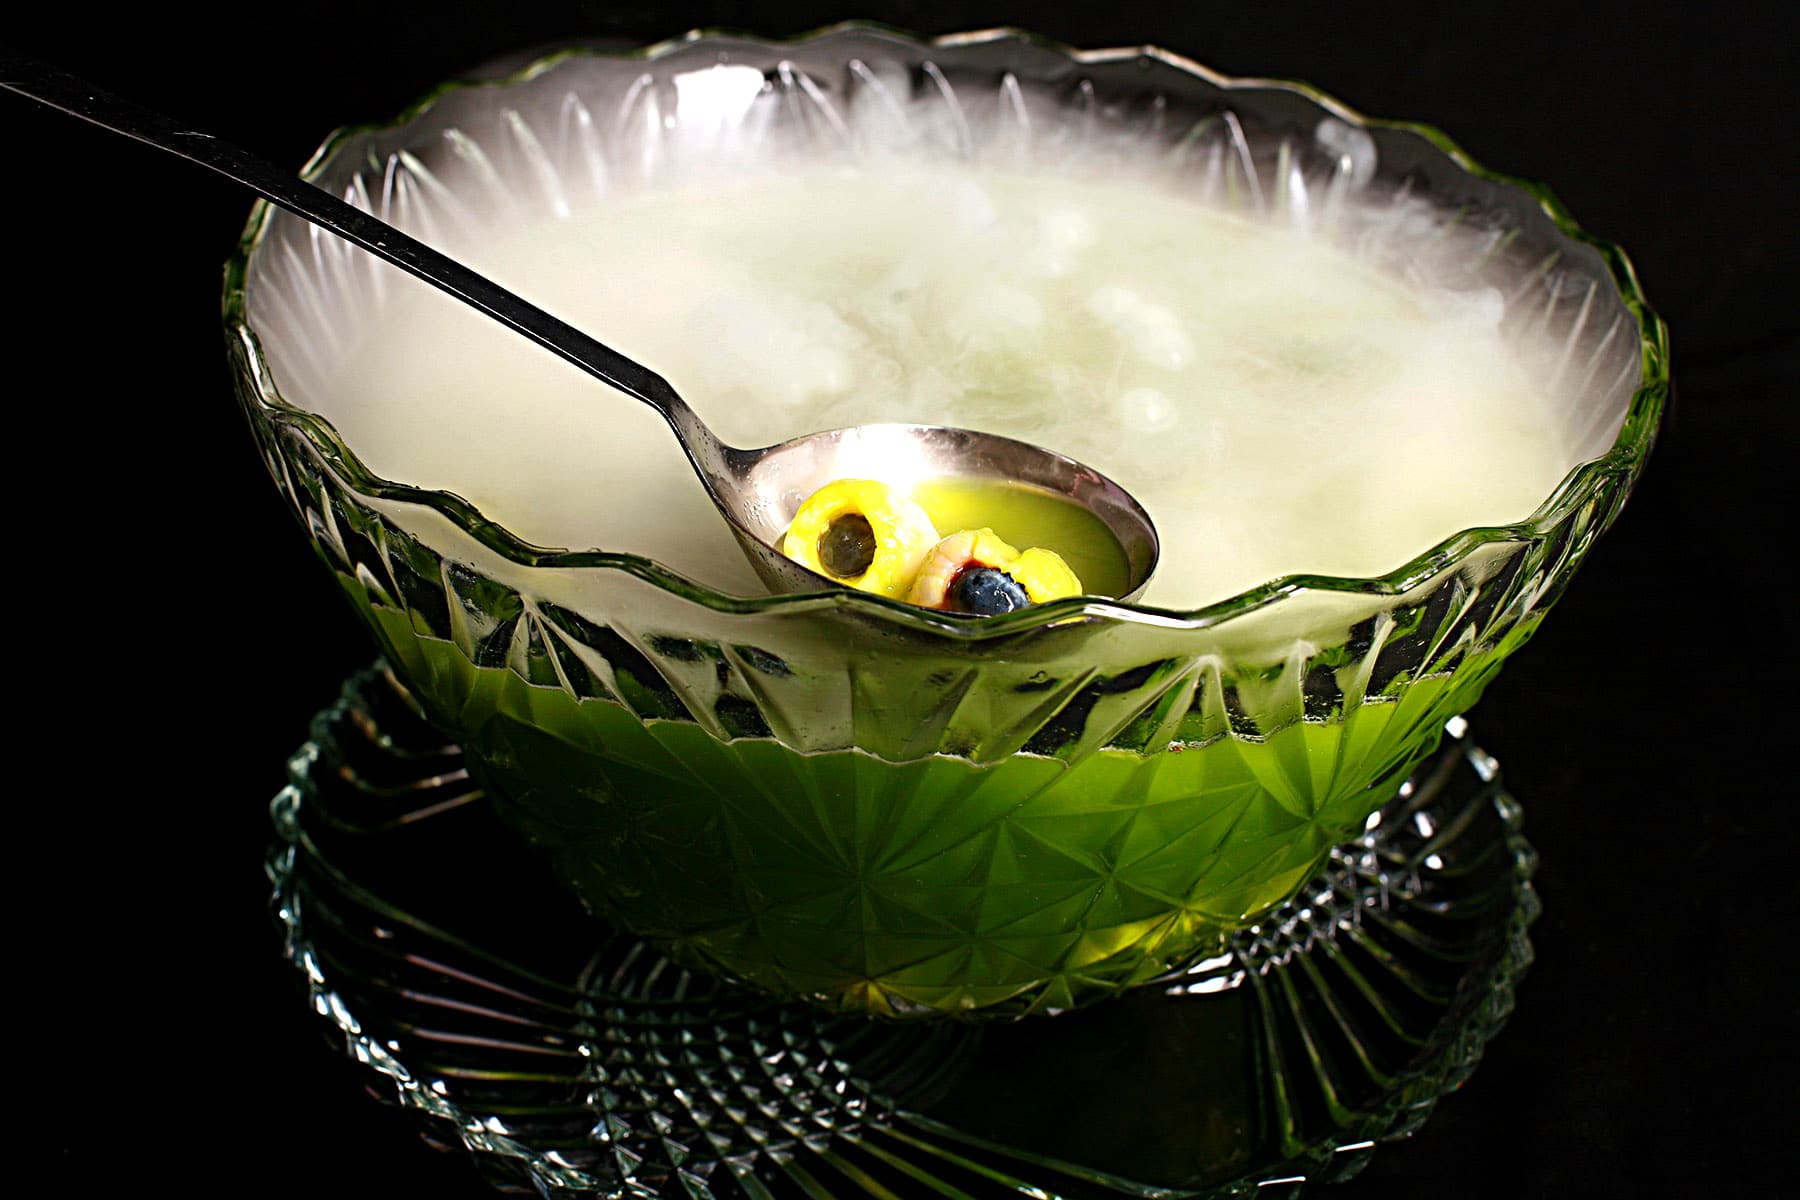
So, I decided to build a fruity Halloween punch recipe around the idea of my Bloody Eyeball Shot from that post.

FOG! Always great to add a little hocus pocus to the drinks table, right?
Check it out! (Volume on for extra cool factor, btw)
Halloween Party Punch Ingredients
As canned lychees are a key ingredient - forming the bulk of each “bloody eyeball” - I wanted to play with that flavour a little, using it as a starting point.
So, the reserved syrup from the canned lychees is the first ingredient. You can usually find these in the international aisle at a larger grocery store.
From there, I decided to keep it pretty simple, and went with Ginger ale - or lemon lime soda - and pineapple juice.
The ginger ale / lemon lime soda and pineapple juice combination is a pretty traditional base for Halloween punch recipes for a reason - it’s always a crowd favourite, and generally non-offensive.
When it comes to food colouring, I like to use a neon green gel food colouring, which you can find at any cake decorating store.
The final Bloody Eyeball Halloween Punch won’t turn neon green unless you use a TON of it... but a few drops of green food coloring will turn a pretty gross green colour!
And, you know... for once, “gross” is what we’re going for, here!
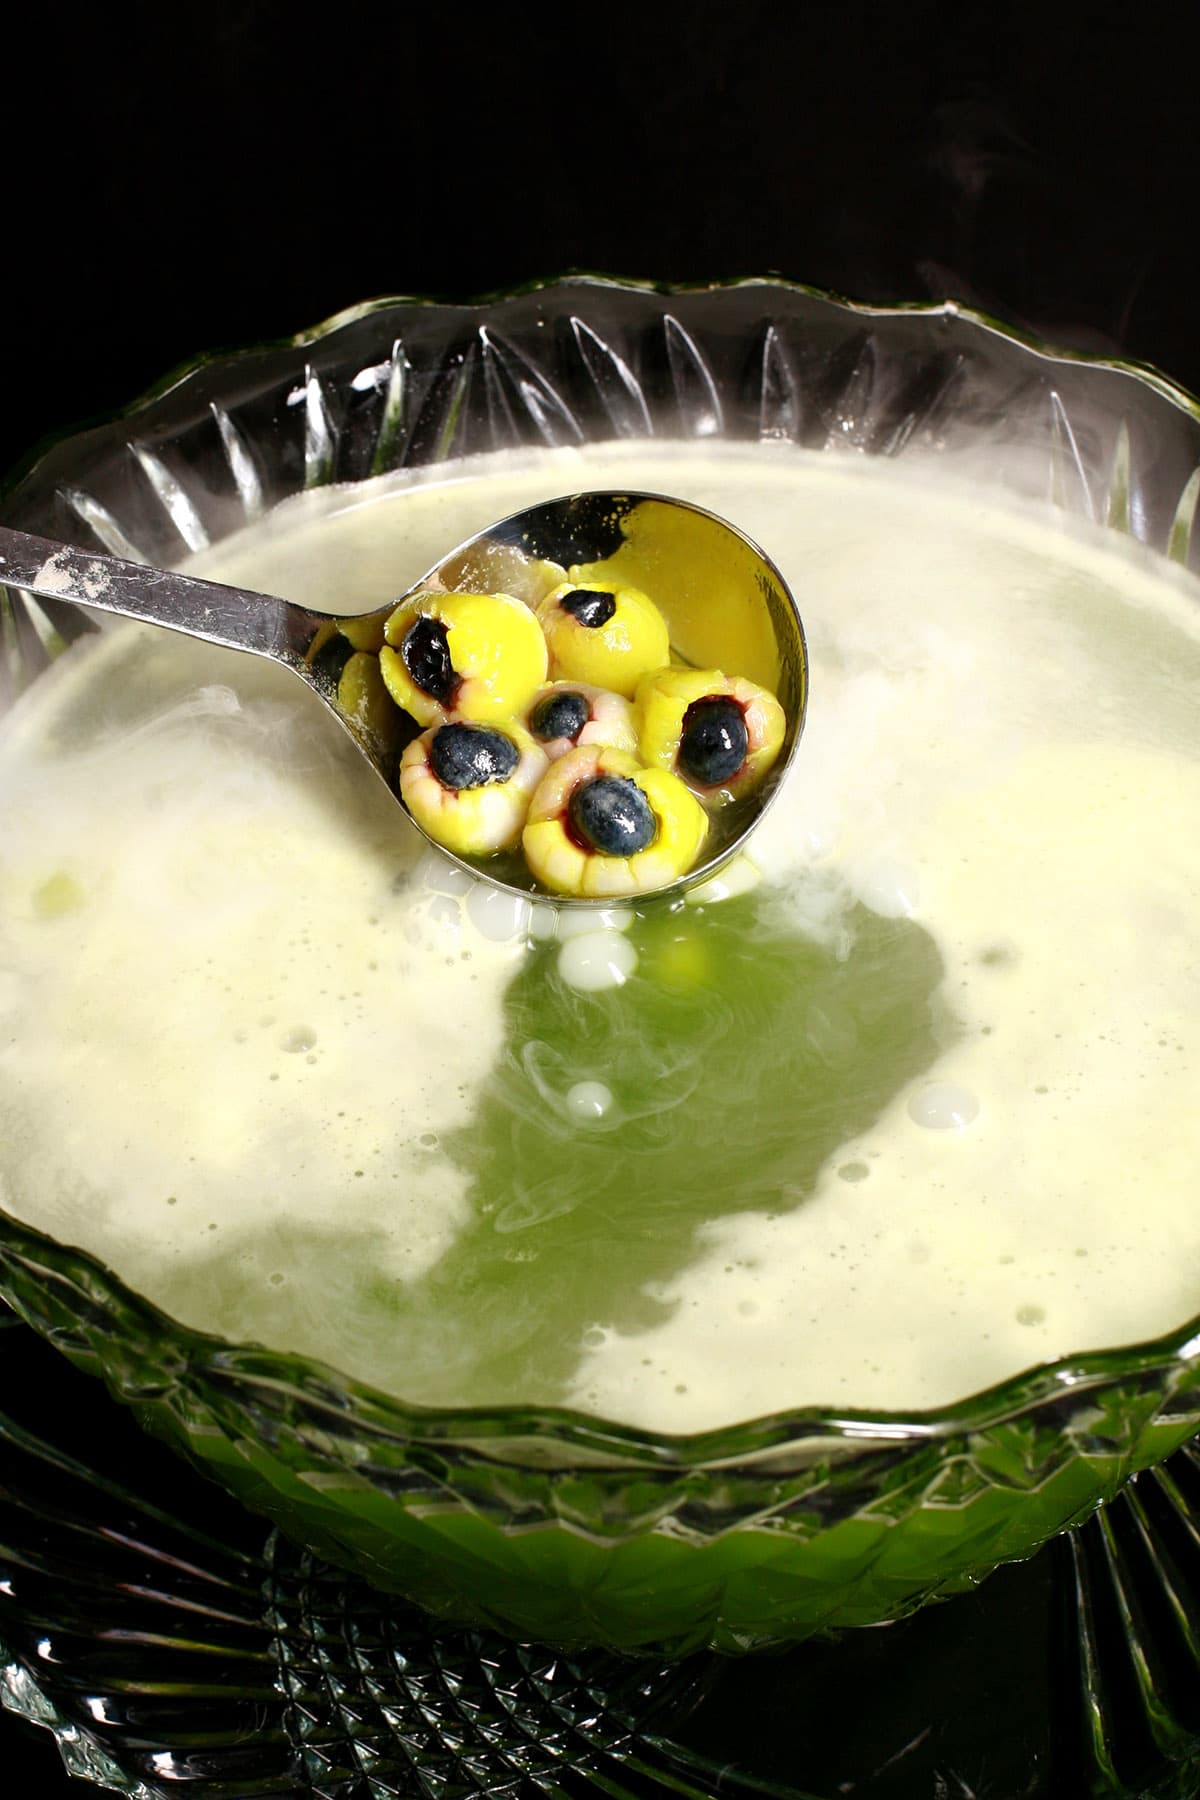
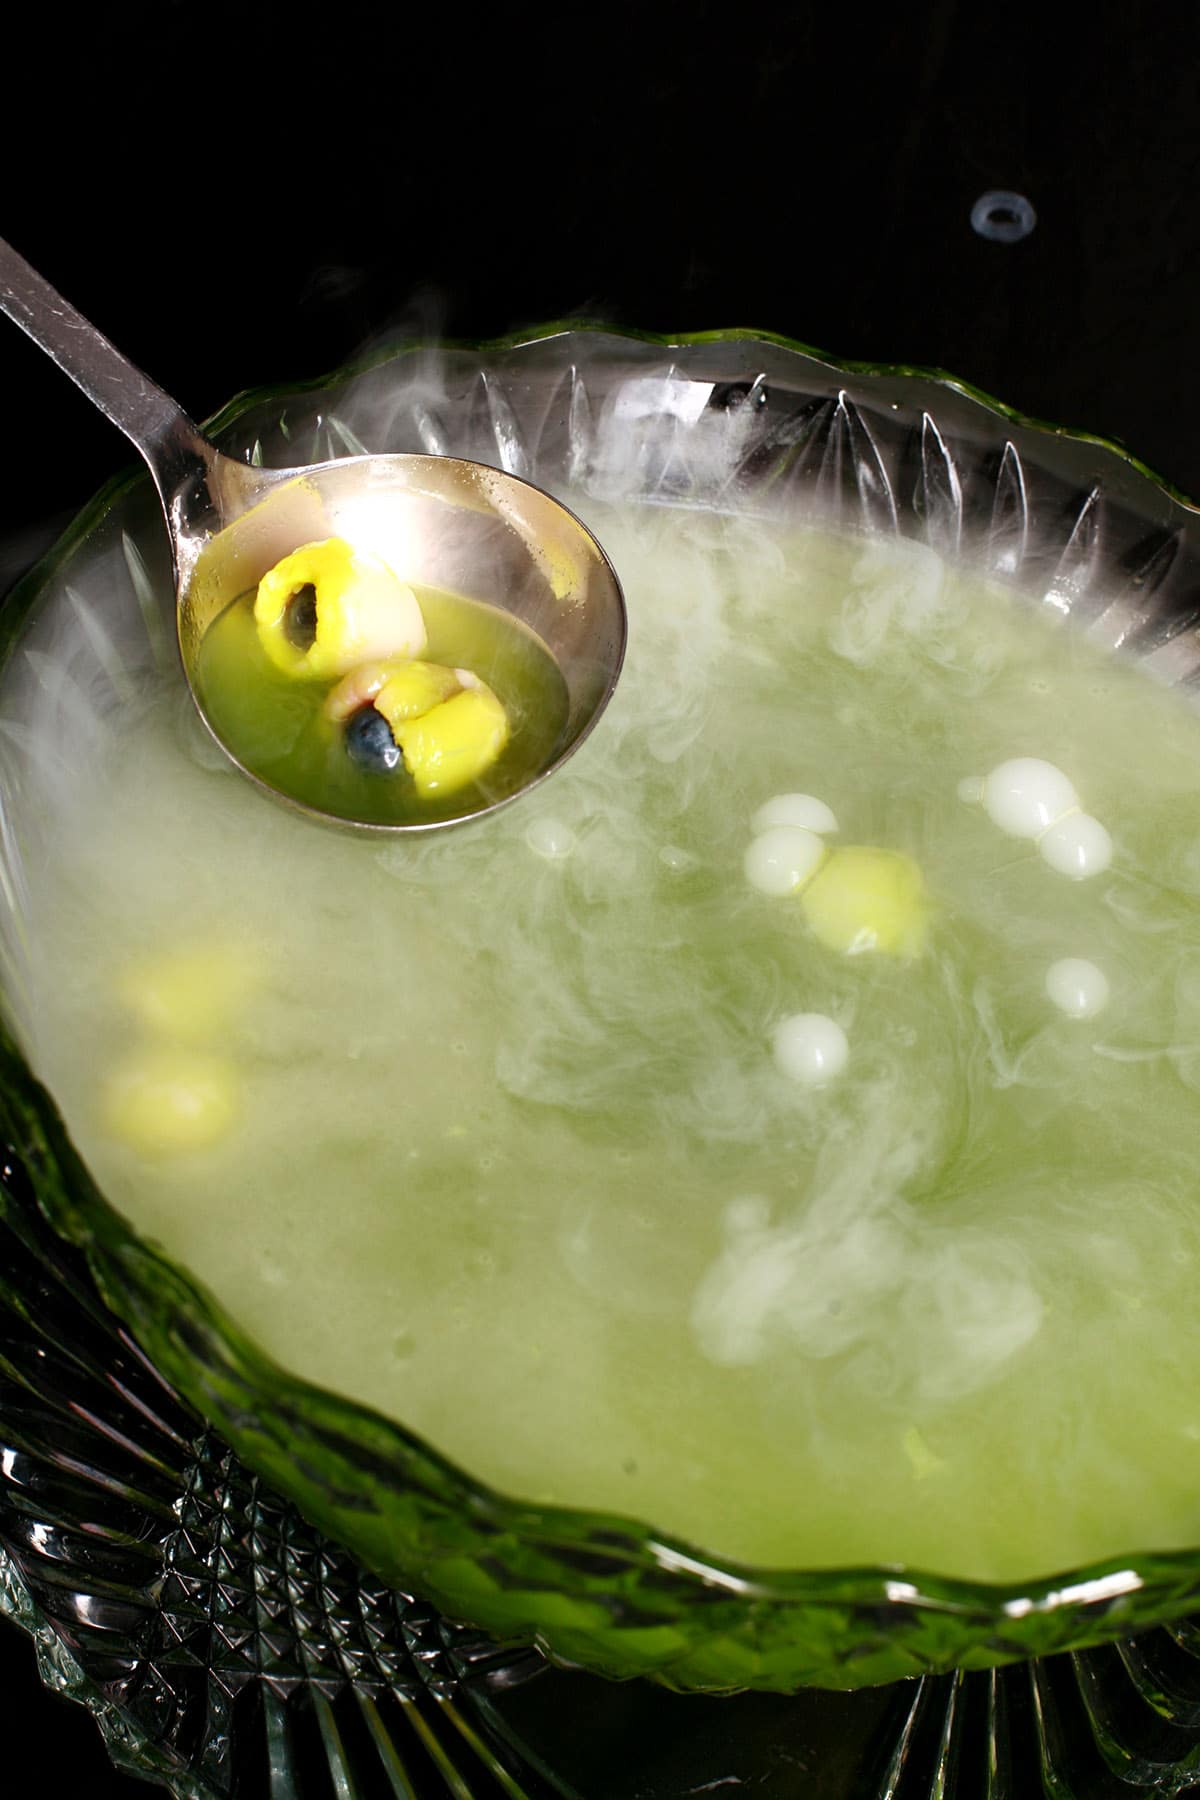
You’ll also need some blueberries and a seedless red jam - I usually use Raspberry jam.

How to Make Lychee Bloody Eyeballs
Strain lychees, reserving syrup.
Using a small spoon or a pastry bag, fill each lychee about ½ full with raspberry jam.
Place one blueberry in each lychee, choosing blueberries that are a relatively tight fit for each lychee.
Set these "eyeballs" aside until just before serving the punch.
Note: The lychees can absorb the food colouring from the punch, and will eventually turn green. It's best to leave the eyeballs out until the last minute!

Halloween Punch Variations
This punch tastes fantastic as-is, but you can definitely customize it to your tastes and ingredient availability. Some options:
Swap the Juice
I love the combo of lychee and pineapple, but lychee is one of those flavors that work well with almost any fruit, IMHO.
Especially if you’re not married to the idea of a green punch, you can swap all or part of the pineapple juice out for passion fruit juice, cherry juice, and/or grape juice.
Swap out 1-2 cups of the total juice amount with orange juice, or a smaller amount (½ cup or so) with lemon juice or lime juice.
Sure, mixing some of these juices may produce ugly colors - pineapple, cherry, and grape, anyone?
... but it’ll taste great, and it’s Halloween. Not only is “gross looking” a good thing, it can be enhanced or covered up with the use of gel food coloring.
Go dark green, or purple... even black!
Make it a Sherbet Punch
I’ve always loved those punches with floating bits of rainbow sherbet in them - and it’s something you can do with this one, too.
I recommend lime sherbet or orange sherbet. Add it shortly before serving, let it melt a bit, THEN add the lychee eyeballs.
Make it a Spooky Cocktail Punch
This delicious punch is great for the whole family, but if you’re looking to make a spiked punch for a more adult party?
Just add rum.
Pineapple and lychee go SO well with rum - whether a light or dark rum. I love this with Screech (a flavourful Jamaican black rum), and it also goes really well with coconut rum.
And hey, if you use some passion fruit, lemon, and lime juice with some white rum and dark rum?
Zombie punch - Doubly appropriate for Halloween!

Equipment and Supplies
You won’t need much to make this punch.
First off, you’ll need a large punch bowl. If you can find a large cauldron, even better!
A ladle will definitely come in handy for serving the punch, too.
Along with measuring cups and such, that’s the bare minimum you’ll need to make this punch.
If you’re using dry ice, you’ll need a few more items - gloves, tongs, etc (see the info below for more details.)
Finally, if you’re anticipating having your ice come as a large block, you’re going to want something to break it up into smaller pieces - a towel and a hammer can work great!
Not only is it theme-appropriate to have *stuff* on the table - plastic spiders, skulls, etc - having a bit of clutter will discourage people from absentmindedly putting their plates, etc down.
Not being inhospitable or anything - if you’ve got dry ice involved, you want to discourage lingering too close, or the possibility of touching it.
More on that in a minute, but in general - raid your favorite craft stores to find some fun visual barriers for the punch bowl table!
Using Dry Ice in Halloween Punch
While this punch is tasty and weird-looking enough to serve as-is, it’s a lot more fun to add some dry ice. Totally optional, of course.. but a fun way to take it to the next level!
This is what makes it “boil” - while chilling it, rather than heating it up. Very cool effect, and it’s easier to accomplish than you may think!
What Is Dry Ice?
Dry ice is the solid form of carbon dioxide - and it’s REALLY REALLY COLD. - 109 F / - 79 C, to be more specific.
Fun fact: Dry ice doesn’t melt, it sublimates - rather than turning from a solid to a liquid when warmed/thawed, it goes from a frozen solid directly to a gas.
This makes it a lot of fun when it comes to special effects. Some fog effects can be dry ice, and that’s especially true when it comes to any kind of fogging effect around food service.
As carbon dioxide, dry ice is considered “food safe” in a sense - carbon dioxide is what’s used to carbonate soda, for instance. The reason I say “in a sense” is that solid carbon dioxide can be incredibly dangerous if handled improperly, which I’ll be getting into in a minute here.
If you respect the dry ice and handle it appropriately, however, it can DEFINITELY up your Halloween Punch game!

Obtaining Dry Ice For Your Halloween Punch
Dry ice is a lot easier to come by than you may think, you’ll just want to make some calls ahead of time.
Some gas stations carry a big container of it, most cities have multiple distributors of it, etc. Welding companies can carry it, too.
Just do a quick google of “Dry ice, *your city name* and you’ll easily find the closest option for you.
It tends to be quite cheap, too. A reasonable sized brick should be under $10, and we paid $3.75/kg for the dry ice used in this post, which was in pellet form - very handy!

Dry Ice Safety
Handling dry ice safely is an important consideration, from procurement right through to storage, serving, and disposal.
The overarching theme in safely handling dry ice is going to be “don’t touch it, don’t breathe it”. You see, there are two main dangers when it comes to dry ice:
Freezing
As dry ice is incredibly cold, you can burn yourself on it. You read that right.
Dry ice burns are incredibly painful, and can be life threatening - usually if we’re talking about the burn happening internally. You DO NOT want to ingest dry ice, period.
Asphyxiation
Remember that incident a while back, where a birthday party happening in a small enclosed pool area turned tragic when they dumped a LARGE amount of dry ice into the pool?
Yeah, we want to avoid a similar thing happening at your Halloween party.
Without going into a ton of detail, as the dry ice off-gasses into carbon dioxide, that CO2 can overwhelm your system, choke out the oxygen, and kill you.
This is why it’s important to not only handle it properly in terms of not touching it, but also to not have too much of it in small spaces.
... but let me provide a bit more detail on safe handling of dry ice:
How to Buy Dry Ice
Before picking up dry ice, call ahead to ask if there’s anything you need to bring. Some places provide containers and scoop the ice for you, others are more self-serve.
If you’re bringing your container, find a small cooler that closes securely and is “airtight”. You don’t want it spilling in your car, or in your house. Airtight is important, for reasons I’ll mention in a minute.
Ideally, transport it in your trunk, or as far away from the driver as possible.
Do not buy any more dry ice than you really think you’re going to need - and you’re not going to need much.
As an example, 1 soup ladle worth of dry ice kept this punch bubbling for at least 20 minutes - the time will depend on the pellet size.
You’re not necessarily going to want to keep it bubbling all night, but I’ll get to that in a bit.
Handling of Dry Ice
Whenever you’re handling dry ice, you want to keep unprotected skin away from the ice itself, and out of the path of any mishaps.
Don’t have bare feet or bare legs, for instance, as a dry ice cube that gets away from you can easily land on your foot. (Yes, I almost had an accident when shooting this Halloween Punch!)
Use long metal tongs, and heavy gloves if you have them - bare hands are definitely not ideal. You can’t be too careful!

Storage of Dry Ice
Don’t keep your cooler in a small enclosed space, or anywhere near small animals or children. “Airtight” containers do tend to off-gas, and that’s a good thing... otherwise, they’d explode!
Additionally, you don’t want curious kids or pets getting into the cooler!
Other than that, just keep it in the cooler until you’re ready to use it.
Preparing to Add Dry Ice To The Punch
When planning your use of dry ice, take care to ensure that you’re using appropriate vessels to serve it, and to place the dry ice in the punch.
Many glass vessels will shatter if exposed to sudden temperatures that cold, so don’t put the dry ice into an empty glass vessel.
Putting dry ice - in reasonably small amounts - into a filled punch bowl is unlikely to damage the bowl, as the punch acts as a temperature buffer.
If you’re moving the dry ice between the storage unit (cooler) and the punch bowl, be sure to treat any intermediate vessel as though it’s dry ice itself.
With the way metal conducts heat, a small metal bowl that’s holding dry ice can be just as dangerous if touched directly, as the dry ice itself.
Use gloves, an oven mitt, etc.
Disposal of Dry Ice
If you’re sure of the privacy - in terms of no wandering kids or animals - you can leave the cooler of extra dry ice outside, with the cooler open. That’s what we tend to do - and just let it evaporate naturally.
Outside is the best option in general, however you can manage to keep it out of reach. If you’re in an apartment, you can leave it out on your deck. Small pieces will evaporate faster than large blocks.
Whatever you do, don’t let it evaporate naturally in enclosed spaces, in living areas, or in reach of children or pets.

Serving Bloody Eyeball Halloween Punch
The number one thing to keep in mind when serving this Bloody Eyeball Halloween Punch is to WATCH THE DISPLAY.
Do not let kids, drunk people, or clutzy people within arm’s reach of the punch bowl!
While you never want to let kids put their hands in something that is being served to others - and that’s especially important these days! - it’s especially important that little hands go nowhere near that bowl.
Have an adult - who’s been brought up to speed on what’s going on with the punch - serving it.
Ideally, don’t serve it until the “boiling” has completely subsided. If you must serve it while it’s off gassing, scoop the punch off the surface - don’t dig deep - and be sure to not get any ice in the glass.
MAKE SURE YOU DON’T PUT ANY ICE IN THE GLASS
As a note: Dry ice tends to sink at first - which is why it’s a good idea to not dig deep with the ladle - but once enough of the surrounding punch has turned to ice around it, it can behave more like normal ice, and float on top of the punch.
Personally, I recommend not using any ice in punch as a general rule (to avoid diluting the flavour!), but it’s especially important when you’re dealing with dry ice - you definitely don’t want to mistake a chunk of dry ice for a normal, safe ice cube!
In this case, it can APPEAR safe, but it’s not.
Dry ice is great for show, but absolutely should be kept away from the body!

More Halloween Ideas
If you're still considering ideas for fun Halloween recipes and other creative ideas, be sure to check out my:
3D Halloween Bat Cupcakes
Bacon Wrapped Mummy Meatloaf
Black Velvet Cupcakes
Bloody Eyeball Cupcakes
Breakfast Mummy Pastries
Candy Apples
Easy Halloween Bat Cupcakes
Easy Spider Web Cookies
Elegant Halloween Charcuterie Board
Fudgy Halloween Brownies
Glazed Halloween Popcorn
Gluten Free Mummy Dogs
Gluten-Free Mummy Jalapeno Poppers
Halloween Shooters
Halloween Spider Web Cupcakes
How to Carve a Pumpkin Like a Pro
Lychee "Bloody Eyeball" Pancakes
Lychee Bloody Eyeball Halloween Pavlova
Mummy Dogs
Keto Witch Finger Cookies
Gluten Free Witch Finger Cookies
Mummy Jalapeno Poppers
Nightmare Before Christmas Cookies
Spider Bread Bowl
... and check out our Holiday Recipes section for recipes to suit any holiday!
Share the Love!
Before you chow down, be sure to take some pics of your handiwork! If you post it to Bluesky, be sure to tag us - @CelebrationGen. We're also on Pinterest, so you can save all your favourite recipes to a board!
Also, be sure to subscribe to my free monthly email newsletter, so you never miss out on any of my nonsense. Well, the published nonsense, anyway!
Finally, if you love this recipe, please consider sharing it on social media, and leaving a star rating and/or a comment below!
Anyway, now that I’ve probably scared you off the idea of using dry ice altogether, let’s get to my Bloody Eyeball Halloween Punch recipe, eh?

Spooky Bloody Eyeball Halloween Punch [With Dry Ice]
Equipment
- Punch bowl
Ingredients
- 1 can Lychees in syrup
- ⅓ cup Seedless raspberry jam
- Blueberries
- 2 L Ginger Ale or Lemon Lime soda of choice
- 1 can Pineapple juice 1.36L / 46 oz
- Lime green food colouring
- 1 small scoop Dry ice pellets Optional
Instructions
- Strain lychees, reserving syrup.
- Using a small spoon or a pastry bag, fill each lychee about ½ full with raspberry jam.
- Place one blueberry in each lychee, choosing blueberries that are a relatively tight fit for each lychee.
- Set these "eyeballs" aside
- In a large punch bowl, mix together reserved lychee syrup, soda, and pineapple juice.
- Use food colouring to tint your punch as desired*
- Cover and chill until serving, if you're making it ahead of time.
- Just before serving, add "eyeballs" to the punch bowl.
- If you're using dry ice, CAREFULLY AND FOLLOWING SAFETY INSTRUCTIONS, add a small scoop of dry ice pellets to the filled punch bowl.
- Enjoy!


[…] Bloody Eyeball Halloween Punch [Dry Ice] – Celebration Generation This Bloody Eyeball Halloween Punch is easy to make and only takes a few ingredients… but it can definitely make an impression! Check out this recipe […]