

Handmaid's Tale Wings Tutorial
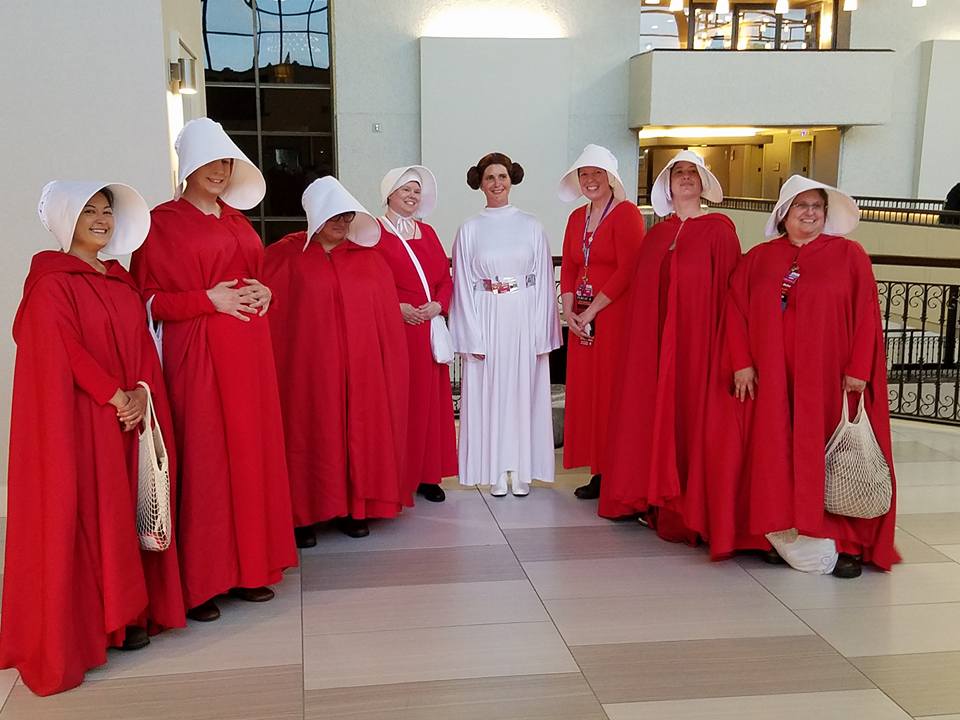
A few years ago, I was part of a group of cosplayers working on Handmaid's Tale costumes to wear to Convergence, a convention I used to go to while I was still living in the USA.
Everyone had varying levels of sewing experience, but loads of enthusiasm and OPINIONS about the current political situation. Our crafting nights - working on the cloaks - were... colourful at times.
While the group cosplay was the catalyst to getting together, most of us were looking beyond the convention... and planning to wear them to protests.
While the cloaks were easy enough to cut out and walk everyone through sewing, I ended up just making the bonnets - "Wings". It just seemed too fussy to walk everyone through.

As time went on and people approached us at protests, it was clear that I should be designing a pattern and writing up a tutorial for it.
It was a TON of work, but eventually I had my pattern and tutorial available through my Etsy page, and then later is was available direct off my site,, for a nominal fee.
I'm posting the tutorial portion of that pattern here today, for ease in viewing while making your Wings.
The pattern portion is available for purchase at the above links, or you could - I'm sorry! - just wing it, based on the directions here.
Either way, I hope this tutorial is helpful!
As a disclaimer: tutorial is not produced, affiliated, or endorsed by Hulu, Margaret Atwood, or the producers of The
Handmaid’s Tale series.

A Note on Patterns
If you're looking to make the under bonnet / cap - a quicker, easier project - I have a tutorial posted here.
If you'd like to purchase my pdf printable pattern for the Wings in this tutorial - or my Handmaid's Tale cloak - you can do so through my Etsy page, or direct off this site, here.
Note: This site is a participant in the Amazon Associates Program, an affiliate advertising program designed to provide a means for the site to earn fees by linking to Amazon and affiliated sites. While I’ll only ever link to items that I, personally, wholeheartedly recommend, I do need to put that disclosure out there!

Share the Love!Before you chow down, be sure to take some pics of your handiwork! If you post it to Bluesky, be sure to tag us - @CelebrationGen. We're also on Pinterest, so you can save all your favourite recipes to a board! Also, be sure to subscribe to my free email newsletter, so you never miss out on any of my nonsense. Well, the published nonsense, anyway! |

Handmaid's Tale Wings Tutorial
Equipment
- Sewing machine with straight stitch and zig zag
- Serger (optional)
- Iron, ironing board, etc
- 5 gallon bucket
- Scissors
- Wire Cutters
Ingredients
- 1 yard white linen This is enough for wings & under bonnet
- 1 yard 25" wide buckram I use “Unicorn” buckram from Joann Fabric
- 45 inches Millinery wire*
- 45 inches Extra wide double fold bias tape, white
- White thread
- Spray Adhesive
- Craft paper, rosin paper, etc (as a drop cloth)
Instructions
- Before starting, make sure work surface and sewing machines are clean and free from any bits of coloured lint, thread, etc from prior projects. The wings are very white, and any bit of coloured fuzz, etc will show!
- Cut out the pieces needed:a.) The Brim, from buckram, cut on fold as indicated on patternb.) 1 rectangle of buckram, approximately 14" x 28"c.) 1 rectangle of linen, approximately 14" x 28"d.) The “Back” piece, cut on fold as indicated on pattern piece.
- Using a hot setting, iron all pieces, taking care to remove all wrinkles and folds:- Both buckram pieces and the linen rectangle should be ironed flat.- “Back” piece should be ironed while folded on original fold line. Iron fold line to create a sharp fold.
- Using a wide zig zag stitch or narrow serger stitch, sew along the raw, curved edge of the Back piece, stitching both layers together. (You may pin them together first, if necessary)

- Using a straight stitch, stitch a line parallel to the fold of the Back piece, about 1.25" away from the folded edge.

- Trim threads, set Back piece aside.
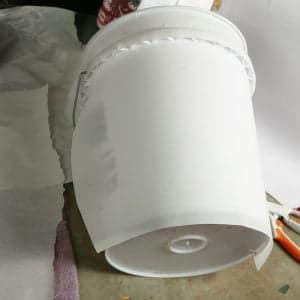
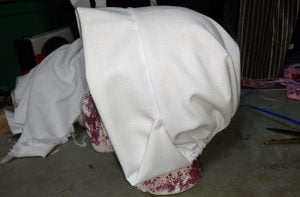
- Cover work surface with craft paper or rosin paper. Lay cut “Brim” buckram piece on paper, spray generously with spray adhesive.
- With bucket on its side, lay sprayed Brim piece over the bucket, sticky side up. You will want the long (curved) end of the brim facing the opening of the bucket.
- Carefully position the rectangle of buckram over the sprayed Brim piece.

- Starting from the top / center of the brim, carefully smooth the rectangle down over the sprayed piece, working out any air bubbles, wrinkles, etc.

- You may need to carefully separate the pieces in sections, starting small sections over. Work from the middle of the piece, outward.
- Sprayed Brim piece should be completely covered by rectangular piece, with both pieces smooth together.
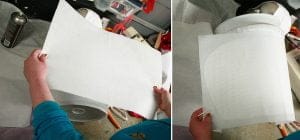
- Carefully transfer adhered Brim piece back to your papered work surface, with the cut brim piece on the underside, rectangle piece on top.
- Spray rectangular piece generously with adhesive. Return to bucket, once again draping it with the rounded edge being parallel to the bucket opening. Discard the paper you used as a drop cloth.
- Carefully position the rectangle of linen over the sprayed piece. Repeat step #8, smoothing the linen to the adhered buckram pieces.
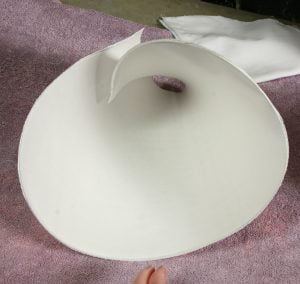
- Once all 3 pieces are adhered and smooth, remove from bucket. Flip over onto your work surface, so that the original cut Brim piece is facing up, and the linen is on the bottom.

- As you straighten this out, there will be some warping - this is to be expected. The point of draping it over the bucket as you form it is to ensure the outer layers are slightly bigger that the innermost layer. If you were to assemble them on a flat surface, rather than over a bucket, the innermost layer would end up buckled and warped when wearing it.
- Once laid out, use sharp scissors to cut around the edge of the original Brim piece, removing excess buckram and linen from the originally-rectangular pieces.
- Using a wide zig zag stitch, sew the millinery wire to the curved edge of the Brim. Start with the buckram side facing up, with the straight edge of the Brim facing away from you. Leave 1 cm (or ½") of space from the edge, before starting the wire

- Zig zag back and forth a few times to start, to securely encase the end of the wire. Hold the wire right up to the curved edge of the brim. Slowly and carefully stitch over the wire, being very careful not to hit the wire with the sewing needle. Take your time!
- As you approach the other end of the curve - where it meets the straight, back edge of the Brim - use strong wire cutters to trim the excess wire, allowing it to end 1 cm / ½" from the edge.

- When you reach the end of the wire, zig zag back and forth a few times over the very end of the wire, securely encase it. Trim thread from both ends of the brim.
- Allow Brim to curl naturally, gently bumping out any wrinkles, etc. Set Brim aside.

- Set your sewing machine to the longest straight stitch setting it has, or a gathering stitch if you have it. Starting at the straight seam on the Back piece - without back stitching - sew a seam close to the edge of the Back, along the curved edge. End at the other end of the straight seam. Leave long ends of thread attached, as you remove it from your sewing machine.

- Gather the curved edge of the Back piece. Gently pull on one of the end threads (usually what was the bottom one, in my experience), carefully pushing fabric bulk inward.
- Continue gathering until the curved edge of the Back measures about 19.5" from folded edge to folded edge.
- Once 19.5" is reached, distribute gathering evenly across the curved edge.
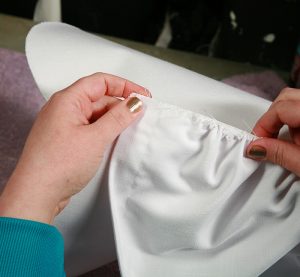
- Once curved edge is evenly gathered to the right length, line up one end of the curved edge of the Back to the straight edge of the Brim. The folded edge of the back should meet up with the curved edge of the Brim.

- Using a medium length straight stitch, carefully stitch the Back to the Brim, lining up the gathered edge of the Back with the straight, raw edge of the Brim. Be gentle as you go - try not to cause any deep creases, etc with the brim.

- As you get to the end of the gathering / straight edge of the brim, adjust gathering if needed, to ensure that the folded edge of the Back comes right to the rounded edge of the Brim, without going over. You may need to manually add some more gathering as you go, you may need to gently tug some gathering loose.
- Once you get to the very end of the seam, finish seam off, trim all loose threads. Finish raw edge of the seam with either a wide zig zag stitch, or a serger.
- Gently flip Wings right side out, taking care not to crease the Brim. Gently bump out any wrinkles, etc.
- With the Back facing away from you, and the top/right/linen side of the Brim facing up, apply bias tape to the edge of the Brim. Trim edge of bias tape to be straight across, and fold under ½" for a clean edge. I like to start my bias tape ½" before the brim, to enclose the end of the Brim-Back joining seam. Make sure that the longer edge of the bias tape is on the underside of the Brim.

- Use a medium length straight seam to sew bias tape to the Brim, being careful to sew through all layers - top side of bias tape, Brim, and under side of bias tape.
- As you come to a curve, gently stretch bias tape to ease around the corner, so there is no gathering on the inner edge of bias tape.
- As you come to the end of the Brim, trim excess bias tape to allow only enough to go as far as you need (the ½" past the seam), plus ½" to turn under.
- Turn under the last ½" of bias tape to create a clean edge, sew to the end, finish off seam. Trim all thread ends.
- Using a pencil, fabric pencil, or pen, mark a spot along the straight seam that is 2" from where the Back meets the Brim. Mark a second point that is 6" from where the Back meets the Brim.

- Hold the two back corners of the brim together, folding the Back piece in half to find the halfway point of the Back.
- Lining up the bottom edge of both layer, pin through both layers of the Back to secure.

- Holding the bottom edges of the Back together, make a couple of small stitches at the 2" and 6" marks, right on the original straight seam - be sure to unpin as you go. Trim all thread ends.
- Pin the fold of the center back of the Back piece so that it is directly on top of the 6" place marked stitch.
- Pin in place, with a loop of fabric out to either side of that center.
- Pin the 6" place marked stitch to the 2" place marked stitch. This will form the last of the pleats on the back.
- Lining up the bottom (folded) edges, pin through all layers to secure pleats in place. Be sure to line up the straight seam that goes across the Back, as well.

- Using a medium length straight stitch, sew a straight seam across the Back, over top of the original straight seam, unpinning as you go. This will secure all of the pleats in place. Trim all thread ends.
- Gently bump out any wrinkles, etc.
- Your Wings are done - Blessed be the fruit!


Notes
from “Richard the Thread”, where it’s listed as “extra heavy millinery
wire”

Hope you've enjoyed this Handmaid's Tale Wings Tutorial!


Paula Smith
I purchased the bonnet pattern from you on ETSY. I made this for my DIL for a Halloween costume. Got hung up on step 24 when I discovered the "Fold Line" notation on "Back Pattern 2" seems to be on the wrong side of the pattern piece. When I recut it (after watching the video several times) and folded the fabric on the left side of that pattern piece, it worked. SO glad to be done, but it did turn out very well. Thanks for the pattern!
Marie Porter
Hi Paula!
This is the first I'd heard of a problem with the labeling, so I printed it off to double check - the fold notations are on the right spots for me. Were you unable to assemble it to look like the diagram on page 10?
Either way, I'm glad it finally worked out!
NoriMori
Okay… And then how do you tie it on?
Marie Porter
It just cups the back of the head, there are no ties.