

One batch of sugar cookies, 2 different Nightmare Before Christmas Cookies! These Jack Skellington Cookies & Sally Cookies are a fun project!

Based on 2 favorite characters from the Tim Burton classic, this tutorial divides a batch of my delicious sugar cookie dough
in half, making 2 very different cookies.
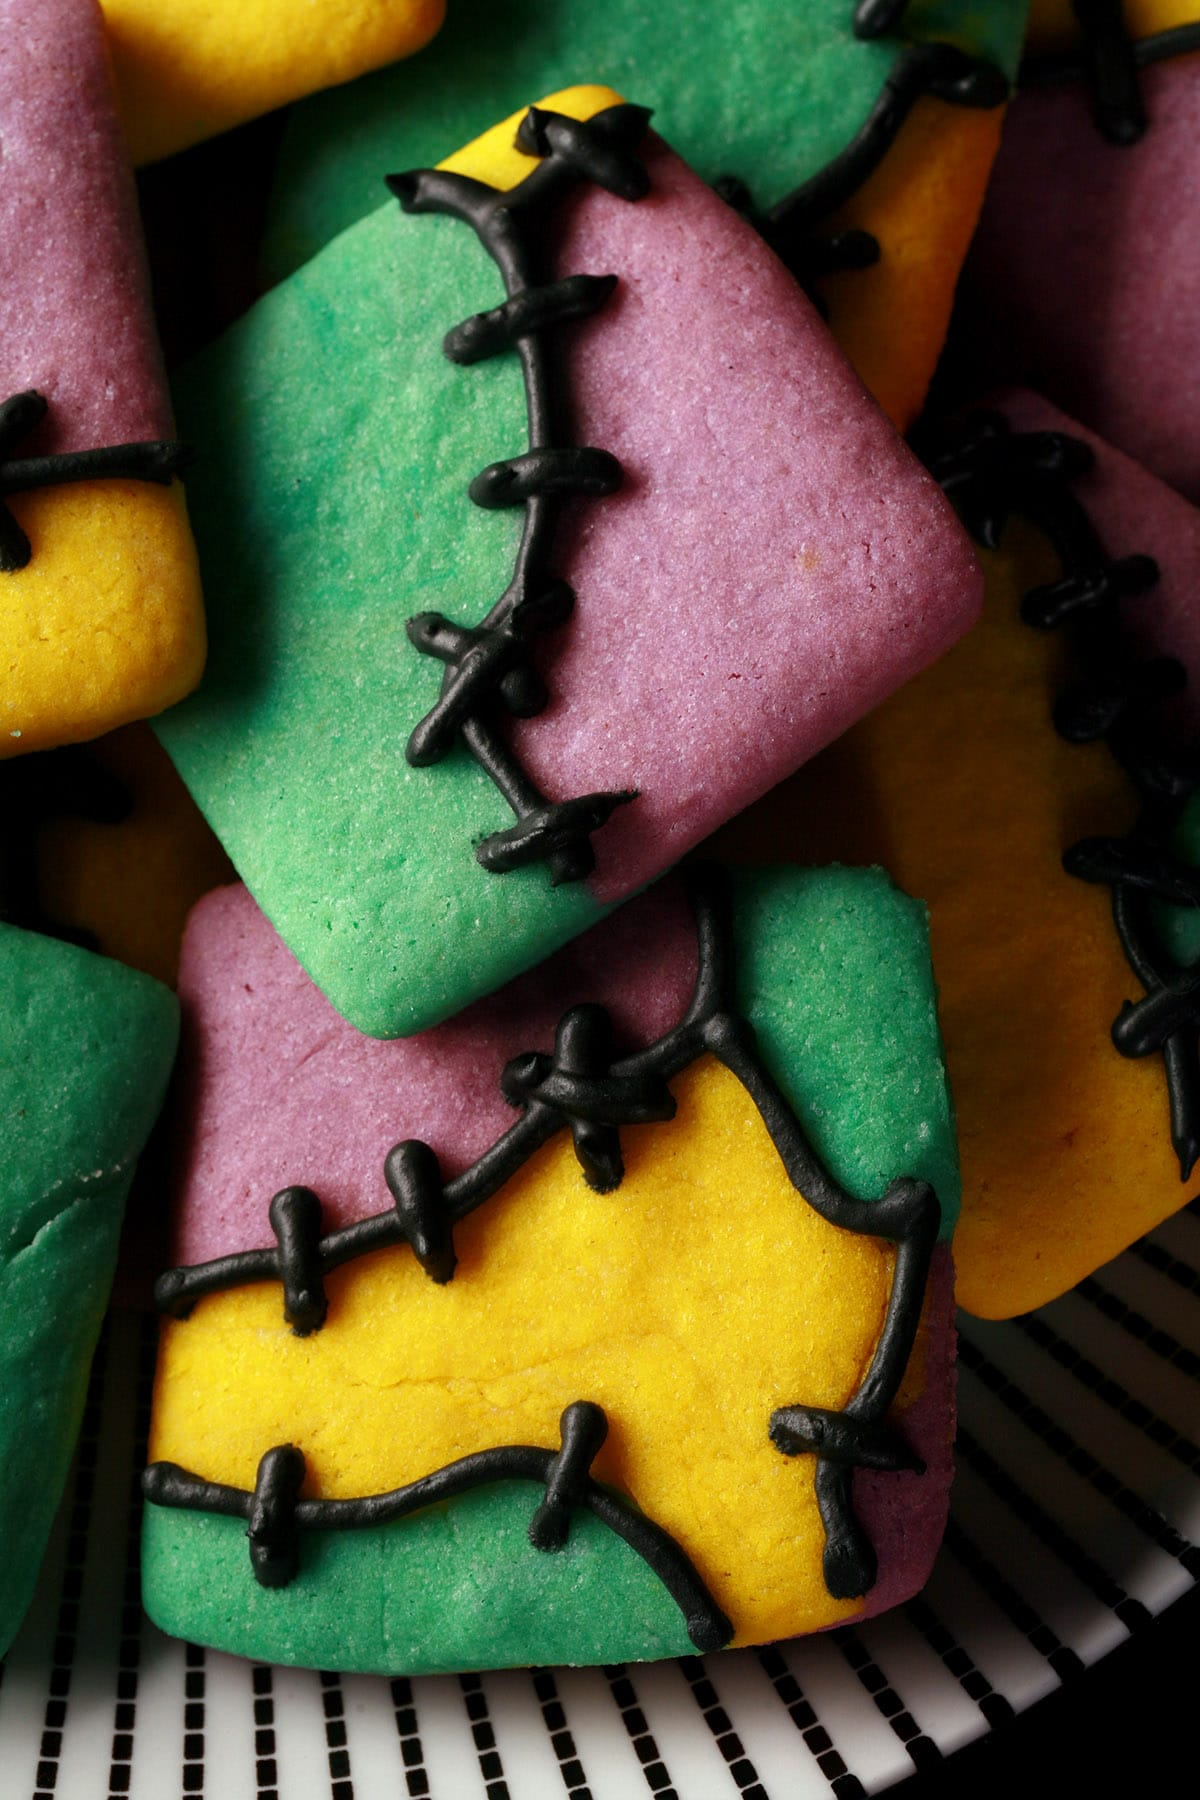
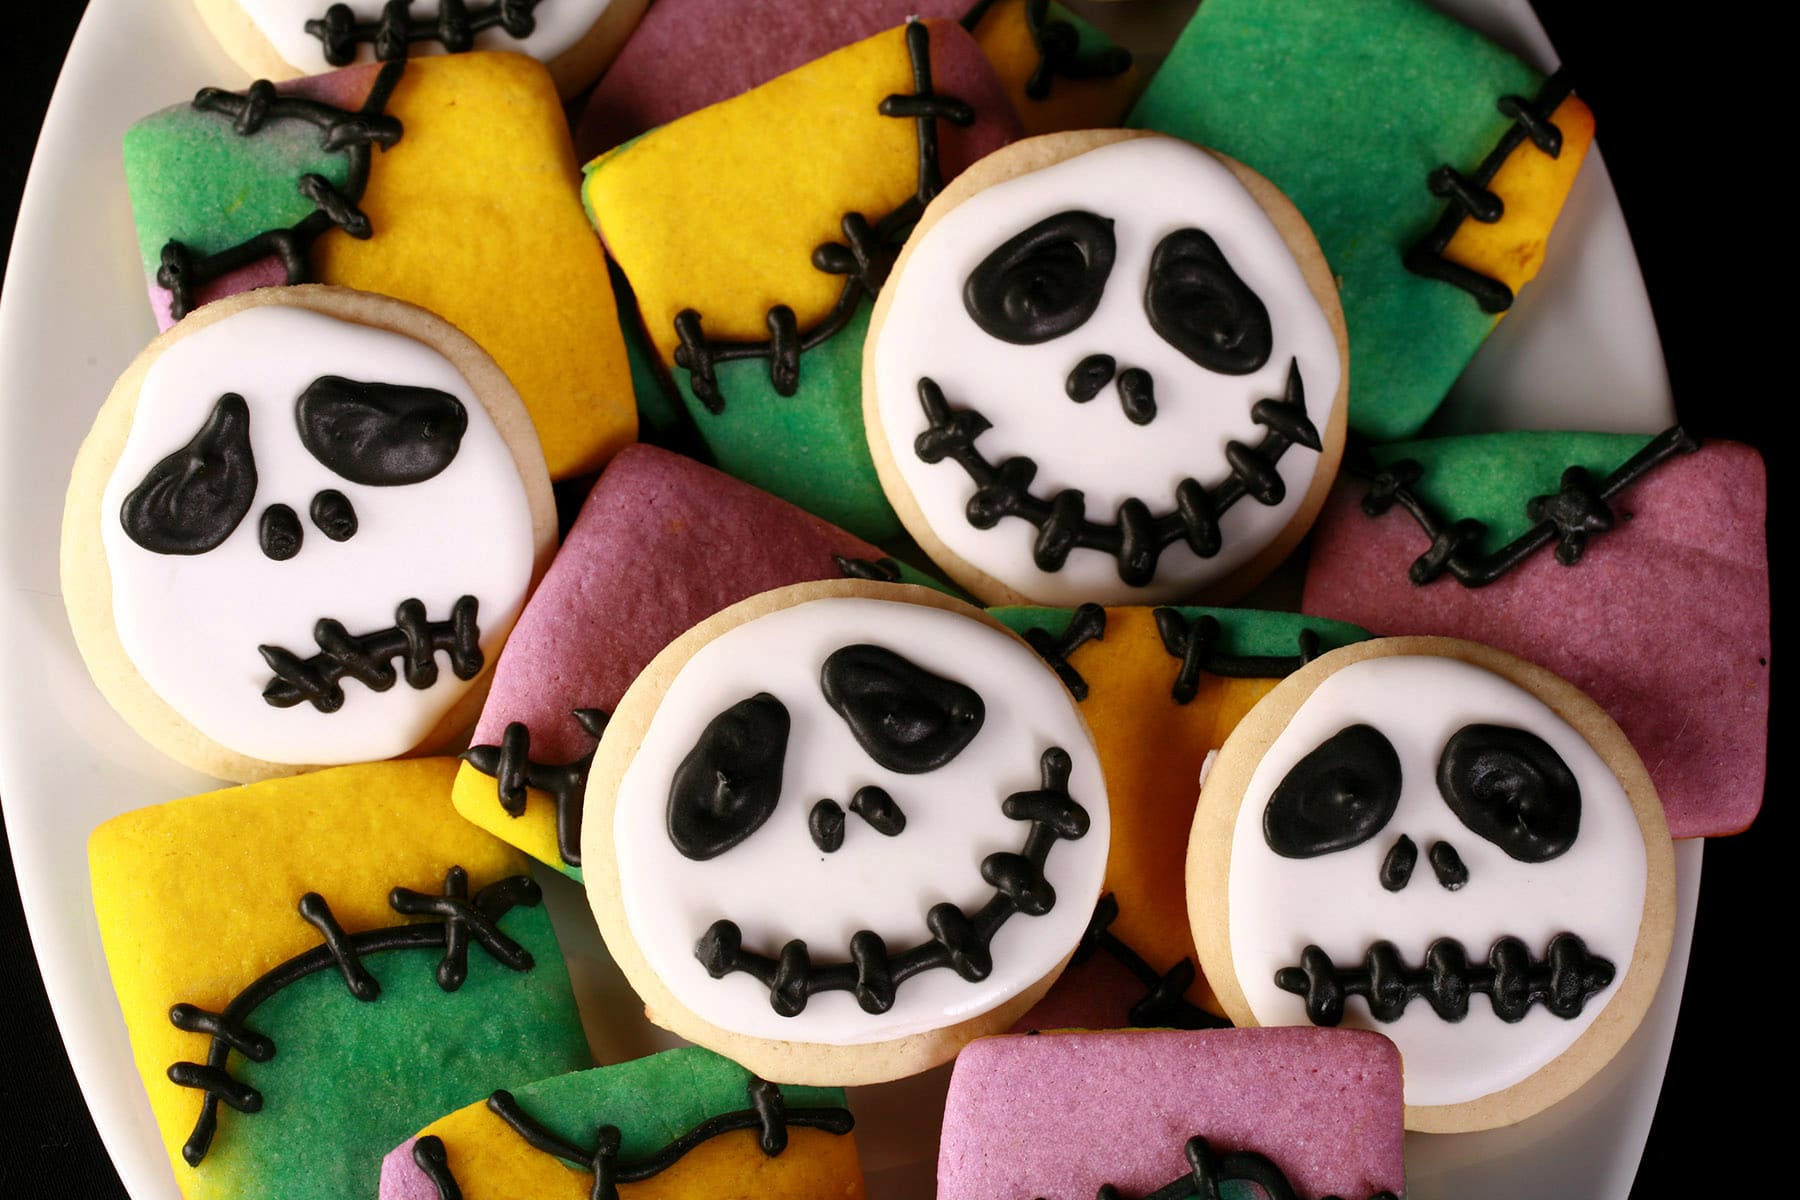
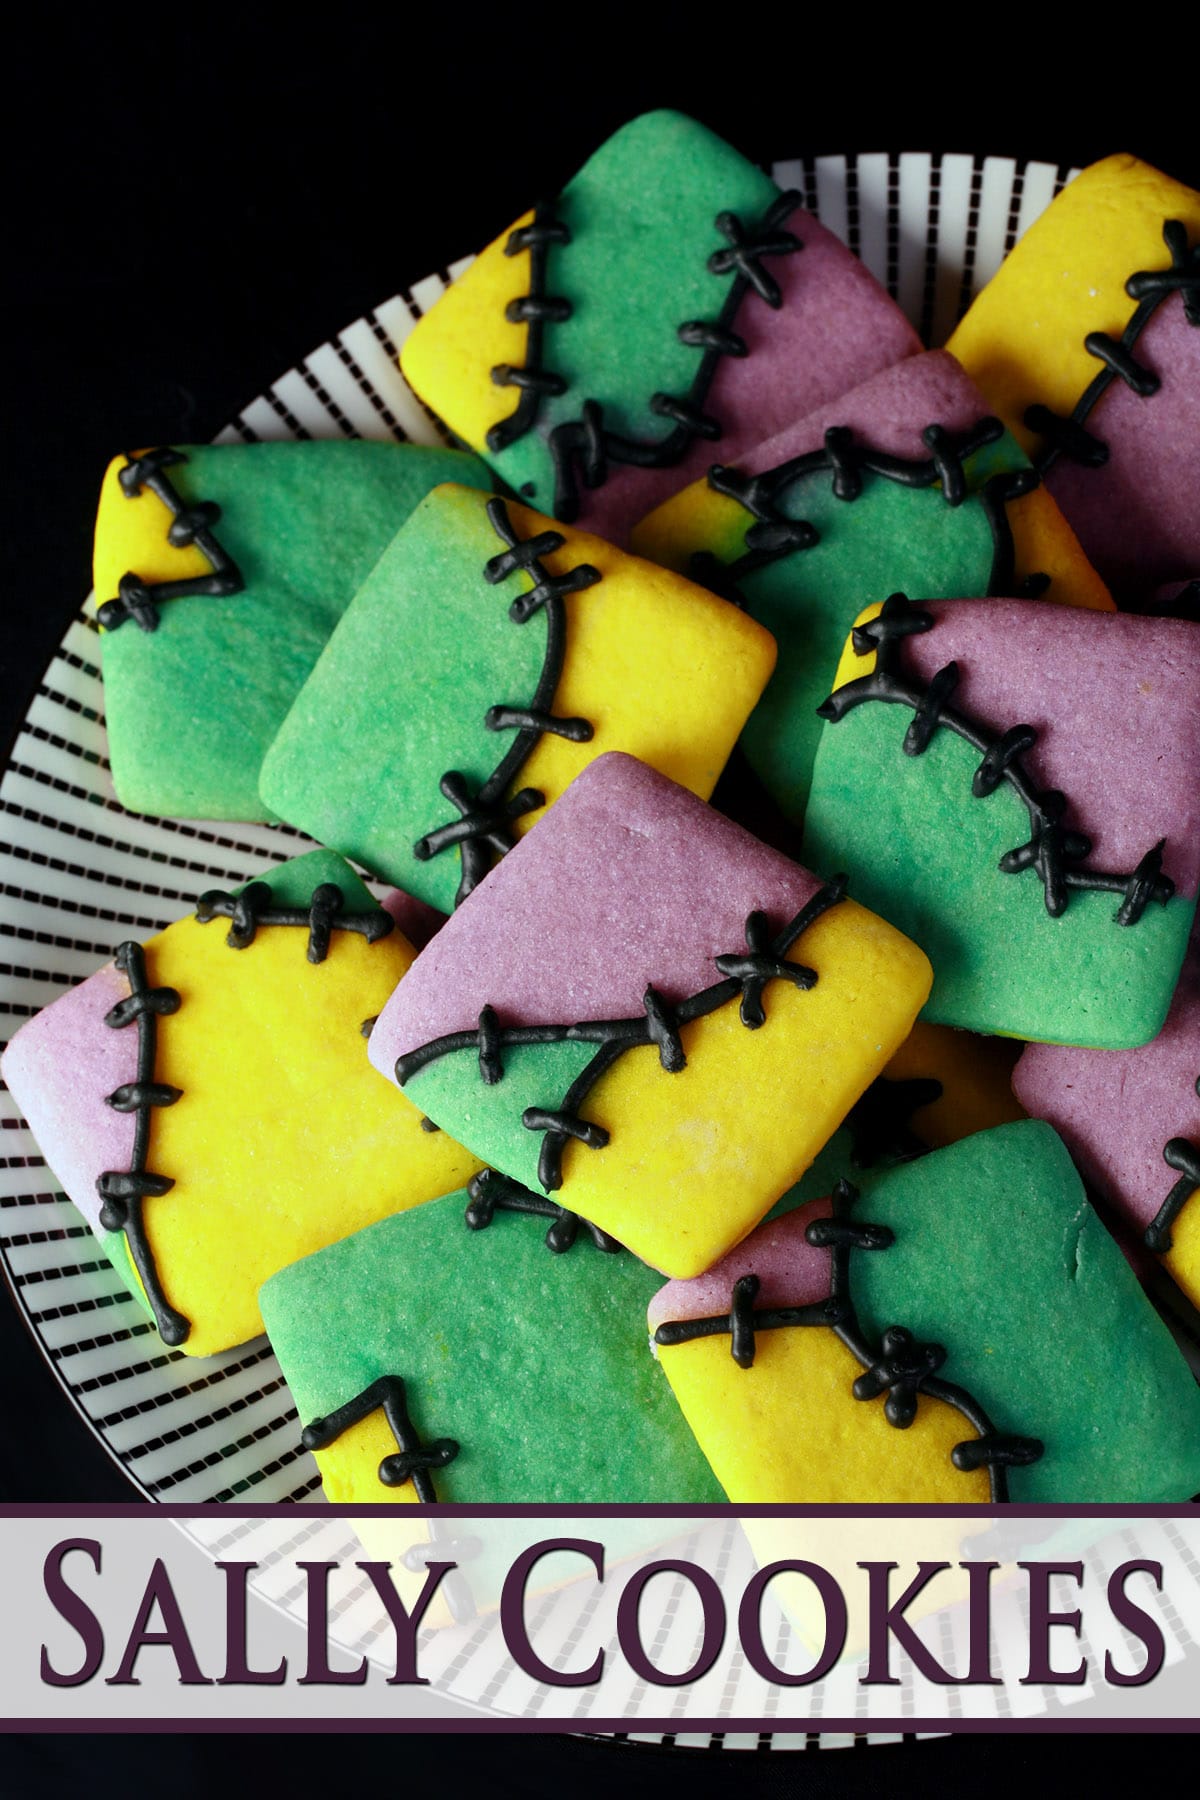
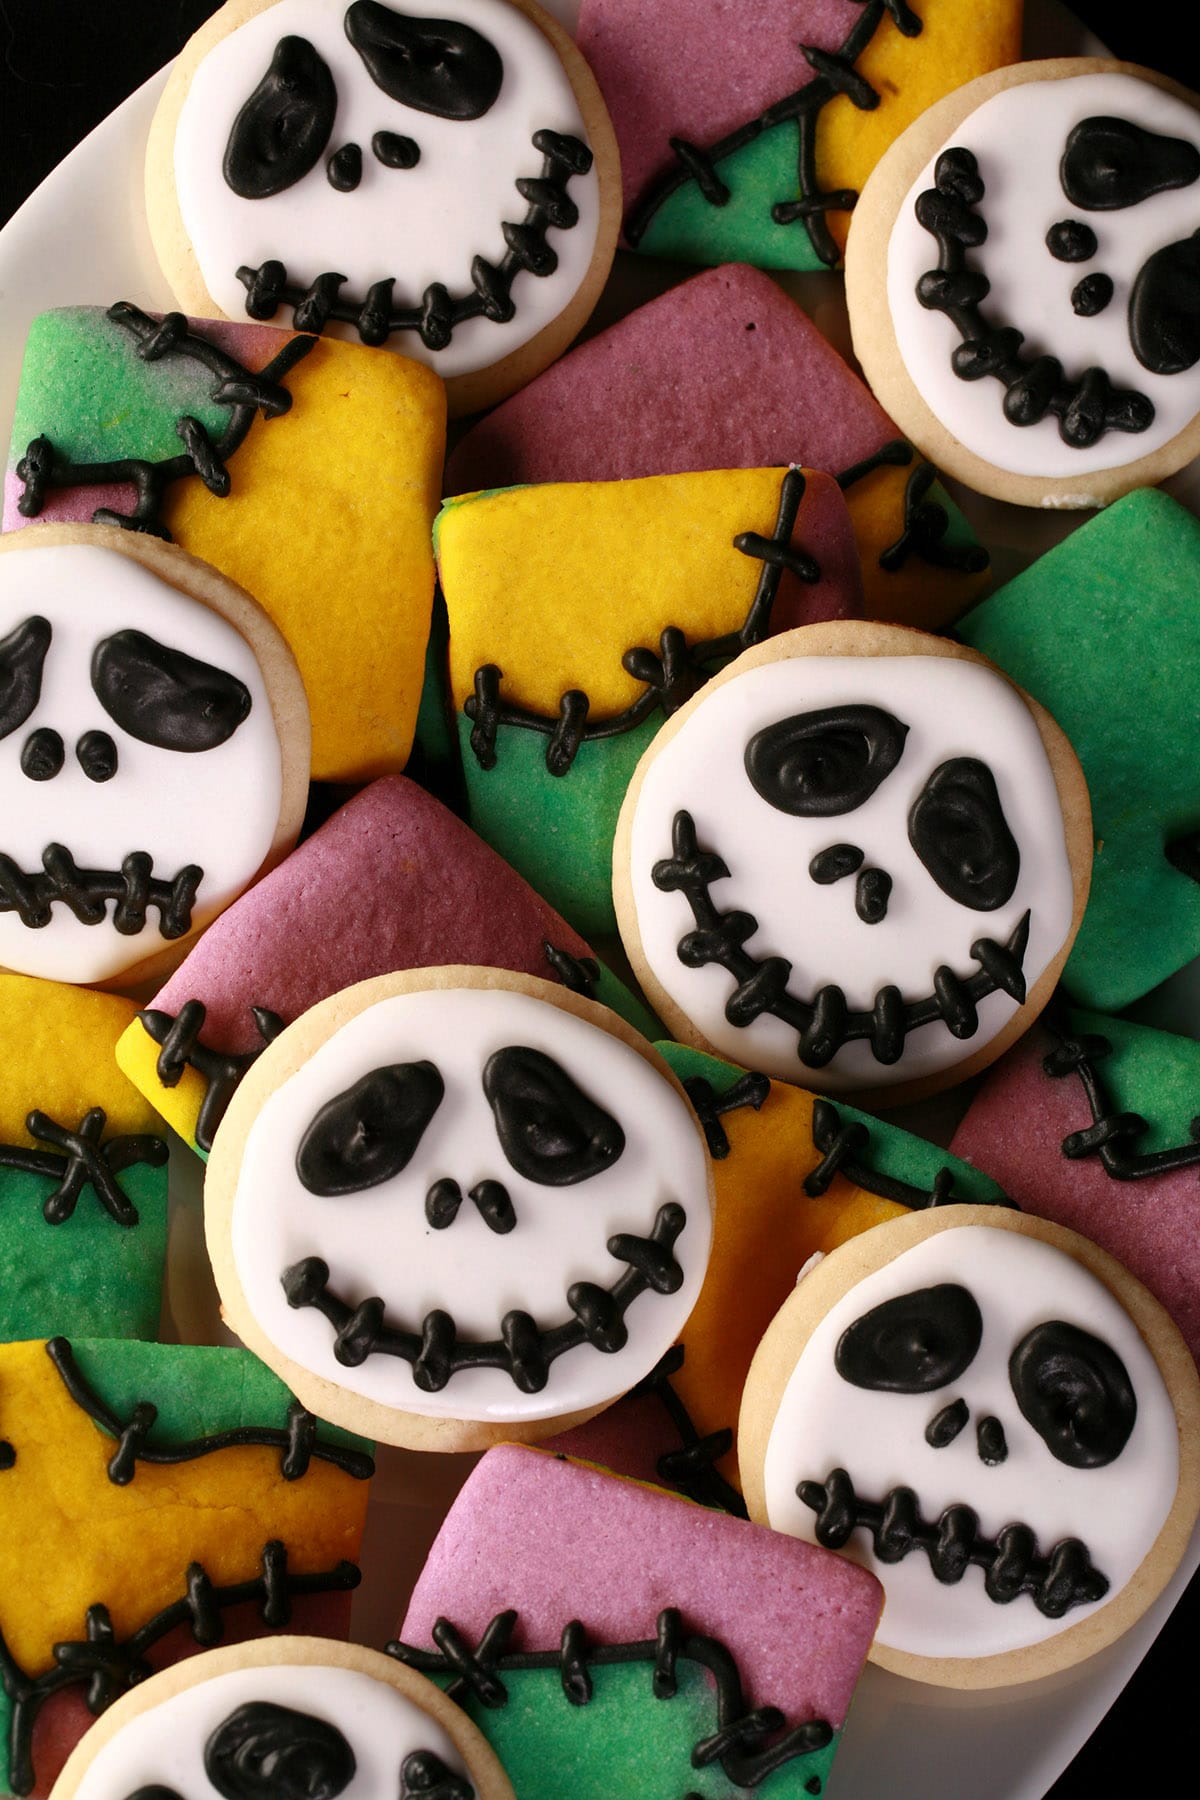
One is a lightly decorated patchwork cookie based on Sally’s dress, and the other is a fully frosted Jack Skellington face cookie!
Together, they are the perfect addition to your Halloween spread - fun to make AND eat!
This is a long tutorial, but an easy on to do - you can even get the kids involved!
Gluten Free Nightmare Before Christmas Cookies
Love these cookies, but need them gluten-free?
Just make up a batch of my Gluten-Free Sugar Cookies for Decorating.
Divide and color the dough as described in this post, bake following the directions over there, then use the decorating tutorial post here to finish them off!
A Note on the Piping
Please excuse how sloppy my piping is - it’s definitely not representative of someone that was once a competitive professional cake artist!
I had widespread tendon damage from an antibiotic two years ago, and I’m STILL rehabbing from it. Piping royal icing was shockingly difficult!
Still, they’re cookies. No matter how messy you may make them, they’re going to be cute AND tasty!

Ingredients
This tutorial involves 2 recipes - a modified version of my Sugar Cookies for Decorating, and a meringue powder royal icing.
You will need:
Sugar Cookies
All-purpose flour
Butter
Granulated sugar
Large eggs
Vanilla extract
Baking powder
Salt
Gel food colouring
I always use gel food coloring, as it gives the most intense colour - and this is most important when it comes to the black food coloring.
Specifically, I recommend Americolor (what I used when I was in the USA), or ChefMaster (Which is the option more readily available here!).
For this particular recipe, you’ll want it in Violet, pink, teal, yellow, and black

Royal Icing
Because Halloween cookies are usually made as gifts, for a mixed audience, etc... I like to use a Meringue Powder royal icing for decorating them.
It’s a safer option than using raw egg whites, which are traditional for royal icing.
That’s not to say that the traditional recipe is UNSAFE, it’s just recommended that you avoid serving it to pregnant people, immune compromised people, etc.
To me, it’s worth the few extra bucks to not have to worry about who is getting the cookies!
Aside from the Meringue Powder, you will need some icing sugar / powdered sugar.

Equipment
This recipe / tutorial requires some fairly basic equipment:
For making the cookie dough and the frosting, you’ll want either a Stand Mixer (paddle attachment for the cookie dough, whisk attachment for the royal icing), or an Electric Hand Mixer.
Either works fine!
(I use my Hamilton Beach 6 Speed Mixer - LOVE IT!)
Especially when it comes to the Jack Skellington cookies, you want them really flat and even - this gives you the best work surface for flooding the frosting.
For cutting the cookies, you’ll want a cookie cutter or two. I have a Set of Round Cookie Cutters and a Set of Square Cookie Cutters, I use the rounds for the jack Skellington cookies, and the squares for the Sally cookies.
You can go any size you want, you’ll just want to keep an eye on the baking time, adjusting up or down for bigger or smaller cookies.
I usually aim for 2.5" or 3" cutters.
I like to use a Large Piping Bag for both the white icing and the black icing. I’ll usually skip using a coupler and tip for piping the round base, but I’ll use Standard Decorating Couplers and a Round Piping Tip for piping the black frosting details.
Generally speaking, I’ll usually use a Wilton tip #2 or Wilton tip #3 for the details.

How to Make Nightmare Before Christmas Cookies
For the full recipe, see the recipe card at the end of this post. This is the pictorial walk through.
Make the Cookie Dough
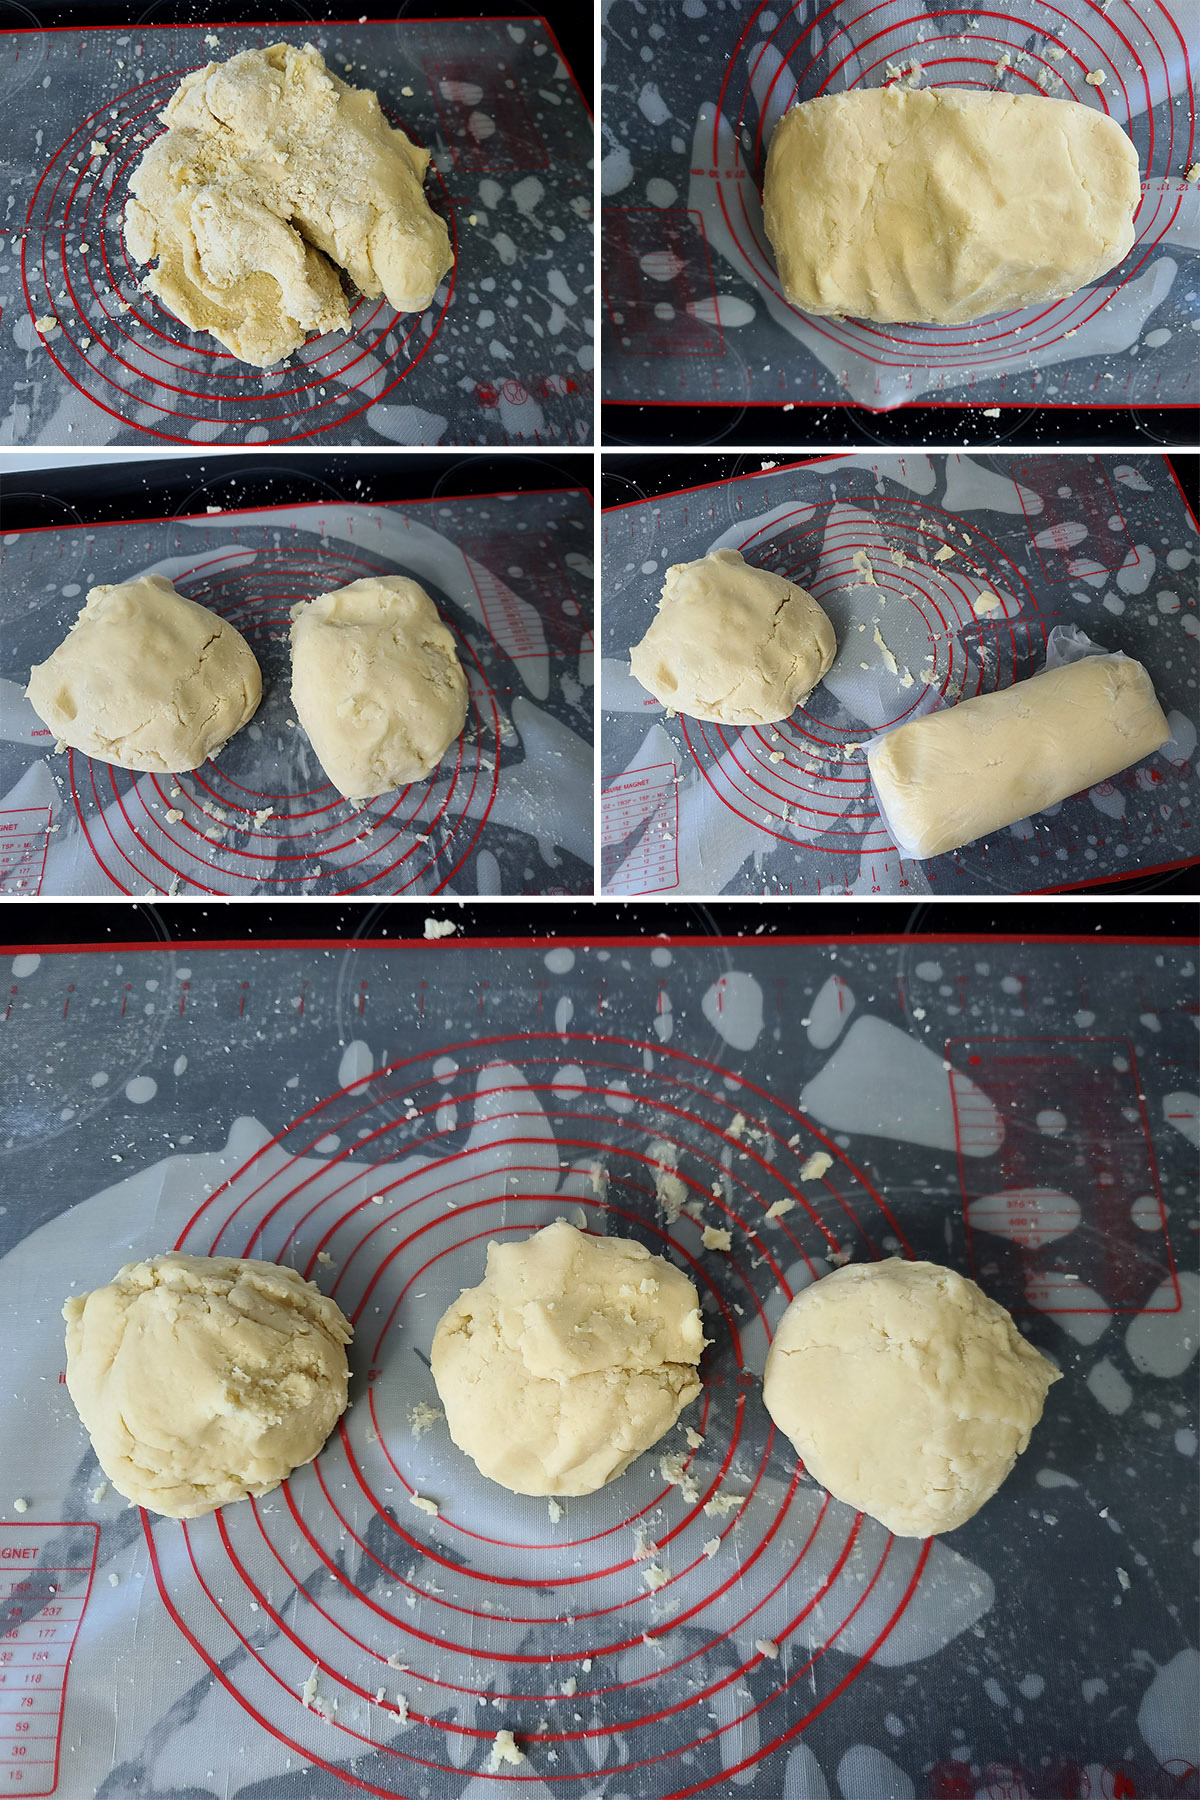
In a large bowl - or the bowl of a standing mixer - cream together butter and sugar until smooth and fluffy.
Add in eggs a little at a time, beating well between each addition. Add vanilla extract, and mix until well incorporated and smooth.

In a separate bowl, mix the flour, baking powder, and salt together. Carefully add this dry ingredients mixture into wet ingredients, stirring until fully incorporated.

Divide the remaining half into 3 relatively equal portions.
Add yellow gel paste to one portion, gently knead in until well distributed. Wrap in plastic wrap, set aside.
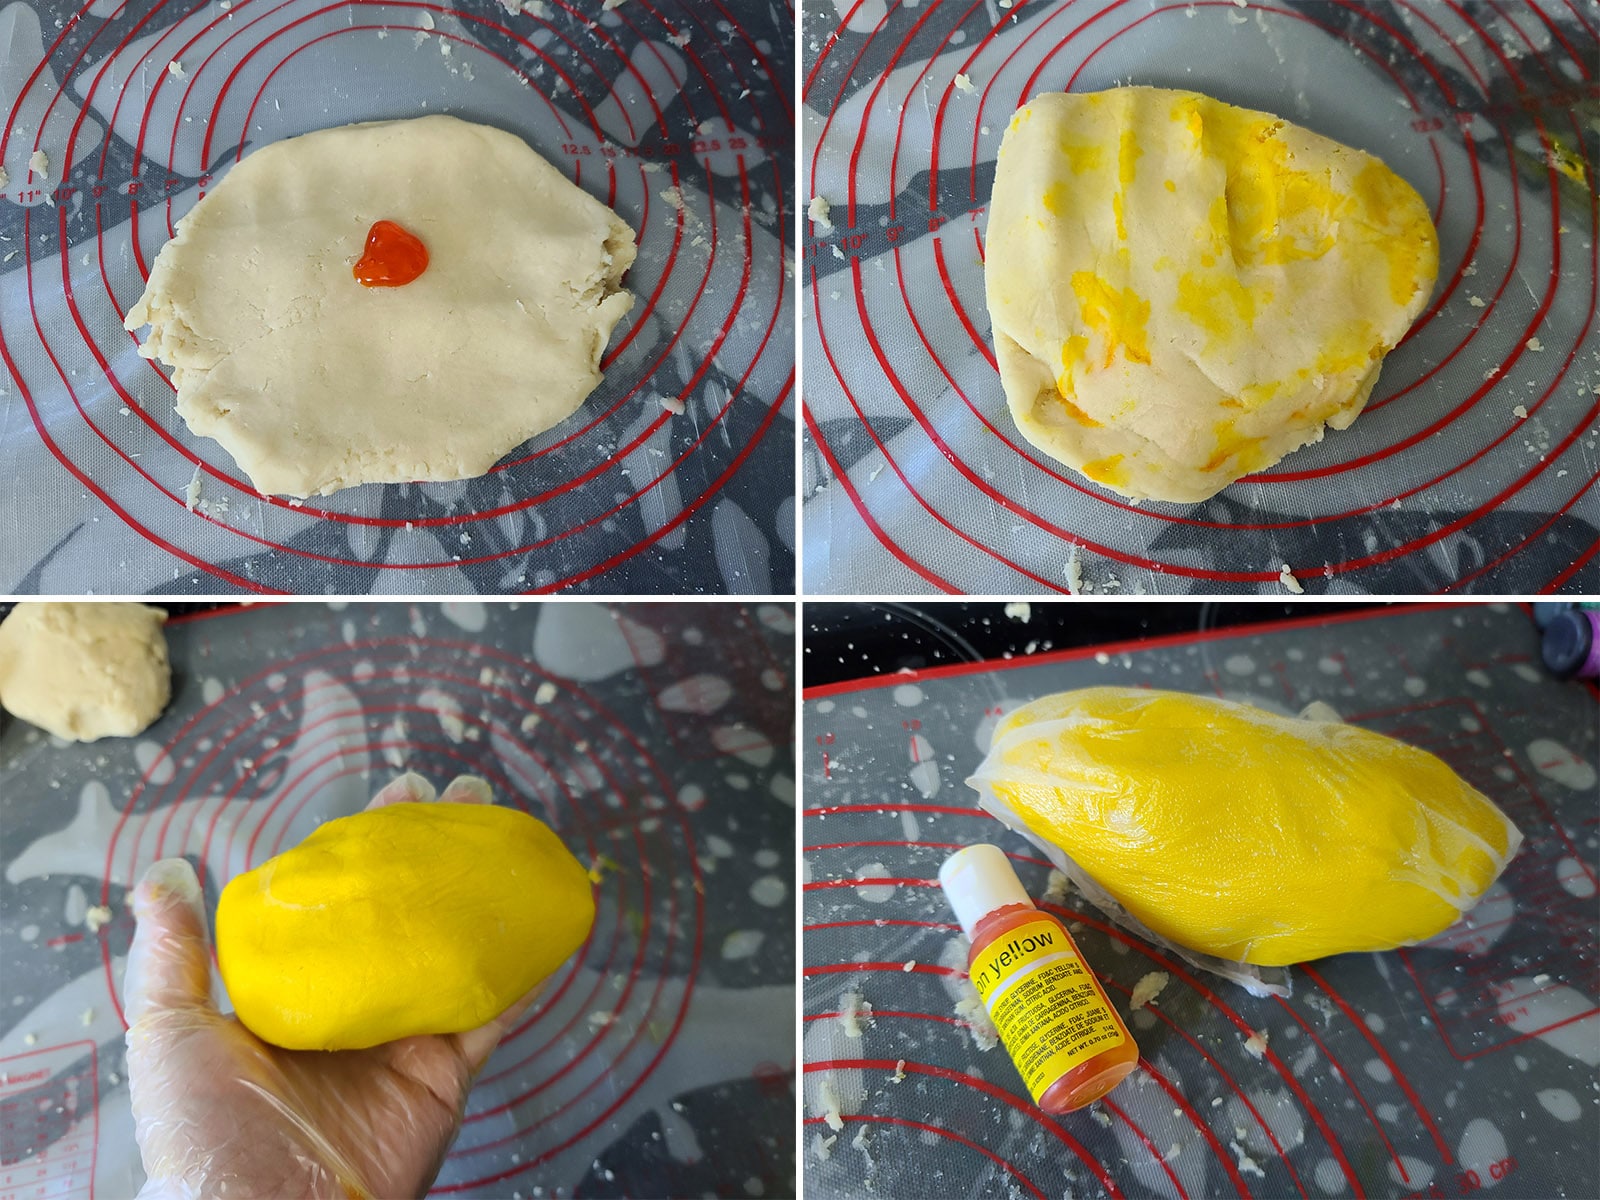
Add a small amount of teal gel colour to the third dough ball, knead and wrap in plastic. Set aside.

To dye it black, add a little cocoa powder (optional) and a copious amount of black gel colouring to the remaining ½ of the dough, kneading well. Wrap in plastic.
Chill all 4 dough balls for 1 hour.
Bake the Jack Skellington Cookies
Preheat oven to 400 degrees F, line baking sheets with parchment paper
On a floured work surface, roll plain (or black!) cookie dough out to about ¼″ thick (can be slightly thicker).
Take care to ensure the cookies are of VERY even thickness, for the best results. I like to use a Rolling pin with adjustable thickness guides to help with that.
Use cookie cutters to cut out round cookies (about 2.5-3" diameter), placing on prepared cookie sheets.


Gather the cuttings together and re-roll to get more cookies.
Once the cookies are out of the oven, you can place a piece of parchment over top of the hot cookies and gently press another cookie sheet down - lightly - to flatten any distortion that may have happened during baking.

Allow cookies to cool on cookie sheets for at least 5 minutes before moving. Cookies need to cool completely before decorating.
Bake the Sally Cookies
On a clean work surface, unwrap the yellow, pinky purple, and teal doughs. Break each into about 6 pieces, then each of those in half again. Roll each into a smooth ball.
Place the coloured dough balls into a random pile, then squeeze and roll them into a log. You don’t want to actually marble them, so don’t knead them together - just join them.
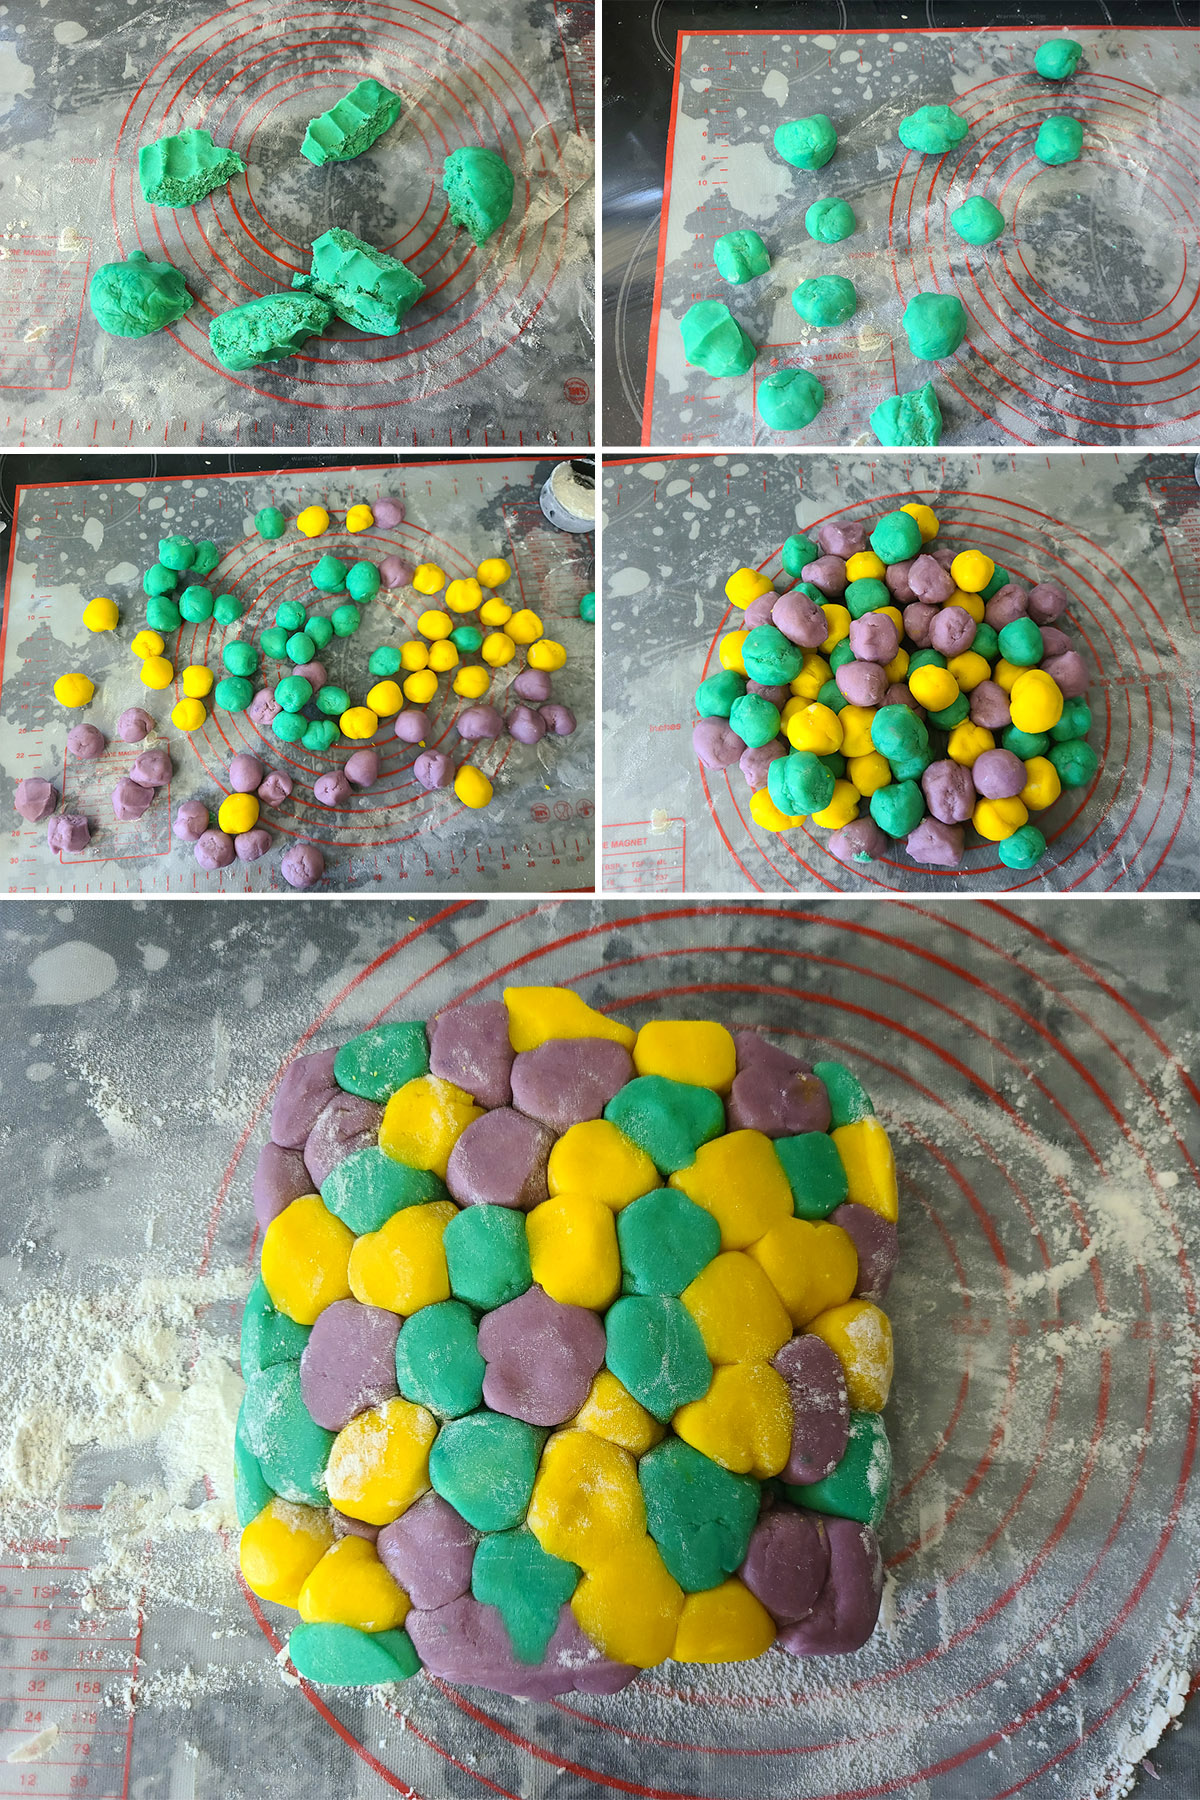
Use cookie cutters to cut out square cookies (about 2.5-3" diameter). You can position your cookie cutter to get nice patterns, but try to get the pieces cut as close together as possible.

You will get your best looking patchwork out of the first roll, so try not to leave much in the way of cuttings. Cuttings can be gathered and re-rolled, carefully to not be too marbled.

Place cookies on prepared baking sheets, bake for 8-10 minutes, until the bottoms look lightly golden.

This is optional, but gives a very flat surface to decorate.
Allow cookies to cool on cookie sheets for at least 5 minutes before moving. Cookies need to cool completely before decorating - you can put the sheets on a wire rack, if you have one.

Make the Royal Icing
Combine icing sugar and meringue powder in the bowl of a stand mixer - ideal - or large mixing bowl (to beat with an electric hand mixer)
Add water, mix on low speed until combined.
Turn speed up to high, beat for a couple minutes until thick, smooth, and glossy.
Check the frosting for consistency, adjust as needed for your intended usage. You will want a fairly thick frosting – but still smooth and workable – for piping details and borders.
– If the frosting settles out in less than 5 seconds, it’s too runny. Add a little more powdered sugar.
– If the frosting settles out in 5-10 seconds, you’re good to go!
– If the frosting takes longer than 10 seconds to settle, it’s too thick. Add a little water or lemon juice and try again.
( If you're not using it immediately, transfer to an airtight container, cover surface with plastic wrap, and secure lid tightly. Re-whip before use.)

Decorate the Jack Skellington Cookies
Once your white icing is the proper consistency, transfer it to frosting bags.
Spoon a fair amount of white frosting into a pastry bag, covering the remaining icing as soon as you’re done doing so.
As you’re spooning the frosting into the bag, try to avoid creating air pockets. Squeeze any air pockets out the back end, tie off the bag close to the frosting, and do not cut the tip off til you’re ready to use it.
Note: You can use a coupler and round tip if you’d like, I don’t usually don’t bother.
Base Colour
When you’re ready to decorate the round cookies:
1 - Grab your first frosting bag, and cut the very end of the tip off. I like to cut enough off as to leave about a ¼" diameter opening.
2 - Carefully pipe your outer circle, inside the outer edge of your first cookie. I like to leave a bit of a border along the outside of the cookie top, as it allows for settling.
3 - Once the outer edge is piped, quickly - but carefully - fill in the center of the cookie with frosting.
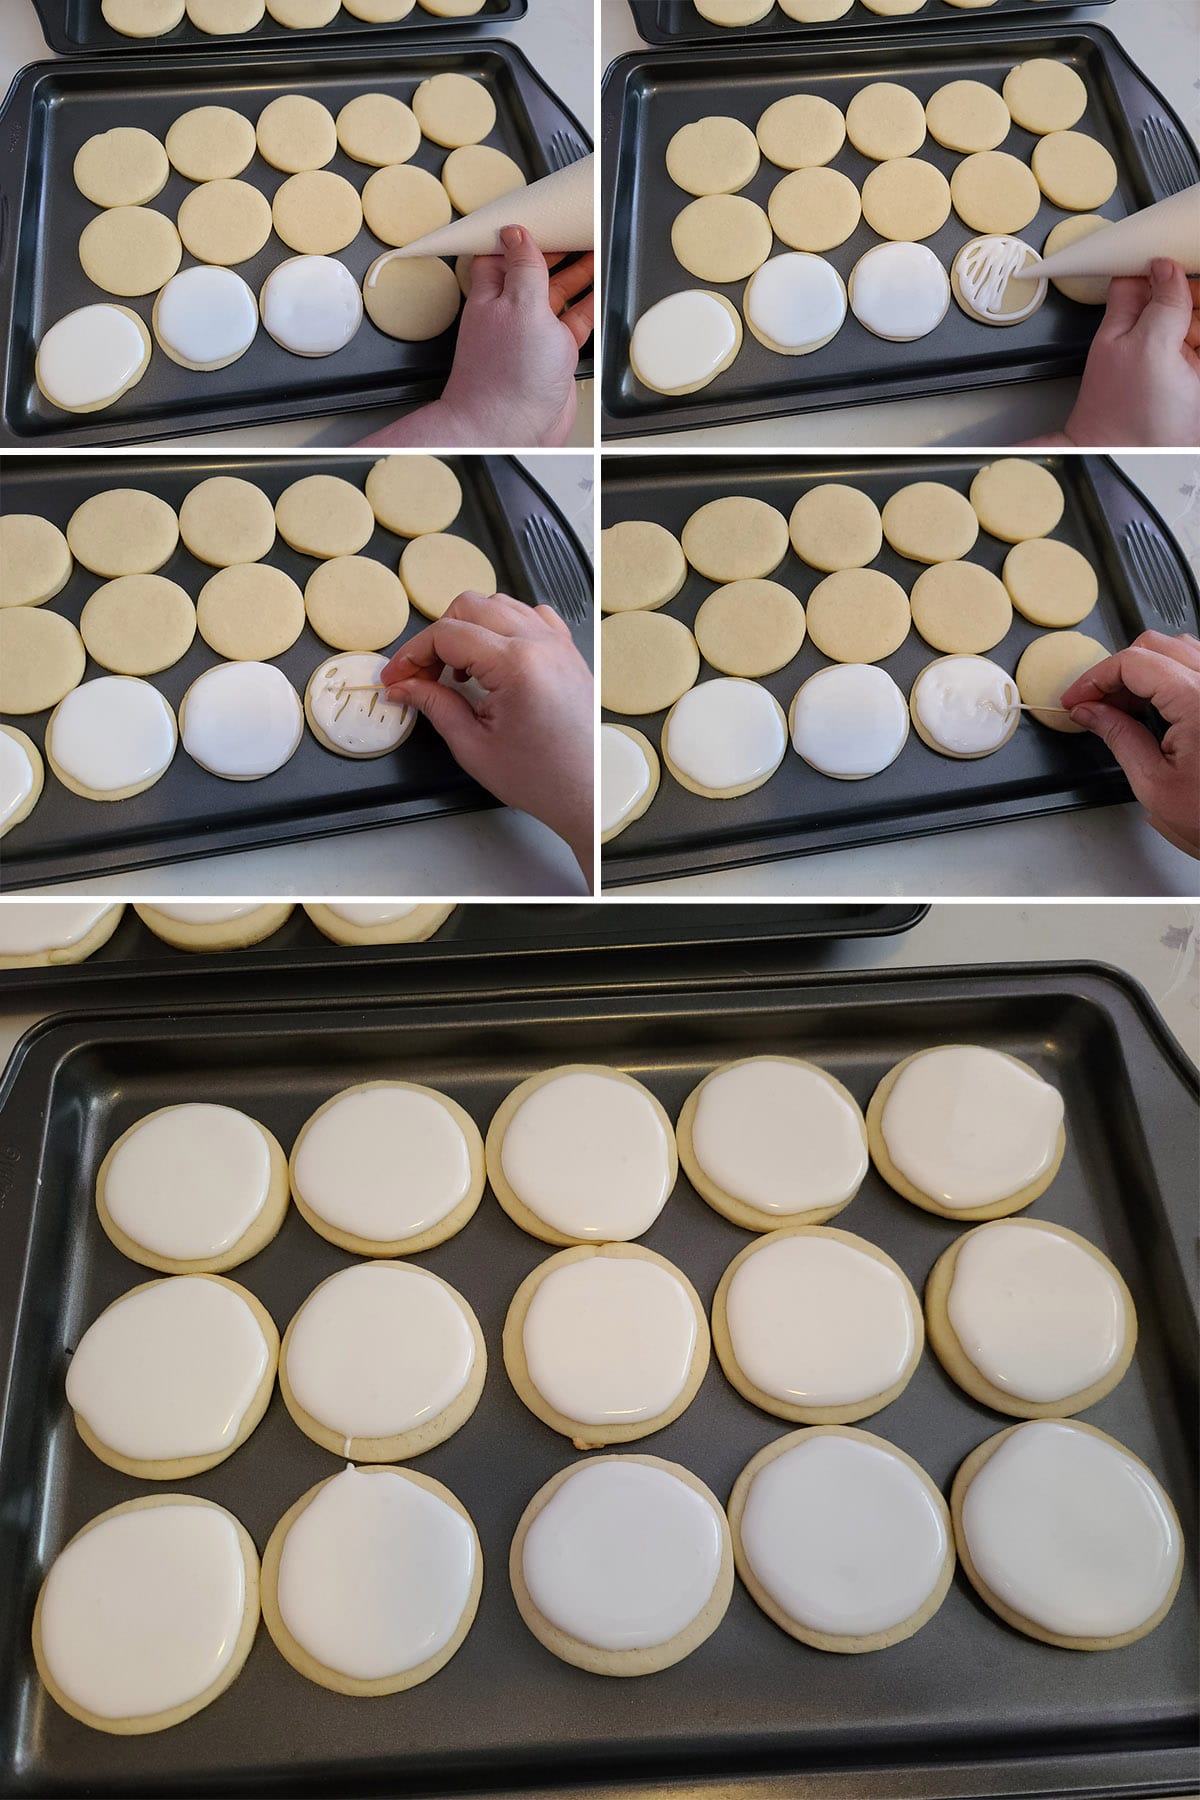
4 - Repeat with remaining plain round cookies. Allow the cookies to dry for at least 6 hours, ideally overnight.

Details
In a small bowl, use black gel food coloring to tint the remaining frosting deep black.
For the detail piping, I’ll set the frosting bag up with a coupler inside, trim the end, and affix a smallish round tip - usually about a #2 or #3.
You want it small enough to be relatively dainty, but wide enough to be nice and visible.
Use the frosting bag to pipe faces on the hardened white frosting cookie faces.
Note: I did a Google search for a wide variety of facial expressions, and just freehanded it.
Allow black frosting to set for several hours before serving or packaging.

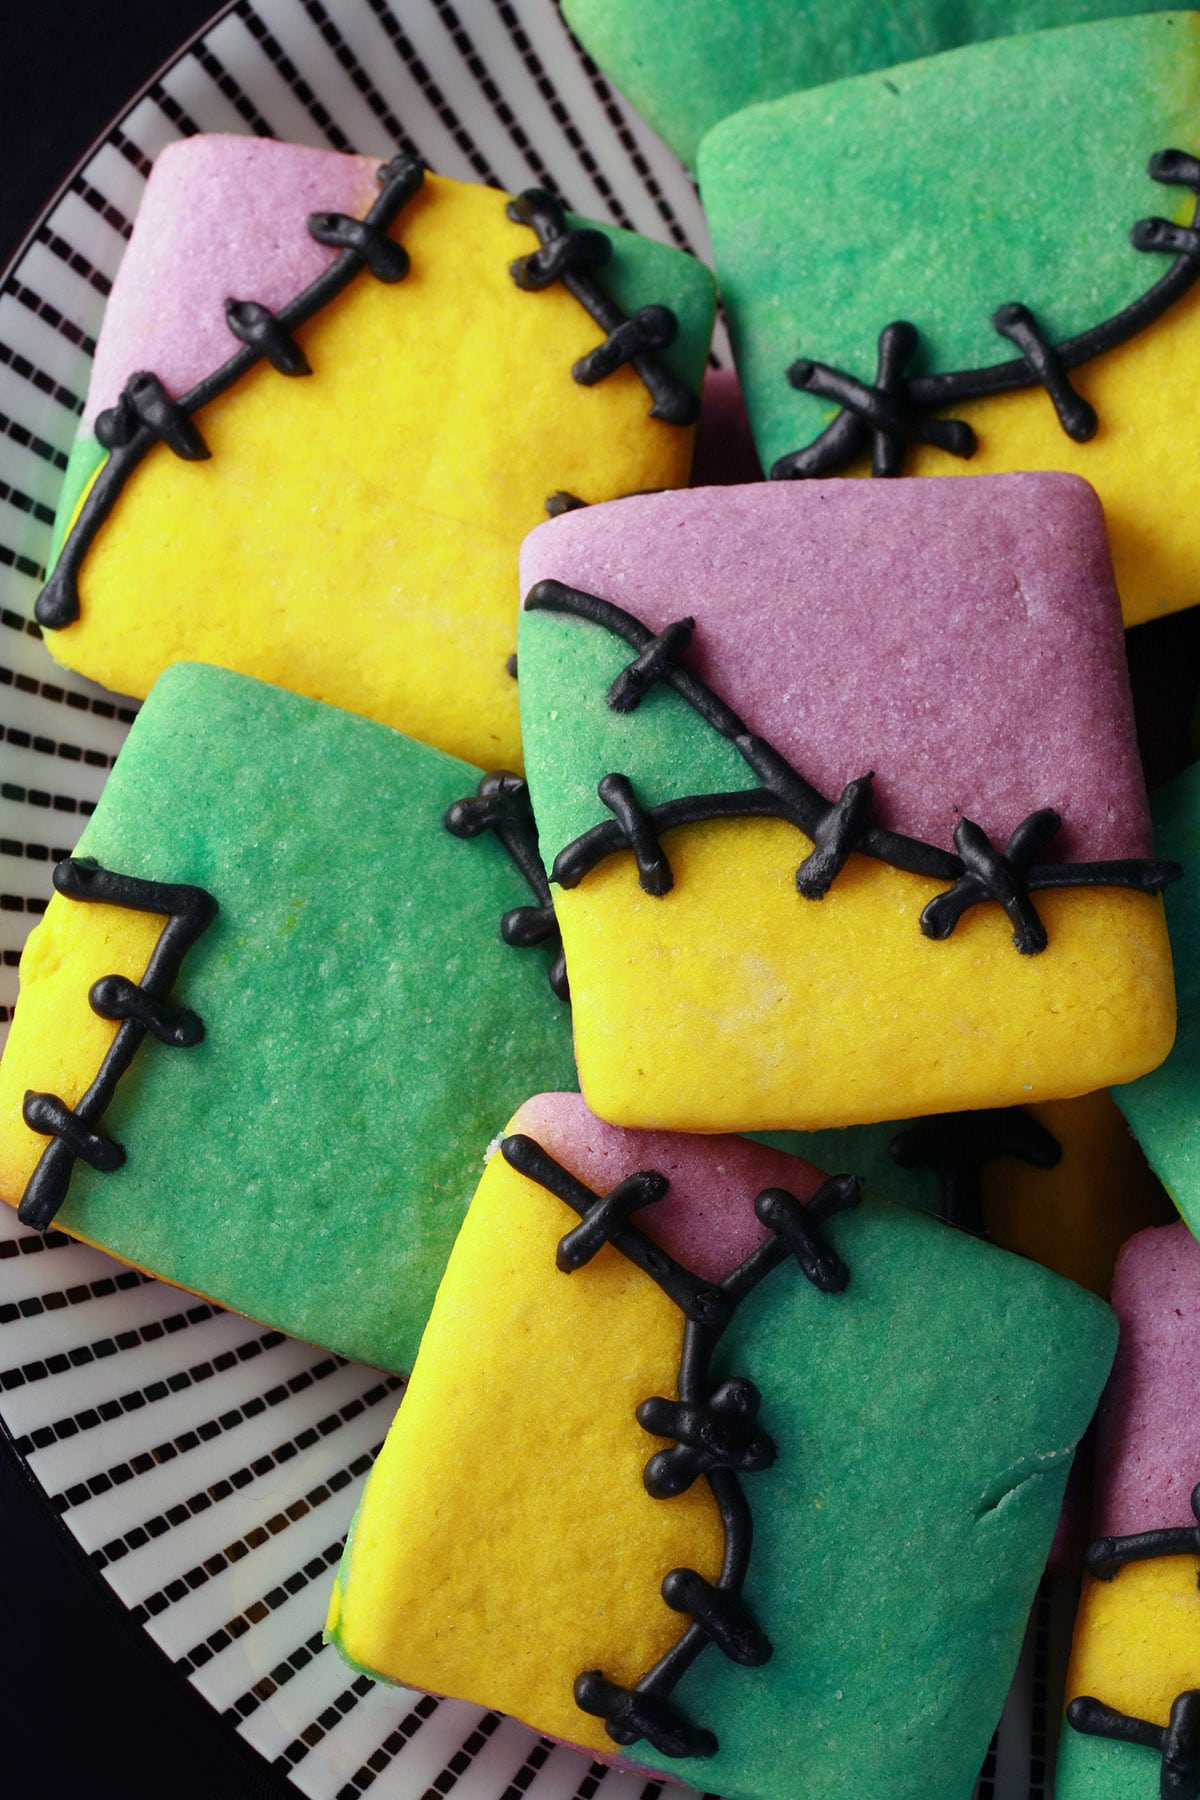
Decorate the Sally Cookies
Use the prepared bag of black royal icing to outline the transitions between the different colors of cookie dough, then add small lines as “stitches” across those lines.
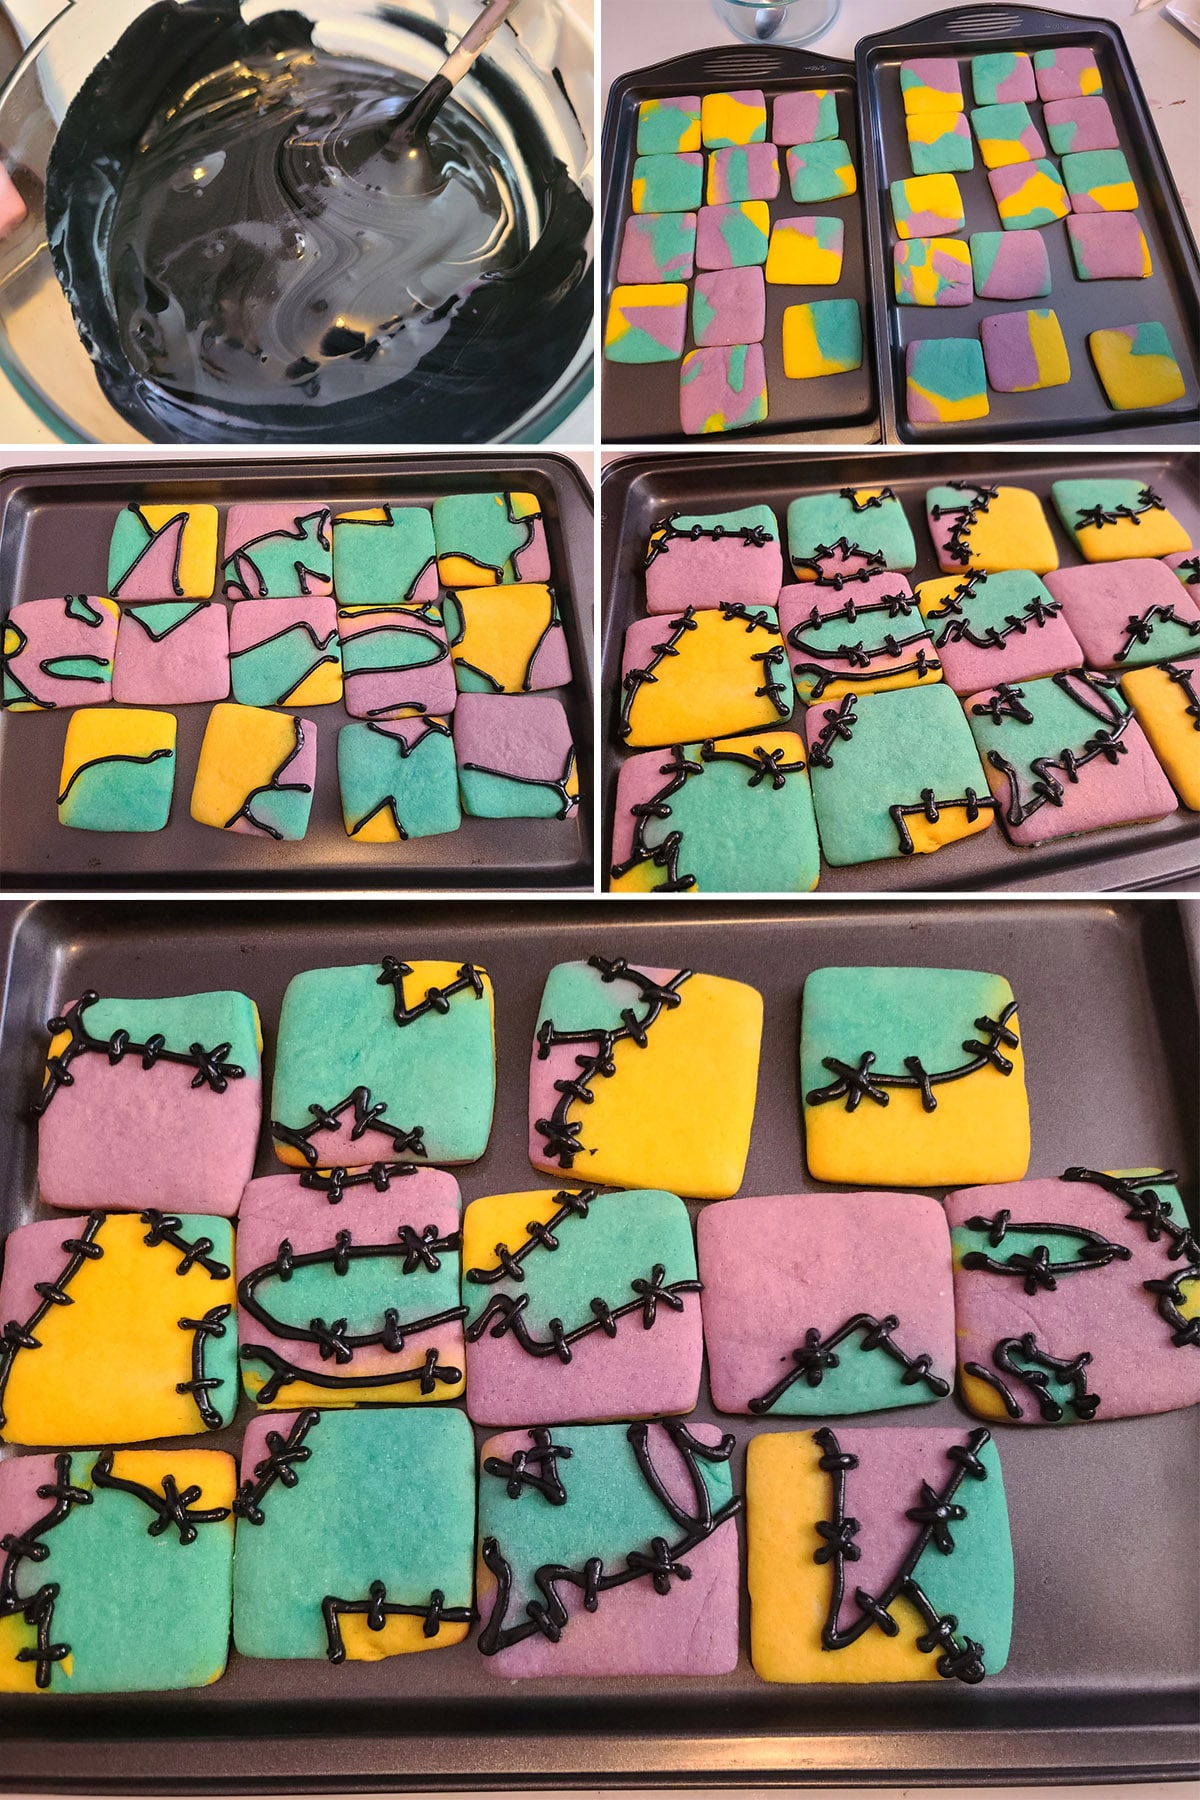
Allow designs to set for several hours before serving or packaging.
More Halloween Ideas
If you're still considering ideas for Halloween recipes and other ideas, be sure to check out my:
3D Halloween Bat Cupcakes
Bacon Wrapped Mummy Meatloaf
Black Velvet Cupcakes
Bloody Eyeball Cupcakes
Bloody Eyeball Halloween Punch
Easy Halloween Bat Cupcakes
Easy Spider Web Cookies
Elegant Halloween Charcuterie Board
Fudgy Halloween Brownies
Glazed Halloween Popcorn
Gluten Free Mummy Dogs
Gluten-Free Mummy Jalapeno Poppers
Halloween Pavlova
Halloween Shooters
Halloween Spider Web Cupcakes
Homemade Pastry Mummy Dogs
How to Carve a Pumpkin Like a Pro
Jalapeno Popper Mummies
Lychee "Bloody Eyeball" Pancakes
Mummy Pastries
Spider Bread Bowl

Share the Love!
Before you chow down, be sure to take some pics of your handiwork, for posterity - and social media! If you post it to Bluesky, be sure to tag us - @CelebrationGen. We're also on Pinterest, so you can save all your favourite recipes to a board!
Also, be sure to subscribe to my free monthly email newsletter, so you never miss out on any of my nonsense. Well, the published nonsense, anyway!
Finally, if you love this recipe, please consider leaving a star rating and/or a comment below!

Nightmare Before Christmas Cookies
Equipment
- Square Cookie Cutters
- Round Cookie Cutters
- 2 Baking Sheets
- Parchment Paper
Ingredients
Cookies
- 1 ½ cups Butter softened
- 2 ¼ cups Granulated sugar
- 4 Large eggs
- 2 teaspoon Vanilla extract
- 5+ cups All-purpose flour
- 2 teaspoon Baking powder
- 1 teaspoon Salt
- Gel food colouring Violet, pink, teal, yellow, and black
- 2 tablespoon Cocoa powder optional
Royal Icing
- 4 cups Powdered sugar
- ¼ cup Meringue powder
- ⅓ cup Lukewarm water
Instructions
Cookie Dough:
- In a stand mixer, cream together butter and sugar until smooth and fluffy.
- Add in eggs a little at a time, beating well between each addition. Add vanilla extract, and mix until well incorporated and smooth.
- In a separate bowl, mix the flour, baking powder, and salt together. Carefully add this dry ingredient mix into wet ingredients, stirring until fully incorporated.
- Divide dough ball in half, set one half aside. Divide the remaining half into 3 relatively equal portions.
- Add yellow gel paste to one portion, gently knead in until well distributed. Wrap in plastic wrap, set aside.
- Add a small amount of violet and pink gel to the second portion, knead until well distributed. Wrap in plastic, set aside.
- Add a small amount of teal gel colour to the third dough ball, knead and wrap in plastic. Set aside.
- For the remaining dough, you can either leave it plain, or dye it black. To dye it black, add cocoa and a copious amount of black gel colouring to the remaining ½ of the dough, kneading well. Wrap in plastic.
- Chill all 4 dough balls for 1 hour.
Bake the Jack Skellington Cookies:
- Preheat oven to 400 degrees F, line cookie sheets with parchment paper
- On a floured work surface, roll plain (or black!) cookie dough out to about ¼″ thick (can be slightly thicker).
- Use cookie cutters to cut out round cookies (about 2.5-3" diameter), placing on prepared cookie sheets.
- Bake cookies for 8-10 minutes, or until bottoms look lightly golden.
- Once the cookies are out of the oven, you can place a piece of parchment over top of the hot cookies and gently press another cookie sheet down - lightly - to flatten any distortion that may have happened during baking.This is optional, but gives a very flat surface to decorate.
- Allow cookies to cool on cookie sheets for at least 5 minutes before moving. Cookies need to cool completely before decorating.
Bake the Sally Cookies:
- On a clean work surface, unwrap the yellow, pinky purple, and teal doughs. Break each into about 6 pieces, then each of those in half again. Roll each into a smooth ball.
- Place the coloured dough balls into a random pile, then squeeze and roll them into a log. You don’t want to actually marble them, so don’t knead them together - just join them.
- On a floured work surface, roll the cookie dough out to about ¼″ thick (can be slightly thicker).
- Use cookie cutters to cut out square cookies (about 2.5-3" diameter). You can position your cookie cutter to get nice patterns, but try to get the pieces cut as close together as possible.
- Place cookies on prepared baking sheets, bake for 8-10 minutes, until the bottoms look lightly golden.
- Once the cookies are out of the oven, you can place a piece of parchment over top of the hot cookies and gently press another cookie sheet down - lightly - to flatten any distortion that may have happened during baking.This is optional, but gives a very flat surface to decorate.
- Allow cookies to cool on cookie sheets for at least 5 minutes before moving. Cookies need to cool completely before decorating.
Make the Royal Icing
- Combine icing sugar and meringue powder in the bowl of a stand mixer - ideal - or large mixing bowl (to beat with an electric hand mixer)
- Add water, mix on low speed until combined.
- Turn speed up to high, beat for a couple minutes until thick, smooth, and glossy.
- Check the frosting for consistency, adjust as needed for your intended usage. You will want a fairly thick frosting – but still smooth and workable – for piping details and borders.A good way to figure out if your frosting is the right consistency is to pull a spoon through the middle of the frosting bowl.– If the frosting settles out in less than 5 seconds, it’s too runny. Add a little more powdered sugar.– If the frosting settles out in 5-10 seconds, you’re good to go!– If the frosting takes longer than 10 seconds to settle, it’s too thick. Add a little water or lemon juice and try again.
Decorate the cookies
- See the post for a photo walk through on decorating the cookies.
- You’ll want to use white royal icing to cover the round cookies, then let them dry for several hours or overnight.
- Then you’ll dye the remaining frosting black, and use that to pipe the details on both the Sally cookies and the Jack Skellington cookies.
Notes
Nutrition


Leave a Reply