

My whole life, my Great Uncle Tom was well known for his Perfect Pie Crust recipe. In this post, he shared his prized pie dough recipe with me - and you! - via my grandma.

Originally published August 18, 2011. Updated on 8/31/2022
Sure, you can “skip to recipe” - but you’ll miss a ton of helpful information! Anyway.
This has been my favorite pie crust recipe for a very long time. Unlike every other recipe on this site... this one is not even my own recipe!<./div>
He was always renowned for his pies, which were reportedly scooped out of his hands on sight!
It really is the best crust - easy to handle, baking up to a gorgeously flaky pie crust, and tasty.
I’ve been using this pie crust dough for all of my regular pies - savory AND sweet pies - for... 20 years now?
Note: Need a great gluten-free pie crust? Try my Gluten-Free Pie Crust Recipe, over on Beyond Flour. Another perfect crust, just without the wheat!
A Note on the Change in Directions
Up until this update, I’ve had the recipe posted exactly as it was given to me.
The technique was a bit weird, adding the wet ingredients to the dry BEFORE cutting the lard in.
The thing is, it was given to me over the phone - more than a decade ago - from someone who now has dementia, through someone who’s sadly not with us anymore.
I can’t check the veracity of the recipe, as I had transcribed it.
SO, while I keep his ingredients and general instructions the same, I have swapped those two steps in this update.
It works much better, is less frustrating, and has less of a chance of being overworked. This is a really easy recipe, working up in less than 10 minutes of effort.
I like to think it’s how he actually did it, but I have no way of knowing, now.

Ingredients
This is a simple recipe, with super simple ingredients that you can find in any grocery store:
All purpose flour
Lard*
Brown sugar (Cut in half for savory pies)
Baking powder
Ice water
Large egg
Vinegar
Salt
It makes a lot - enough dough for 6 individual crusts. (Use 2 to make a double crust pie) - but it can be frozen for future use.
More on that in the “tips” section...

*A Note on the Lard
Tom recommends using Tenderflake brand lard, which is apparently only available in Canada.
Shortening can be substituted if lard cannot be obtained, but is definitely not *preferable* to lard - and is more prone to overworking the dough, in my experience.
Equipment
Aside from bowls and measuring implements, you’ll only need a few really basic pieces of equipment to make this homemade pie crust recipe:
Pastry Blender
AKA a pastry cutter - this is used to cut the lard into the flour mixture, distributing small pieces of fat throughout the dough.
Honestly, this is mostly a nicety - I use a potato masher now, and I’ve been known to use a couple of forks. It’s all good.
Rolling Pin
While any rolling pin will do - and I used to make this with a decades old wooden one - I now use a Rolling pin with adjustable thickness guides, and love it!
(That link goes to the one I have).
Not only is it perfect for getting a perfectly even roll to exactly the thickness I want (⅛", btw.), it also comes with a silicone mat that is super handy for rolling it out on.
I use the round templates on it not only for rolling the dough out, but for tracing a parchment circle out - more on that in a bit, though!
Pie Plate
Go with whatever your pie recipe is calling for, but generally speaking you’re going to want a 9-inch pie plate
Personally, I use a glass pie dish whenever I make pies now, finally having gotten rid of all my metal ones.
I just find that the glass cooks more evenly and bakes up nicer.
And, on a shallow food blogger note, they look nicer in photos, LOL!

How to Make the Perfect Pie Crust
Whisk cold water, egg, and vinegar together, set aside.
In a large bowl, combine flour, brown sugar, baking powder, and salt until well combined.

Using a fork, pastry blender/, or your fingers, cut the lard into the dry ingredients, until it resembles a loose gravel - roughly the size of peas.
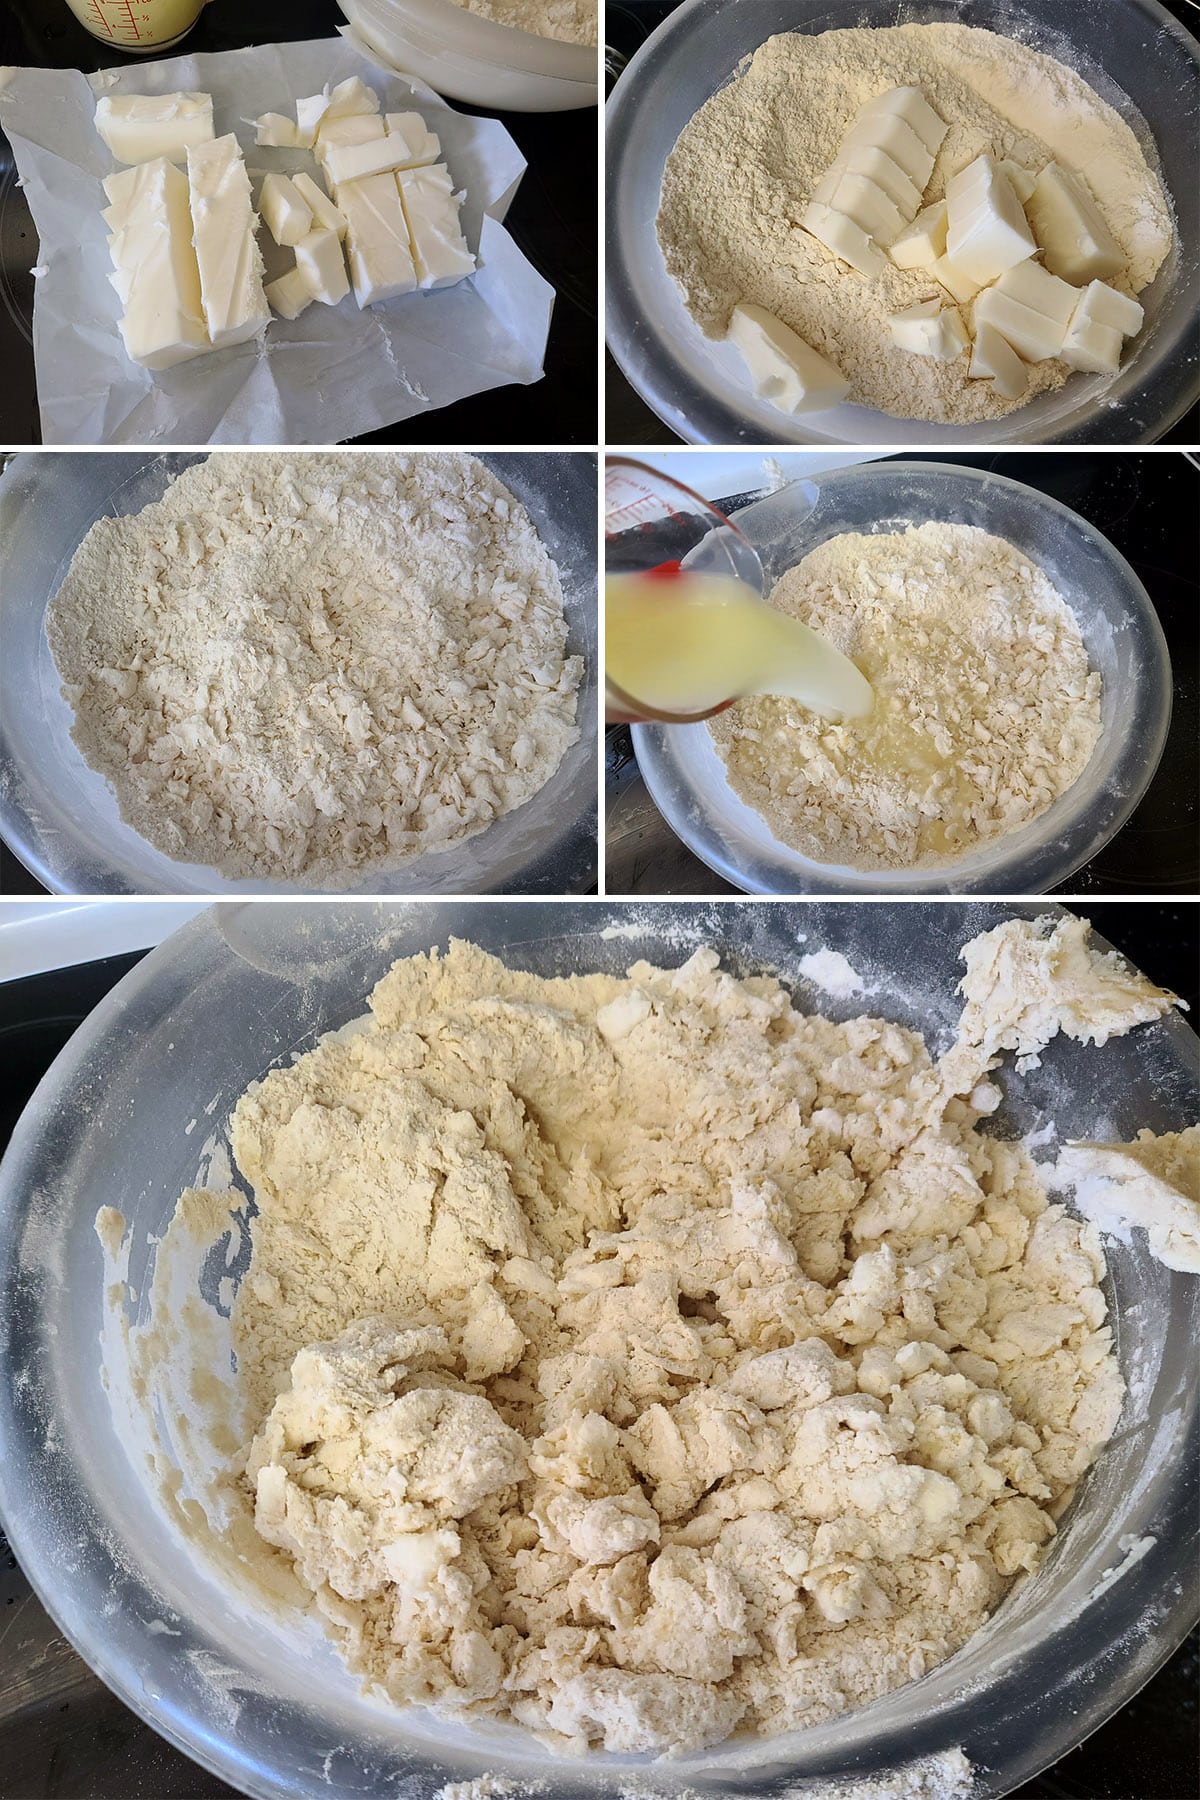
Don’t over handle it. In Tom’s words, “Mix it with kindness"!
Gather dough into a loose ball, divide dough into 6 equal balls.

Roll into a large circle, press dough into the pan and bake, following specific pie recipe instructions.

Butter vs Lard vs Shortening
When I started making pies, I did all-butter crusts at first, then a combination of butter and shortening.
When I was really poor and butter cost a fortune, I made a couple all-shortening ones... that was a learning experience.
Eventually, I was given this recipe, and completely converted to lard. I figure it may be helpful to cover the differences between each of them.
All Butter Crust
All-butter crusts were really difficult to work with. Butter chills harder than shortening or lard, and softens WAY too easily.
So you want it warm enough to work with, but still cold enough to give a flaky texture to the finished crust. Warm hands and handling it can take the cold butter from “just right” to “too warm” in NO TIME.
Basically? It’s really fussy.
Also - as I realized when I started playing around with other versions - all butter is TOO buttery. Shortening and lard have more neutral flavours.
Butter and Shortening Crust
Using a combination of unsalted butter and shortening worked a lot better than an all butter pie crust, IMHO.
It was easier to handle at really cold temps, and the shortening tempered the overly buttery flavour of the all-butter version.
It was a bit difficult to get a really flaky crust though - I suspect I was probably over handling it at times.
The shortening is REALLY soft, so it’s easy to get it too well incorporated.
All Shortening Crust
WAY too easy to overwork it, and did not have any flavour at all. Do not recommend!
All Lard Crust
This was the best to work with, hands down. It chills harder than shortening, but not as hard as butter, and makes gorgeous, super flaky crusts.
A couple caveats on this, though:
1. My earlier pie crust experimentation was when I was very young - in my teens - and I wouldn’t doubt that part of my results here also come from experience and better control.
Honestly though, I do think this is easier to work with than butter, especially for people who are new to making pies.
Tenderflake lard is the big brand here, and it’s got a more neutral taste then the regular lard I’d buy in the USA. It works great for all my pies, sweet or savoury.
The stuff I’d get in the US definitely smelled/tasted like a meat product. It was great in my Savoury Alligator Pie and even chicken pot pies and such, but I could definitely taste a difference when I used it for sweet pies.
As a caveat on THAT caveat, though: I’m autistic and have a SUPER sensitive sense of taste. You may not taste what I was tasting.
That said, I’ve been told that higher end lard tastes better down there - I just didn’t tend to shop at grocery stores that carried such things (artisan lard? What?), so I have absolutely no firsthand experience with it.
Trust me, the border guards are used to it, LOL!

Pie Dough Tips
How your pie dough turns out depends on a few factors: water, fat, handling, and chilling. (And there’s a fair amount of crossover between these categories!).
Water
Water can be a tricky element - ideally, you want to use the perfect amount of water off the bat, as adding water later = extra handling.
If you don’t use enough water, though, you’ll have a crumbly dough - and crust - that is really hard to work with.
You know how you knead bread dough to make bread, pretzels, buns, etc? It’s to get that chewy texture - the exact opposite of what you want in a pie.
If you find yourself needing / wanting to adjust the water amount, the earlier on you can do it, the better.
Unless you’re doing something wild with the flour measurement, though - the recipe should work perfectly as-is.
Fat
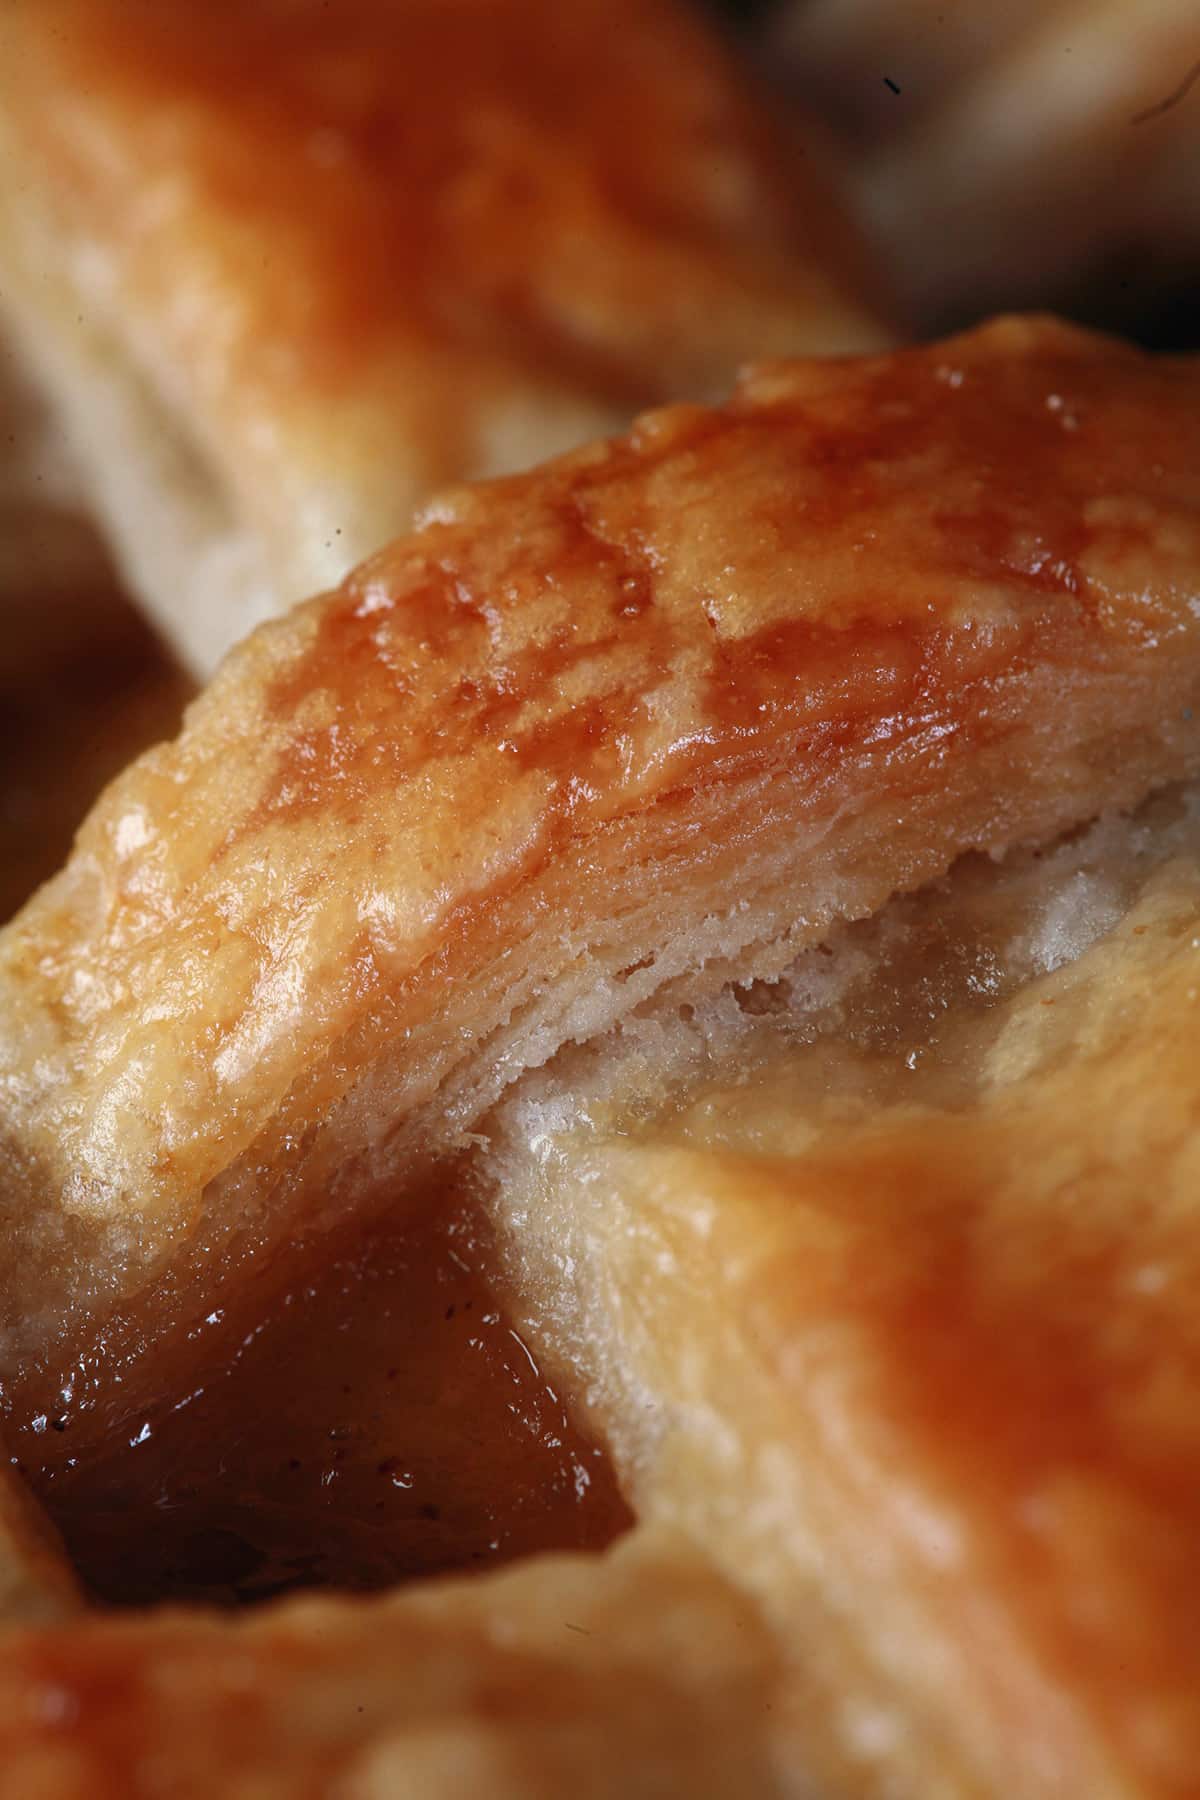
Fat is what causes the flakiness in the crust.
Little bits of fat are coated with the flour mixture. When pies are baked, that fat melts.
The water content in the melted fat (and, to some degree, the surrounding dough) turns to steam and separates layers of the actual dough.
Have you ever seen croissants being made? Same deal.
Anyway, it can take practice - and pattern observation - to get really good at the technique, but basically?
Aim to get the lard worked in ENOUGH - to the gravel / small flakes look - without OVERLY working it in (and obliterating it.).
If the lard isn’t cut down small enough, you’ll need to use additional water - and get a tough crust.
If you cut it down too small, those air pockets will be tiny - or non-existant.
Handling
Much as you don’t want gluten to develop through excess water, you also don’t want it to develop through overworking the dough.
So, handle the dough as little as possible, at every step after adding the water. (The gluten doesn’t really start developing until you add water).
When you add the water, gently mix it with a wooden spoon, rubber spatula, or by hand. Don’t use a stand mixer or food processor for this!
After adding the water, don’t knead the dough, so much as gather it together.
Also, don’t stretch the dough. This can be hard to describe for the rolling part - you want the rolling pin to roll across the dough, not drag it.
When you roll dough out, make sure you’re starting with a clean surface, and dust that work surface with a little flour. This prevents sticking, which in turn prevents stretching.
You don’t want to use too much flour, though - it’ll dry out your dough and lead to overworking it. Use a little bit at a time, and re-dust as needed.
Also? Depending on the type of rolling pin you’re using, you might want to lightly dust THAT with flour as well.
Finally, when you’re putting the rolled dough into the pie plate - or transferring top crust pieces - try to handle it in a way that prevents the dough from stretching out of shape.
Chilling
Chilling is an important issue in pies, as it prevents the fat from melting prematurely, and just incorporating into the flour.
Yes, it’s ALL about those fat pockets!
So, chill your lard ahead of time.
When you rest the dough at room temperature after bringing it together, you’re letting the temperature level out a bit after that initial handling, while ALSO allowing any gluten that’s developed to relax.
If your house is really warm, do that resting step in the fridge.
If you’re using a metal rolling pin, chilling it can help - the metal ones absorb heat from your hands, so best to start out cold.
On that note, have your pie filling made and chilled ahead of time, before you even roll out your crust.
If logistics mean rolling your bottom crust before getting the filling ready, keep the pie pan - and crust - in the fridge as you prepare that filling.
Honestly, you can’t really OVER chill the dough, especially after it’s been rolled. When it doubt, throw it in the fridge for a while.
You want the fat in the crust as cold as possible, when it goes into the oven.

Using Pie Crust
In general, you’ll want to follow the recipe for whatever pie you’re making with the crust.
Some can be vague or leave steps out, though, so here’s what you will need to know to use this pie crust recipe:
Lining the Pie Plate
Before putting your crust in the pie plate, consider preparing the plate.
Most recipes will have you put the pie crust into an ungreased plate, relying on the fat in the crust to “grease” the pie plate as it bakes.
I don’t know about you, but I’ve literally never had any luck with this at all. Some kind of juice will always manage to drip down, caramelize, and GLUE that sucker to the pan.
Doing a quick spritz of pan spray goes a long way to avoiding this, but lately I’ve gotten into an even BETTER option - lining the pan with parchment paper!
To do this, I cut a circle of parchment paper that’s about 12" in diameter.
Press the 12-inch circle of parchment paper into the bottom of the pan, smoothing out any trapped air.
Use clean kitchen scissors to cut slits from the outer edge of the parchment circle, down to the bottom edge of the pan. I’ll do this every 1.5" or so - this takes care of the excess fullness.
Smooth out the strips of parchment to overlap slightly and lay smooth against the side wall of the pie plate. I like to carefully trim excess back to the edge of the pie pan, JUST slightly overhanging it.

Once it’s baked and cooled, you’ll find that even the very first slice comes out cleanly. You can leave the parchment if, or take it out - gently! - if you prefer.
As a food blogger, I generally pull mine out, so it’s just clean pie pan showing in photos. Sometimes, the whole thing pulls out so easily, it feels like that whole “pull the tablecloth out from under the place settings” thing.
Of course, never when I have a camera rolling. AUGH!
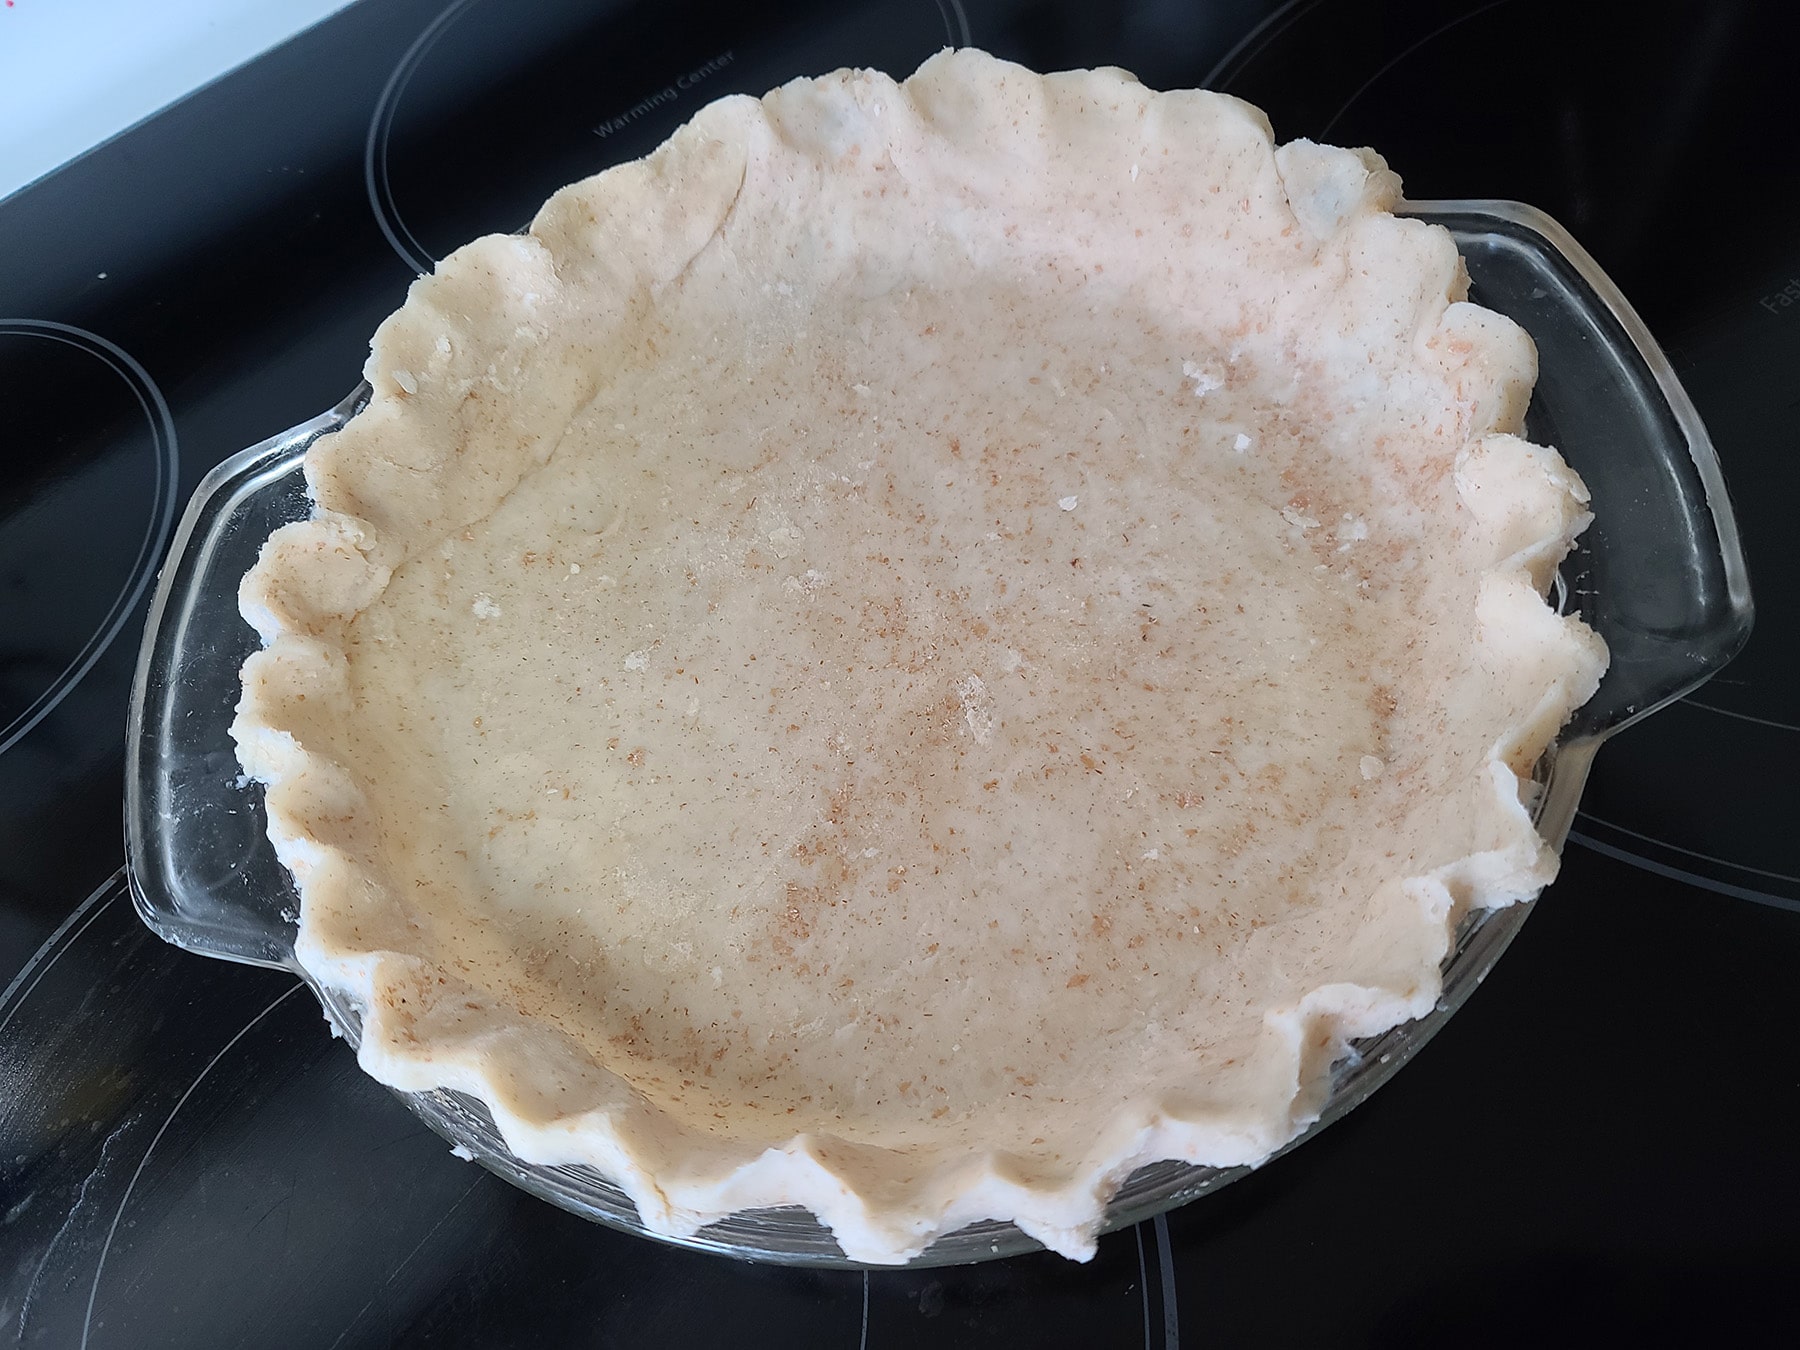
Single Crust Pie
Assuming you’re using a regular pie dish, roll your crust out to ⅛" inch thick (this is why I like using a rolling pin with thickness guides!).
For a 9" pie pan, you’ll want the dough rolled out to a diameter of at least 12" all around.
Carefully transfer the rolled dough to your pie plate, centering it as best you can - again, try to avoid stretching the dough.
Gently fit the dough into the bottom edge of the pan - without stretching - and smooth everything out.
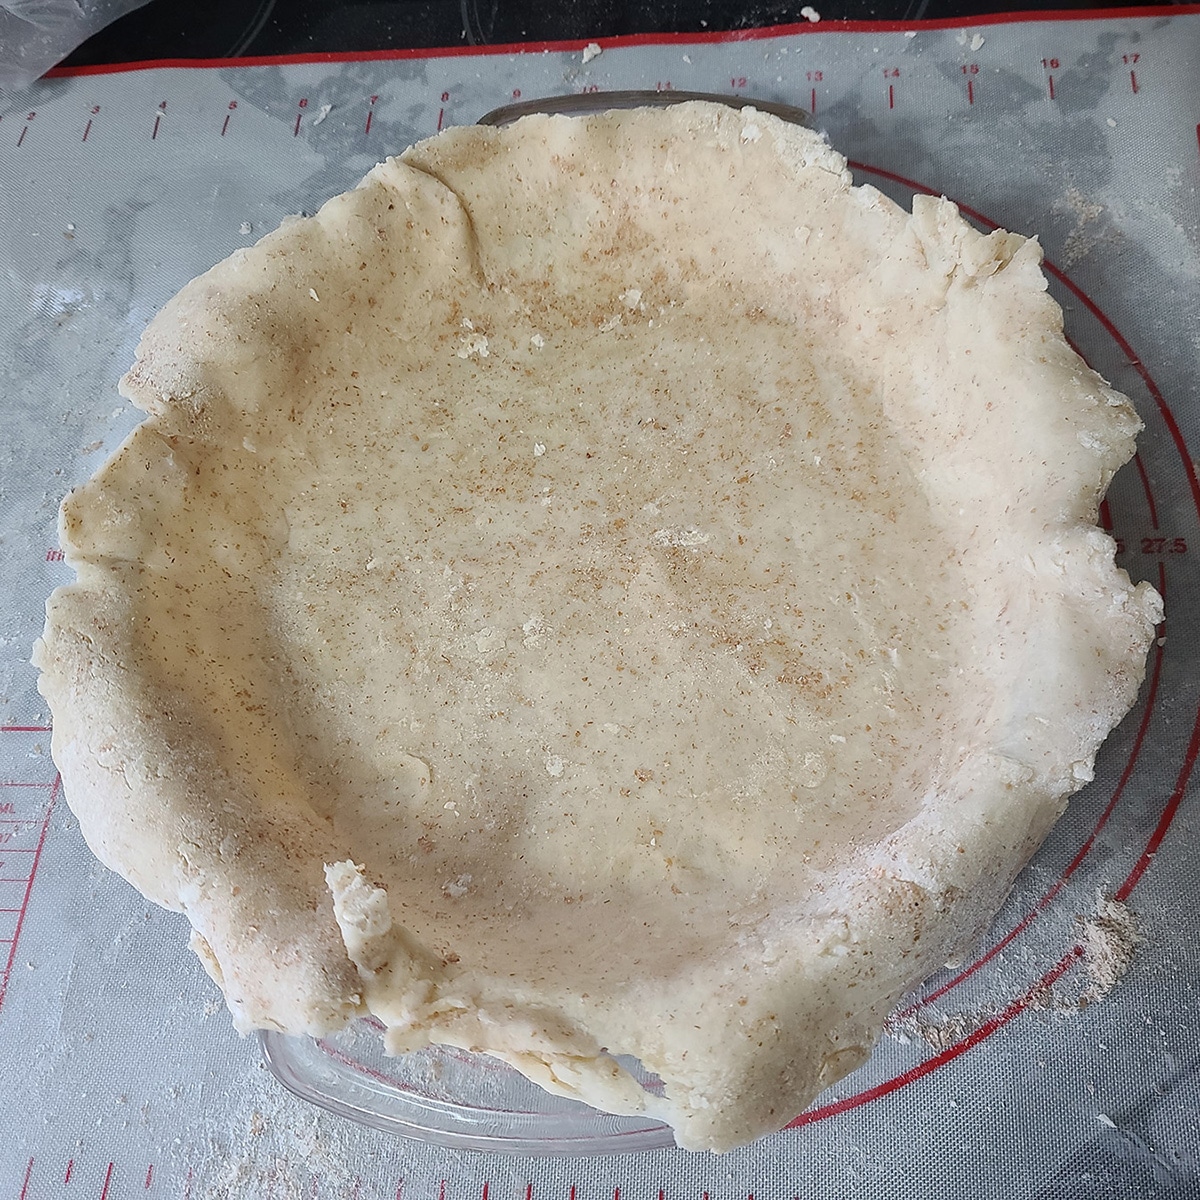
Fold the very edge of the crush under itself, the whole way around. Aim to basically fold the actual overhang in half.

Flute edges (more on that in a minute), then chill if needed.
Fill with your pie filling, and bake as instructed in the recipe you’re using.
Double Crust Pie
There are two main ways to make a double crust pie: A solid top crust, and a constructed top crust.
Whichever way you’re going with, follow the “Single Crust Pie” instructions for the bottom crust, up to the point of trimming the excess.
Trim it to about ½" (Solid top crust) or ¾" for the constructed top crust.
After your oven is preheated, transfer your chilled pie filling to the lined pie plate, set it in the fridge while you work on the top crust.
Roll out your second crust to ⅛ of an inch.
Solid Top Crust
Take your filled pie out of the fridge.
Carefully center your second crust over the prepared pie filling.
Trim the top crust to about a ¾" overhang. Fold the edge of the upper crust under - encasing the edge of the bottom crust.
Flute the crust as desired, brush the top of the pie with egg wash (info below).
Use the tip of a sharp knife to cut a few vents into the pie crust, to let the steam escape.
Note: order of operations is important here. If you do the egg wash AFTER cutting the vents, the egg can seal them shut.
Constructed Top Crust
This category of pie includes all manner of lattice top pies, layered shapes, etc.
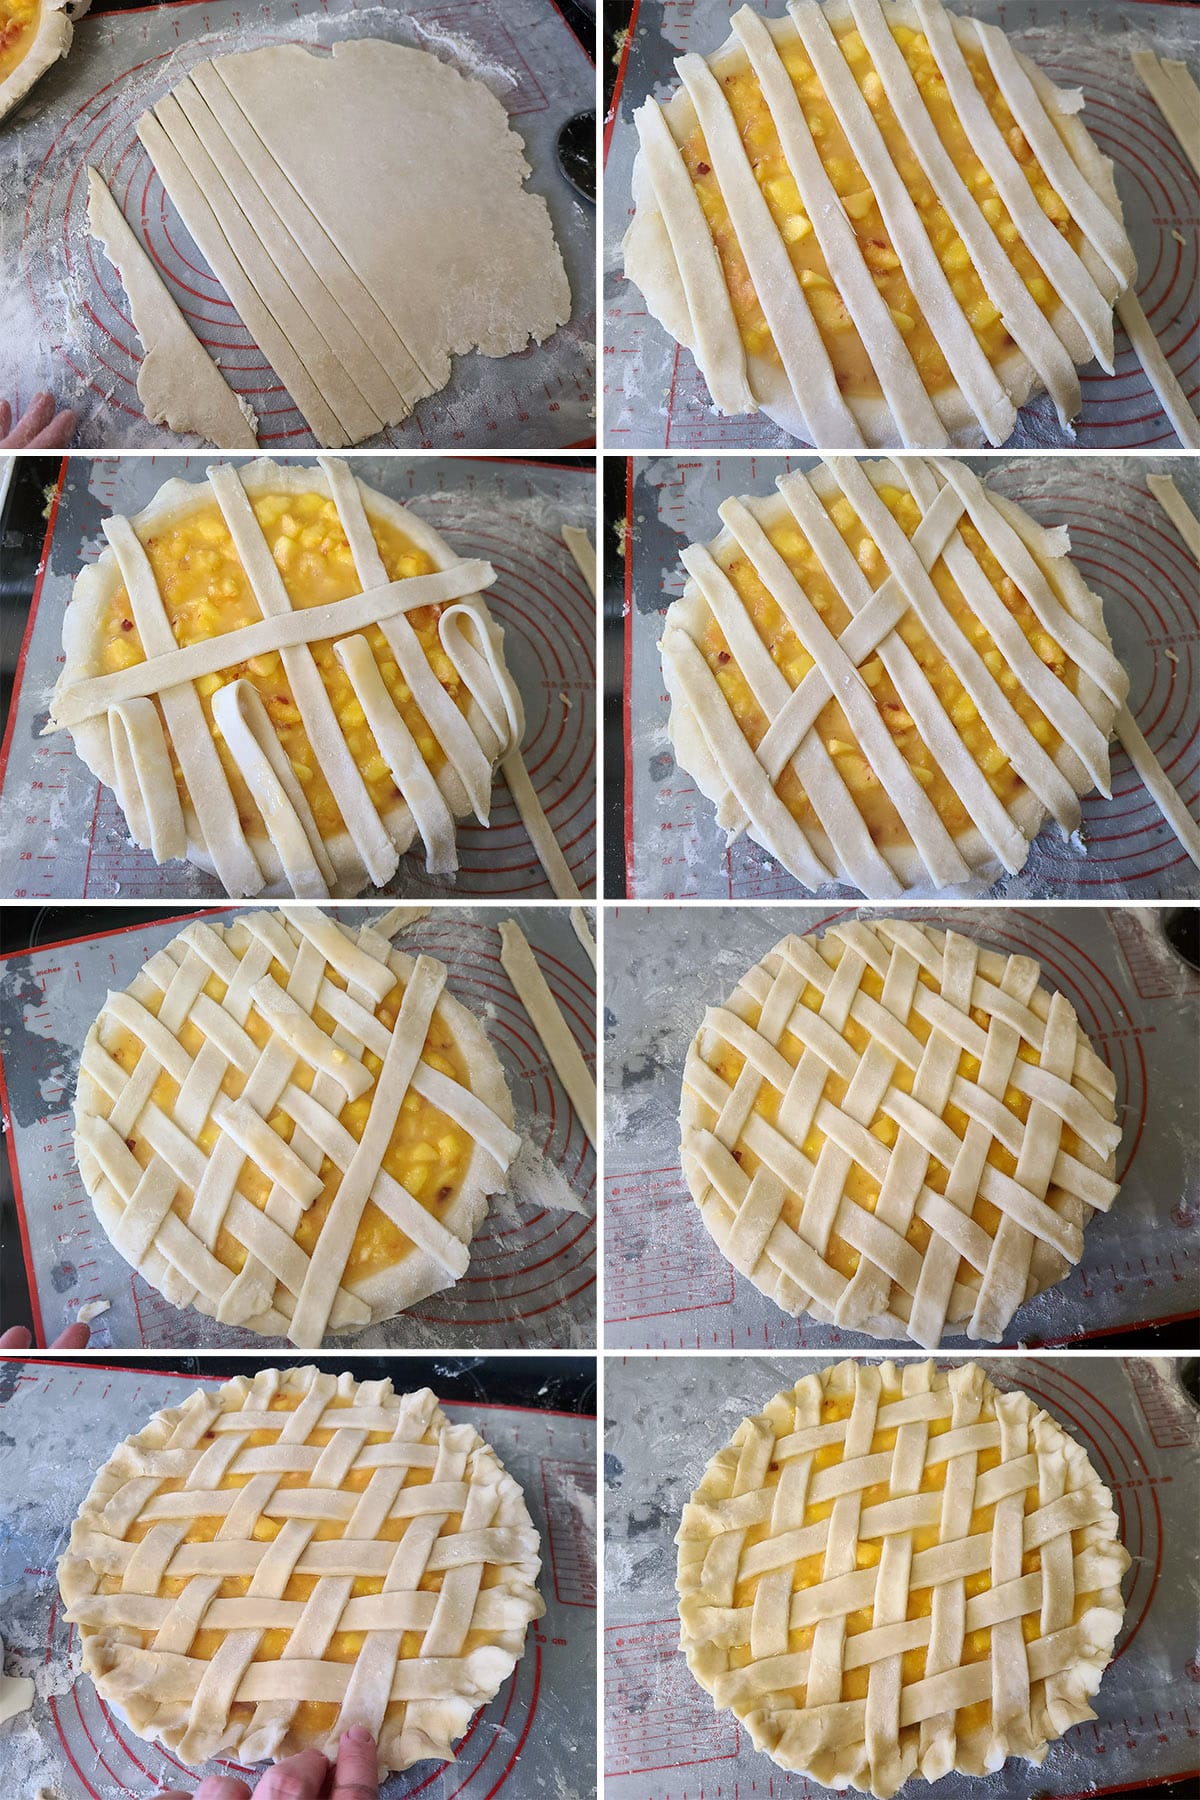
Cut the rolled out second crust as you need for your intended design - strips for lattice, whatever shapes you’re doing, etc.
Take your filled pie out of the fridge.
Lay out your upper crust pieces however you need them.
Trim the top crust pieces to about a ¾" overhang. Fold the edge of the upper crust pieces under - encasing the edge of the bottom crust.
Flute the crust as desired, brush the top of the pie with egg wash (info below).
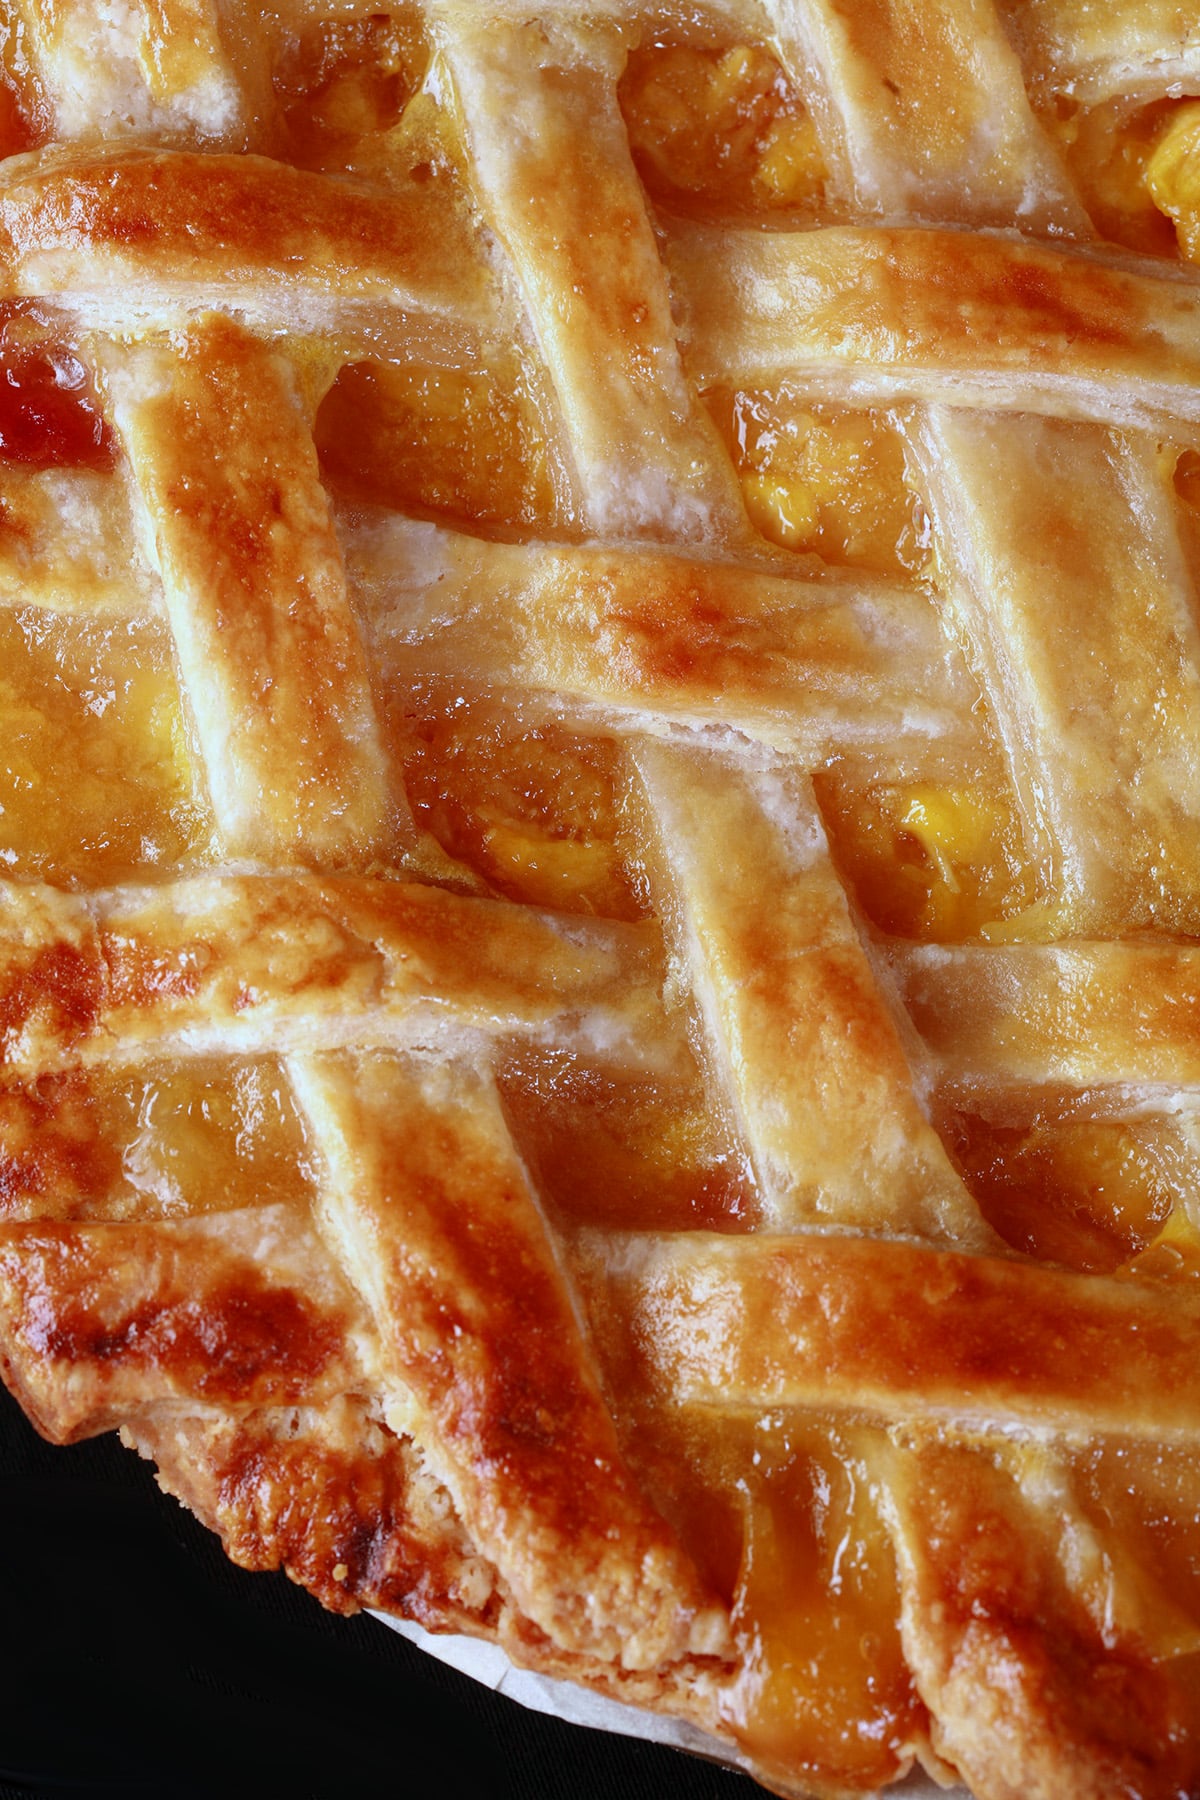
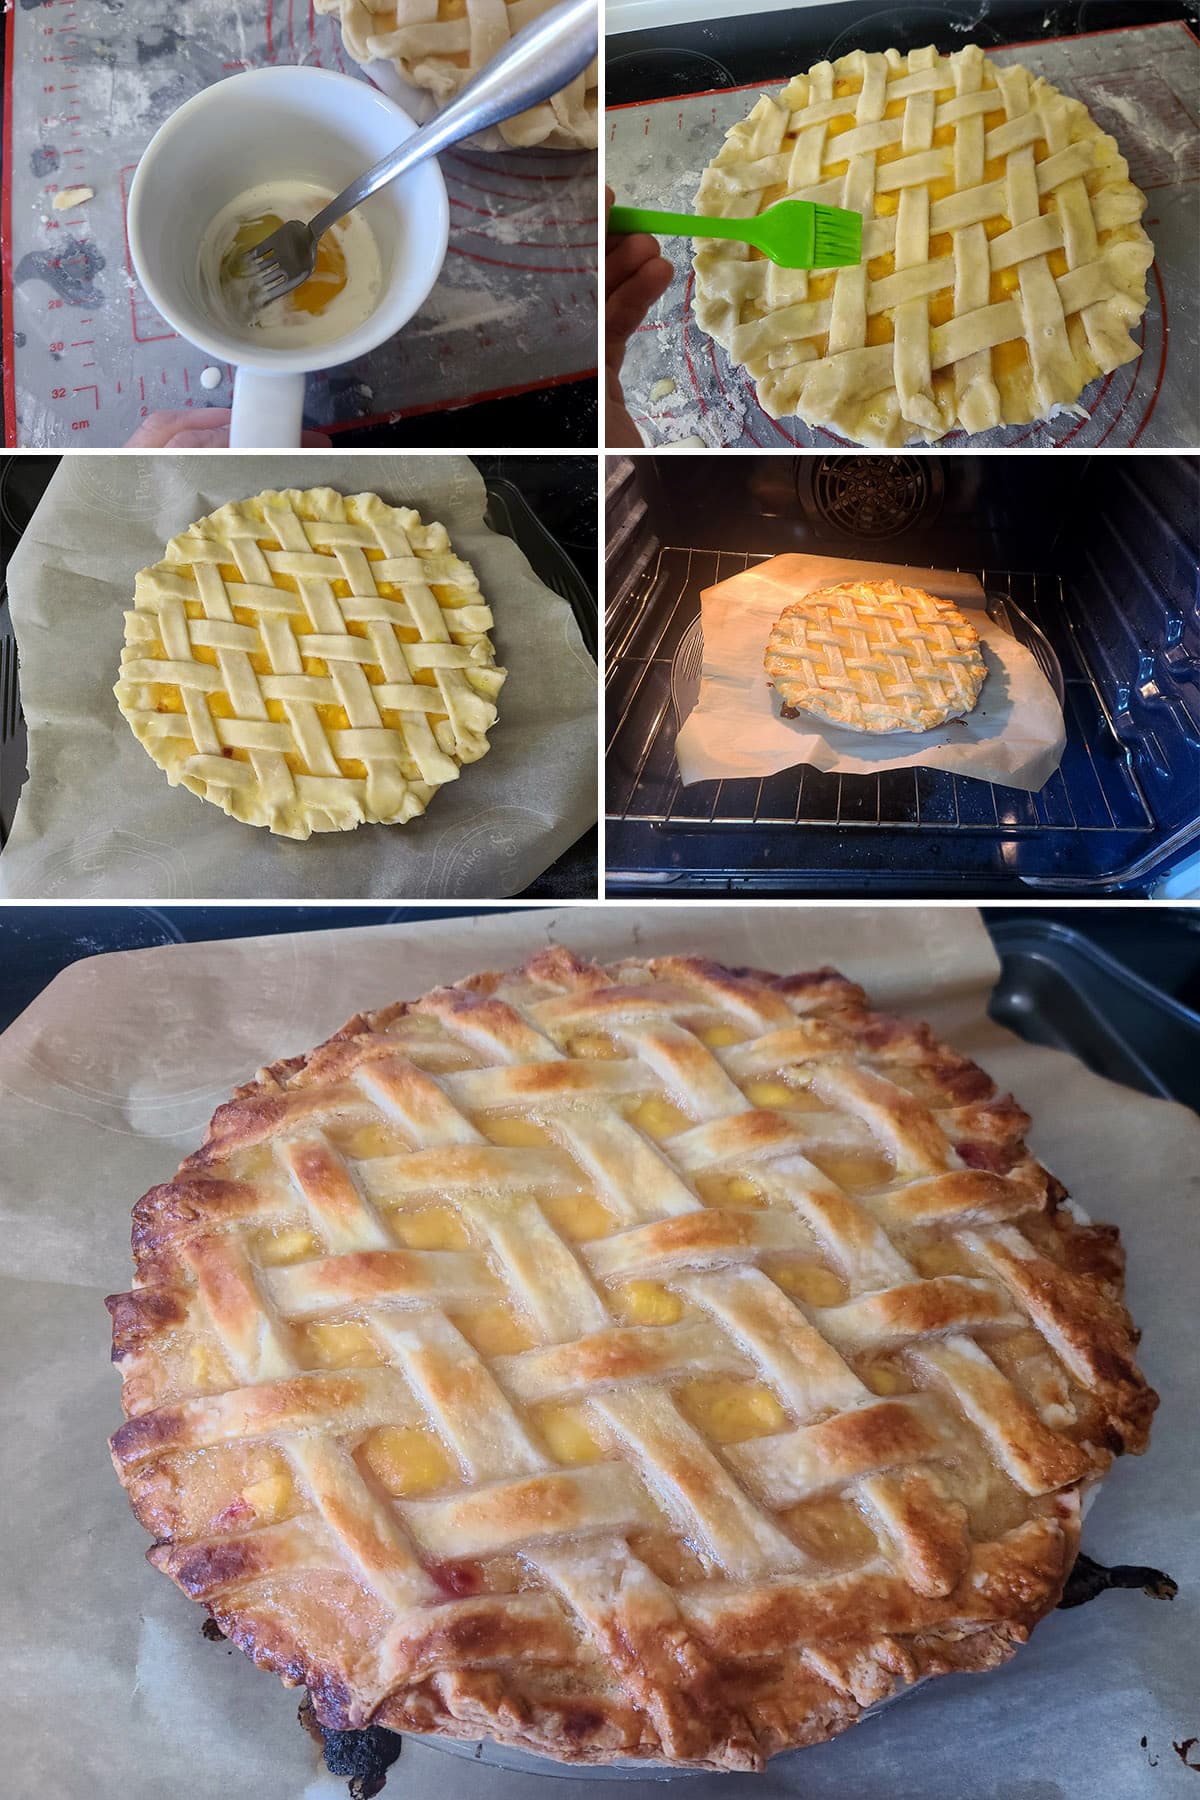
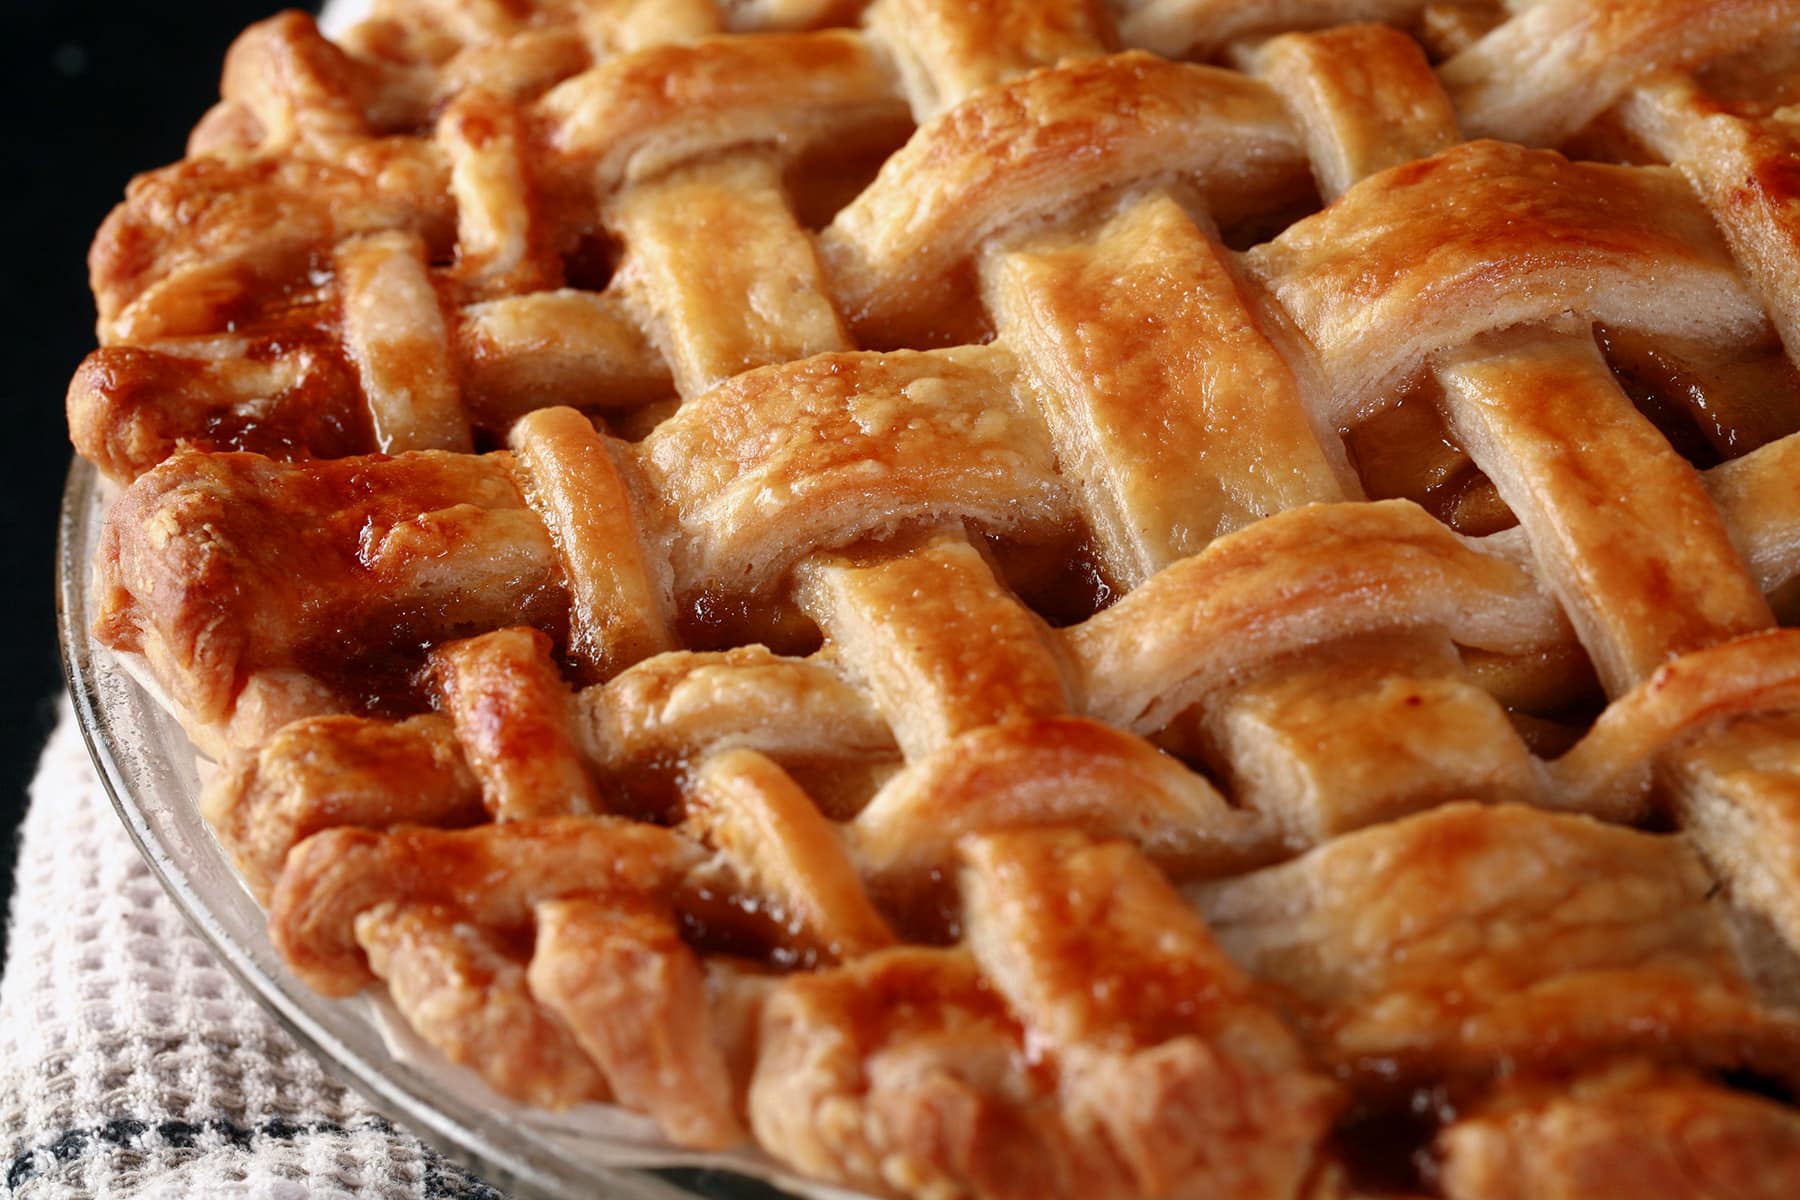
Lattice Top Pies
As a quick guide, here’s how I do lattice top pies:
Lay out one set of strips across the pie filling. Fold every second strip back, at the halfway point.
Place a new strip of pie dough across the pie, basically centered - close to the fold point.
Set each of the folded back strips back to their starting points, taking care not to stretch them.
Fold back every second strip of crust, but this time do the ones you didn’t fold back the first time.
Repeat these steps - alternating which strips are folded back - until you reach the far end of the pie.
Then, turn the pie around and repeat the steps from the beginning, to finish out the lattice on the other half of the pie:
Egg Wash
Whether you’re doing a solid top crust or a lattice crust, I recommend doing an egg wash.
It just gives it a really nice finish, and adds a bit of flavour and colour.
Whisk together a large egg and 1 tablespoon of heavy cream / whipping cream in a small bowl or mug.
Use a pastry brush to evenly brush the egg wash over all exposed crust.
Transfer to the oven and bake as directed.
Note: After doing the egg wash, you can sprinkle some coarse sugar over the pie, or a sweet, crunchy, and pretty topping.
I like to use Pearl Sugar when doing a sugar crust like this.
Fluting the Pie Crust
Fluting is what you do to seal the two crusts together (when applicable), and just deal with the excess bulk of dough in a pretty way.
Basically, I lay the pointer and middle finger of my dominant hand on the edge of the pie, about a finger width apart - maybe slightly less.
I guess I’d say that the underside of my outermost knuckle is lined up with the edge of the pie crust.
Then, I bring my thumb up between the two fingers, from underneath the edge of the pie crust. This crimps the edge of the pie crust into sort of a wavy “W” type shape, in between the 3 fingers.

Everyone has their own technique, so you may want to play around with.
Prebaked Crust
Some recipes call for a prebaked crust.
This can be for a few reasons - usually if you’re dealing with a pie filling that requires no baking. For those situations, you’ll need to blind bake this crust.
Note: In other cases - like when dealing with a custard pie, or an especially juicy filling - the recipe will have you pre-bake the crust as part of their instructions. When that’s the case, it can be because the filling requires less heat/time to cook properly than the crust will.
In those cases, you can follow the instructions on how to do a single crust pie - above - but you should follow the recipe’s directions for baking it, as it could be dependant on the needs of the filling.
The idea is that the “something” takes the place of the filling - temporarily - to help the crust bake properly.
Without something doing that, your pie crust will behave weird - lots of obnoxious bubbles, the sides of the crust slipping down / shrinking, etc.
You can buy actual Pie Weights for this, or just use dried beans. Either way, you’ll line your constructed single crust pie with parchment paper or aluminum foil, and fill it up with whichever you’re using.
Just be sure to fill it right up to the edge of the pie pan, or you can get some shrinkage.
Roll, set, trim, and flute your pie as discussed earlier, then stick it in the freezer for 30 minutes.
Once it’s thoroughly chilled, preheat your oven to 375 F.
When the oven is ready, take the pie plate and crust out of the freezer, and line it with parchment or foil.
Fill the pie with beans or pie weights, right up to the edge of the pie plan.
See the pie recipe you’re using - generally speaking - you’re going to want the pie to cool to room temperature before filling it.
Otherwise, you can trap the heat - as steam - under the filling, and end up with a soggy crust.
Generally speaking, I like to - carefully - remove the lining and weights soon after the pie crust is removed from the oven.
While it’s easier - and a bit safer - to handle when it’s cool, the beans / weights can continue cooking the crust, as they can retain heat.
Pie Baking Tips
Ok, so we’ve got the pie all ready to go - I’ve got a few tips for the actual baking process.
Generally speaking, you want the bottom of the crust to cook faster than the top. Otherwise, you can end up with a burning top and a soggy bottom!
So, I like to bake pies on the bottom rack of my oven.
Even still, you might find that your upper crust - especially the edge - is browning faster than you want it to.
The solution? A pie shield!
I’m frugal AND hate having too many single-purpose kitchen gadgets, so I just wrap a long strip of aluminum foil around the edge, when needed.
I suppose a large circle of aluminum foil with a big hole cut out in the center would also work, now that I think about it!

Freezing Pie Crust
This recipe makes 6 single crusts - so enough for anywhere between 3-6 pies.
... I don’t know about you, but I generally don’t bake 3 pies in a sitting, never mind 6 of them!
So, it’s good that this dough freezes well.
Transfer those wrapped dough balls to a freezer bag, and remove most/all of the air from the bag.
Freeze for up to 3 months, taking out a crust or two as needed.
To use, let wrapped dough thaw in the fridge for a day, then use as directed above.
Looking for More Pie Recipes?
Pies, tarts... good stuff put into a flaky crust. I've got you!
Note: All recipes designated as gluten-free can alternately be made "regular" - just swap in your favourite pie crust recipe or store bought crust!
Caramel Apple Pie
Creamy Blueberry Amaretto Pie
Earl Grey Pie
Easter No-Bake Chocolate Pie
Gluten Free Apple Pie
Gluten-Free Maple Pumpkin Pie
Gluten Free Pie Crust
Maple Butter Tarts
Partridgeberry Pie
Reese's Peanut Butter Pie
Savoury Alligator Pie
Southern Comfort Peach Pie
Southern Comfort Pecan Pie
Strawberry Grand Marnier Chiffon Pie
Share the Love!
Before you chow down, be sure to take some pics of your handiwork! If you post it to Bluesky, be sure to tag us - @CelebrationGen. We're also on Pinterest, so you can save all your favourite recipes to a board!
Also, be sure to subscribe to my free monthly email newsletter, so you never miss out on any of my nonsense. Well, the published nonsense, anyway!
Finally, if you love this recipe, please consider leaving a star rating and/or a comment below, and maybe even sharing this post on social media!

Great-Uncle Tom's Perfect Pie Crust - Easy and Flaky!
Ingredients
- 1 cup Ice water
- 1 Large egg
- 1 tablespoon Vinegar
- 5 ½ cups Flour
- 2 tablespoon Brown sugar
- 1 pinch Baking powder
- 1 pinch Salt
- 1 lb Lard*
Instructions
- Whisk water, egg, and vinegar together, set aside. In a larger bowl, mix together flour, brown sugar, baking powder, and salt until well combined.
- Chop lard into smaller pieces, add to the bowl of dry ingredients.
- Using a fork, pastry blender, or your fingers, cut the lard into the dry ingredients, until it resembles a loose gravel.
- Add wet ingredients to the bowl of dry ingredients, mixing with a fork until just combined.Don’t over handle it. In Tom’s words, “Mix it with kindness"!
- Gather dough into a loose ball, divide into 6 equal balls. Wrap each with plastic wrap, and let rest for 30 minutes before using.
- Roll and bake, following specific pie recipe instructions.
Video
Notes
Nutrition
-->


Leave a Reply