

This tutorial shows you how to make silk floral pomanders for both indoor and outdoor weddings and events! Beautiful, endlessly customizable!
Originally published June 22, 2012. Updated on 8/13/2021

2.5 years ago, I posted my first wedding floral design tutorial, planning to make it a regular thing.
With floral design being one of my earlier ADD career incarnations, I've got about 15 years experience (off and on for a decade of that) - a lot of floral knowledge! - kicking around in the back of my head, ready to share.
Procrastination took over, though... so here's my second floral tutorial. Better late than never, right?

June is for Weddings... and PRIDE!
For the past few years, June really makes me think of weddings. Not because June is the stereotypical "Wedding Month" (August was always FAR busier, for me!), but because it's Pride month.
While weddings happen all year, and can / do happen every day of the year... the sea of rainbow really had a way of making me stop to think about weddings, marriage, and happiness.
When you've been in the wedding industry for 15 years, it's easy to lose sight of some things.
For instance, it's easy to take weddings - and marriage - for granted, when you're one of the many for whom it's available.
I've never had to consider the idea that I wouldn't legally be able to marry my husband, that there's any chance of being denied any of the legal benefits to being married, etc.
Hell, even before that... we didn't need to worry that our falling in love, dating, or getting engaged could result in any sort of fallout with family, or provoke hatred and violence from strangers.
No one sees our marriage as a "threat" to their own, no one campaigned against our rights to marry, etc. We didn't have to fight for it.

Volunteering for Pride
As a Canadian immigrant living in the USA, I still haven't wrapped my head around why gay marriage is even an issue.
If anyone's marriage is threatened by someone else's ability to marry - regardless of anyone's plumbing - perhaps it's *their* marriage that needs to be examined.
You know, NOT the marriage of the happy couple who wants nothing more than the right to be together. UGH. I've ranted about it before, so I'll cut the tangent short, here.
As you may know, I was a sponsor of the Twin Cities Pride Festival for a few years, providing all of the floral design for their commitment ceremonies area.
The year I moved to MN, we went to the Pride Festival, and were shocked to see that the ceremonies area consisted of a single, unadorned garden trellis - no flowers to speak of!

Pride Ceremony Site Floral Designs
I signed up for the following year, and created many floral arrangements for the site.
To this day, I still receive compliments about the designs - especially the pomanders.
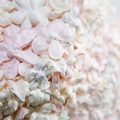
Yes, the silk flowers were very cheap and not the most realistic... but the color and visual impact that they brought to the site completely transformed the entire look and feel of the ceremonies site!
(Don't judge! We needed durability, first and foremost, as these flowers would be outside - through various weather conditions- for several days. Then they would be packed away for a year, and brought out to decorate the following year.. lather, rinse, repeat. Nicer flowers would NOT hold up!)
Anyway.

How to Make Silk Flower Pomanders
In honor of Pride weekend, I'd like to show you how to make them!
Pomanders are a great way to decorate wedding ceremonies and receptions: Put them in trees, suspend them from garden hooks, or hang them off the corner of chairs or church pews.
As a DIY thing, they're a great way to save money on decor, and can be made WAY ahead of time - so they're great for pre-wedding time management.
You Will Need
Materials
Styrofoam balls - I used 3", you can use larger if needed.
Ribbon (Preferably satin type, ½" - 1 ½" wide)
Silk flowers - MANY*
Silk greenery or accent flowers (such as Baby's Breath), if desired
Pins (I like beading pins. Perfect length + bit larger head)
Decorative accents, optional**
* Flowers: I like to buy stems with many small flowers attached - ideally the kinds where the flower heads are easily pulled off.
It'll require a LOT - the small pomander pictured took about 50 smallish flower heads! (1.5" - 2" in diameter, when pressed flat)
** Decorative accents: Depending on the look you're going through, there are SO many options for what you can do to really customize these.
Metallic airbrush accents, spray glitter, stick-on rhinestones, sprays of wired beads, etc. I've seen steampunk bouquets with gears glued on, and I've seen pieces of Lego successfully use in a wedding bouquet.
Have fun with it!
Alternatively, you can use larger flowers (such as the silk roses pictured above). Cut the stems to 1.5" - 2" long instead of pulling the flower heads off the stems.
Equipment
Wire Cutters
Chopstick or BBQ skewer
Scissors
Making Your Silk Flower Pomander
Prepare the Base
Using a chopstick (preferred) or metal grilling skewer, puncture a hole right through the middle of a styrofoam ball.
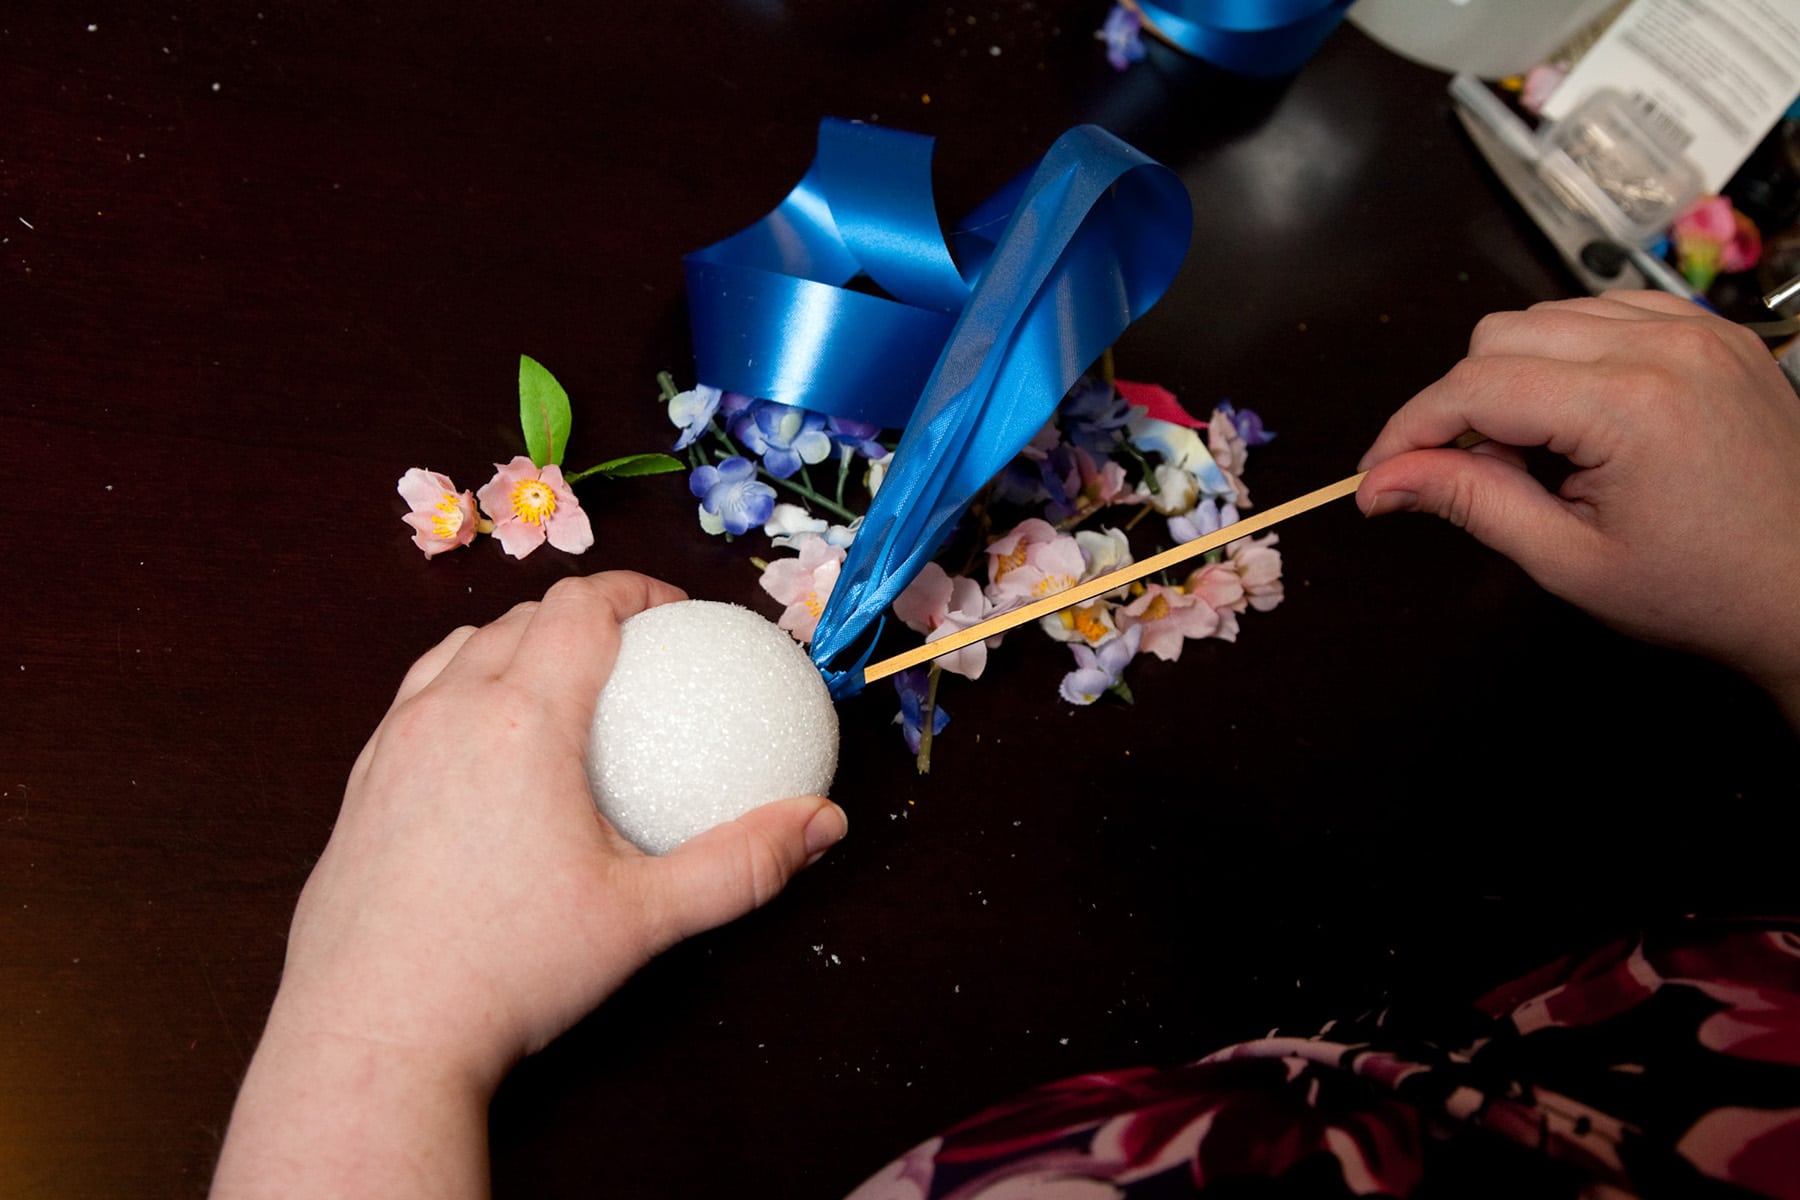
Cut a length of ribbon.
You'll want it big enough not only for the loop, but for the ribbon through/under the styrofoam ball as well. As an example, if I want a 12" drop (IE: the ball sits 12" below whatever it's being hung from), I'd allow 24" for the loop, 6" for the two ends to pass through the 3" ball, and then another 6" or so for knotting, etc... meaning a 36" length.
Fold the ribbon in half, "good" side out.
If using a chopstick, fold the two edges of ribbon over the end of the chopstick by 2", and push through the styrofoam ball, before knotting them together on the other side.

If using a (sharper, pointier) skewer, knot the two ends of the ribbon together (small, tight knot). Use the skewer to GENTLY push the knot through the styrofoam ball.
Carefully pull the knot out of the other side and knot another time or two - you'll want the knot to hold the ball on securely, and pushing the knot through - rather than un-knotted ribbon - has a tendency to leave a fairly wide hole.
Start Adding Flowers!
Start affixing flowers to the styrofoam ball. I like to push the ~¼" rubber/plastic nub on the back of the flower into the styrofoam, then secure with a pin.
I push the pin through the flower somewhere near(ish) to the center of the flower, but not through the hole in the very center of it.
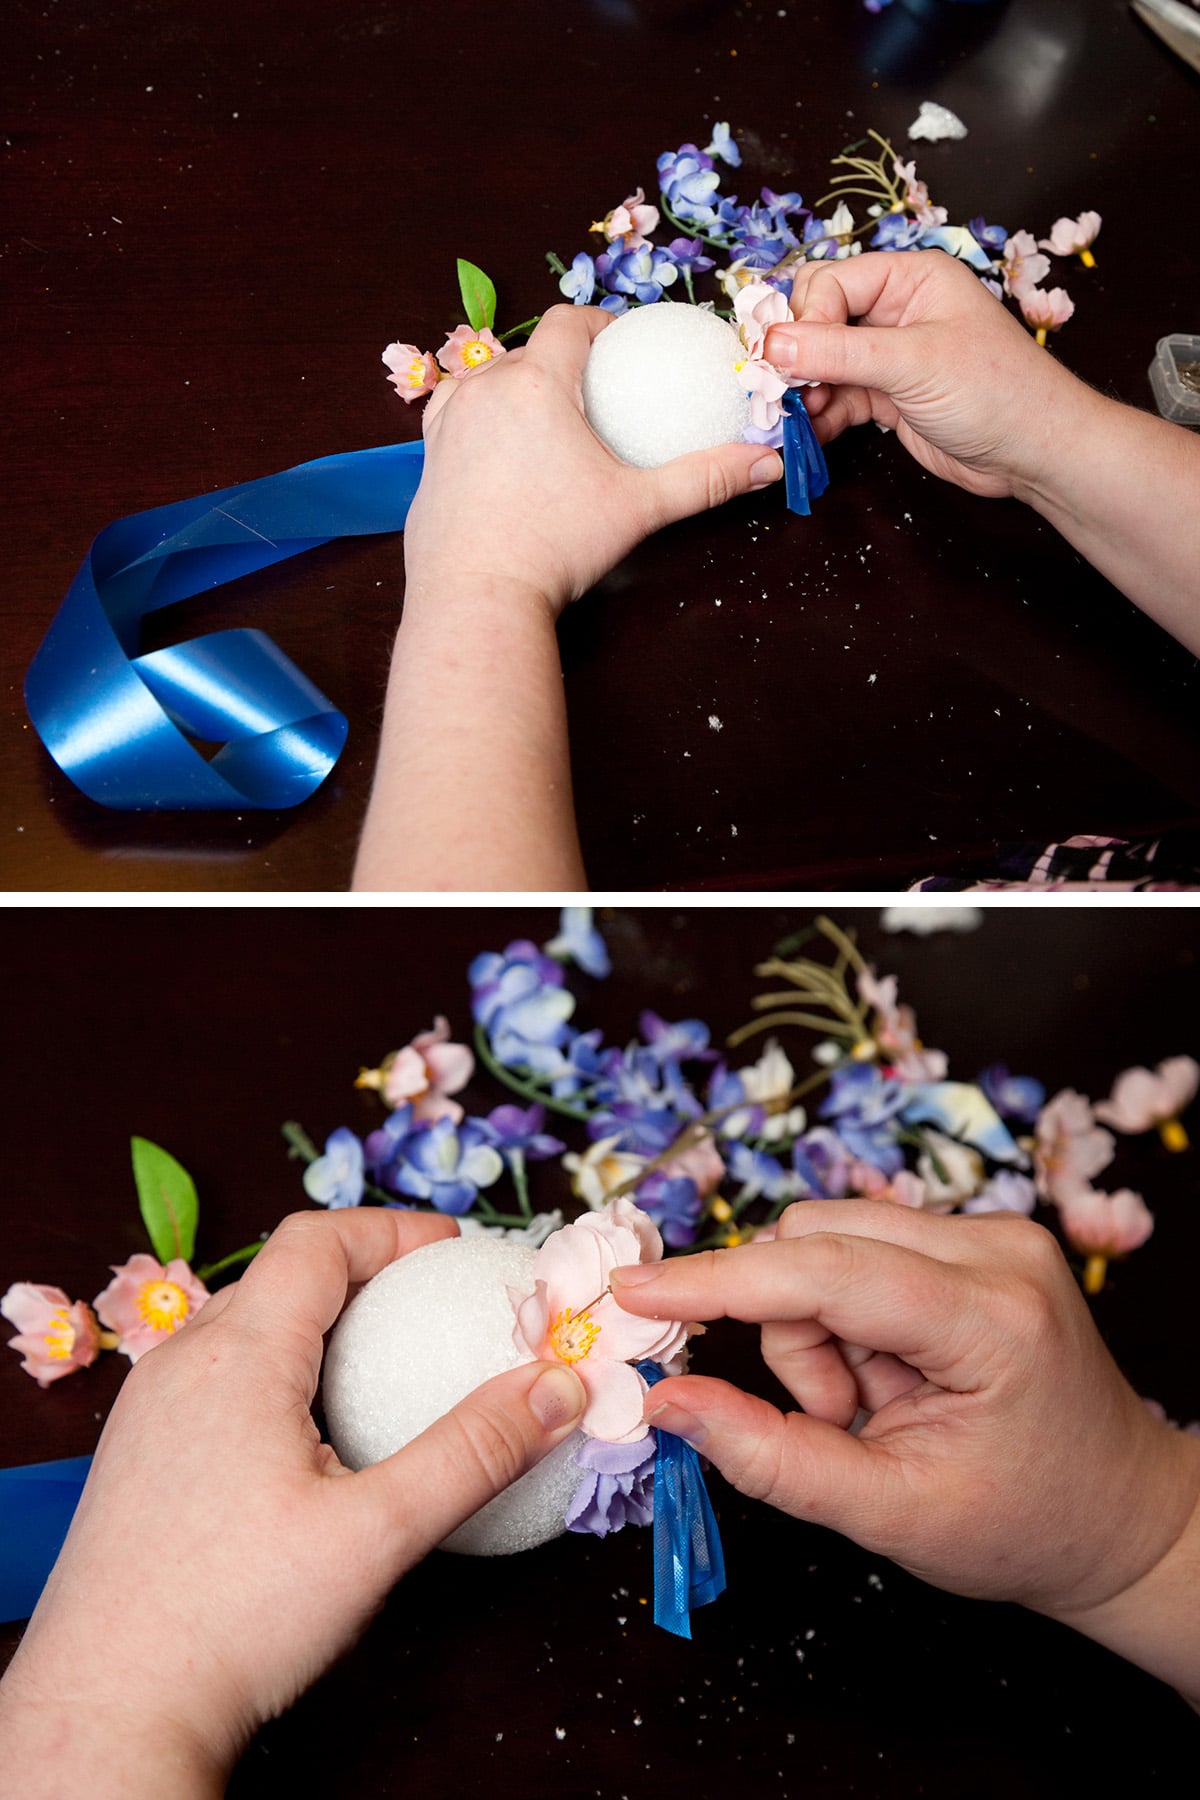
If you're using larger flowers with the small pieces of stem attached, just push the stems into the styrofoam.
If your flower type has several layers of petals, try to push it through a spot where most of the layers overlap - it'll be more secure that way.
On this type of flower, I made sure to catch the pin through part of the plastic center, so that it'll remain on the ball. If I had pinned it just through the petals, there's a good chance that the center would eventually fall out.
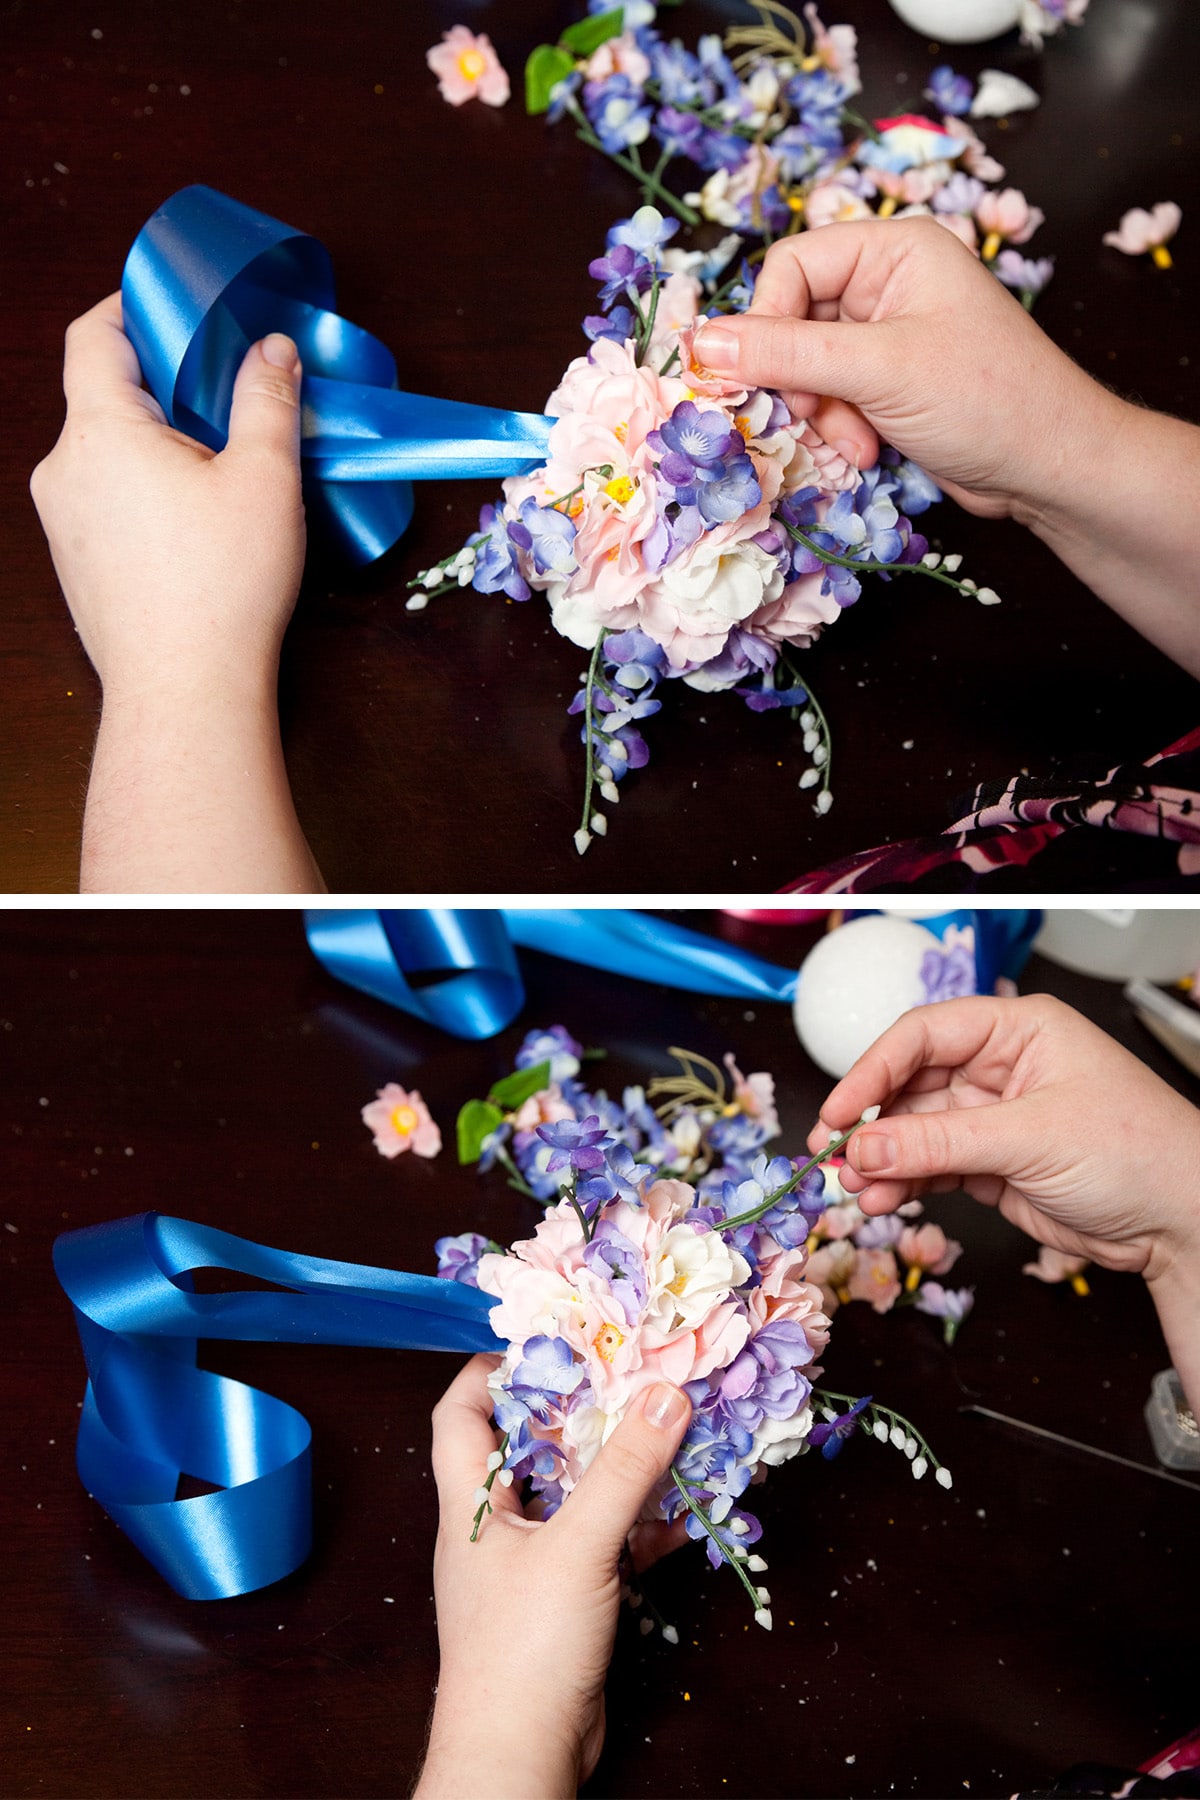
Continue attaching flowers over the entire surface of the ball.
Be sure to lift petals of an already-affixed flower to be able to place the next flower fairly close to it - you don't want any styrofoam showing between the individual flowers.
Accessorize it!
Once your ball is completely covered with flowers, attach your decorative accents, if using.
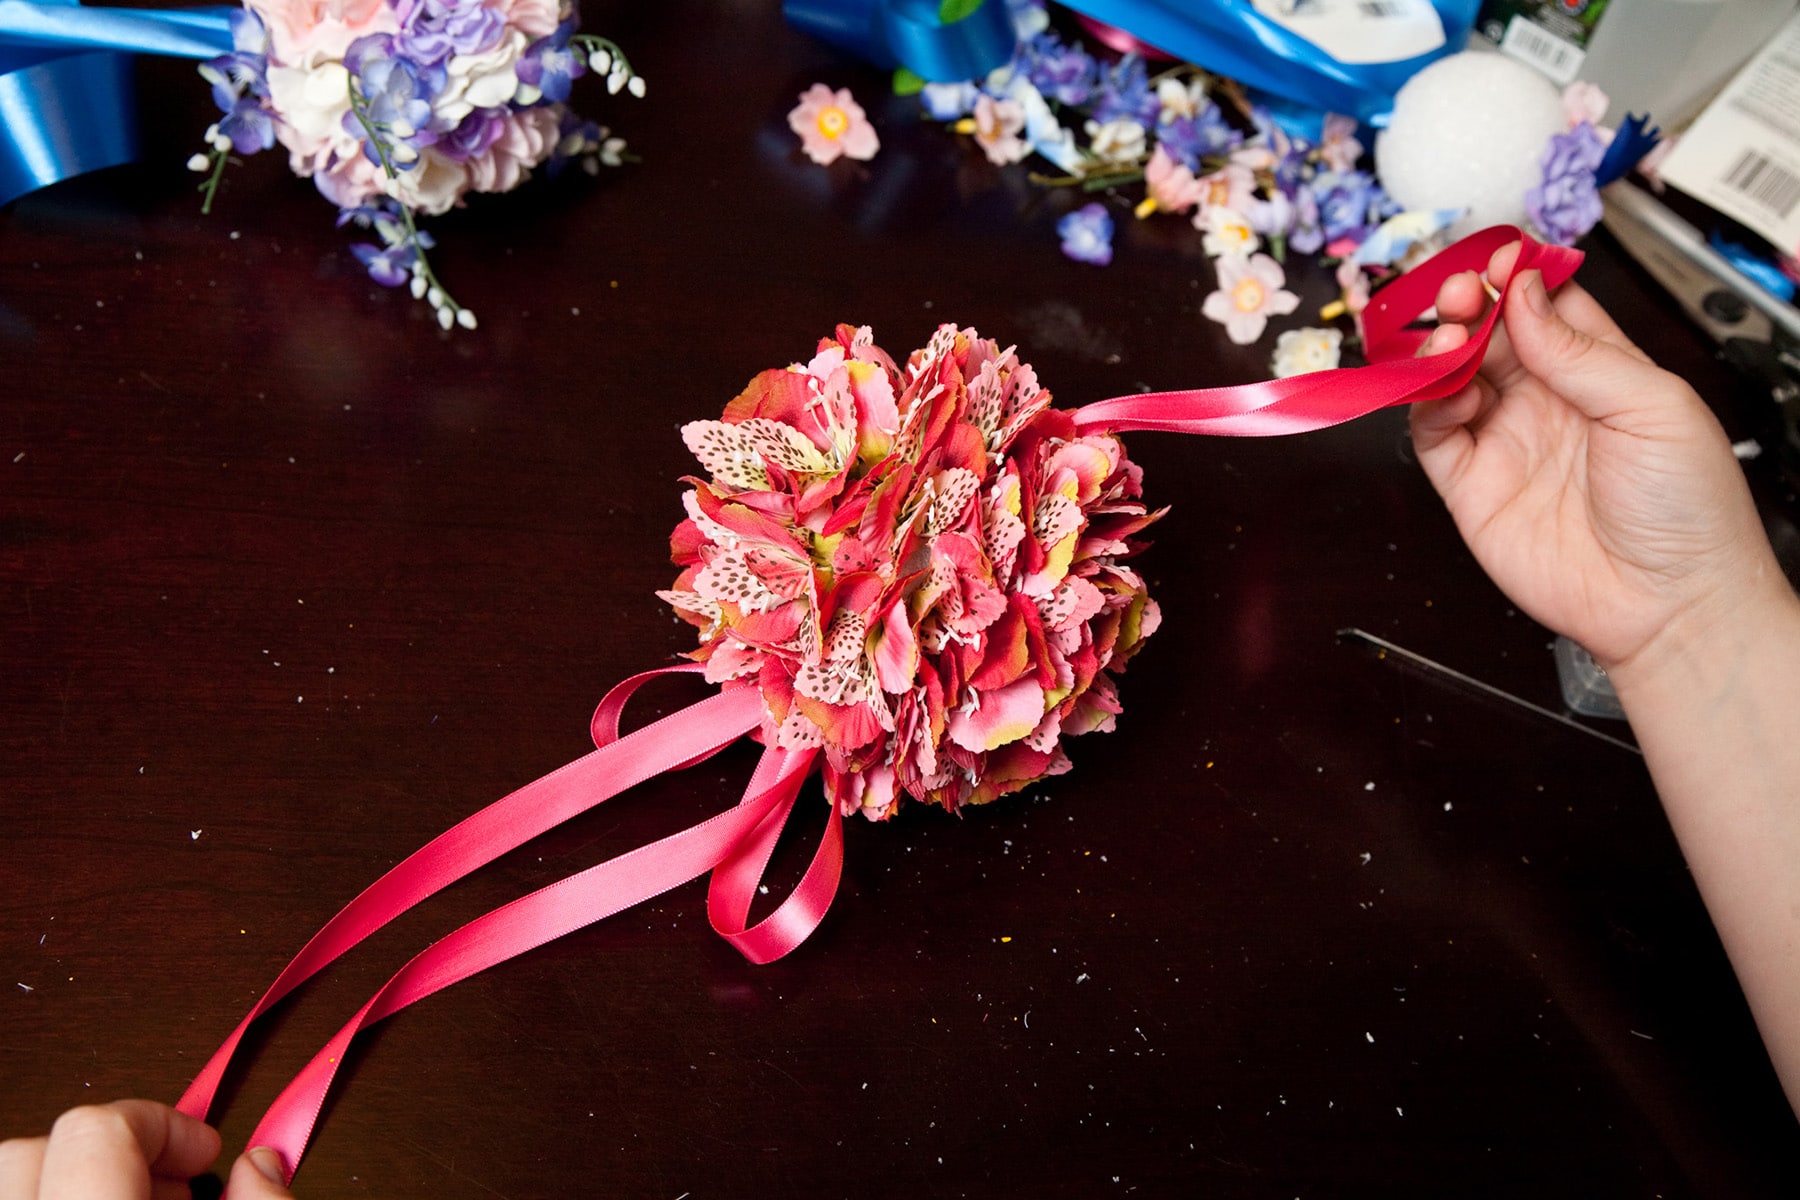
If you would like to attach a decorative bow, tie one in a length of ribbon, then push a pin through it.

Pin the bow to either the very bottom of the pomander (hold it up by the loop to see where the very bottom actually is!), or to the top, near the loop.
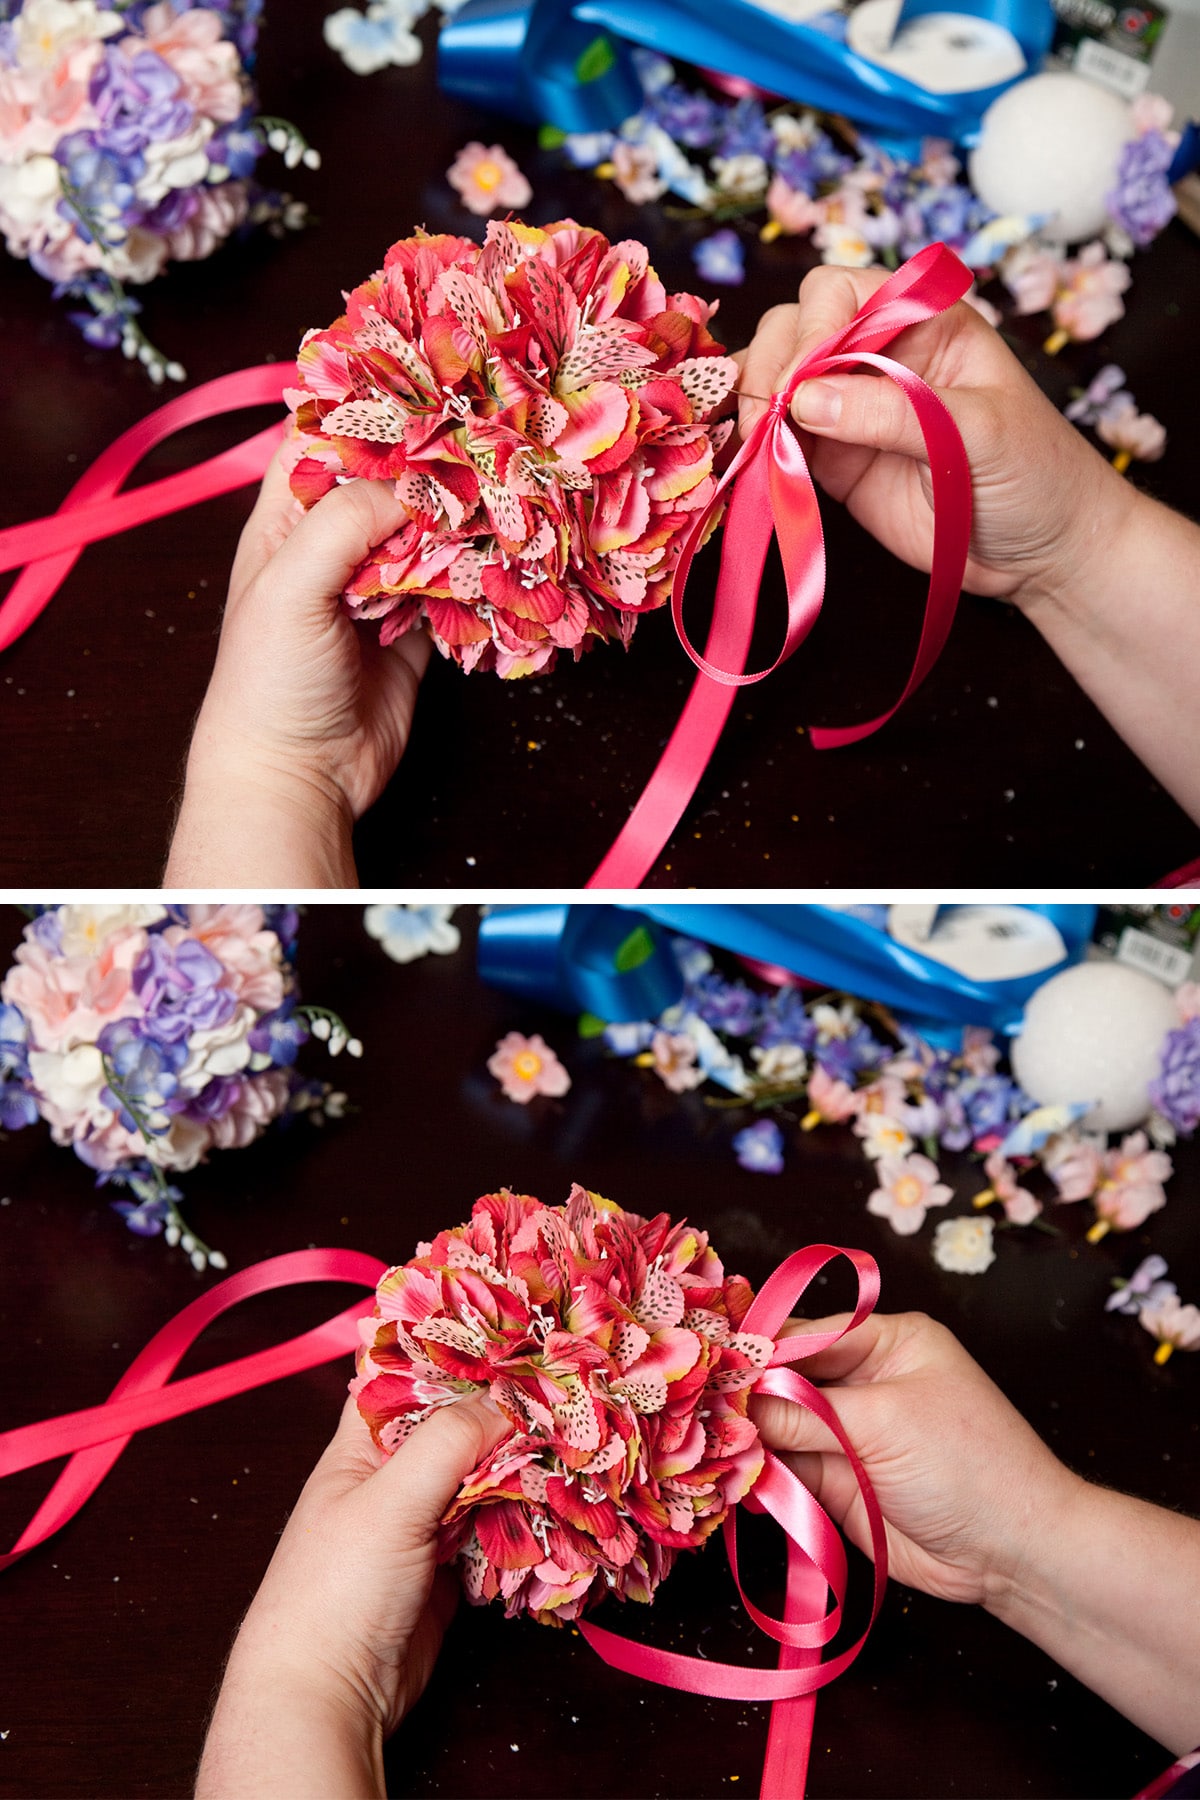
Your pomander is complete, and ready to bring some color and visual interest to your celebration! Now... make a bunch more.
To Make the Double Pomanders
These are fun for hanging over tree branches, or draping over chairs.
To make:
feed one end of a ribbon through the ball, rather than two ends.
Knot and proceed as described.
Once you have two pomanders ready, tie the ribbon length from each together in a pretty bow.

Share the Love!
Before you chow down, be sure to take some pics of your handiwork! If you post it to Bluesky, be sure to tag us - @CelebrationGen. We're also on Pinterest, so you can save all your favourite recipes to a board!
Also, be sure to subscribe to my free monthly email newsletter, so you never miss out on any of my nonsense.
Well, the published nonsense, anyway!


How to Make Silk Flower Pomanders
Equipment
- Wire Cutters
- Chopstick or BBQ skewer
- Scissors
Ingredients
- Styrofoam balls - I used 3" you can use larger if needed.
- Ribbon Preferably satin type, ½" - 1 ½" wide
- Silk flowers - MANY*
- Silk greenery or accent flowers such as baby's breath, if desired
- Pins I like beading pins. Perfect length + bit larger head
- Decorative accents optional**
Instructions
- Using a chopstick (preferred) or metal grilling skewer, puncture a hole right through the middle of a styrofoam ball.
- Cut a length of ribbon. You'll want it big enough not only for the loop, but for the ribbon through/under the styrofoam ball as well. As an example, if I want a 12" drop (IE: the ball sits 12" below whatever it's being hung from), I'd allow 24" for the loop, 6" for the two ends to pass through the 3" ball, and then another 6" or so for knotting, etc... meaning a 36" length.
- Fold the ribbon in half, "good" side out.
- If using a chopstick, fold the two edges of ribbon over the end of the chopstick by 2", and push through the styrofoam ball, before knotting them together on the other side.
- If using a (sharper, pointier) skewer, knot the two ends of the ribbon together (small, tight knot). Use the skewer to GENTLY push the knot through the styrofoam ball.
- Carefully pull the knot out of the other side and knot another time or two - you'll want the knot to hold the ball on securely, and pushing the knot through - rather than un-knotted ribbon - has a tendency to leave a fairly wide hole.
- Start affixing flowers to the styrofoam ball. I like to push the ~¼" rubber/plastic nub on the back of the flower into the styrofoam, then secure with a pin. I push the pin through the flower somewhere near(ish) to the center of the flower, but not through the hole in the very center of it.
- If you're using larger flowers with the small pieces of stem attached, just push the stems into the styrofoam.
- If your flower type has several layers of petals, try to push it through a spot where most of the layers overlap - it'll be more secure that way. On this type of flower, I made sure to catch the pin through part of the plastic center, so that it'll remain on the ball. If I had pinned it just through the petals, there's a good chance that the center would eventually fall out.
- Continue attaching flowers over the entire surface of the ball. Be sure to lift petals of an already-affixed flower to be able to place the next flower fairly close to it - you don't want any styrofoam showing between the individual flowers.
- Once your ball is completely covered with flowers, attach your decorative accents, if using.
- If you would like to attach a decorative bow, tie one in a length of ribbon, then push a pin through it.
- Pin the bow to either the very bottom of the pomander (hold it up by the loop to see where the very bottom actually is!), or to the top, near the loop.
- Your pomander is complete, and ready to bring some color and visual interest to your celebration! Now... make a bunch more.


Leave a Reply