

These DIY Custom Nerds Wedding Favors are a cute and unique gift to offer at your special event. Customize to your theme and taste!
Originally published August 28, 2011. Updated on 9/12/2021

Saturday was our Wedding anniversary!
No one has died or been (significantly) maimed, so I think we're doing pretty good at this whole "marriage" thing 🙂
While we splurged on the venue, we did a lot of our wedding ourselves, DIY. It was all quite nerdy and perfect for us.
Our Big Nerdy Wedding
We got married at a science museum, which was a no brainer for us. It was the only venue we'd looked at!
In looking at a local wedding magazine, with huge lists of the local venues, we got headaches just thinking about picking a venue.
Then, we saw the Science Museum listed. Boom. Done.
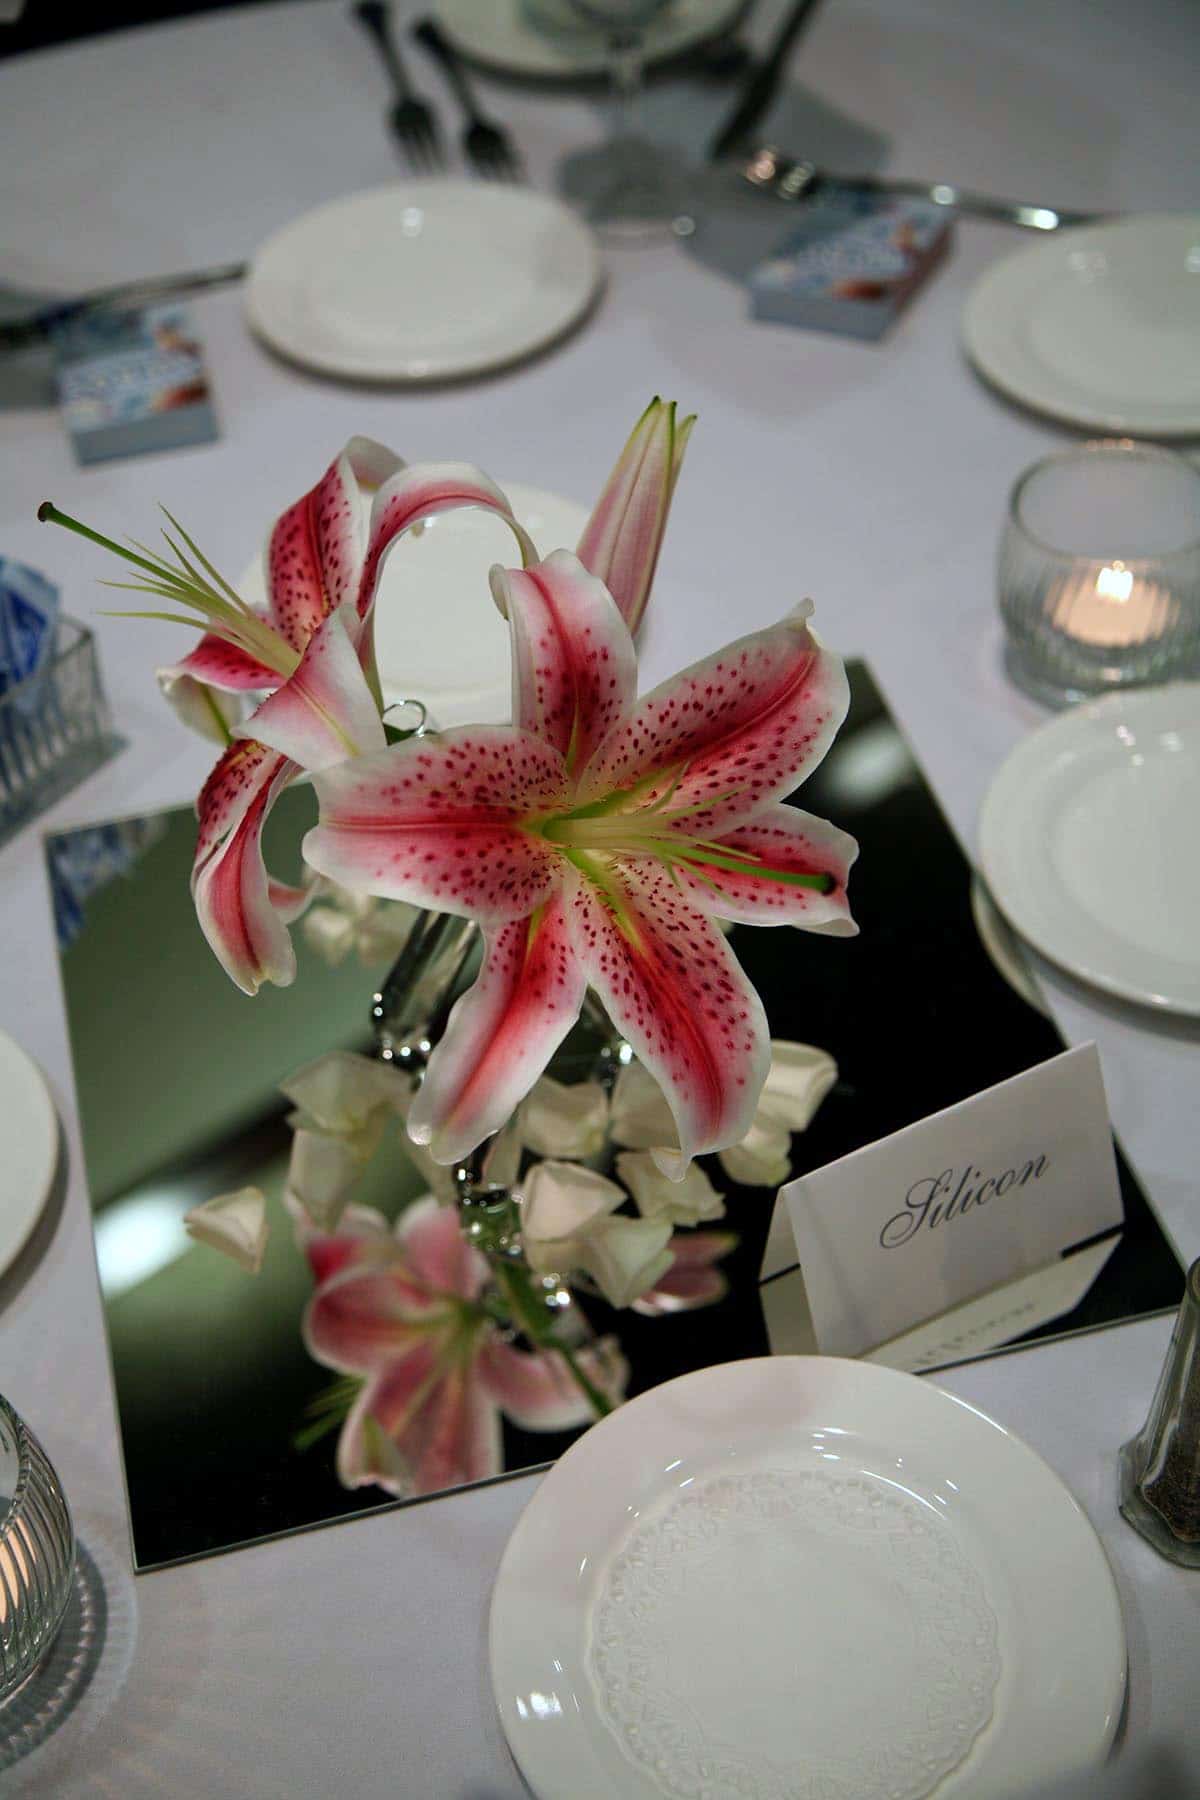
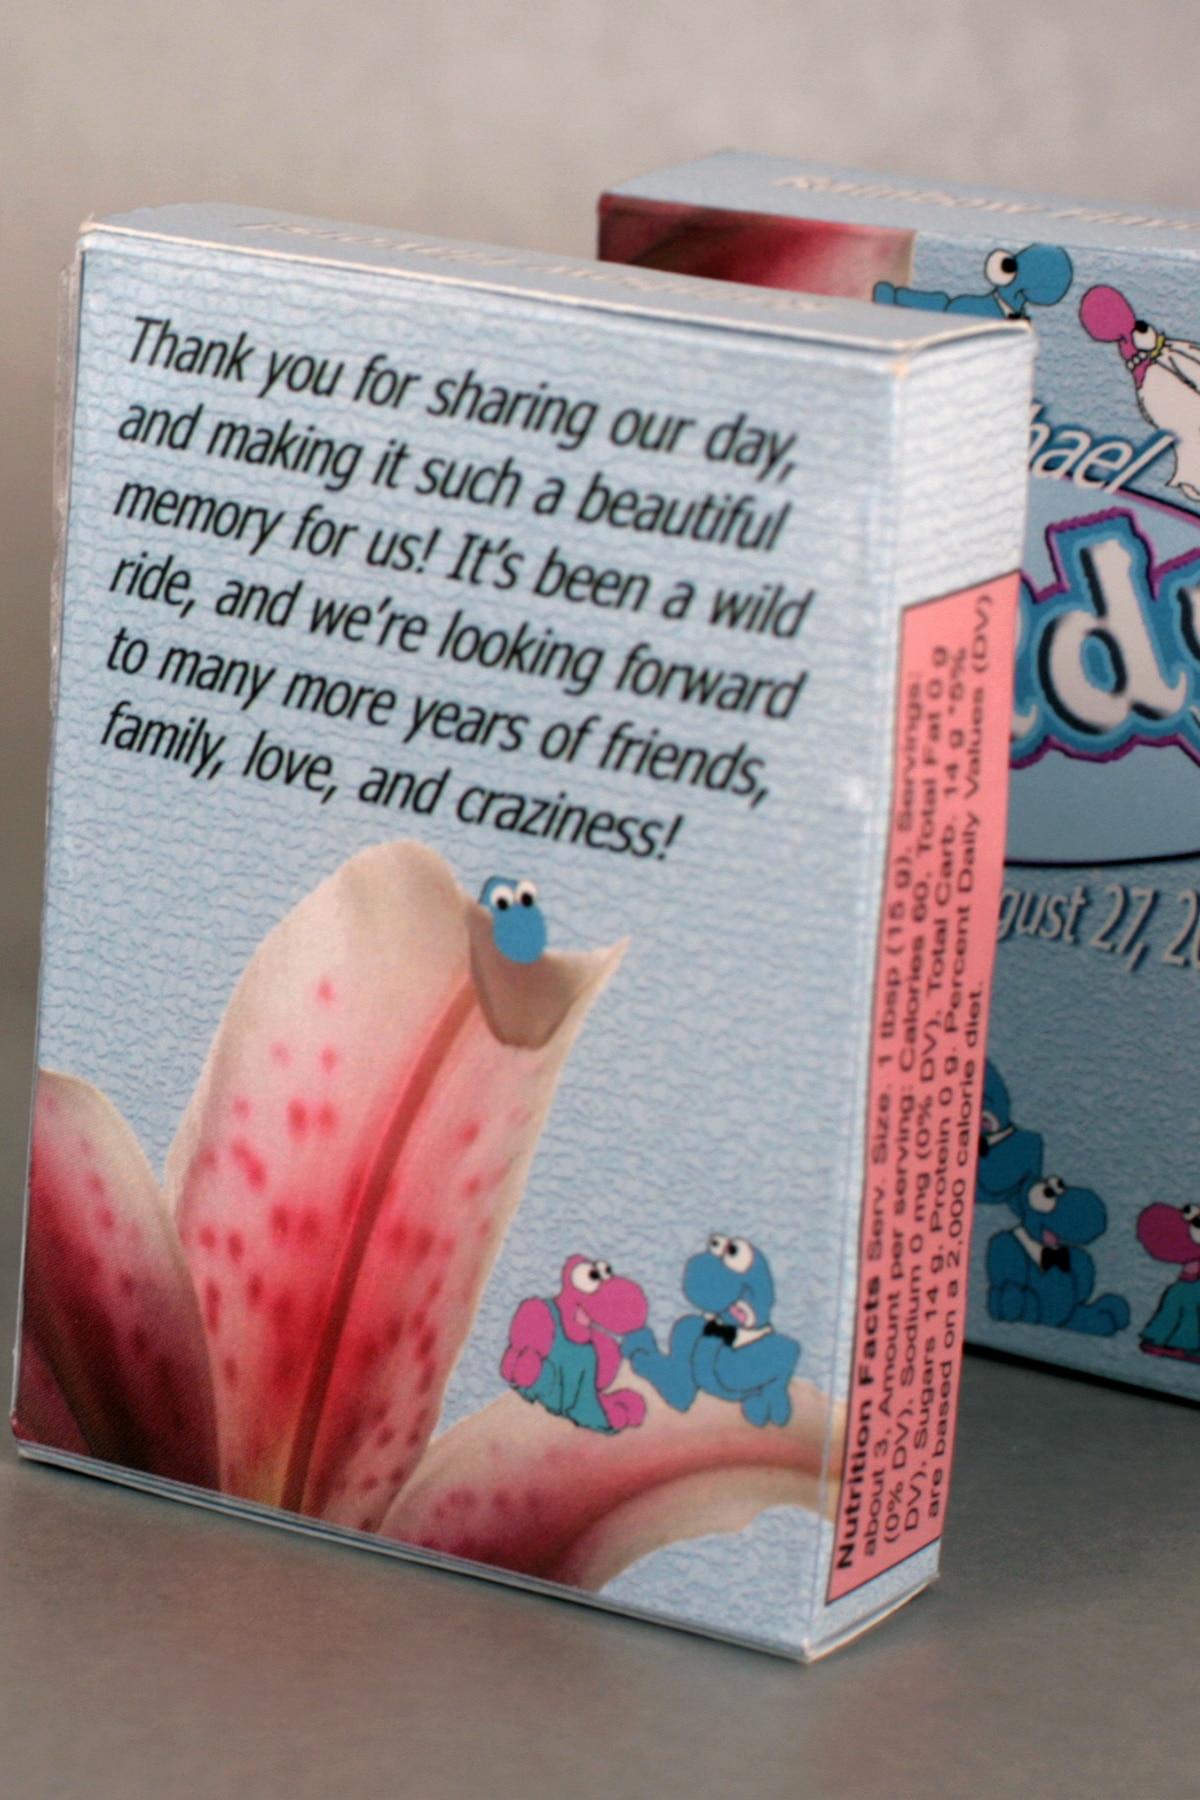
Our centerpieces were very simple, just 3 test tubes glued together tripod-style, each with a stargazer lily.
These were placed on mirror tiles on each of the guest dining tables - each table named after an element.
We had fun trying to arrange the table names in an appropriate way - closest friends were seated at tables named after our favorite element, the kids were at the "Neon" table, etc.
The food was not so hot, our cake (I did NOT make it!) was freezerburnt, and our photographer spent most of the time hitting on one of our friends, rather than actually working.
Meanwhile, the DJ and the bartender did their absolute best to make it an awesome evening, which it was.
I mean really, we had our ceremony less than 5 yards away from "Bodyworlds", LOL!
Anyway, in honor of our anniversary, I'd like to share what we did for our favors: Custom "Nerds" Wedding Party Favors!
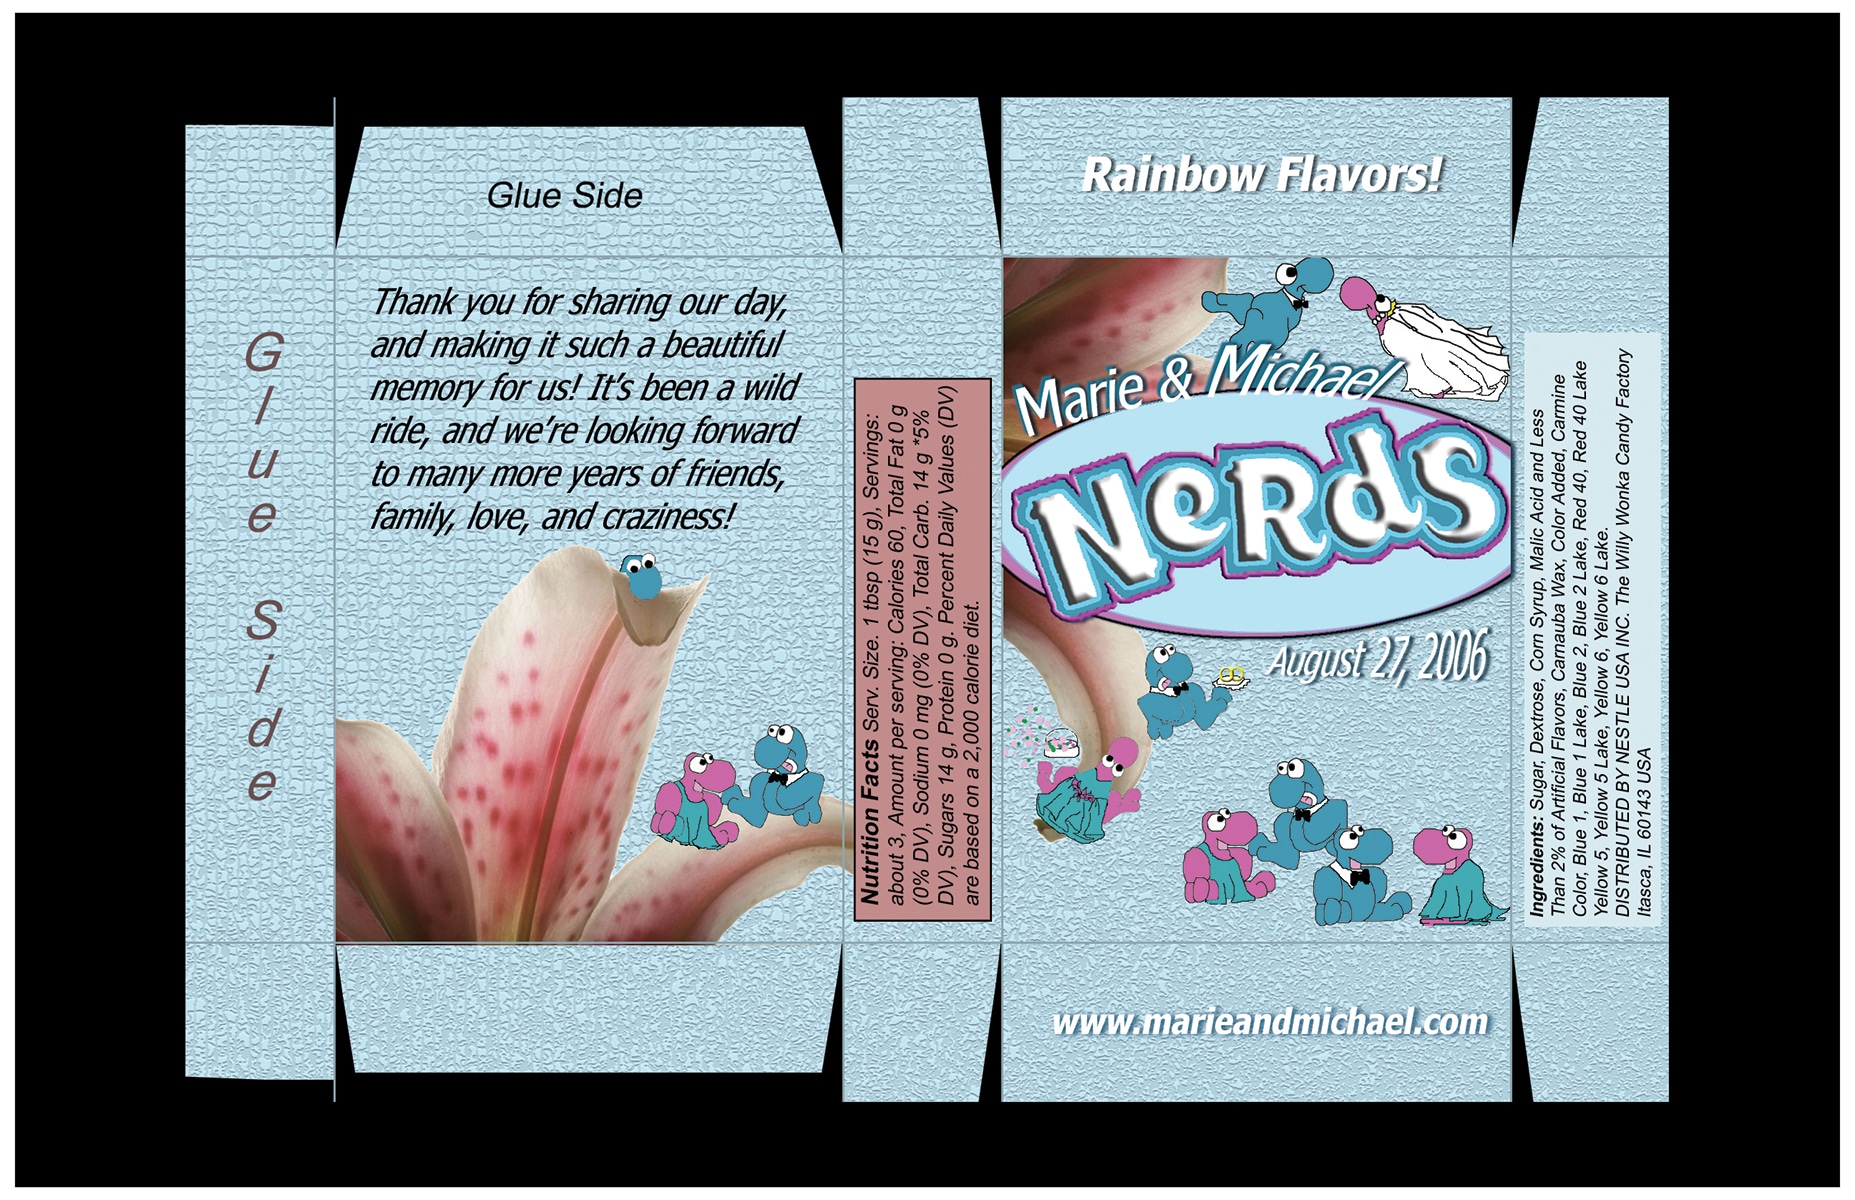
Custom Nerds Wedding Favours
There were 2 main parts to this - the designing and the assembly. Spoilers: I’ve got a PSD file of the base design for you, a bit further down!
Designing my Nerds Box Party Favors
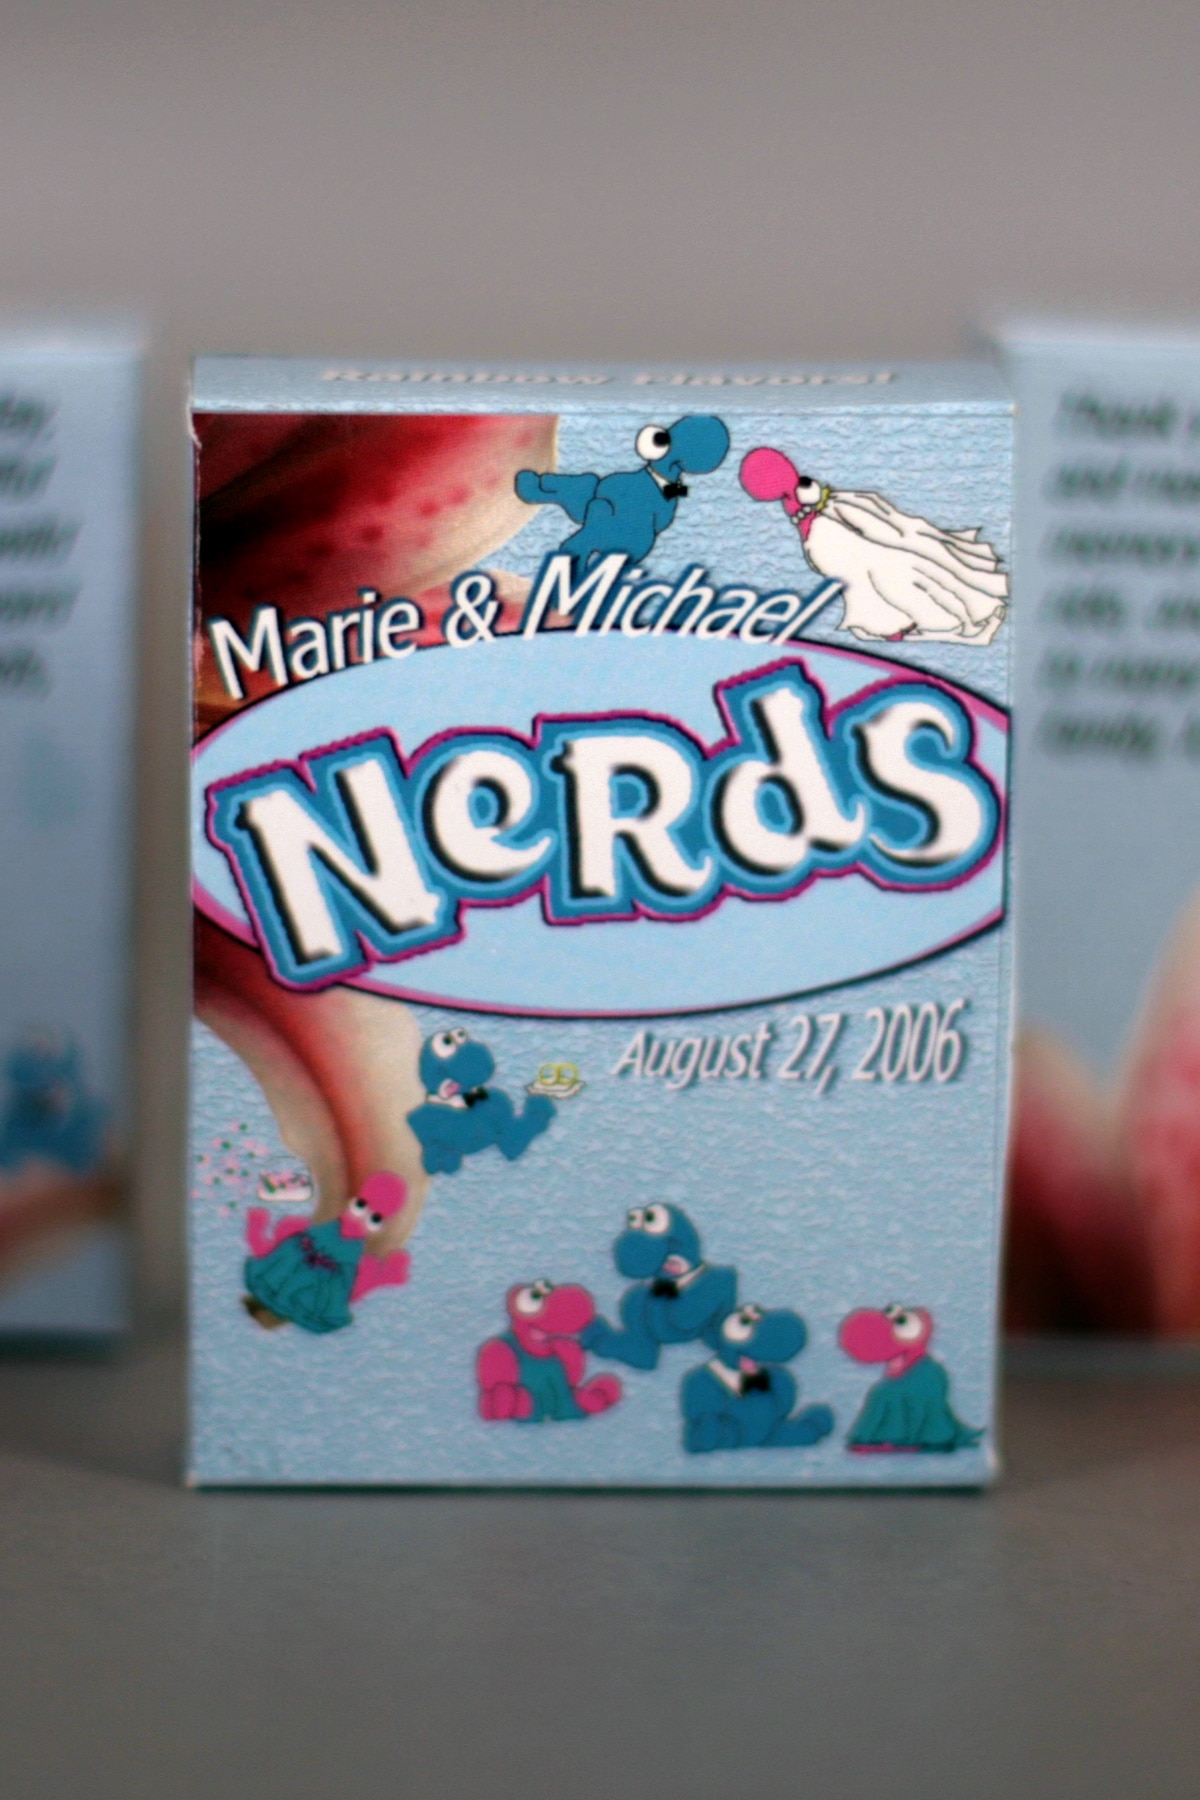
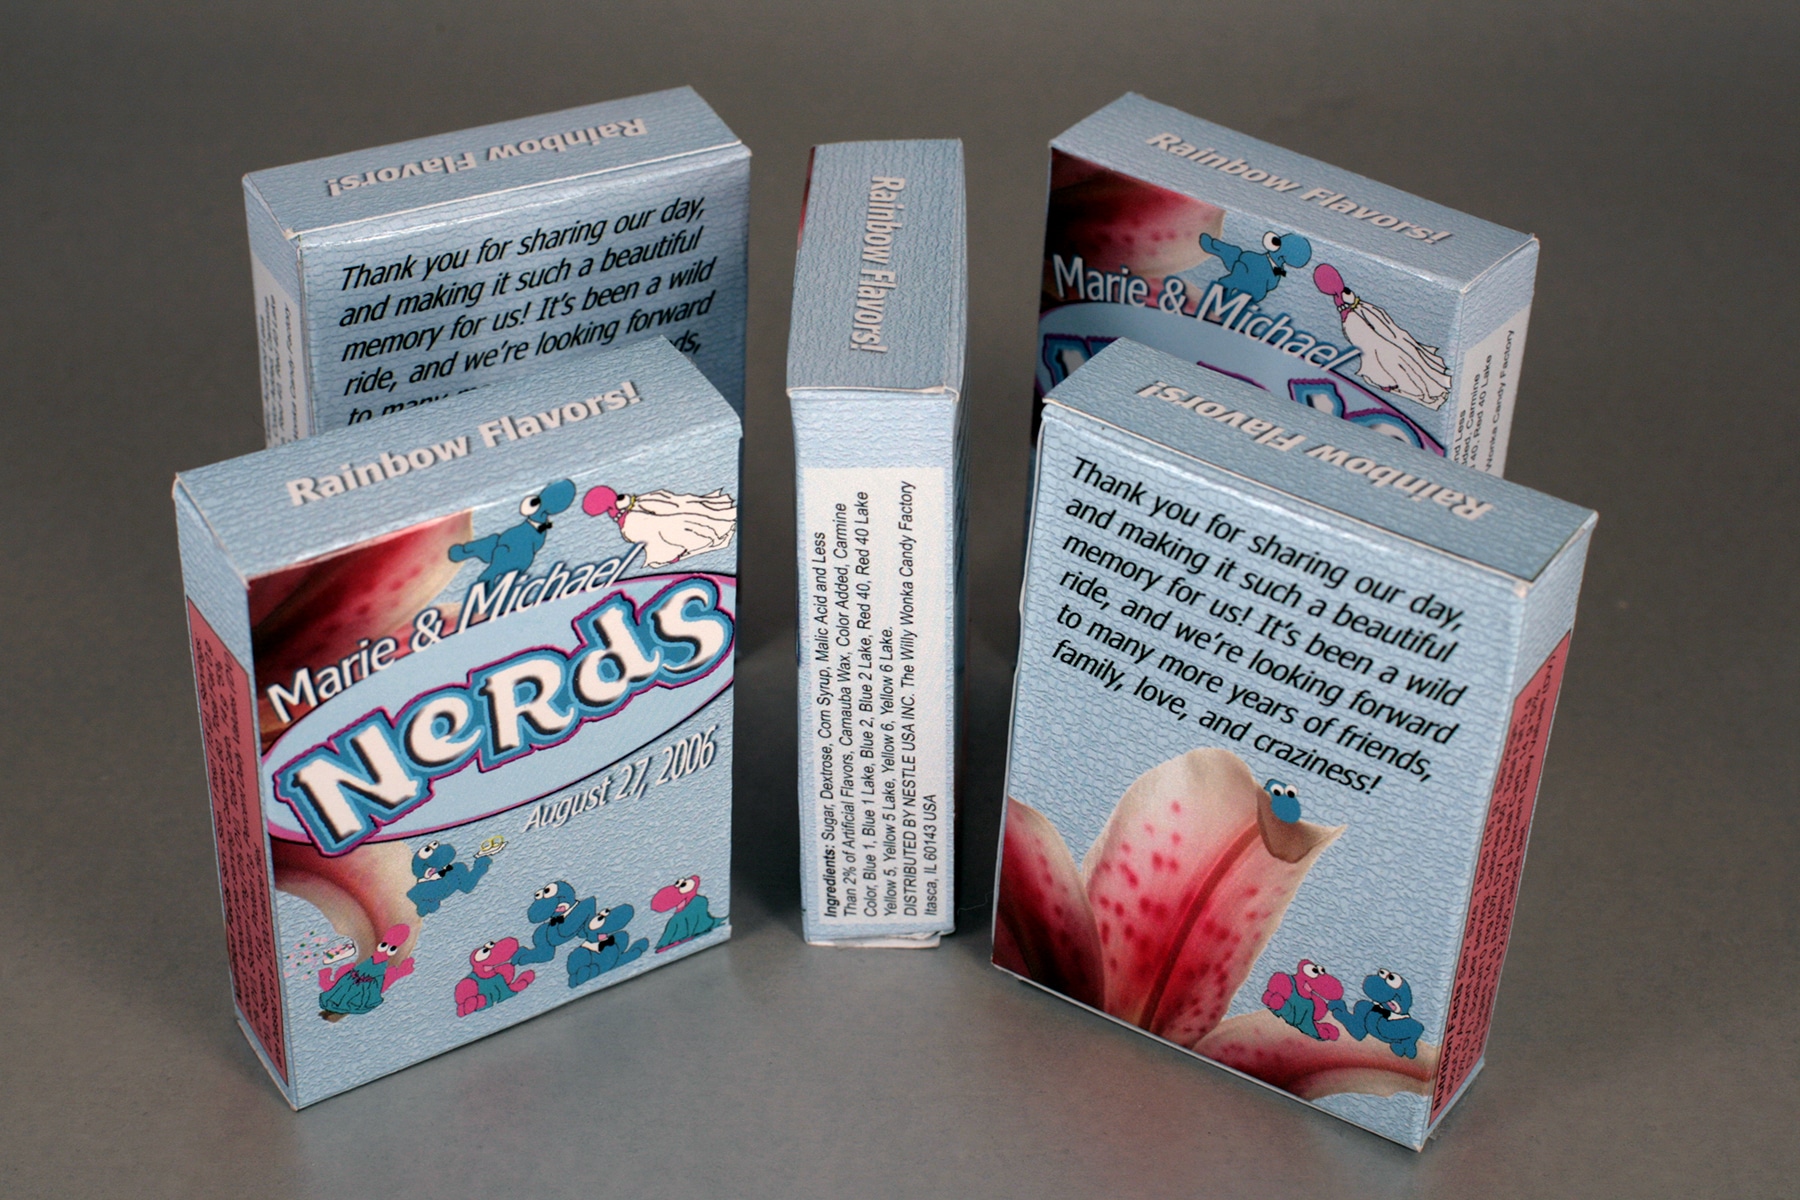
1. Bought a box of Nerds, carefully took the box apart, and scanned it.
2. Did a cleaner outline of the box in photoshop. Cleaned up the logo and "Nerds" characters, extracted the colors and left outlines.
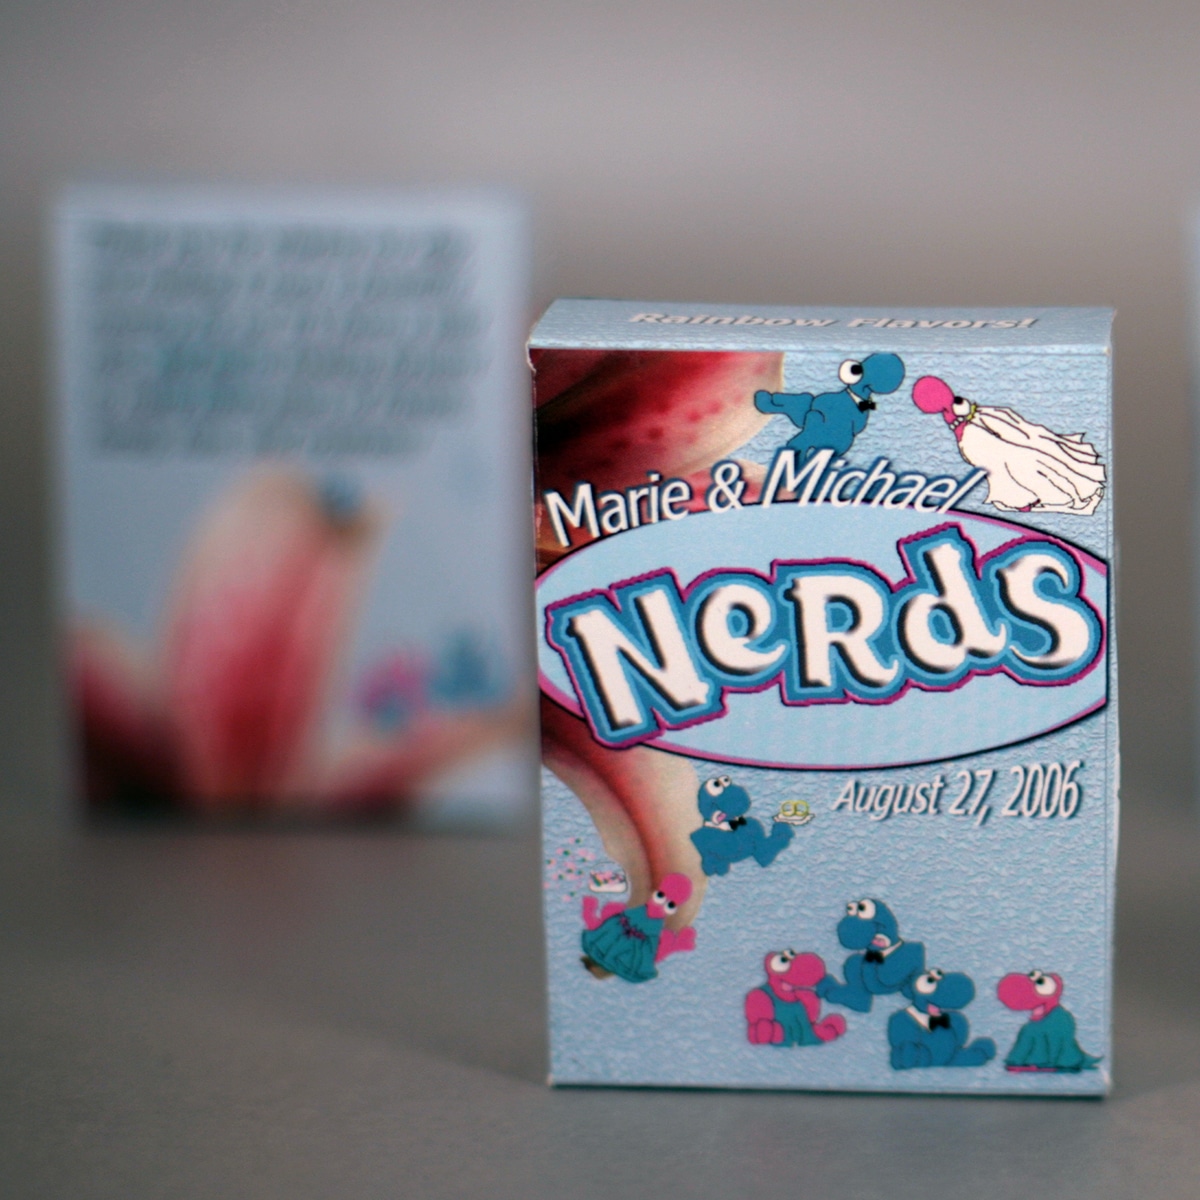
3. I edited the characters - drew dresses and collars/bowties on them, added a ringbearer pillow and flowergirl basket, aimed a "bride" and "groom" character at each other, as if about to kiss. Then I coloured each in our wedding colors.
4. Edited the "Willy Wonka" to our names, added our wedding date to the logo.
5. Customized the ingredients/nutrition info to match our color scheme, added our wedding website url to the bottom flap of the box.
5. Texturized the background color layer, added images of Stargazer lilies from our main stationery, and moved everything around to look good.

The work in progress!
Ordering and Assembly
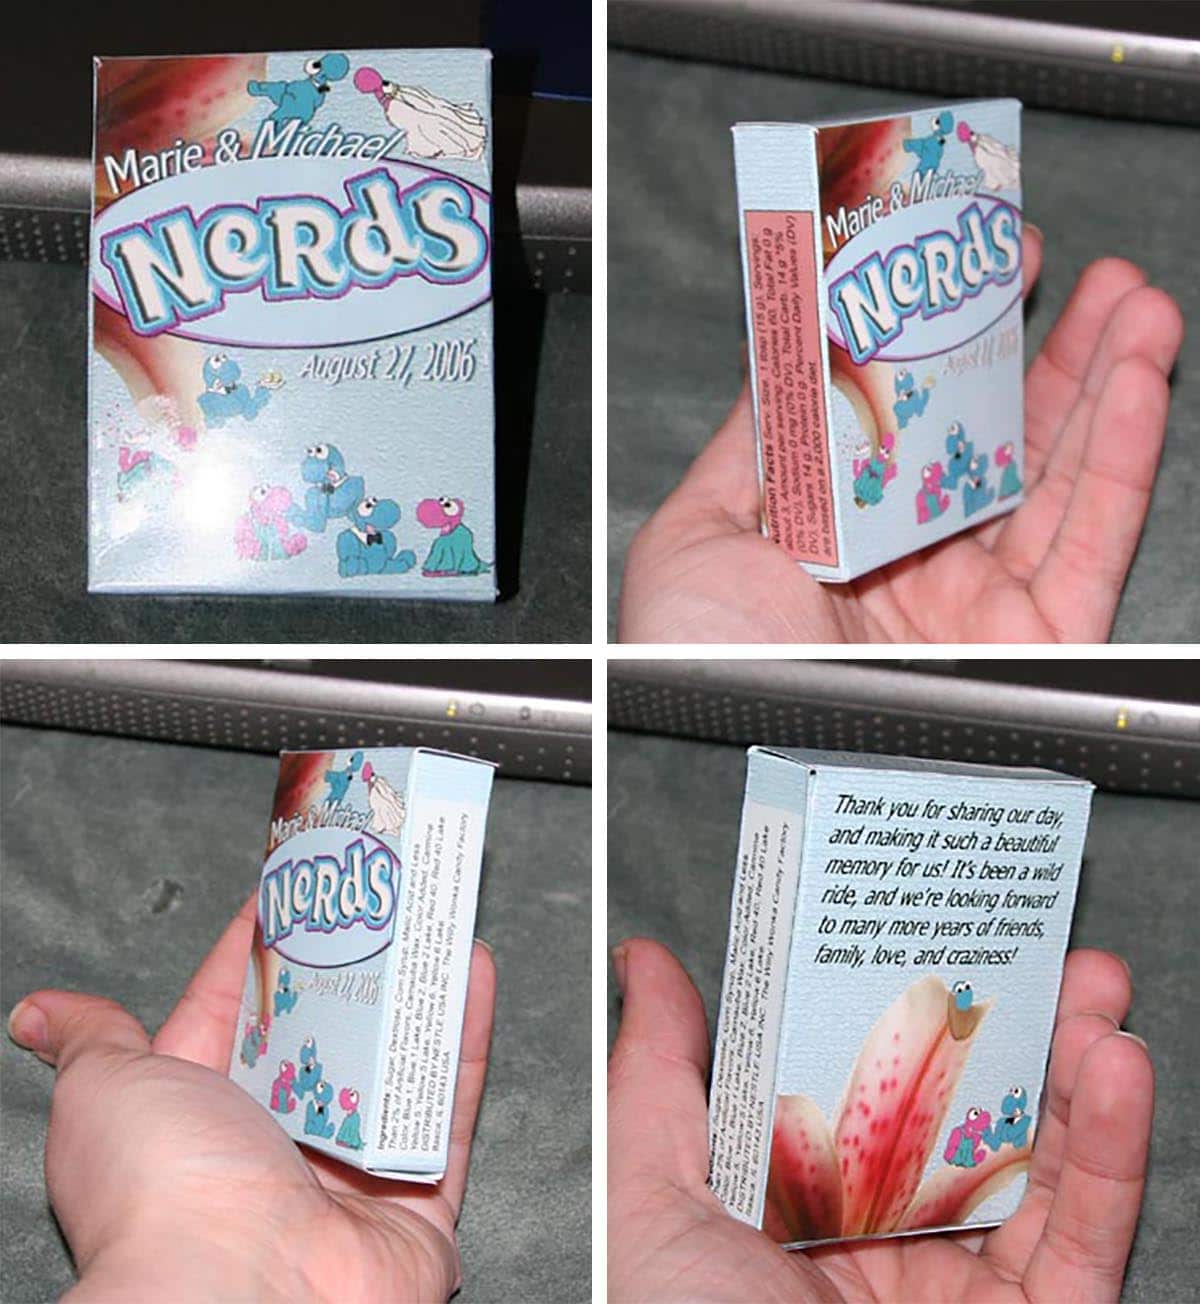
1. Once happy with the design, I pasted the whole image to one of the large Vistaprint postcard templates, and saved the file.
2. I ordered about 50% more than I needed, and waited for the delivery.
3. Used a slide cutter to trim the postcards to the outer outlines of the box, then used very sharp tipped scissors to trim all of the little "v" cuts, etc.
4. Scored the edges with a different attachment for the slide cutter.
5. Folded all of the boxes. Glued them together them together as we went, leaving 1 opening.
6. Ordered bulk nerds candy, used that to fill the boxes.
7. Glued the final flap open, and... done!
These went over SUPER well, and we still have a few today. It was a fair amount of work, but well worth it!
In fact, here's a version I did for someone else:

How to Make Custom Nerds Wedding Favours... or Party Favours!
Not only were these custom Nerds boxes a cool idea for wedding favours, it would also work well for birthday parties, graduations, and more!
What You Need
Photoshop or equivalent image editing software
Slide Type Paper Cutter with Scoring attachment
Sharp, pointed tip scissors
Glue*
Bulk Nerds Candy
* You’ll want a glue that adheres well to shiny, coated paper.
Free Custom Nerds Box Favour Template
The first bit of work on these - scanning, measuring, fussing - was the most annoying part, so I’ve done it for you
Well, I've finally dug out one of my original files, and am making it available for download!
The file is 4MB, click here to download it.
Please note: I am offering this as a free, standalone resource. I am unable to offer any design assistance or trouble shooting, beyond the information contained in this blog entry. Thank you for understanding.
Customizing the Template
Here is what you will want to do (more or less!)
1. Open it in Photoshop.
2. Change the background colour to one more appropriate to your own event. Delete the background copy layer (I just left it in there as an idea of what looks good for texture). If you'd like a textured background, go for it. (Works best with a really small, fine texture)
3. Edit "Website or greeting here" to... well, a website or greeting. 🙂
4. Swap out the flowers for flowers more appropriate to your wedding, or - for other events - something else. Maybe a birthday cake, etc? Use a high res image for best results.
5. Change the colours of the dresses and bowties, if desired.
6. Personalize the Name(s) and date for your own use. Also, feel free to change the wording of the greeting on the back of the box.
7. Make sure everything is as you want it, save the psd file as is (just in case), then convert to JPG and save it as a different file. It should look more or less like:
.... with your own design added, of course 🙂
Printing Your Custom Nerds Boxes
1. Obtain a template for a large postcard from your choice of printer - we used VistaPrint, with their "Oversized Postcard" option.
2. In Photoshop, select all for your completed design, copy and paste it to the printer's template.
Center it, making sure to keep it within the safe space guidelines provided. Delete the guidelines layer (if applicable), flatten and save.
3. Order your prints. I recommend full-colour glossy on one side, and no print or coating on the other side.
I HIGHLY recommend ordering 50% more than you think you'll need - this will allow for cutting/assembling mistakes, accidents, last minute extras needed, and keepsakes.
Assembling Your Custom Wedding Candy Favours
1. While waiting for the printer, order your choice of filling. Amazon sells Bulk Nerds Candy - so much easier than buying retail boxes and transferring the contents!
2. When your print order arrives, use a slide cutter to trim the postcards to the outer outlines of the box.
3. Use very sharp, pointed tip scissors to trim all of the little “v” cuts, etc. (We used small, precision scrapbooking scissors)
4. Using the dull/blunt scoring attachment for your slide cutter (you may need to purchase this separately), score all of the fold edges.
5. Fold all of the boxes.
6. Glue the boxes together at the side flap.
7. Glue all of the boxes together at the bottom flap. Allow to dry completely.
8. Fill the boxes about ⅔ full, glue the top flap closed.
... and that's it! It's a bit of effort, but VERY much worth it!
Have you seen any awesomely nerdy wedding or party favors? We'd love to hear about them!
Share the Love!Before you chow down, be sure to take some pics of your handiwork! If you post it to Bluesky, be sure to tag us - @CelebrationGen. We're also on Pinterest, so you can save all your favourite recipes to a board! Also, be sure to subscribe to my free email newsletter, so you never miss out on any of my nonsense. Well, the published nonsense, anyway! |


Krystal Elliott
This is such an incredible idea. I am a full time student so I don't have time to do this for my wedding in may but was wondering if I could contact you and order them from you and you can ship them to me?
admin
Unfortunately, I can't - intellectual property issues. Happen to know anyone handy with photoshop?
Jaclyn
I was wondering if there was any way for me to obtain a template of this or a version I could edit. I am horrible at photoshop so if I had to start from square one I wouldn't be able to do this. But I love it! It is so adorable.
Vanch
This is such a great idea! I'm helping a geeky friend of mine for her wedding. Thanks for sharing this! Btw, is there a way that we could get a copy of this template? Please..
Marie Porter
Shoot me an email - I'll see if I can find it!
Rachel Massie
Oh my gosh this is so cute! I wish I had thought of it for our wedding! =)
Kelly
I love these! Is there anyway I can get a copy of an editable template for this? Thanks!
Kelly
Thank you again for posting this template! What kind of glue did you use?
Brittany
I'm going to try and use these for our wedding, such a great idea! It's Star Trek and Star Wars themed, so I'm going to try and mix that into this. Thanks so much for the template!
Brittany
These are so awesome!
Samantha Jane
Wow! It's wonderful to see this. Is there anyway I can get a copy of an editable template for this?
Marie Porter
Yes, just click the link at the top of the post to go to it.
John
Hi, so your saying using a extra sized postcard... is that kinda big? when I think of Nerd Boxes I think of the small halloween sized boxes.
Marie Porter
These are based on the original sized boxes, not the little Halloween sized boxes.
Rebecca
Hi!
Thanks for sharing! Your file is great and I am actually in the process of ordering from Vistaprint using the oversized post card.
I have a question: the post cards have a "safety line" on Vistaprint where basically they say during the cutting, you can lose some of the space on your tabs. Did this cause you any issues when assembling your boxes?
I was thinking if some of that space is cut off, that the tabs might be too short.
Thanks! 🙂
Marie Porter
No, the safety line is just so you don't have anything important risk getting printed off the edge. It's not the trim line.