Wine Making at Home, Part II : Equipment to Get Started
(Originally posted December 28, 2010. Updated on July 13, 2020)
Now that we've covered the subject of Why you would want to make wine at home, it's time to address equipment!
Wine making is a hobby that you can definitely build on. You can start out with a basic set of equipment, and build from there. I recommend making a batch or two of wine, deciding if it’s a hobby you can see yourself sticking with, and THEN worrying about rounding out your equipment collection. I’m just thrifty like that.
So, where to start? Here is the basic equipment that we recommend for a first SMALL batch. Each item is linked to an Amazon listing for visual aid, more information, and ease in purchasing... but all of the equipment we’ll be listing below should be easy to find in any brew supply store.

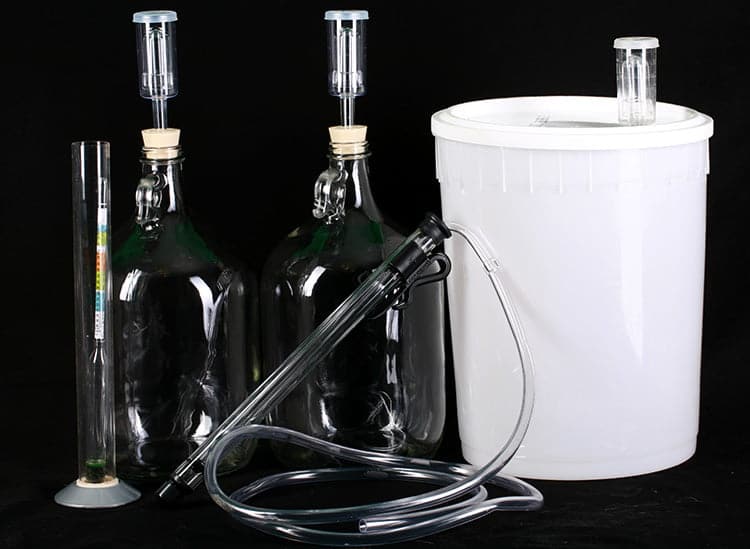
- One 2 gallon plastic fermenting bucket with drilled lid Buy here
- Two 1 gallon glass jugs (Carboys) Buy here
- One rubber stopper (Included with carboy above!)
- One airlock (Included with carboy above!)
- One 5/16" Auto siphon Buy here
- 8' of 5/16" tubing for siphon (Included with siphon above!)
- One Hydrometer Buy here
- One hydrometer test jar (Included with hydrometer above!)
As you can see, getting started doesn’t need to cost a lot of money. This list will get you set up nicely for a 1 gallon batch of wine for under $40 or so in equipment capital. All of the equipment here can be used for many, many batches of wine to come!
Over time, we’ve managed to accumulate 7 or 8 of the single gallon glass carboys / stopper sets, as we like to try a recipe as a small batch first. If we like it, we’ll tinker with it before making a big batch. If we love it... we put a big batch on ASAP. Trust us, 1 gallon of home brewed wine that you love does NOT last long!
Additionally, it’s good to have some of the 1 gallon jugs on hand in case your large batch does not fit in your larger fermenter. More on this later - just wanted to make the point that buying a small set to start does NOT end up being a waste, even when upgrading to a larger setup.
When you are ready to graduate to a larger batch set, here is what we recommend:

- One 6.5 gallon plastic fermenter with lid and tap Buy here OR
- One 7.9 gallon plastic fermenter with lid Buy here
- One or two 5 gallon glass carboys Buy here
- One 6.5 gallon glass carboy Buy here
- One rubber stopper (Buy to fit the mouth of whatever carboys you have!)
- More airlocks * Buy here
- One Hydrometer **
- One hydrometer test jar **
- One ½” auto siphon *** Buy here
- 5' of 7/16" tubing for auto siphon (Included with siphon above) ***
*You only NEED one of each, but it’s a good idea to have a few extra on hand for doing multiple batches!
** You only need one hydrometer & jar, if you bought already bought a set with the small set up, that’s all you need!
*** This is an ideal, but not totally necessary if you already have the 5/16" siphon set up. This set flows MUCH faster and is a great time saver, but is a luxury rather than a necessity. The 5/16" set up will work fine with the larger carboys, but this ½" one will NOT fit in the smaller carboys.
Other equipment that you may / probably already have at home:

- A small food scale (for weighing sugar and other ingredients)
- A food processor or blender (for chopping fruit)
- Measuring spoons and cups
- Funnels
- Stock pots
- Turkey fryer (Nice for large 5 gallon batches, NOT necessary for 1 gallon batches!)
Here’s the deal with the turkey fryer. You can get by with cooking small batches of fruit/sugar/water in stock pots, but it gets tedious. Brew stores carry boiling kettles and burners, but they’re definitely cost prohibitive. Turkey fryers do the job just as well, for a small fraction of the cost. To compare:
Brewing store: 8 gallon kettle and burner set - $250 USD
As an example, a quick search turned up this similarly sized 30 quart turkey fryer set: $100 USD on Amazon. That’s both the pot AND the burner!
Better yet, buy your fryer right around Thanksgiving for huge savings! We got ours for $30 or $40... a far cry from the ~$250 a comparable brewing-specific set up would have cost!

One caveat. The brewing specific pot is made from stainless steel. Many cheaper turkey fryers feature an aluminum pot. While this is not a problem at all, you will want to oxidize the surface before using it for wine making. This will prevent your pot from imparting any undesirable aluminum flavors on your wine.
All you need to do is fill your pot with water and boil it for a few minutes. Dump the water and you are set to go, you only need to do this once. Well, you won’t need to do this again UNLESS you use a scouring pad or other rough surface to clean your pot. Doing so will remove the finish, and you’ll have to boil the water again.
Other stuff:

This stuff doesn’t really belong with equipment, as it’s all stuff that you’ll use up and need to buy repeatedly, rather than a capital equipment cost. Nonetheless, here are some other items you will want to have on hand when you start.
- Brew wash, for cleaning your equipment. We use PBW, this will make your life easier! Buy here
- Sanitizer, for equipment and utensils. We use Star-San Buy here
- Yeast. There are different varieties for different uses, we like to keep a selection of them in the fridge. Buy here
- Yeast nutrient Buy here
- Acid blend Buy here
- Pectic enzyme Buy here
- Wine Tannin Buy here
- Campden tablets (If you'll be using fresh, uncooked fruit.) Buy here
With these recommendations, you should have what you need to make most wine recipes, aside from the actual ingredients. Read through any wine recipe before actually getting started, to make sure that you have any other items it may call for!
Next, we'll cover the process of making wine at home, before going on to learn How to Stabilize and Back Sweeten Wine!
Home Brewing Recipes!
Looking to get started with home brewing? Here are a few of my other wine, cider, and mead recipes:
Wine Recipes
Banana Wine Recipe
Blackberry Wine Recipe
Blackcurrant Wine Recipe
Blueberry Wine Recipe
Cherry Wine Recipe
Cranberry Clementine Christmas Wine Recipe
Cranberry Wine Recipe
Faux Lingonberry Wine
Lychee Wine Recipe
Mango Strawberry Wine Recipe
Mango Wine Recipe
Mint Wine Recipe
Lychee Wine Recipe
Partridgeberry Wine Recipe
Passionfruit Wine Recipe
Peach Wine Recipe
Stone Fruit Wine Recipe
Strawberry Wine Recipe
Ube Wine Recipe
Watermelon Wine Recipe
Mead Recipes
Black Cherry Mead Recipe
Blueberry-Clementine Mead Recipe
Blueberry Mead Recipe
Clementine Mead Recipe
Pumpkin Mead Recipe
Wildflower Mead Recipe
Cider & Miscellaneous Homebrew Recipes
Hard Apple Cider Recipe
Home Brew Hard Iced Tea Recipe
Maple Hard Apple Cider Recipe
Share the Love!
Once you've got something brewing, be sure to take some pics of your handiwork! If you post it to Bluesky, be sure to tag us - @CelebrationGen. We're also on Pinterest, so you can save all your favourite recipes to a board!
Also, be sure to subscribe to my free monthly email newsletter, so you never miss out on any of my nonsense.
Well, the published nonsense, anyway!


Noni Short
What bottle type do you recommend? I have a few of the swing tops and need more but I am open to buying a variety of styles. I do not have a corker but will get one if needed.
Marie Porter
We like to use actual wine bottles from winemaking stores - but not the swing top kind. I tend to think of those as better for shorter term use, not wines that we may age for years.