

Canada Day is coming up - Have you considered watermelon carving? Here is my tutorial for how to carve a Canadian Watermelon Bowl
Originally published June 6, 2012. Updated on 6/17/2021

Inspiration really can come from the weirdest of places. Remember the story of how my French Martini Upside Down Cake was conceived? Jann Arden, an auto-correct Fail, French Canadian culture, and talking pineapples... oh my!
Sometimes the most simple thing can spark an idea... and that's what happened with today's post.
About a week ago, I posted my blog entry on my Caladium Leaf Watermelon Bowl... Caladium being a pretty variety of plant with large pink, white, and green leaves.
As with all my blog posts, after I finished publishing it here, I posted links on Facebook.
Now, as an out-and-proud Canadian immigrant, I shouldn't have been surprised when the following comment was posted as a reply:
"Ok, when I first read the title of the post, I *swore* it read "How to Carve a Watermelon Fruit Bowl - Canadian Style!" ;)"
So, thank you for the inspiration, Sarah Elizabeth!
Once I read your response, I knew I *had* to go out and make a Canadian style watermelon bowl - Canada Day IS just around the corner, after all!
To my Yankee friends and readers - no worries, I have a "Stars and Stripes" version as well!

What You Need to Carve a Watermelon
Watermelon Carving Ingredients
A Large Watermelon
Be sure to see my Stars and Stripes Watermelon Bowl post for a ton of info on how to find the perfect watermelon!
Fruit for the Filling
To keep this bowl on theme for the Canadian / Canada Day theme, I went with red and white fruit.
Some ideas:
Red Fruit: strawberries, raspberries, red grapes, cherries, red currants, pomegranate arils, watermelon balls.
White Fruit: Peeled Lychee (fresh or canned), apples*, pears*, bananas*, white dragonfruit/pitaya, peeled rambutan, pineberries, coconut, white mulberries.
* These fruits should be tossed with a bit of lemon juice, to prevent browning.
Watermelon Carving Tools & Supplies
Drop “Cloth”
I like to use 2 layers of craft packing paper (office supply stores), or rosin paper (home improvement stores) to cover my work surface.
Carving watermelon is messy business, and this makes cleanup easier!
Knives
Be sure to have a large chef’s knife and a paring knife, at the very least.
Large Spoon for Scooping
I like to use a large metal spoon for scooping out the watermelon flesh, as I find metal gives a cleaner edge than a plastic spoon... but that’s probably overly fussy. Use what works!
Melon Baller
This one is optional, and I didn’t use one for this project.
However, if you’d like watermelon balls - rather than chunks - in your fruit salad, you’ll want to use a Melon Baller to carve the balls out of the bulk of the melon before pulling it out of the whole melon.
Once you’d got enough balled, you can use the large spoon to clean up the inside of the melon.

Pumpkin Carving Set
When I photographed this tutorial, I used just a paring knife to carve it. This worked fine, but was more work than it needed to be.
Now, I use a pumpkin carving set when I’m carving watermelons - especially the metal-ended carving tools. This Pumpkin Carving Set is the set I have.
Dry Erase Marker(s)
I like to use dry erase markers for marking my designs now, a departure from the Sharpies used in the photos.
Sharpies work fine, but don’t wash/rub off easily.
A Serving Plate
I like to use cake plates with a bit of a rim.
Choose your plate based on the side of your watermelon, and whether or not you want to have fruit around the base of it.

Watermelon Carving Tips
- Before carving the watermelon, give it a good scrub. You can use produce wash, or a mix of water and vinegar.
- I like to cover my work surface with rosin paper, and use a cutting board. This spares a lot of potential mess.
- Make sure your knives are SHARP. Dull knives are actually more dangerous, and more likely to result in injury when carving.
- That said, the watermelon should be at room temperature when carving it. Carve, THEN chill.
- The first few times I carved watermelons, I marked my design with Sharpies, intending to cut the markings off. DRY ERASE markers work so much better! So, do as I say, not as I did in these decade-old photos!
- When it comes time to serve it, make your fruit salad in a separate bowl, and spoon it in. This will be most gentle on your carving, allow you to mix the salad well, and allows you to avoid transferring a lot of excess juice with the fruit.
How to Carve a Canadian Watermelon Bowl
First of all, I didn't get the best in-progress photos, so go and read my earlier Caladium Leaf Watermelon Bowl Tutorialfor a general idea of what we'll be doing here.
Here is what I did:
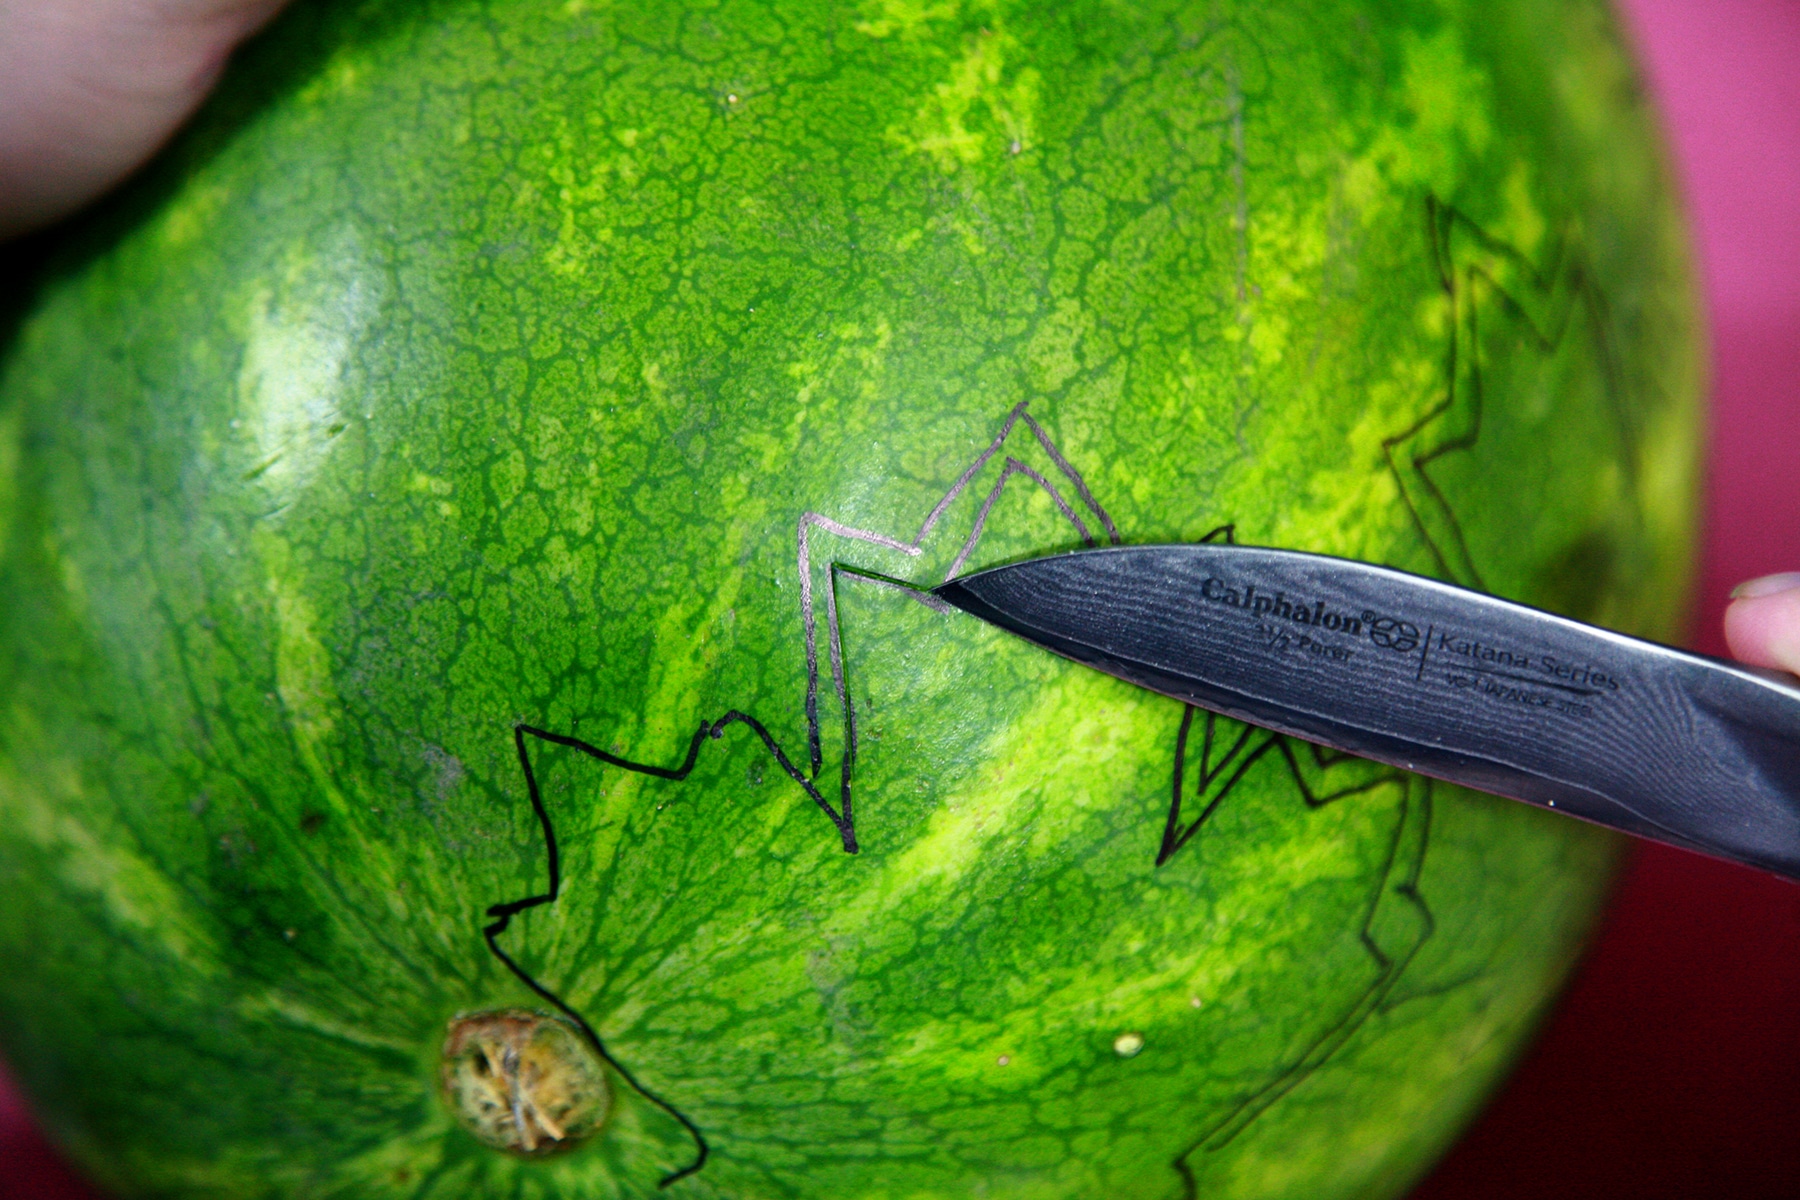
Mark & Outline The Design
1. I found a clipart graphic of a maple leaf (Canadian Flag style), and sized it down to a few different sizes I liked. Printed them off and cut them out.
2. Cut the bottom off the watermelon, to make it more stable.

3. Using the paper maple leaves (As a Canadian, I have to admit - I did spell that "Leafs" before catching myself!) and a sharpie, draw a border of overlapping maple leaves around the watermelon.

4. Unlike my Caladium design, I planned to do most of the design carving before doing the major carve. The maple leaf design is so intricate and fussy, I figured it would be the smartest idea.

Start Carving The Design
5. After deciding that I would alternate red and white leaves, I set about carving it all out to outlined white leaves. Keep a close eye on what leaf is going where, it's easy to cut out a piece of green - that you didn't mean to! - by accident.


6. Once all of the leaves are done up as plain white leaves with outlines, carefully carve off the top of the watermelon. I aimed for all of the peaks/high points of my design, but you can aim a bit higher if you’re not feeling that confident. You can always carve more away, but it’s hard to add watermelon if you’ve carved away too much!
7. Using a sharp knife – I used a good paring knife – carefully carve out the outer edge of your leaf design. Aim to keep your knife straight in, at a 90 degree angle to the surface you are carving – you’ll taper the edges later.

Carve and Scoop The Watermelon
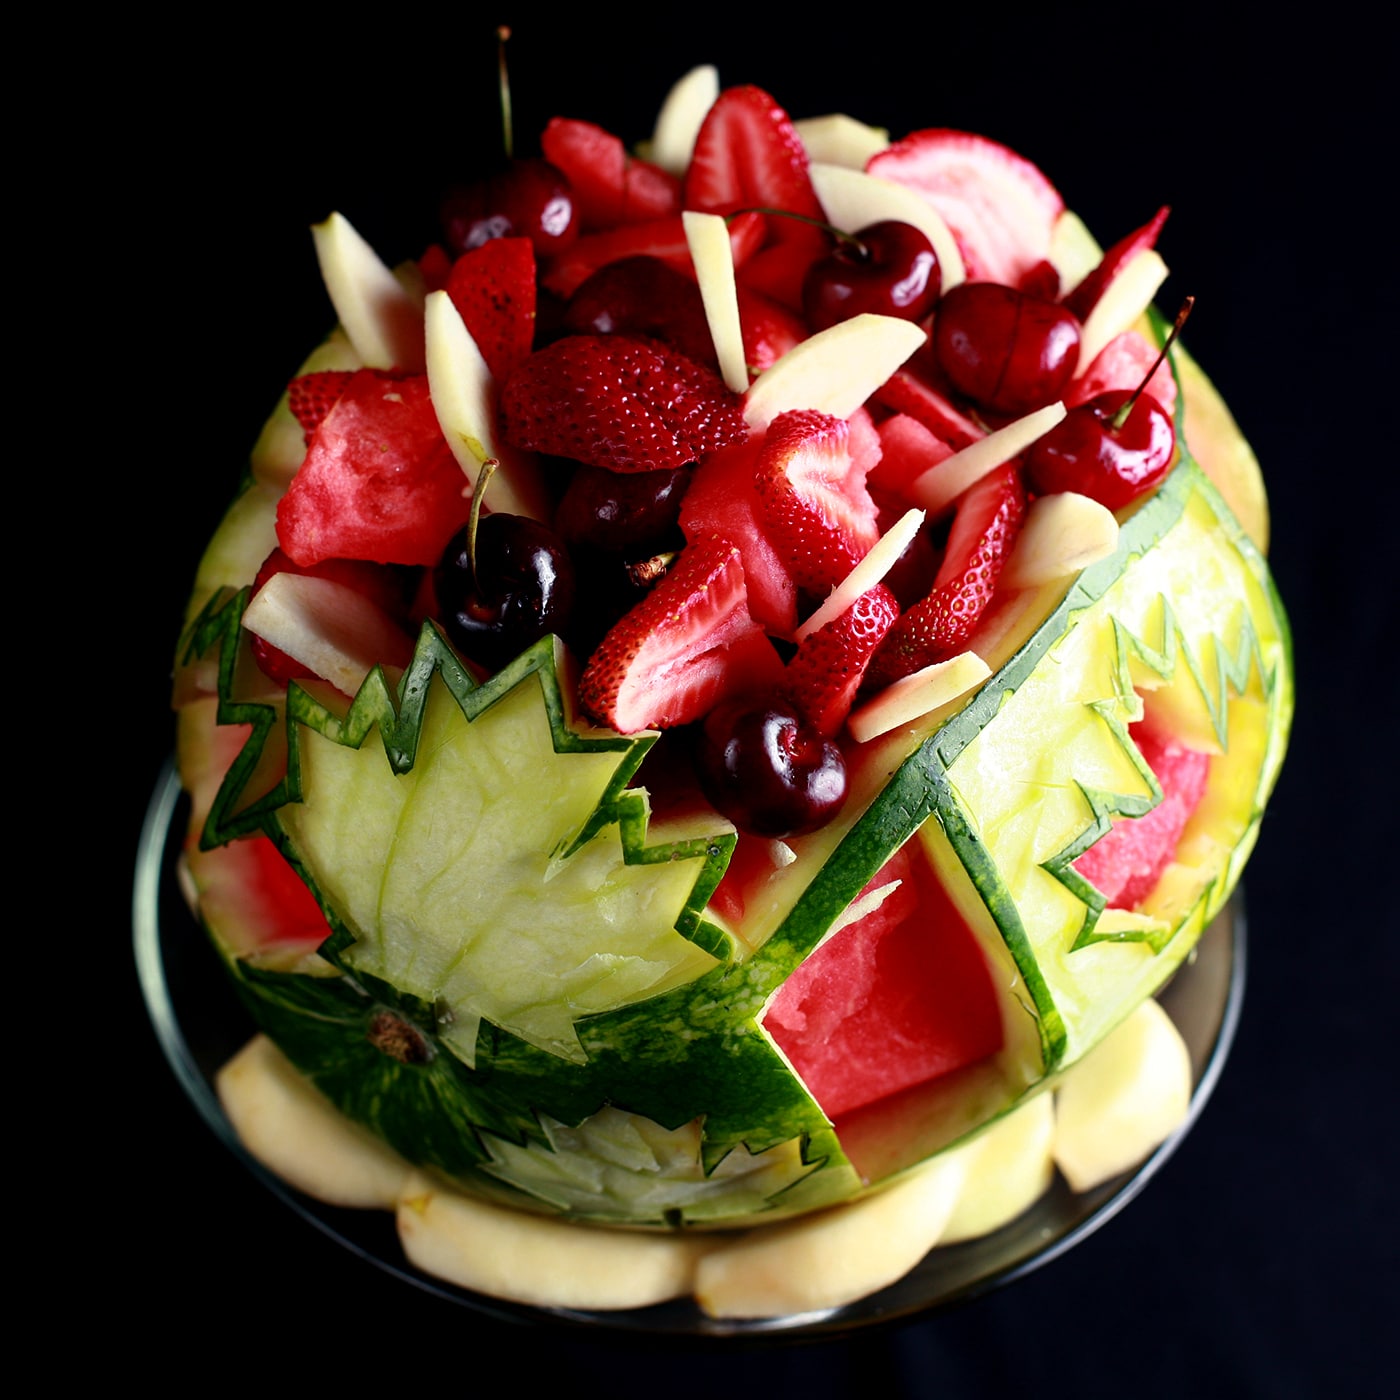
8. Once you’ve carved and removed the very top, scoop out some of the watermelon – for this design, I left about 1″ of red around the side walls.
This was to allow for the red design to show through in the middle of some of the leaves. Because there is no need for extra watermelon flesh on the very bottom, I scooped it out almost down to the white rind.
Note: If you want melon balls, use the melon baller to scoop the watermelon out. It’s much easier to do straight from the watermelon, than to try after you scoop it out.
9. Once the outer edge has been carved, go back over it and carefully taper the edges in a bit.
Clean up any rough edges on the green rind, and taper inward from there – creating a gentle, rounded edge to the white rind, into the red.
Don’t taper it in at too shallow a slope, though – you’ll want plenty of red behind the middle of the leaf design!

Carve the Red Sections
10. If the white part of your rind is relatively shallow, carefully carve it out of every second leaf, being careful to leave the outer outline intact.
If, like me, you managed to pick a watermelon with a very, very thick white rind?
Just cut the insides of every second leaf right out. Position large pieces of carved-out watermelon behind each new opening, and it's all good!
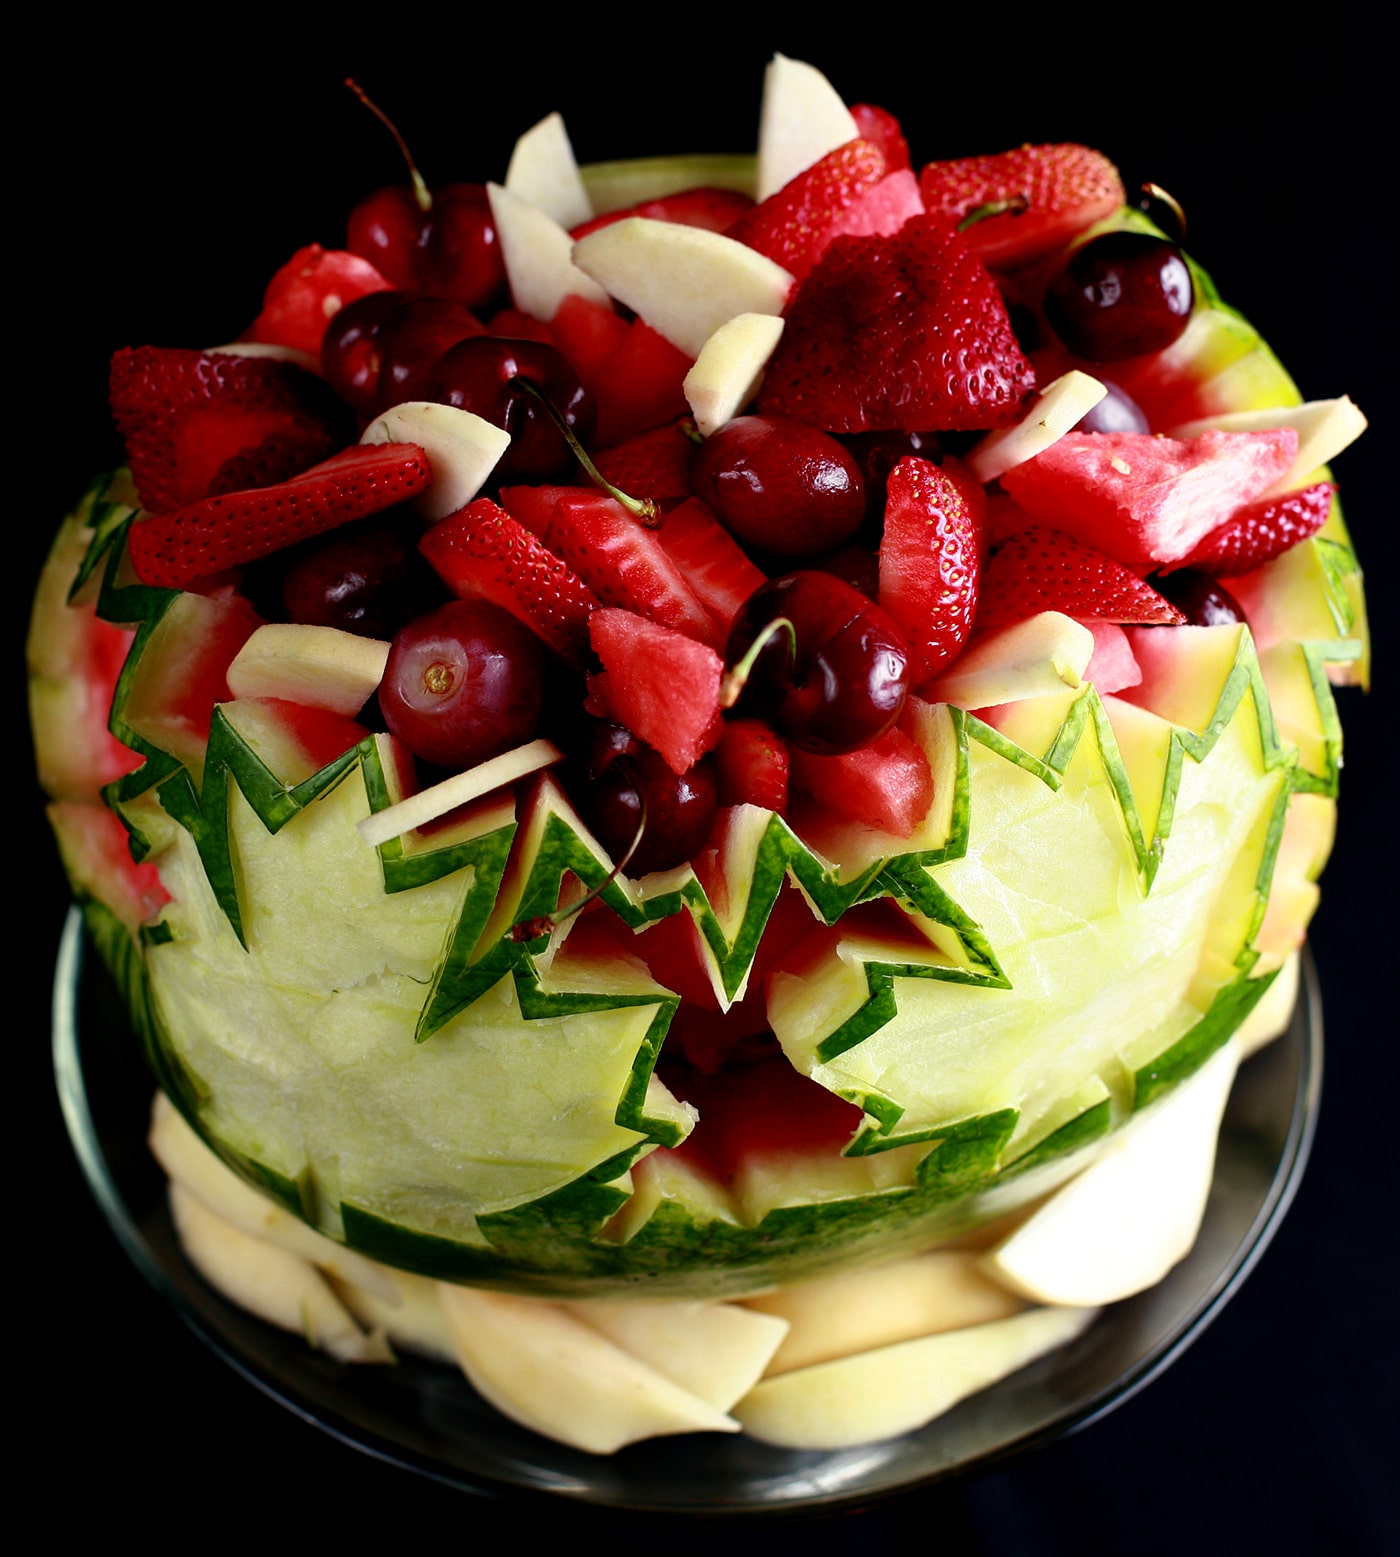
Serve Your Canada Day Watermelon!
Position your fruit bowl on a serving platter (the bottom will very likely leak moisture), and fill with your choice of red and white fruit.
Be sure it’s all ripe and sweet, NOTHING is worse than less than ripe fruit in such a display!
For ours, we used watermelon, red grapes, strawberries, cherries, and peeled/sliced pears.
Set it out and enjoy!

More Seasonal Fun With Food
Looking for more fun, tasty, and crafty ways to celebrate? Here are a few more ideas!
3D Monarch Butterfly Cupcakes
Bloody Eyeball Halloween Punch
Caladium Leaf Watermelon Bowl
Halloween Themed Shooters
How to Carve a Pumpkin Like a Pro
Stars and Stripes Watermelon Bowl
Tornado Smashed Gingerbread House

Share the Love!
Before you chow down, be sure to take some pics of your handiwork! If you post it to Bluesky, be sure to tag us - @CelebrationGen. We're also on Pinterest, so you can save all your favourite recipes to a board!
Also, be sure to subscribe to my free monthly email newsletter, so you never miss out on any of my nonsense.
Well, the published nonsense, anyway!

Interested in Canadian food? Be sure to check out my cookbook, "More Than Poutine: Favourite Foods from my Home and Native Land”. "More than Poutine" is a Canadian cookbook like no other - written by a Canadian living away, it includes both traditional home cooking recipes, as well as accurate homemade versions of many of the snacks, sauces, convenience foods, and other food items that are hard to come by outside of Canada! Order your copy here on this site, through Amazon, or through any major bookseller!

How to Carve a Canada Day Watermelon Bowl
Equipment
- Chef Knive
- Paring Knife
- Large Metal Spoon
- Melon Baller
- Pumpkin Carving Set (Optional)
Ingredients
- 1 Large Watermelon
- Fruit to Fill it With
- Craft paper, rosin paper, etc (as a drop cloth)
Instructions
- Print and cut out clip art patterns for your maple leaves.
- Cut the bottom off the watermelon, to make it more stable.
- Using the paper maple and a dry erase marker, draw a border of overlapping maple leaves around the watermelon.
- Unlike my Caladium design, I designed to do most of the design carving before doing the major carve. The maple leaf design is so intricate and fussy, I figured it would be the smartest idea.
- After deciding that I would alternate red and white leaves, I set about carving it all out to outlined white leaves. Keep a close eye on what leaf is going where, it's easy to cut out a piece of green - that you didn't mean to! - by accident.
- Once all of the leaves are done up as plain white leaves with outlines, carefully carve off the top of the watermelon. I aimed for all of the peaks/high points of my design, but you can aim a bit higher if you’re not feeling that confident. You can always carve more away, but it’s hard to add watermelon if you’ve carved away too much!
- Using a sharp knife – I used a good paring knife – carefully carve out the outer edge of your leaf design. Aim to keep your knife straight in, at a 90 degree angle to the surface you are carving – you’ll taper the edges later.
- Once you’ve carved and removed the very top, scoop out some of the watermelon – for this design, I left about 1″ of red around the side walls. This was to allow for the red design to show through in the middle of some of the leaves.
- Because there is no need for extra watermelon flesh on the very bottom, I scooped it out almost down to the white rind.
- Once the outer edge has been carved, go back over it and carefully taper the edges in a bit. Clean up any rough edges on the green rind, and taper inward from there – creating a gentle, rounded edge to the white rind, into the red. Don’t taper it in at too shallow a slope, though – you’ll want plenty of red behind the middle of the leaf design!
- If the white part of your rind is relatively shallow, carefully carve it out of every second leaf, being careful to leave the outer outline intact.
- If, like me, you managed to pick a watermelon with a very, very thick white rind? Just cut the insides of every second leaf right out. Position large pieces of carved-out watermelon behind each new opening, and it's all good!
- Position your fruit bowl on a serving platter (the bottom will very likely leak moisture), and fill with your choice of red and white fruit.
- Be sure it’s all ripe and sweet, NOTHING is worse than less than ripe fruit in such a display! For ours, we used watermelon, red grapes, strawberries, cherries, and peeled/sliced pears.
- Set it out and enjoy!


Leave a Reply