

How to Carve a Caladium Leaf Watermelon Bowl
Originally published May 28, 2012. Updated on 6/17/2021

This Caladium Leaf Watermelon Bowl Tutorial shows you how to use the colours / layers of a watermelon to craft something beautiful!
About a week ago, we celebrated the one year anniversary of our tornado.
Hrm. "Celebrated" seems like a weird thing to say about a natural disaster.
Observed? Marked the occasion?
Nah, we did celebrate it. On the Sunday afternoon immediately before the actual anniversary date, we have a very small party for those who helped us out following the tornado - a volunteer appreciation party.
We had SO much help from friends - both the day of, and in the long months that followed - such a party was the least we could do to thank them.
So.. we handed out "thank you!" copies of Twisted: A Minneapolis Tornado Memoir, and fed them all.
In addition to the Low Country Boil, party sized Pavlova, and various crudités, I decided to make a watermelon fruit bowl.
A carved, fancy one - though I'd never even considered the possibility before, much less actually made one!
Having carved pumpkins before (Nowhere near as professionally as The Pumpkin Geek, but passable!), I figured I had a good idea of what to do. It was fun, and I think it turned out well... so here's how I did it!

What You Need to Carve a Watermelon
Watermelon Carving Ingredients
A Large Watermelon
Be sure to see my Stars and Stripes Watermelon Bowl post for a ton of info on how to find the perfect watermelon!
Fruit for the Filling
We just wanted bright, colourful, and celebratory, so we bought a BUNCH of different fruits, and went with a rainbow theme.
For ours, we used pineapple, watermelon, grapes, kiwi, mango, cantaloupe, strawberries, raspberries, blueberries and blackberries.... garnishing with HUGE mint leaves.
You can use whatever you like - whatever is accessible, or go with a colour theme!

Watermelon Carving Tools & Supplies
Drop “Cloth”
I like to use 2 layers of craft packing paper (office supply stores), or rosin paper (home improvement stores) to cover my work surface.
Carving watermelon is messy business, and this makes cleanup easier!
Knives
Be sure to have a large chef’s knife and a paring knife, at the very least.
Large Spoon for Scooping
I like to use a large metal spoon for scooping out the watermelon flesh, as I find metal gives a cleaner edge than a plastic spoon... but that’s probably overly fussy. Use what works!
Melon Baller
This one is optional, and I didn’t use one for this project.
However, if you’d like watermelon balls - rather than chunks - in your fruit salad, you’ll want to use a Melon Baller to carve the balls out of the bulk of the melon before pulling it out of the whole melon.
Once you’d got enough balled, you can use the large spoon to clean up the inside of the melon.

Pumpkin Carving Set
When I photographed this tutorial, I used just a paring knife to carve it. This worked fine, but was more work than it needed to be.
Now, I use a pumpkin carving set when I’m carving watermelons - especially the metal-ended carving tools. This Pumpkin Carving Set is the set I have.
Dry Erase Marker(s)
I like to use dry erase markers for marking my designs now, a departure from the Sharpies used in the photos.
Sharpies work fine, but don’t wash/rub off easily.
A Serving Plate
I like to use cake plates with a bit of a rim.
Choose your plate based on the side of your watermelon, and whether or not you want to have fruit around the base of it.

Watermelon Carving Tips
- Before carving the watermelon, give it a good scrub. You can use produce wash, or a mix of water and vinegar.
- I like to cover my work surface with rosin paper, and use a cutting board. This spares a lot of potential mess.
- Make sure your knives are SHARP. Dull knives are actually more dangerous, and more likely to result in injury when carving.
- That said, the watermelon should be at room temperature when carving it. Carve, THEN chill.
- The first few times I carved watermelons, I marked my design with Sharpies, intending to cut the markings off. DRY ERASE markers work so much better! So, do as I say, not as I did in these decade-old photos!
- When it comes time to serve it, make your fruit salad in a separate bowl, and spoon it in. This will be most gentle on your carving, allow you to mix the salad well, and allows you to avoid transferring a lot of excess juice with the fruit.

How to Carve a Caladium Leaf Watermelon Bowl
Mark & Outline the Design
Before you get started, take a good look at your watermelon - there should be an obvious top and bottom to it.
Figure out how you want it to sit, and carve a small amount of rind off the bottom. It may take a few passes to get it to sit solid and level - you don't want it rolling around as you work, or after you fill it!

Once watermelon has a solid base to it, draw your design on it. I used a Sharpie, fully intending to carve out anywhere I had drawn. In retrospect, a dry erase marker may have been a smarter idea.
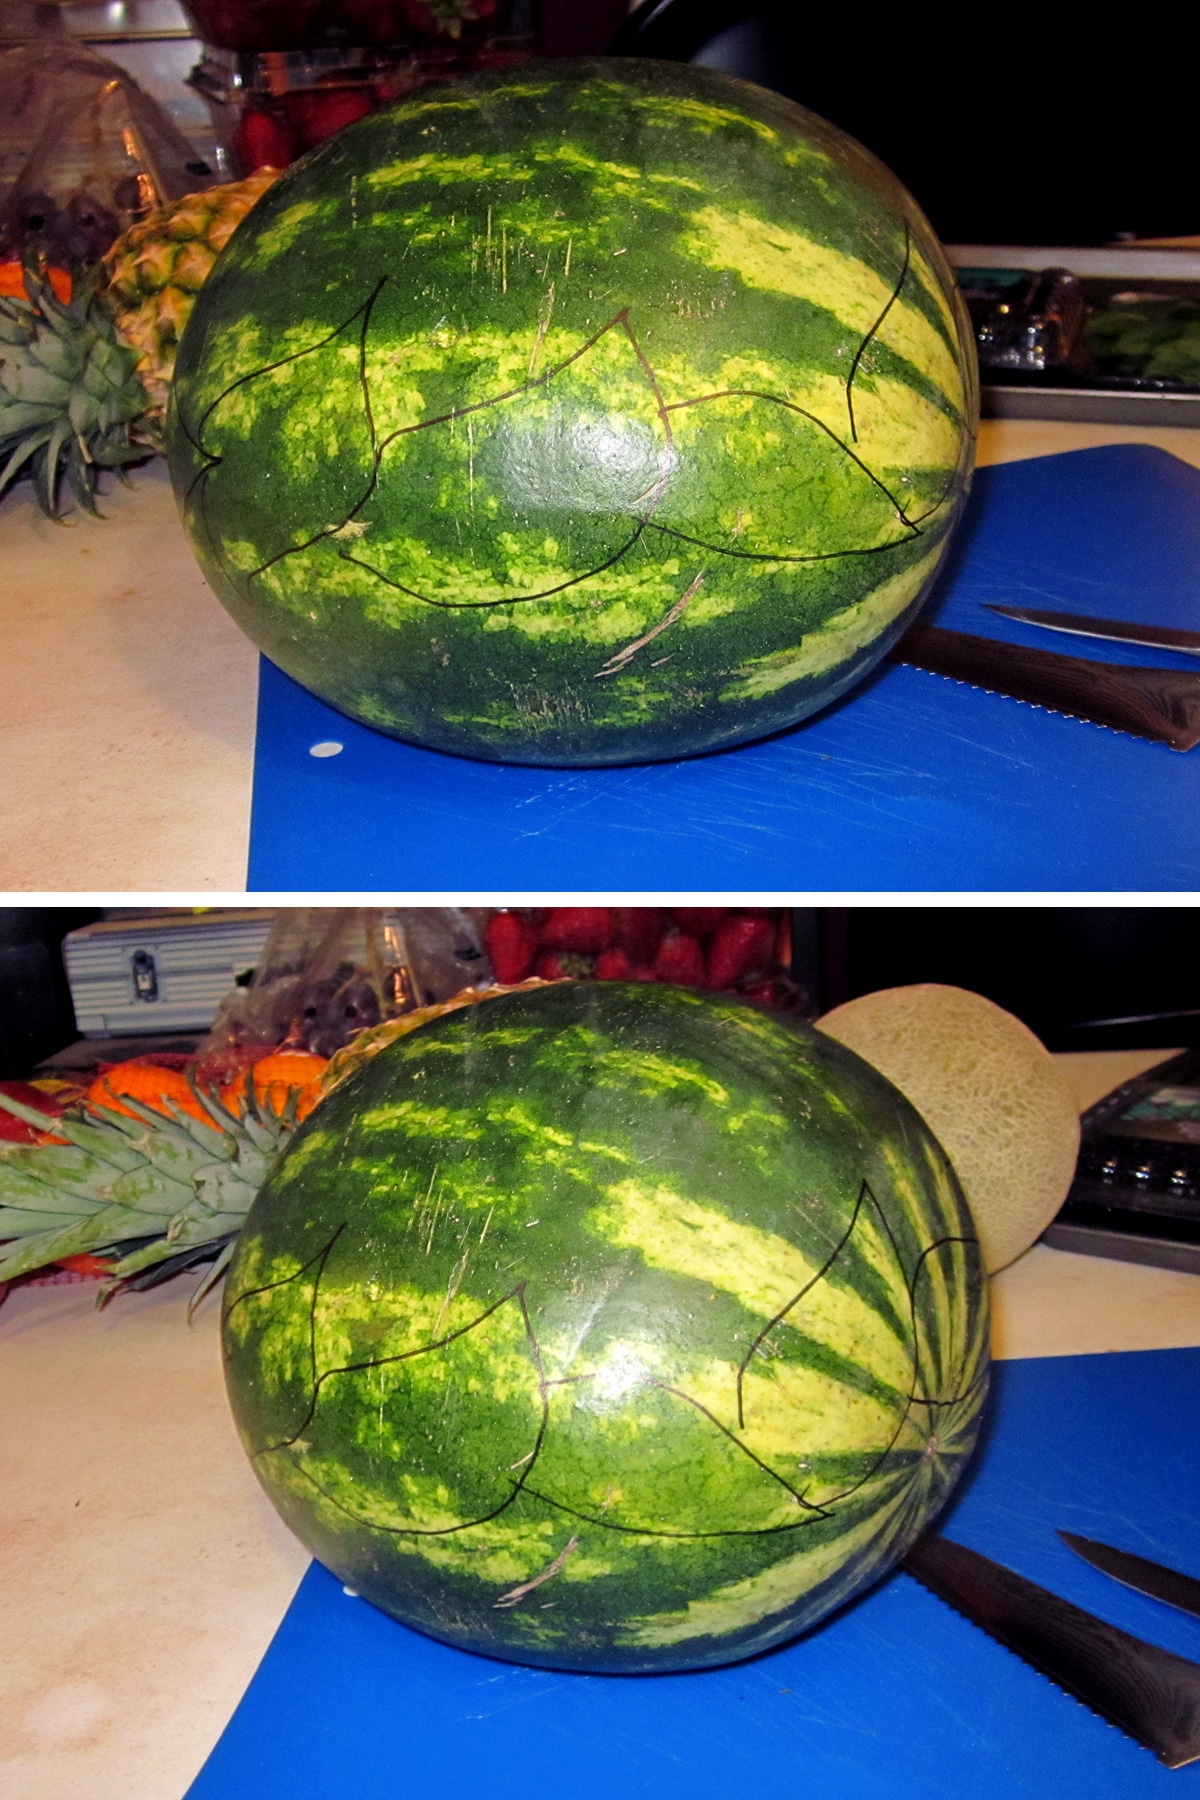
Also in retrospect: Caladium leaves pull inward at one end, pointed at the other - sort of "heart" shaped. Whoops!
Carve The Watermelon
Note: In retrospect, it would have been better to have carved the leaf design before carving the top off the watermelon. Instructions reflect the photos, though!
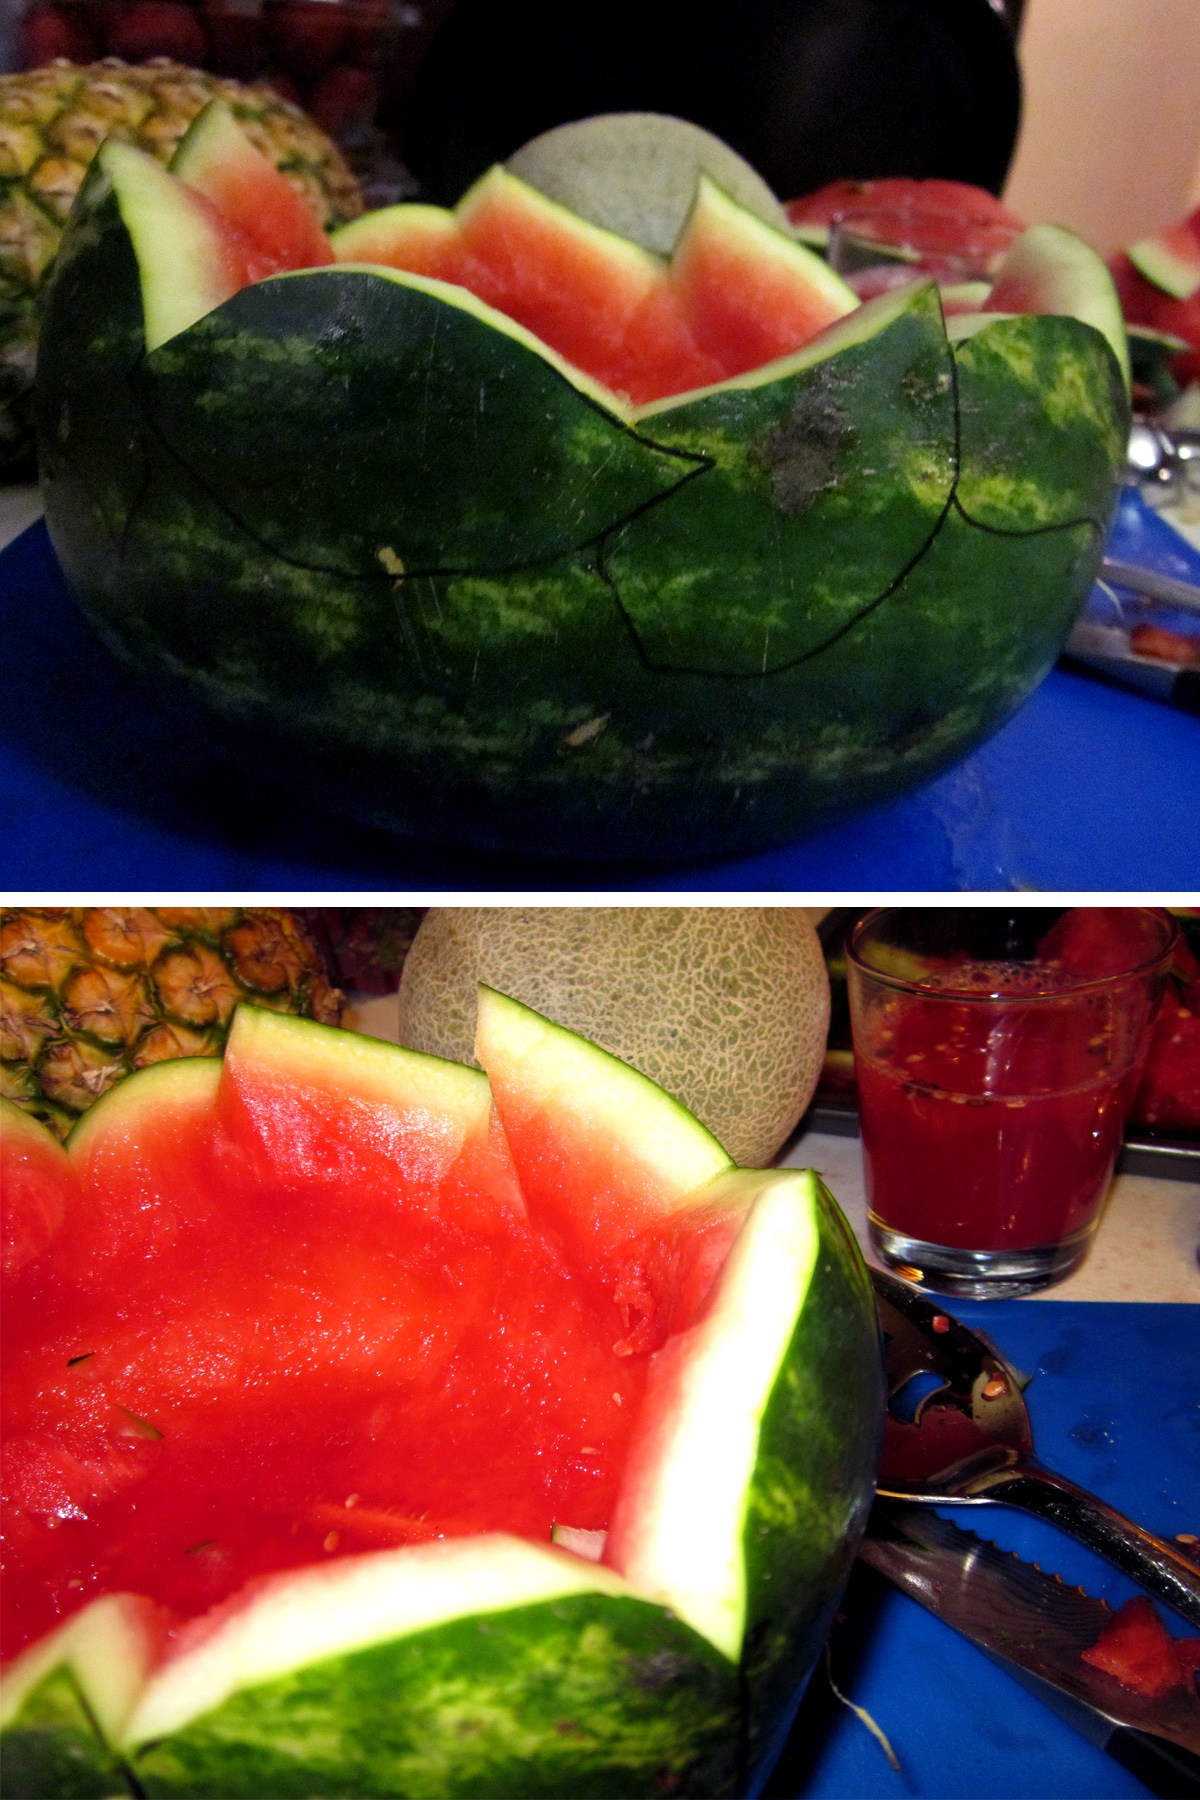
Carefully carve off the top of the watermelon. I aimed for all of the peaks/high points of my design, but you can aim a bit higher if you're not feeling that confident.

You can always carve more away, but it's hard to add watermelon if you've carved away too much!
Once you've carved and removed the very top, scoop out some of the watermelon - for this design, I left about 1" of red around the side walls.
This was to allow for the red design to show through in the middle of the leaves. Because there is no need for extra watermelon flesh on the very bottom, I scooped it out almost down to the white rind.
Note: If you want melon balls, use the melon baller to scoop them out right from the whole watermelon. It’s a lot easier to do that, than to get balls out of melon that has been scooped out!
Using a sharp knife - I used a good paring knife - carefully carve out the outer edge of your leaf design. Aim to keep your knife straight in, at a 90 degree angle to the surface you are carving - you'll taper the edges later.

Once the outer edge has been carved, go back over it and carefully taper the edges in a bit. Clean up any rough edges on the green rind, and taper inward from there - creating a gentle, rounded edge to the white rind, into the red.
Don't taper it in at too shallow a slope, though - you'll want plenty of red behind the middle of the leaf design!
Start Carving Your Design
Using the very tip of your paring knife, trace along one side of your leaf design marks, and then again on the other side of each mark. Take your time, and be gentle.
Well, not too gentle, anyway - you're going to want to cut deep enough to get down into the white part of the rind.
Once you've cut the edges of the channel you're about to make, carefully wedge the edge of your knife into one side of your new design lines. You'll want to wedge it in almost parallel to the rind - not go deep with it.

Lift your knife a bit, pulling out a bit of rind. Not going to lie, this is fussy work and will take you a while if it's you first go at it! Also, be careful not to stab yourself! It's really easy to cut all the way through the wall, and right in to your hand. Trust me on this.
Continue carving out the edges of your leaf design, the whole way around. If some areas don't pull up and out easily, you may need to re-cut the edges of the channel in those places.

Detail the Leaves
Once all of your leave edges have been carved out, use your Sharpie/dry erase marker to draw the outer edge of what will become the white interior of the leaf design. (This didn't show up so well in photos, due to glare... thank you, Photoshop!)
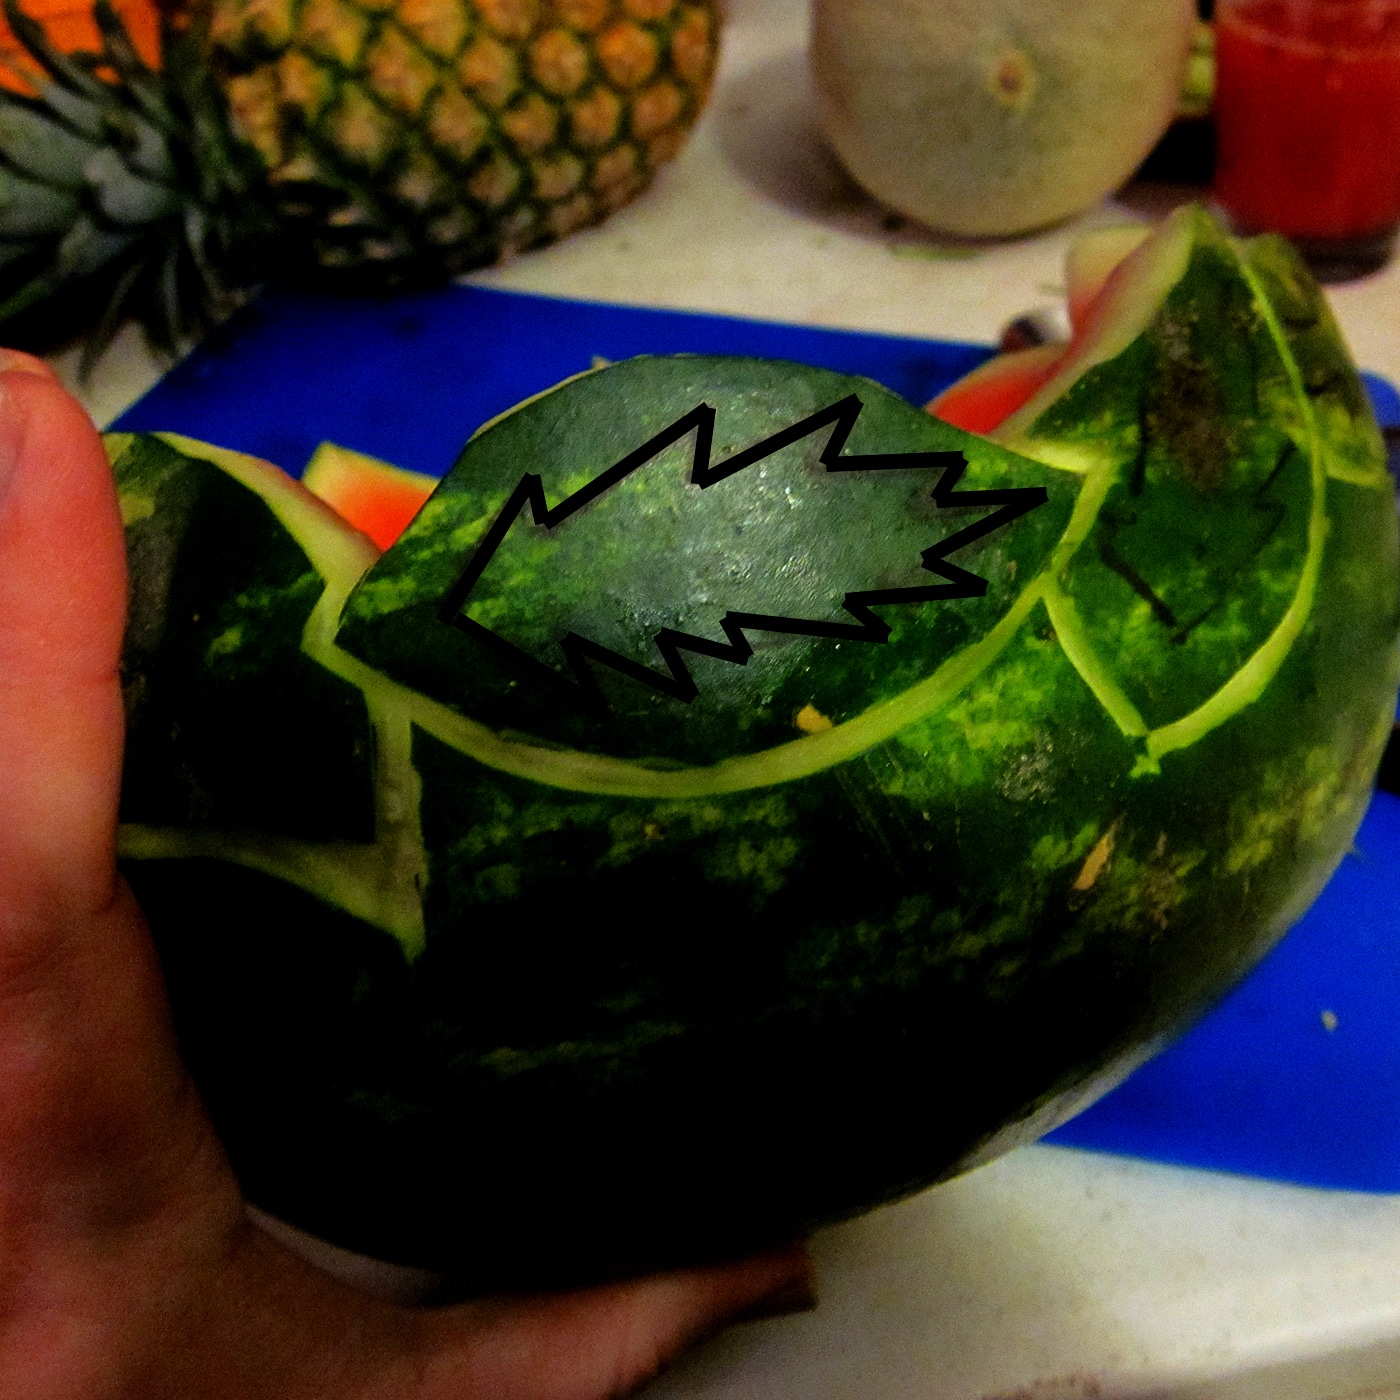
As with the channels for the leaf edges, trace the tip of your knife along the outsides of the new marks, and carefully carve out the green rind inside the designs. Try not to go too deep with it.

Because the exposed white rind is so wet, you'll have to freehand the next bit.
Leaving a bit of white rind around the edges, once again trace a shallow pattern with the tip of your knife, and carve the middle down to the red flesh of the watermelon interior.
Tah dah! Bastardized Caladium leaves!

Serve your Caladium Leaf Watermelon Bowl!
Position your fruit bowl on a serving platter (the bottom will very likely leak moisture), and fill with your choice of fruit.
Be sure it's all ripe and sweet, NOTHING is worse than less than ripe fruit in such a display!
Set it out and enjoy!

More Seasonal Fun With Food
Looking for more fun, tasty, and crafty ways to celebrate? Here are a few more ideas!
3D Monarch Butterfly Cupcakes
Bloody Eyeball Halloween Punch
Canadian Watermelon Bowl
Halloween Themed Shooters
How to Carve a Pumpkin Like a Pro
Stars and Stripes Watermelon Bowl
Tornado Smashed Gingerbread House


Share the Love!
Before you chow down, be sure to take some pics of your handiwork! If you post it to Bluesky, be sure to tag us - @CelebrationGen. We're also on Pinterest, so you can save all your favourite recipes to a board!
Also, be sure to subscribe to my free monthly email newsletter, so you never miss out on any of my nonsense.
Well, the published nonsense, anyway!


How to Carve a Caladium Leaf Watermelon Bowl
Equipment
- Chef Knive
- Paring Knife
- Large Metal Spoon
- Melon Baller
- Pumpkin Carving Set (Optional)
Ingredients
- 1 Large Watermelon
- Fruit to Fill it With
- Craft paper, rosin paper, etc (as a drop cloth)
Instructions
- Figure out how you want your watermelon to sit, and carve a small amount of rind off the bottom.
- Once watermelon has a solid base to it, draw your design on it, using a dry erase marker.
- Carefully carve off the top of the watermelon. I aimed for all of the peaks/high points of my design, but you can aim a bit higher if you're not feeling that confident. You can always carve more away, but it's hard to add watermelon if you've carved away too much!
- Once you've carved and removed the very top, scoop out some of the watermelon - for this design, I left about 1" of red around the side walls. This was to allow for the red design to show through in the middle of the leaves. Because there is no need for extra watermelon flesh on the very bottom, I scooped it out almost down to the white rind.
- Using a sharp knife - I used a good paring knife - carefully carve out the outer edge of your leaf design. Aim to keep your knife straight in, at a 90 degree angle to the surface you are carving - you'll taper the edges later.
- Once the outer edge has been carved, go back over it and carefully taper the edges in a bit. Clean up any rough edges on the green rind, and taper inward from there - creating a gentle, rounded edge to the white rind, into the red. Don't taper it in at too shallow a slope, though - you'll want plenty of red behind the middle of the leaf design!
- Using the very tip of your paring knife, trace along one side of your leaf design marks, and then again on the other side of each mark. Take your time, and be gentle.
- Well, not too gentle, anyway - you're going to want to cut deep enough to get down into the white part of the rind.
- Once you've cut the edges of the channel you're about to make, carefully wedge the edge of your knife into one side of your new design lines. You'll want to wedge it in almost parallel to the rind - not go deep with it. Life your knife a bit, pulling out a bit of rind. Not going to lie, this is fussy work and will take you a while if it's you first go at it! Also, be careful not to stab yourself! It's really easy to cut all the way through the wall, and right in to your hand. Trust me on this.
- Continue carving out the edges of your leaf design, the whole way around. If some areas don't pull up and out easily, you may need to re-cut the edges of the channel in those places.
- Once all of your leave edges have been carved out, use your Sharpie/dry erase marker to draw the outer edge of what will become the white interior of the leaf design. (This didn't show up so well in photos, due to glare... thank you, Photoshop!)
- As with the channels for the leaf edges, trace the tip of your knife along the outsides of the new marks, and carefully carve out the green rind inside the designs. Try not to go too deep with it.
- Because the exposed white rind is so wet, you'll have to freehand the next bit. Leaving a bit of white rind around the edges, once again trace a shallow pattern with the tip of your knife, and carve the middle down to the red flesh of the watermelon interior.
- Position your fruit bowl on a serving platter (the bottom will very likely leak moisture), and fill with your choice of fruit. Be sure it's all ripe and sweet, NOTHING is worse than less than ripe fruit in such a display!
- Set it out and enjoy!


Kim Ode
Drop dead gorgeous. I've seen cutouts designs and such before but never with the express intent of recreating something that actually is of those colors. Caladium! Love it. And an early Happy Birthday to you!
Suzanne
So beautiful!! I love carving pumpkin and this will be such a fun project for our open house. Thank you for sharing!