

How to Carve a Stars and Stripes Watermelon Bowl
Originally published June 13, 2012. Updated on 6/17/2021

If you’re wondering How to Carve a Stars and Stripes Watermelon, look no further. This could be perfect for your July 4th celebration.
When I recently got it in my head that carving a Caladium Leaf Watermelon Bowl would be cool, I had no idea that it would inspire me to do other watermelon designs.
Here's the 3rd in less than a month - I swear I'm done now! All watermeloned out!
As I promised on my Canada Day Watermelon Bowl, I had carved a second watermelon that same day... for my American friends.
Well, and to gain brownie points with my American husband, after all of the Canada Day talk that had preceded it!
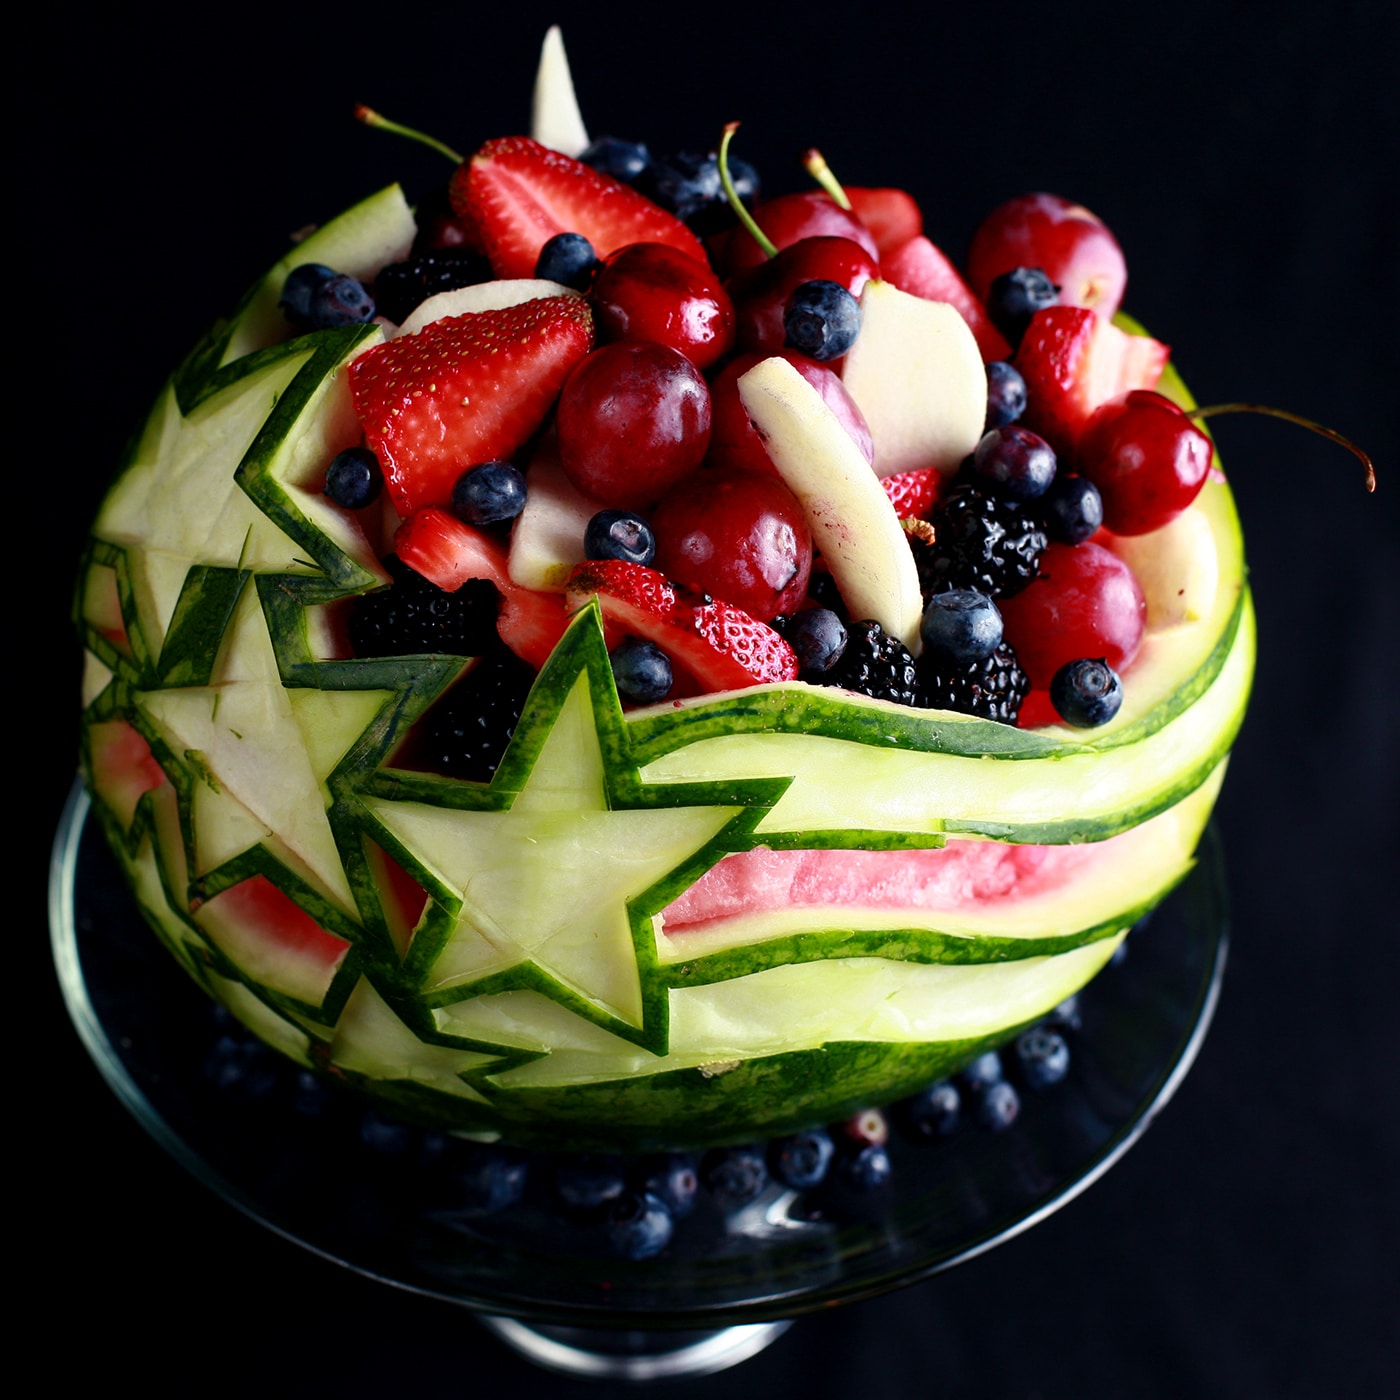
So here we go, with plenty of time before the 4th of July - a Stars and Stripes themed watermelon fruit bowl! Perfect for any red, white and blue Independence Day party, BBQs, potlucks, or whatever.
This design whipped up quickly and easily, and is sure to impress!
What You Need to Carve a Watermelon
Watermelon Carving Ingredients
A Large Watermelon
See further below for info on choosing one!
Fruit for the Filling
To keep this bowl on theme for the “Stars and Stripes” / Independence Day thing, I went with red, white, and blue fruit.
Some ideas:
Red Fruit: strawberries, raspberries, red grapes, cherries, red currants, pomegranate arils, watermelon balls.
White Fruit: Peeled Lychee (fresh or canned), apples*, pears*, bananas*, white dragonfruit/pitaya, peeled rambutan, pineberries, coconut, white mulberries.
Blue Fruit: blueberries, blackberries, blackcurrants.
* These fruits should be tossed with a bit of lemon juice, to prevent browning.
Watermelon Carving Tools & Supplies
Drop “Cloth”
I like to use 2 layers of craft packing paper (office supply stores), or rosin paper (home improvement stores) to cover my work surface.
Carving watermelon is messy business, and this makes cleanup easier!
Knives
Be sure to have a large chef’s knife and a paring knife, at the very least.
Large Spoon for Scooping
I like to use a large metal spoon for scooping out the watermelon flesh, as I find metal gives a cleaner edge than a plastic spoon... but that’s probably overly fussy. Use what works!
Melon Baller
This one is optional, and I didn’t use one for this project.
However, if you’d like watermelon balls - rather than chunks - in your fruit salad, you’ll want to use a Melon Baller to carve the balls out of the bulk of the melon before pulling it out of the whole melon.
Once you’d got enough balled, you can use the large spoon to clean up the inside of the melon.
Pumpkin Carving Set
When I photographed this tutorial, I used just a paring knife to carve it. This worked fine, but was more work than it needed to be.
Now, I use a pumpkin carving set when I’m carving watermelons - especially the metal-ended carving tools. This Pumpkin Carving Set is the set I have.

Dry Erase Marker(s)
I like to use dry erase markers for marking my designs now, a departure from the Sharpies used in the photos.
Sharpies work fine, but don’t wash/rub off easily.
A Serving Plate
I like to use cake plates with a bit of a rim.
Choose your plate based on the side of your watermelon, and whether or not you want to have fruit around the base of it.
How to Choose a Good Watermelon
Watermelons don’t continue to ripen once they’re harvested, so you want to be sure to pick one that is already ripe... without being OVER-ripe.
You’ll want to use a few different senses when it comes to assessing your potential watermelon selections!
Look at It
There are several visual indicators that you should keep in mind when selecting a watermelon. Look for a watermelon that:
- Is dark, not pale green... and with a matte colouration. Shiny watermelons aren’t ripe yet.
- Is nicely symmetrical.
- Is free of bulges, lumps, dents, bruises, and cuts.
- Has a large yellow section on what has been the underside of the melon, as it was growing. Yellow = ripe. Green or white = not ripe. Also, the darker / richer the yellow, the more it was allowed to ripen on the vine.
- Has a dried stem, if there is stem present. A “fresh” green stem means it was harvested before it had fully ripened.
Touch It
Going by feel is another way to ascertain whether a watermelon is likely to be in good shape or not. In general, pick a watermelon that:
- Is firm all over, with no soft spots.
- Feels heavy for its size.
- Feels like its weight is balanced. Even aside from the symmetry issue, you want one where the weight is evenly distributed.
Hear It
Specifically, pay attention to how it sounds when you hit it.
Give your watermelon a whack with the palm of your hand - a thump, not a slap.
If you get a deep sound, you’re good to go. If it sounds dull or hollow, it’s probably too ripe / going bad inside.

Watermelon Carving Tips
- Before carving the watermelon, give it a good scrub. You can use produce wash, or a mix of water and vinegar.
- I like to cover my work surface with rosin paper, and use a cutting board. This spares a lot of potential mess.
- Make sure your knives are SHARP. Dull knives are actually more dangerous, and more likely to result in injury when carving.
- That said, the watermelon should be at room temperature when carving it. Carve, THEN chill.
- The first few times I carved watermelons, I marked my design with Sharpies, intending to cut the markings off. DRY ERASE markers work so much better! So, do as I say, not as I did in these decade-old photos!
- When it comes time to serve it, make your fruit salad in a separate bowl, and spoon it in. This will be most gentle on your carving, allow you to mix the salad well, and allows you to avoid transferring a lot of excess juice with the fruit.
How to Carve a Stars and Stripes Watermelon Bowl
Mark & Outline Your Design
Before you get started, take a good look at your watermelon – there should be an obvious top and bottom to it.
Figure out how you want it to sit, and carve a small amount of rind off the bottom. It may take a few passes to get it to sit solid and level – you don’t want it rolling around as you work, or after you fill it!

Once watermelon has a solid base to it, draw your design on it. I used a Sharpie, fully intending to carve out anywhere I had drawn. In retrospect, a dry erase marker may have been a smarter idea.

Using the very tip of your paring knife, trace along the edges of your design marks. Take your time, and be gentle. Well, not too gentle, anyway – you’re going to want to cut deep enough to get down into the white part of the rind.

Start Carving Your Design
Once you’ve cut the edges of the design piece (say, a star) you’re about to carve out, carefully wedge the edge of your knife into one of your new design lines.

You’ll want to wedge it in almost parallel to the rind – not go deep with it. Lift your knife a bit, pulling out a bit of rind.

Not going to lie, this is fussy work and will take you a while if it’s you first go at it! Also, be careful not to stab yourself! It’s really easy to slip and drive the knife right in to your hand. Trust me on this.
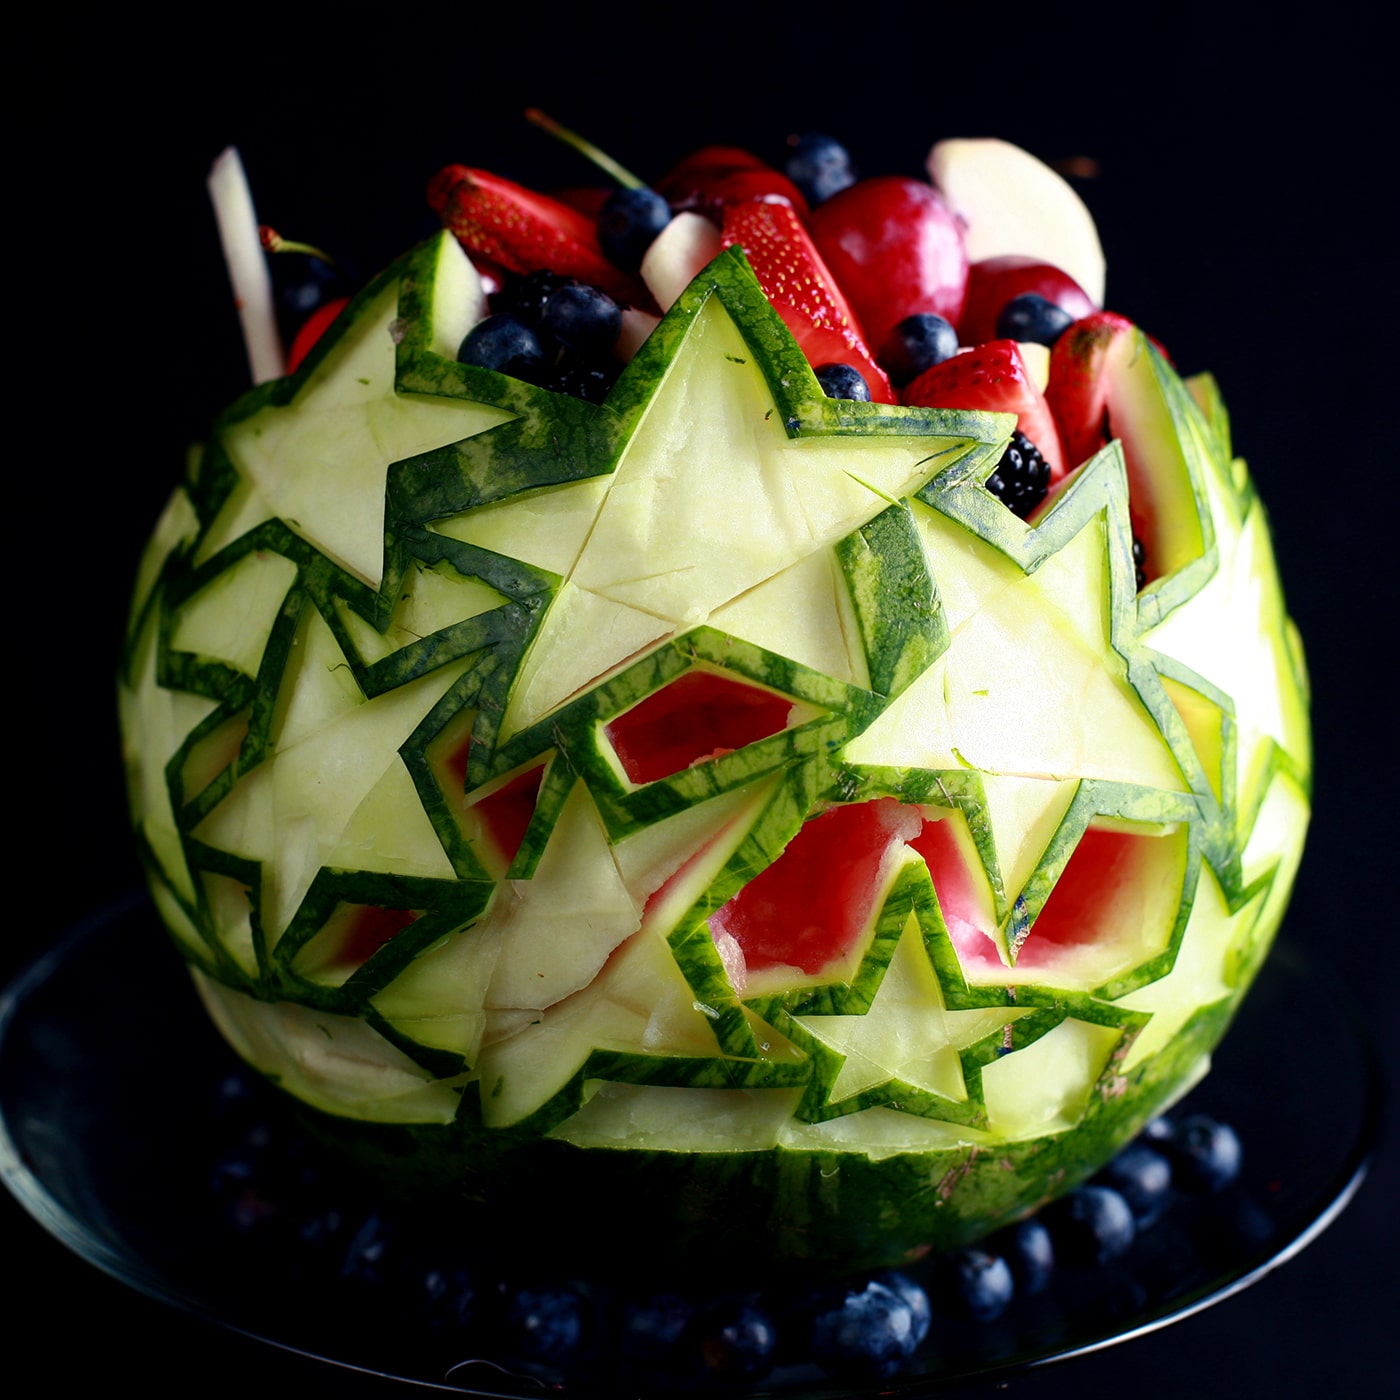
Continue carving the rind out of your designs, until finished. Be sure to leave a green rind border between each individual design element.
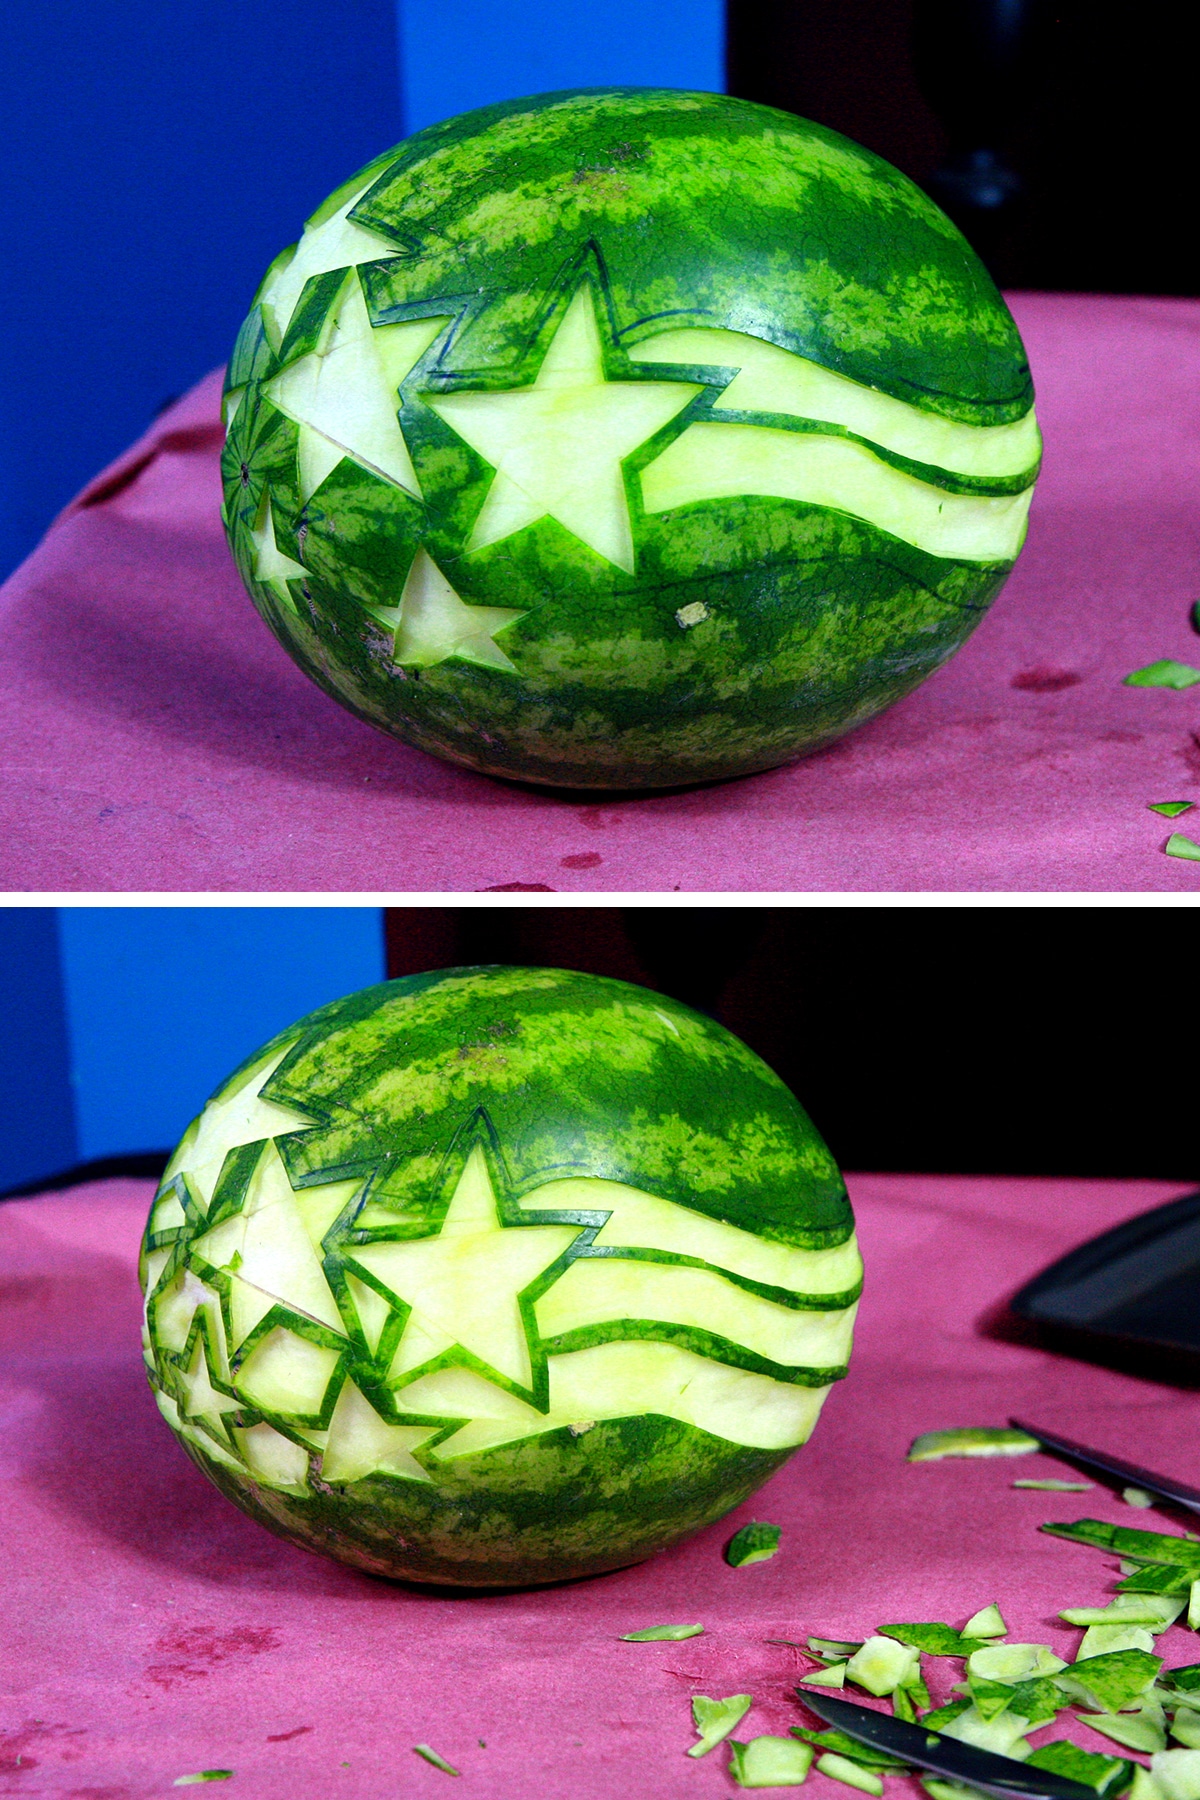
Also, for now just concern yourself with getting it down to the white - it doesn't matter that some areas will be red eventually - we're getting there!
Carve and Gut the Watermelon
Carefully carve off the top of the watermelon.

I aimed for all of the peaks/high points of my design, but you can aim a bit higher if you’re not feeling that confident. You can always carve more away, but it’s hard to add watermelon if you’ve carved away too much!
Once you’ve carved and removed the very top, scoop out some of the watermelon – for this design, I left about 1″ of red around the side walls.

This was to allow for the red design to show through for the red stripe. Because there is no need for extra watermelon flesh on the very bottom, I scooped it out almost down to the white rind at the bottom of the melon.
Note: If you want to serve the watermelon as balls, use the melon baller to remove the flesh. It’s a lot easier to do it when it’s intact and in the melon, rather than after you’ve taken it out in chunks
Using a sharp knife – I used a good paring knife – carefully carve out the outer edge of your leaf design. Aim to keep your knife straight in, at a 90 degree angle to the surface you are carving.

Clean up the Edges
Once the outer edge has been carved, go back over it and carefully taper the edges in a bit.
Clean up any rough edges on the green rind, and taper inward from there – creating a gentle, rounded edge to the white rind, into the red.
Don’t taper it in at too shallow a slope, though – you’ll want plenty of red behind the middle of the red stripe design!
Carve the Red Sections
In the areas that you want red, VERY CAREFULLY carve out the white part of the rind to expose the red flesh behind it.

You may want to do this in several small passes, rather than taking out deep chunks.
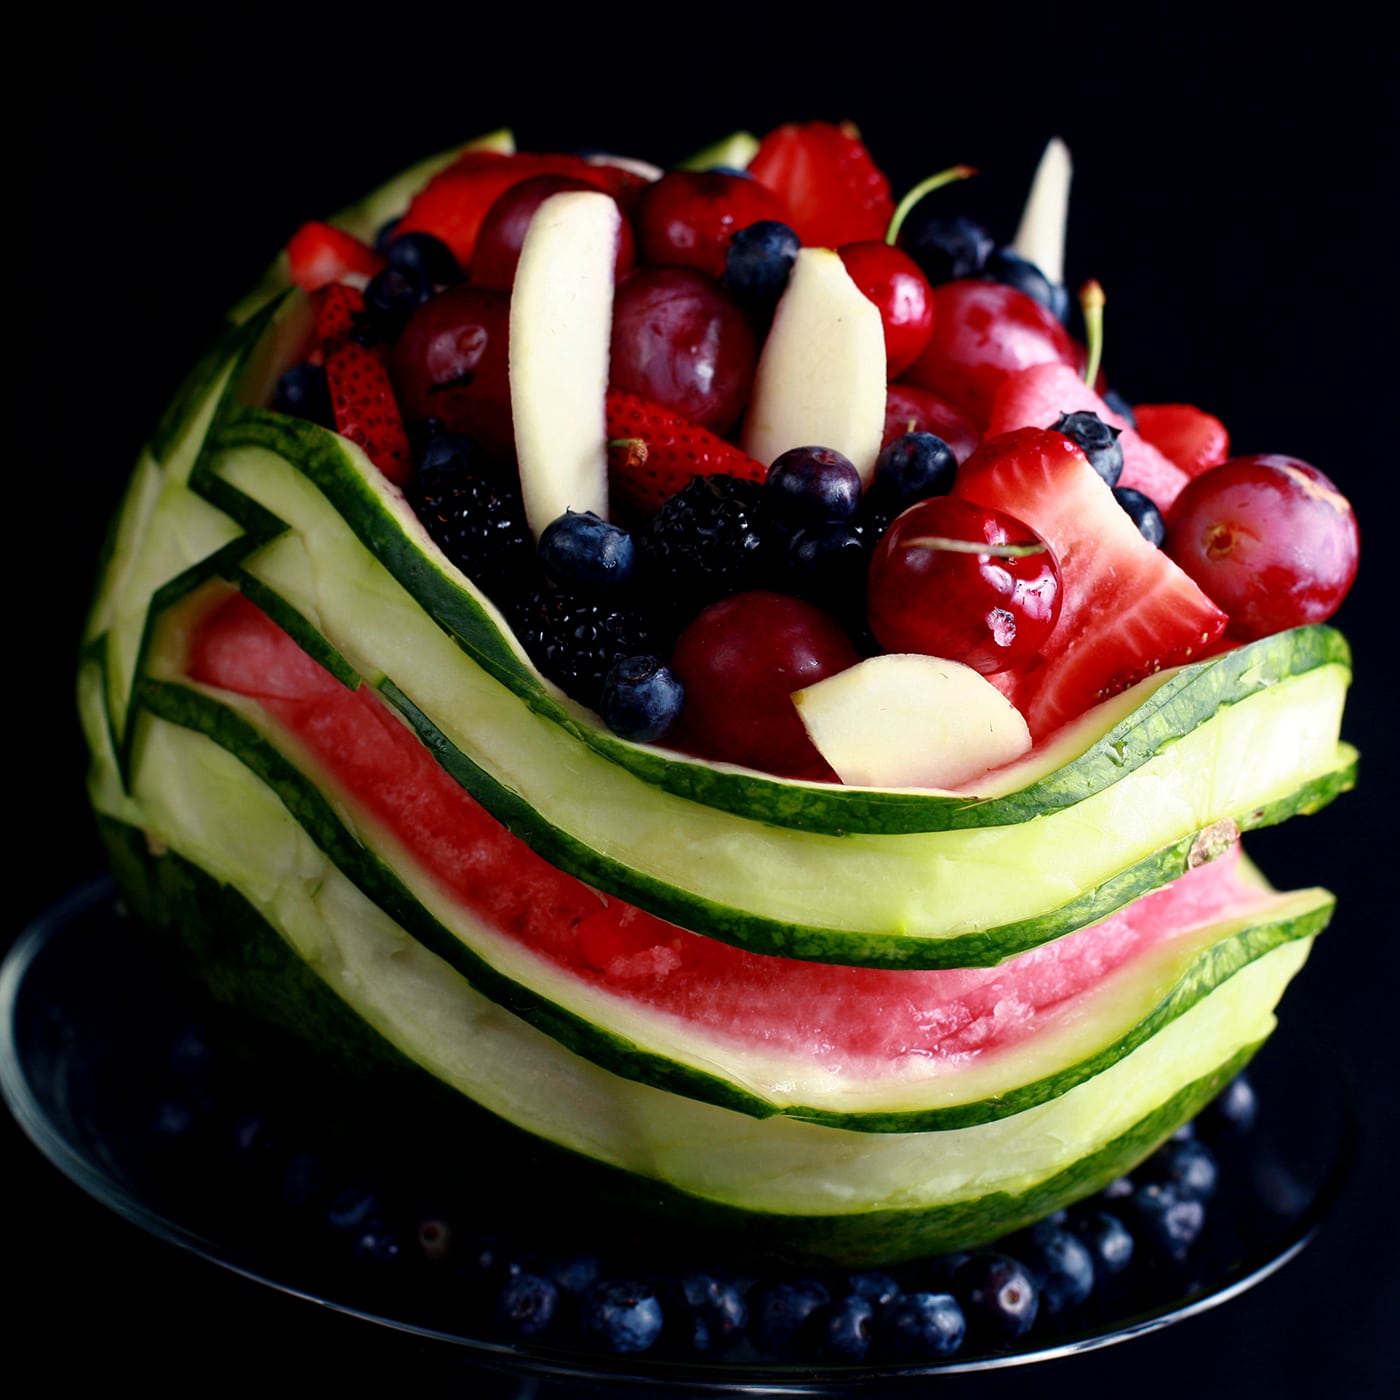
Serve Your Independence Day Watermelon!
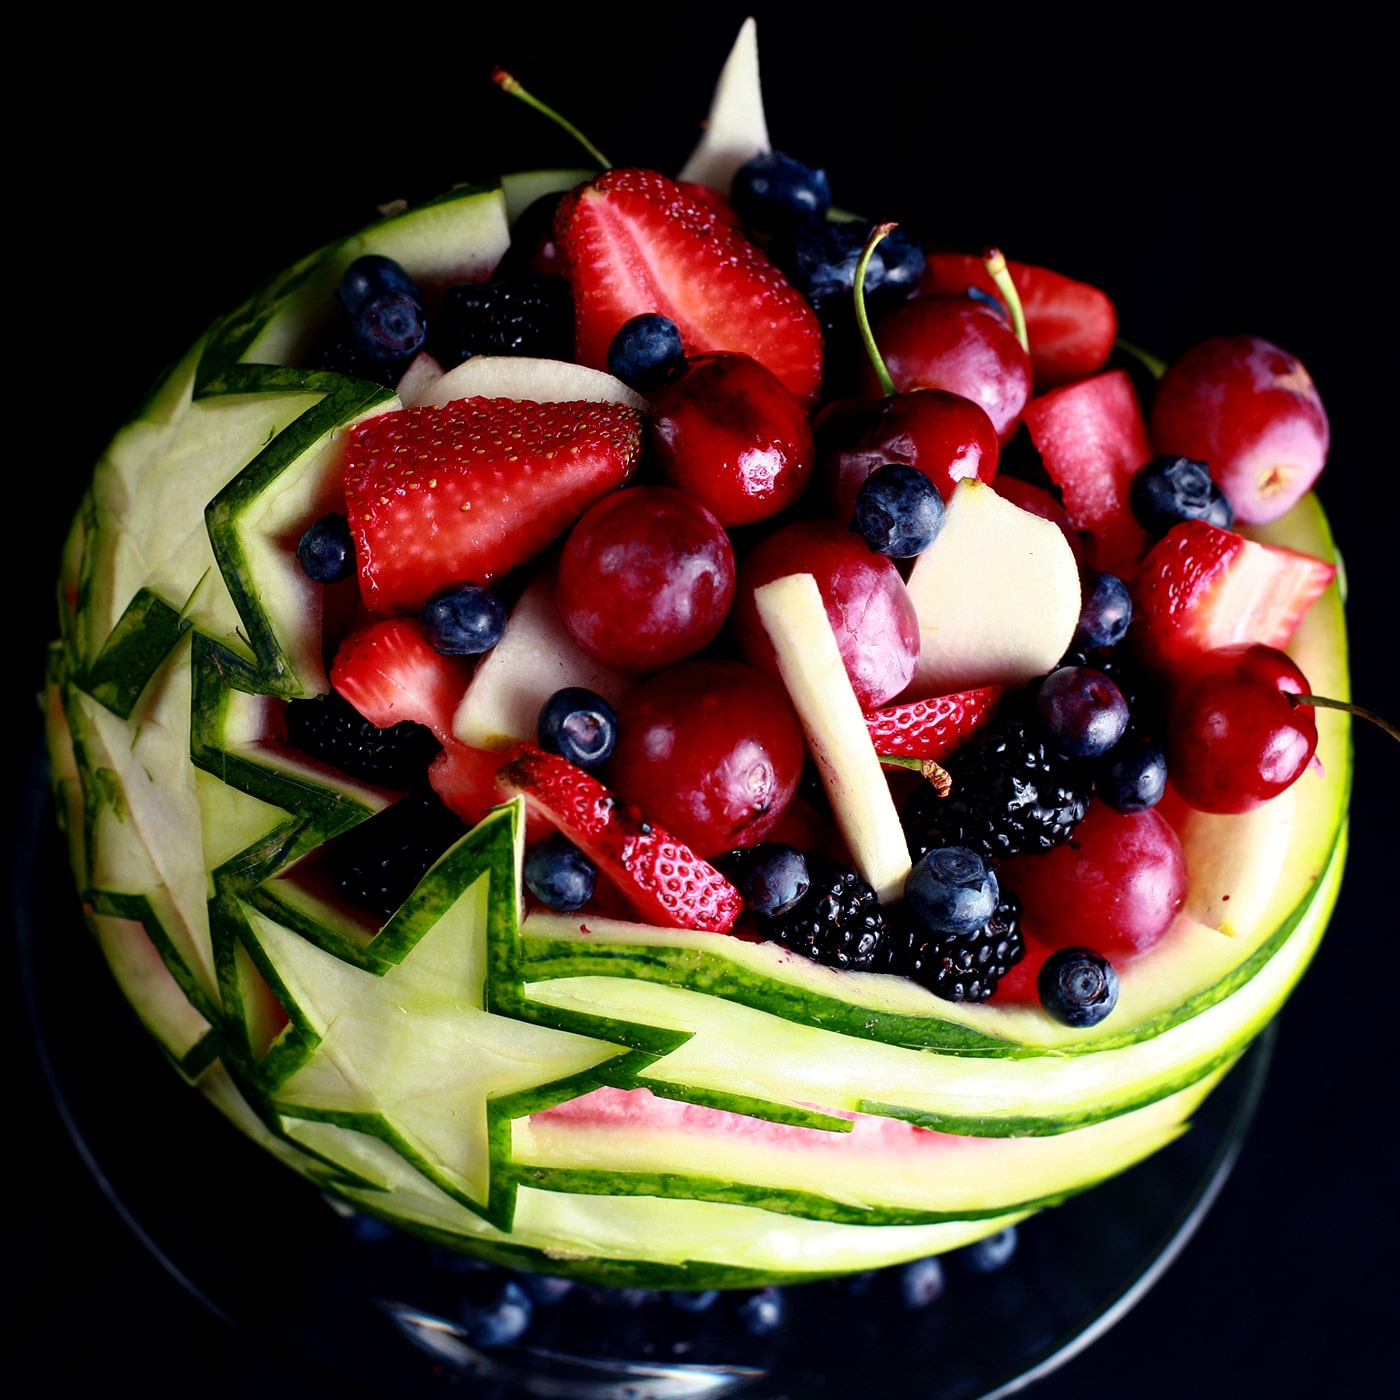
Position your fruit bowl on a serving platter (the bottom will very likely leak moisture), and fill with your choice of red, white, and blue fruit.
Be sure it’s all ripe and sweet, NOTHING is worse than less than ripe fruit in such a display!
For ours, we used watermelon, red grapes, strawberries, cherries, peeled/sliced pears, blueberries and blackberries.
Set it out and enjoy!

More Seasonal Fun With Food
Looking for more fun, tasty, and crafty ways to celebrate? Here are a few more ideas!
3D Monarch Butterfly Cupcakes
Bloody Eyeball Halloween Punch
Caladium Leaf Watermelon Bowl
Canadian Watermelon Bowl
Halloween Themed Shooters
How to Carve a Pumpkin Like a Pro
Stars and Stripes Watermelon Bowl
Tornado Smashed Gingerbread House

Share the Love!
Before you chow down, be sure to take some pics of your handiwork! If you post it to Bluesky, be sure to tag us - @CelebrationGen. We're also on Pinterest, so you can save all your favourite recipes to a board!
Also, be sure to subscribe to my free monthly email newsletter, so you never miss out on any of my nonsense.
Well, the published nonsense, anyway!


Karen O'Lawdhavemercy
Totally Awesome! 🙂
Crystal L DeFrate
Brilliant and inspirational, like the artist herself. 🙂
Toni Esser
Brilliant and Beautiful!!!! We will need to try this one 🙂 Thank you for sharing your talent.
Maria
Just wanted to let you know I made your watermelon, albeit - not as good! But I blogged about it here: http://craftycre8tions.blogspot.com/2013/07/4th-of-july-watermelon.html
Marie Porter
Thank you so much for sharing! It looks great!
Culinary Supplies Inc.
Very beautiful...perfect for the 4th of July coming!
Melinda
BEAUTIFUL, LOVE IT!! I'M DEFINITELY GOING TO TRY THIS ONE!