

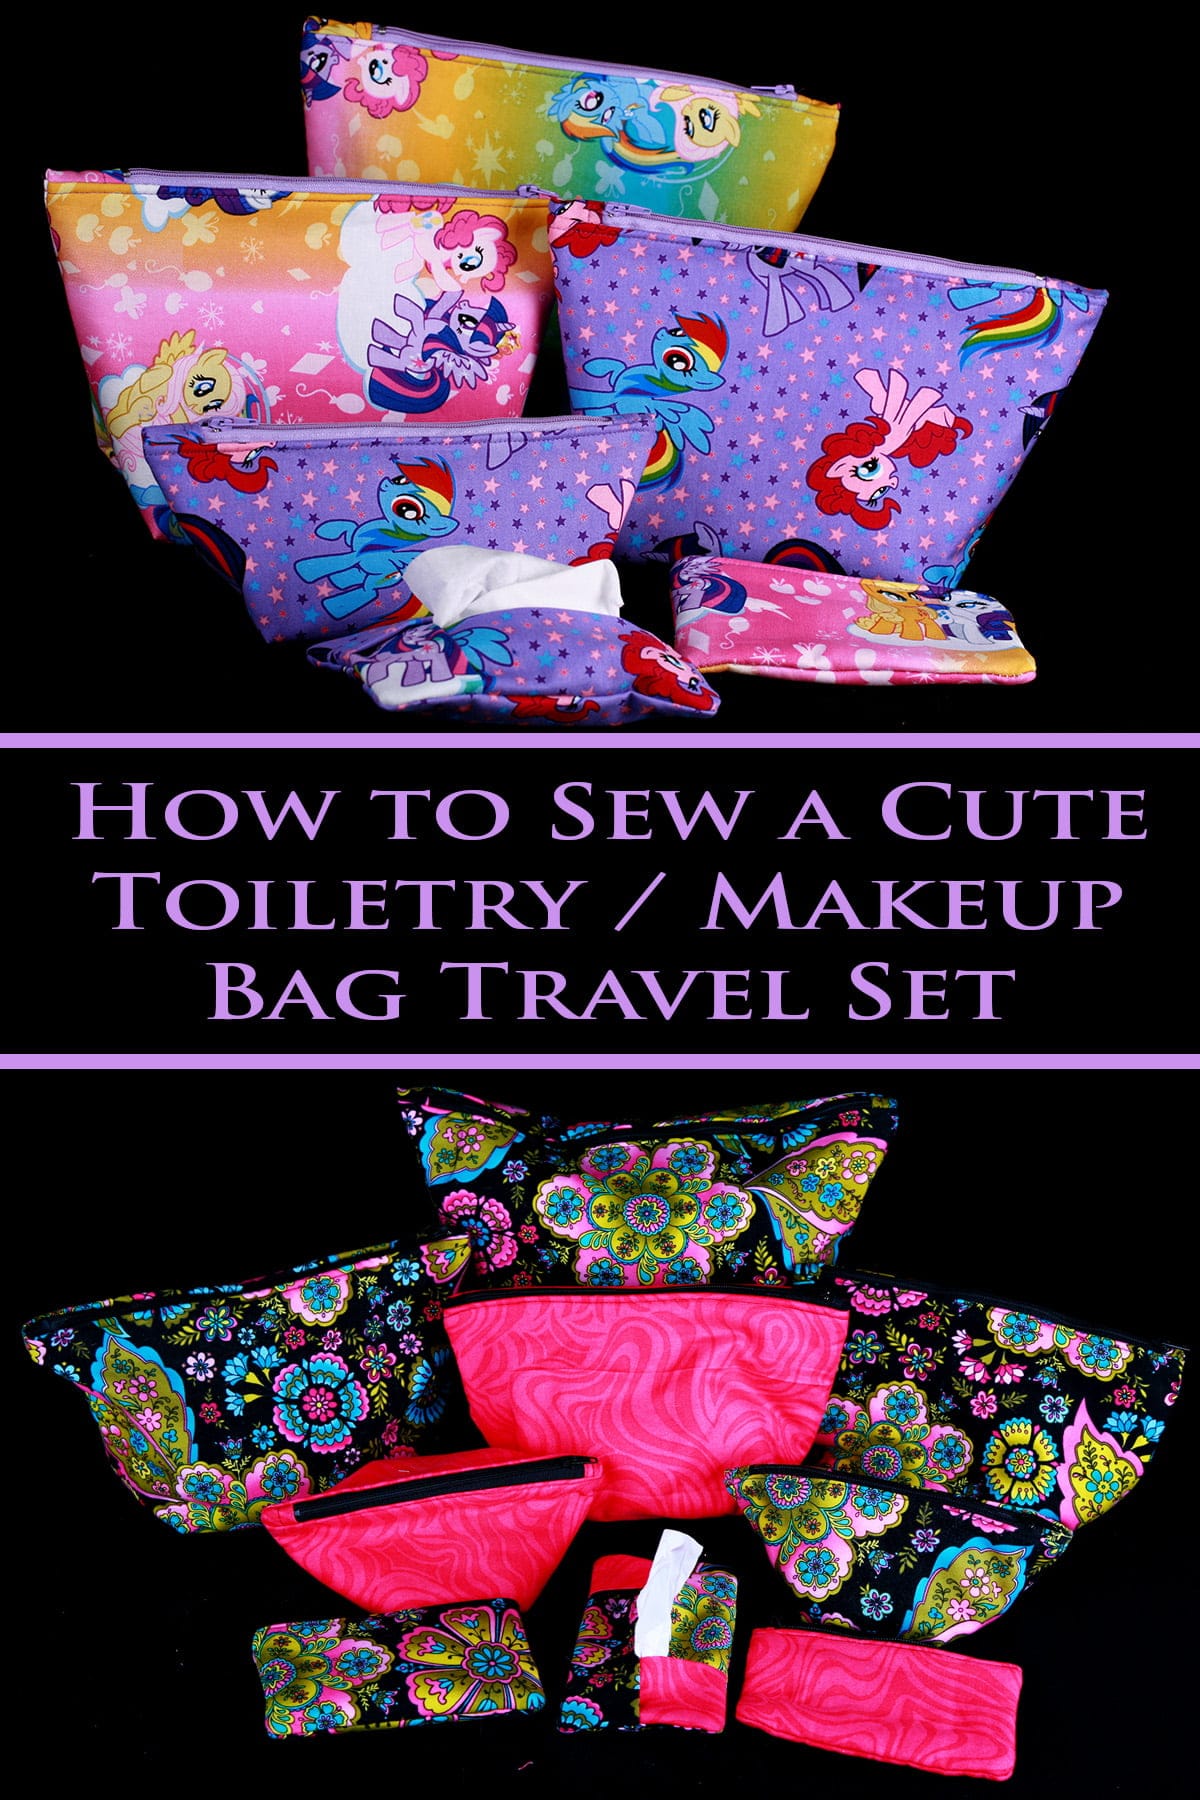
How to Sew a Cute Toiletry / Makeup Bag Travel Set. This set is easy to make and makes a great travel set for yourself... or as a gift!
Originally posted July 22, 2013. Updated 2/2/2021
Back in the beginning of May, I posted a very long, very detailed post of the various ways that I trained and prepared to compete on MasterChef.
While we all know how THAT went, I did walk out of the experience with a bunch of awesome new friends... and the super cute toiletry set I'd made mention of, near the end of that first post!
You see, I never - ever - sew for myself. I like to think of it as "I can't afford me!", but it's usually more a case of a bastardized version of "The cobbler's kids go barefoot".
Either way, I own pretty much nothing that I made for myself, save for my wedding gown.
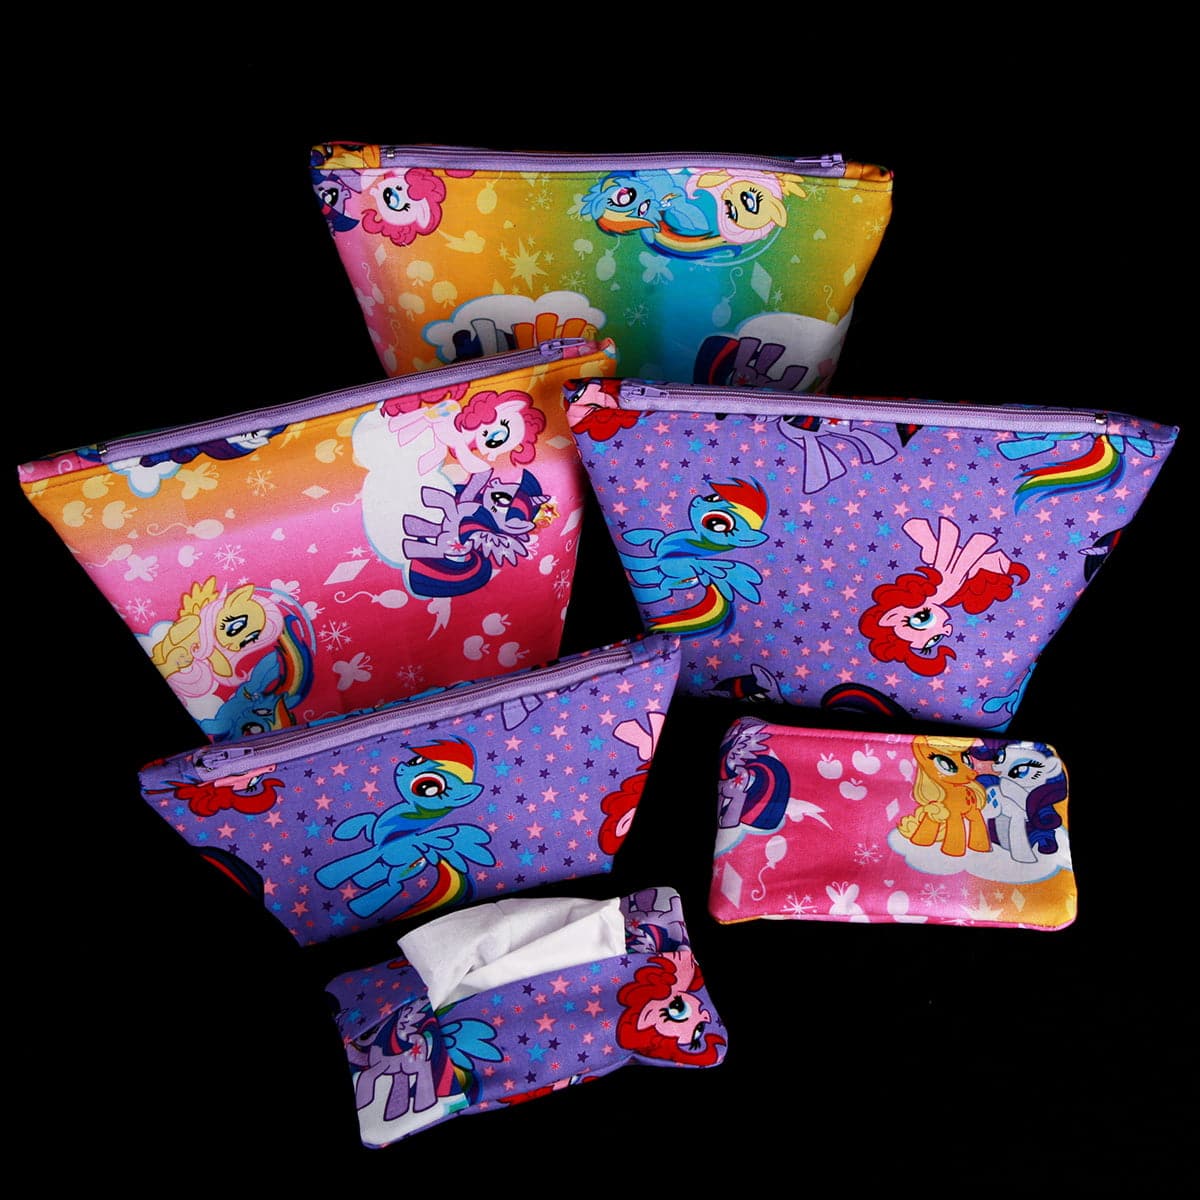
This set was a rare thing for me. I took a bit of time out to make something pretty - albeit HIGHLY useful - for myself.
The idea as inspired by a well-loved 4 piece set of a similar basic design that my friend had made me for Christmas a few years ago - hers quilted from stripes of various different fabrics, embellished with ric-rac. They were super cute, and I loved the stand-up nature of the two little bags in the set.
For my trip, I had so much STUFF to organize, that I decided to make a big set of custom sized ones for myself. (I have a pretty OCD need for everything to match, when we're talking things like suitcases, travel sets, etc!).
The basic idea for the bags came in handy, as I was sharing a bathroom with another woman - so I made a bunch, in a bunch of different sizes.
One bag for hair dye, bleach, gloves, etc… another for accessories, another for hair accessories, another for ALL my makeup, a smaller one for “day of” makeup in my purse, etc.
Plus, the bright print just made me happy!
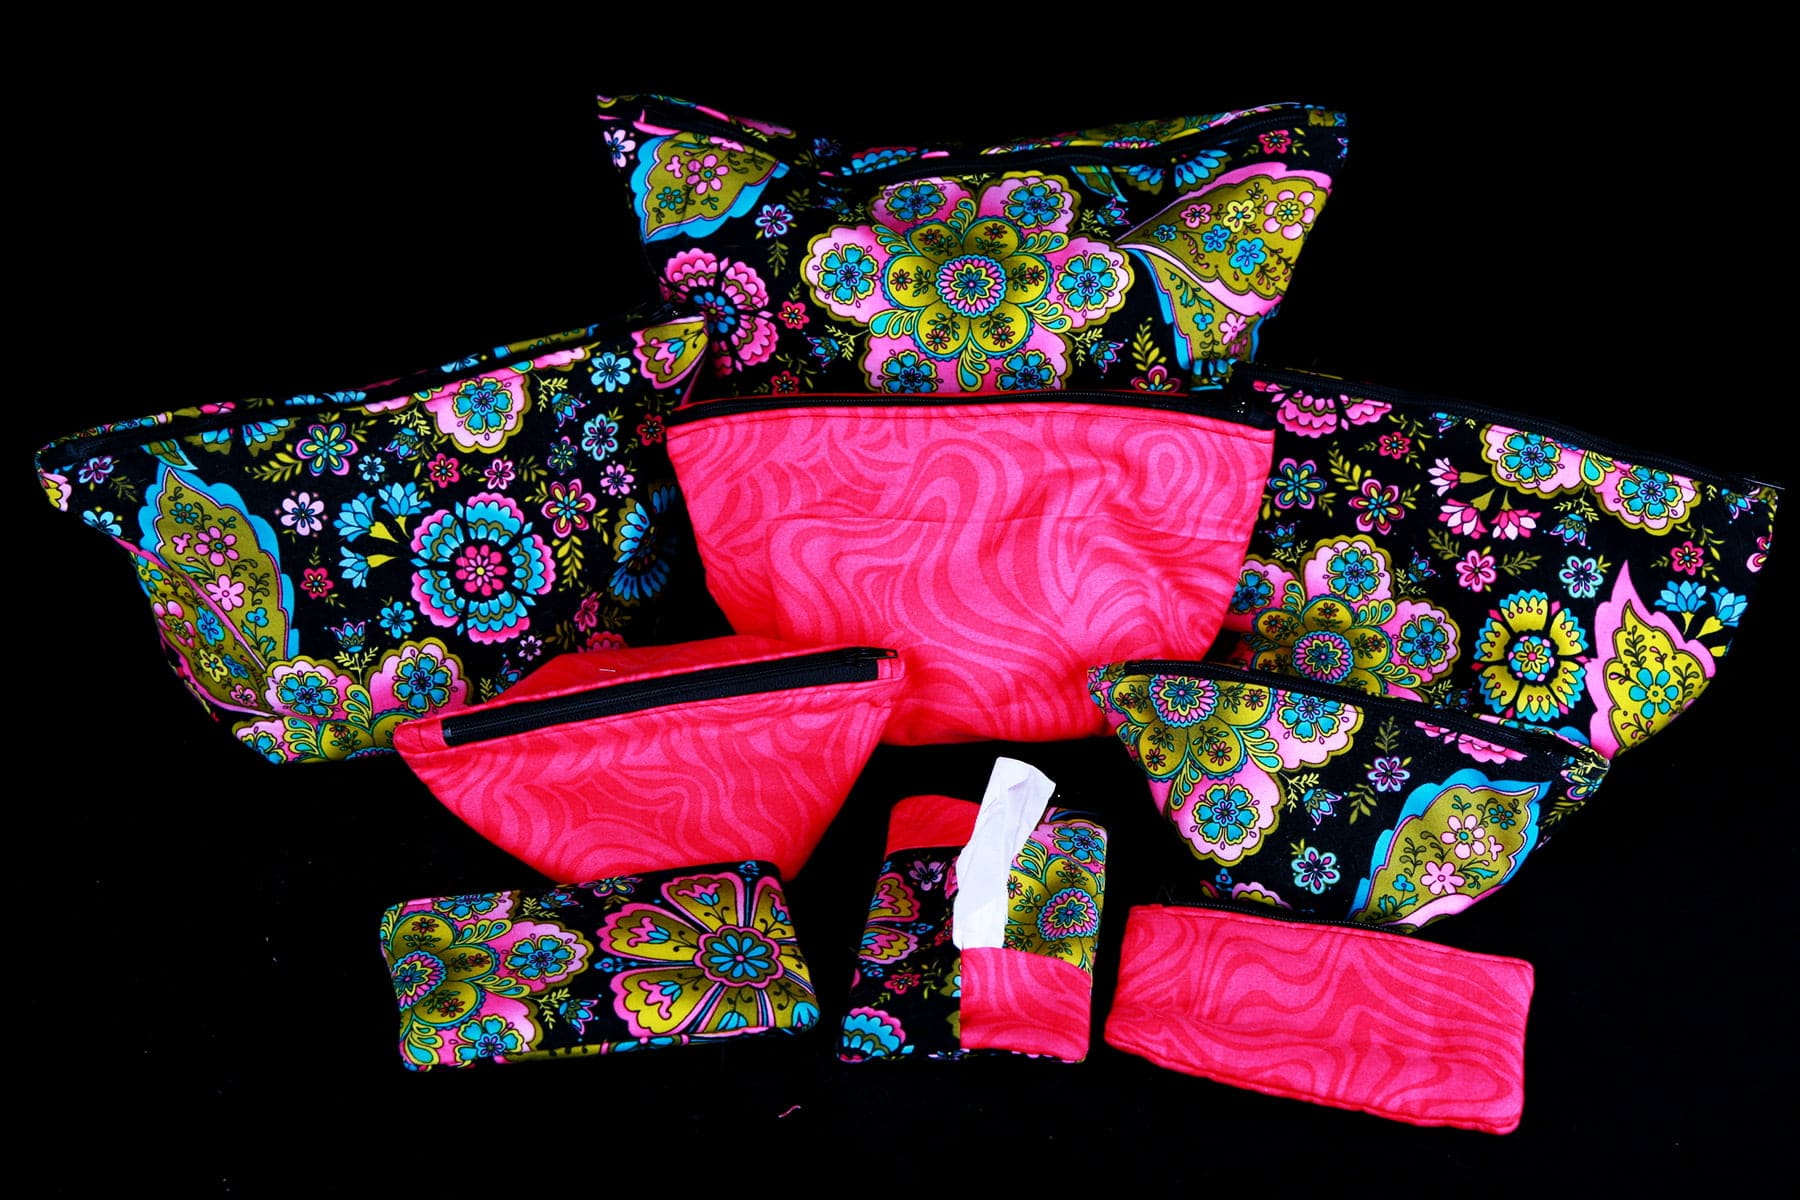
A set I made for a friend - these make fantastic gifts!
Toiletry and Makeup Bag Tutorial
After receiving a bunch of compliments on it, I figured I should post a bit of a how-to, so you can all make them for yourselves!
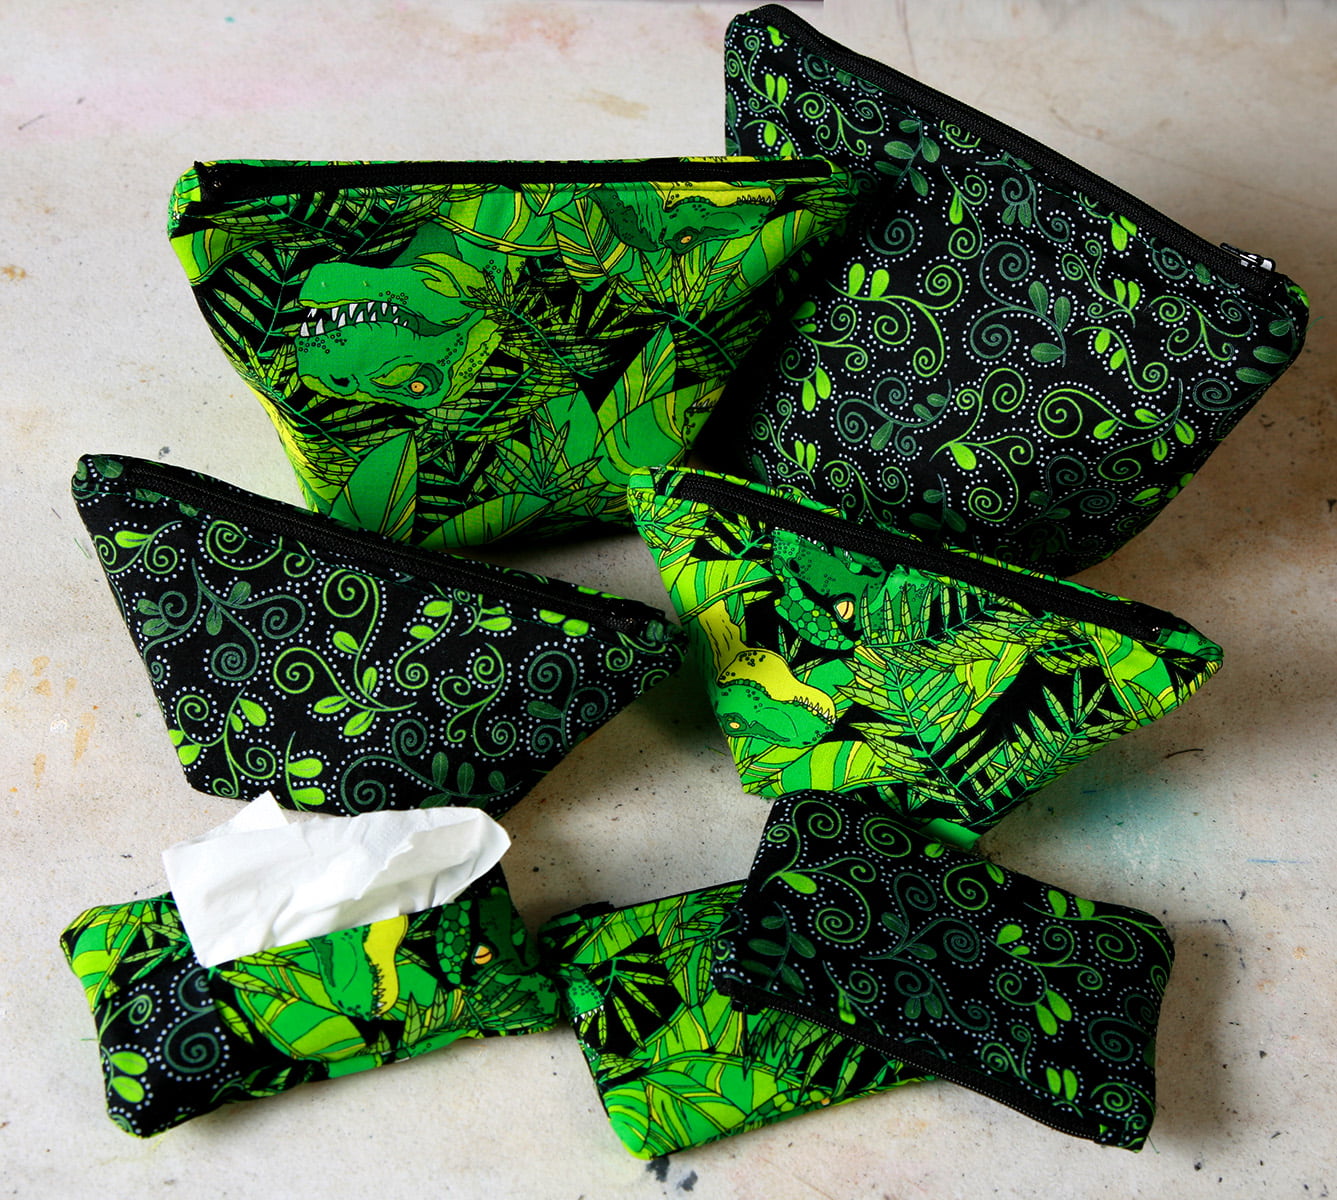
So, yesterday I drafted up a few patterns - and an outline on how to make your own - and made a second set, pictured here.
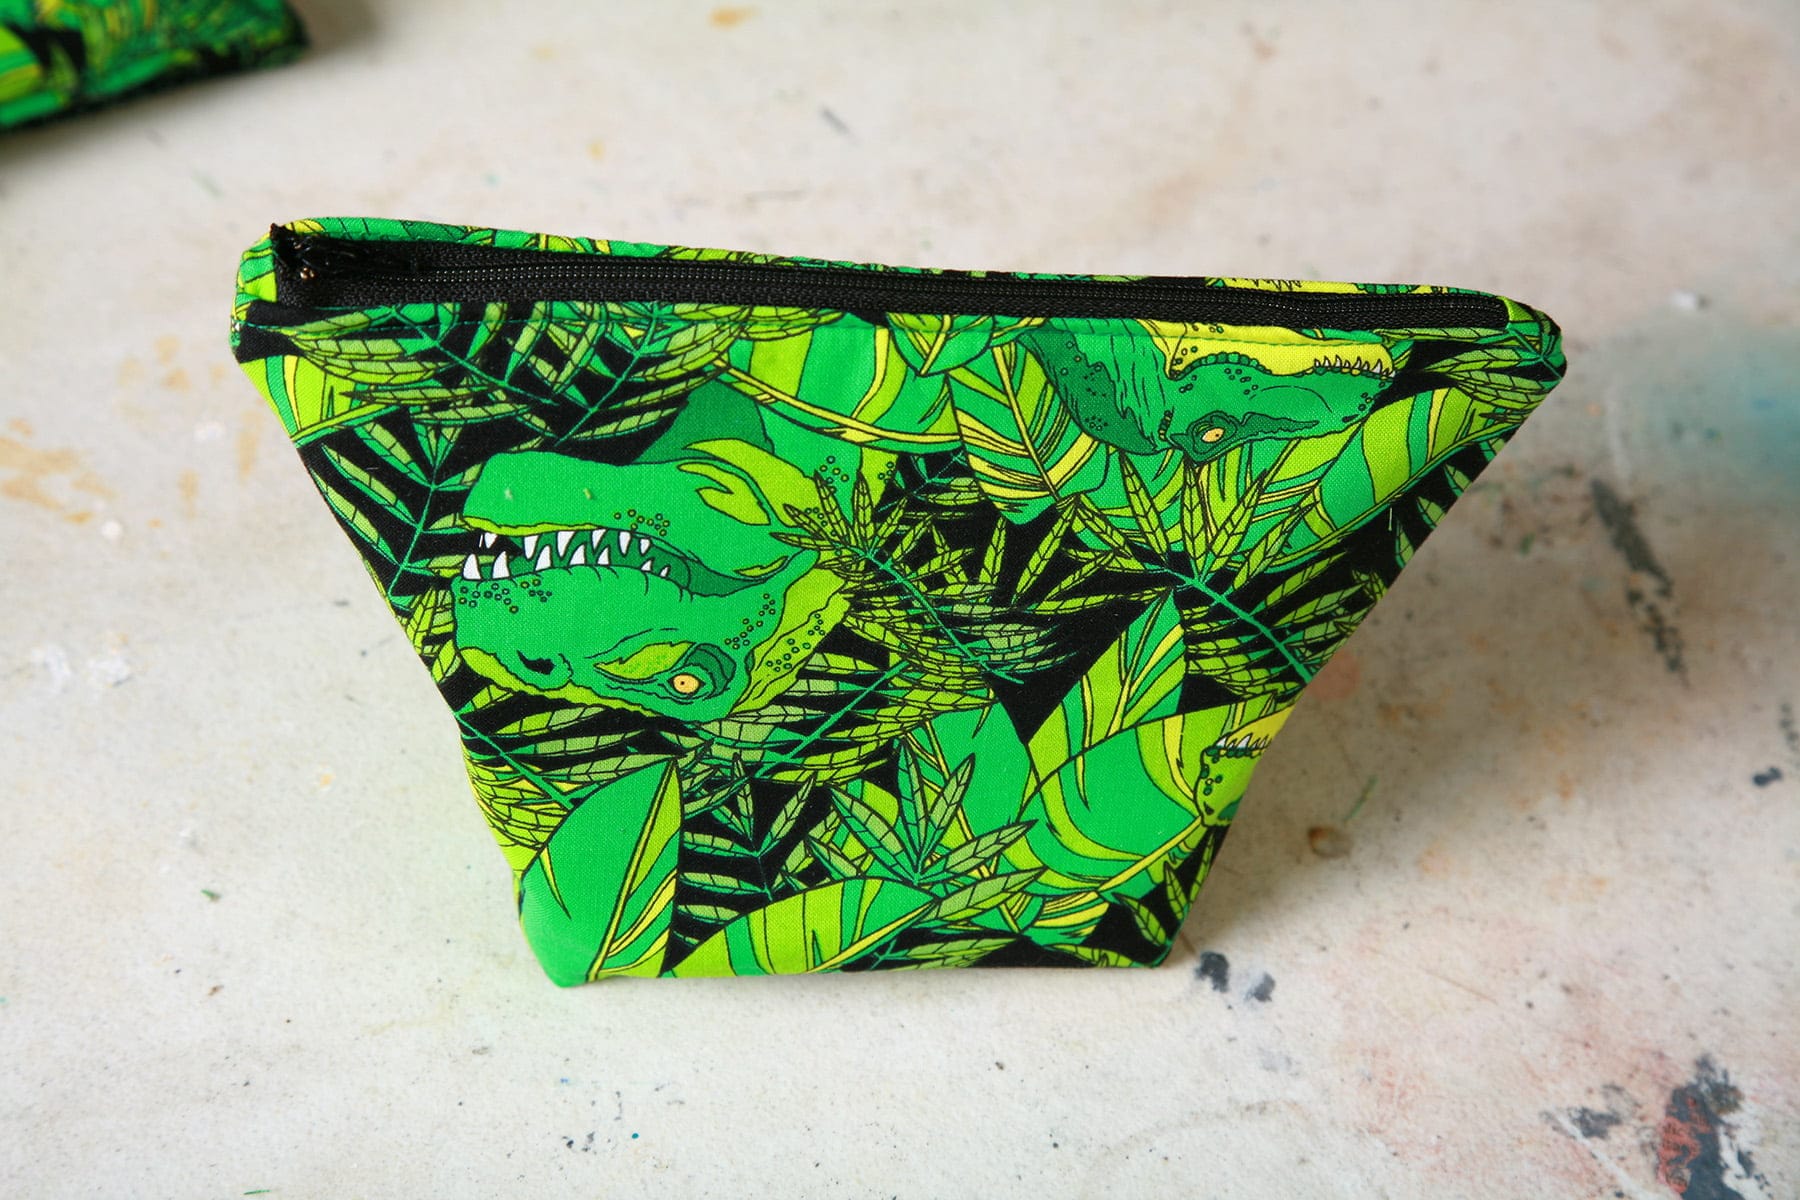
We documented the whole process as I went... yes, that's a dinosaur print. I'm an adult, I can do whatever I want 🙂
So, here we go! There are three main pieces / patterns to this set - the bags, the tissue holder, and the coin purse.
The bag pattern is simple to make, and the sewing procedure is the same for each, no matter what size you make.
The tissue holder and coin purse use the same pattern piece, with the tissue holder requiring one other (simple!) pattern piece.
How to Sew a Cute Toiletry Bag Travel Set
Fabrics & Notions
How much fabric you'll need will depend on how many/ what size items you'll be making. As an example: to make an entire set as pictured, I used 1 yard each of two different print fabrics, and one yard of very thin cotton quilt batting.
Each bag / coin purse requires a zipper that is approximately the width of the bag (more on that in the bags section!), and you'll want thread that either matches/contrasts with the two fabrics you choose.
As for the fabric, I like to choose two prints that go well with each other, while still providing a bit of contrast in colours/ patterns. I used basic printed cotton, the kind you find in any fabric or craft store - usually with a HUGE selection to choose from!
There are fantastic plaids, colourful houndstooth designs, cats, figure skating prints, and autistic pride prints, with many more in the works. Click HERE to go to my main Design Collections page on spoonflower.
Of particular interest for this project: All of the prints in my "Great for Face Masks" collection are appropriately sized for not only making face masks, all of them work well for other smaller-type projects, like this sewing project.
How to Sew a Tissue Holder
Let's start with the easiest piece - the tissue holder!
You Will Need
- Three rectangles of one print fabric, 6.5" x 4" each
- Two squares of the other print fabric, 4" x 4" each
- One travel sized pack of tissues (the kind that opens on the largest surface of the pack, NOT at one small end!)
- Pins (optional
Tissue Holder Instructions
First, iron all your pieces if you so desire. I'm lazy, and usually don't bother 🙂
Next, you'll be folding and laying out your pieces.
Take one of your rectangles, and lay it with the right side up - this is your base.
All four of the remaining pieces need to be folded in half, the long ones folded to create 6.5" x 4" strips.
Position one of your long strips on the base piece, lining up the two raw edges with one of the long edges of the base.

Then, position one of the smaller strips overlapping it, lining up with the short edge of the base piece... like so:

Position the remaining long piece, overlapping the small piece you just put down, and lining up with the remaining long edge.
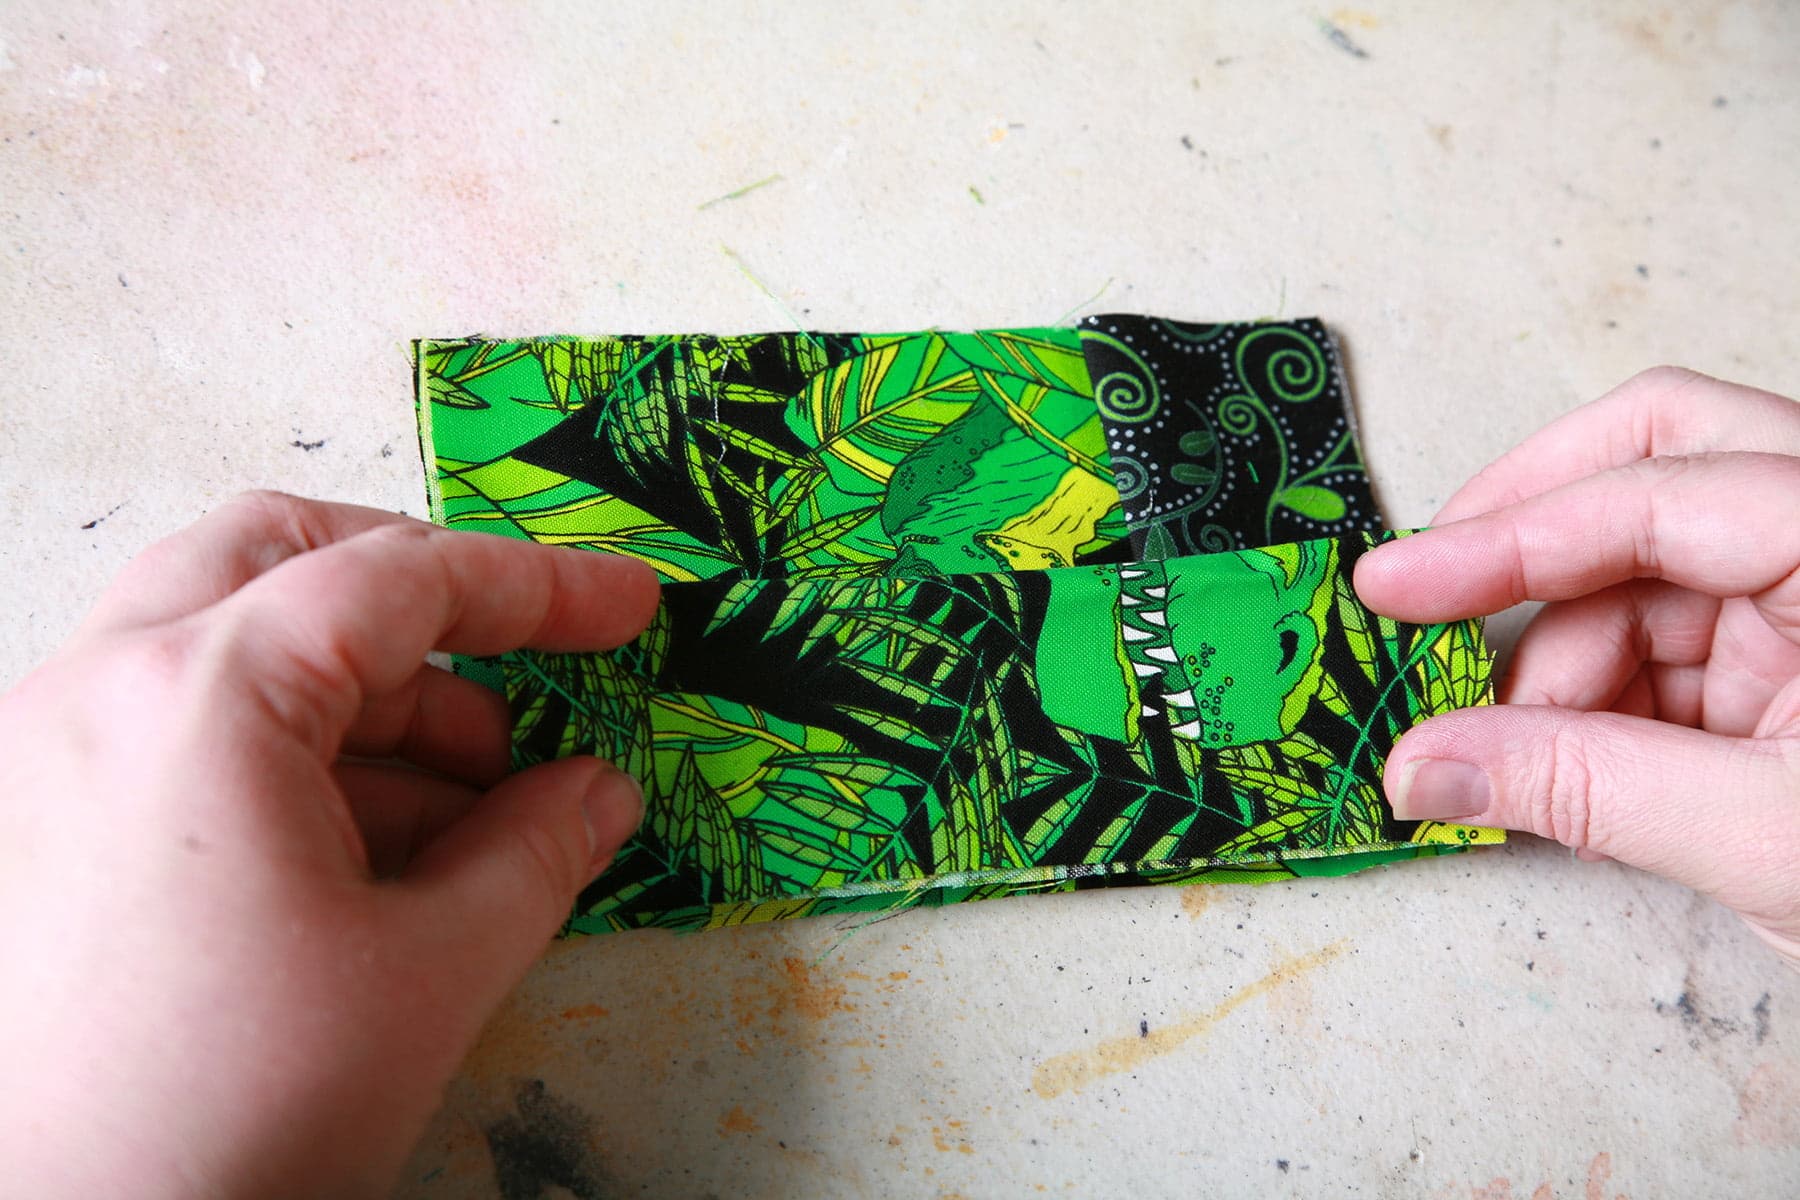
Position the remaining short piece to overlap that piece, but to go UNDER the first piece you placed, lining up with the remaining short end of the base, like so:

(You can pin the corners down to make things easier, as shown!)
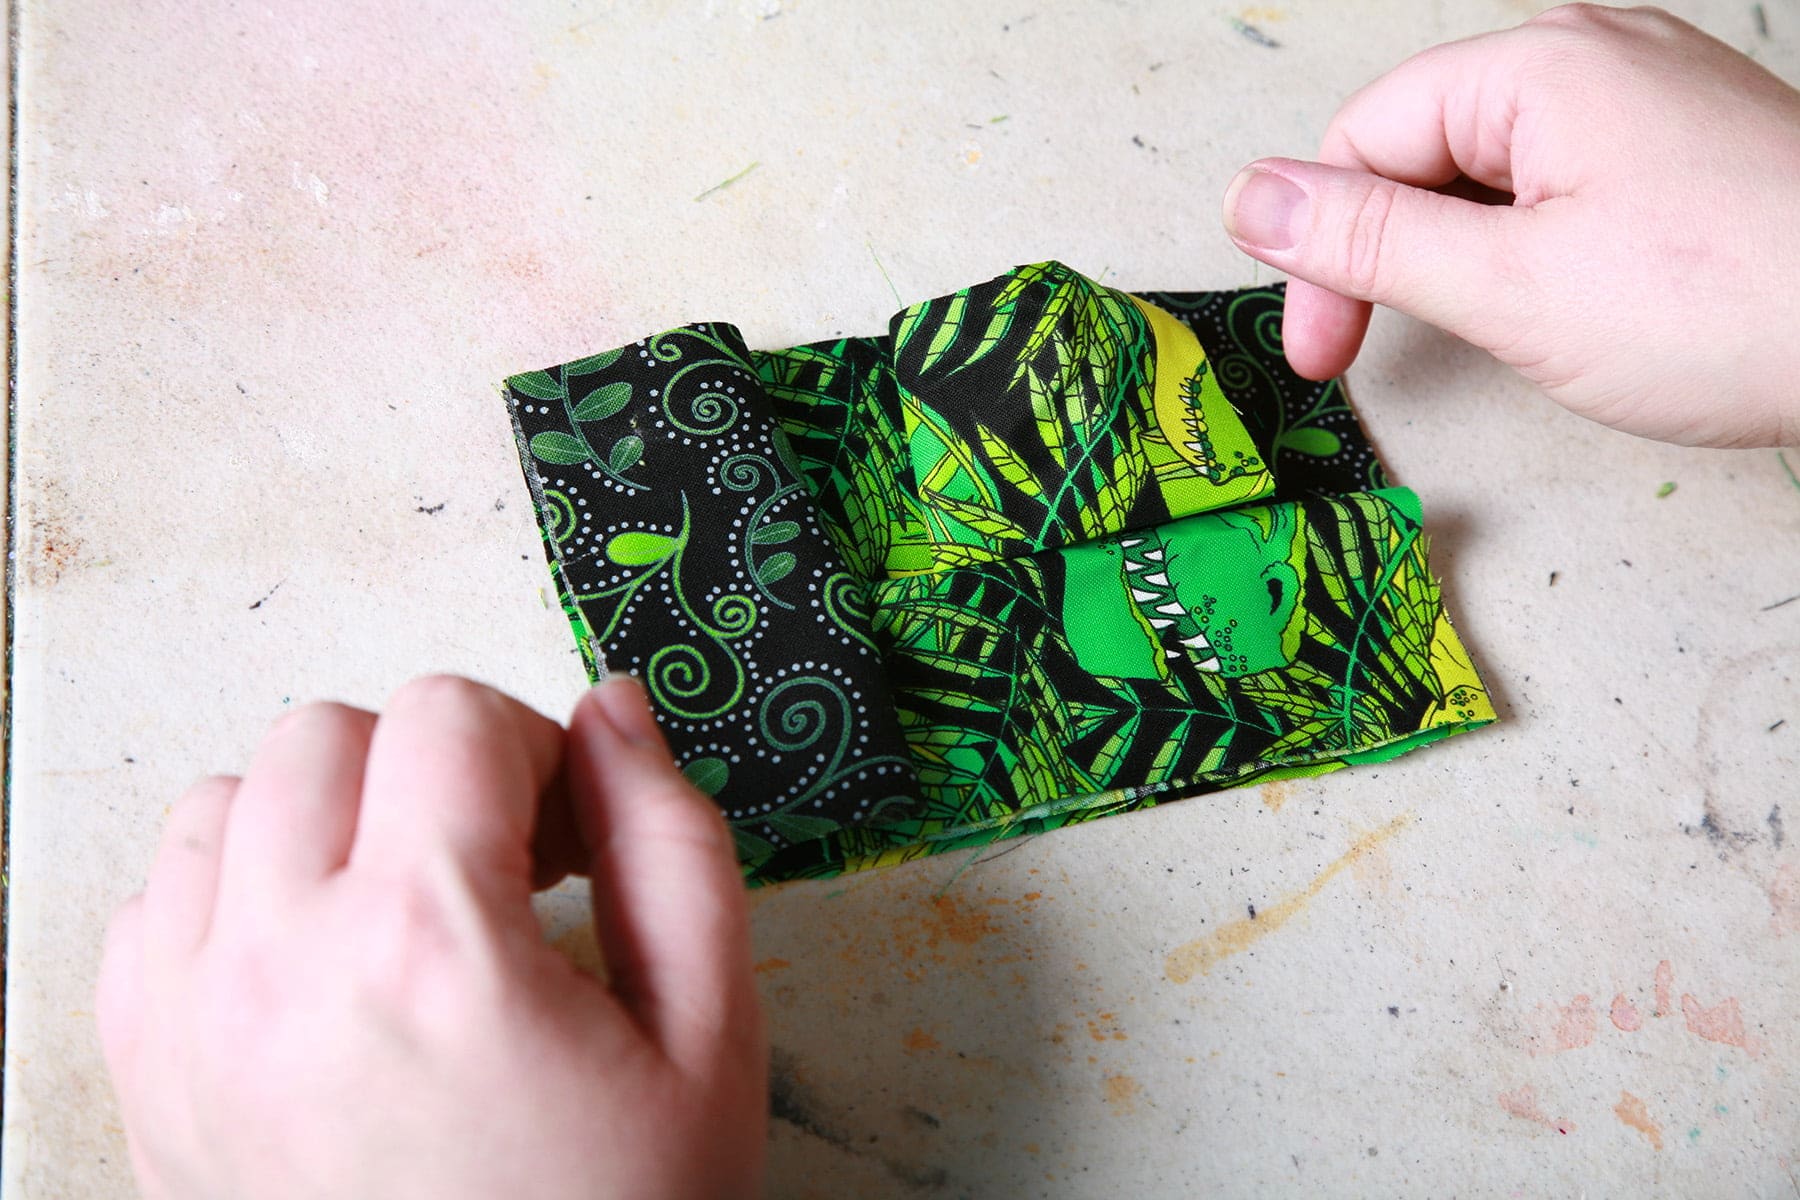
Stitch all the way around the edge - I like to keep the right side of my presser foot on the outer edge of fabric, as my seam allowance guide - back stitching at the beginning and edge of your seam. Trim threads, clip corners:

Finish off all sides with either a serger or a zig zag stitch

... and turn everything right side out:

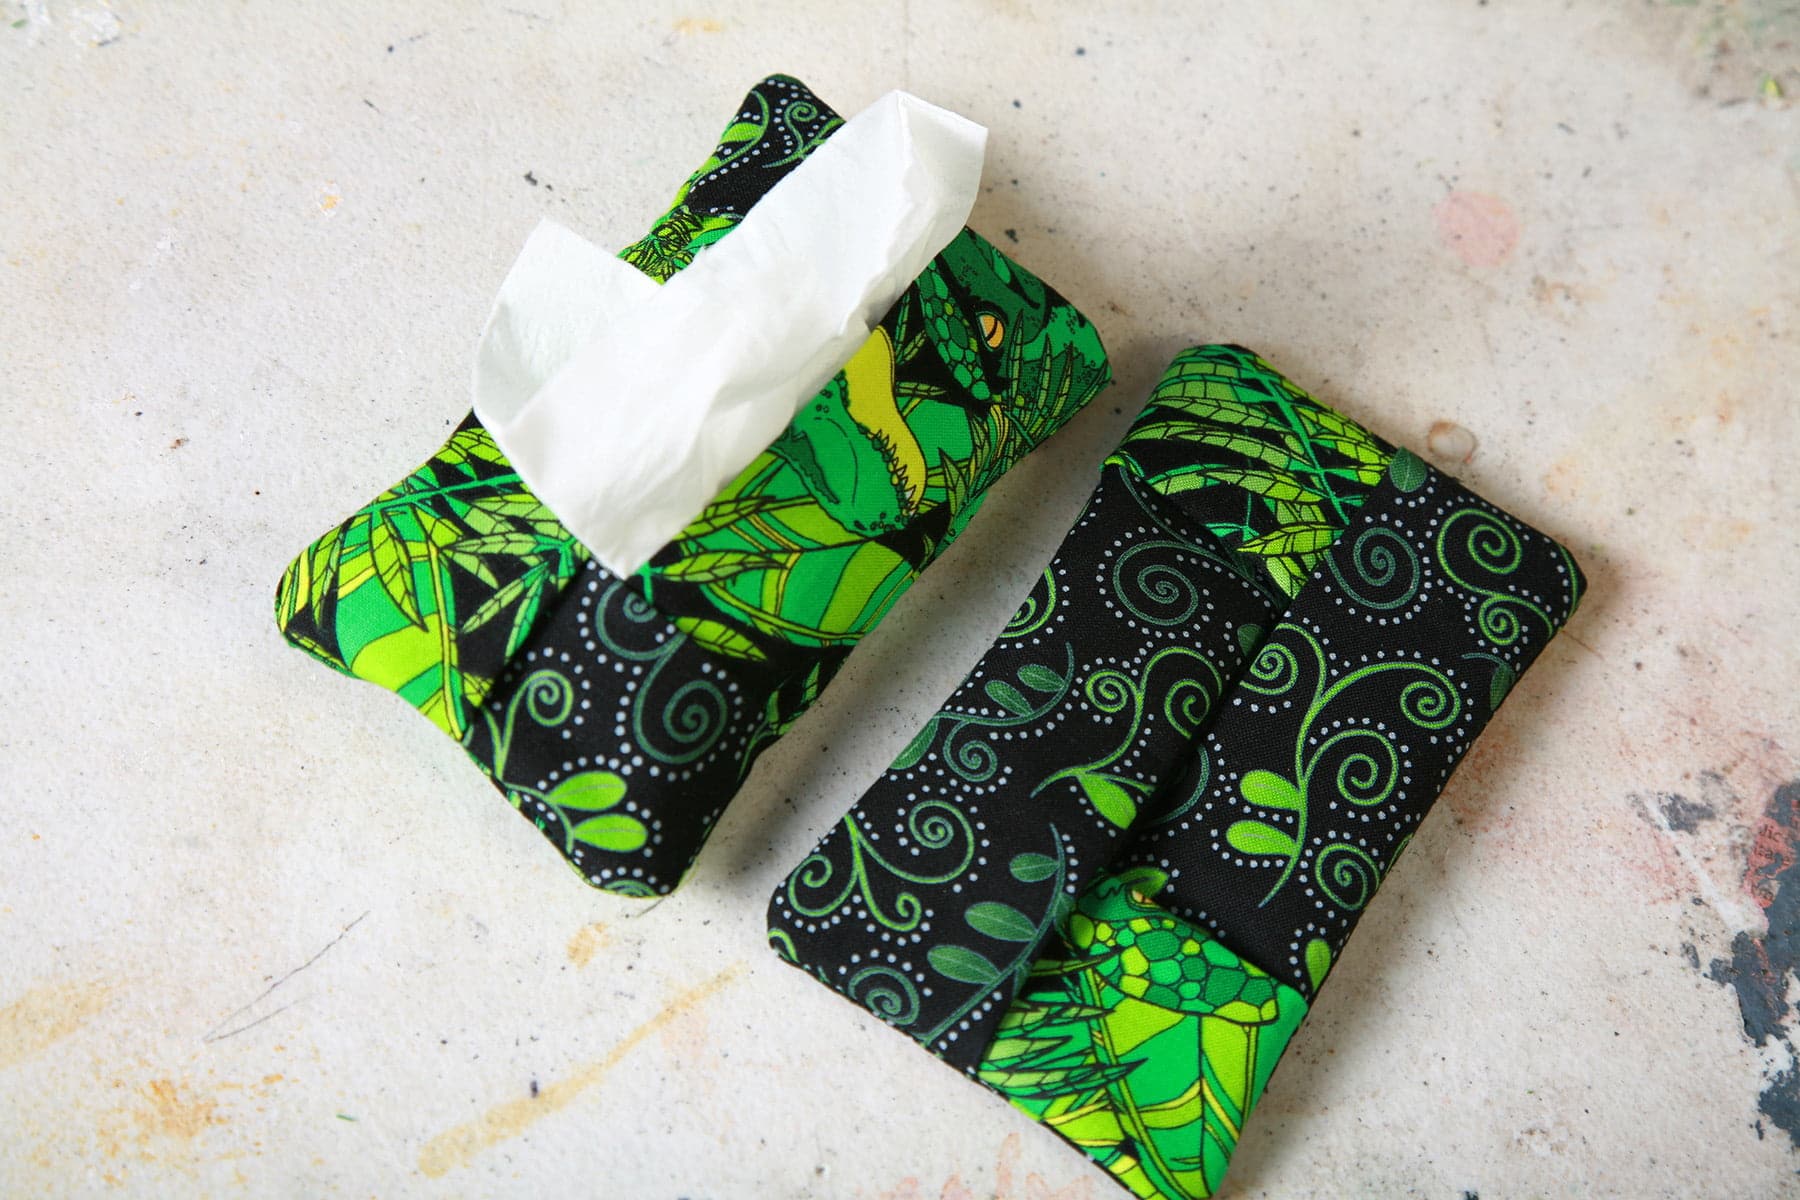
Slip a back of tissue in there, and you're done! Cute, eh?
ZIPPERS!
Ok, before going any further, I should detail how I do the zippers for these - it's the way I do them for all the bags, and the coin purses.
First, pick a zipper that is about the same length as the top edge of the bag you're making. It can be longer, but you don't really want it to be much shorter.
Cut a strip of fabric to either match or contrast the fabric that will be on the outside of the bag you're making. (I prefer to match, as shown throughout this tutorial!).
It should be at least 5", by the width of the zipper you're using (usually an inch or so). Cut that length into two roughly equal pieces:

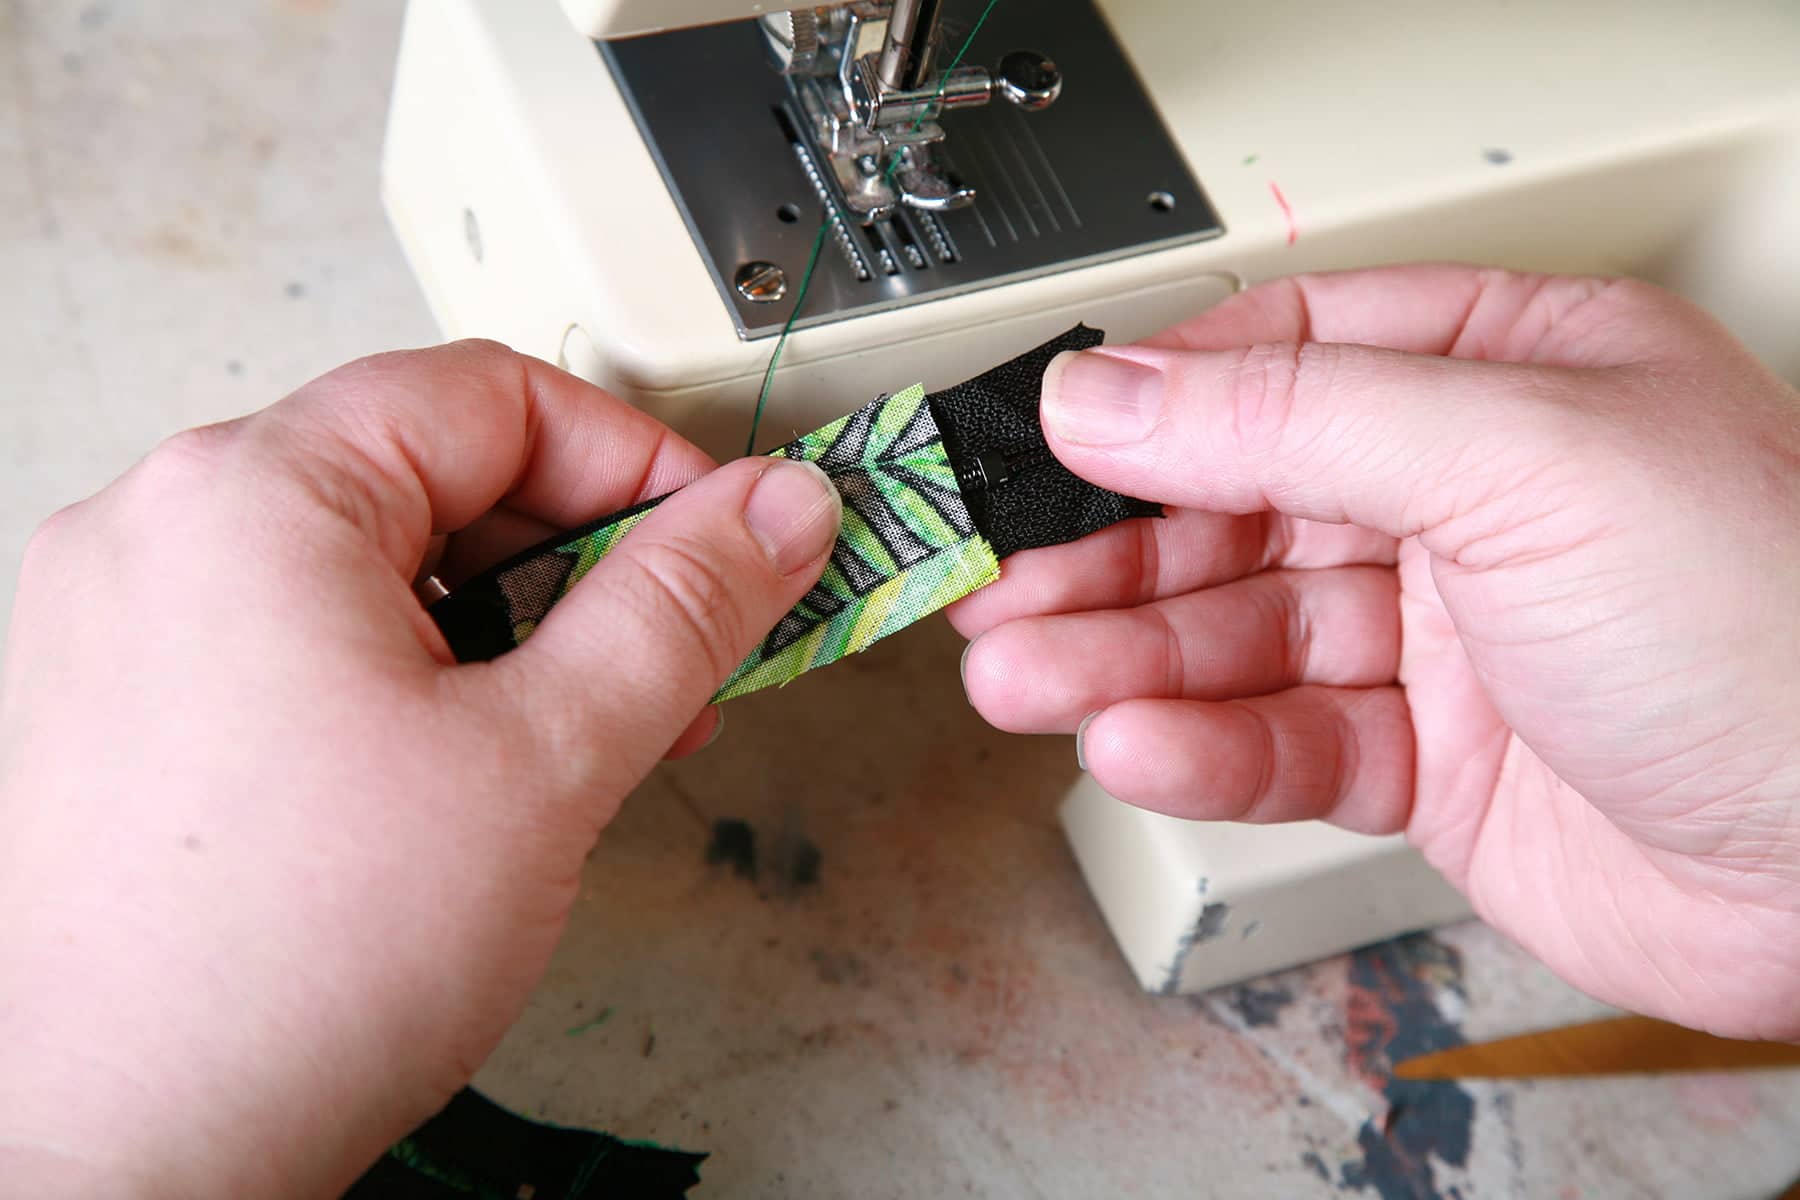
Open the zipper a little, and place it face down on the right side of one of your fabric strip pieces.
Stitch them together with a straight seam, just beyond where the actual zipper ends (immediately to the right of the metal ends, in this picture):

Flip the zipper over, and pull the fabric back so that it is resting over the very end of the zipper. Stitch it down with a straight seam, like so:
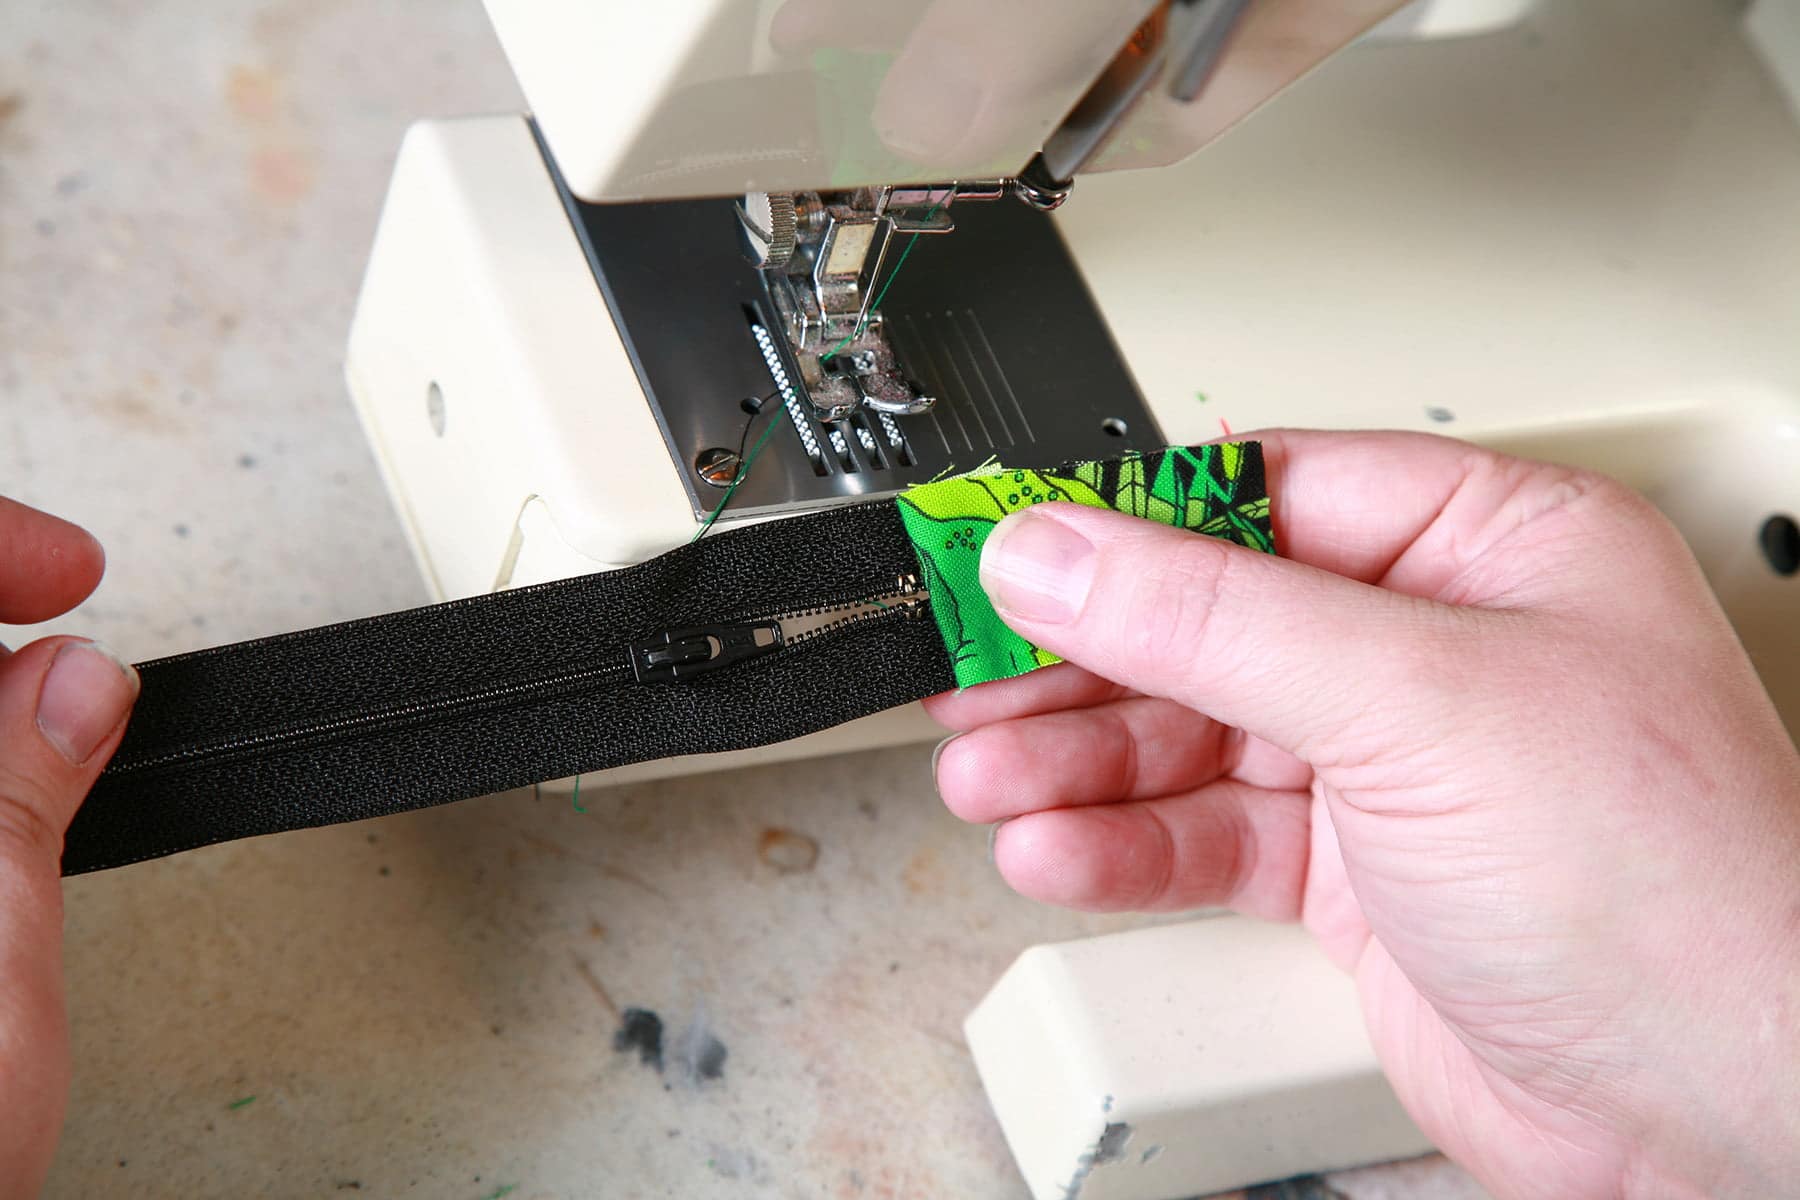

Position the other fabric strip face down on the right side of the zipper at the other end, just before the actual zipper ends. Depending on the length of the original zipper, I like to leave ⅛ - ¼" before the metal end doohickey, as shown.
Stitch the strip down with a straight seam, and trim the excess zipper away, including the end bit:

Flip the fabric over and stitch it down, as you did with the other side.
Center your zipper across the top of the bag that it will be sewn into, and trim the edges to fit:

Place zipper face down on the right side of the bag (see bag instructions first!), and sew a straight seam down the length of it.

Repeat with the other side of the zipper, and the other bag piece:
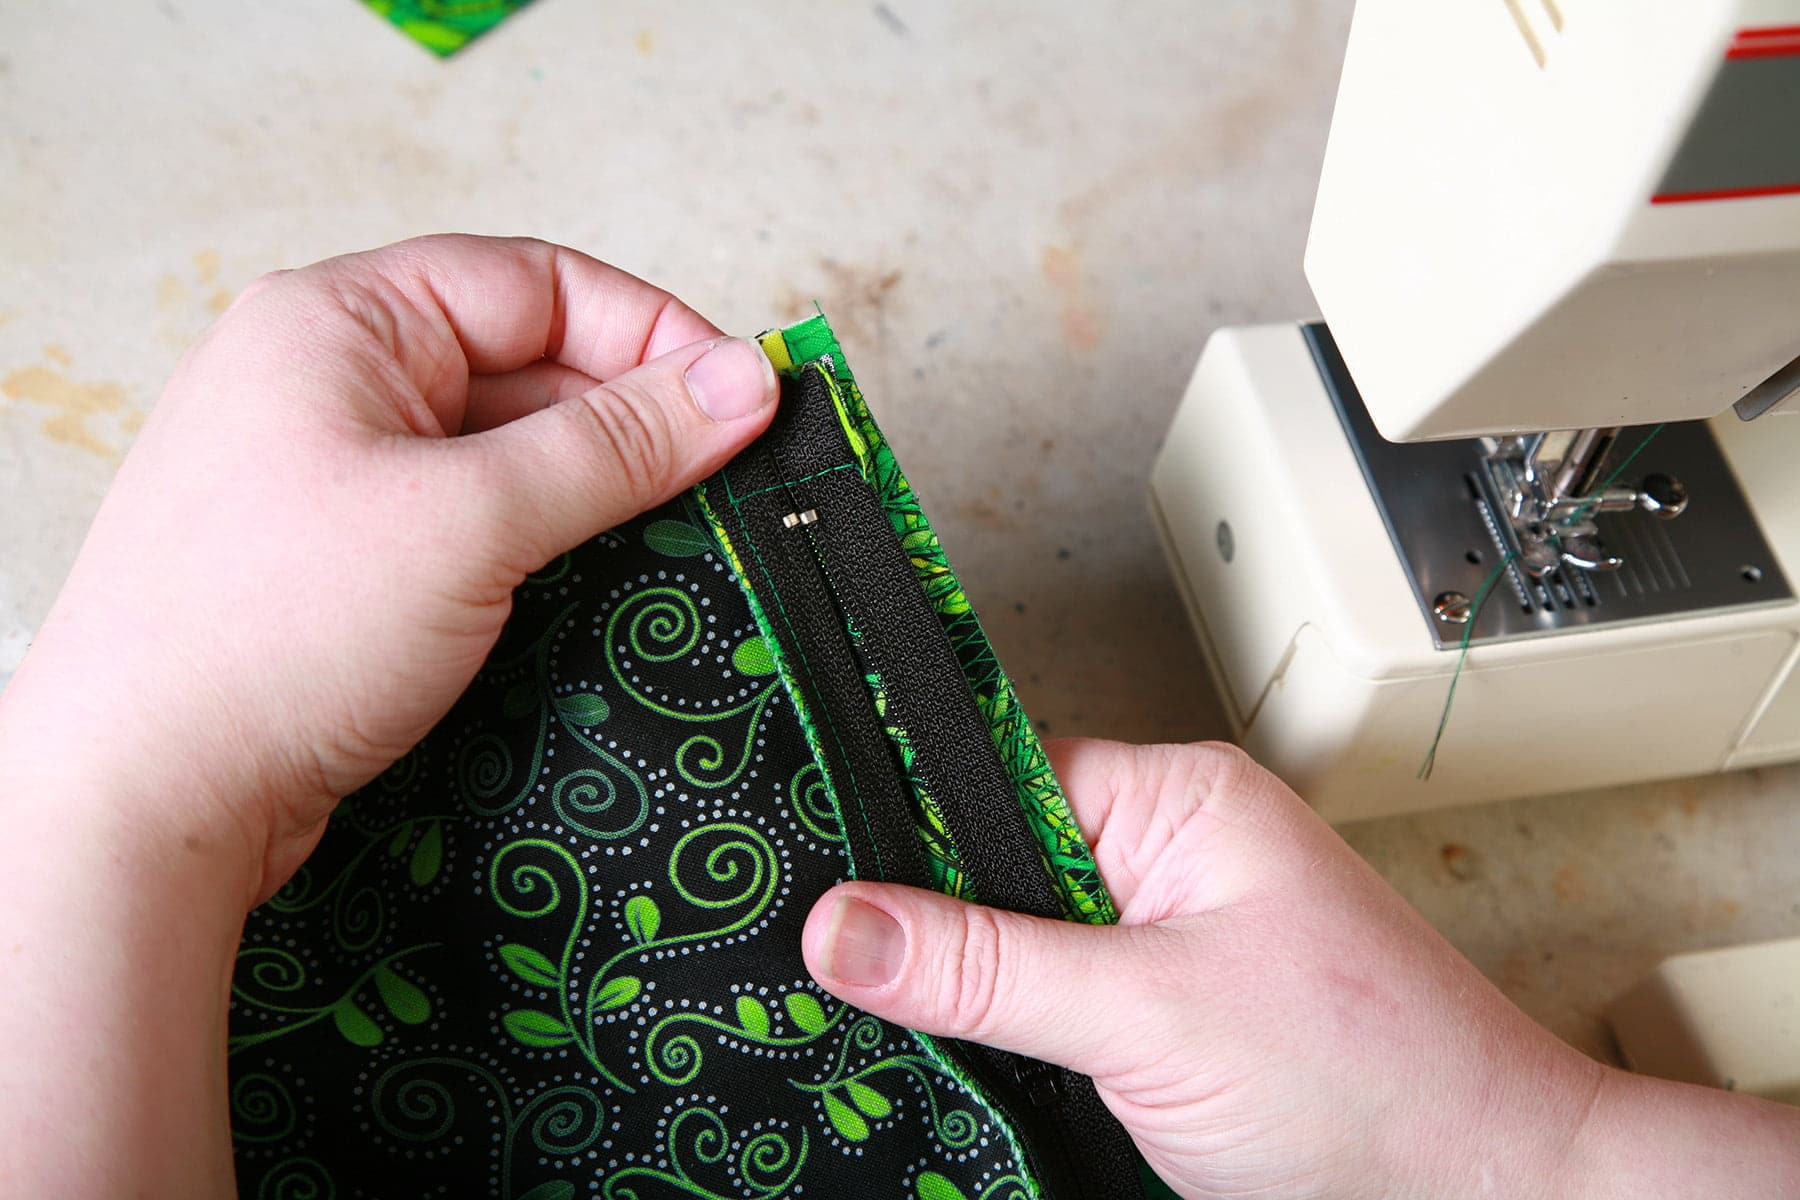
Flip the bag over and top stitch a straight seam near the edge of where the fabric folds back, on both sides. This flattens everything out and makes it look cleaner/more finished:


Done!
Wow, this is getting to be a long entry, sorry about that!
How To Sew a Coin Purse
Of the bags, the coin purse is the easiest, so let's do it first!
You Will Need
- Two rectangles of one print fabric, 6.5" x 4" each
- Two rectangles of the other print fabric, 6.5" x 4" each
- Two rectangles of thin quilt batting, 6.5" x 4" each
- 1 prepared zipper, as described above.
Coin Purse Instructions
First, lay out your pieces. Place one set of fabric (both the same print!) down on your work surface, with the right sides facing down.
Place a quilt batting piece over each, and top with the remaining pieces of the other print fabric, right sides facing up. Line everything up well!
You can pin everything together and zig zag around the edge if you'd like - I usually don't bother. I do recommend serging or zig zagging one of the long sides of each piece, though - it makes the zipper installation easier / look more finished!
Apply your zipper, as described above.

OPEN YOUR ZIPPER BEFORE CONTINUING (!!!)

Fold the bag in half so that the right sides are facing each other, and stitch a straight seam around the three raw edges.
Finish edge with a serger or zig zag seam:

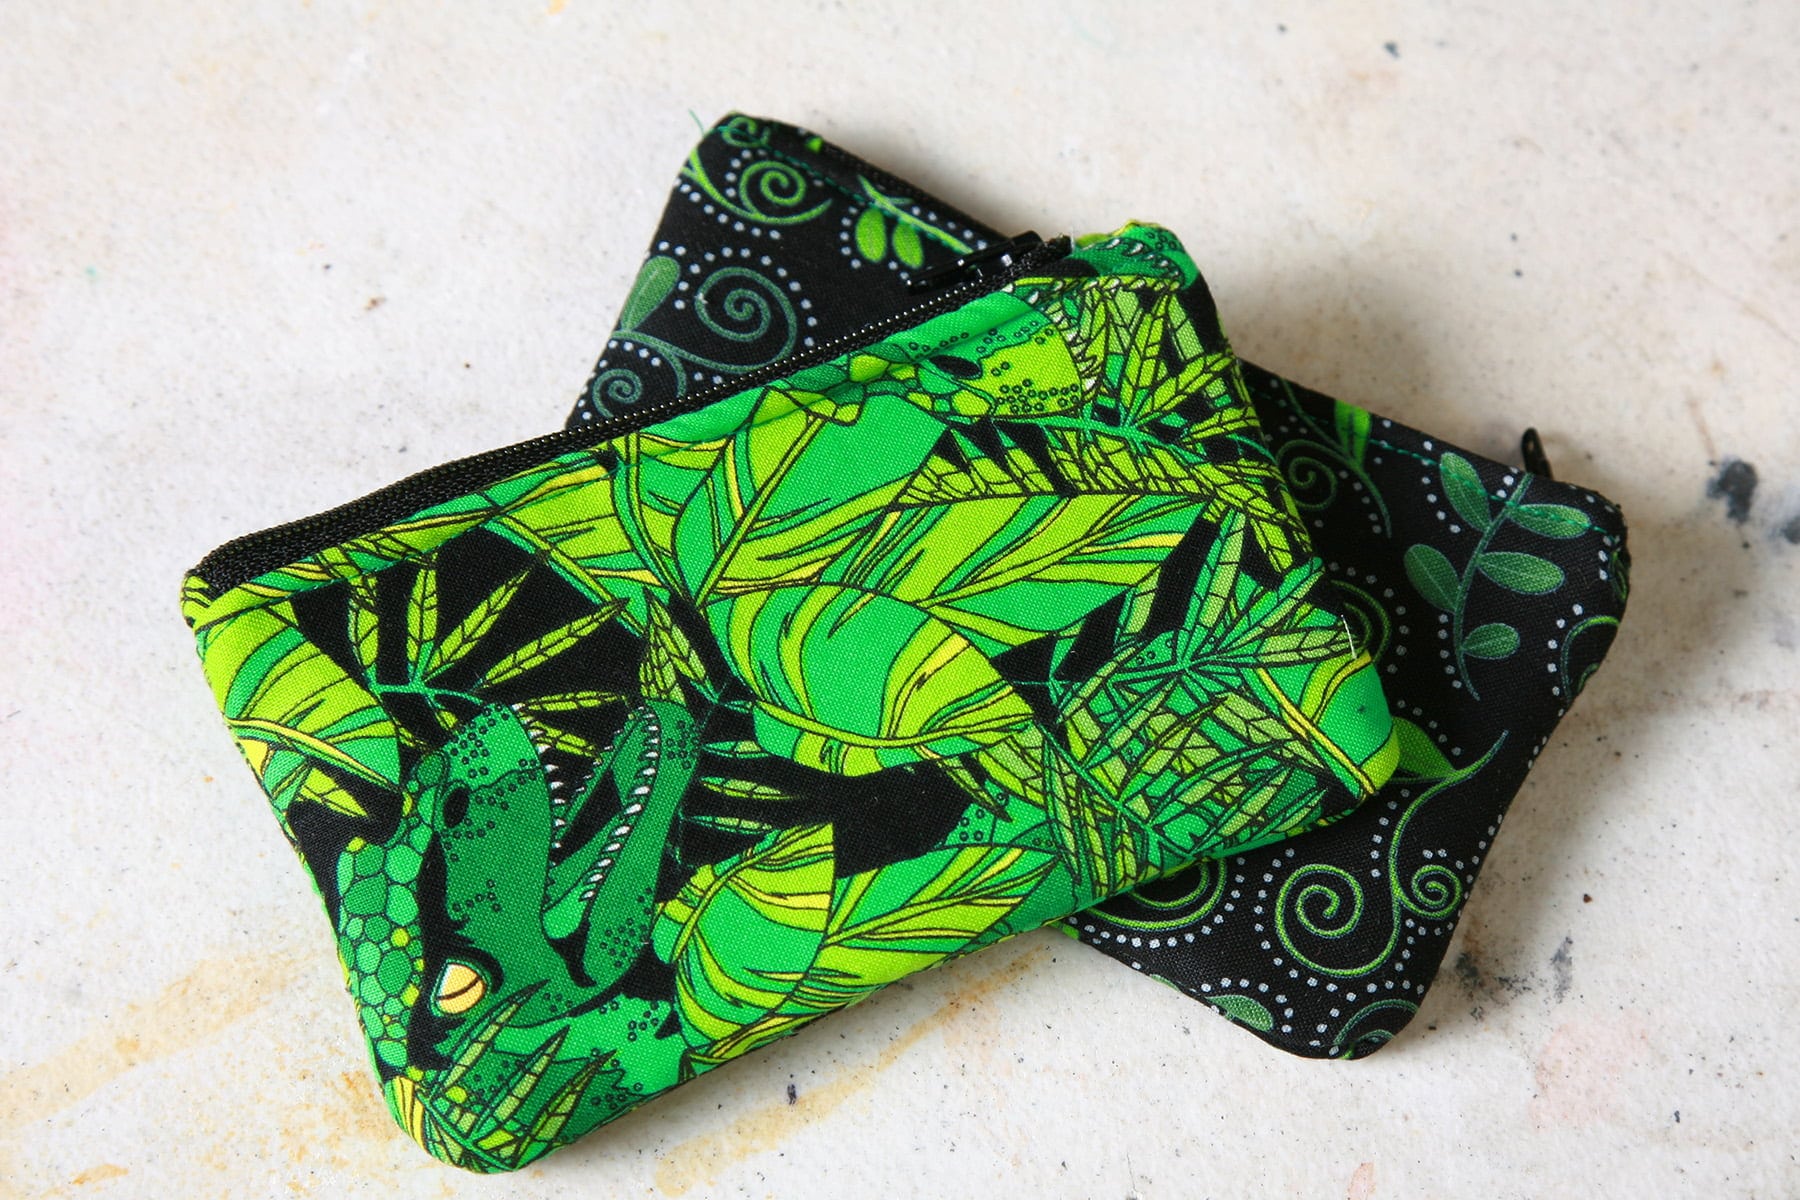
Turn it right side out, and you're done!
How to Sew Toiletry and Makeup Bags
Finally, the makeup and toiletry bags. These are slightly more complicated to explain, but are easy to make!
You will Need
- Two pattern pieces cut of one print fabric
- Two pattern pieces cut of the other print fabric
- Two pattern pieces cut of thin quilt batting
- 1 prepared zipper
Design Your Pattern
First, you need to decide what size bag(s) you're going to make. As an example, here's what I use as the "final dimensions" measurements:
Large Toiletry Bag*: 12" x 8" x 5"
Makeup Bag: 10" x 6" x 4"
Sunglasses Bag: 9" x 3.5" x 4"
* I made a large one in the MasterChef set, but not in the set pictured throughout this tutorial. Was short one zipper, whoops!
When looking at each set of measurements, this is what they're going to translate to, in the order mentioned above:
A = Intended length of the bag
B = Intended height of the bag
C = (One half of) the intended bottom width of the bag. Measurement above is final size, but when drafting the pattern, use half of that measurement as "C"!
Using the measurements and the letters I give above, use a ruler to draw a pattern like this:
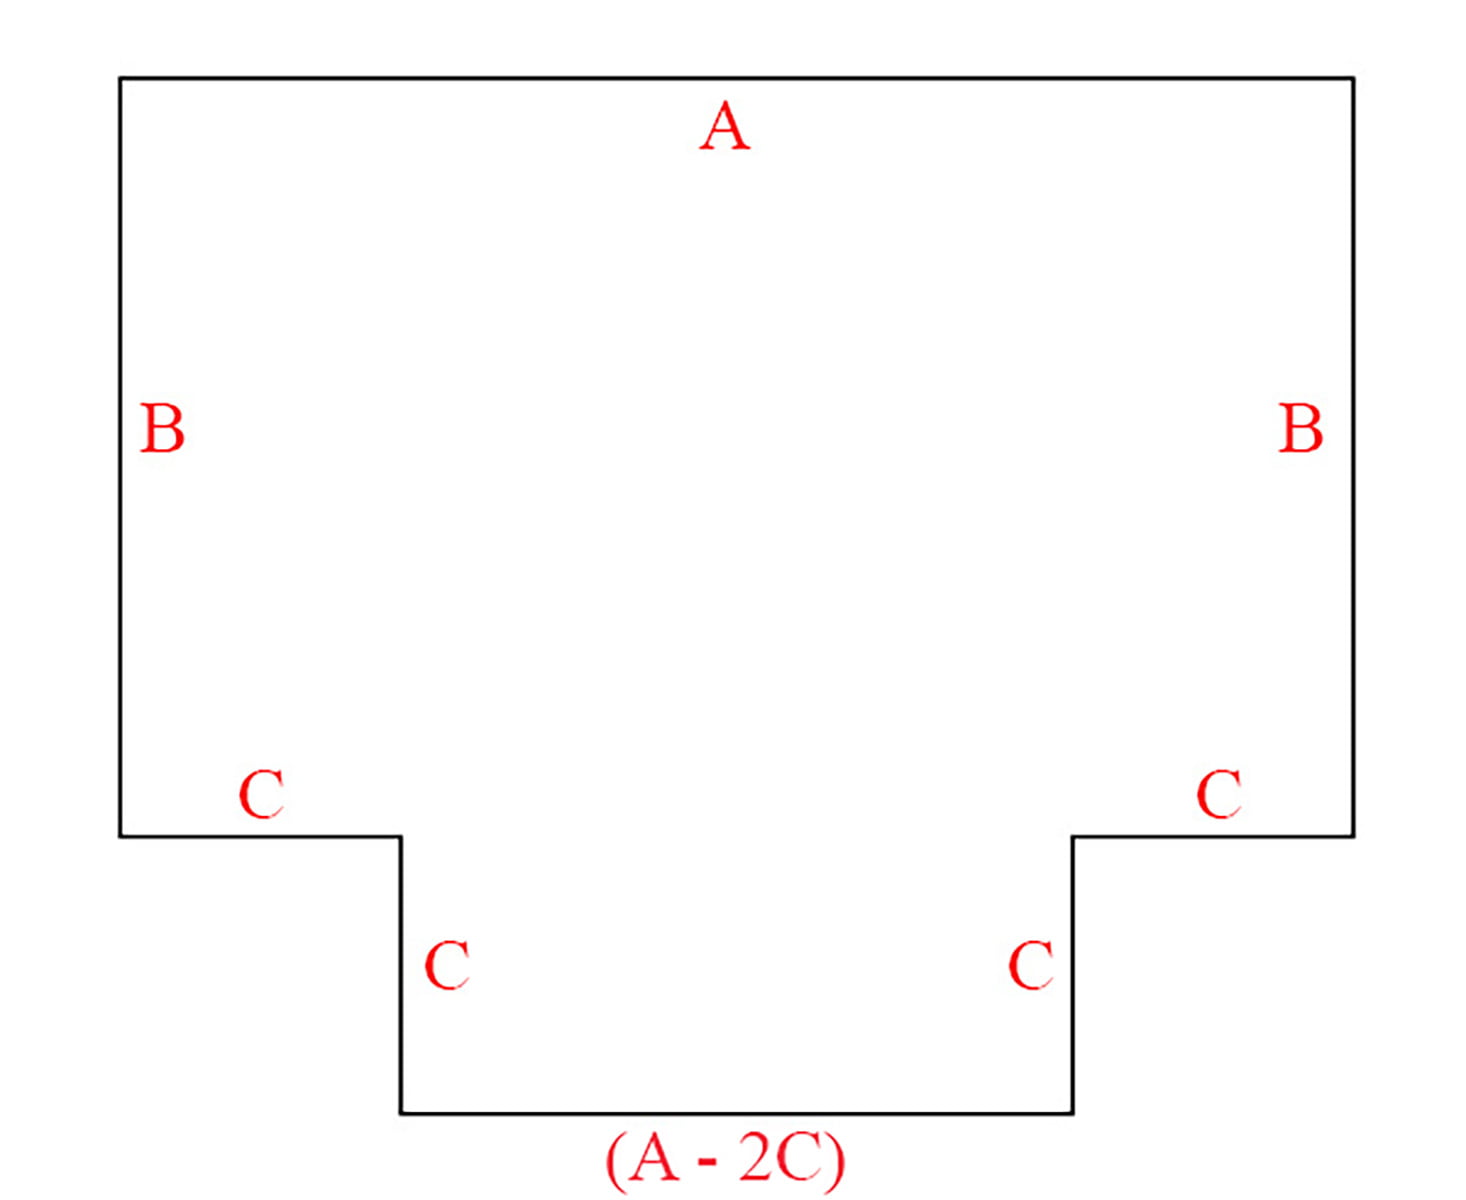
Then, draw a second set of lines around your original pattern - these will add your seam allowance. I like to add ¼", all the way around:
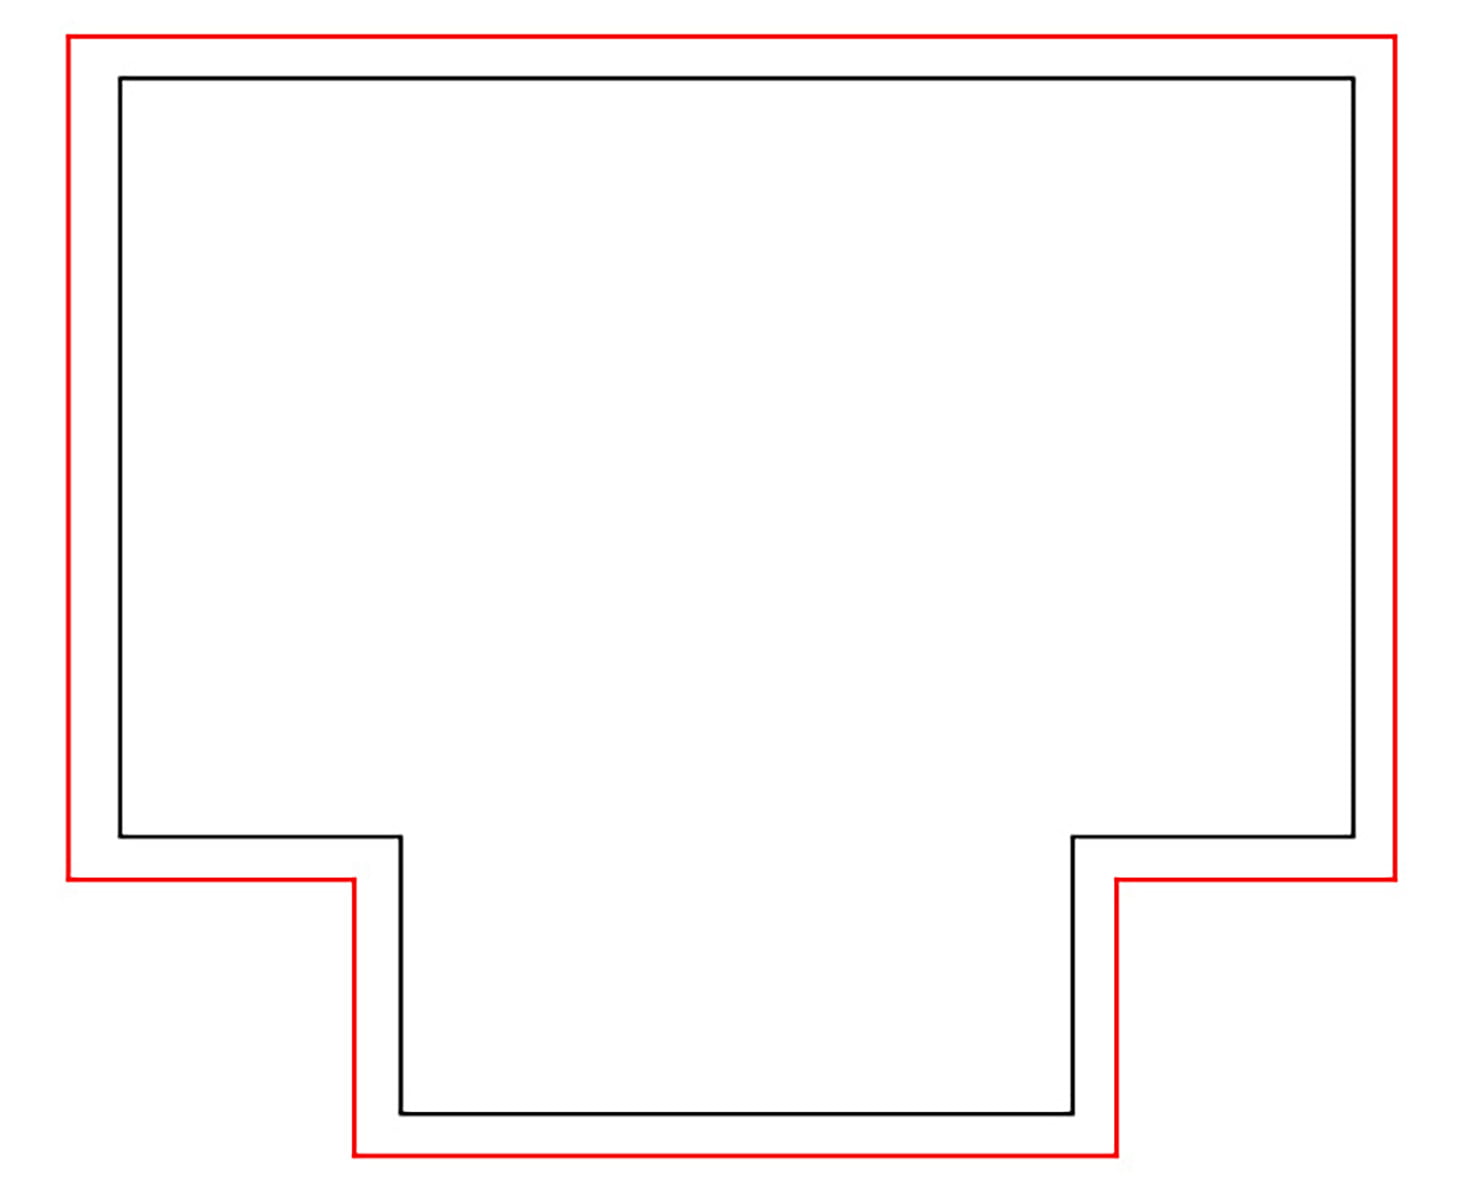
Go on and cut out the pattern pieces that you'll need, using the outermost set of pattern lines as your final pattern.
Piece and Sew Your Bag(s)
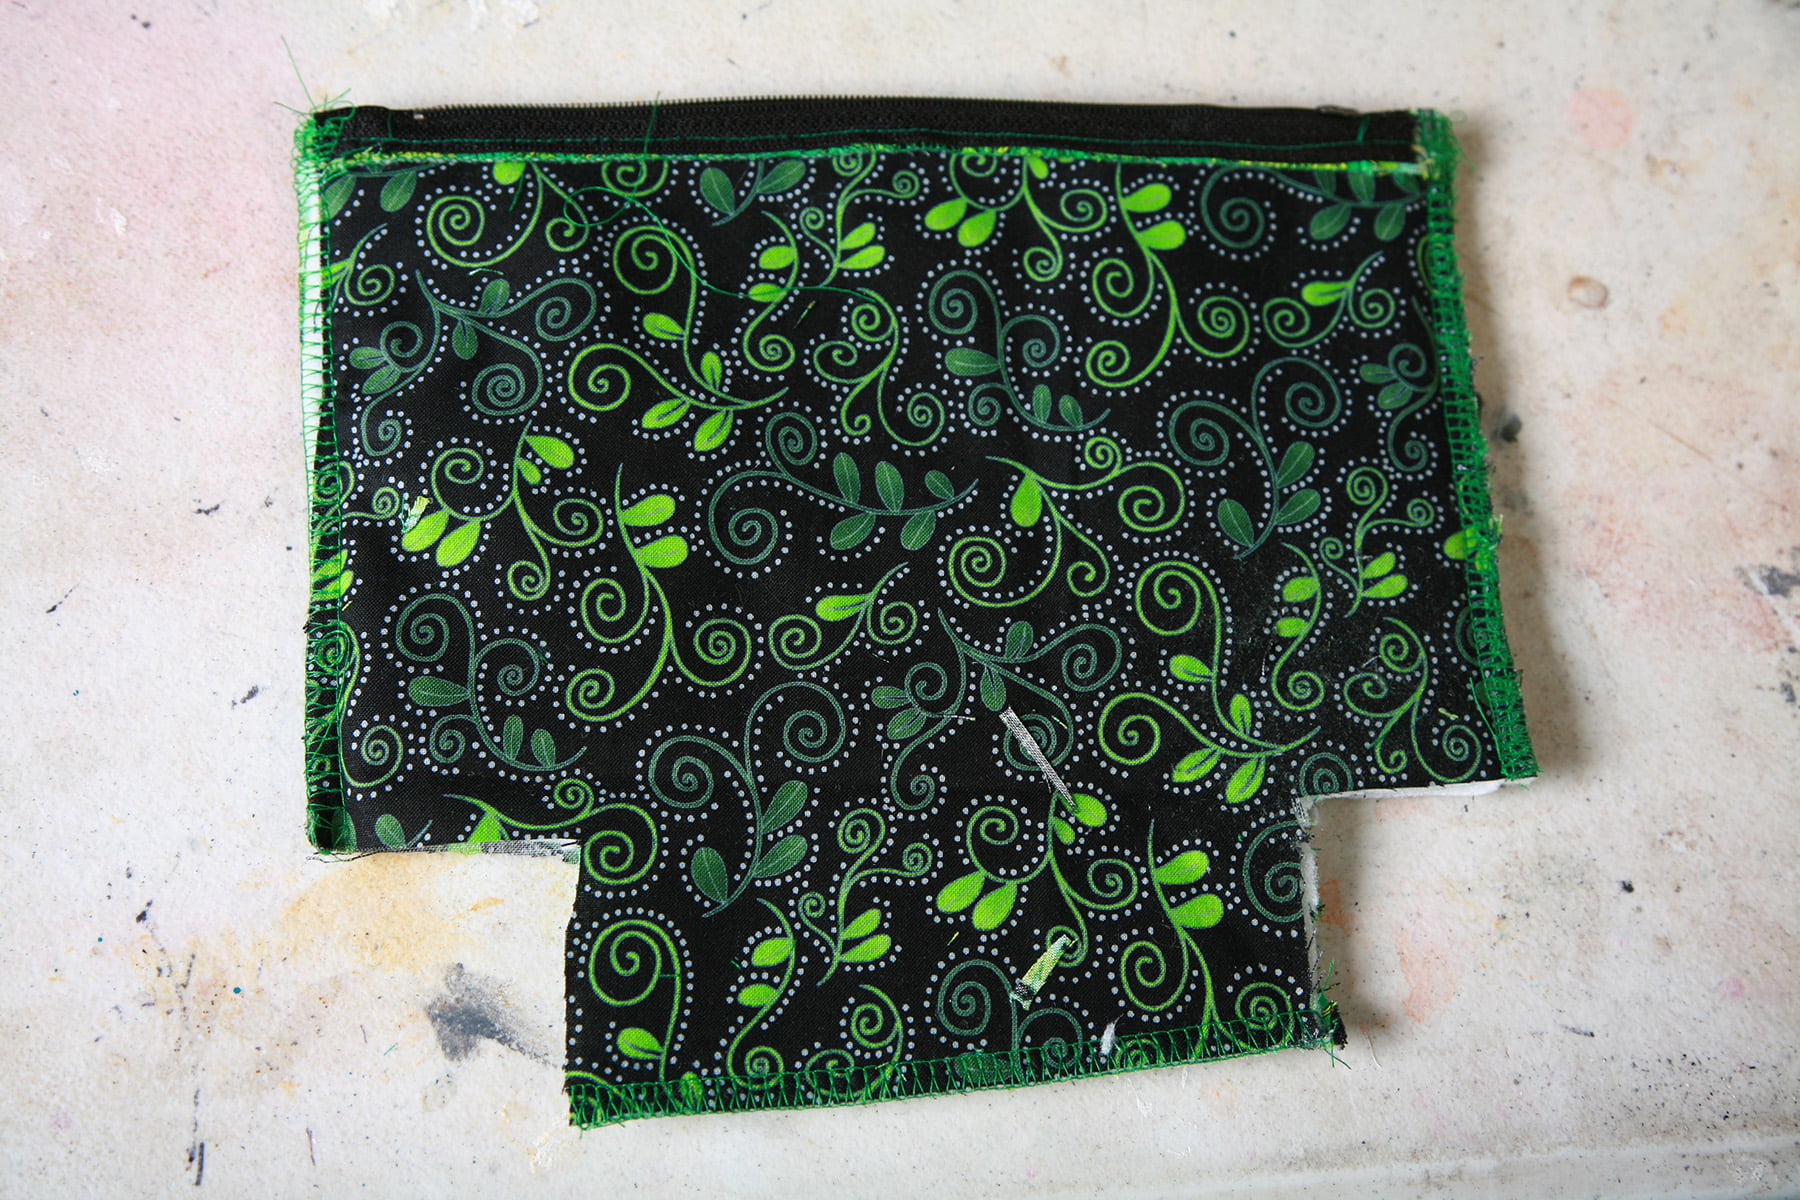
Now, lay out your pieces. Place one set of fabric pieces (both the same print!) down on your work surface, with the right sides facing down.
Place a quilt batting piece over each, and top with the remaining pieces of the other print fabric, right sides facing up. Line everything up well!
You can pin everything together and zig zag around the edge if you’d like – I usually don’t bother.
I do recommend serging or zig zagging one of the long sides of each piece, though – it makes the zipper installation easier / look more finished!
Apply your zipper, as described above. OPEN YOUR ZIPPER BEFORE CONTINUING (!!!)
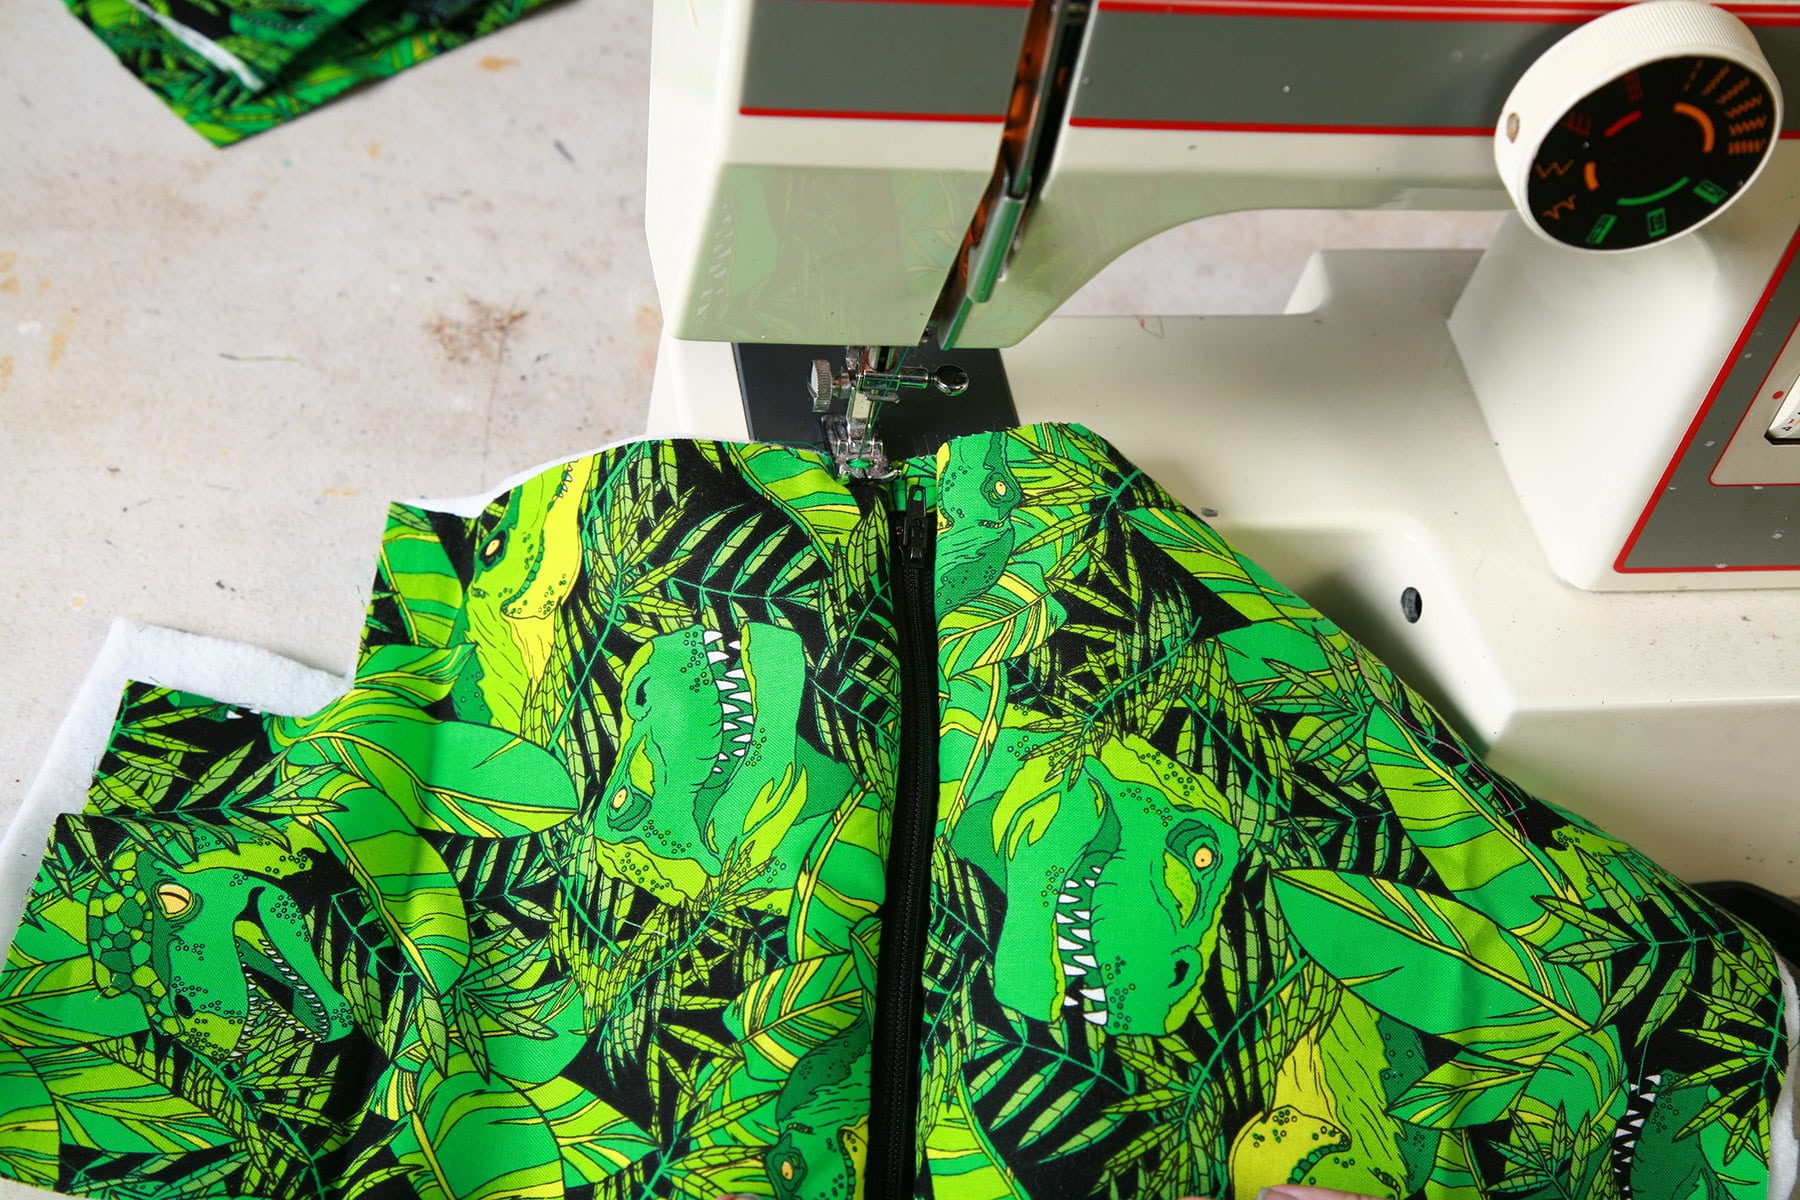
Fold the bag in half so that the right sides are facing each other, and stitch a straight seam around the side and bottom edges - NOT the "C" edges, though!
Finish edges with a serger or zig zag seam:
Now, go to one of your "C" corners, and open it. Within that opening, fold it in half to line up the side seam with the bottom seam, like this:
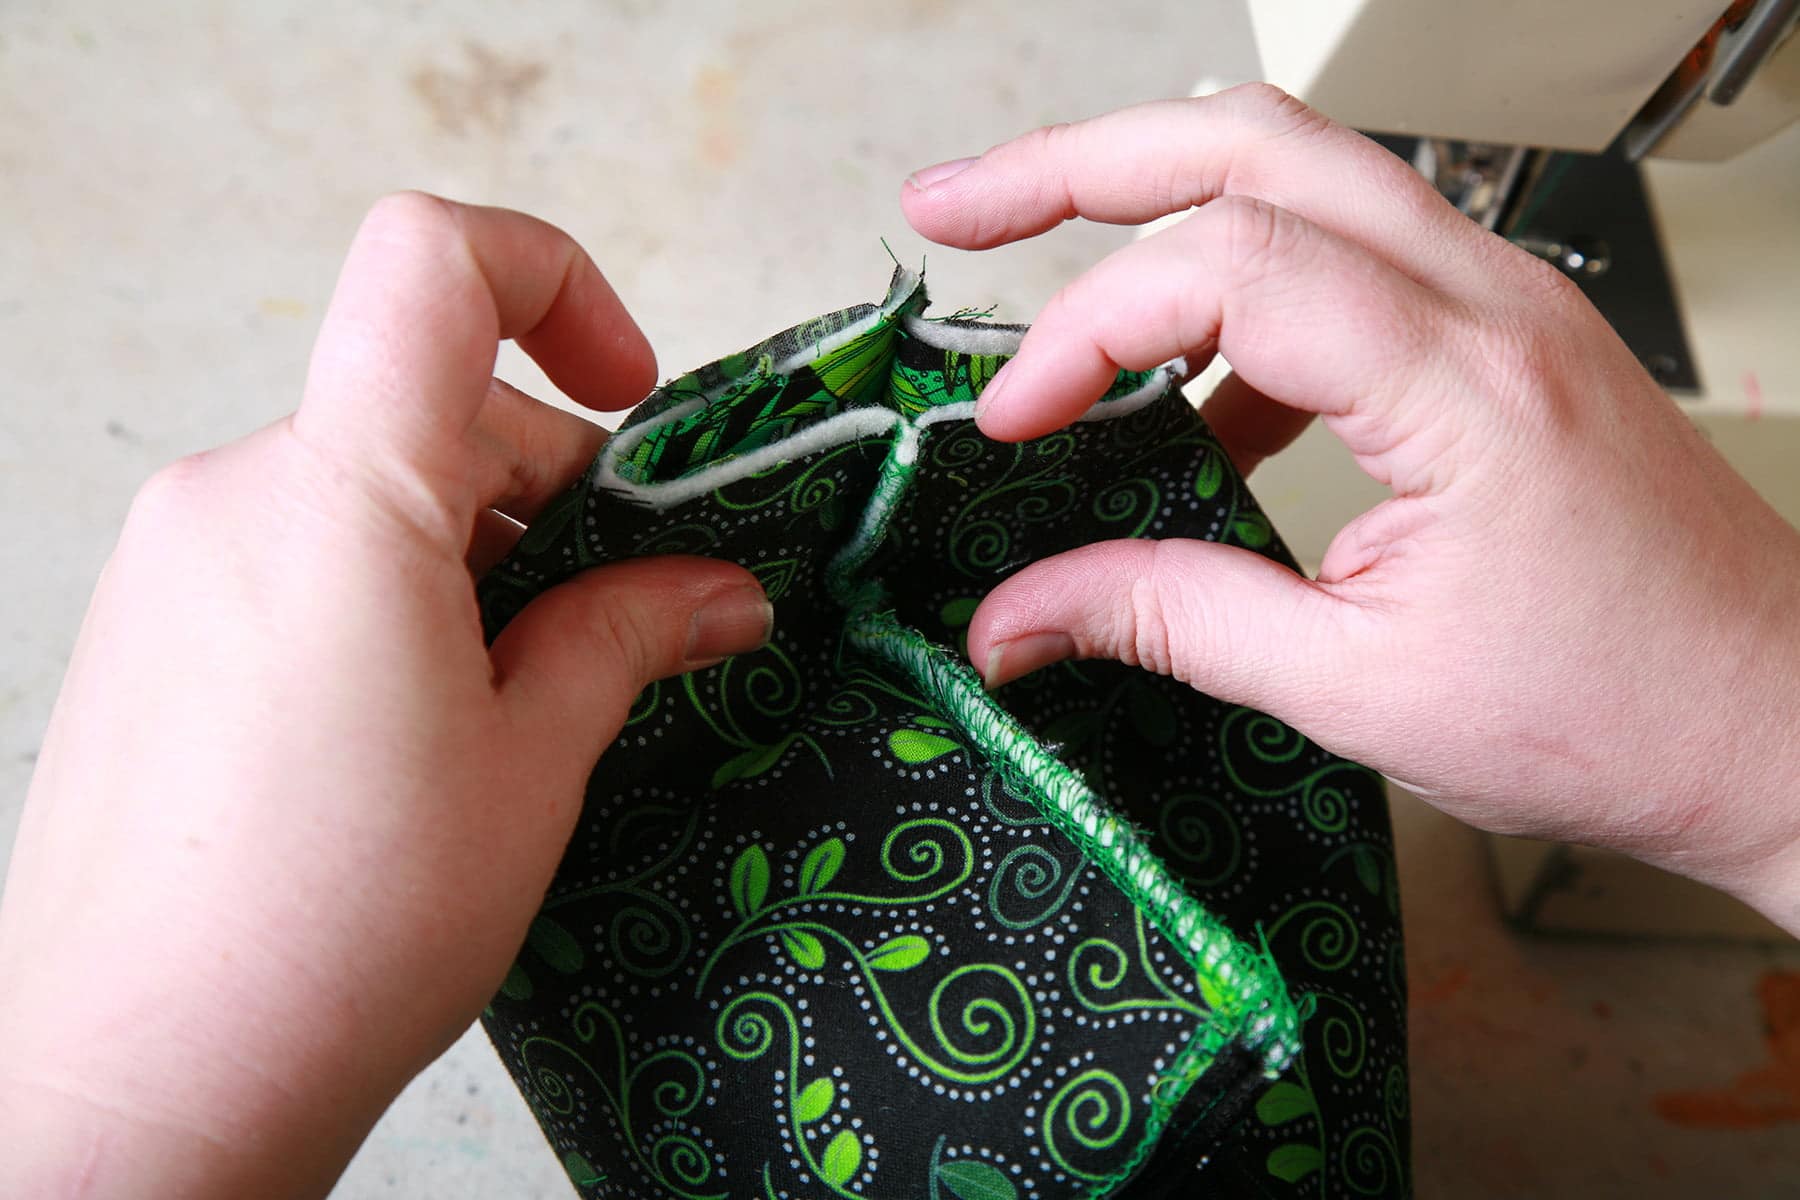
Stitch a straight seam across the new edge, taking care to stitch through ALL layers of fabric - they'll want to move! Trim the edge if it becomes uneven at all, and finish off with a serger or zig zag seam:


Repeat on the other "C" corner. Trim all thread ends, and turn bag right side out.
Woo hoo! You're done! (Now go make several more bags, so you have a complete set!)

Looking for More Homemade Gift Ideas?
We have a few DIY gift tutorials, with even more coming! For now, be sure to check out:
Booze Bouquet Tutorial.
DIY Citrus and Cedar Bath Set
DIY Cutting Board Tutorial - Colourful Squares
DIY Mustard Bath Gift Set
Homemade Cutting Board Tutorial - Log Cabin
Homemade Hop Spa Bath Set
Homemade Peppermint Eucalyptus Spa Set
a href="https://celebrationgeneration.com/mop-doll-air-freshener-cover/">Mop Doll Air Freshener Covers
DIY Ugly Christmas Sweater Masks
Share the Love!
Before you give away your set, be sure to take some pics of your handiwork! If you post it to Bluesky, be sure to tag us - @CelebrationGen. We're also on Pinterest, so you can save all your favourite recipes to a board!
Also, be sure to subscribe to my free monthly email newsletter, so you never miss out on any of my nonsense.
Well, the published nonsense, anyway!


Susie
I'm not much of a traveler but some of these would make gorgeous project bags for my knitting. Love the materials you've chosen!
Jen
Do you know about Crafty Planet in NE Minneapolis? I think you might be able to sell your patterns there (or teach a class if you have the patience).
Vanessa
Where did you get that dinosaur fabric? I LOVE IT!!!
Marie Porter
I know, right?
We got it at a local fabric warehouse, S.R. Harris
Anita
LOVE LOVE LOVE your tutorial! I will definitely be using your zipper method from now on! And since I have several vacations/trips coming up, I need to get to the fabric store ASAP so I can get these bags made for myself. I'm sure when the travel partners see them, they're gonna want some too! Thanks for sharing!