

Pysanky is a beautiful, intricate Ukrainian Easter Egg technique. This Easy Ukrainian Easter Eggs tutorial requires no special skill or equipment, and is appropriate for all ages - even young children!
Originally Posted April 13, 2011. Updated 3/12/2023

Manitoba is known for a huge population of Ukrainians. Canada has the biggest Ukrainian population outside of Russia and Ukraine itself, and I think most of them are in my hometown of Winnipeg.
So, people of Ukraine origin have had huge cultural influence on my hometown. Excellent homemade perogies could be found anywhere... but I digress.
My grandmother's neighbor was Ukrainian, Easter meant that she'd bake up these wonderful citrussy breads - Paska - and share with us every Easter season..
Oh, they were amazing. My favourite part of our Easter celebration, I still remember those delicious breads.
These Ukrainian Easter eggs - beautiful eggs decorated with a wax-resist method - would show up in advertising, or on display, or whatever.
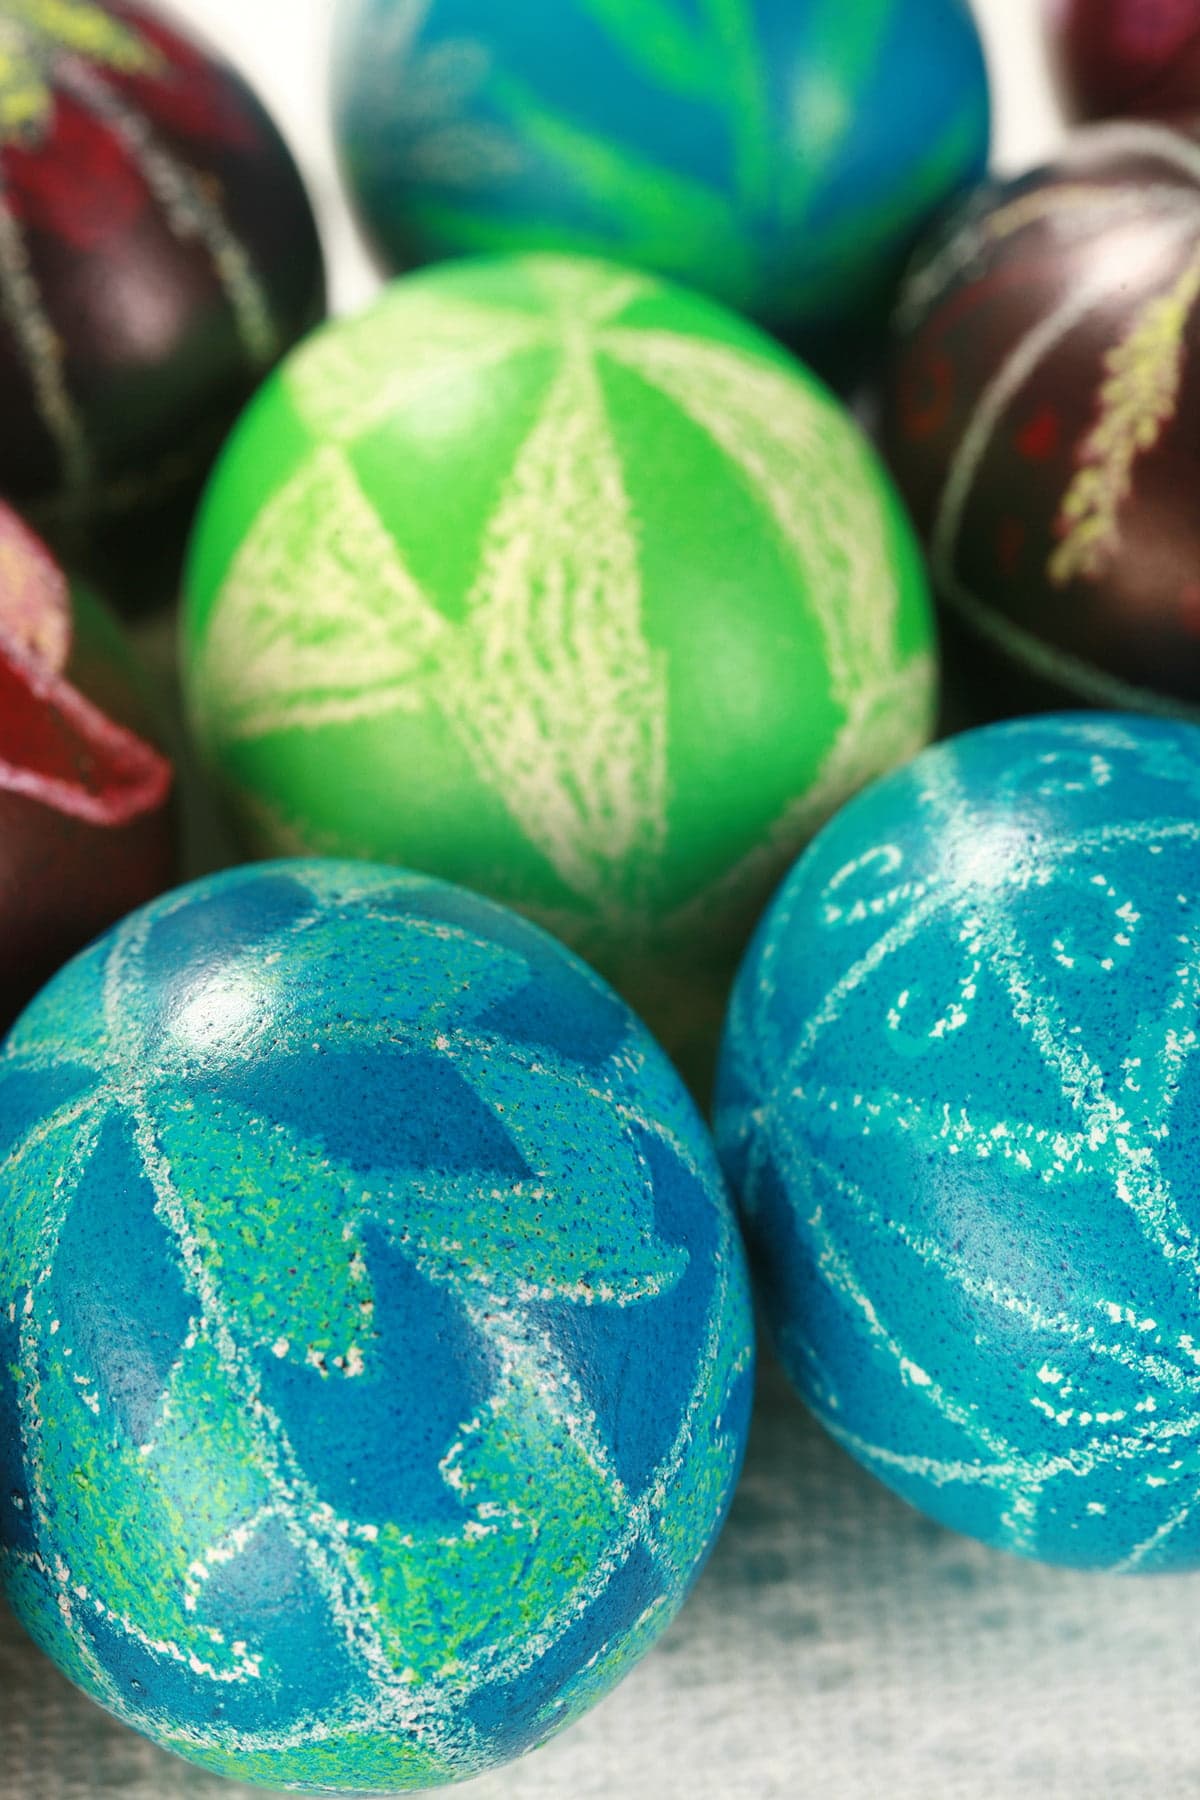
I'd marvel at the intricate designs and the bright colors of those artful eggs. Tons of hard word, beauty and talent, right there.
Anyway, while I was living in the United States as a young woman, I missed a lot of that culture.
One date night, I came up with a fun way to make Pysanka eggs at home ... and it ended up being a great way to introduce the art of pysanky to young children in the area, too!
Anyway, a bit of background for you, before getting to those step-by-step instructions...
What is Pysanky? What is Pysanka?
Pysanky is a Ukrainian word that refers to the Ukrainian tradition of decorating super ornate Easter eggs using a wax resist dye method.
Practitioners of the art form use a stylus called a “Kistka / Kistky” writing tools - basically a stick with a small, open-tipped well to hold - and melt - beeswax, to write their designs on the egg.
The melted beeswax masks off the egg - whether white (before dyeing), or after subsequent dye baths.
The wax design prevents the colour being written on from taking on dye, in the areas covered by that wax.
As the whole process progresses, that egg goes through multiple steps of masking and dyeing, producing a multicoloured design - it can take many hours.
Once the design work is complete and the decorated egg has been dyed in its final colour, the was is melted off, and the finished egg design is revealed.
“Pysanka” is the singular form - a Pysanka egg, “Pysanky” is the plural.
The History of Easter Eggs
While Pysanky is definitely seen as a Christian religious practice, the general idea of the eggs date back to ancient times.
In pre-Christian times, early Slavic cultures worshiped a sun god, and eggs were decorated as a ritualistic element for their ceremonies.
Eggs symbolized many of the same things back then, as they do in modern Easter observation - birth, rebirth, life, symbol of spring, etc. The sun was believed to be the source of all life, and eggs were seen as basically a magical extension of that life source.
In pagan times, that rebirth was celebrated after each long winter, as the rebirth of the Earth itself.
With the advent of Christianity, the general concept was changed slightly for Christian beliefs, to be the rebirth of man - specifically of Jesus Christ.
The egg became a symbol of the risen Christ, and remained an important symbol for worship around the springtime - specifically for holy week.
Oh, and even Easter baskets have roots in Eastern European countries, where people bring a basket of eggs, meat, and breads (the Paska I mentioned earlier!) to be blessed on Holy Saturday or Easter Sunday.
It’s a practice that goes back several centuries in Eastern Europe, not only across the regions of Ukraine, but also across many different countries - Poland, Romania, Russia, and more.
When it comes to Pysanky specifically, the eggs have long been seen to possess great powers of protection for those they’re given to, from warding off evil spirits, to bringing good luck and good health.

Pysanky Designs
Traditional Pysanky tends to feature folk art design motifs that incorporate one or more of a few different design themes.
Beyond being a beautiful egg, many designs have a symbolic meaning, such as the use of rakes for encouraging a good harvest.
Beyond that, designs tend to include a range of different motifs to express different meanings:
Religious Iconography
Religious (specifically Christian) imagery. Churches, religious motifs, goddess motifs, references to the holy trinity, old gods, etc.
Nature Imagery
Plants, including flowers / floral designs, grapevines, trees, pine branches, and wheat.
(I was surprised to learn that wheat designs aren’t considered traditional patterns, as I saw so many of them used in Manitoba! Apparently it’s a symbol of homesickness in Ukrainian diaspora.)
The “tree of life” is an ancient symbol and specific theme in some traditional designs, usually represented as flowering plant in a pot.
Some of the most popular motifs are references to the sun, usually as a stylized symbol of the sun.
This is considered an important motif, and can be represented in many ways, from a circle, to as a broken cross, rosettes, etc.
There are also more literal sun depictions, frequently as a rising sun.
Animal motifs generally consist of relatively literal animal figures, including birds, fish, sheep, roosters, deer, etc.
Geometric Designs
Geometric designs are some of the most fun to play with when coming up with original designs.
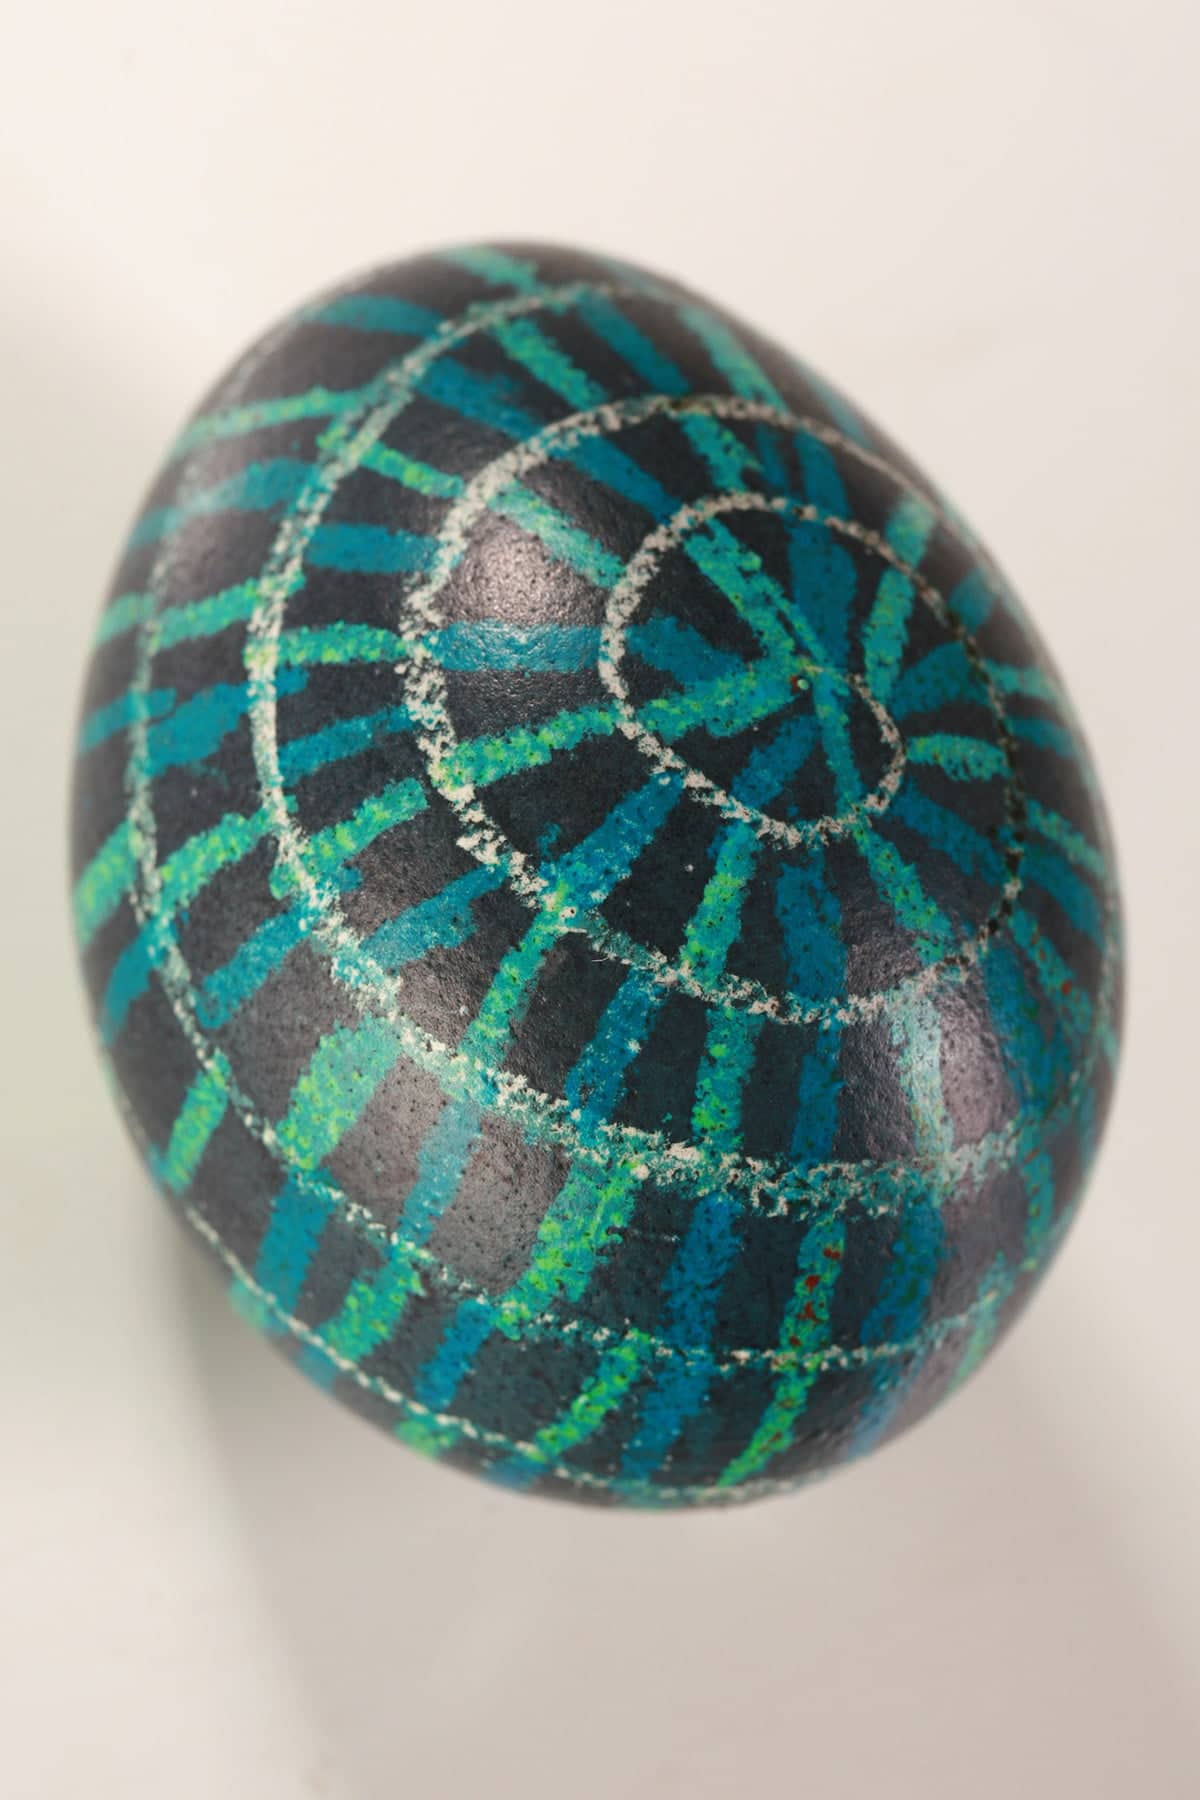
They can incorporate elements such as stars - usually as large star symbols - curls, spirals, straight lines / “endless lines”, and more.
Many of these geometric motifs are done incredibly tiny, in repetition and in concert with other elements.

Ukrainian Easter Eggs, As a Kid ...
One year - I'm sure I was probably in grade 4 or 5 - my class went to the Ukrainian Cultural & Educational Centre for one of their pysanky workshops, to learn about Ukrainian culture, and how to make our own Ukrainian Easter eggs, using the old ways.
We were given the little tools to draw wax designs on our eggs. We'd scoop some wax into the little well, use a candle to melt it, and draw our initial outlines on.
We'd dye it, dry it, draw more wax on... lather, rinse, release.
When we were done, we'd carefully hold our eggs up near the candle flame, to melt all of the wax we'd drawn on, to reveal all of the colors that we'd protected from subsequent dye baths.
Although none of our eggs looked anything like the gorgeous egg art projects displayed in the Center - and available in the Ukrainian gift shop - it was a lot of fun.
I've always loved learning new skills, admiring the work of others, and learning about other cultures... even though I was NOT skilled at this particular type of work, LOL!
Date Night Easter Eggs, as an Adult!
Several years ago - just before this was first posted - I was thinking about how much fun I'd had back then, and decided that I would try it again, with my husband.
As we're both sort of anti social, doing so at home was the most attractive option.
I didn't own any Pysanky tools, so I needed to either buy some, or some up with an alternate way to get the wax on the eggs.
After briefly considering painting melted wax on with art brushes, I thought of another way - CRAYONS!
So, we bought some crayons and eggs, and went to it.
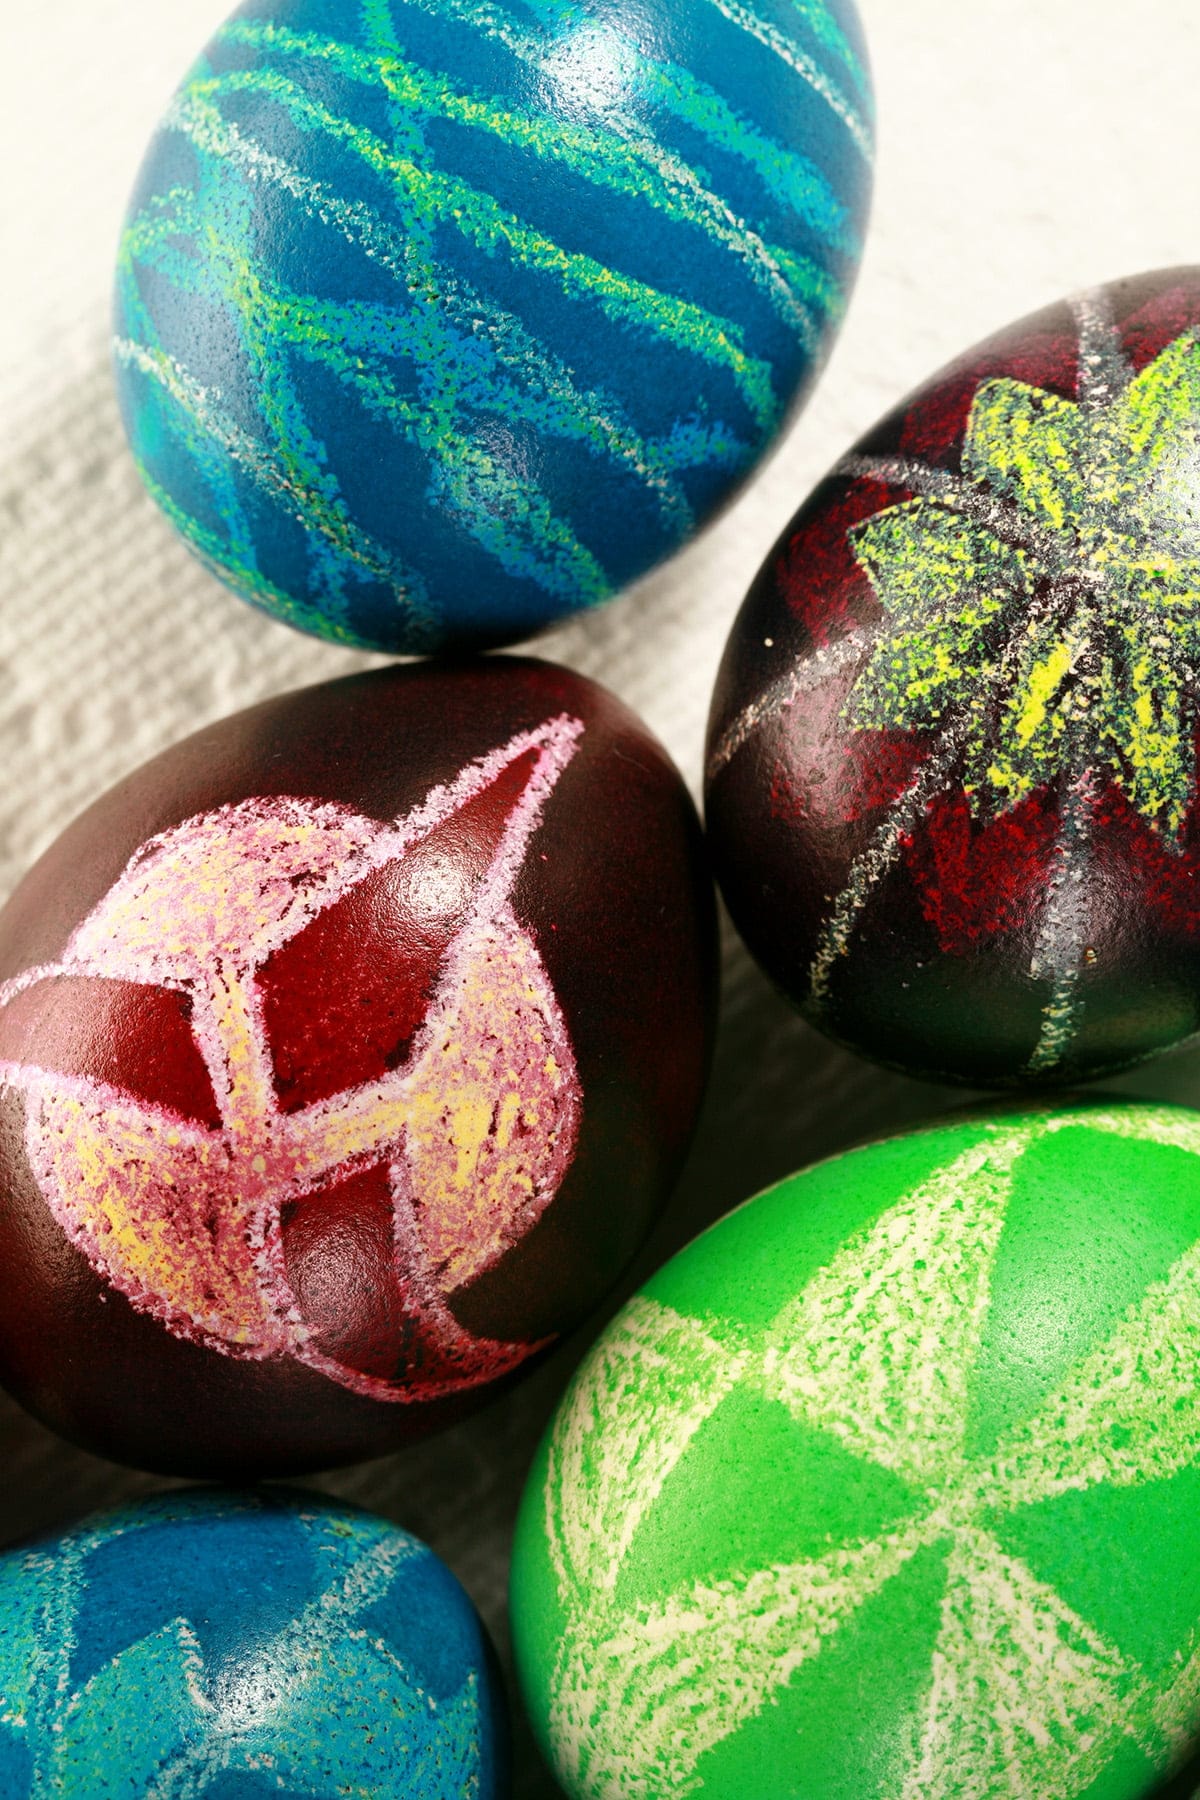
We had a BALL!
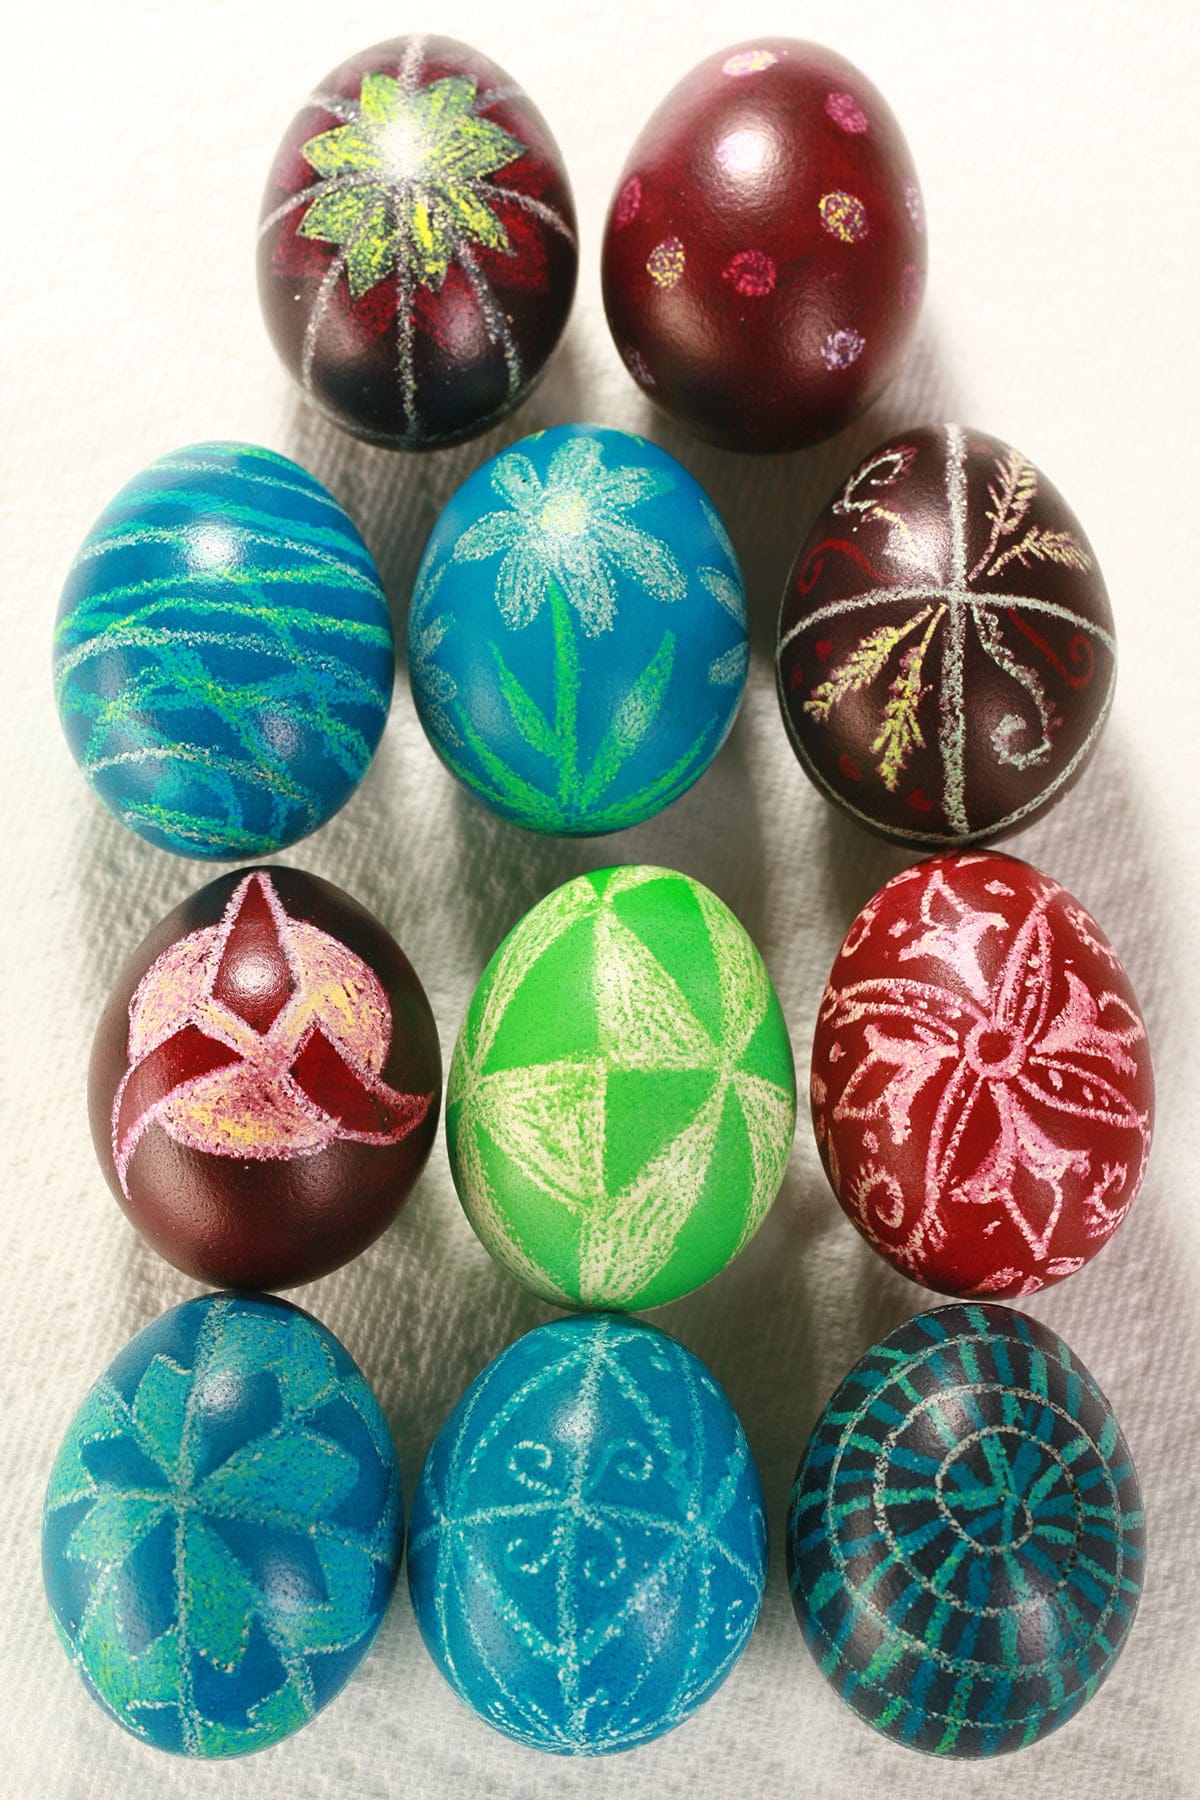
Though our results were far from professional - and DEFINITELY not authentic Ukrainian eggs, they were definitely more interesting than your average "egg dyeing kit" results... and really easy!
There was so much interest in our nonsense when I posted about it online, I decided to make an actual tutorial for these easy wax relief Easter eggs.
It’s a fun craft for kids AND adults or all skill levels. Let me show you how to do it - full step by step directions below!
A Note on Crayon Pysanky Designs
As crayons are nowhere near as suited for doing the kind of fine detail utilized in traditional, authentic Ukrainian pysanky designs, I usually play a bit loose with the designs.
I mean, there’s a special tool used for the traditional Ukrainian method for a reason - and that reason is being able to apply the hot beeswax in a much more precise manner than you’ll get from a crayon!
Have fun with it - polka dots may not have any real special meaning, but they’re one of the different ways you can get a fun design without a legit pysanky kit!
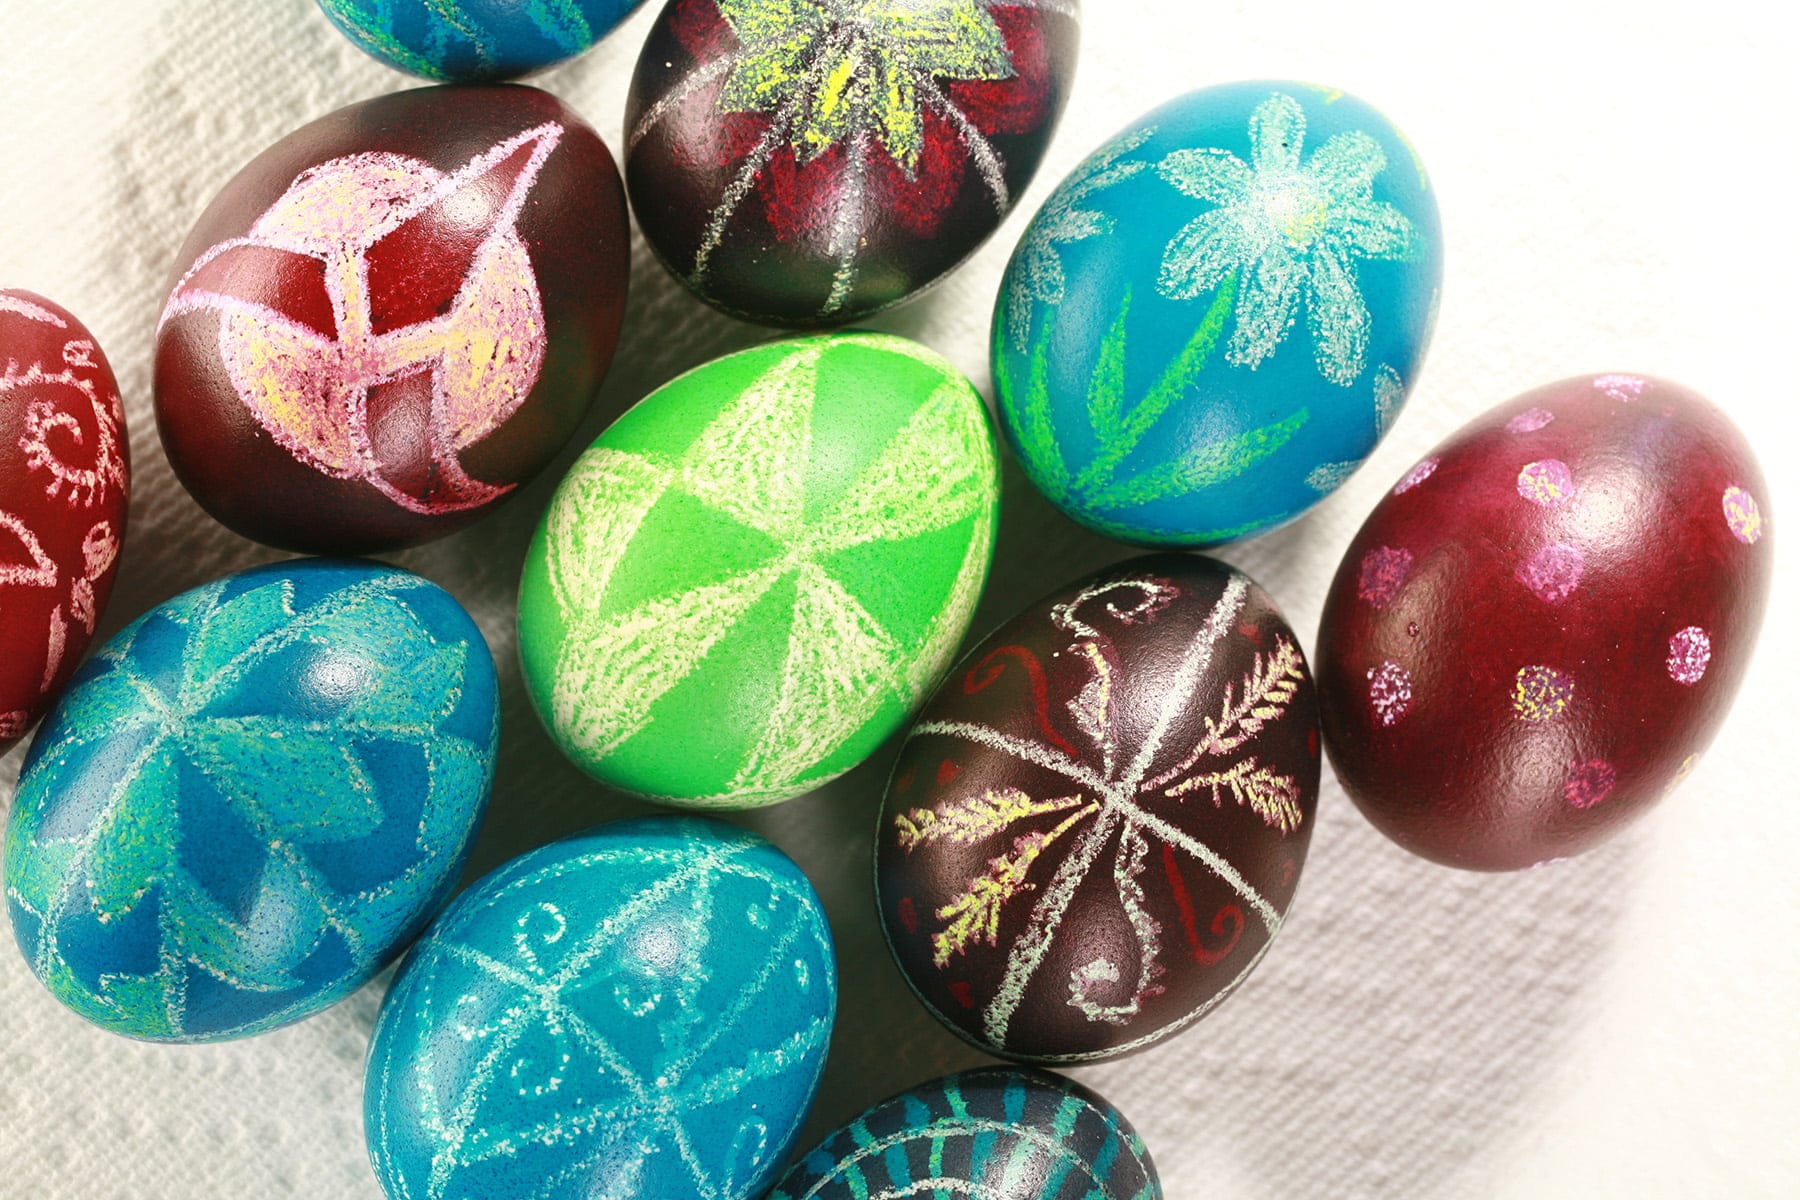
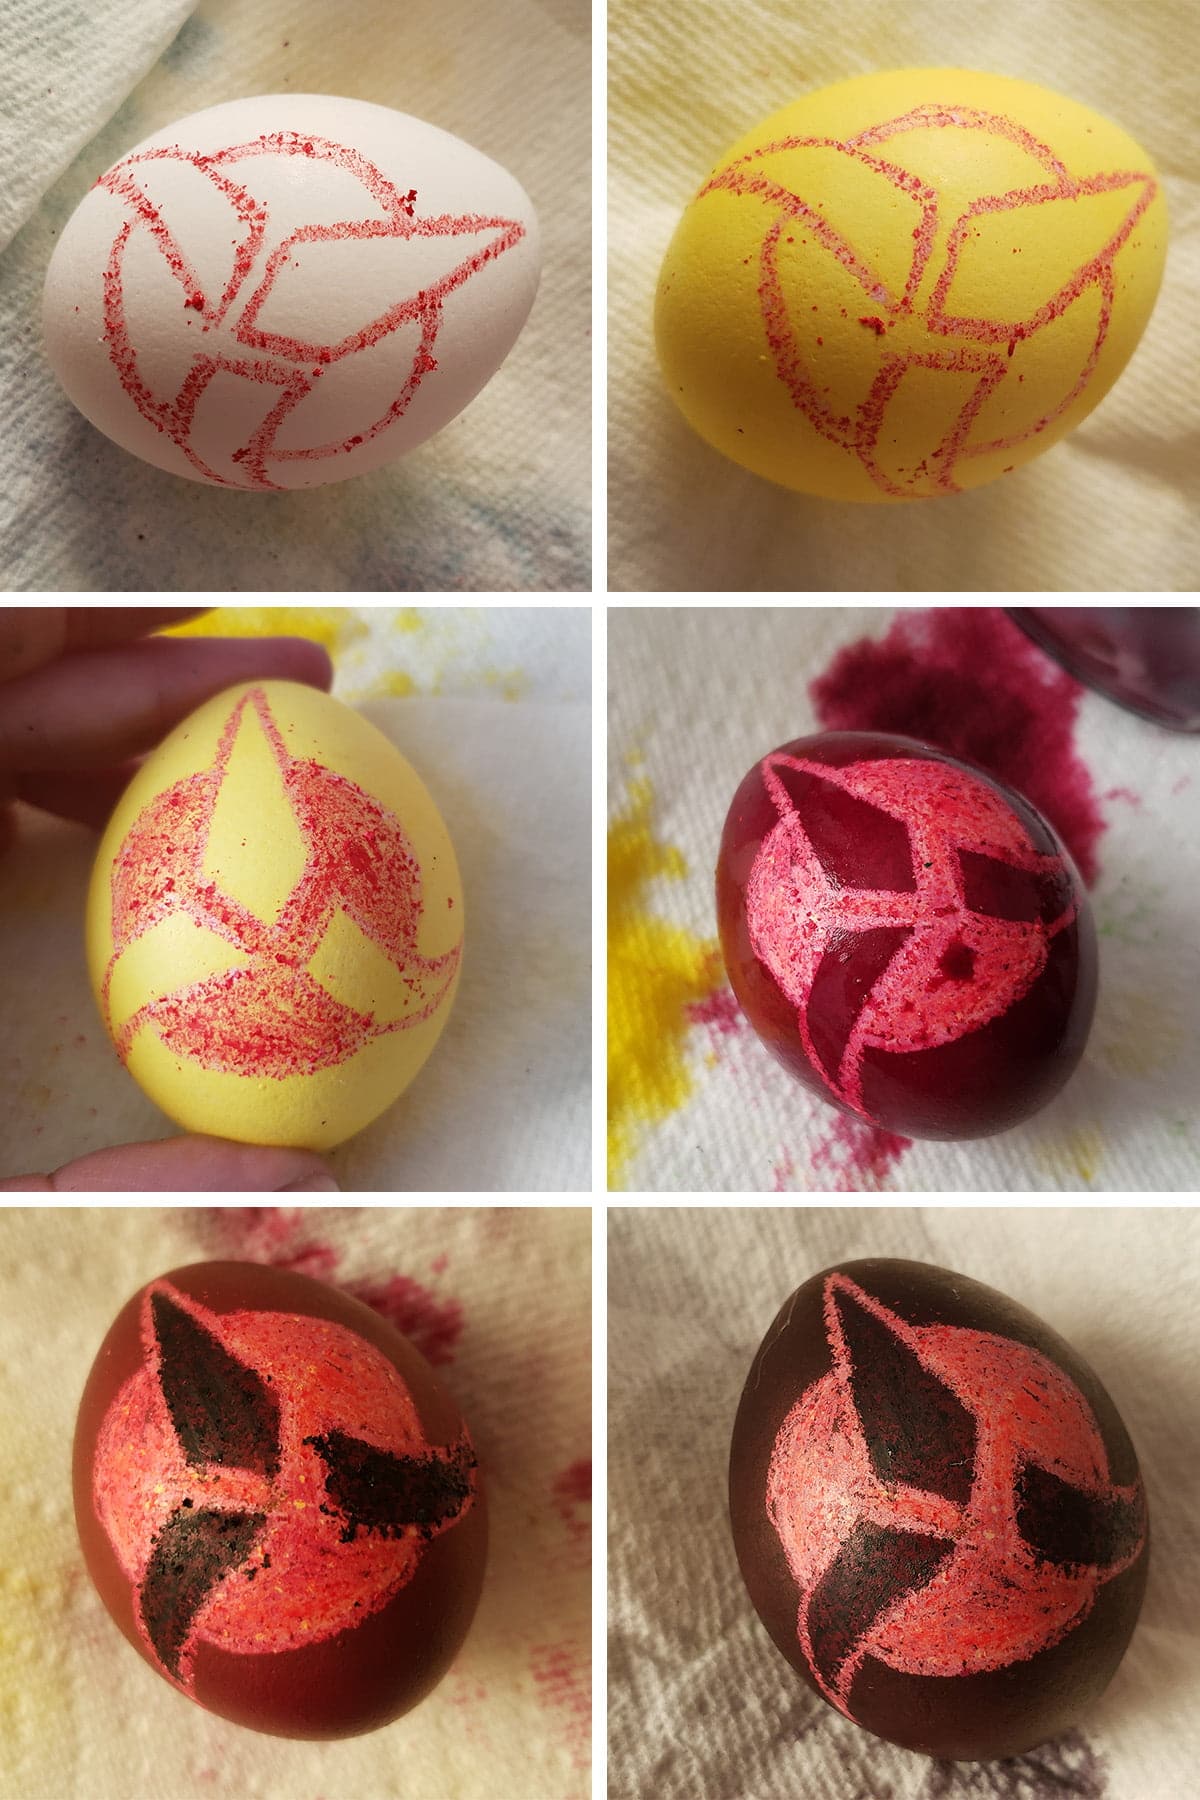
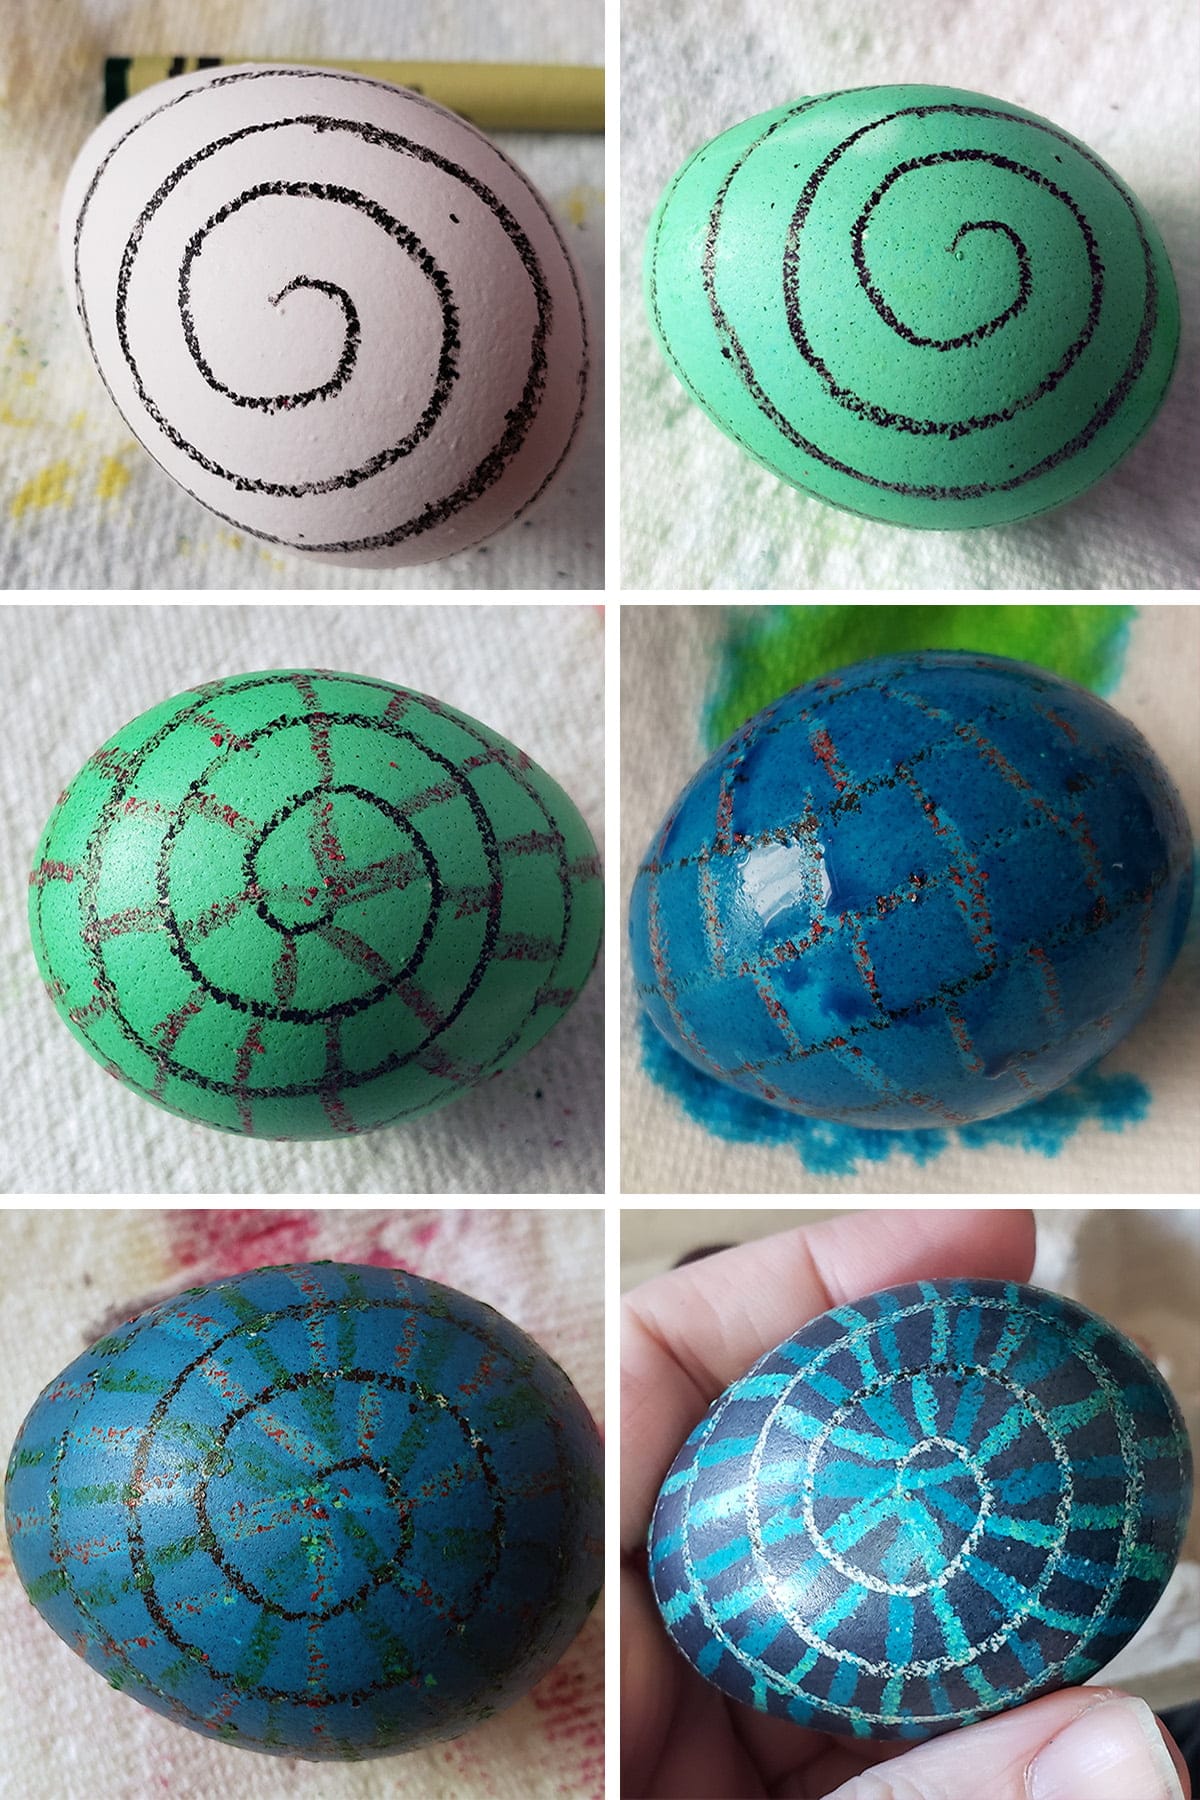
Spirals, flowers, Klingon symbols.. Whatever floats your boat - just have fun with it!
Easy Pysanky Supplies Needed
While you won’t need your own kistka to use this technique, there are some supplies you’ll want to have for this:
Eggs
Generally speaking, you’ll be using chicken eggs for this. They’re cheap, easy to come by, and their egg shells are usually white - a nice, blank canvas.
That said, feel free to play around with eggs of different colors, or even different types of eggs. I’ve seen goose egg pysanky - amazing!
Anyway, I use whole raw eggs when doing this, and consider them decorative eggs - NOT to eat.
Crayons
You’ll want a fair amount of basic wax crayons. You WILL break crayons. Have a lot on hand, and consider them disposable. The Dollar Store is your friend!
Make sure you aren’t using any kind of “special” crayons - glitter, etc. MOST IMPORTANTLY: DO NOT USE WASHABLE CRAYONS.
When re-shooting for this entry, I didn’t notice that the crayons I’d purchased were washable. After spending hours designing and dyeing the eggs, they ended up completely ruined. So much time, wasted!
Washable = dye will permeate them!
Here's a fail egg! Sometimes the crayon just doesn't stick, as was the case here. I knew it was trouble from when I started!
This is the same thing that happened with the washable crayons.
Belted beeswax seems to rub off a bit cleaner than crayon wax, IMHO..
They’re expensive, though, so I usually don’t bother. I can handle a bit of dye showing through on my designs!

Egg Dyes and/or Food Coloring
As a kid, I used store-bought Easter egg dye kits, which were OK... but not amazing.
In recent years, I mixed a bit of Americolor Gel Food Colouring with some hot water and vinegar.
I had a ton of it on hand, as a cake decorator. It allowed for MUCH brighter, more vivid colors... including black. (See the very bottom of this post for photos from that night!) Exposure to moisture - such as the beading that ended up happening (I'll come back to this in a bit) was a problem.
I was shocked at how cheap the proper dyes were, so I bought a few, in a selection of vibrant colors.
As a bonus? Apparently when stored in a cool, dark place, these dyes can last 2-4 years!
Money well spent!
Aside from the dyes being SO much better to work with than the previous dyes we'd used, Kathy - the business owner - was SUPER helpful to deal with. I've already placed a second order, after having finished the photography for this post update.
So, if you're looking for really great dyes to do this ridiculous little technique of mine, or want to go all out and get the legit tools... I highly recommend their site!
(Did you know that electric kistka was a thing? They have those, too!)
Also, they have a Facebook Page, Instagram, Twitter, a helpful resource page, AND a Facebook group!
Be sure to check them out!
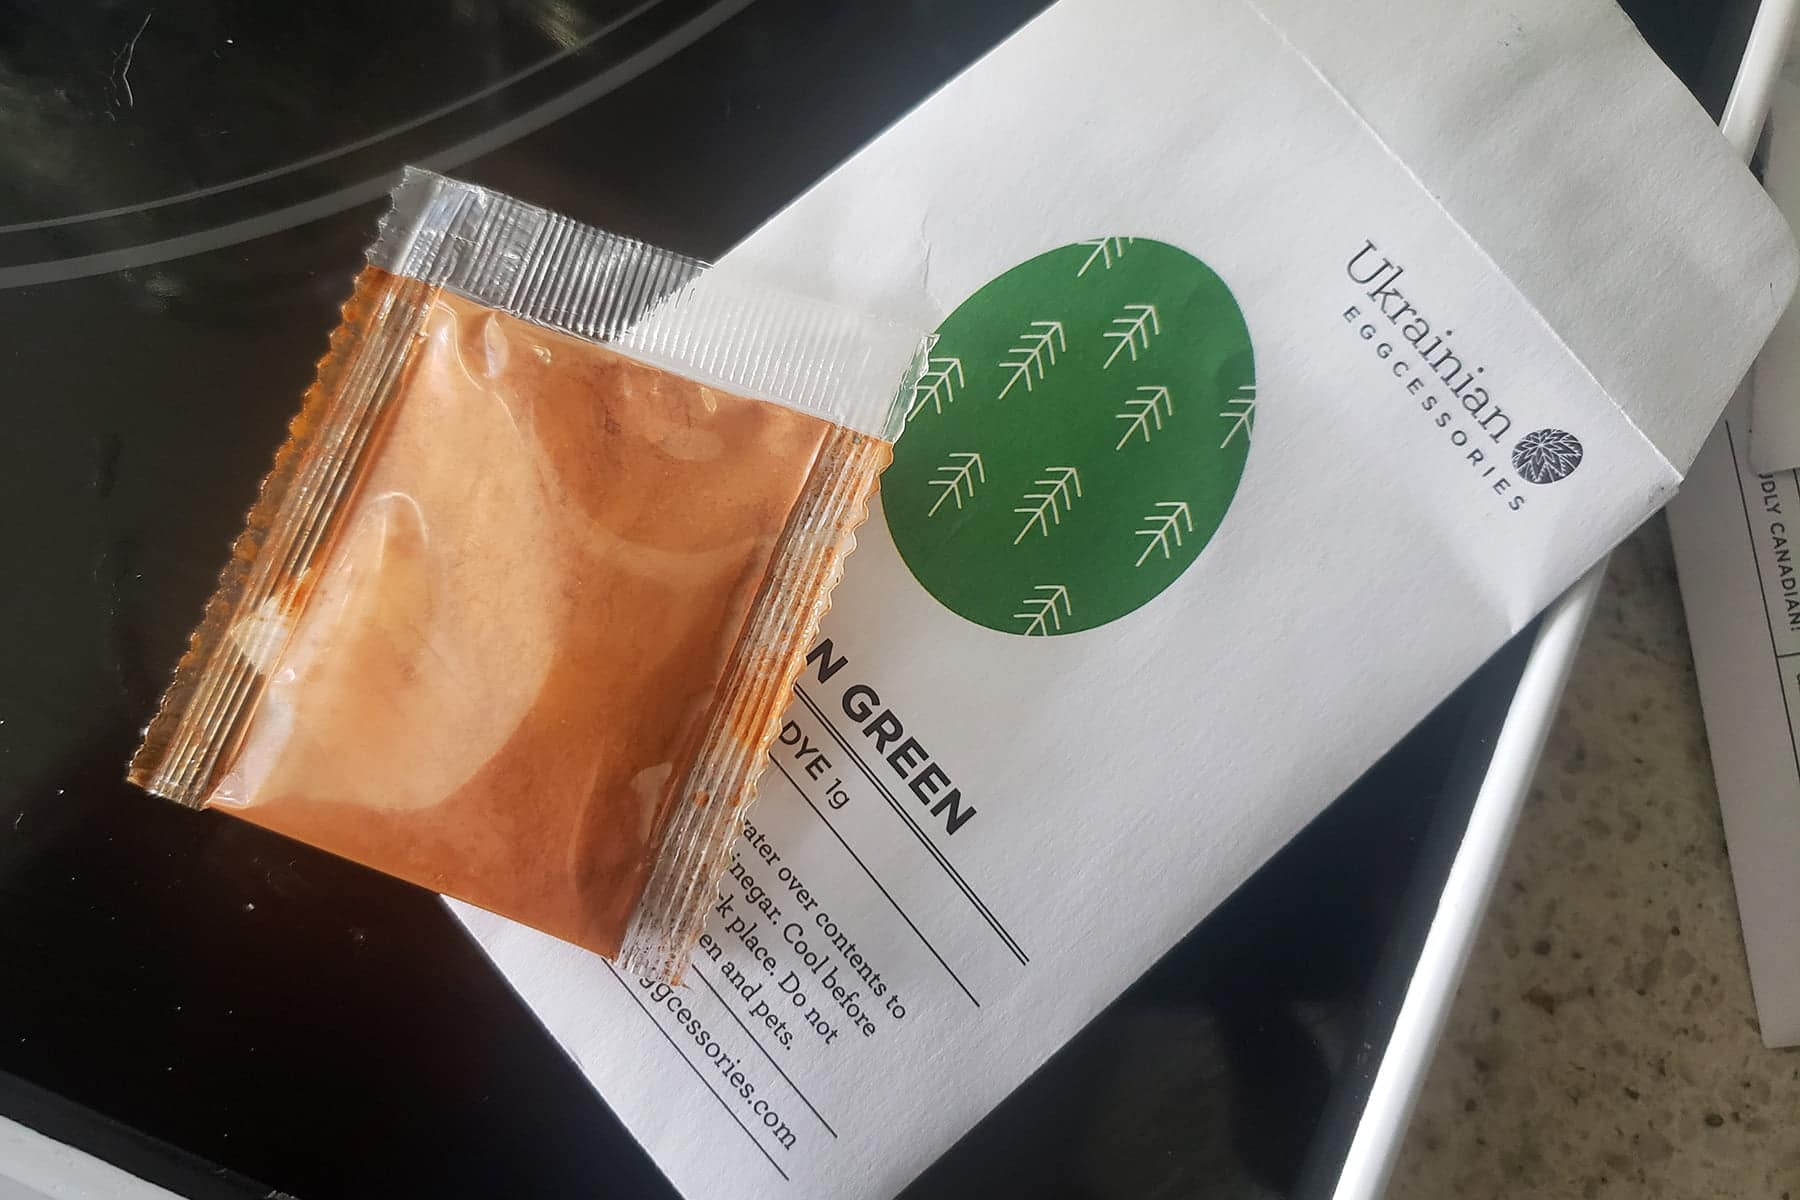
Egg dye can be weird. I was surprised to get a packet of orange powder in my green dye envelope... but it turned green as soon as it hit water!
Other Supplies
- Brown craft paper or newspaper
- Napkins or paper towels. LOTS.
- Vinegar
- Cups or bowls for dye
- Spoons
- Candles, optional
How to Make Pysanky Eggs, The Easy Way
Here is my easy pysanky process: Mostly traditional method, just unconventional means of getting the wax on the egg!
Design Your Easter Eggs
Decide on what colorful designs you’d like to do, and what colors you’ll need to do so.

I like to scrawl out a basic idea of what I'm planning to do. Helped me keep things straight!
Prepare Your Egg Dyes
Mix up your egg dyes according to instructions..
If your dye instructions (assuming NOT using pysanky-specific dye!) don't include the addition of vinegar, I highly recommend adding some - about 1-2 tablespoon per dye cup.
This results in much more vibrant color on the finished eggs. If you'd prefer to do pastel colored Pysanky, then skip the vinegar!
Prepare Your Work Surface
Cover your entire work surface with brown craft paper or newspaper - preferably a few layers, if using newspaper.
Put a good stack of napkins or paper towels at each seat - you will go through a ton of them!
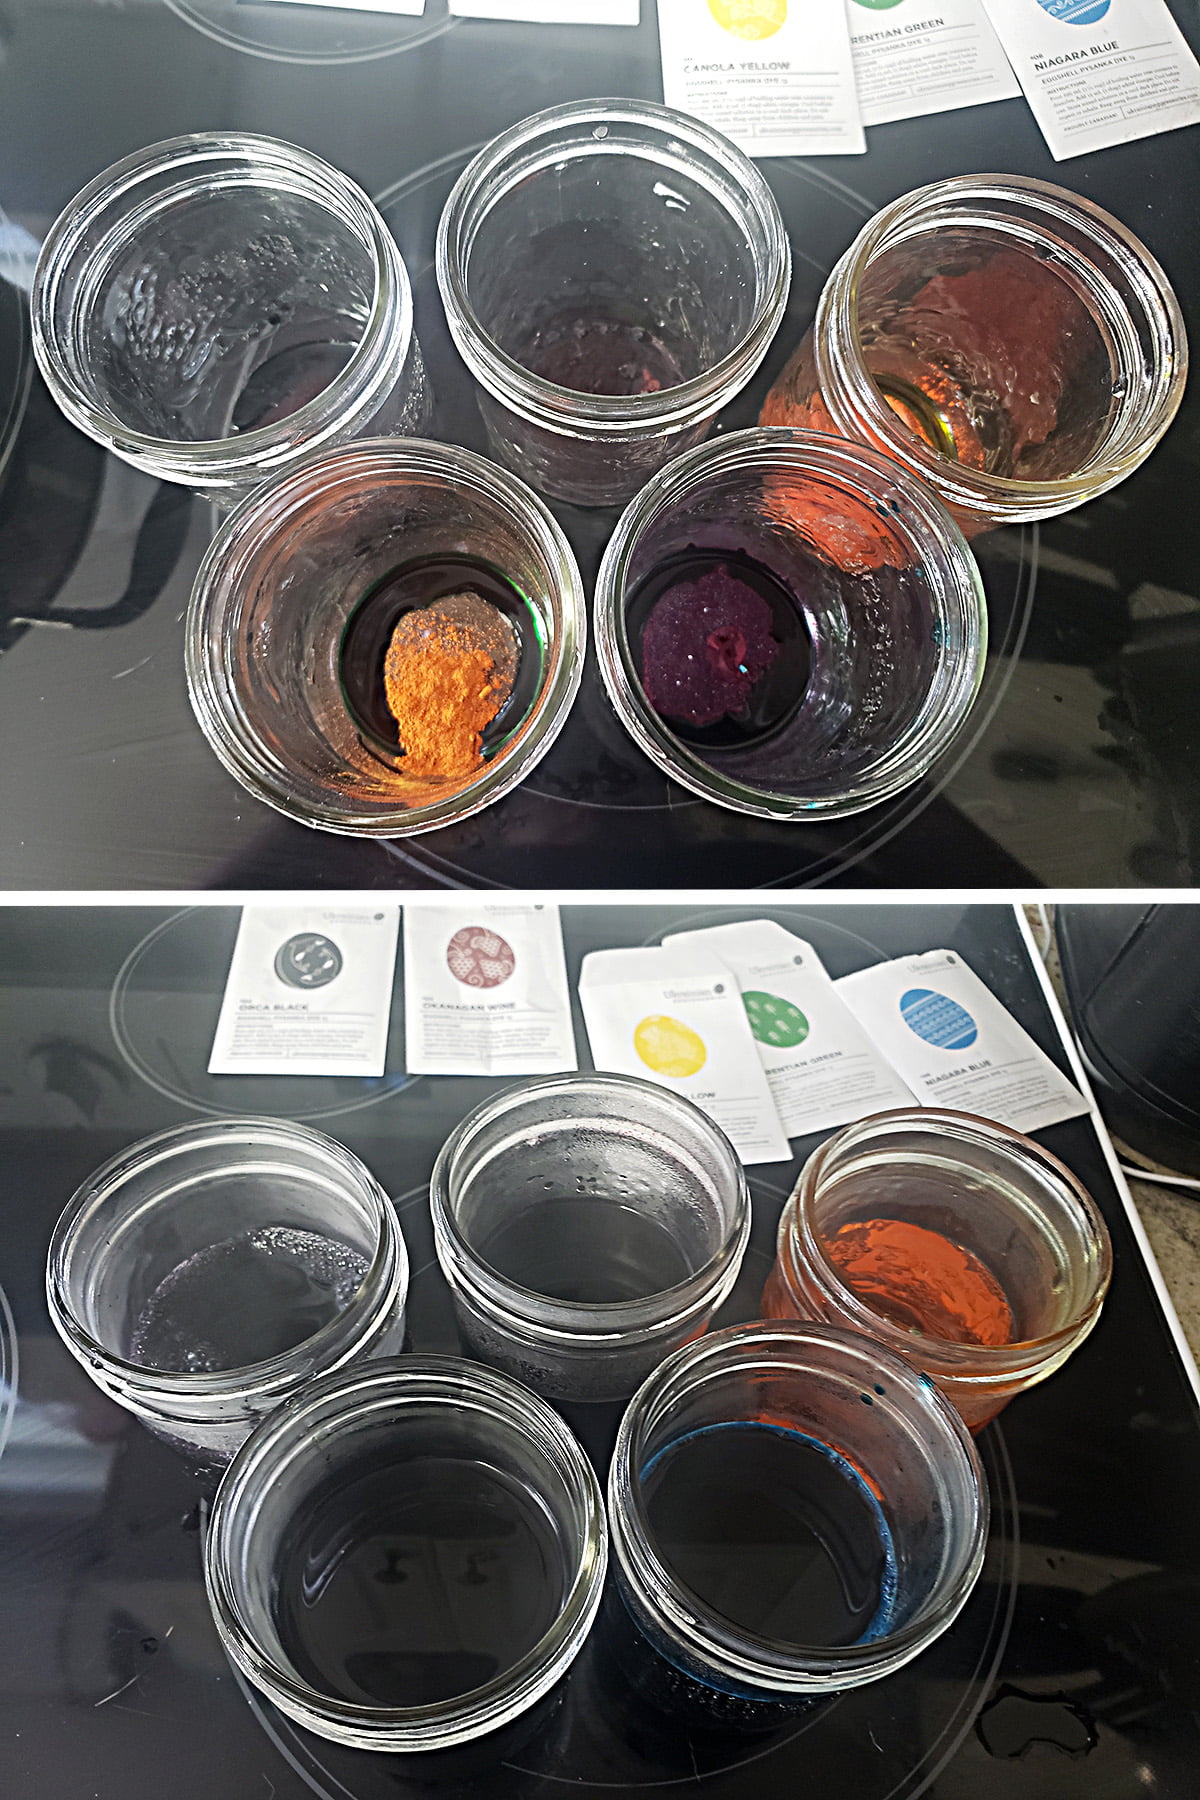
Add 1 spoon to each dye cup, and line them up on your work surface, progressing from light to dark. Our dyes were ordered: Yellow, Red, Green, Blue, Black.
If you have food coloring bottles, dye jars, or anything else, it can be helpful to place them in front of their respective dye cups - for identification.
Set out your crayons and eggs, and you’re good to go!
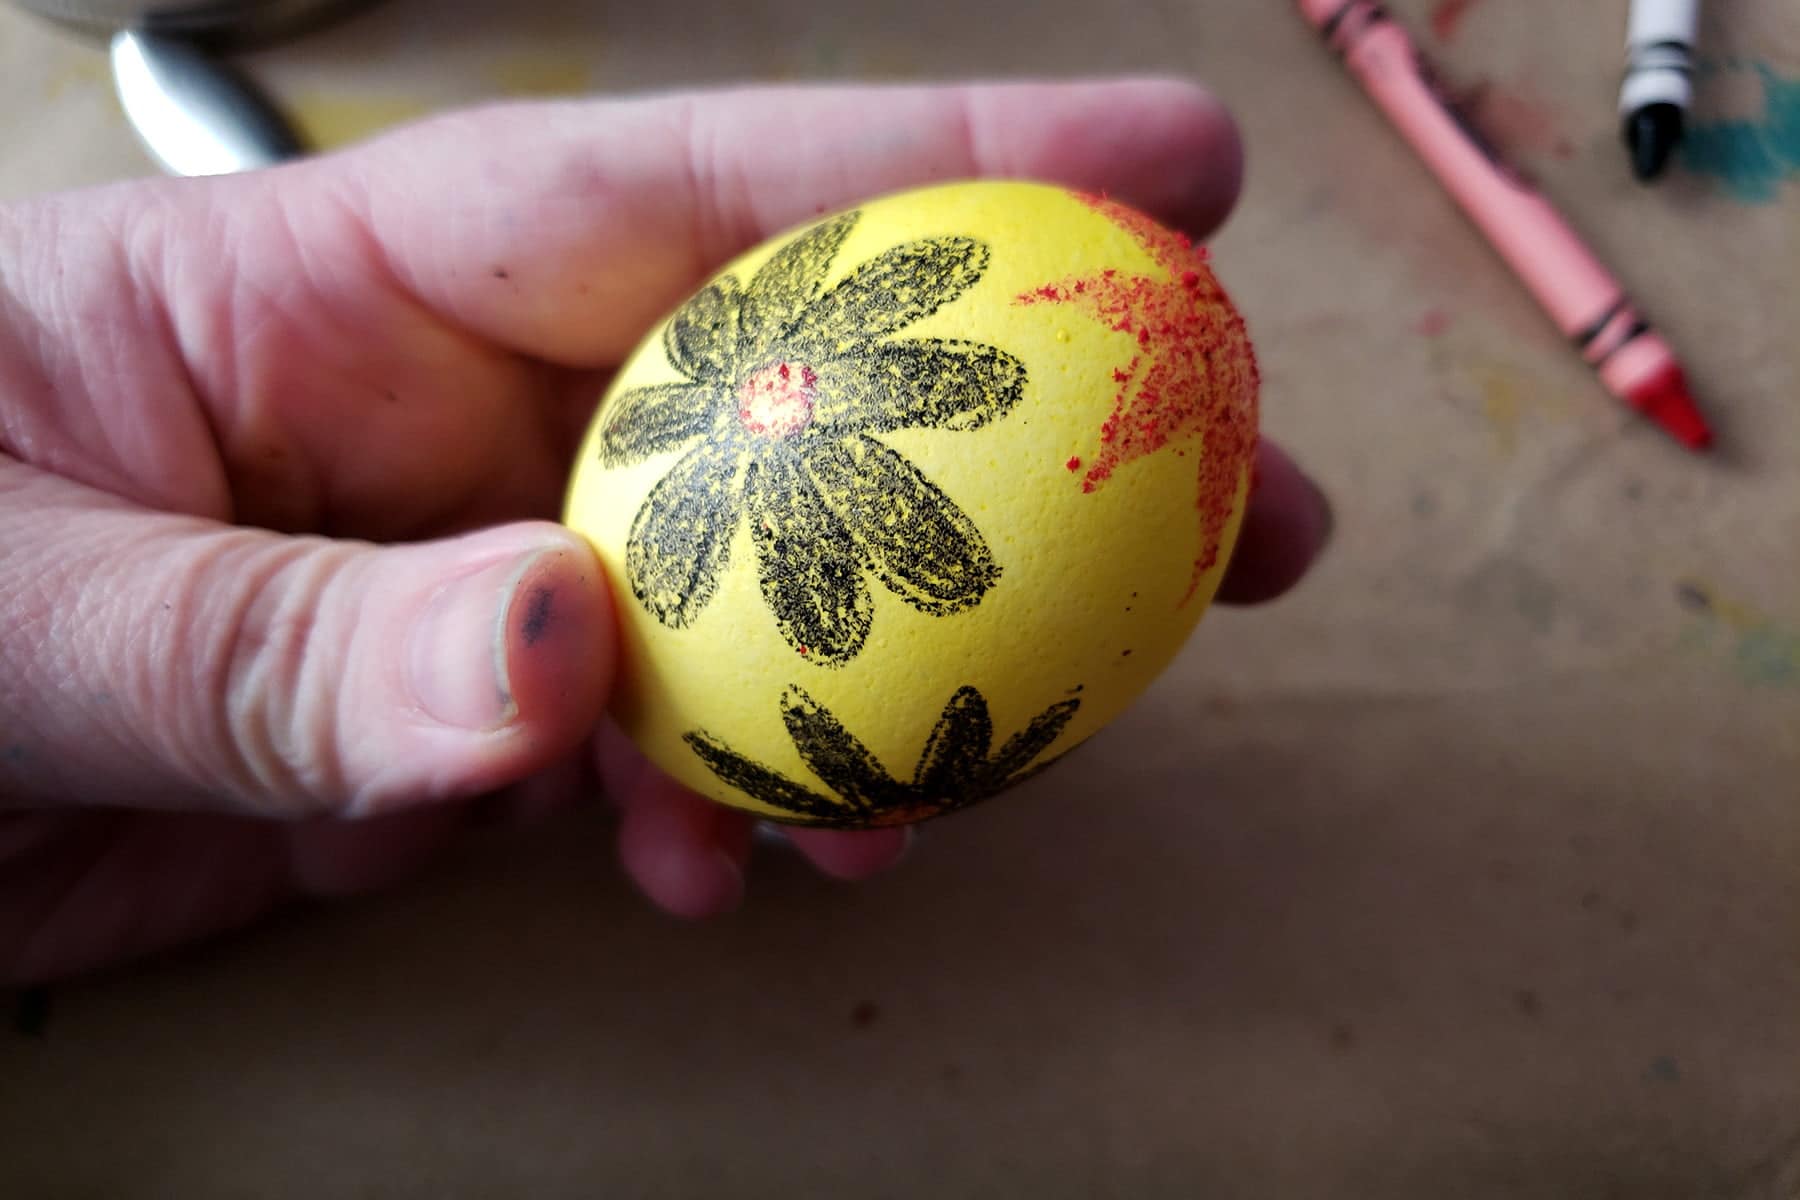
Start Writing Your Pysanky - First Colour
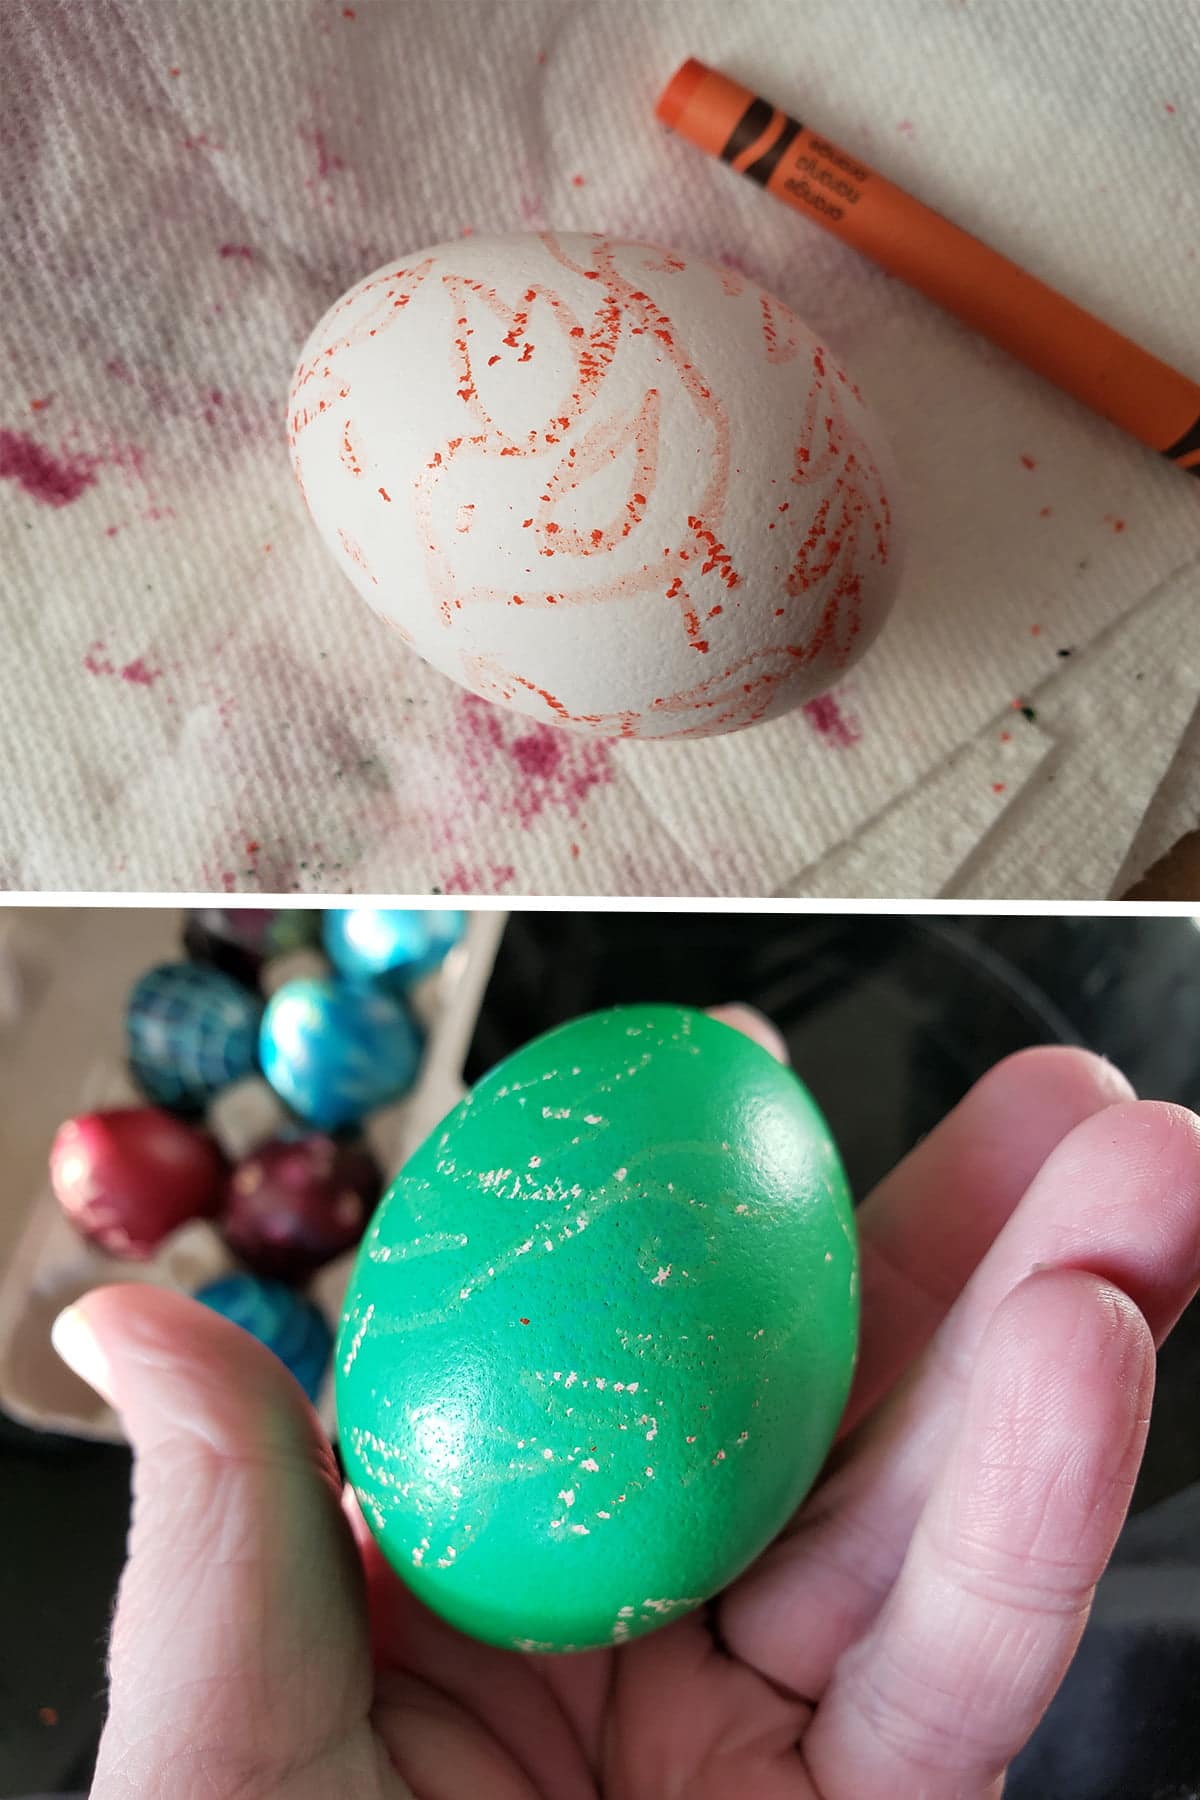
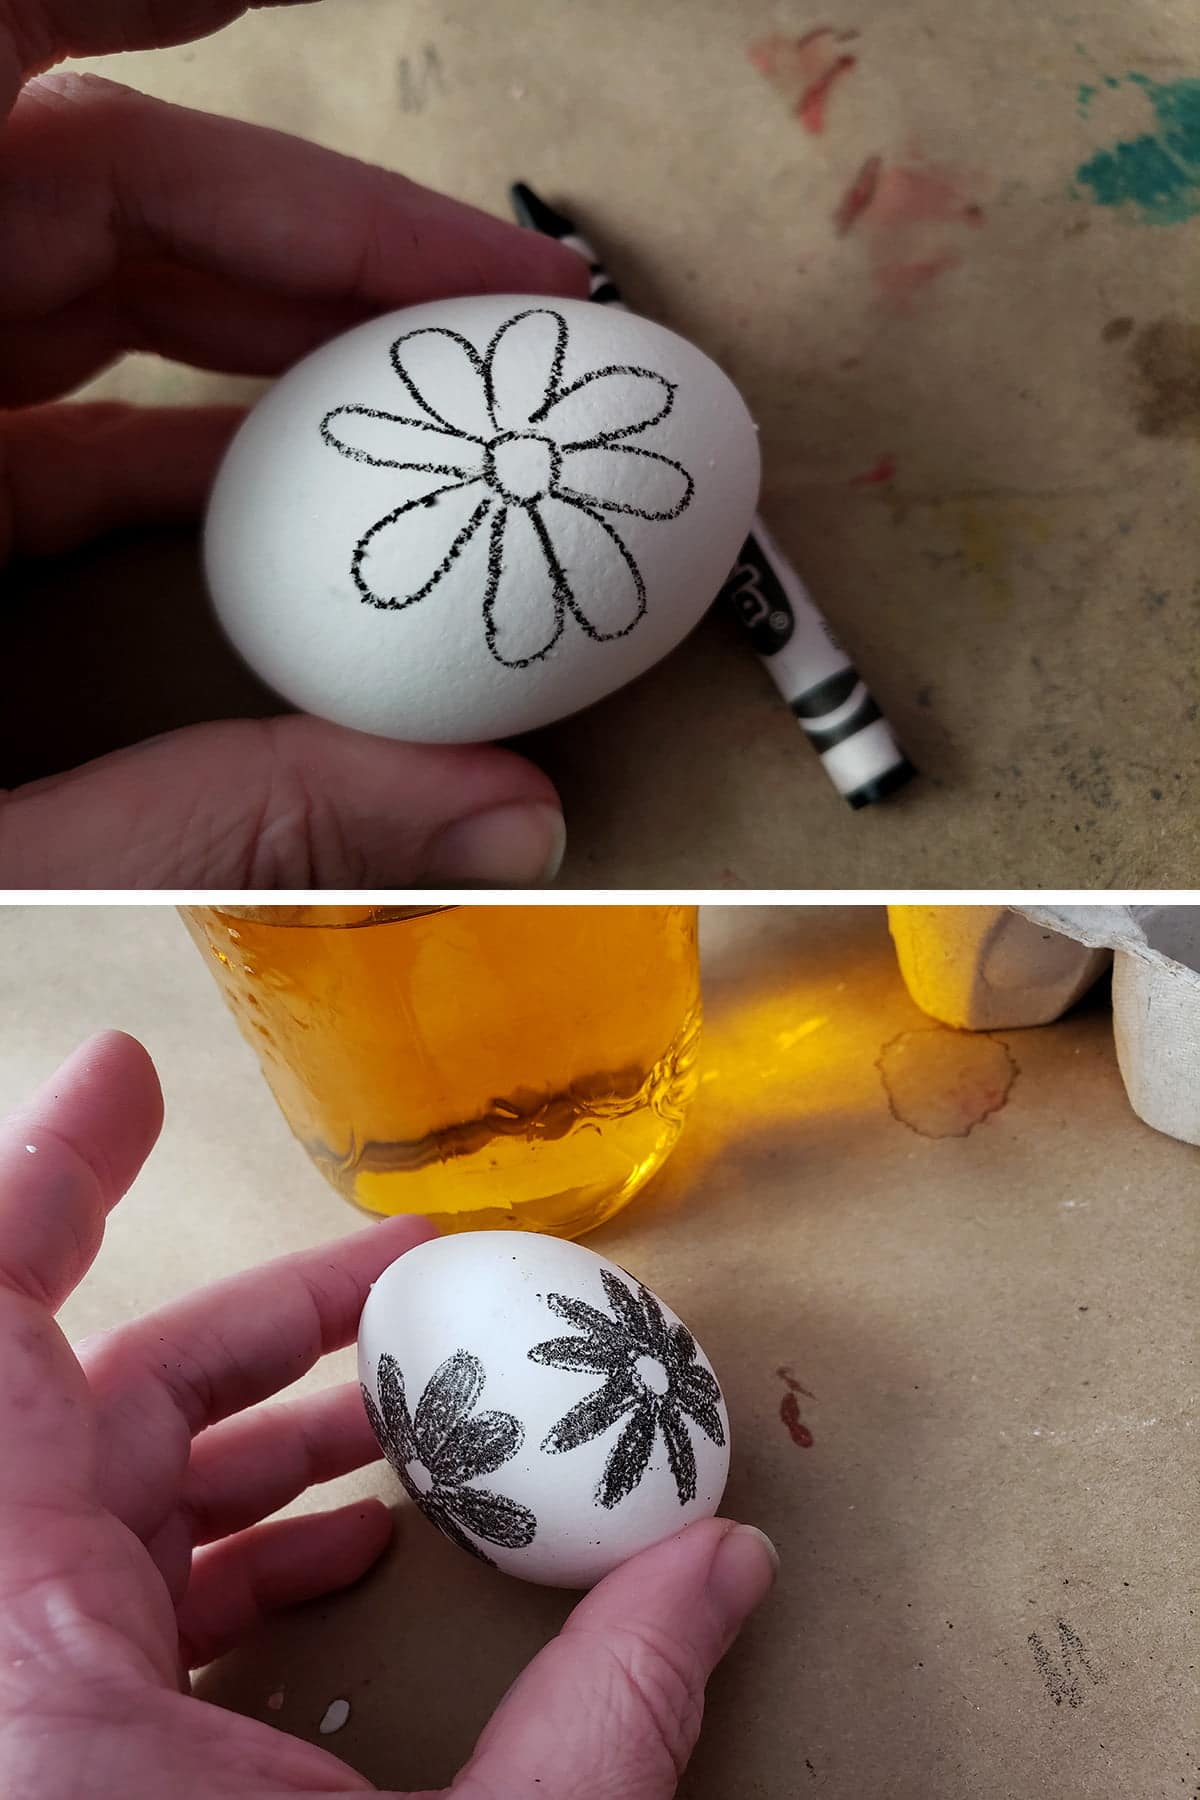
If you are using any white in your design, draw that part of it onto the egg with a crayon.
Make sure that any lines or spaces that you want white are completely covered - you are using the wax to protect that part of the egg from subsequent dye baths!
Once you are satisfied that all of your white is drawn on, dye your egg in the first dye: the lightest color of dye you'll be using.

Allow your egg to sit in the first color for about 2 minutes, until the egg is the desired vibrancy. The amount of time needed will vary between color of dye, dye brands, and intensity you’re aiming for.
Take out quickly for a light color, leave it in longer for strong color.
Use a spoon to remove egg from dye, pat - don’t rub - COMPLETELY dry with paper towel.

Next Colour...
When egg is completely dry, use your crayon to draw on the design for the color you just dyed.
For instance, if your egg is now yellow, draw the yellow part of your design on with the crayon.
Dye egg in the next lightest color you're using.
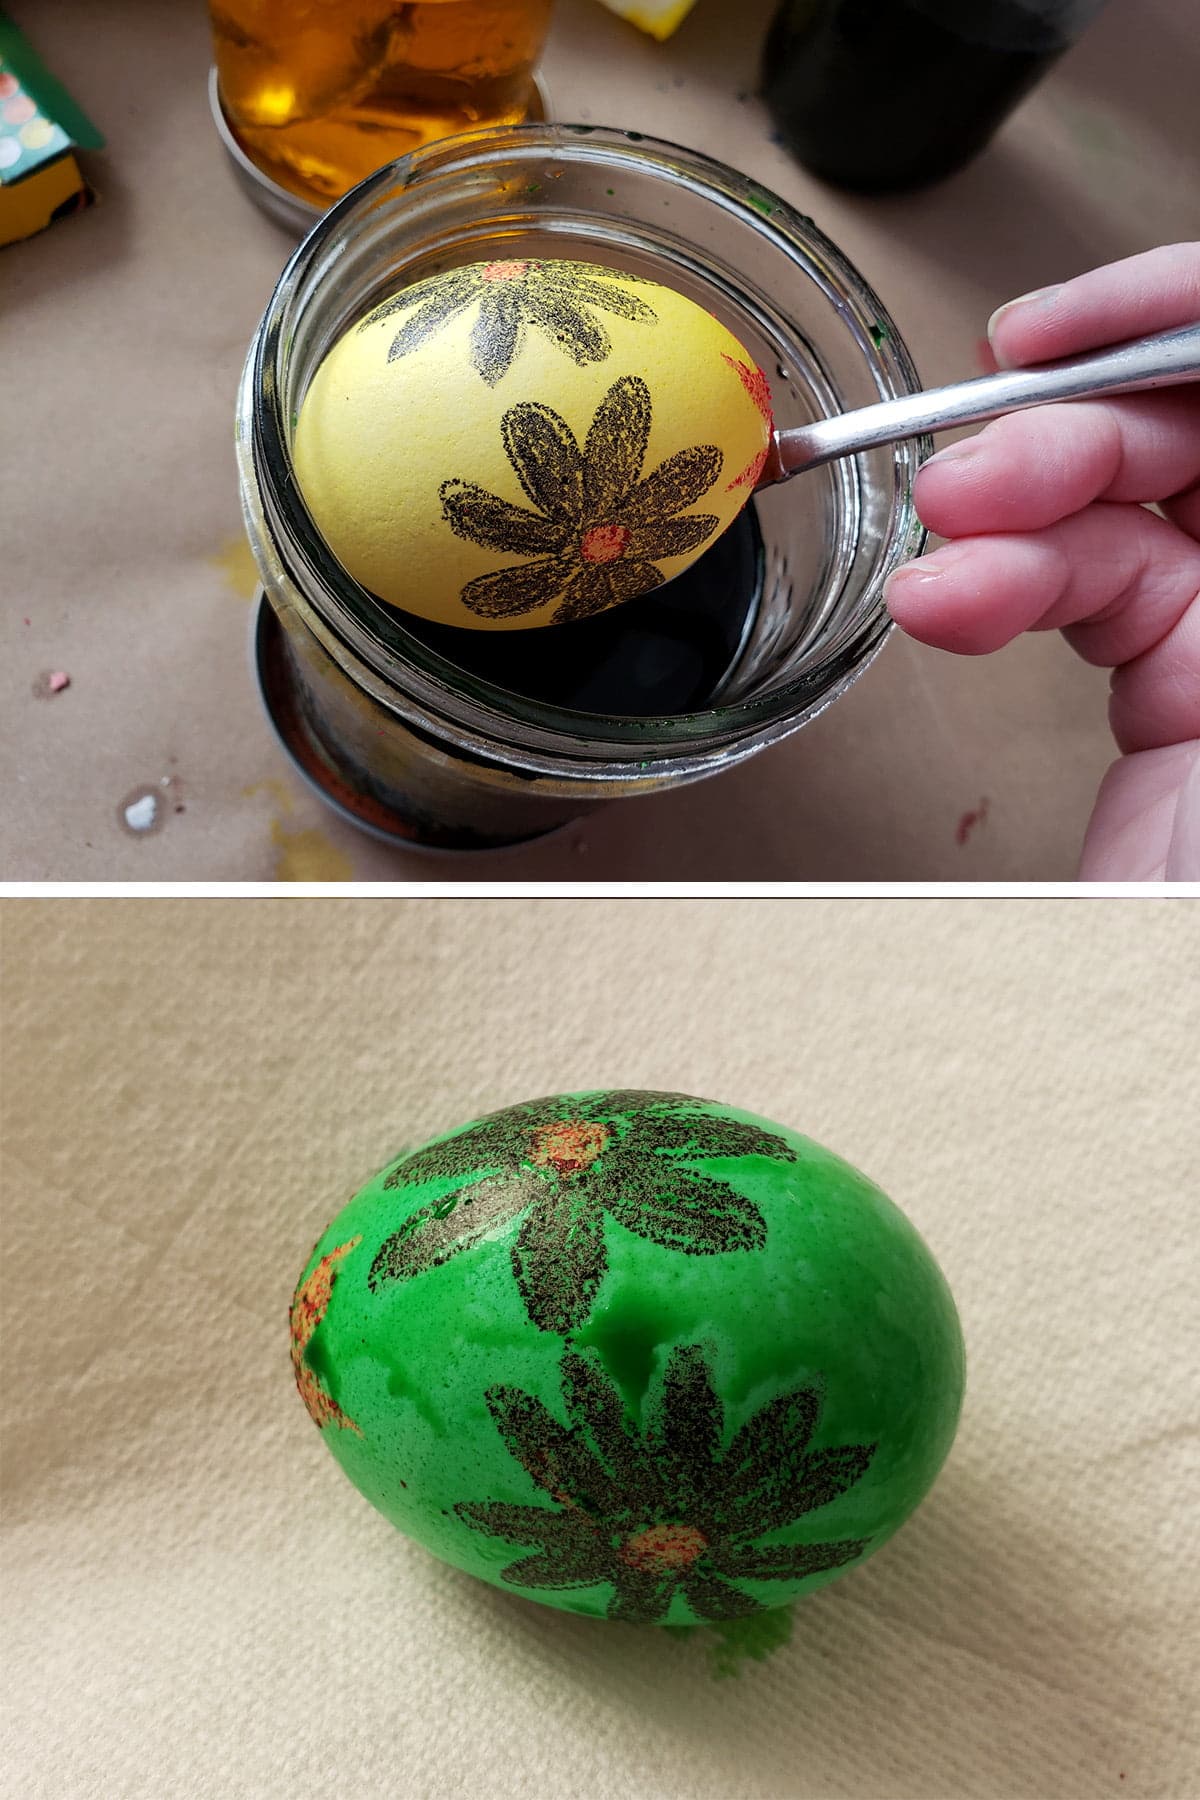
Lather, rinse, repeat.
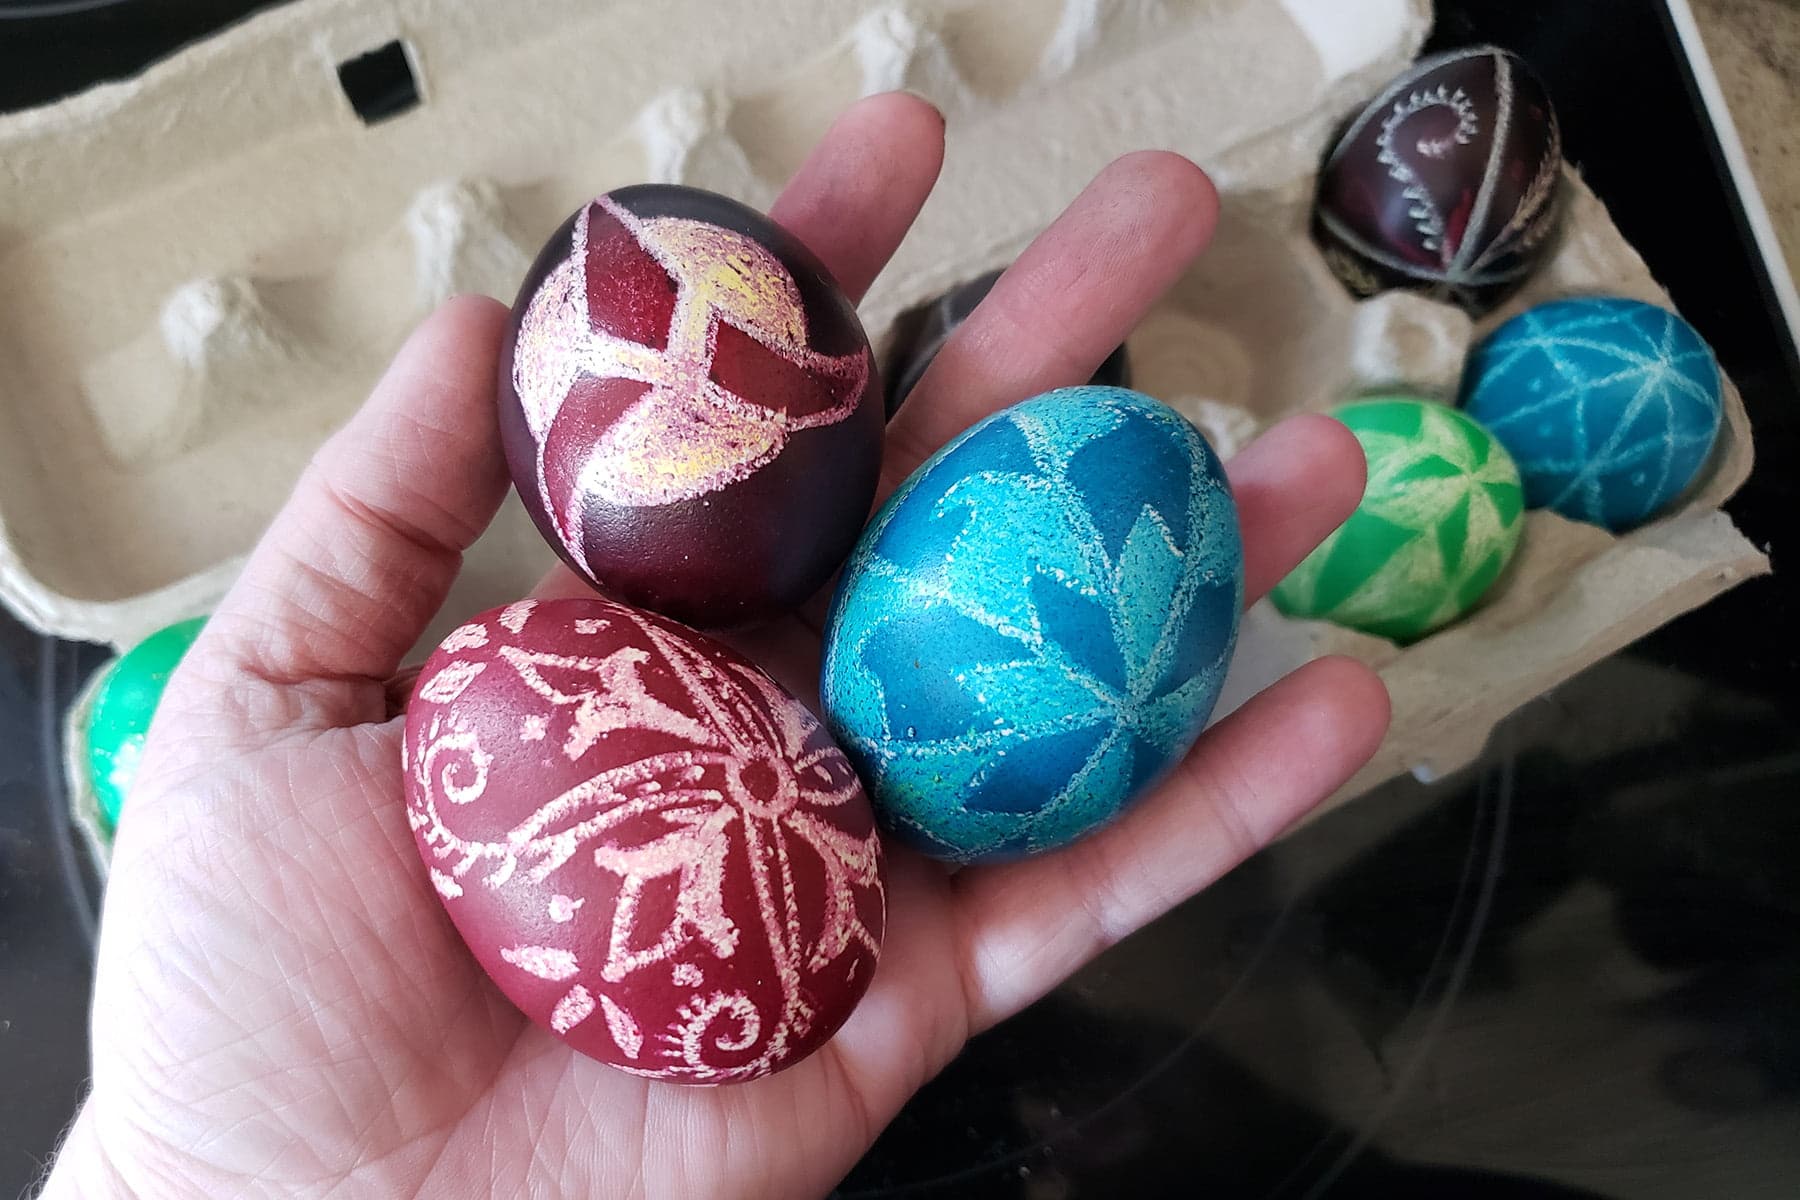
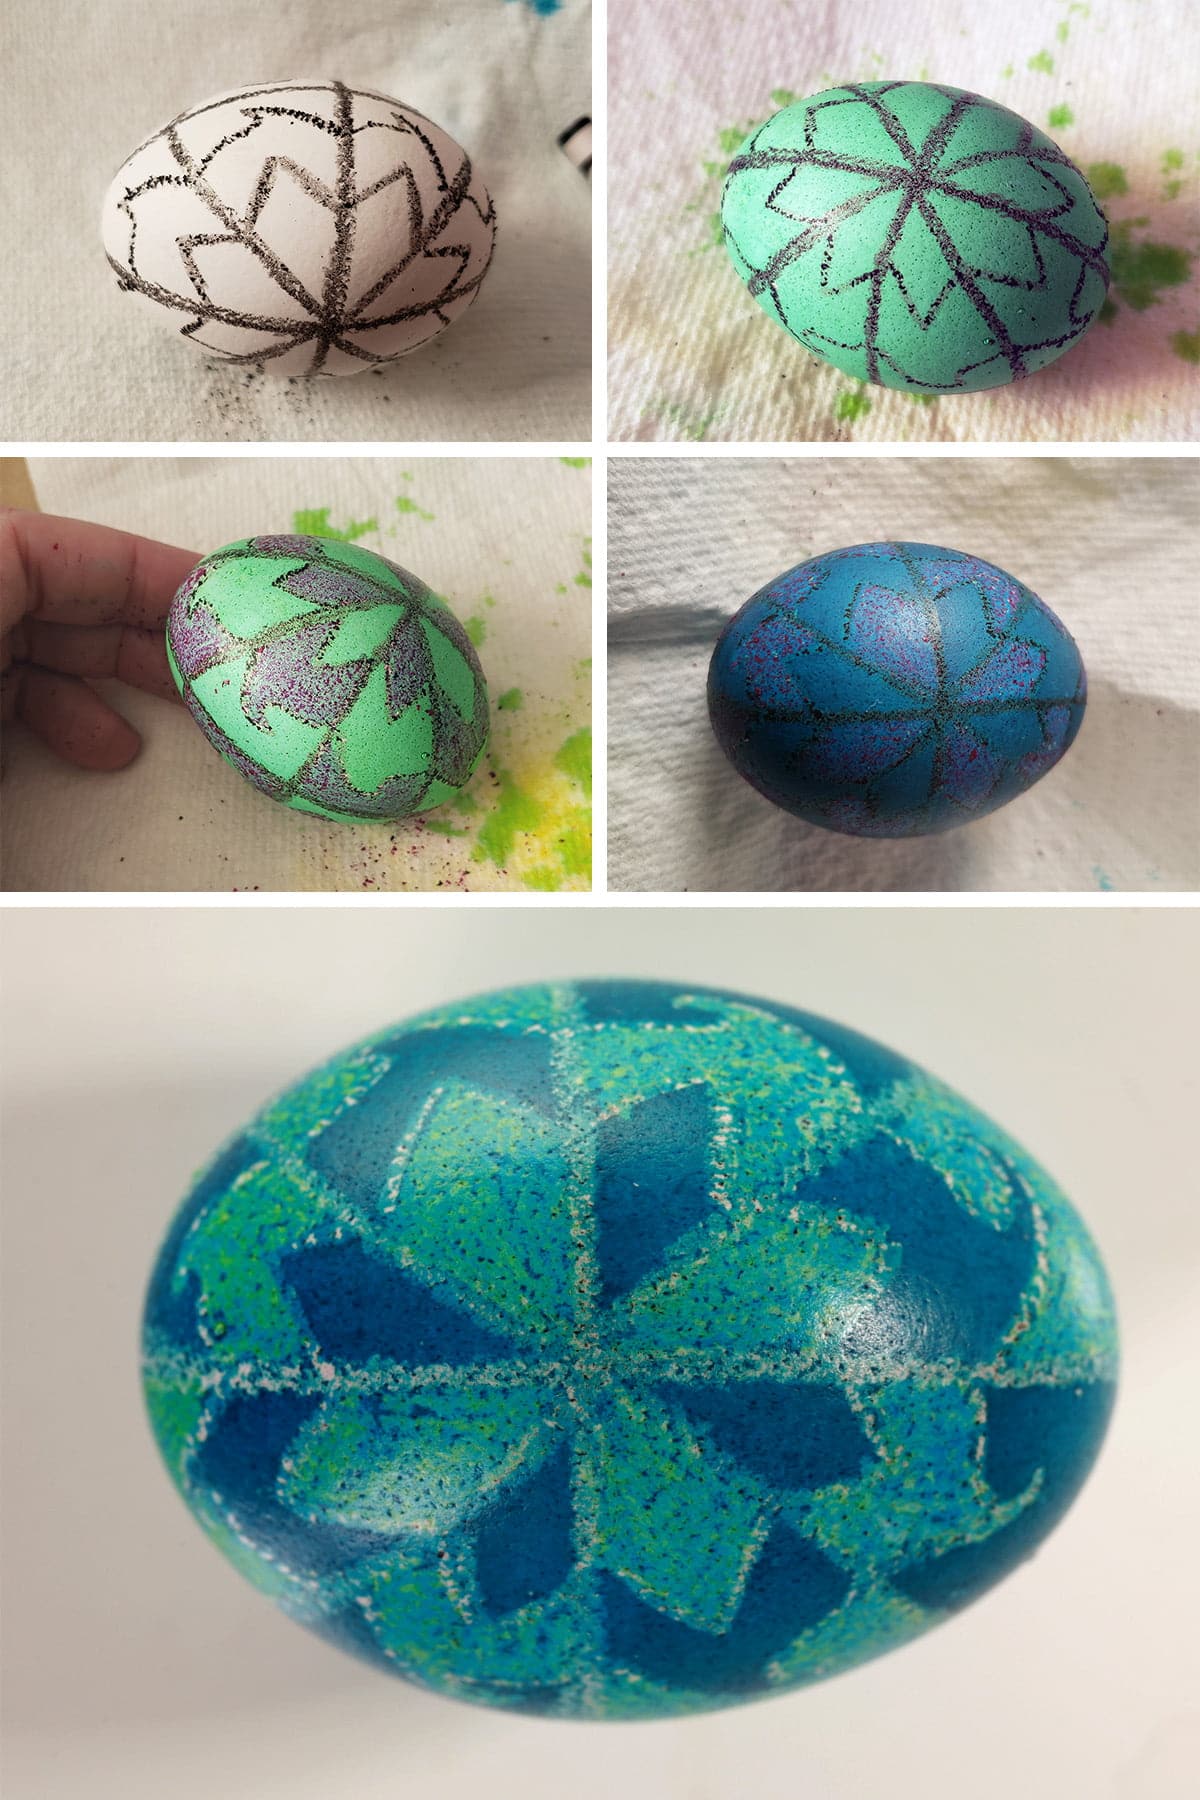
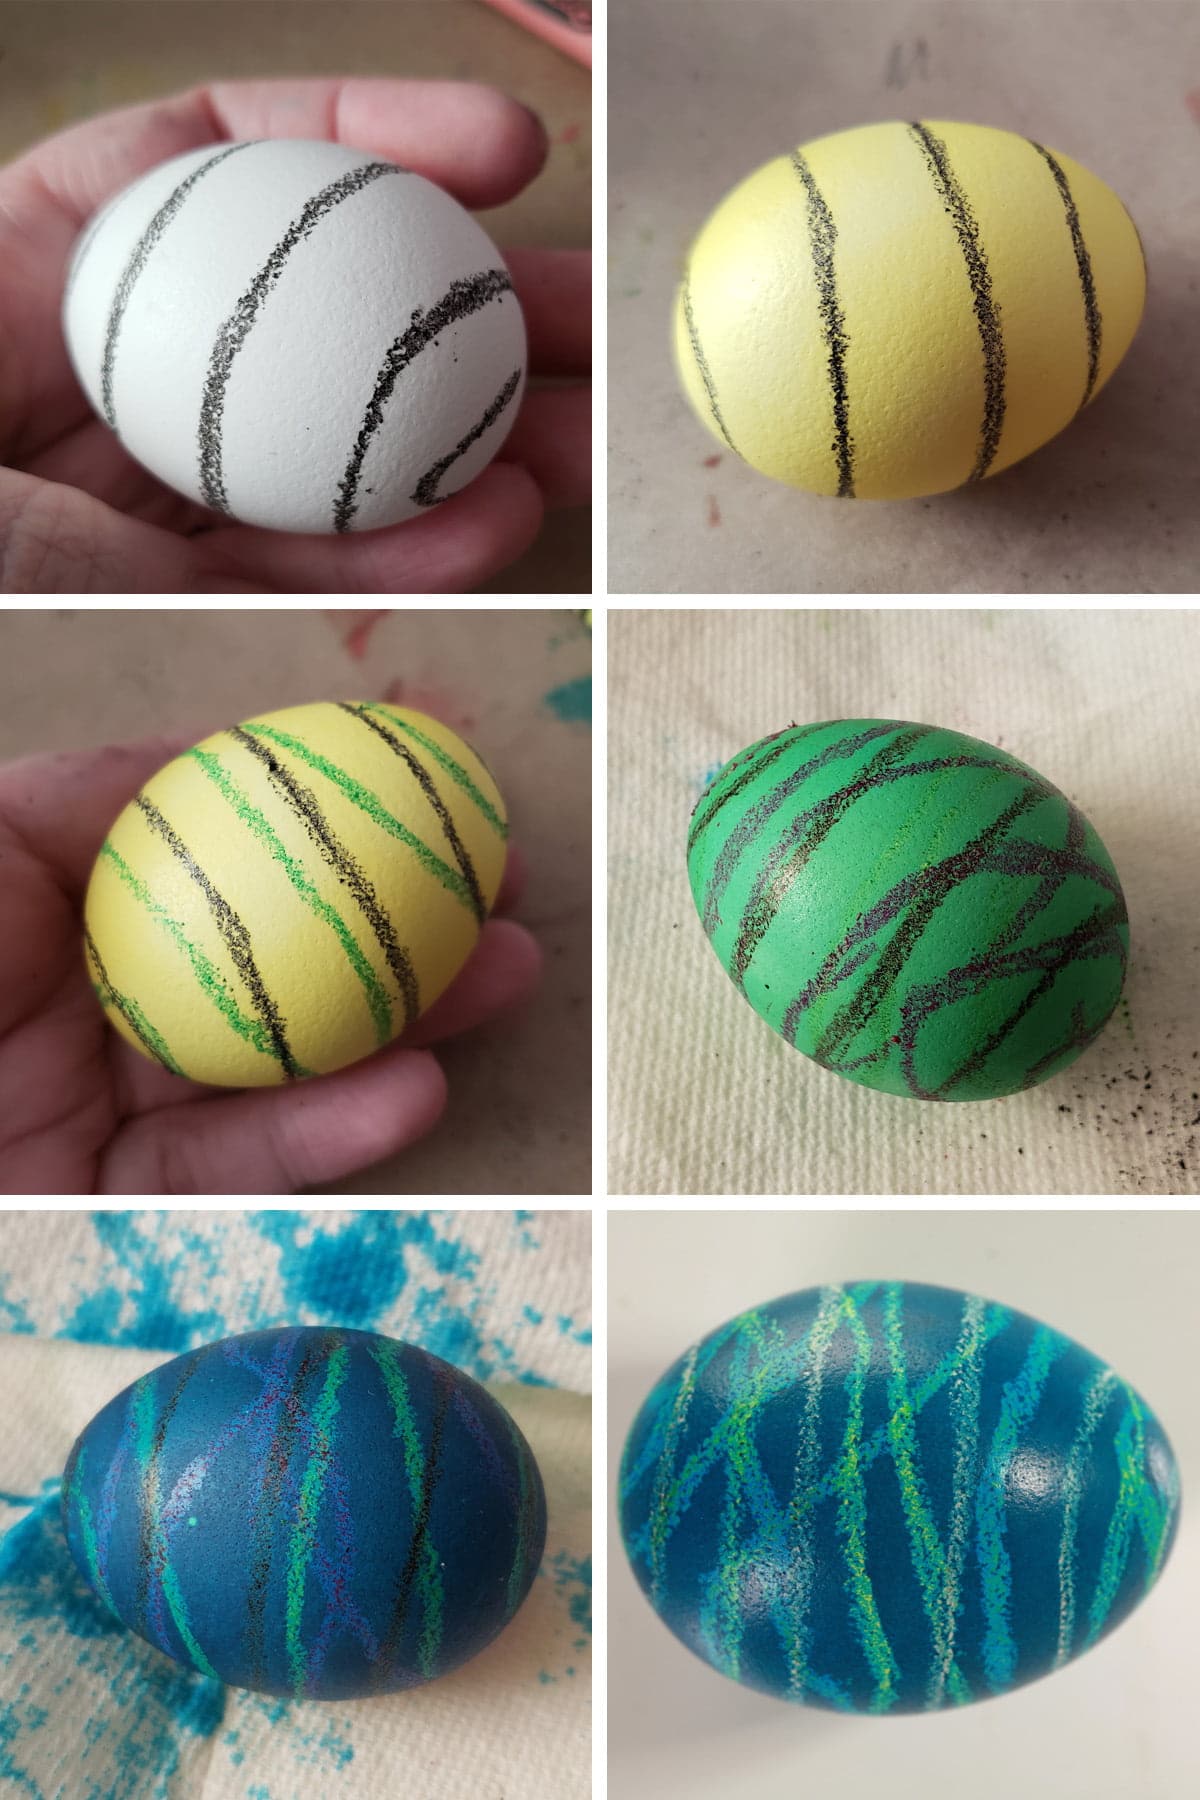
This egg went from white (petals) to yellow (center of daisies, sun), to green (stems and leaves) to blue (final colour / background . Darkest color).
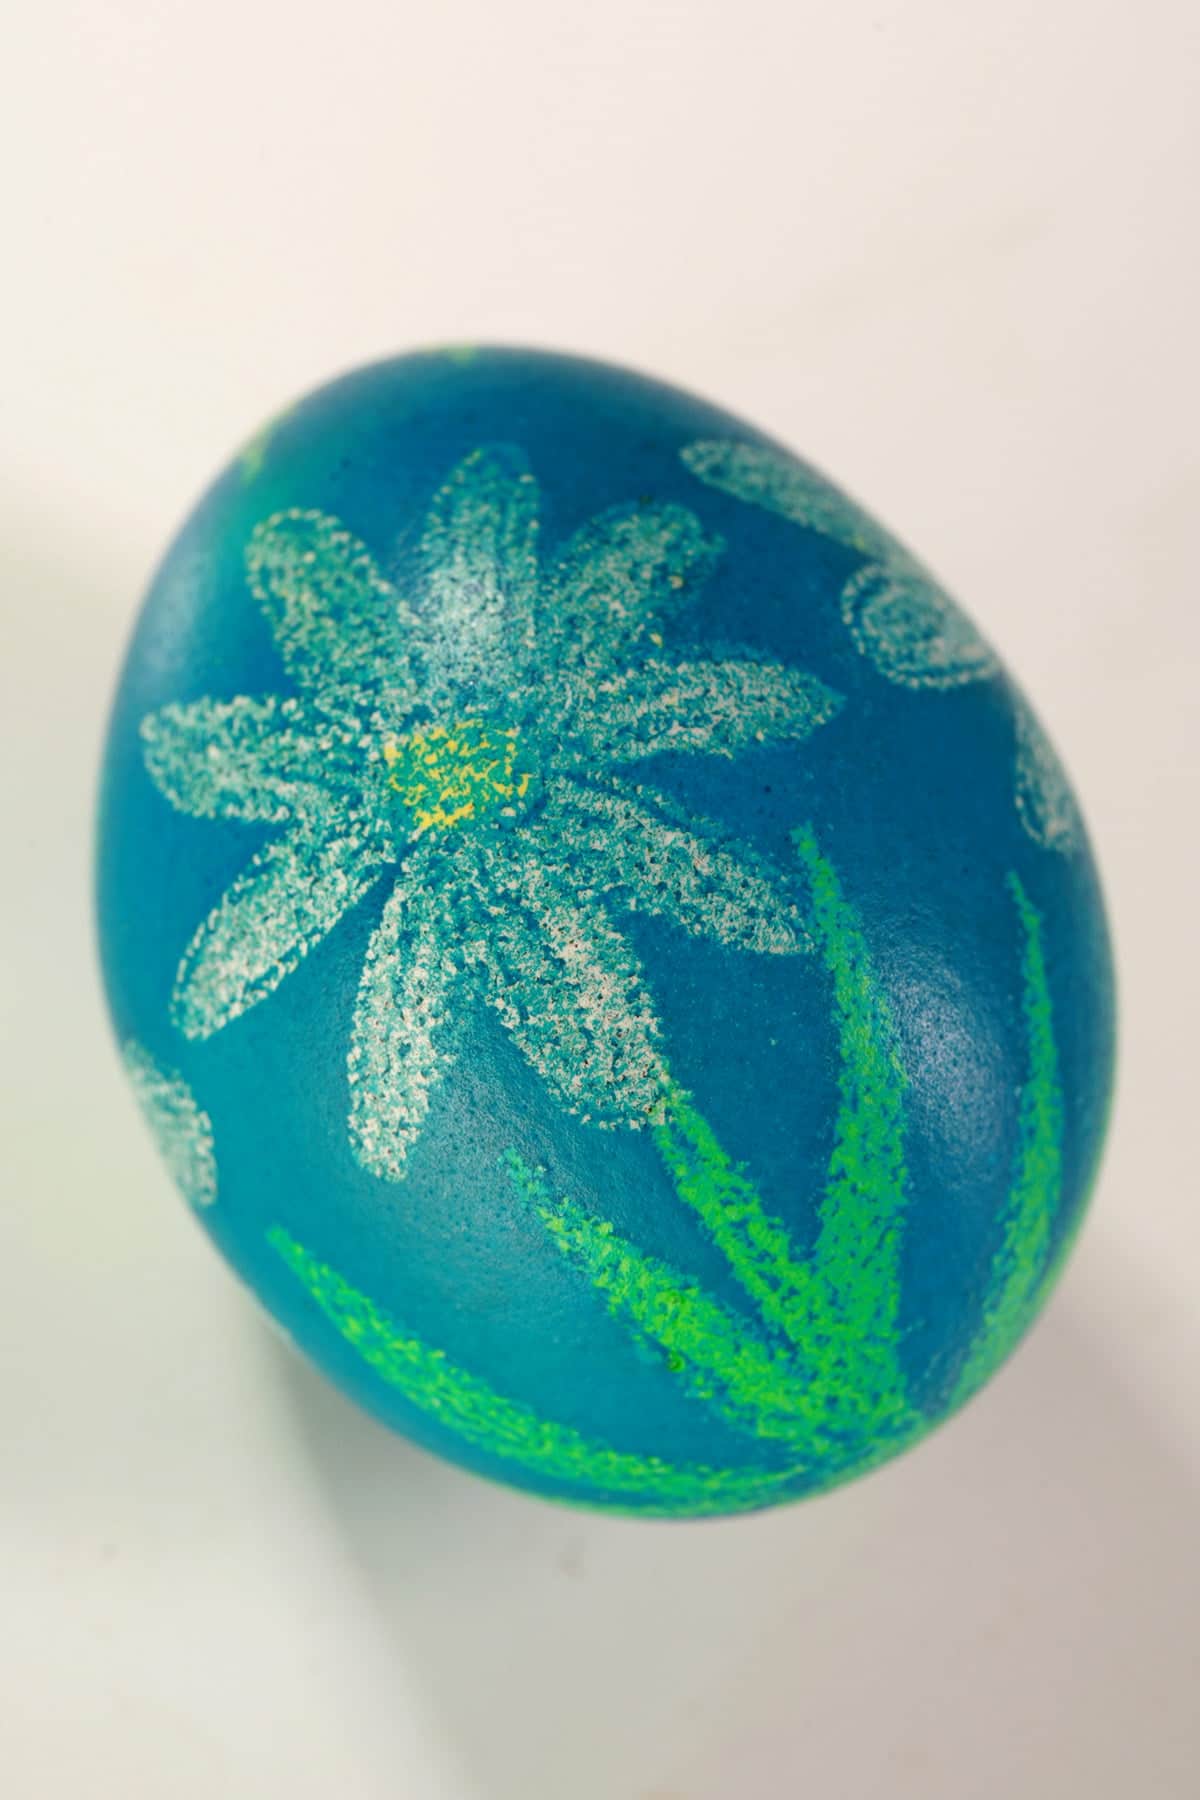
Spoilers: This is after the wax was removed!
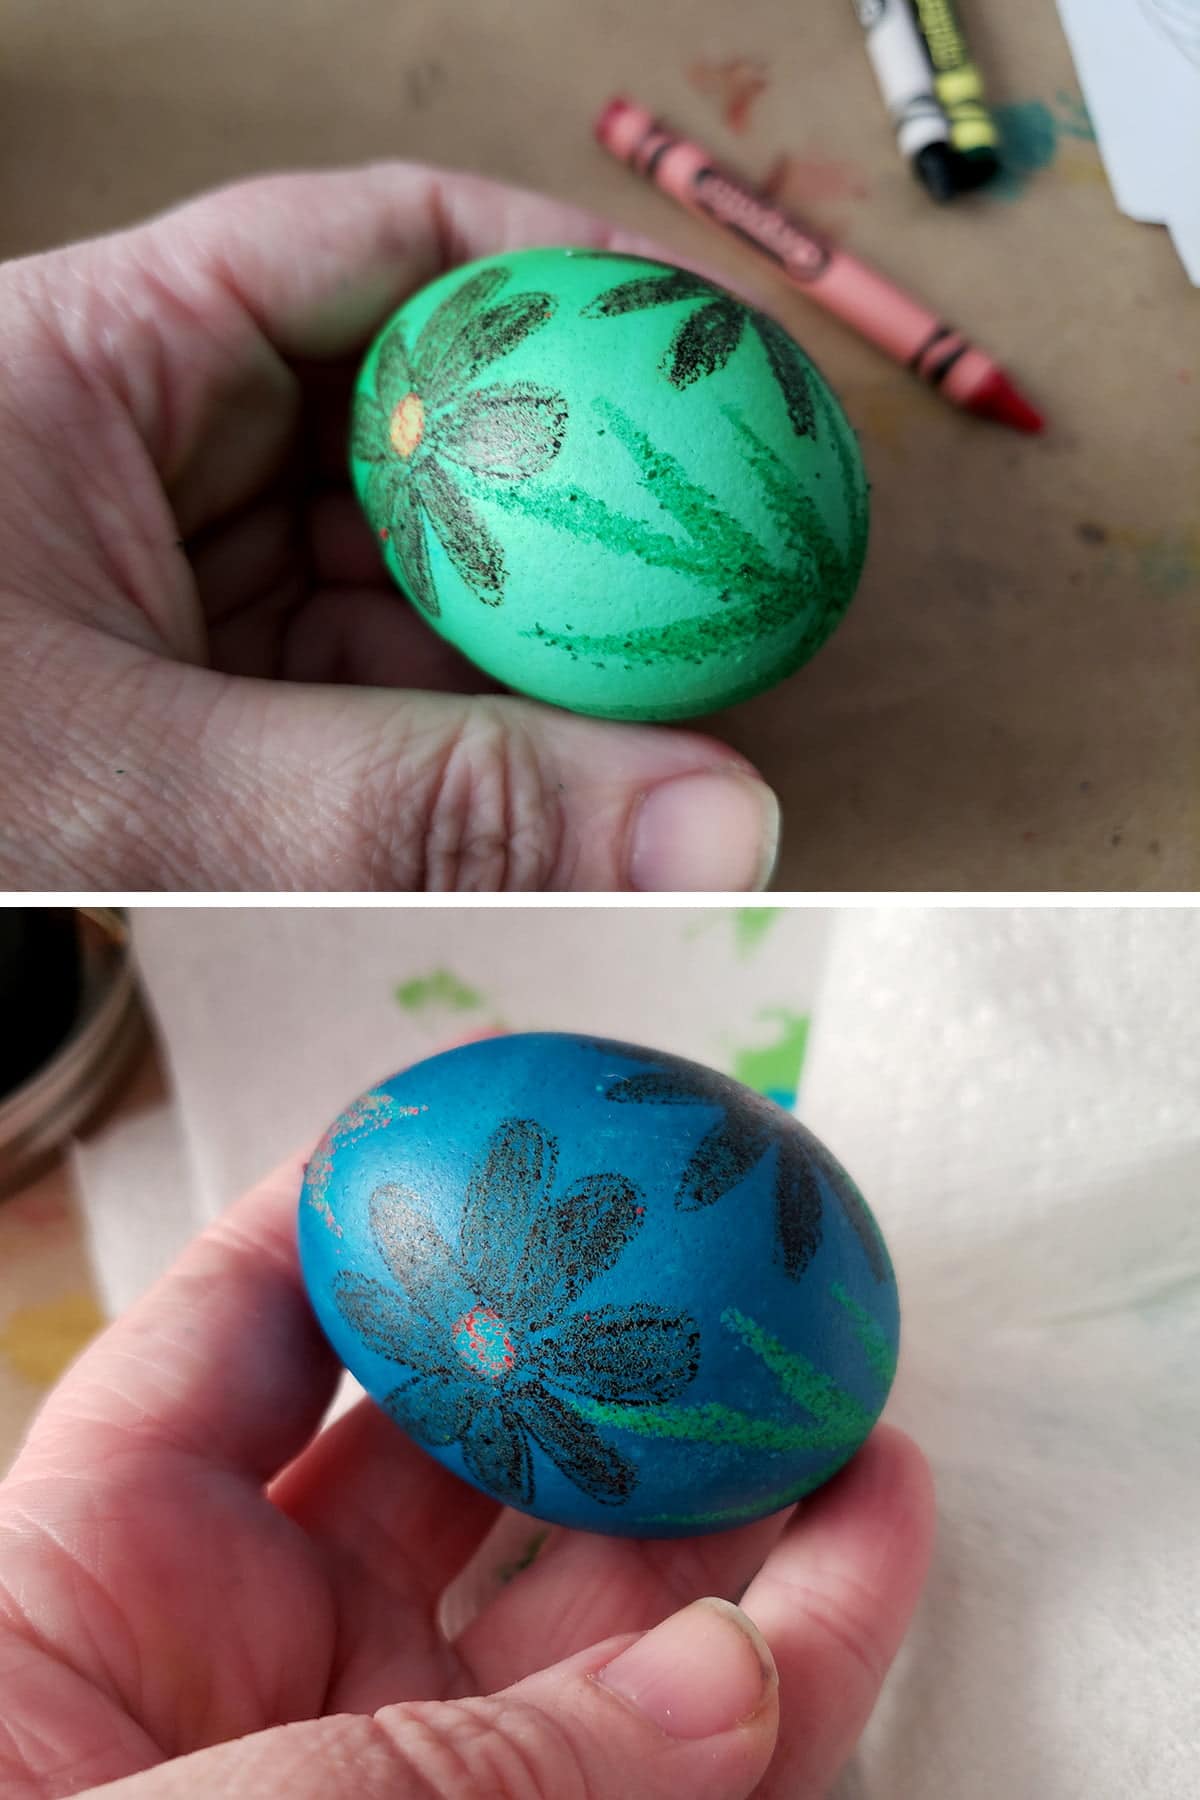
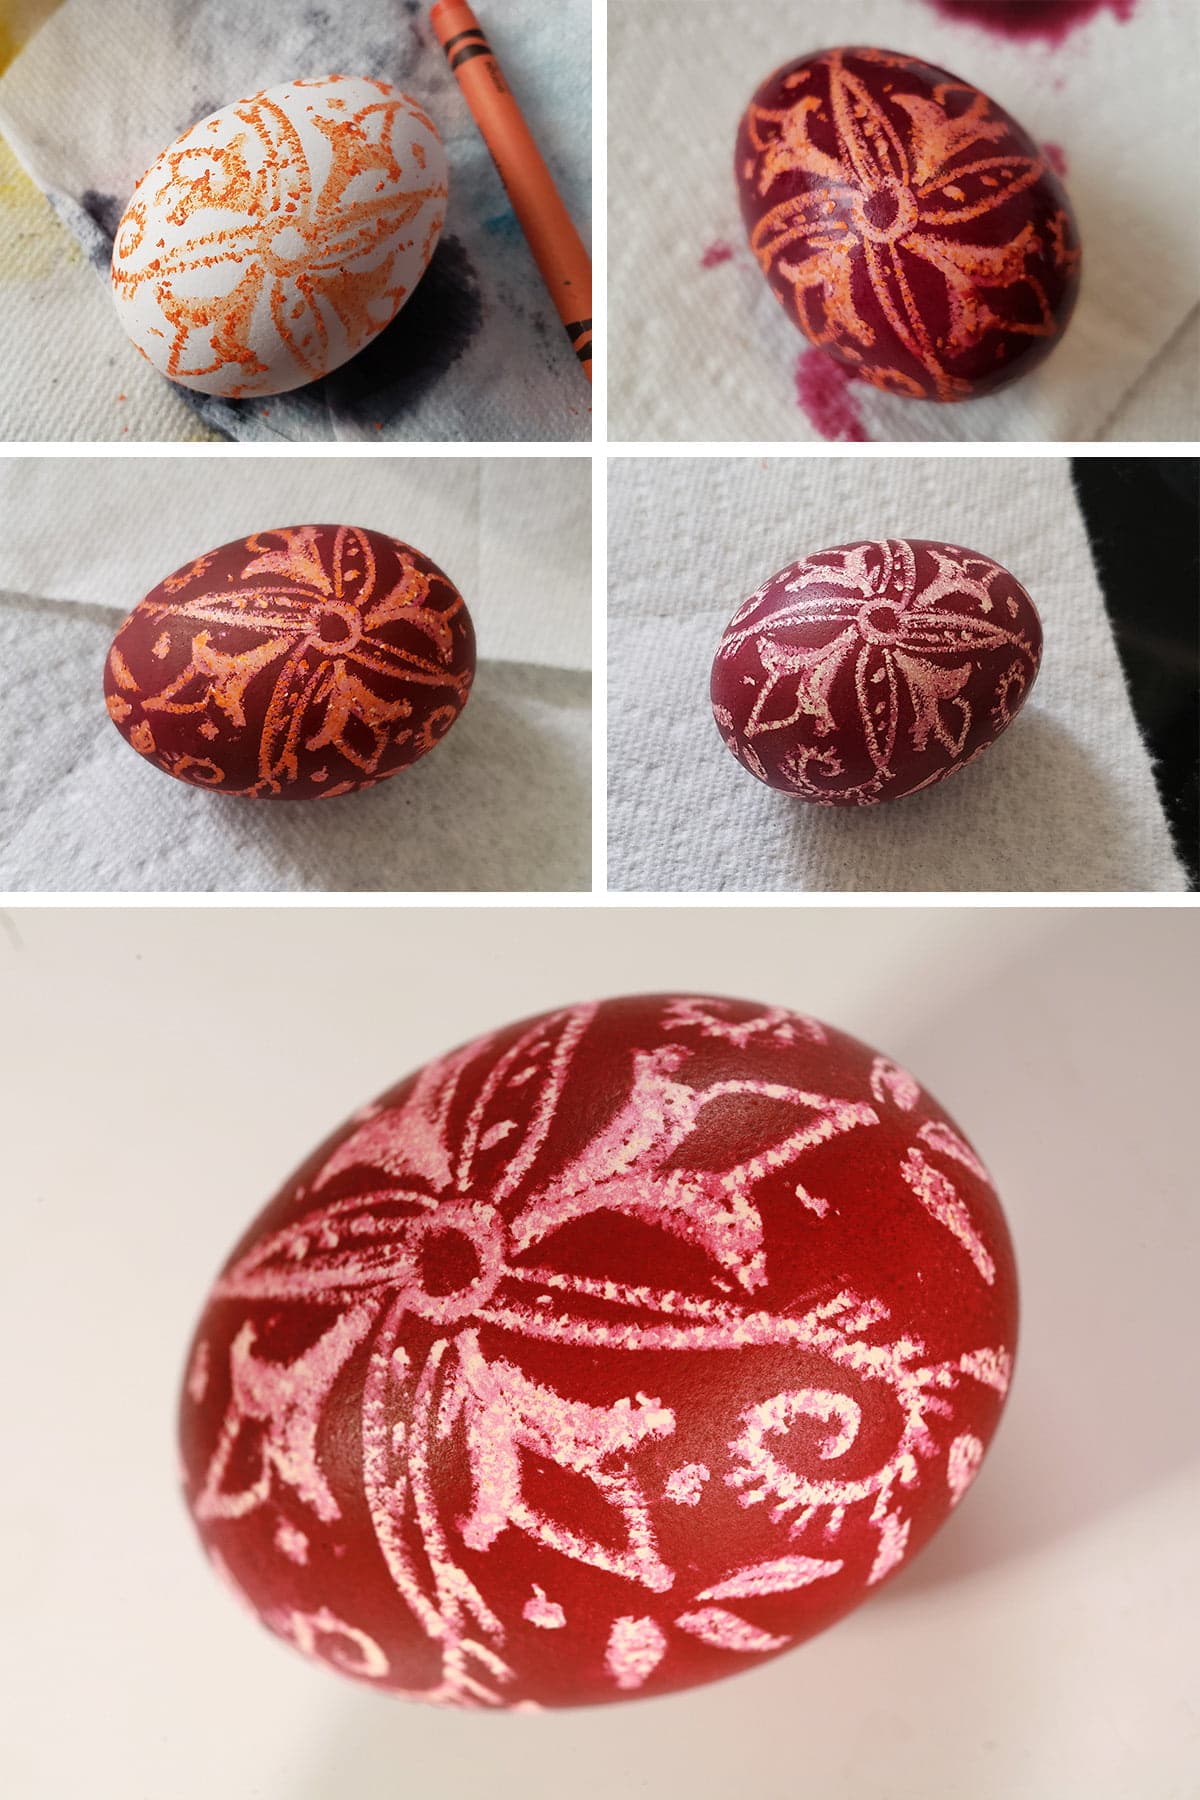
Here are a few more progressions:

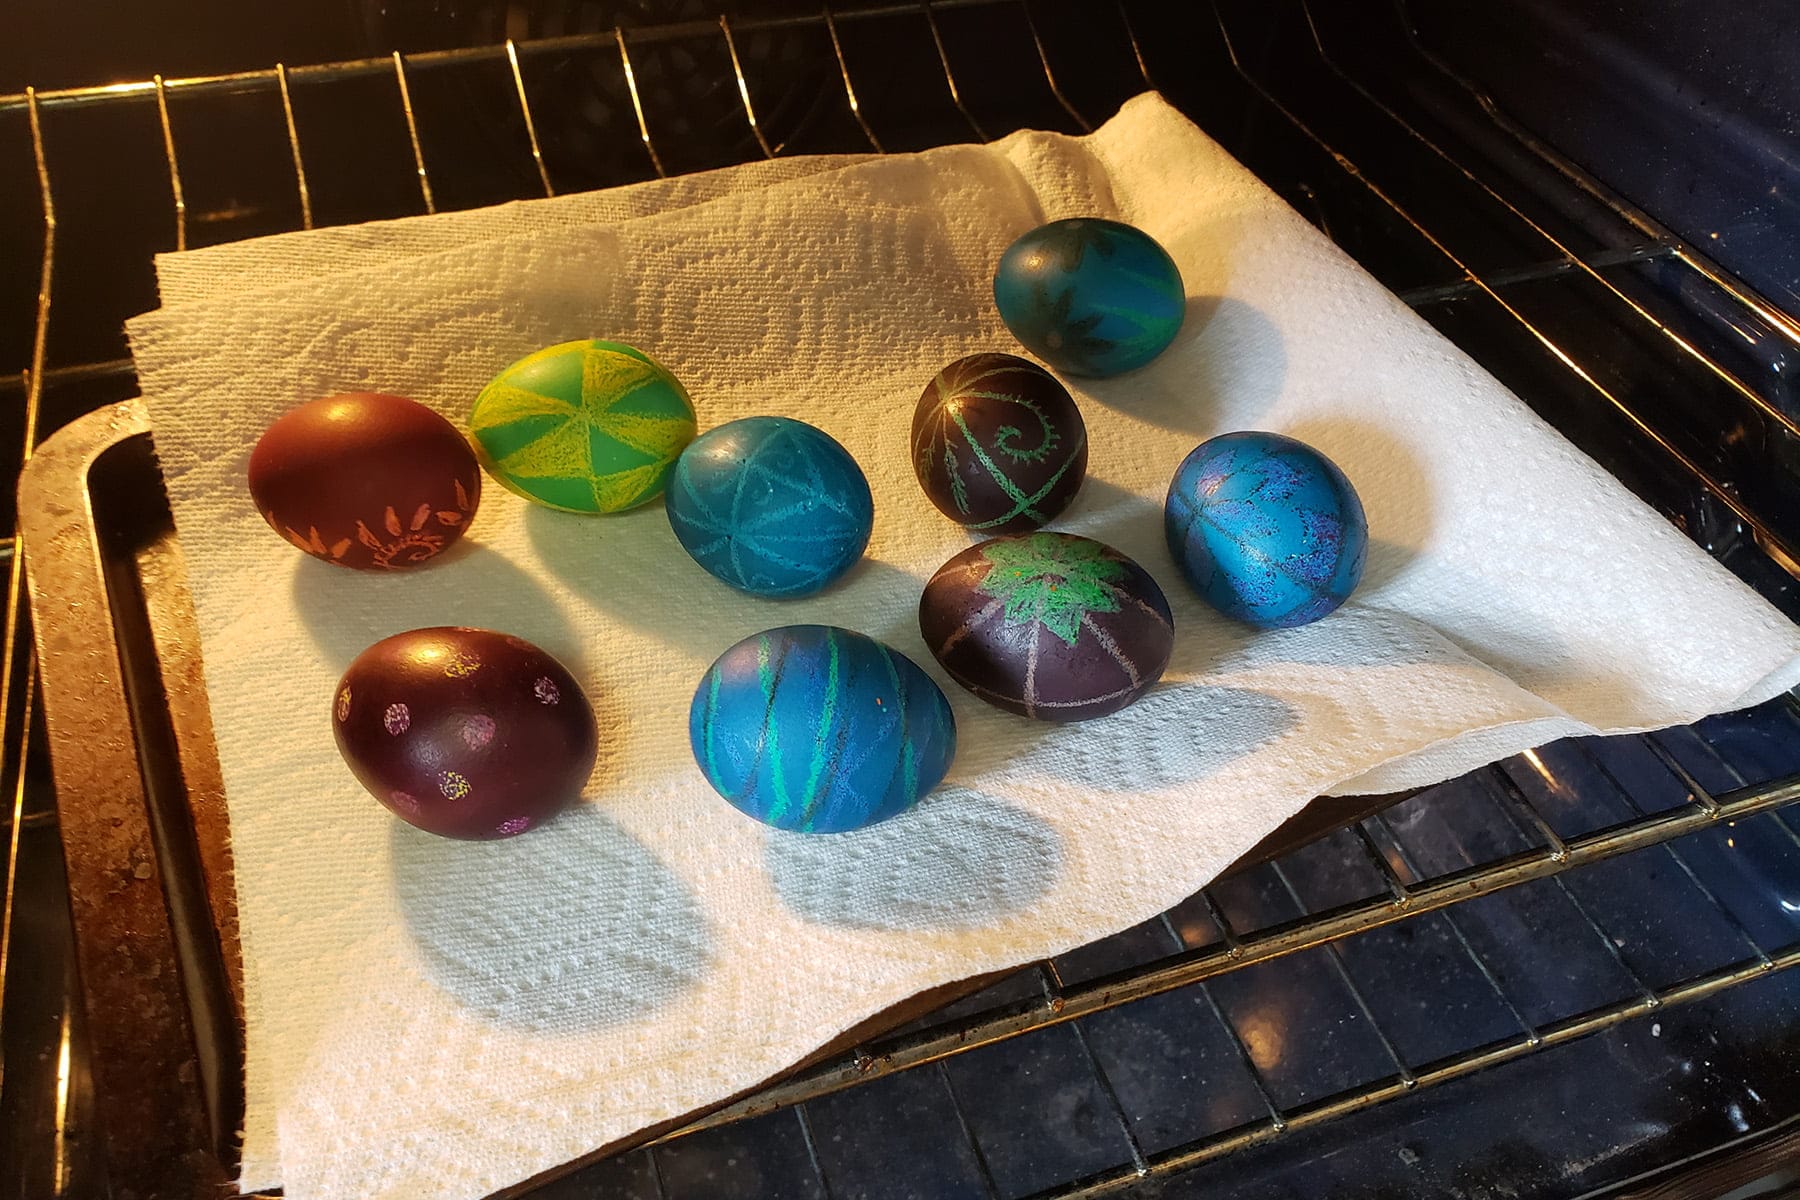
Once all of your eggs are fully designed and have gone through their final dye bath, dry them all off completely (this is very important). We placed ours on a baking sheet lined with paper towels.
Remove The Wax
While I initially learned the “hold the egg up to a candle to melt the wax off, bit by bit” method, there is a much better way:
The oven. Yes!
Heat your oven to 175 F.
Space your eggs out on a baking sheet lined with paper towels. If the eggs are rolling around, you can wad up some paper towel between them.
Place them in the oven for 10-12 minutes, allowing the wax from the crayons to soften and melt.
Take one egg out, and use a paper towel to gently rub off the hot wax, revealing your final design.

Repeat - one at a time - until the melted wax is removed from all your eggs.
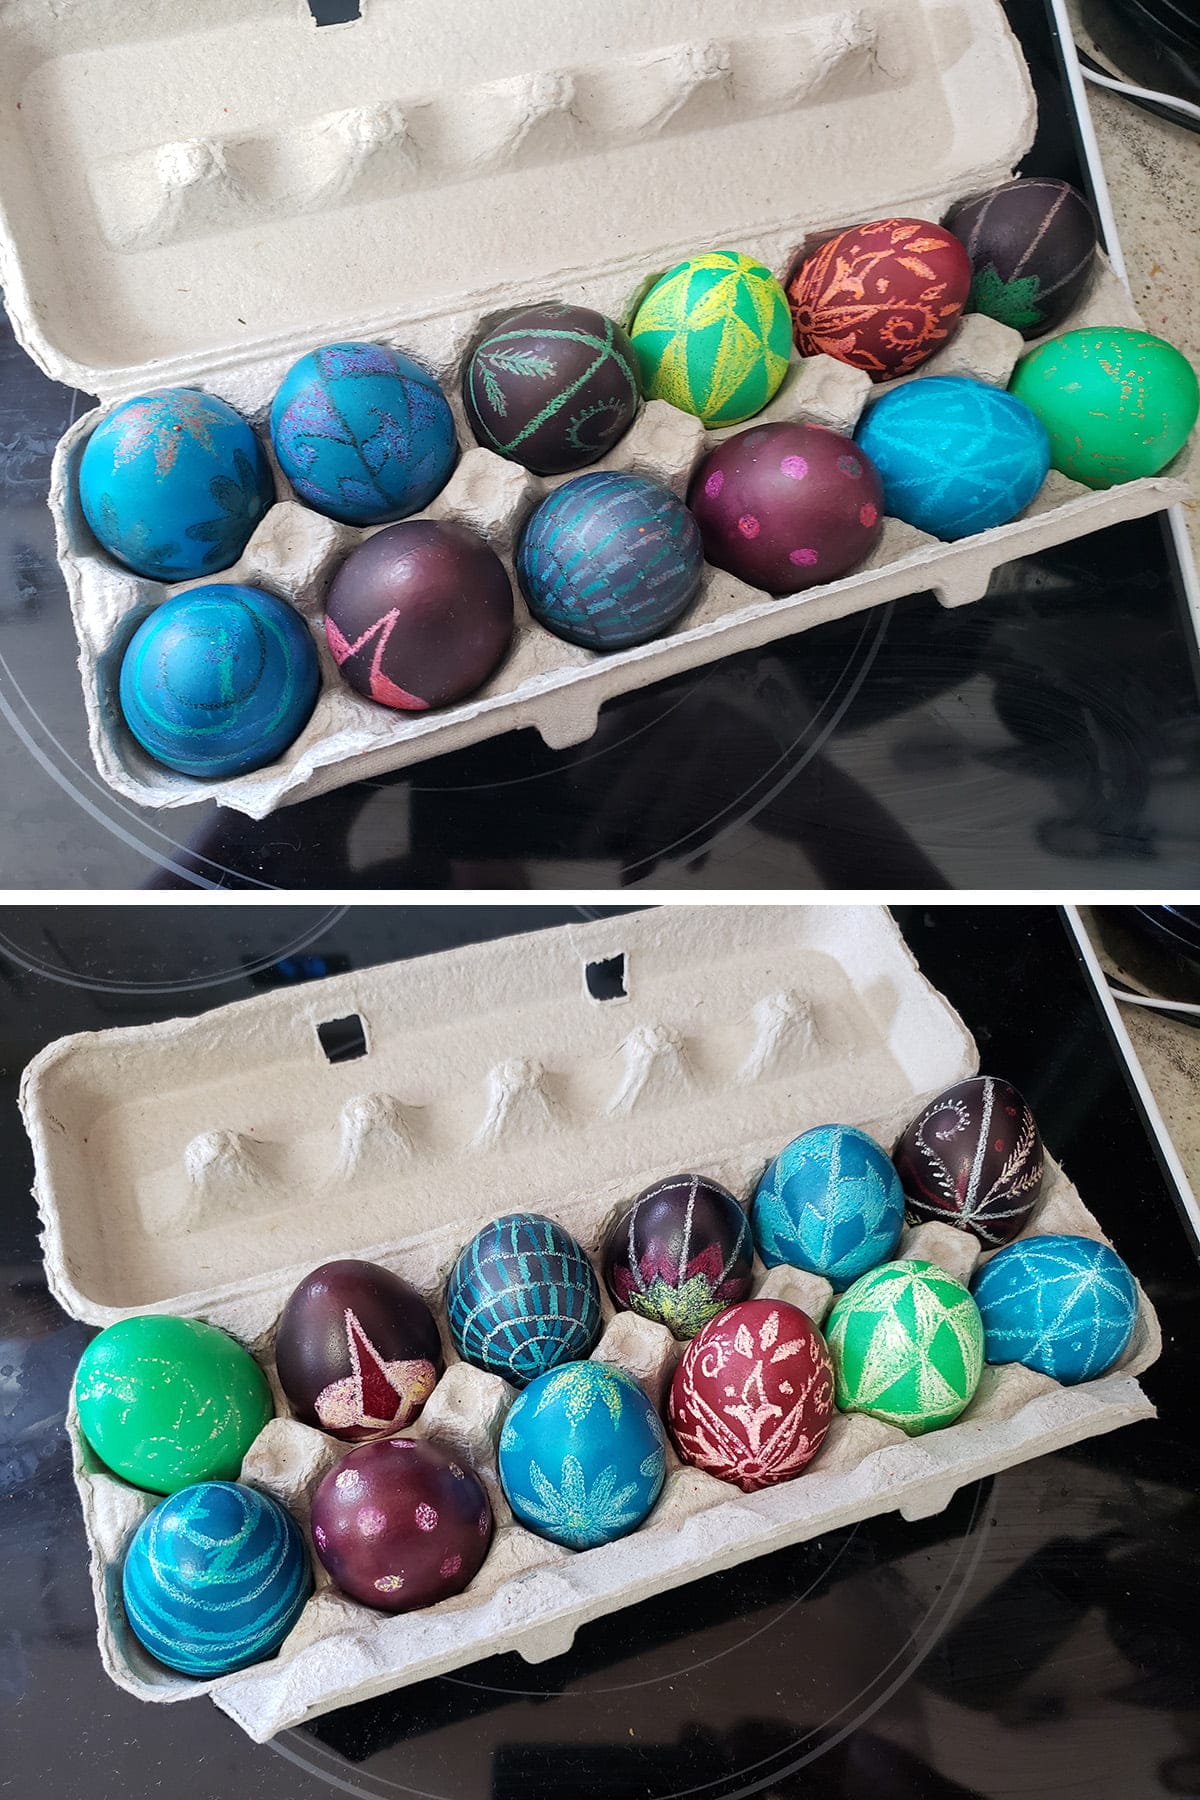
The eggs, before and after removing the crayon designs.
A Caveat About The Oven Method
The first time we ever did this easy way of making wax resist eggs, we ran into a problem with getting the wax off:
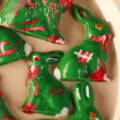
I don't know if it was our dye (We had used Americolor food colouring, vinegar, and water) or the fact that the eggs were hard-boiled (something we don’t do anymore), but we found that the oven caused moisture droplets to appear, and ruin the dye job!
Our darkest eggs were left with neon pink dots on it, almost looking like someone had splattered bleach on it.
The solution we figured out after our first batch turned out weird:
Use a mini muffin tin. Lay paper towels out over the impressions, and gently rest your eggs on top.
Bake for about 5 minutes.
Remove from the oven, carefully blot away any moisture.
If any wax is melted, gently rub it off AFTER removing the moisture droplets.
Return to oven, bake another 3 minutes, repeat. Do this until all of the wax is removed.
Note: Using the Ukrainian EggCessories dye and NOT boiling the eggs completely avoids this problem altogether.
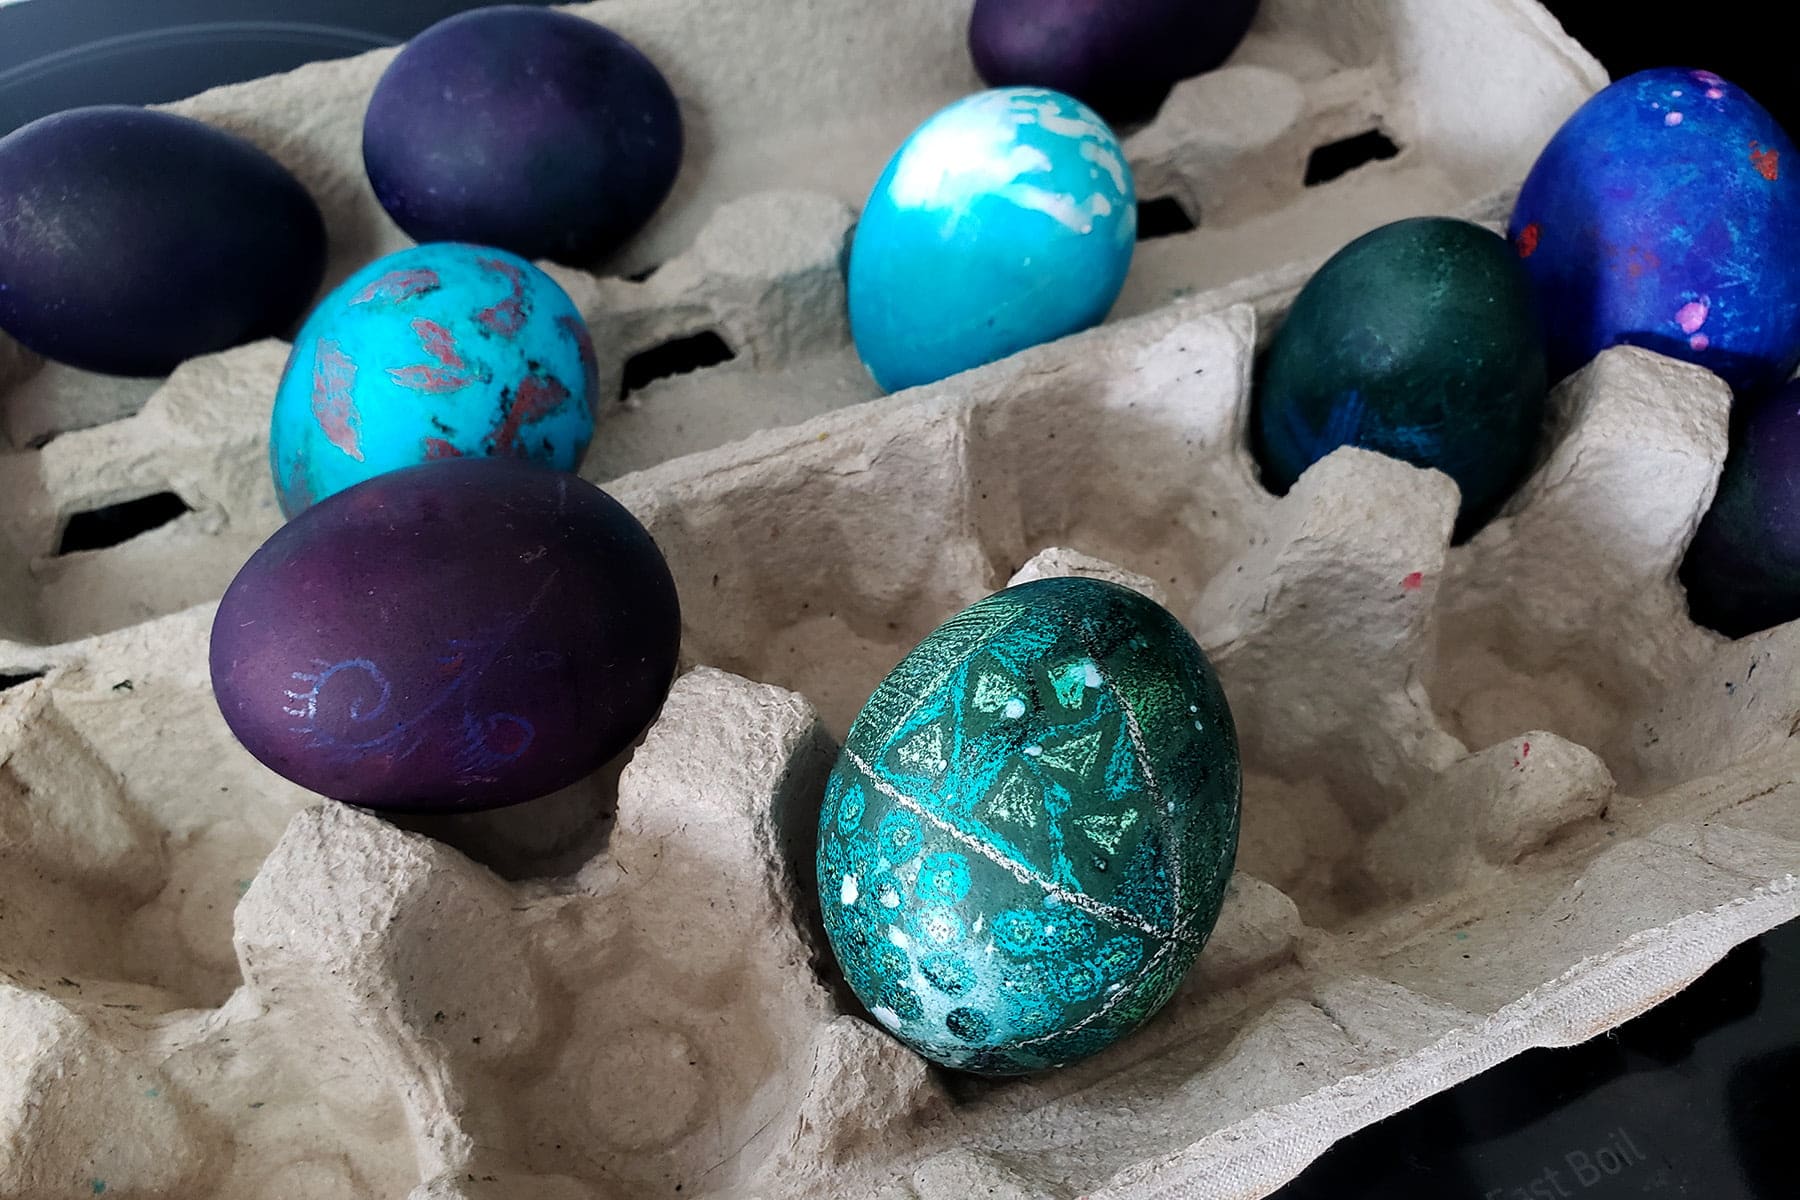
This is the fail batch, with the water beading.
Removing the wax - Candle Method
This is slightly more labor-intensive - and not as kid-friendly as the oven method, but it’s worth mentioning.
To do so, hold your finished-design, DRY egg up near your candle flame.
Don't let it touch the flame, or hold it OVER the flame - you don't want it to smoke, as it may ruin your egg.
Allow a small section of wax to melt, and gently rub it off with a paper towel. Repeat, until your whole egg is revealed!

Easy Ukrainian Style Egg Tips
Writing Tips
Eggs should be very dry before you draw on them, or the wax won’t stick. Let them dry thoroughly between each dye bath.
Try to use a different color after each dye bath, so you can tell what you drew last time around, and which is new. Depending on the design, it CAN get confusing after a couple colors.
You don't NEED to start with white, and you don't NEED to end with the darkest color you have on hand.
Some of the prettiest designs don't have one of those - or either of them. It can be very tempting to use every color, so try to break out of the habit!
Even something like a simple white design against a red background can be stunning!
If this happens, shrug it off and claim you meant to. It's like... Easter Egg Patina finish. Yes. That's what it is.
You read it here first, I pioneered crayon Easter Egg Patina. Royalties, baby!

Dye Tips
The amount of time an egg needs to spend in the dye will depend on the type of dye used, the colour of dye, and the colour you’re wanting to achieve. It can be 5 seconds, it can be 5 minutes.
Just pull it out every once in a while and see where it’s at.
Washing Eggs
- Sometimes eggs can be weird. If you find that the wax isn’t sticking, or the dye is not taking to it well, you can try washing the eggs.
To do this, mix ½ cup water and ¼ cup vinegar. Let the eggs soak in it for a minute, then gently give it a scrub and rinse.
Allow to fully dry before drawing on or dyeing the eggs.
Wax Removal Tips
- Always gently dab the eggs to dry off, don’t *rub* them, and don’t rinse in water.
I like to roll them around on some paper towel to remove the excess, then dab with a fresh paper towel.
Miscellaneous
If you don't have ankle biters around, this is a lot of fun to do as a Pysanky date night!
I tried to get #DrunkenPysankyMaking to trend on Twitter last night, to no avail. Regardless, it was fun, and highly recommended!
- That said, this is totally kid-friendly, and fun for family members of all ages and skill levels.
It’s best to decorate them while raw, and they’ll be out of the fridge for a fair amount of time.
The dyes you use - especially if you’re using the good stuff - can render the eggs toxic at worst, or “not food grade” at best.
Finally, even if you’re using food safe dyes and are careful about temperatures / time out of the fridge, the egg you’re left with once you’ve dyed it doesn’t lend itself to eating, TBH.
You can’t boil it, and the times/temps to remove the wax only end up half baking the eggs.
Make something pretty, enjoy the look. Not everything needs to be edible!
Preserving the eggs is an option, I’ll address that next...
Preserving Your Easy Pysanky
I’ve never bothered to preserve my decorated Easter eggs. With 7 cats, this household isn’t really suitable for super fragile things!
However, if you’ve created something you really love and would like to keep around, you have a few options.
Let it Dry Out
If you don’t varnish it, the egg can apparently just dry out on its own, over time.
Best to not do this in the sun, as your un-varnished egg can discolour.
Also, a big caveat: some eggs will just blow up or go bad, so this is very hit or miss.
If you DO manage to end up with a dried out egg, go ahead and use an oil based varnish to protect it.
Empty the Egg
Emptying the egg is the preferred base method for keeping an egg long term.
You can buy pre-emptied eggs and just start out from scratch with that nonsense taken care of for you, or you can CAREFULLY tap a couple of holes into your egg and blow it out yourself.
This is something I tried as a kid. Frankly, I’m just far too clumsy to work with super fragile empty eggs, so I’m just going to link you to Eggs.ca’s tutorial on how to create hollow eggs!
Alternately, you can always buy an Egg Blower, if you feel so inclined.
These are little devices that come in a number of different set ups, usually some some sort of a little manual pump.
Once your egg is completely finished, you can paint it with an oil based varnish to protect it.
The Klingon Easter Egg
Of COURSE - we *had* to make a Klingon Easter Egg:

"LOL Is that a Klingon egg amidst the other pretty ones? 🙂 Easter FtlhW"
Hahaha! 'FthlW'!!! Love it! I have the *best* Twitter tweeps!
More Easter Content!
Looking for more fun / tasty ways to observe Easter? Here are a few of my favourite recipes:
4 Layer Easter Creme Egg Brownies
Chocolate Zombie Easter Bunnies
Easter No-Bake Chocolate Pie with Mini Eggs.
Mini Egg Easter Pavlovas
Easter Pavlova
Easy Pysanky [Epic Easter Eggs]
Gluten-Free Paska [Easter Bread]
Easter Deviled Eggs
Homemade Marshmallow Peeps
Hot Cross Bagels
Keto Paska
Paska - Ukrainian Easter Bread
Hot Cross Scones
Pastel Easter Charcuterie Board
Southern Comfort Glazed Ham
Paska Bagels
Share the Love!
Before you chow down, be sure to take some pics of your handiwork! If you post it to Bluesky, be sure to tag us - @CelebrationGen. We're also on Pinterest, so you can save all your favourite recipes to a board!
Also, be sure to subscribe to my free monthly email newsletter, so you never miss out on any of my nonsense. Well, the published nonsense, anyway!
Finally, if you love this recipe, please consider leaving a star rating and/or a comment below, and maybe even sharing this post on social media!


Easy Ukriainian Easter Eggs [Pysanky] Tutorial
Equipment
- Cups or bowls for dye
- Spoons
Ingredients
- Brown craft paper or newspaper
- Napkins or paper towels. LOTS.
- Egg Dyes and/or food coloring
- Vinegar
- Raw eggs
- Crayons NOT the washable kind.
- Candles optional
Instructions
Design Your Easter Eggs
- Decide on what you're looking to design, and what colors you're using.
- Prepare Your Egg Dyes
- - Mix up your egg dyes according to instructions. We actually used Americolor food coloring, guessing at the amount.
- - If your dye instructions (assuming NOT using pysanky-specific dye!) don't include the addition of vinegar, I highly recommend adding some - about 1-2 tablespoon per dye cup.
- This results in much more vibrant colors on the finished eggs. If you'd prefer to do pastel colored Pysanky, then skip the vinegar!
Prepare Your Work Surface
- Cover your entire work surface with brown craft paper or newspaper - preferably a few layers, if using newspaper.
- Put a good stack of napkins or paper towels at each seat - you will go through a ton of them!
- Add 1 spoon to each dye cup, and line them up on your work surface, progressing from light to dark. Our dyes were ordered: Yellow, Red, Green, Blue, Black.
- If you have food coloring bottles, dye jars, or anything else, it can be helpful to place them in front of their respective dye cups - for identification.
- Set out your crayons and eggs, and you’re good to go!
Start Writing Your Pysanky - First Colour
- If you are using any white in your design, draw that part of it onto the egg with a crayon.
- Make sure that any lines or spaces that you want white are completely covered - you are using the wax to protect that part of the egg from subsequent dye baths!
- Once you are satisfied that all of your white is drawn on, dye your egg in the lightest color you'll be using.
- If you are not using white in your design, dye your egg in the lightest color you are using.
- Allow your egg to sit in the dye for about 2 minutes, until the egg is the desired vibrancy.
- Use spoon to remove egg from dye, pat - don’t rub - COMPLETELY dry with paper towels.
Next Colour...
- When egg is completely dry, use your crayon to draw on the design for the color you just dyed.
- For instance, if your egg is now yellow, draw the yellow part of your design on with the crayon.
- Dye egg in the next lightest color you're using.
- Lather, rinse, repeat.
- Once all of your eggs are fully designed and have gone through their final dye bath, dry them all off completely (this is very important). We placed ours on a baking sheet lined with paper towels.
Remove The Wax
- Heat your oven to 175 F.
- Space your eggs out on a baking sheet lined with paper towels. If the eggs are rolling around, you can wad up some paper towel between them.
- Place them in the oven for 10-12 minutes, allowing the wax from the crayons to soften and melt.
- Take one egg out, and use a paper towel to gently rub off the wax, revealing your final design.
- Sometimes, not all the wax will come off on the first attempt. Just place the egg back in the oven for another few minutes, and rub it again.
- Repeat - one at a time - until the wax is removed from all your eggs.
Older Photos
Photos from earlier versions of this post:


ryaninmpls
Comment love! 🙂
Uncle Mikey
Cake or death? (This is just a test comment, as requested)
The Pumpkin Geek
Sa-WEEEEET! Beyond Epic! Clearly a very artist Easter Bunny pooed those bad boys! 🙂
Britt
GENIUS. We're dying eggs this Saturday, and (depending on how enterprising I feel) I think I may try this.
Mrfrostings
They came out great! As usual, you are too hard on yourself!
Amanda
Thank you! I don't have authentic pysanky-making supplies and I want my easter basket to look genuine this year! We'll definitely give this a try this year! With toddlers running around, I KNOW I have enough crayons to make this work.
One suggestion- if breaking crayons are an issue, try the twist-up plastic crayons. The tip isn't as fine, but they are MUCH sturdier than the typical Crayola!
Keri
Just tried this with my 3 and 6 year old kiddos. It is neat. I used the oven method...moisture spots and ruined most of the dye jobs but they are still pretty. Next time I will read *all* of the instructions before trying something! Hee hee. The candle method would probably work perfectly. Very fun. Thanks for posting. Oh. I live in Winnipeg by the way, not Ukrainian but I know what you are saying about the influence here. I grew up in Selkirk and most of my neighbours and friends were Ukrainian, made the pysanky eggs at Easter, celebrated Ukrainian Christmas, etc. Love perogies, holopshi, patishka, they have the best food!!!
I will have to check out the Ukrainian cultural center...
Kathy
Great article!! And thanks for the mention of UkrainianEggCessories. 🙂 You had enough great info here for a bunch of posts. Well done!!
Kenzii
I love this! I am going to do this with my grade 3 class this year - thank you for the easy method and tutorial!
My only question - should the eggs be cold or should they be room temperature when we start this? Thanks!!
Marie Porter
I would go room temperature!
Jenny Prileson
Will any of these techniques work on wooden eggs?
Marie Porter
I wouldn't think so, given how porous wood is.
jaya slot
I loved this post! It's so inspiring to see how easy it can be to create beautiful pysanky without needing any special tools. The step-by-step instructions made me feel confident to try my hand at it. Can't wait to gather supplies and get started! Thank you for sharing these tips!