

Decorated Sugar Cookies are fun to make, eat, AND give! Here is everything you need to know to get started with sugar cookie decorating.

Originally published October 23, 2009, Updated on 8/8/2022.
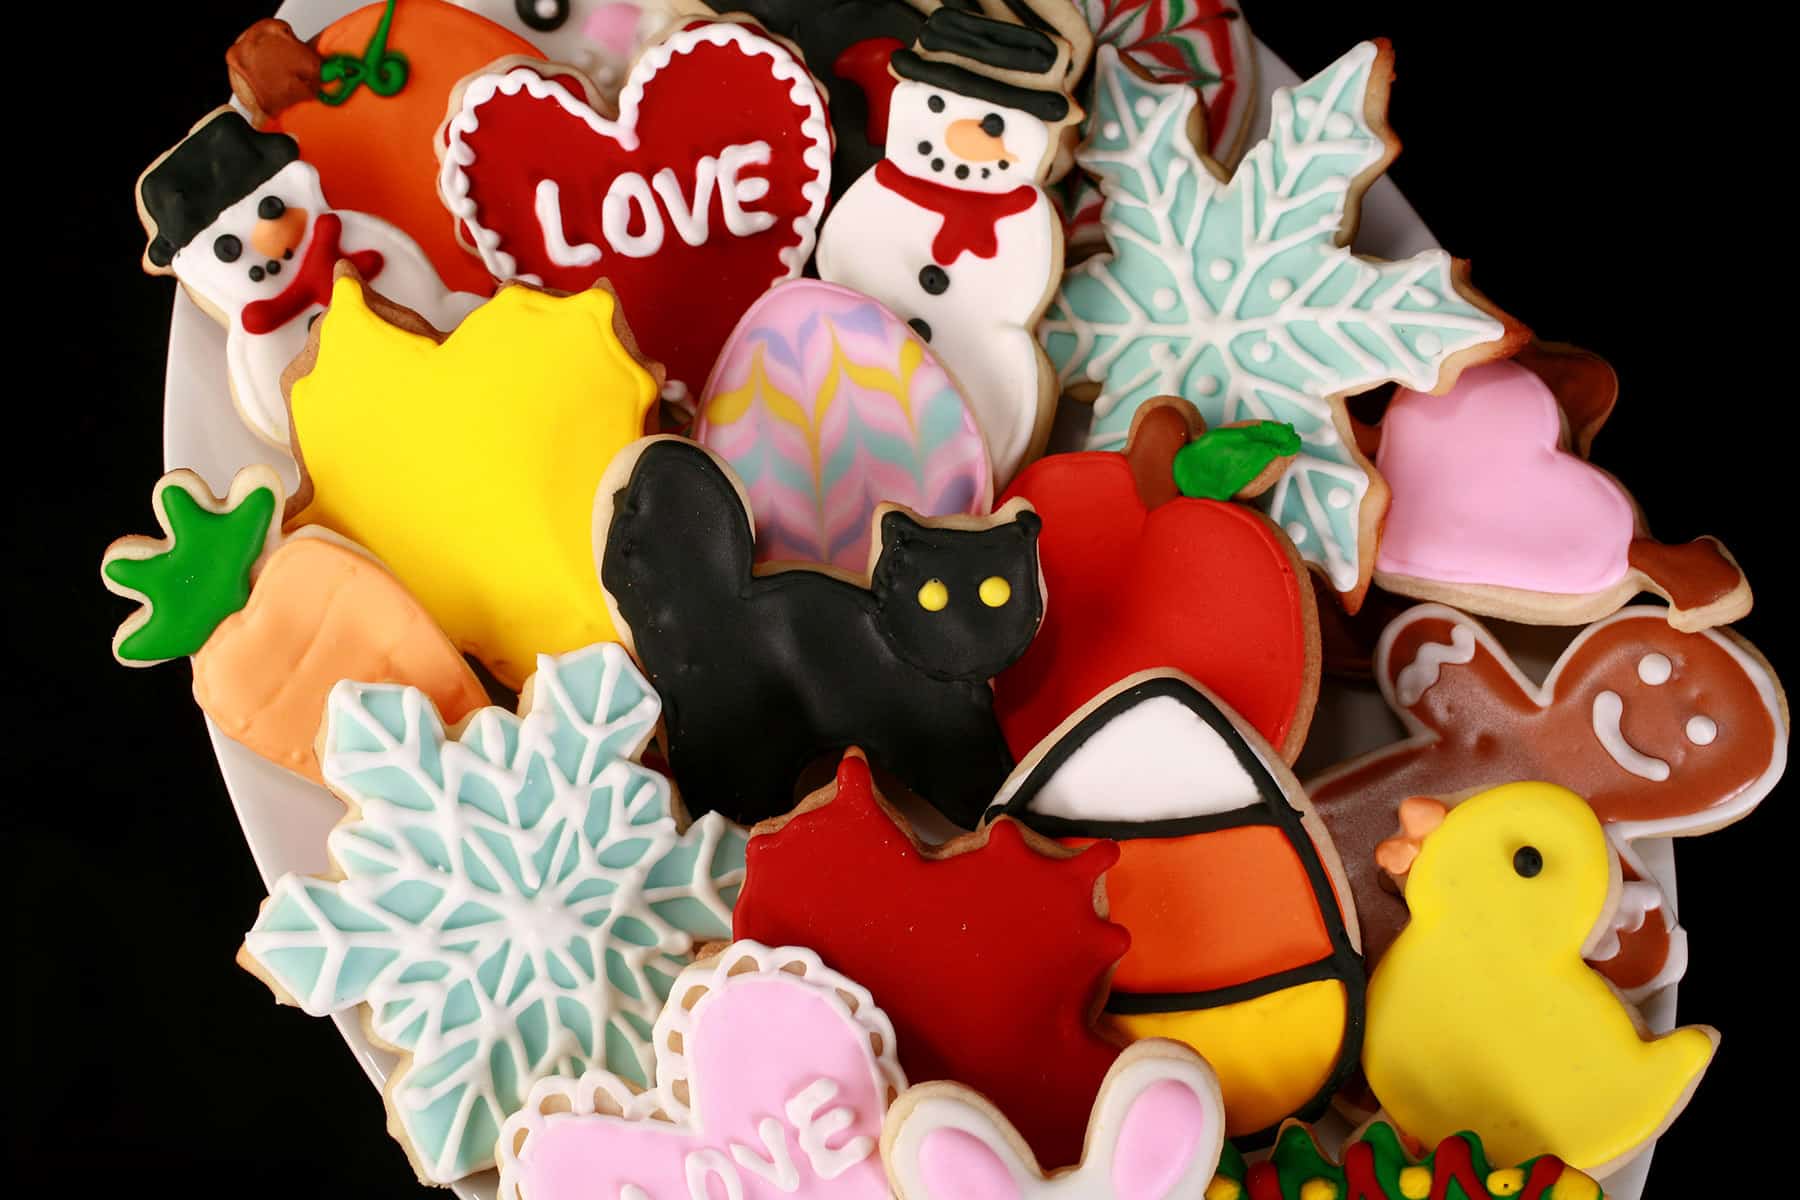
Decorated cookies are great to serve guests at your Halloween party, or as a weekend activity for kids, or even to hand out to your favorite Treat or Treaters - they’re easy to make, and can be a lot of fun!
This post started out as my decorated sugar cookies recipe, way back in 2009 - and nothing else. 2 sentences of into, just leaving people to figure out cookie decorating for themselves.
This time around, let’s get into some actual detailed instruction, beyond just the actual recipe for decorating sugar cookies.
They were just simple sugar cookies, after all - decorating your cookie creations is the REAL fun part!
This post is aimed for beginners, but should have info that will help cookie decorators of most skill levels.
I’ve got a GIANT info-dump planned, with all kinds of information gleaned from my years as a professional baker and cake artist.
(So you might not want to “jump to recipe” on this one, as you’ll miss all the good stuff!)
The techniques and tips you’ll learn in this post will help you take your decorated cookie game to the next level, whether we’re talking sugar cookies, fabulous cookie bouquets, or even your favourite spicy gingerbread cookies.
Anyway, LOTS of info to go over, so let’s get to it!

What do you Need for Cookie Decorating?
You’ll need a few basic ingredients and bits of equipment to get started with cookie decorating.
While I’ll get into some more details about some of these items further on in this tutorial, here’s an overview:
Sugar Cookies
Obviously, you’re going to need cookies to decorate. You can use store bought cookies if you need to, but I recommend going with a good cookie recipe, as the base here.
When making your own cookies, you’ll want a decorating sugar cookies recipe, specifically.
You may be wondering, “What cookie is best for decorating?”.
“Sugar cookies” can mean two wildly different things - a drop cookie, or a rolled cookie.
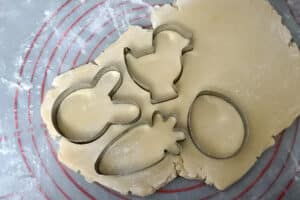
You’re going to need a rolled sugar cookie recipe. Ideally it’s going to be for a cookie dough that has minimal - or NO - spread when baking, to retain the shapes you cut it into.

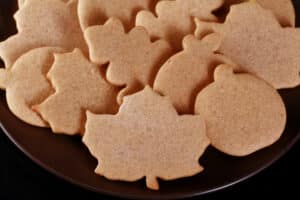
My Pumpkin Spice sugar cookies, PERFECT for Halloween cookie decorating.
Need gluten-free cookies for decorating?
Try my Gluten-Free Sugar Cookies for Decorating... or my Gluten-Free Gingerbread Cookies, for that matter!

Rolling Pin
When making rolled cut-out cookies, you need something to actually roll them out with.
I am a HUGE fan of using a Rolling pin with adjustable thickness guides in general, but that goes double for making cookies for decorating.
It just makes it super easy to get a perfectly even thickness, AND a specific thickness, even across multiple batches.
No sense freehanding and eyeballing it, when you really don’t have to!

Cookie Cutters
I love starting out with cookies that have been cut into a fun shape, especially when decorating themed or character cookies.
I’ll usually buy a set of cookie cutters for any holiday, season, or event that I’m baking for, such as:
Halloween Cookie Cutters
Christmas Cookie Cutters
Wedding Cookie Cutters
Easter Cookie Cutters
Spring Coookie Cutters
Summer Cookie Cutters
Fall Cookie Cutters
Baby Shower Cookie Cutters
Looking to make custom cookie shapes?
Draw or print your design onto cardstock, and carefully cut it out.
Use a shape kitchen knife or X-acto knife to cut cookies out, tracing around the edges of your homemade cookie pattern!
Icing
There are 3 main frostings used for decorating cookies:
Buttercream: A soft frosting, usually used for cake and cupcake decorating. This does NOT dry hard, though.
Cookie Icing / Glaze: A very simple glaze using powdered sugar, water, and corn syrup. It doesn’t dry hard, and can be used for simple designs.
Royal Icing: This is the gold standard when it comes to cookie decorating. It’s made from some form of egg white, powdered sugar, and sometimes lemon juice.
Royal icing dries very hard, and can be adjusted to various consistencies, each suiting a specific aspect of cookie decorating. (More on this in a bit!)
Check out my Easy Royal Icing Recipe, which is made with Meringue powder, or my Traditional Royal Icing recipe, which is made with raw egg whites.
As a note: If you’re baking for anyone pregnant, elderly, or immune compromised, you should use the meringue powder royal icing recipe.
While the traditional recipe is generally low risk, it’s definitely best practice to avoid serving it to those populations!
Food Coloring
You’ll want some kind of food coloring, to tint your frosting. Food coloring comes in 3 main formats:
Liquid food coloring: Generally found in the baking aisle at the grocery store.
Paste food coloring: Usually Wilton brand, you can find this style in craft supply stores and cake decorating supply shops.
Gel food coloring: Comes in a few brands, also found in the larger craft supply chains (sometimes), and in cake decorating shops.
I always use gel colors, as they give the most intense colour, without adding a ton of liquid. This is especially important when dealing with royal icing.
Specifically, I recommend Americolor (what I used when I was in the USA), or ChefMaster (Which is the option more readily available here!).

A small part of my food coloring collection.
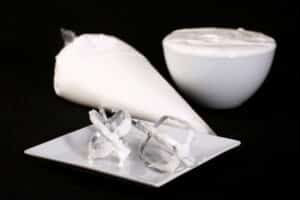
Decorating Bag & Couplers
You’ll want some pastry bags and coupler sets.
For pastry bags, I like to use Anti-Burst Pastry Bags.
Nothing is worse than ending up with a hand full of frosting - or worse, drips on your cookies - when your piping bag cracks open!
While I usually like to have large pastry bags on hand for most things I use them for (filling mini bunt pans, piping filling into jalapeno poppers, etc), I like to use regular size for cookie decorating.
Too much frosting = unwieldy. I’ll also cut off any extra overhanging bag, just to avoid it possibly getting in the way.
Note: Some people prefer to use Cookie Decorating Squeeze Bottles, rather than a pastry bag.
I just find a decorating bag a lot easier to control. Go with what works best for you!
If you are using a bottle, I recommend having a small funnel for getting the royal icing into it.
I like to have a TON on hand - 2 for each colour I’ll be doing (including white), with extras just in case. I tend to have multiple colours going at once, it’s just easier to have plenty on hand.
... and the same goes for bags, btw. I like to have WAY more on hand than I think I’ll need!

Your basic toolkit.
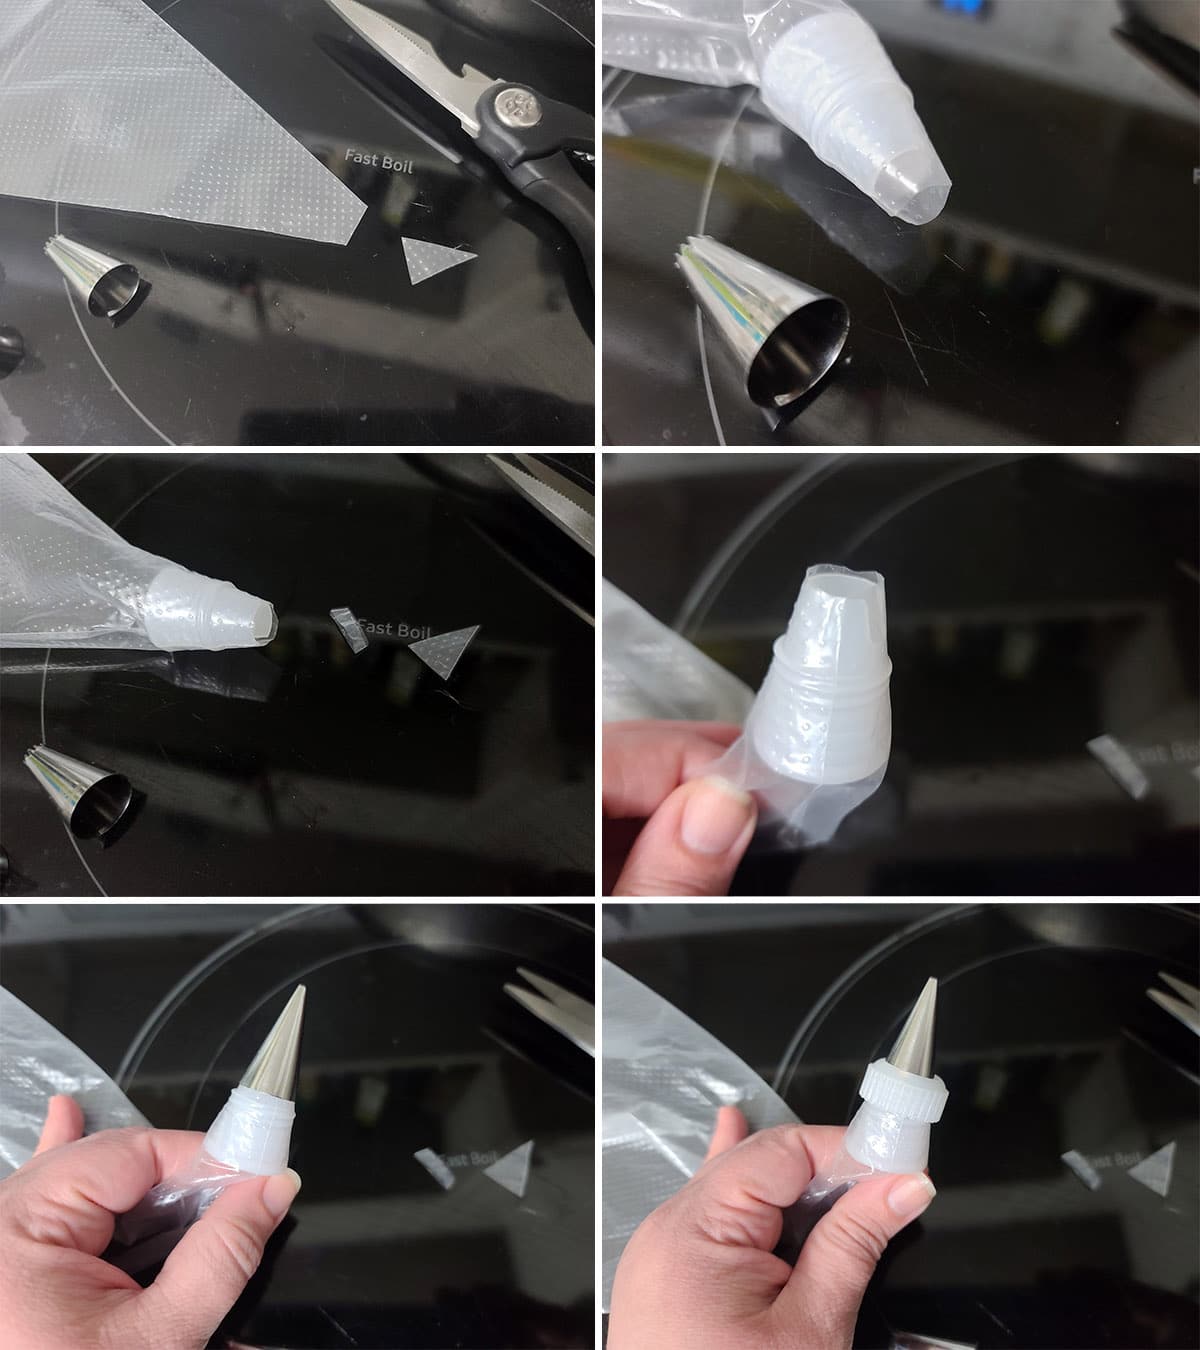
How to Use Decorating Couplers
Cut a small amount of tip off your pastry bag, then slip the tube part of your coupler into the pastry bag. Aim the more narrow end of the coupler towards the tip of the pastry bag.
Pull the pastry bag down around the coupler - you can cut a little more off the bag if there’s a lot of overhang, but you don’t want the plastic to be much lower than the outer edge of the coupler.
Better to have a little too much overhang, than not enough coverage - if the bag isn’t “trapped” between the coupler base and the tip/ring, frosting can leak out.
Place your decorating tip over the end of the bag/coupler, completely covering the open end of the bag.
Finally, place the ring on top, gently screw down until it stops moving.
Decorating Tips
While you can definitely decorate cookies with just the tip cut off the end of a piping bag (skipping the couplers too!), you’ll get a much cleaner result if you use a decorating tip.
There are a TON of options out there, in all kinds of different shapes - all of which perform a different purpose.
So, which cake decorating tips to use?
If you’re just starting out, I recommend using small round tips, as that’ll be the bulk of what you’ll need.
Every tip is designated by a number.
Sometimes I’ll use a Wilton #5 for thicker outlines, especially if I’m doing wet on wet designs.
I’ll use a Wilton #2 for piping design outlines and some small details, and I’ll go as small as a Wilton #1 if I’m looking to do intricate designs.
You CAN buy tips even smaller than that, but I find them hard to use, so I don’t bother. If I need a really, really fine line, I’ll use a Food Coloring Marker.
Beyond the round tips, you can use star tips to pipe stars or borders, leaf tips to pipe frosting leaves, or any of a number of flower or petal tips... but I don’t find myself using many of those when it comes to royal icing cookie decorating.

Other Items
I like to use parchment paper, both for lining the baking sheet when making the cookies, as well as for a “drop cloth” when decorating the cookies.
Some people prefer to bake on a silicone mat - I just don’t have enough space in my kitchen to keep a collection of them, myself! I’ll usually cycle through up to 6 pans when making sugar cookies, I’d need one for each cookie sheet!
... some day, I’ll have a real kitchen, LOL.
You can use them to ease frosting into tight corners, to pop air bubbles that may show up, and also for doing wet on wet cookie decorating (more on that, later in this post!).
They’re also good for adding VERY small amounts of food coloring, which is especially handy when aiming for pale colours.
Try to have a bunch of small bowls and spoons on hand, for mixing your colours. It can be a pain to have to go wash between colors.
If you’re not into freehand piping, you can use a Cookie Scribe Tool or Food Color Markers to mark out your design before piping.

How to Decorate Cookies with Royal Icing
Here’s where my tutorial gets a bit weird to write, as I’m not sure how to format all of the information I want to cover.
I’ll do a quick walk through of the basics, then get to all of the other information you’ll need to know - including definitions of some of the terms I’ll be using.
1. Once you have baked and cooled your cookies, lay them out on your work surface. I like to decorate on baking sheets, or on laid-out parchment paper.
2. Use a stiff or medium consistency icing to pipe a border around the entire cookie, as well as any internal separation lines you may want.

3. Use royal icing that has been thinned to flow consistency to flood icing throughout the appropriate sections.

4. Repeat with other colors, as necessary.
5. Allow the cookies to dry overnight, until the base layer of icing is hard.
6. Use a stiff or medium consistency royal icing to pipe your details over the flooded and dried cookies.
7. Allow fully decorated cookies to fully dry - at least another 24 hours - before packaging or storing in an airtight container.

Tips for Cookie Decorating Success
Let’s try to keep this chronological...
Baking the Cookies
Use a recipe that is specifically intended for rolled and cut cookies, as others are likely to have too much spread.
Also, if the recipe tells you to rest or chill the dough, do not skip that step!
I am a HUGE fan of using a Rolling pin with adjustable thickness guides for rolling your dough out.
¼" is the thinnest you should roll sugar cookie dough, IMHO. While you can go thicker, anything thinner is more likely to break when handling it.
Note: When looking at size, you’re not looking at the overall size, so much as how much distance there is between edges.
A long, narrow cookie should be cooked at the same time as smaller cookies, not larger ones that may be more in line with the “long” measurement.
If you’d like to avoid handling the cut cookie shapes - especially important for intricate shapes - you can roll your dough out onto a silicone sheet, trim it to size, cut the cookies out, and peel the excess dough from around each cookie.
If you’re doing it this way, be sure to leave some space between each of them.
For REALLY sharp edges (assuming a good starting recipe!), chill your cut outs right on the cookie pan for 15 minutes, or even freeze them for 5 minutes, immediately before baking.
I find this gives a really nice, flat surface for decorating.

Is this cheating? Maybe. Does it work well? Absolutely!
If you’re not happy with the edges of your cookies after baking and cooling, you can use a Microplane Zester to sand them down a bit
Cookies should be fully cooled to room temperature before decorating.

You can get them PERFECTLY flat, between the rolling pin and the baking sheet trick!
Royal Icing Tips & Tricks for Use
Start with a good recipe - I recommend using my either my Easy Meringue Powder Royal Icing or my Traditional Royal Icing.
General Tips
You can sift your powdered sugar - after measuring - to help prevent lumps.
Make more frosting than you think you need, especially when multiple colours are involved.
You can flavour royal icing if you like, just be sure you’re not using an oil based flavoring - those can break down the icing.
On that same note, you’re going to want to avoid any grease getting into it at any point in making or storing it.
Make sure bowls, mixers, etc are completely clean, keep pan spray use far away from the frosting, etc.
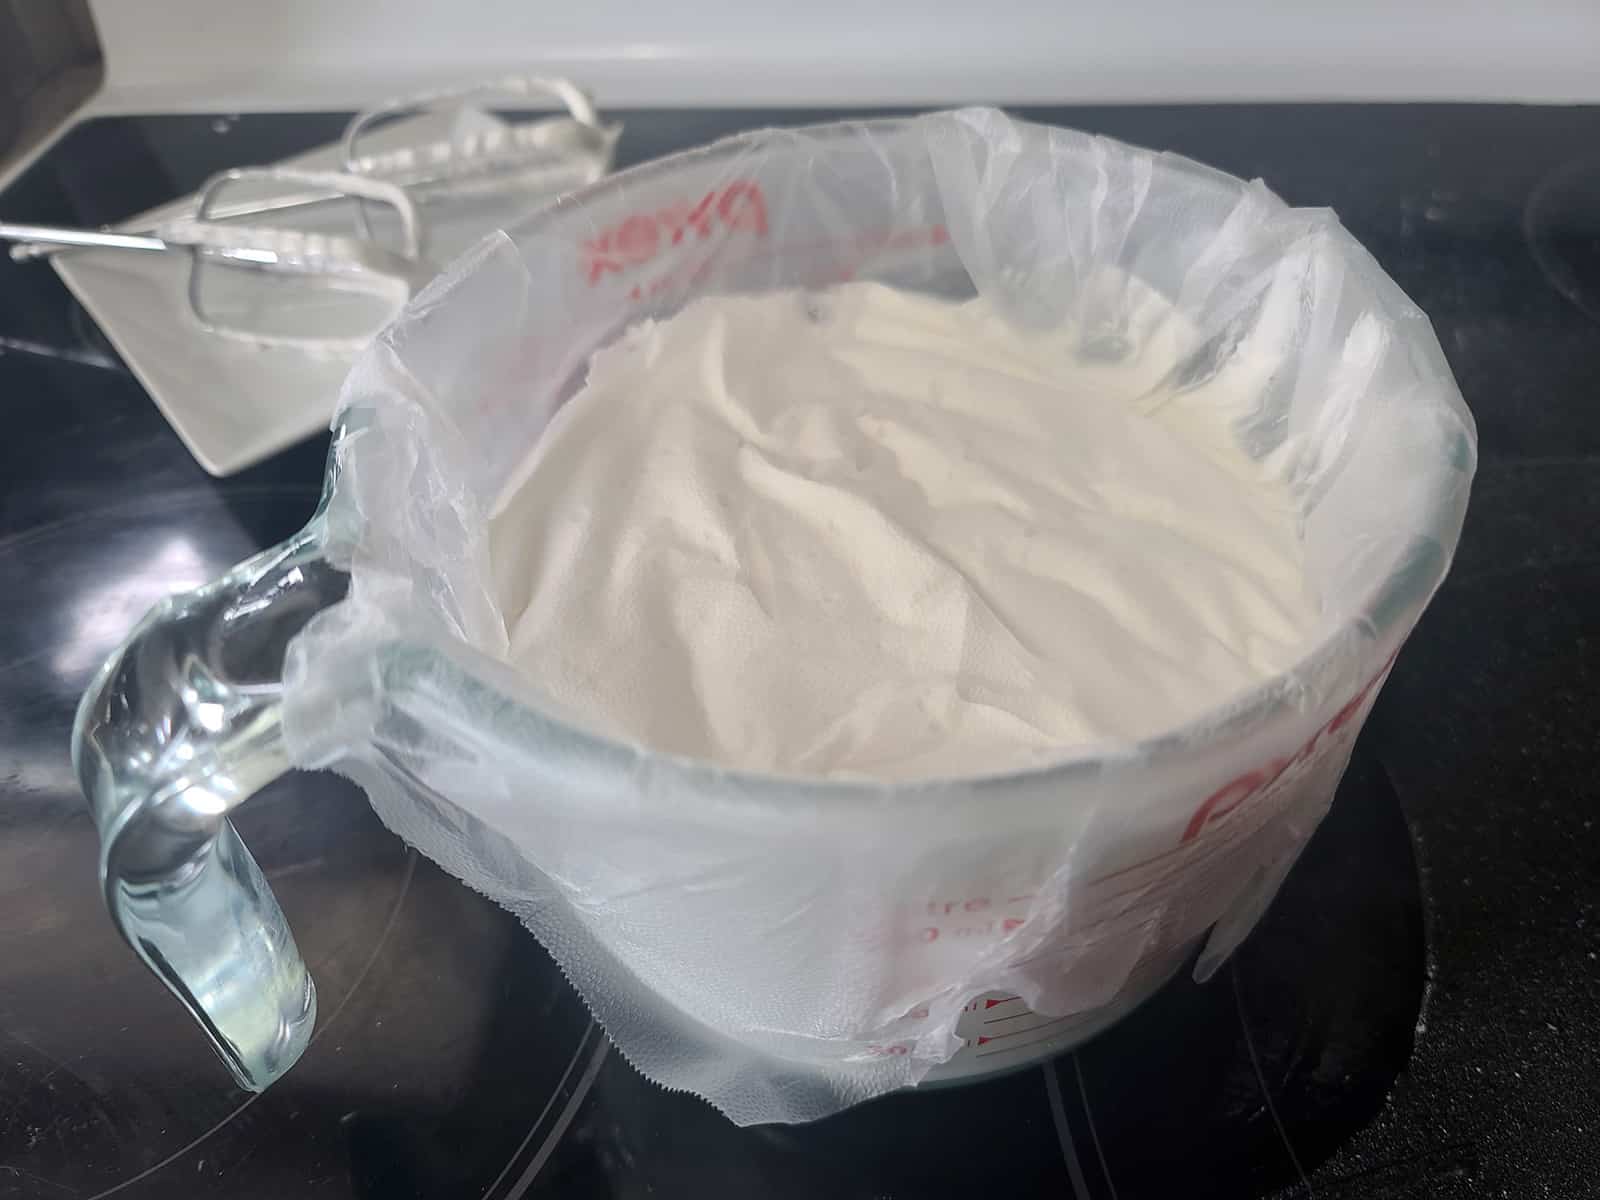
While some recommend using a damp cloth over your bowls of icing, I prefer to use plastic wrap, right on the surface of the frosting.
No sense introducing more moisture, once you’ve obtained the right consistency!
The more you can avoid adding excess air to the frosting, the fewer air bubble issues you’ll have to deal with later. A few tips:
- Using a paddle attachment on a stand mixer is better than using a whisk attachment.
- Most air gets added when adding liquid (color, flavor, or water when thinning).
When adding any of these, it’s best to use a flat spoon or spatula, and stir slowly - in a figure 8 motion - to avoid introducing any more air than necessary.

Coloring Royal Icing
Start with small amounts of food coloring, stir it in well, and then adjust with more colour from there.
It’s easier to add more colour to a too-light frosting, than to try to mute the colour of a too-intense icing.
For light colours, use the tip of a toothpick to introduce VERY small amounts of gel color into the bowl of icing, to avoid ending up with too much colour.
Color your frosting first (again, make more than you think you’ll need!), THEN thin it out.
Food coloring introduces a bit of moisture to the icing, so you’ll want to get it the color you want it first, then thin it based on where the consistency is at that point.
It’s always best to mix these colours at least a few hours before you’ll be using them, and start off with a colour intense than you want.
As an example, here’s what happens when you tint a red to the bright colour you want, and use it as is - you get brick red:

The icing in the bag started out lighter/brighter than shown, and dried to the dark red you see on the cookies.
Aim for a light red, or a medium-dark grey, when what you really want is a bright red or a black.
The more intensely coloured royal icing is, the more prone it will be to the colors running.
To avoid running / bleeding colors:
- Use only as much color as you really need.
- Use the dryest/thickest frosting you can. The more water there is, the more likely the bleed.
- Allow everything to dry fully before adding another color on top. Piping a red or black onto a wet base is more likely to bleed, than piping them onto a dry base.

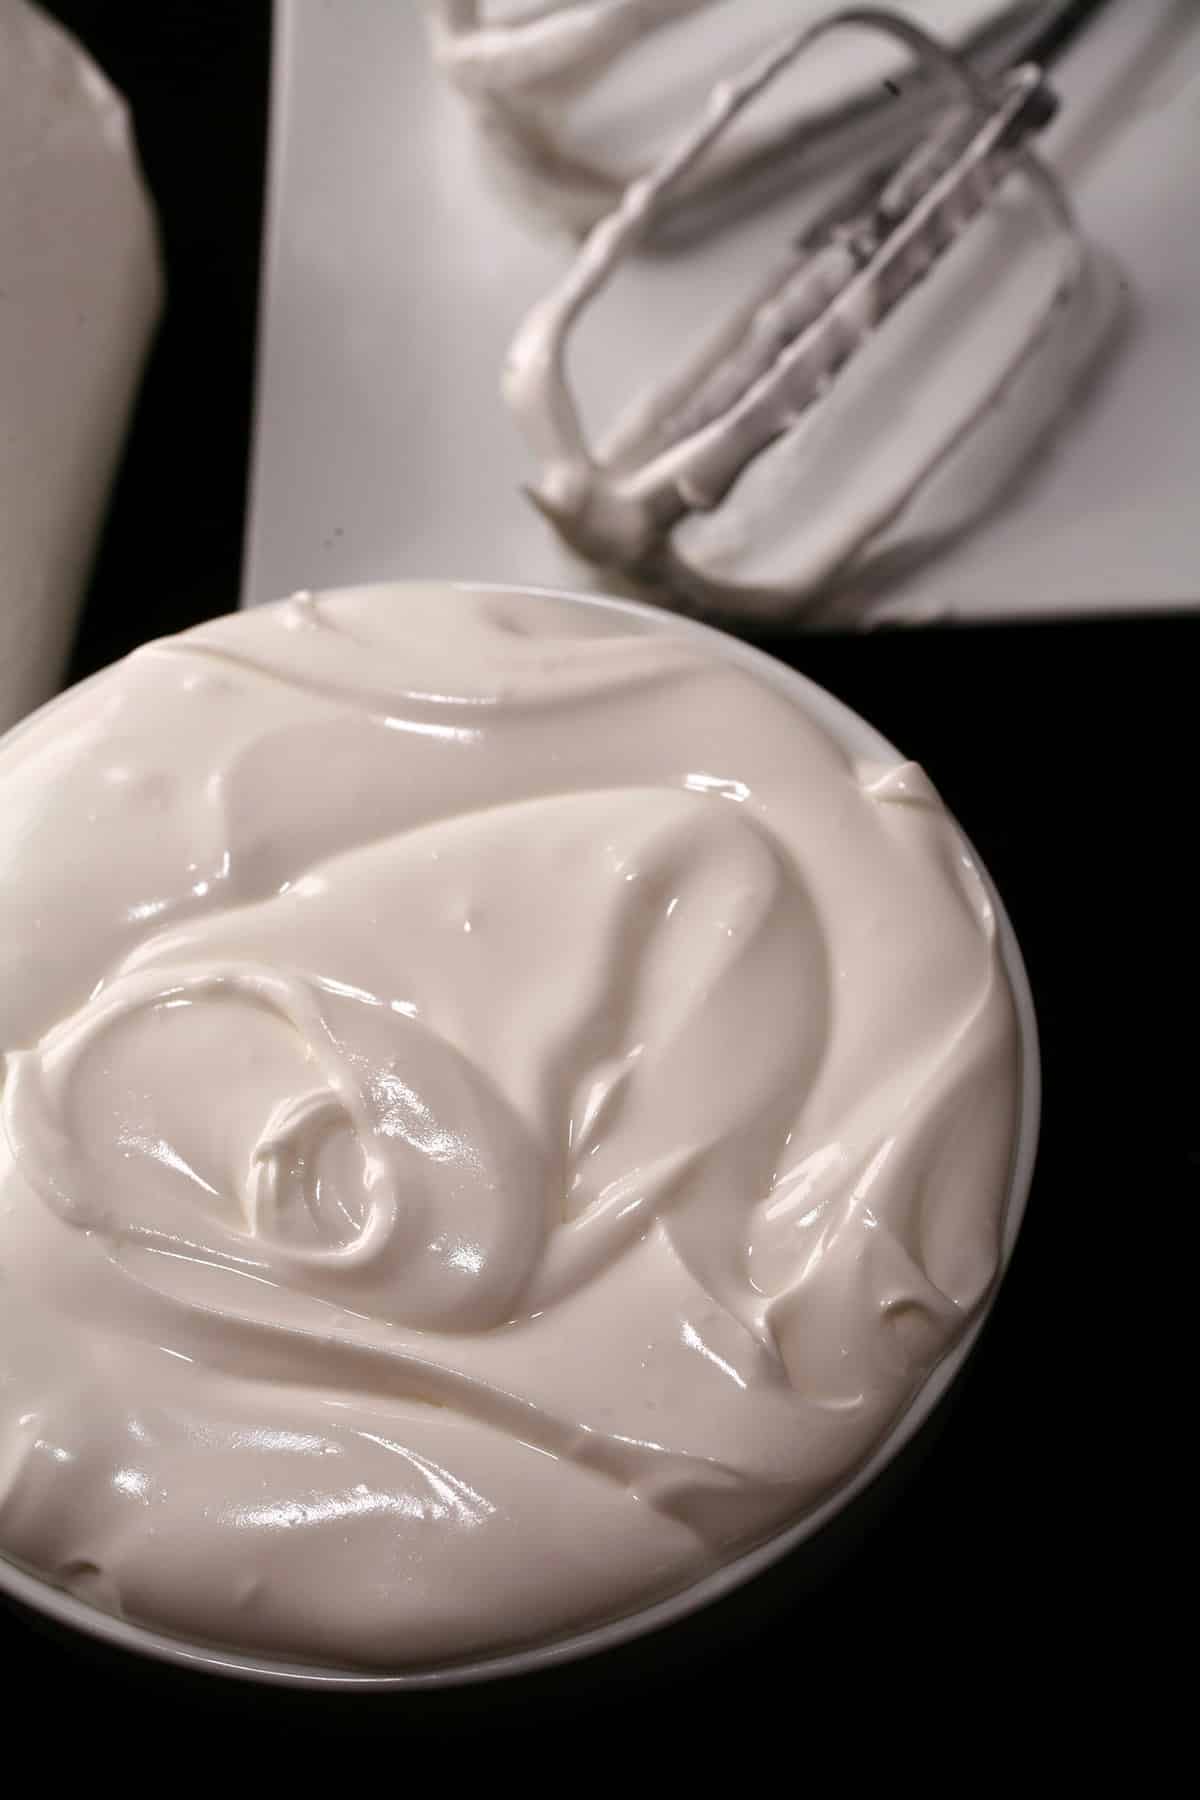
Royal Icing Consistency for Cookie Decorating
When you originally make your frosting, you should be aiming for a stiff frosting, and then you’ll thin it down for use.
Royal icing is thinned out by adding very small amounts of water (or lemon juice), and gently stirring it. I recommend using a ¼ teaspoon spoon, a pipette, or even a misting bottle.
You really want to add water a VERY small amount at a time, as a little can make a huge difference.
If you find that you’ve gone too far with the water, you should add a bit of stiff royal icing to thicken it back up.
When you’ve got a watery icing, adding powdered sugar to it can end up causing lumps.
Generally speaking, you look at consistency in terms of how long the icing takes to completely settle out, when you drizzle some of it over itself in the bowl.
A thinner frosting will have a shorter count, a thicker frosting will take longer to settle out.
Note: these counts are just guidelines, always play around with it and see where YOU like it, with your techniques!
Stiff Royal Icing
This is icing that is soft enough to stir - and pipe with - but it will hold stiff peaks when you’re making it. If you drop some icing back into the bowl, there is no spread, it will hold sharp edges.
Stiff consistency is used for piping details like rosettes, leaves, flowers, ruffles, stars, etc.

Medium Royal Icing
This is slightly thinner than stiff icing. It will flow a little more, not necessarily hold a sharp edge, but it won’t *run*.
If you drop some back into a bowl of itself, it’ll smooth out in 20 seconds or more... and it may not *completely* smooth out.
This is the consistency I like for piping borders, and piping some details like overpiped borders, whiskers, stems, etc, once the cookies have dried.
Border & Fill Icing
While I like to border with one thickness, then flood with a much thinner one, some people prefer to use one consistency for both, laying out their base color in one go.
For that, you want “15-20 second icing”, or “15-20 count icing”.
That is to say, this is when the icing is a consistency that will level itself out in 15-20 seconds, when some is dropped into a bowl of itself.
Thin / Flood / Flow Consistency
This is the thinnest you’ll want to deal with, and it will level out within 7-10 seconds.
It’s the consistency you’ll use for flooding areas of cookie that have been piped with a thicker border, to create a smooth base of solid color to decorate over.
While you can go thinner, I don’t recommend it - the more water there is in the icing, the more likely it’ll ripple or dimple as it dries.
Always use the thickest consistency you can get away with, for what you want to do.

Filling the Bag, etc
When it comes to filling your piping bags, you want to be careful to avoid creating air pockets.
I find it easiest to pull back most of the piping bag down over itself, and scoop spoonfuls of icing right in the bottom / tip end of the bag, working out from there. Squeeze any air pockets out, as they form.
When it comes to filling bags with flood consistency icing, I like to use a pastry bag ONLY - no coupler or tip.
Part of this is to avoid extra hassle of cleaning couplers and tips unnecessarily, but a lot has to do with filling the bag in the first place.
The whole point of flood consistency is for it to RUN - which makes filling an open ended bag messy.
I’ll just open the bag up over a glass and carefully pour it in. Squeeze out any air bubbles, and tie it off with some twine - then it’s good to go for when you need it, no mess involved!
Finally, know that this frosting may be pretty and delicious, but it will also destroy your equipment if you’re not careful.
Once a tip has been used for decorating, either keep it covered with a damp cloth / wrapped in plastic wrap, or wash it immediately. (I recommend using a Decorating Tip Brush.)
On that note, you want to actually wash the tips and air dry them, NOT soak them - they’re prone to rusting if left in water.
Borders and Flooding
Plan ahead!
I’ll make a list of what cookies I’m doing, and what colours each need. Then I’ll group them by which cookies need what colors for the base flooding.
If I have a lot of different cookies, I’ll also make a plan for order of operations.
If I’m using black AND grey, I’ll pipe the black first, then use a little of it to tint some white to grey. That kind of thing.
Aim to keep your borders on TOP of the cookie, maybe even leaving a small border of cookie around it.
You don’t want the border to fall over the edge of the cookie, or it won’t do much for keeping the flooded icing in spot!
If you mess up the border, you can overpipe a bit, or scrape it off and start over - whichever works for you.
Any weird edges can be smoothed over with a lightly damp fingertip (shake off excess water, though!).
Royal icing starts drying / crusting QUICKLY, so your options for fixing issues dry up pretty quickly, as well!
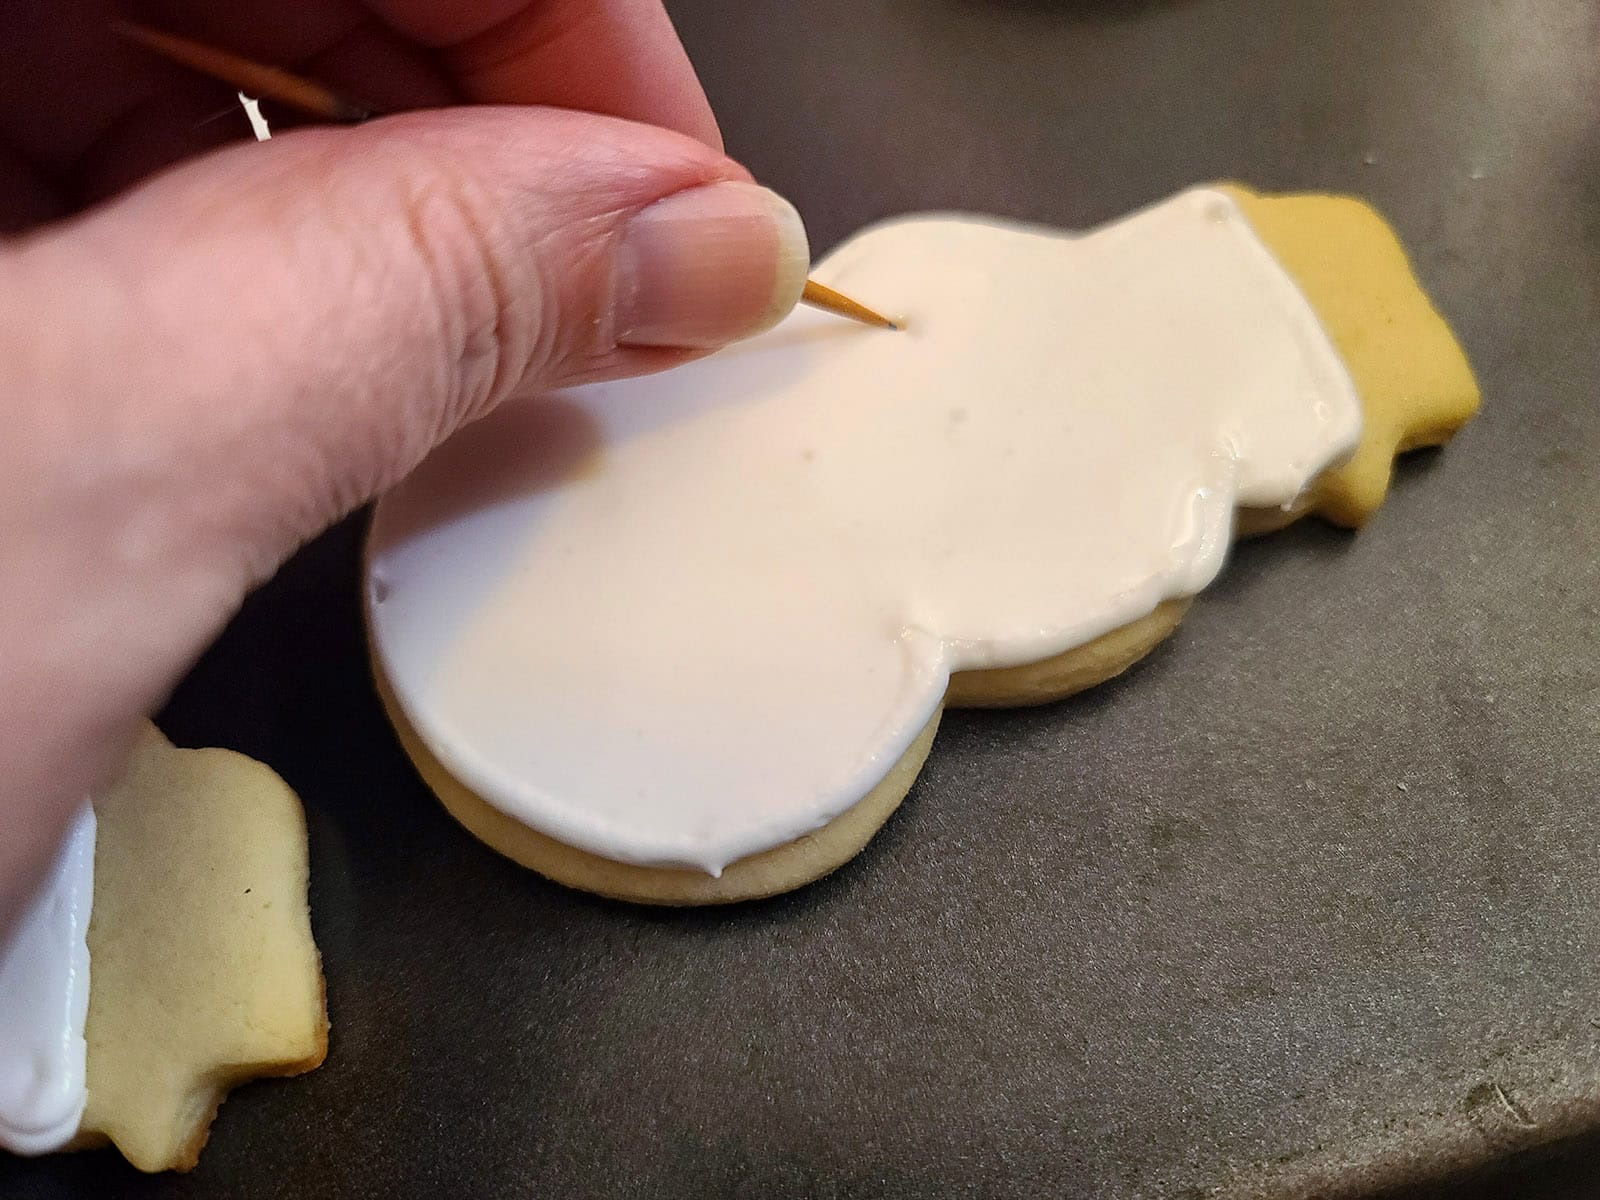
When flooding your icing, don’t worry about any spot that doesn’t completely touch the border, or fully go into a corner.
Get the base filling in, then immediately use a toothpick to nudge icing where you need it to go.
If you have any air bubbles appearing after flooding, pop them immediately with a toothpick. As it dries, it’s more likely to leave evidence of the air bubble.
If your design requires separated areas that are the same color, pipe and flood areas that are not adjacent, and let them dry fully before doing the neighboring spots.
For example, you’re doing a 6 petal flower. The petals will all be the same colour, but you want them defined.
Pipe and fill 3 petals, leaving empty space between each. Let those dry, THEN pipe and full the remaining petals.
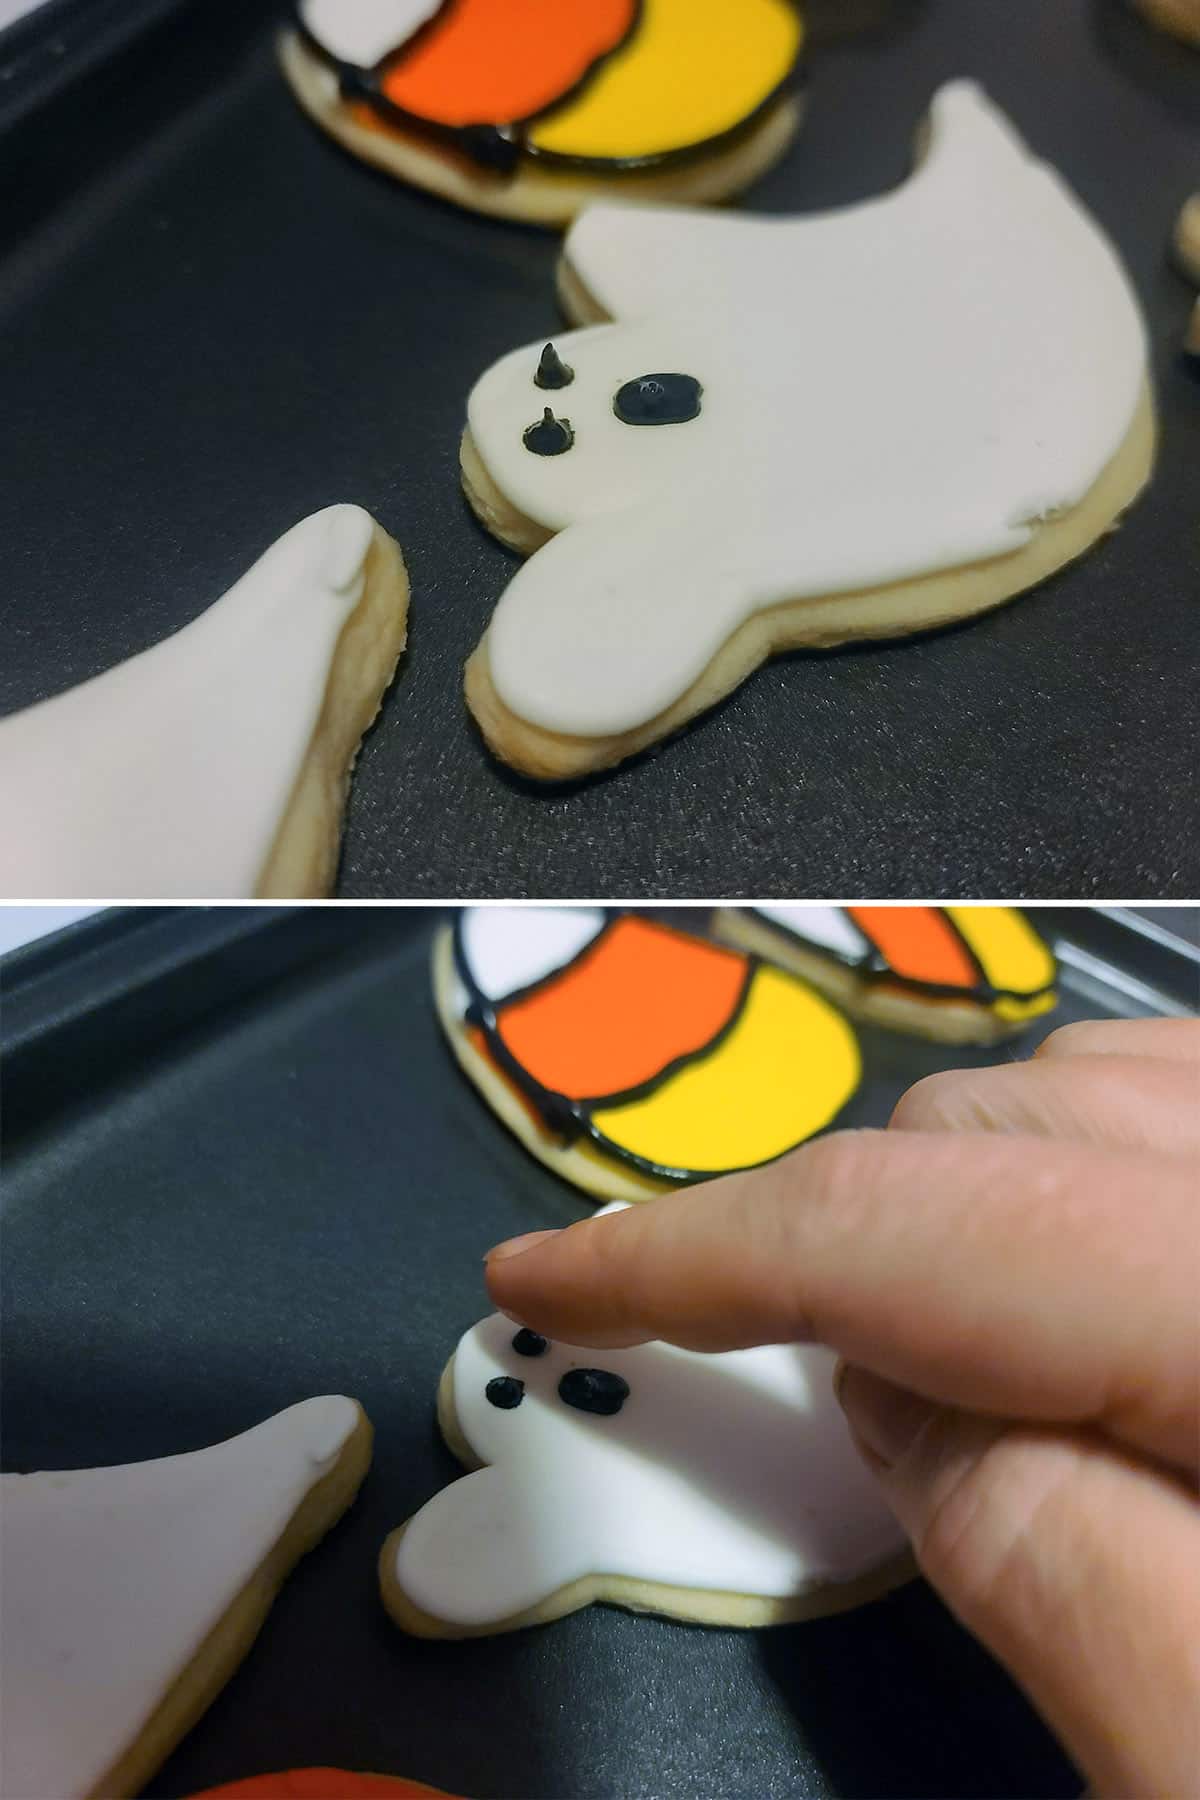
Top Decorating
Unless you’re doing wet on wet decorating, allow your cookies to FULLY dry - at least overnight - before doing any detail decorating on top.
If only partially dry, you risk causing dents or cracks from the added weight of piped decoration.
If you’re unsure about freehanding with the frosting, use a food color marker or cookie scribe to draw out your design on.
If you find that your royal icing is leaving points / sharp peaks at the end point, use a damp finger tip to gently pat them down.
Note: ESPECIALLY when you’re working with intense colours like black or red, be sure your finger tip is only barely damp - shake off all excess water before touching the cookie.
If you have any droplets of moisture on your finger, they can transfer and cause colour bleed.
Even if you weren’t planning to have borders between colours, adding an over piped border can hide mistakes that were made in the outlining and flooding stage.

A bit of outlining can hide all kinds of mess ups.
“Wet on Wet” Cookie Decorating
While you will usually want to allow the base layer of flooded icing to completely dry before piping frosting on top of it, in some case you may want to pipe INTO the frosting.
That’s usually referred to as “wet decorating” or “wet on wet” - you’re using a wet frosting (flooding consistency) piped onto/into an area of wet icing, to achieve a specific look.
Because you’re dealing with 2 flooding icings, the one piped onto the other will sink INTO the other.
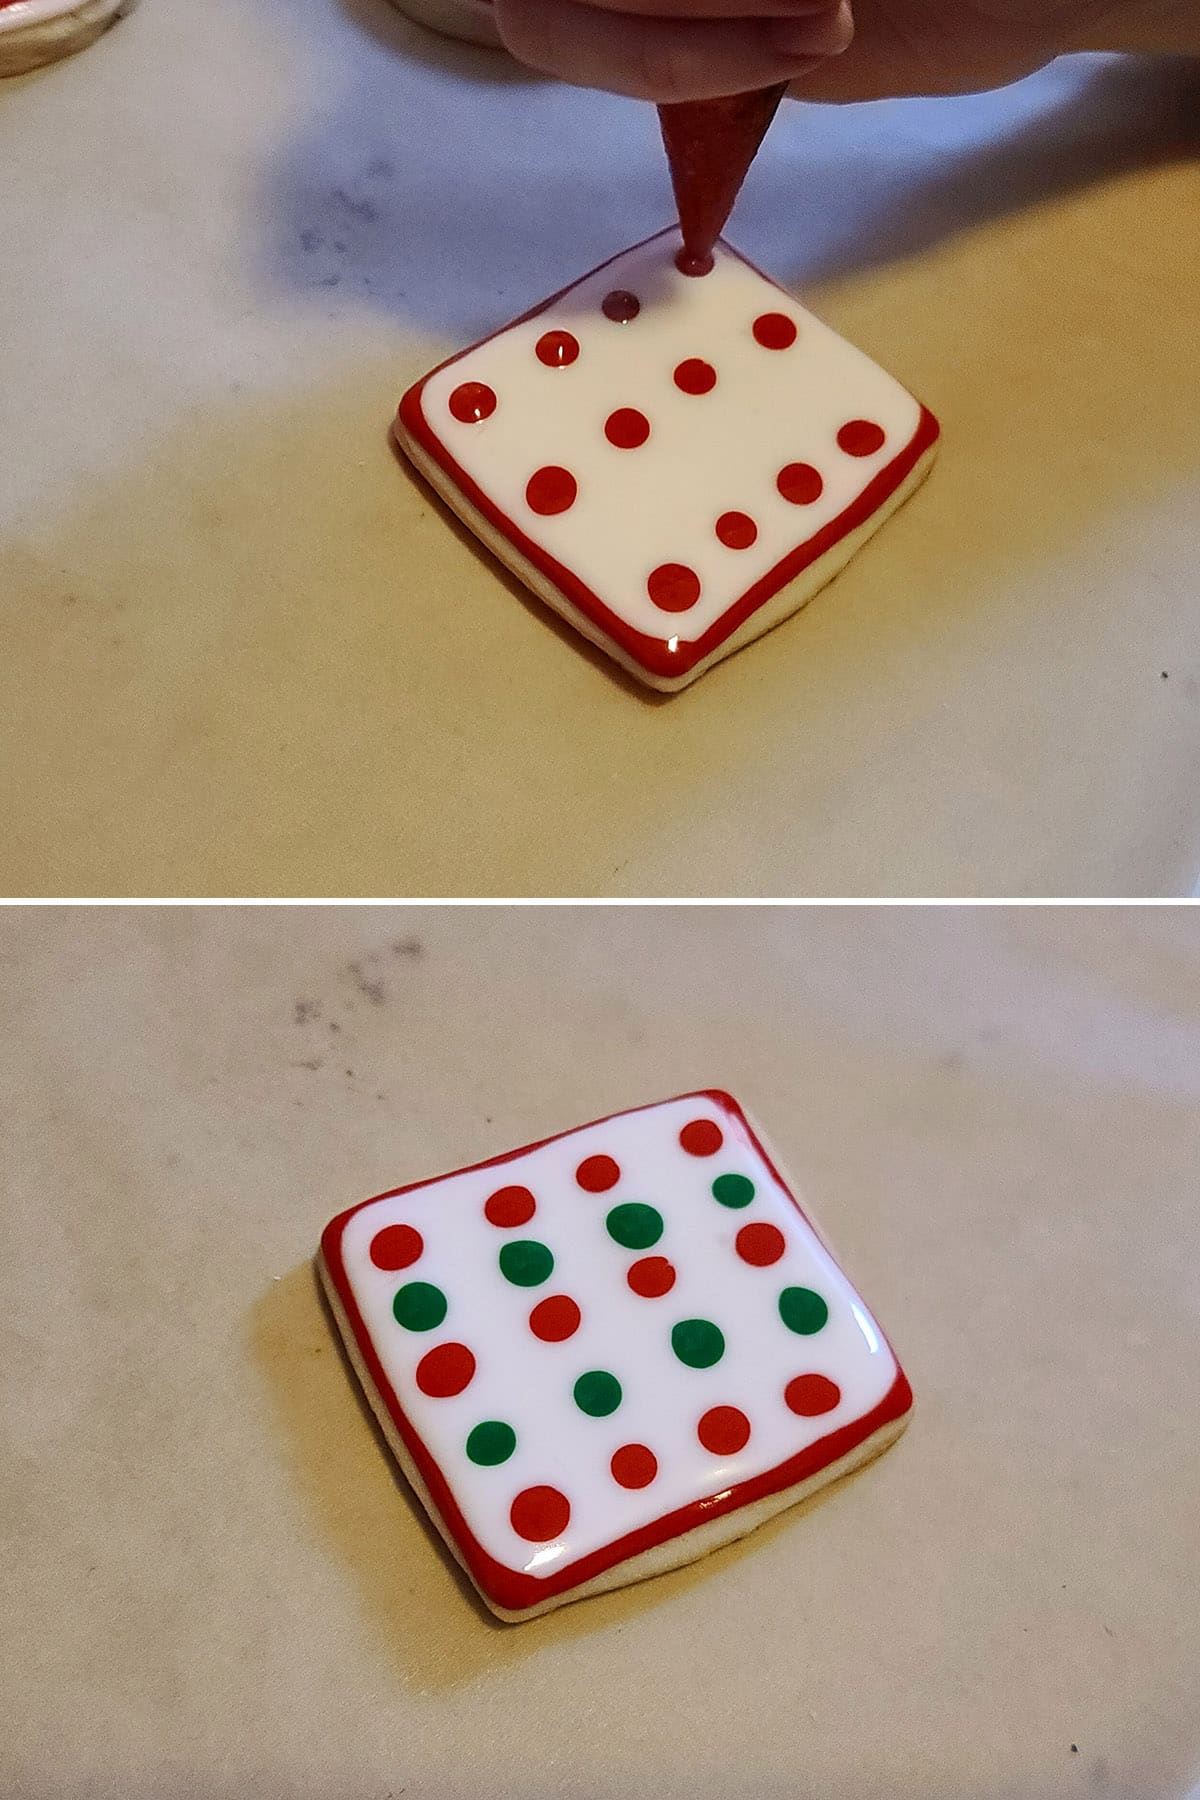
At the most basic, this can be something like piping dots onto a flooded cookie, for a smooth polka dot cookie.
The real fun, however, comes when you start messing around with piped dots. Dragging a toothpick tip through wet-on-wet dots or lines can produce all kinds of fun effects.
Here are a few walk-throughs of the most basic techniques:
Zig Zags / Chevron
1. Border and flood your cookies.
2. Pipe lines of different colored flood-consistency royal icing across your flooded cookies.

3. Using a toothpick and starting at one end of the cookie, drag the tip of the toothpick through the icing, across the lines you piped. End at the far side of the cookie.
4. Wipe the toothpick off (a damp paper towel works great!), then drag it through going the opposite direction, parallel to your first line.
5. Keep repeating - a dragged line, wipe off, a dragged line in the other direction, wipe off - until you’ve zig zagged the whole area you want to.

Notes:
- You can use whatever size tip you want, the bigger the tip, the wider the lines.
- The closer together the dragged lines, the steeper the chevrons will look.
Random Pulled Hearts
1. Border and flood your cookies.
2. Pipe dots of different colored, flood-consistency royal icing all over your cookies, leaving a little space between each.
3. Starting in the main colour flood icing next to a dot, drag the tip of your toothpick from that background colour, through the dot, and out the other side. You can drag it in a straight line, or curve it. It just depends on the look you’re going for.
4. Wipe off your toothpick, repeat with remaining dots.
Note: The bigger the tip / dot, the bigger & more full the heart will be. I went a bit too small when doing these for photos, this time!
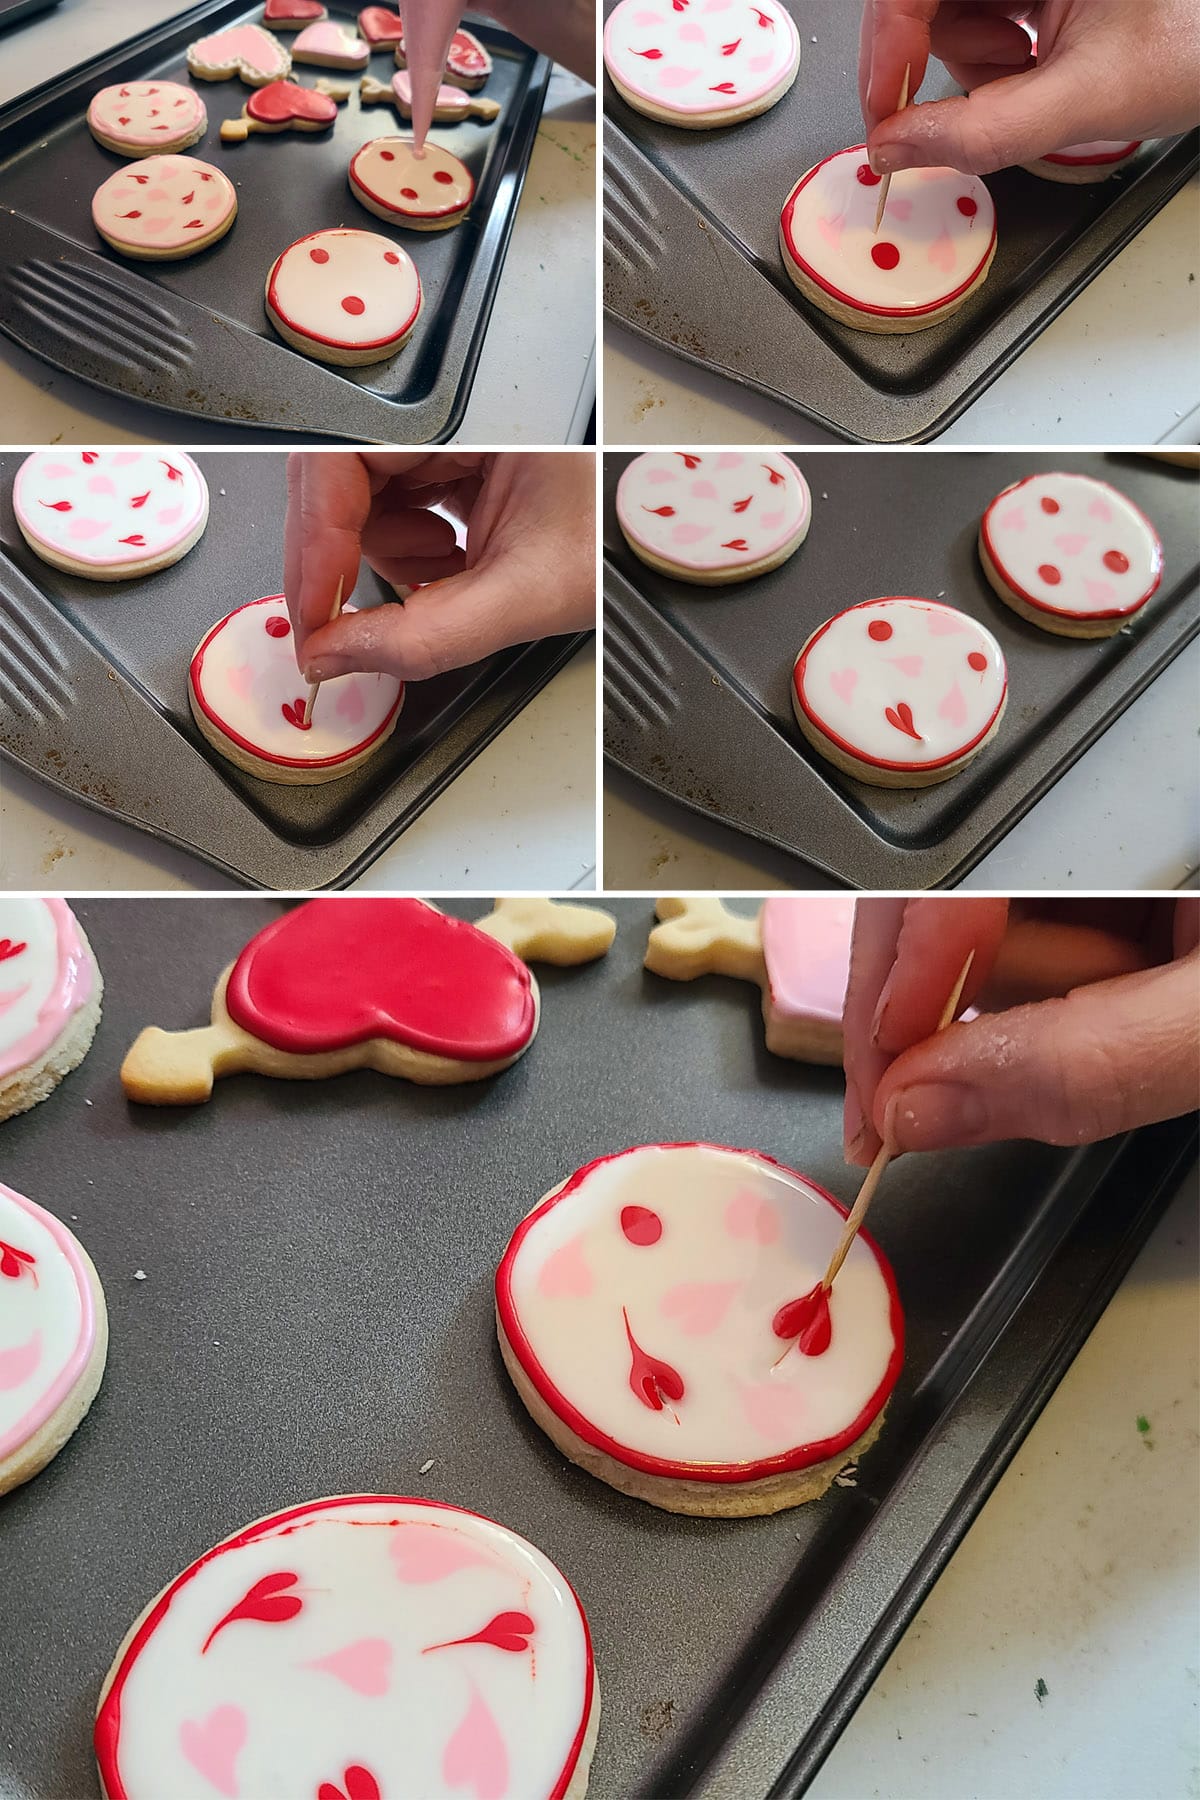
Pulled Heart Lines
1. Border and flood your cookies
2. Pipe dots of different colored, flood-consistency frosting in lines across your cookie, as shown. Leave a little bit of space around each dot.
4. Wipe off your toothpick, repeat with the remaining lines of dots.

- The bigger the tip / dot, the bigger and more full each heart will be.
- While I showed this with all hearts going in the same direction, you can alternate which end of the cookie you start from, so every second row of hearts is facing the opposite direction.
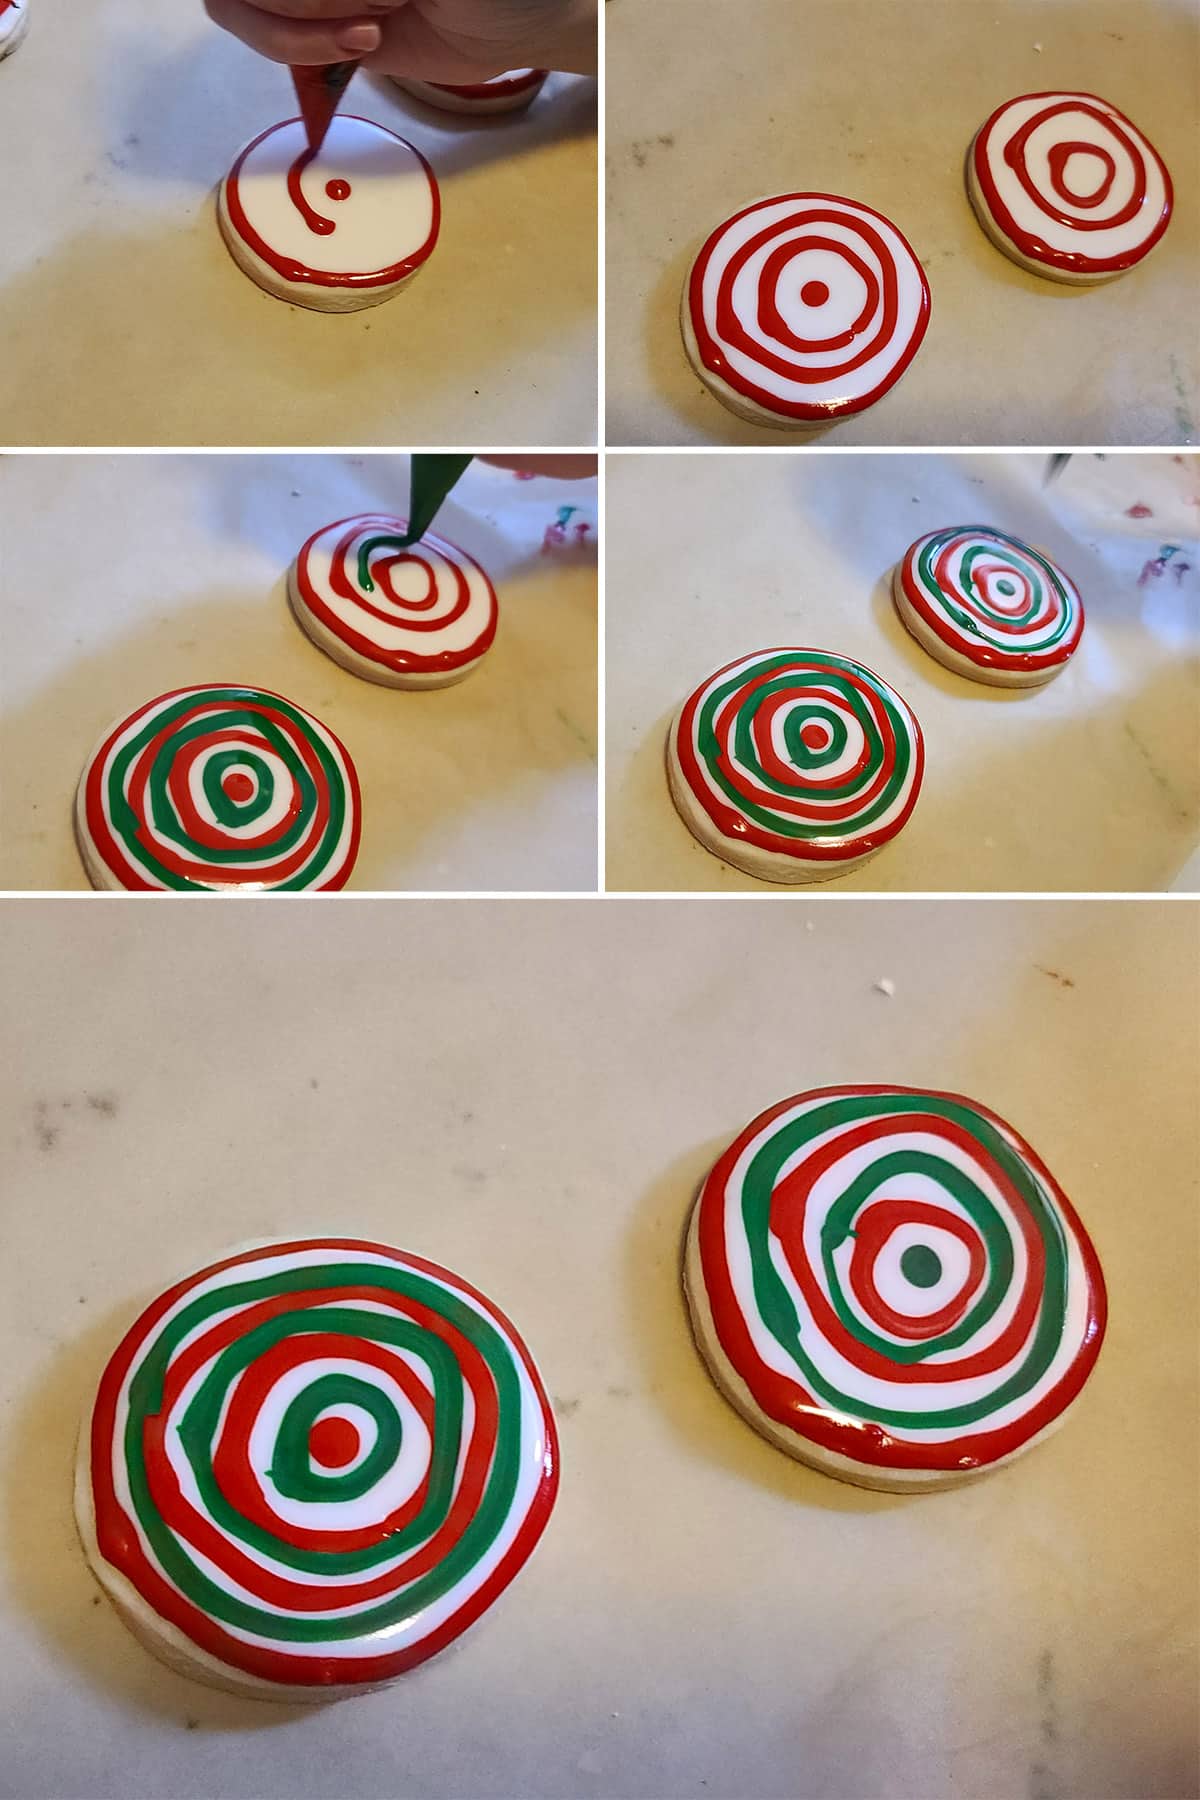
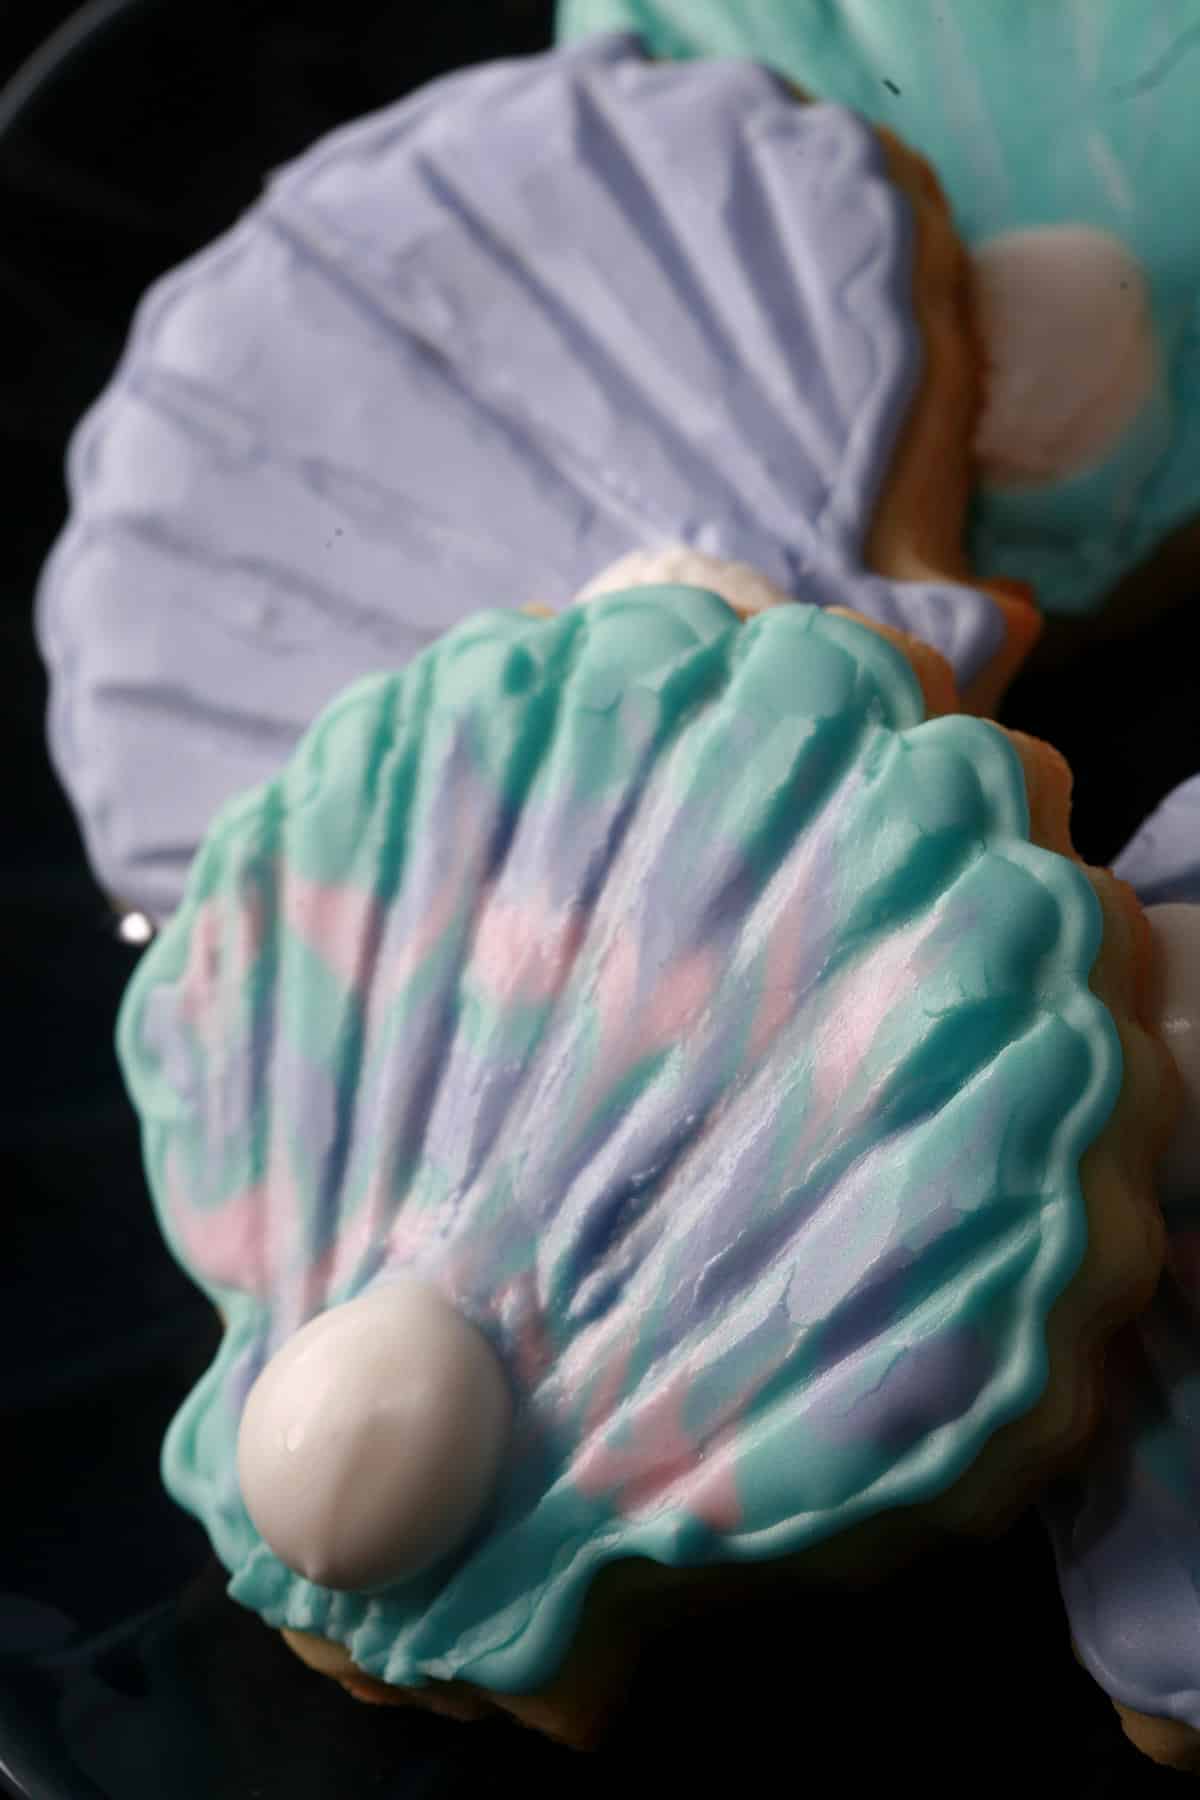
Spider Web
1. Border and flood your cookies.
2. Using a contrasting color of flood-consistency icing, pipe a decent sized dot in the center of the cookie, as shown.
3. Pipe concentric circles of flood-consistency frosting around the circle, leaving some space between each.
4. Starting in the center of the circle, drag the tip of your toothpick in a straight line, through the rings, all the way to the border.
5. Wipe off the toothpick. Starting in the center again, pull the toothpick through the rings, going away from the original path, towards the opposite side of the cookie.
6. Repeat all the way around the cookie.

- The bigger the tip, the wider the rings.
- You can vary how much space you leave between the different colours. Additionally, You can pipe alternating colors as I did in these photos, or all one colour, as I did in my tutorial for Easy Spider Web Cookies.
- I like to work in sets of two: One pull, then the next pulled in the opposite direction, spaced out around the cookie. I find that if I work in a circle - rather than in opposites - the center gets deformed, and then the whole design gets deformed.
Starburst
1. Border and flood your cookies.
2. Using a contrasting color of flood-consistency icing, pipe a decent sized dot in the center of the cookie, as shown.
3. Same as with the spider web, pipe concentric circles of flood-consistency frosting around the circle, leaving some space between each.
5. Wipe off the toothpick. Starting in the center again, pull the toothpick through the rings, going away from the original path, towards the opposite side of the cookie.
6. Working perpendicular to that set of two lines, repeat - this will create an X shape across your cookie.
7. Working in sets of opposite pulls, start at the center of the cookie and pull out 1 more line between each of the first 4 spokes. Be sure to wipe your toothpick each time!

8. Starting at the outside border of a cookie, drag the end of a toothpick through to the center of the cookie. Repeat this between each of the original 8 spokes.
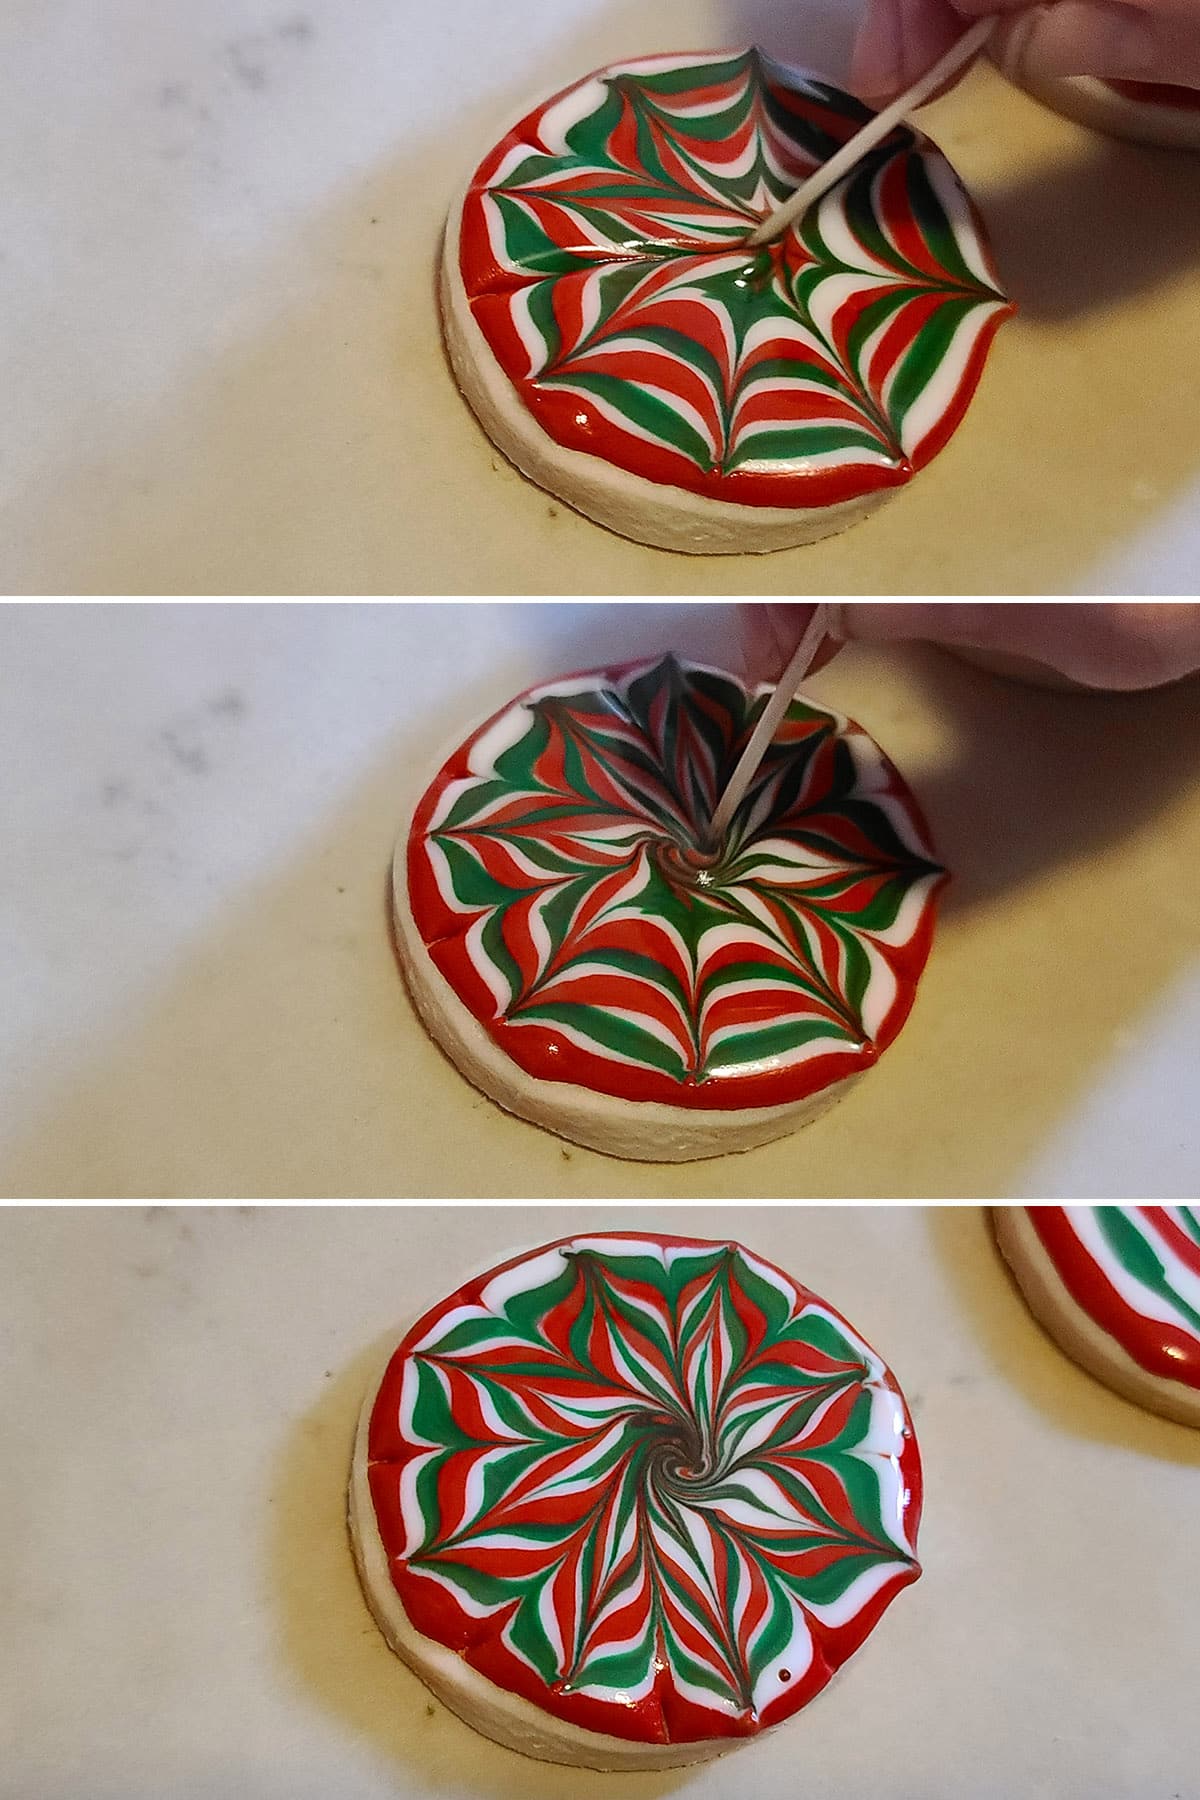
- The bigger the tip, the wider the rings.
- You can also vary how much space you leave between the different colours.
- If the center starts looking messy, you can intentionally start spiraling the pull, right before the center. I love the way this looks, so I generally go this way!
Other Wet on Wet Designs
If you love the idea of this, I definitely recommend Googling or looking at Pinterest for more examples of what you can do - it’s great fun!
I just started a quick Pinterest board for Wet on Wet Cookie Decorating ideas, or there’d be a million links here.
A few of my favourites from it:
Tie Dyed T-Shirt Cookies
Fall Maple Leaf Sugar Cookies
Marbled Turkey Cookies
Citrus Slice Cookies
Elegant Rose Cookies
Miscellaneous Decorating Tips and Tricks
Shiny Finish or Highlights
Want to add a metallic, glitter, or pearlized finish to your cookies? Look to cake decorating dusts!
Luster Dust is an edible finishing dust that comes in many finishes.
Some are single color, some have a bit of a pearlized sheen to them, some are metallic. They all kind of look like loose eye shadow.
- Smudge them on your fully dried cookie (kind of like eyeshadow!), then blow or gently knock off the excess dust.
Or
- Mix a few drops of plain vodka into a small amount of Luster Dust, then paint it on the dried cookie.
Why vodka? Not only does it mix better, it evaporates a lot faster than water - which is key when painting over royal icing!
Fine Details
Don’t want to mess around with trying to elegantly write while trying to force frosting through a tip opening that’s only marginally wider than a hair?
Just write on the cookies!
Once fully dry, you can use Food Color Markers to draw in whatever fine details you like!
These are such a fun thing to work with - I used to use them a LOT in cake decorating, even covering an entire 3 tiered fondant cake in sketched orchids:
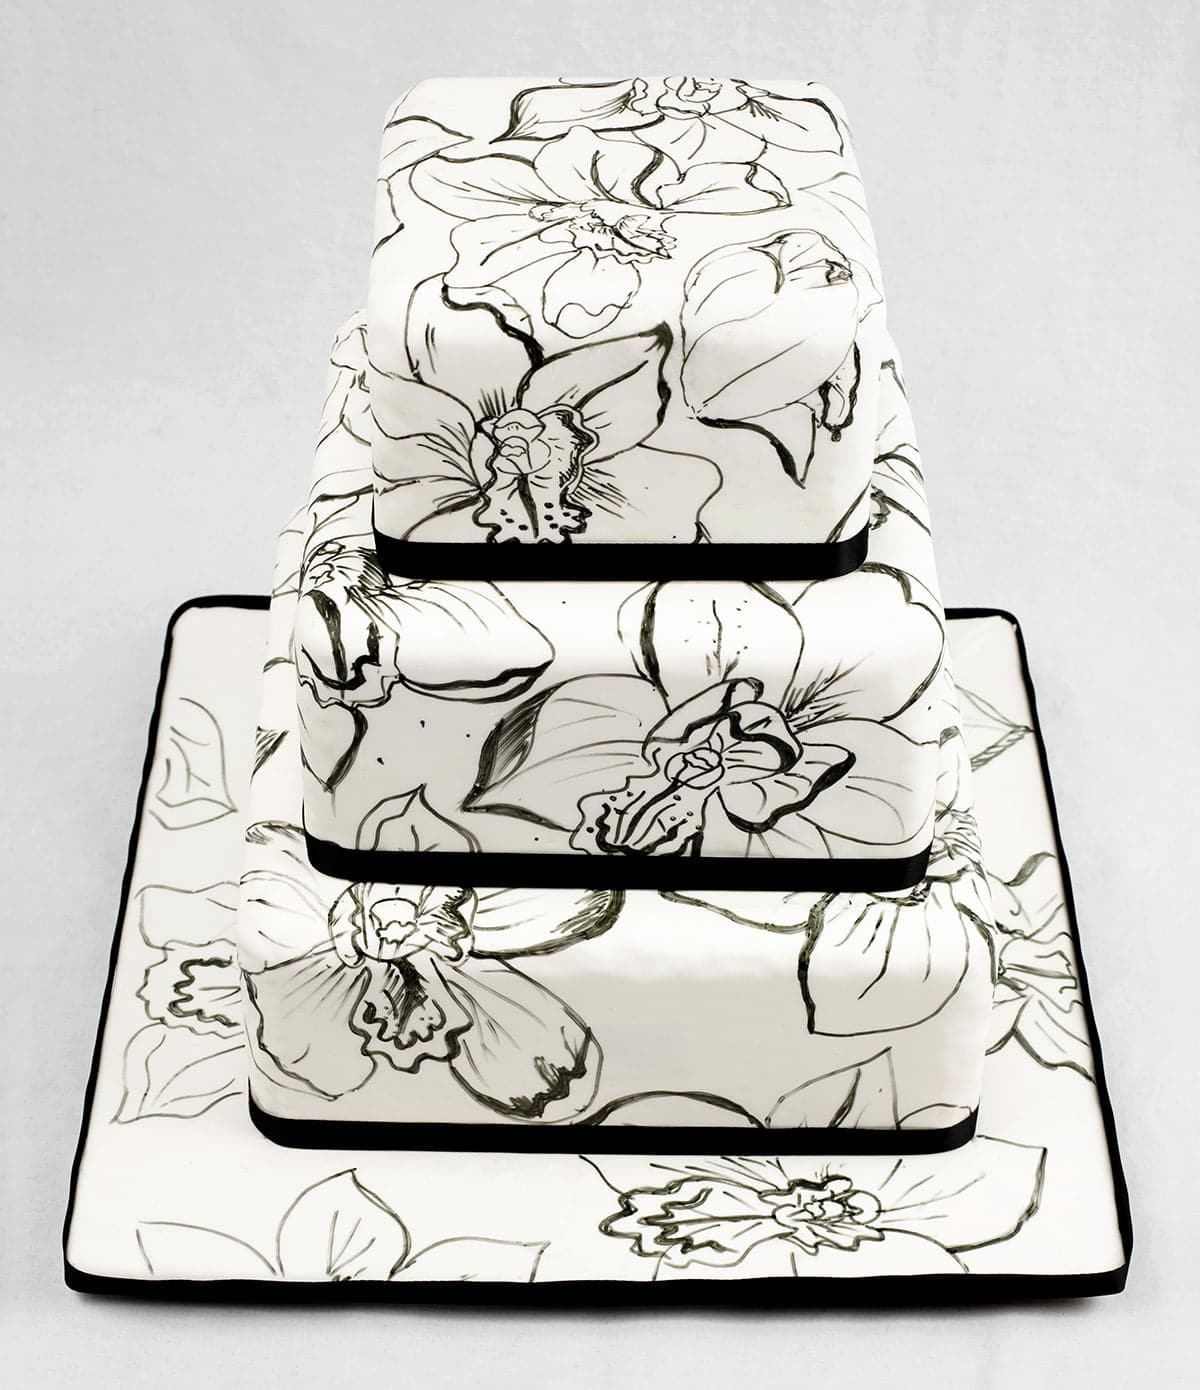
(I have more information about using them on cakes in my Poinsettia Cake Tutorial)
They’re great for adding tiny eyes, whiskers, fine writing, etc.
You can even use them to sketch out your design onto the cookie before piping it out with frosting!
Scribing
On that note, if you’d like to lay out your design WITHOUT using markers, consider using a Cookie Scribe Tool.
This is basically a long pin type tool that’s used to mark a design onto a cookie, before piping.
You know how you can transfer a design to a pumpkin by poking it into the flesh, through a paper pattern?
Same sort of idea!

How to Store Decorated Cookies, Etc
Properly Drying the Cookies
Once you’re happy with the decoration of all your cookies, you need to let them FULLY dry before storing them.
Many recipes will say “at least overnight”, but that’s an absolute minimum.
Personally, I aim for at least 24 hours of drying. Cookie decorations that look and feel dry can sometimes surprised you, and easily be dented when bagged or stacked.
Much better to wait longer, than to risk losing all that work!
1. Cookies should be allowed to air dry, out in the open. Don’t dry them in boxes, etc - air flow is your friend! To speed things up, you can use a fan blowing across your cookies.
2. Cookies will take longer to dry on humid days.
3. How long it takes the cookies to dry affects the finish of the frosting. Slow drying can lead to a dull finish, the faster the frosting dries, the shinier the finish.
4. For a fast drying time and shiny finish, you can dry your cookies in a food dehydrator.
5. Do not dry your cookies in the fridge. Not only is it a fairly moist environment - and one that can impart smells and flavors onto your cookies - condensation cam ruin the finish of your cookies.

Storing Decorated Cookies
Once fully dried - I mean it, FULLY dried - Cookies can be stored in an airtight container for up to a week.
I like to lay them flat, in layers, with each layer separated by a sheet of parchment paper or wax paper.
Can Cookies Decorated with Royal Icing Be Frozen?
FULLY dried cookies can be frozen for several months, if needed.
I recommend individually sealing them in cellophane bags before freezing them. They need to be airtight before freezing - if any moisture gets in, they can be destroyed when thawed
When you’re ready to use them, lay the packages out in a single layer and allow them to come up to room temperature on their own.
Do NOT microwave them to speed it along!
Storing Leftover Royal Icing
The shelf life of your royal icing - and how your store it for that time - will depend on which recipe you use.
Meringue powder based royal icing should be stored at room temperature for up to a month. Chilling it can break it down.
Egg white based royal icing can be stored for up to a week, and it should be kept in the fridge.
It’s best to store royal icing in a very clean airtight container, covered with plastic wrap.
Try your best to avoid having any frosting on the container above the line of the actual frosting. These bits of stray frosting can crust, dry up, and fall into the frosting - which will ruin it.
For best results, you want to transfer your frosting to the container, and carefully wipe down the sides of the container with a damp paper towel.
Then, press a piece of plastic wrap against the surface of the frosting, pushing excess air out the sides.
Finally, adhere the plastic to the sides of the container walls (if possible), and cover the container with a lid to keep it all airtight.
You will need to re-beat the frosting before use, either way - whether or not you see any separation.
I don’t advise storing the frosting in piping bags, but hey - sometimes we forget.
If you DO store them in bags, expect to pour the frosting out into a small bowl and re-beat them, before transferring them into a new, clean piping bag.
Just note: if any crusted frosting falls into it, you’re better off just making up some more frosting.
Have the plastic against the surface of the icing, to prevent air drying.
Making Decorated Sugar Cookies as Gifts
Decorated sugar cookies make excellent gifts and party favors. Because they’re highly customizable, they’re especially great as wedding favors, for baby showers, etc.
To make cookie gifts, just make and decorate cookies as described above, allowing them to FULLY dry - at least 24 hours.
Transfer 1 or 2 cookies to an appropriately sized Flat Cellophane Cookie Bags.
Once in the cellophane bag, gently press out as much air as possible, and secure with a twist tie.
From there, bags can be labeled and/or decorated any way you want - add little stickers, or large, personalized stickers or labels.
I like to tie several strands of ribbon around the twist tie, curling the edges by dragging them across the blade of my scissors.
Have fun with it!
More Cookie Decorating Posts
Looking for more excuses to roll some sugar cookie dough out? In the mood to break out the royal icing? Here are some more cookie recipes and tutorials you may be interested in!
Cut-Out Rolled Sugar Cookies
Decorating Dalek Cookies
Easy Royal Icing
Easy Spider Web Cookies
Gingerbread Biscotti
Gluten-Free Gingerbread Cookies
Gluten-Free Sugar Cookies for Decorating
Nightmare Before Christmas Cookies
Rolled Pumpkin Spice Cookies
Traditional Royal Icing
.. and be sure to check out our Cookies & Bars recipe section for even more delicious cookie recipes!
Low Carb Cookie Decorating
Need options that are both gluten free AND sugar free? Here a a few fantastic recipes over on my keto blog, Low Carb Hoser:
Low Carb Gingerbread Cookies
Keto Pumpkin Spice Cookies
Low Carb Rolled Sugar Cookies
Sugar Free Royal Icing
Share the Love!
Before you chow down, be sure to take some pics of your handiwork, for posterity and social media! If you post it to Bluesky, be sure to tag us - @CelebrationGen. We're also on Pinterest, so you can save all your favourite recipes to a board!
Also, be sure to subscribe to my free monthly email newsletter, so you never miss out on any of my nonsense. Well, the published nonsense, anyway!
Finally, if you love this recipe, please consider leaving a star rating and/or a comment below!

How to Decorate Sugar Cookies
Equipment
- 2 Baking Sheets
- Parchment Paper
- Cookie Cutters
- Disposable Pastry Bags
- Coupler set
Ingredients
- 1 Batch Sugar Cookies
- 1 Batch Royal Icing
Instructions
- Once you have baked and cooled your cookies, lay them out on your work surface. I like to decorate on baking sheets, or on laid-out parchment paper.
- Use a stiff or medium consistency icing to pipe a border around the entire cookie, as well as any internal separation lines you may want.
- Use royal icing that has been thinned to flow consistency to flood icing throughout the appropriate sections.
- Repeat with other colors, as necessary.
- Allow the cookies to dry overnight, until the base layer of icing is hard.
- Use a stiff or medium consistency royal icing to pipe your details over the flooded and dried cookies.
- Allow fully decorated cookies to fully dry - at least another 24 hours - before packaging or storing in an airtight container.


11 winner
I absolutely loved this post! The step-by-step instructions were super helpful for a beginner like me. Can't wait to try out the techniques you shared and make my own decorated cookies for our upcoming family gathering. Thanks for the inspiration!
S8 Game
I loved this post! The step-by-step instructions made cookie decorating feel so approachable. I can't wait to try out the techniques you shared, especially the royal icing tips! Thanks for the inspiration!