

Perogy, Pyrohy, Pierogi, Varenyky ... however you know them, my gramma made the BEST perogies. You can too, with her Perogies Recipe. A bit of work, for the best comfort food ever!
Originally Posted August 29, 2009. Updated 11/9/2022

It had been a long time since I’d had decent perogies. At the time, I settled for crappy frozen store-bought perogies, but vowed to make a big batch of homemade perogies soon.
Growing up, my grandmother used to make amazing cheese perogies, and I've never forgotten that - everything else pales in comparison!
Of course, she was the first person I called when I decided to try my hand at making them. She graciously provided her homemade pierogi recipe, as well as an endless rant of tips. LOL.
Luckily, he was a huge help in the kitchen, and they actually whipped up a lot quicker than I thought they would! I actually had a good time.
I had remembered them being an all-day kind of task, this was more like 2.5 hours, start to finish.
It may look involved, but it's a simple dish that’s actually pretty easy to make - just a little time consuming.
These are nothing like store bought perogies, btw.
These are the kind of Perogies you get from Ukrainian church sales - SO much better than what you find in stores or restaurants!
The best part? These are super customizable! More on that in a bit.

What Are Perogies?
Perogies - AKA Pyrohy, Pierogi, and Varenyky - are delicious dumplings from Eastern Europe.
A simple dough - the ingredients and recipe vary from person to person - is formed around a cheesy potato filling, sealed off, and boiled.
Pierogi are a SUPER popular dish back home in Winnipeg, where you can get them almost anywhere - as a snack, main dish, or appetizer.
While even just the most basic form of pyrohy is amazing, a great thing about them is how much you can customize them, both in filling and preparation.
More on that in a bit, though!
Perogy Ingredients
You need just a few simple ingredients to make perogies:
Perogie Dough Ingredients
All purpose flour
Eggs
Vegetable Oil
Salt
Water
Filling Ingredients
- Red Potatoes (Large or medium potatoes, for ease in peeling!)
- Cheese (Usually Cheddar - more on that in a bit!)
As a note, while I’ll usually add a little butter or warm milk to mashed potatoes, I do NOT do that for making this filling.
The added moisture would mess up the texture!
Note: You can make a variety of different pierogi fillings, even dividing a batch out and doing several. See the next section for variations!
Perogy Fillings: Variations
While I love the flavor profile of the most basic cheddar pierogies, the beauty of this recipe is that you can customize your fillings for perogies in SO many ways.
Have fun with it!
Potato Perogies: Skip the cheese, season the potatoes with salt and black pepper. (A little garlic powder is great, too!)
Traditional Potato Cheese Pierogi: 2 lbs sharp Cheddar cheese
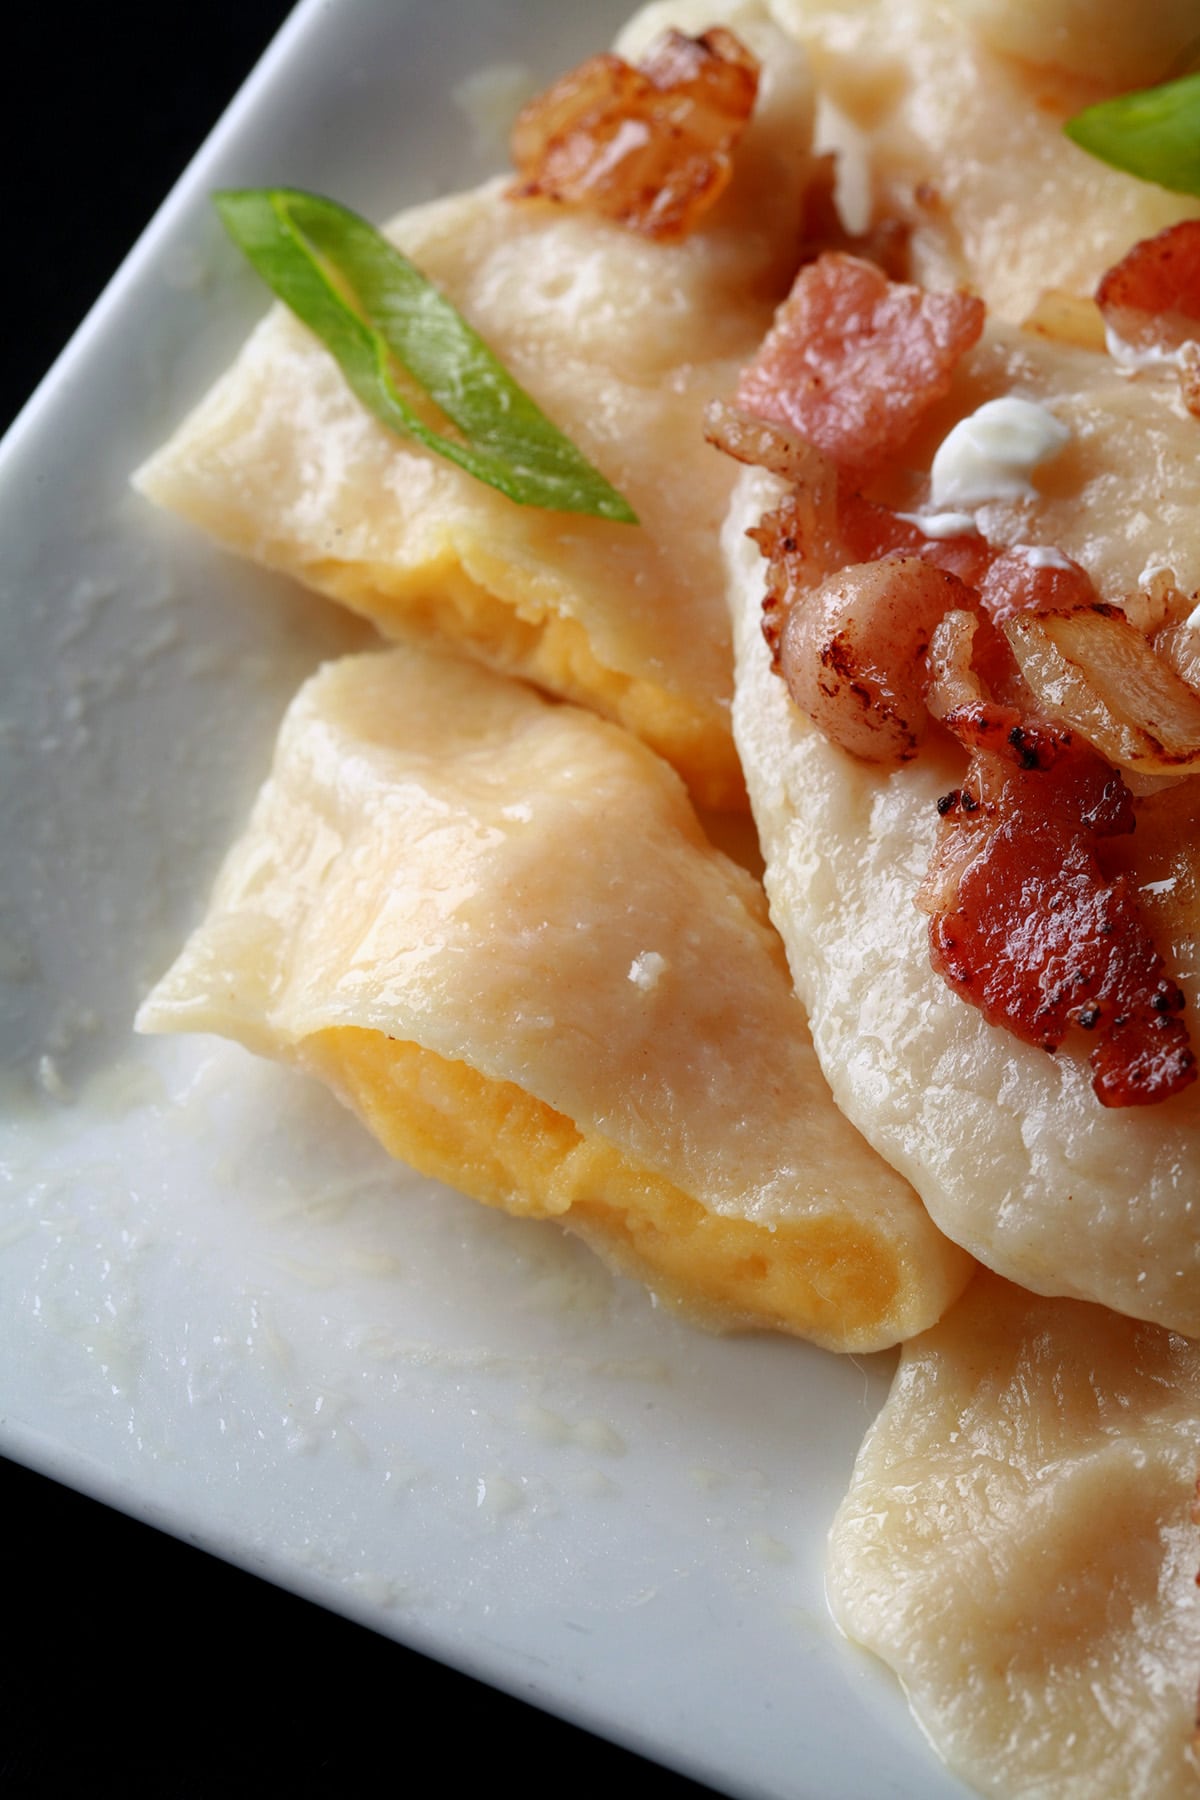
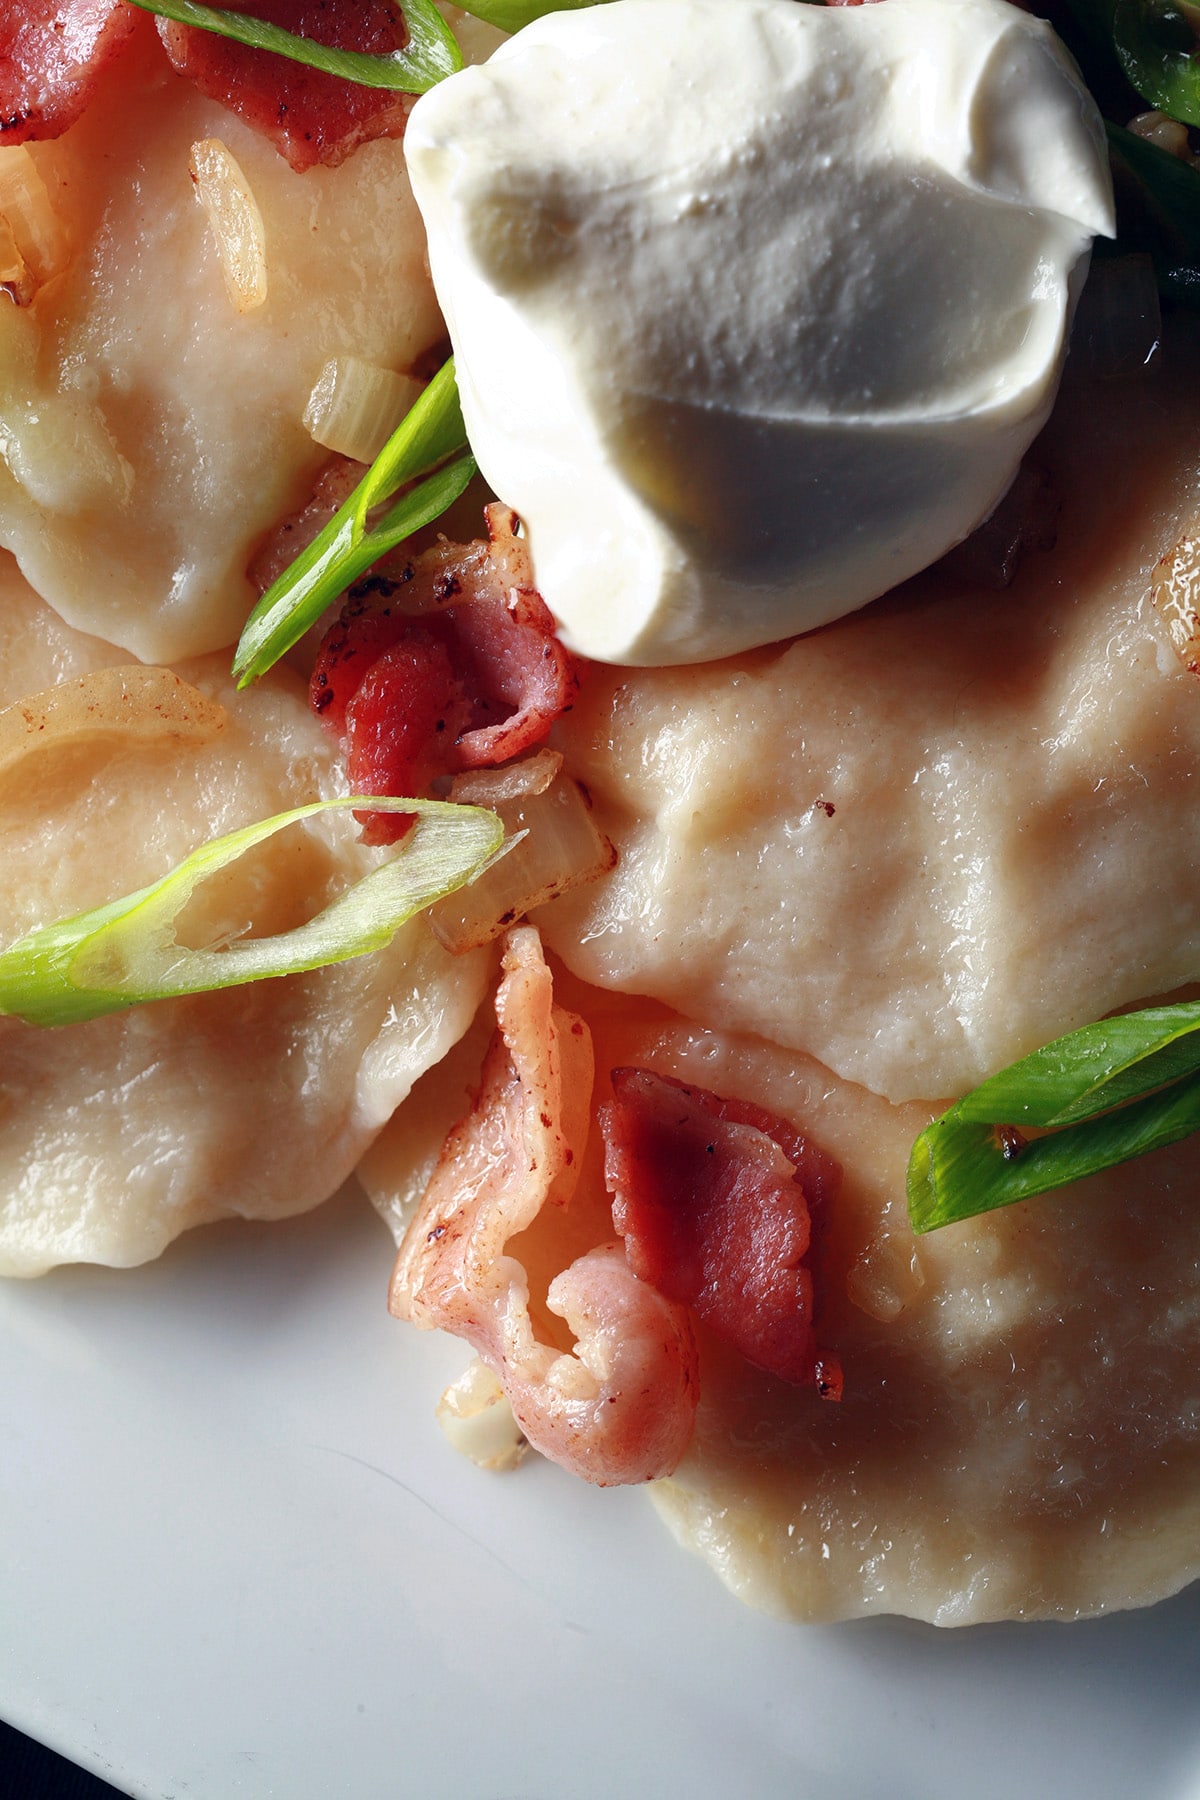
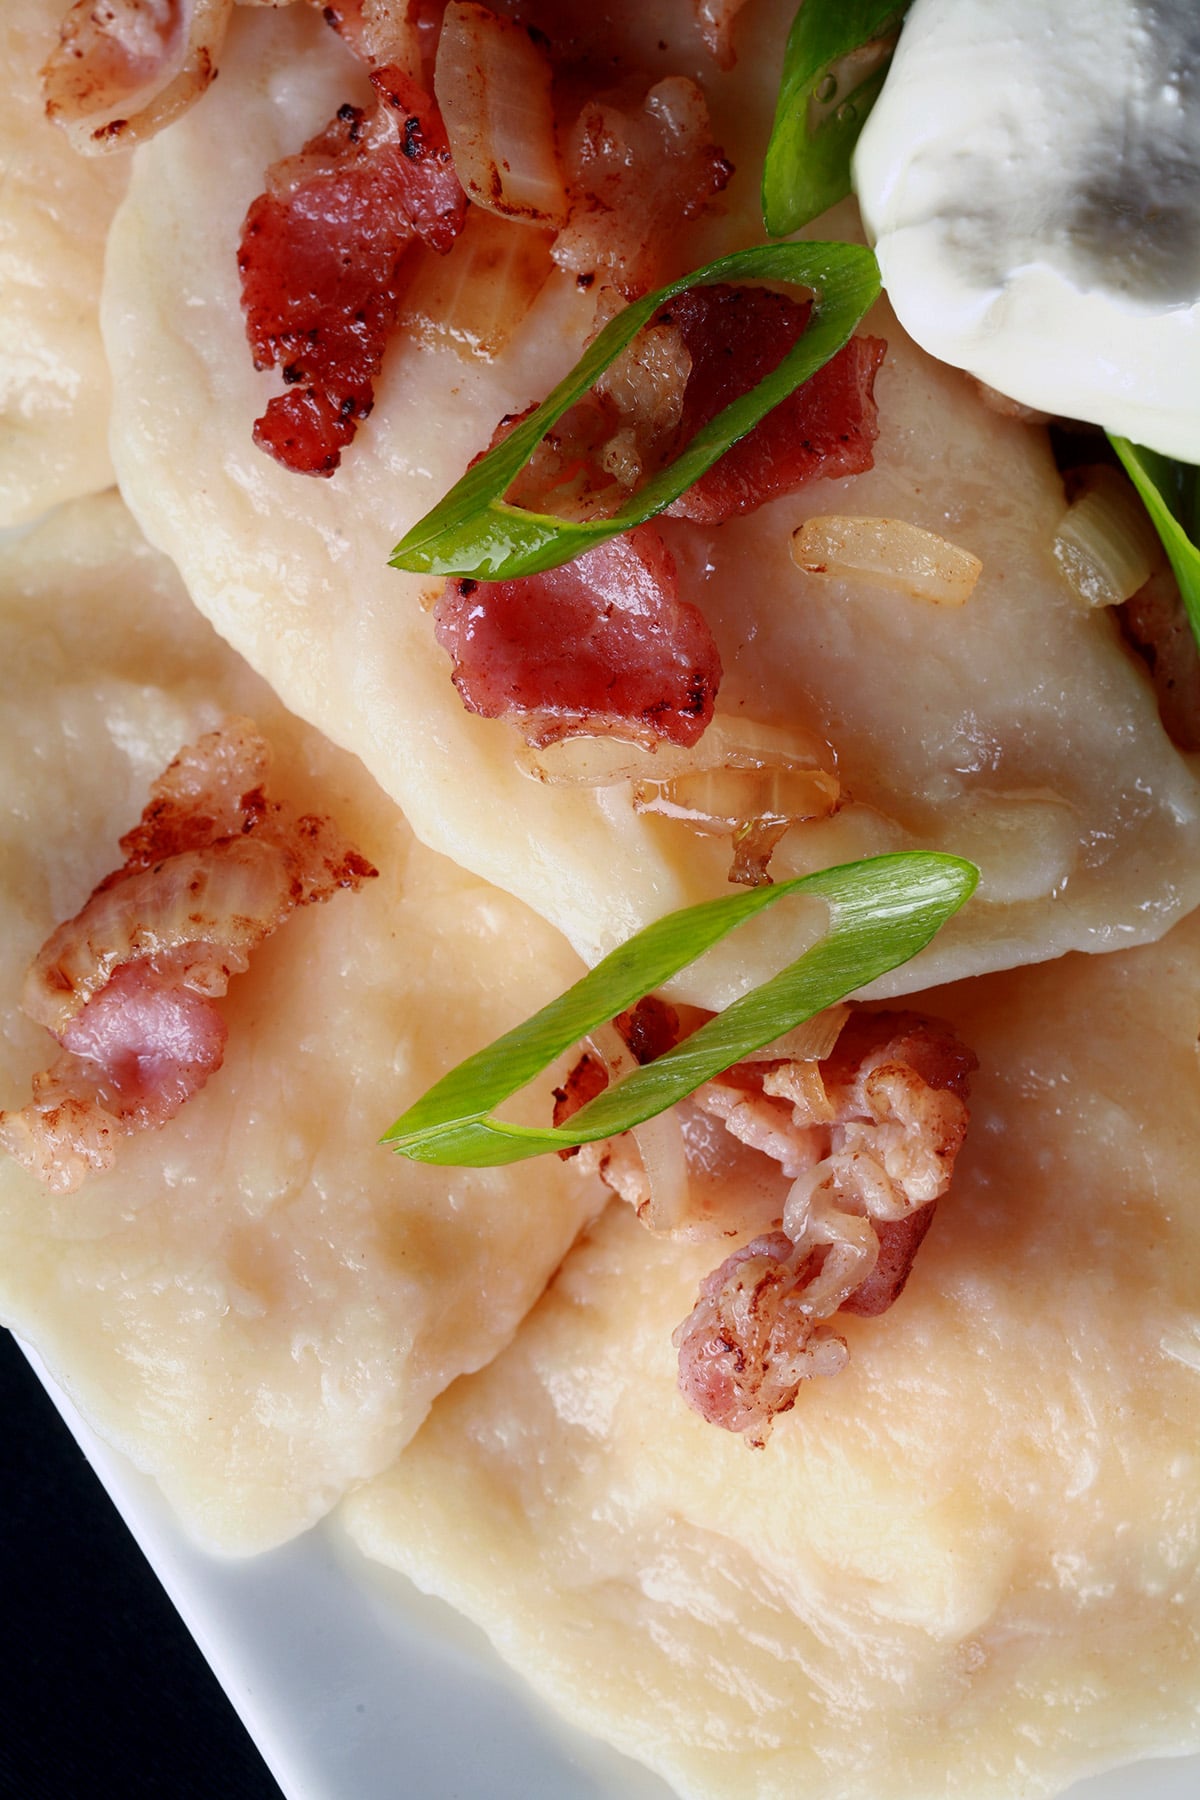
Onion, Bacon, and Cheese: Use 1.5 lbs cheddar cheese of your choice, 1 lb crisp bacon (crumbled), chopped or grated onion to taste.
Cottage Cheese Perogies : Add 1 lb dry curd cottage cheese to the potatoes.
Cottage Cheese, Onion, and Dill: 1 lb dry cottage cheese (or more, whatever!). Season with onion and dill weed to taste.
Sweet Potato Perogies: Roast 3-4 lbs of sweet potatoes. Add a little softened cream cheese - a brick or so - and season with whatever spices or fresh herbs you want.
Multiple Flavours: Divide part of your mashed potatoes into a separate bowl (or bowls!), flavour as desired.
How to Make Perogies
The full recipe is in the recipe card at the end of this post. If you’re an instructions-only person, feel free to skip ahead to the recipe.
If you’d like more of a pictorial guide - with some additional info sprinkled in - here we go!
Dough
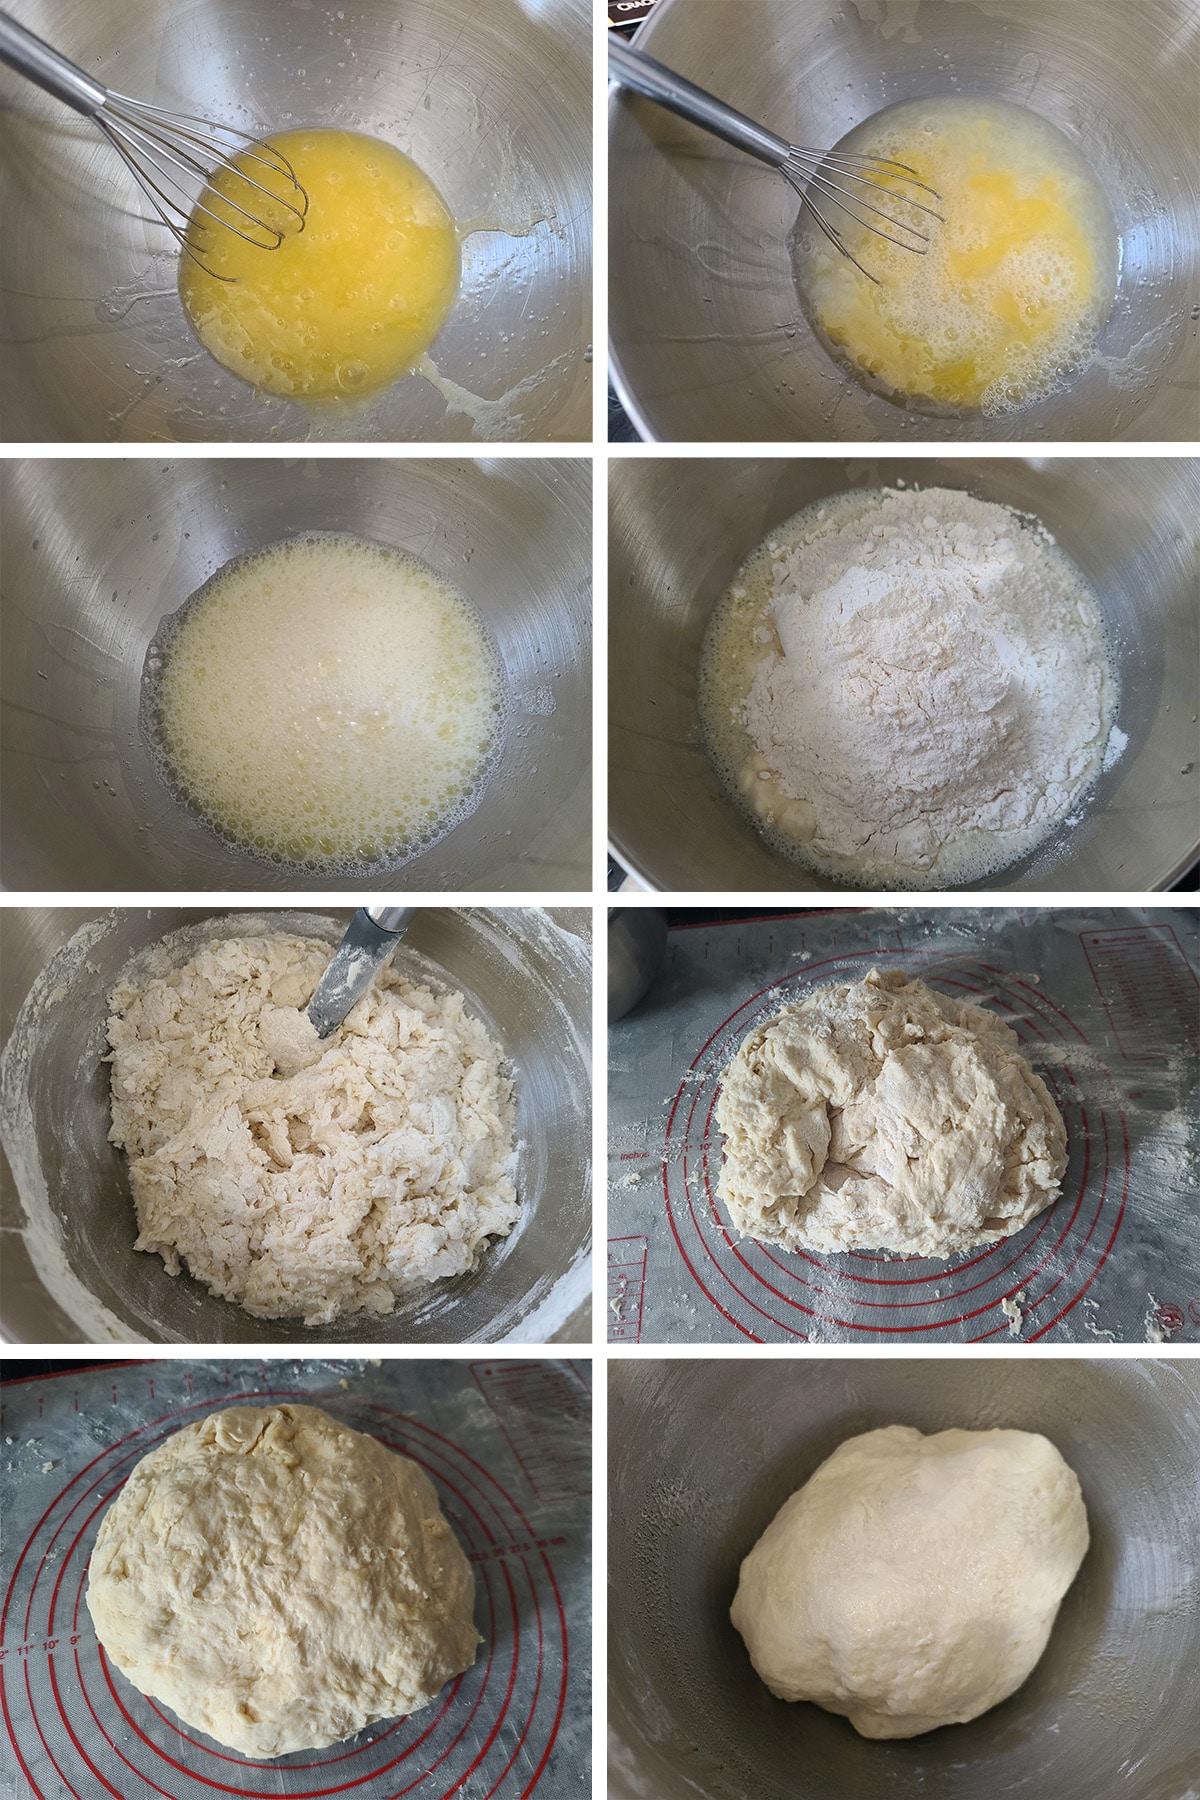
1. In a large bowl beat eggs, salt, and oil until mixed together well. Add water, beat again.
2. Add 5 cups flour to the wet ingredients, adding more flour if sticky.
You definitely want to go by feel here - if it’s too dry, add a little water. If it’s too sticky, add a bit of flour.
3. Knead until well incorporated, smooth, and stretchy.
This can take about 10 minutes to do by hand, or you can just use a dough hook in a stand mixer for about 5 minutes.
4. Cover bowl with plastic wrap and let rest one hour. This relaxes the gluten in the dough, and helps ensure the best results.
Don’t skip this step!
While waiting, work on filling!
Pierogi Filling
1. Peel potatoes, chop into evenly sized chunks.
2. Boil potatoes until fork tender and ready to mash. Drain well, place potatoes in a bowl.

I like to use my KitchenAid to mash my potatoes in general, and it works doubly well for this. A food processor or potato ricer are other great options.
You can, however, always mash and mix by hand - it’s just personal preference.
4. Either way, mash potatoes until smooth, and mix in your choice of cheese and flavorings (See “Variations”, above) until you have a creamy potato filling.
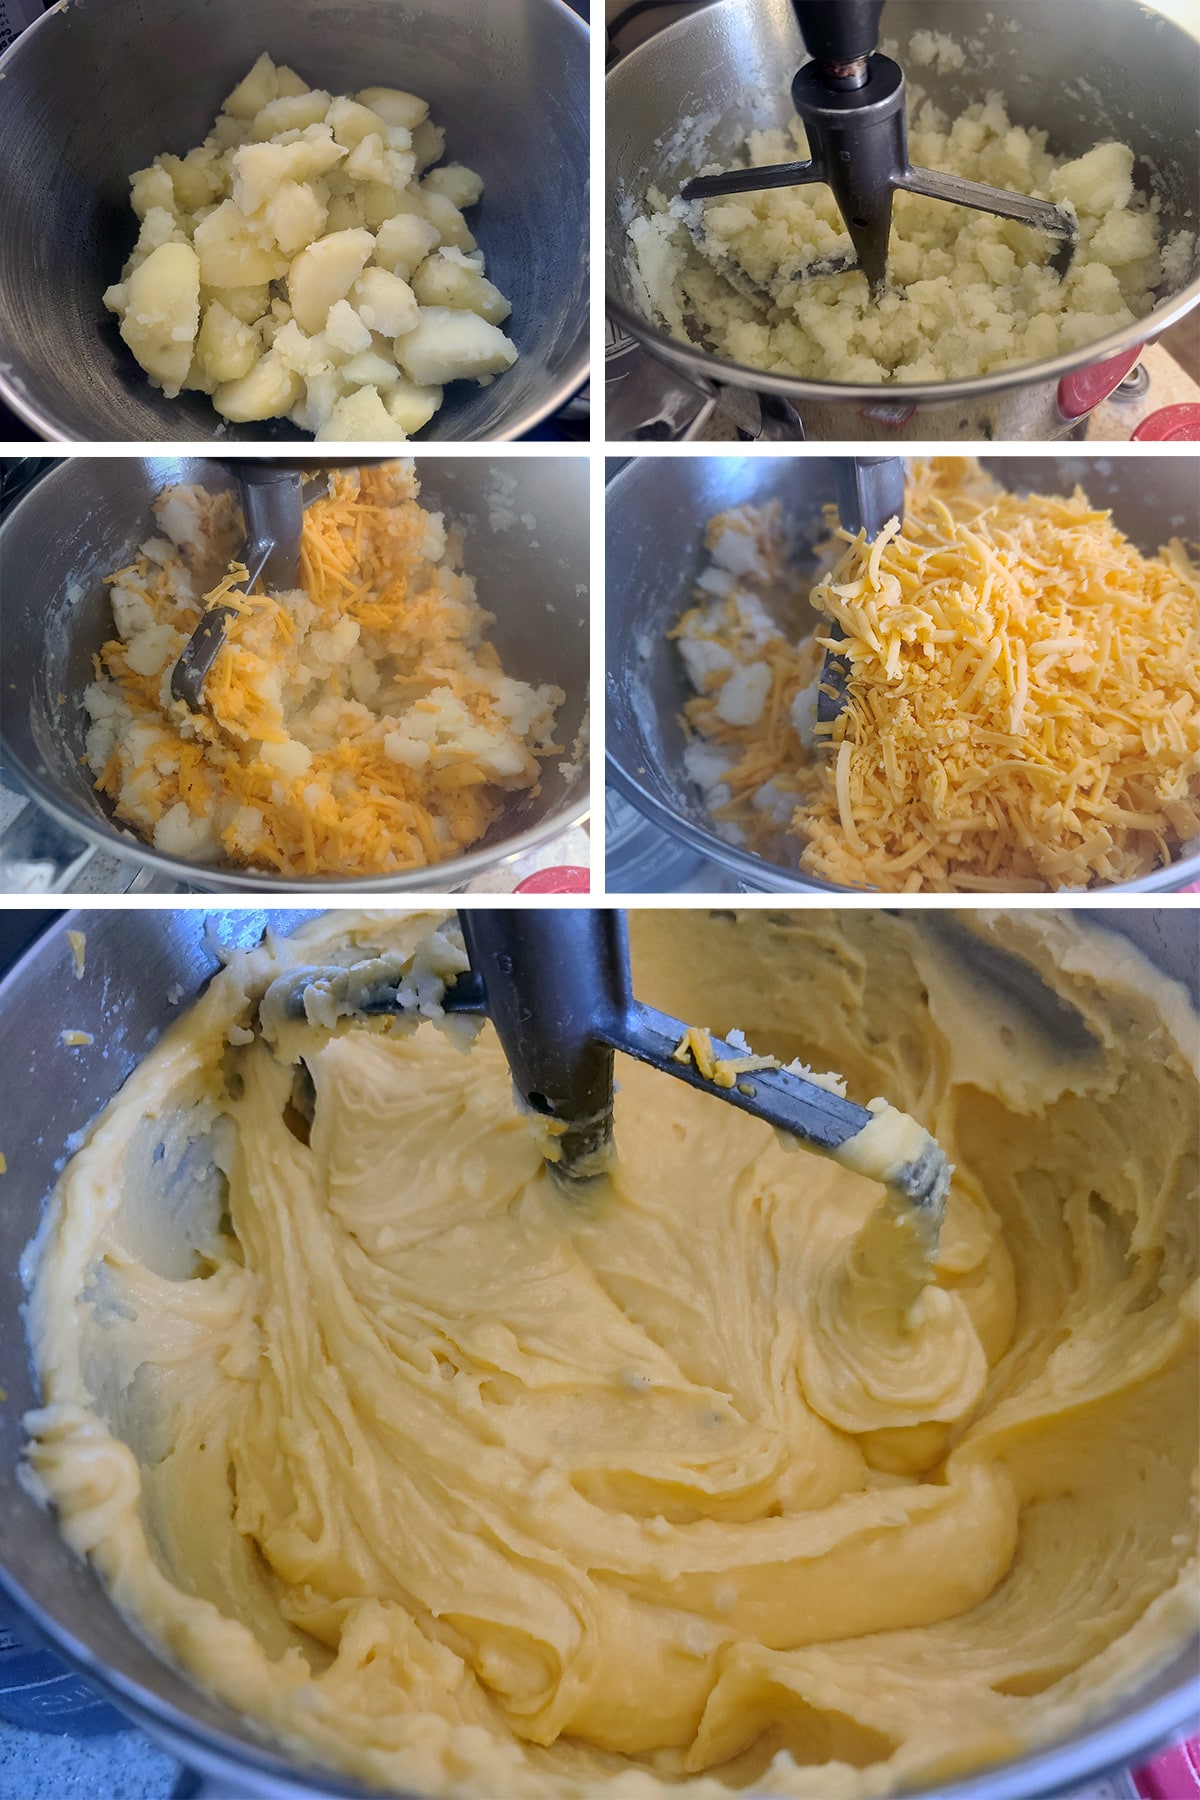
The Cheesy Potato Filling.
5. Allow to cool to room temperature. This will firm it up and make it easier to roll into balls.
Perogy Assembly
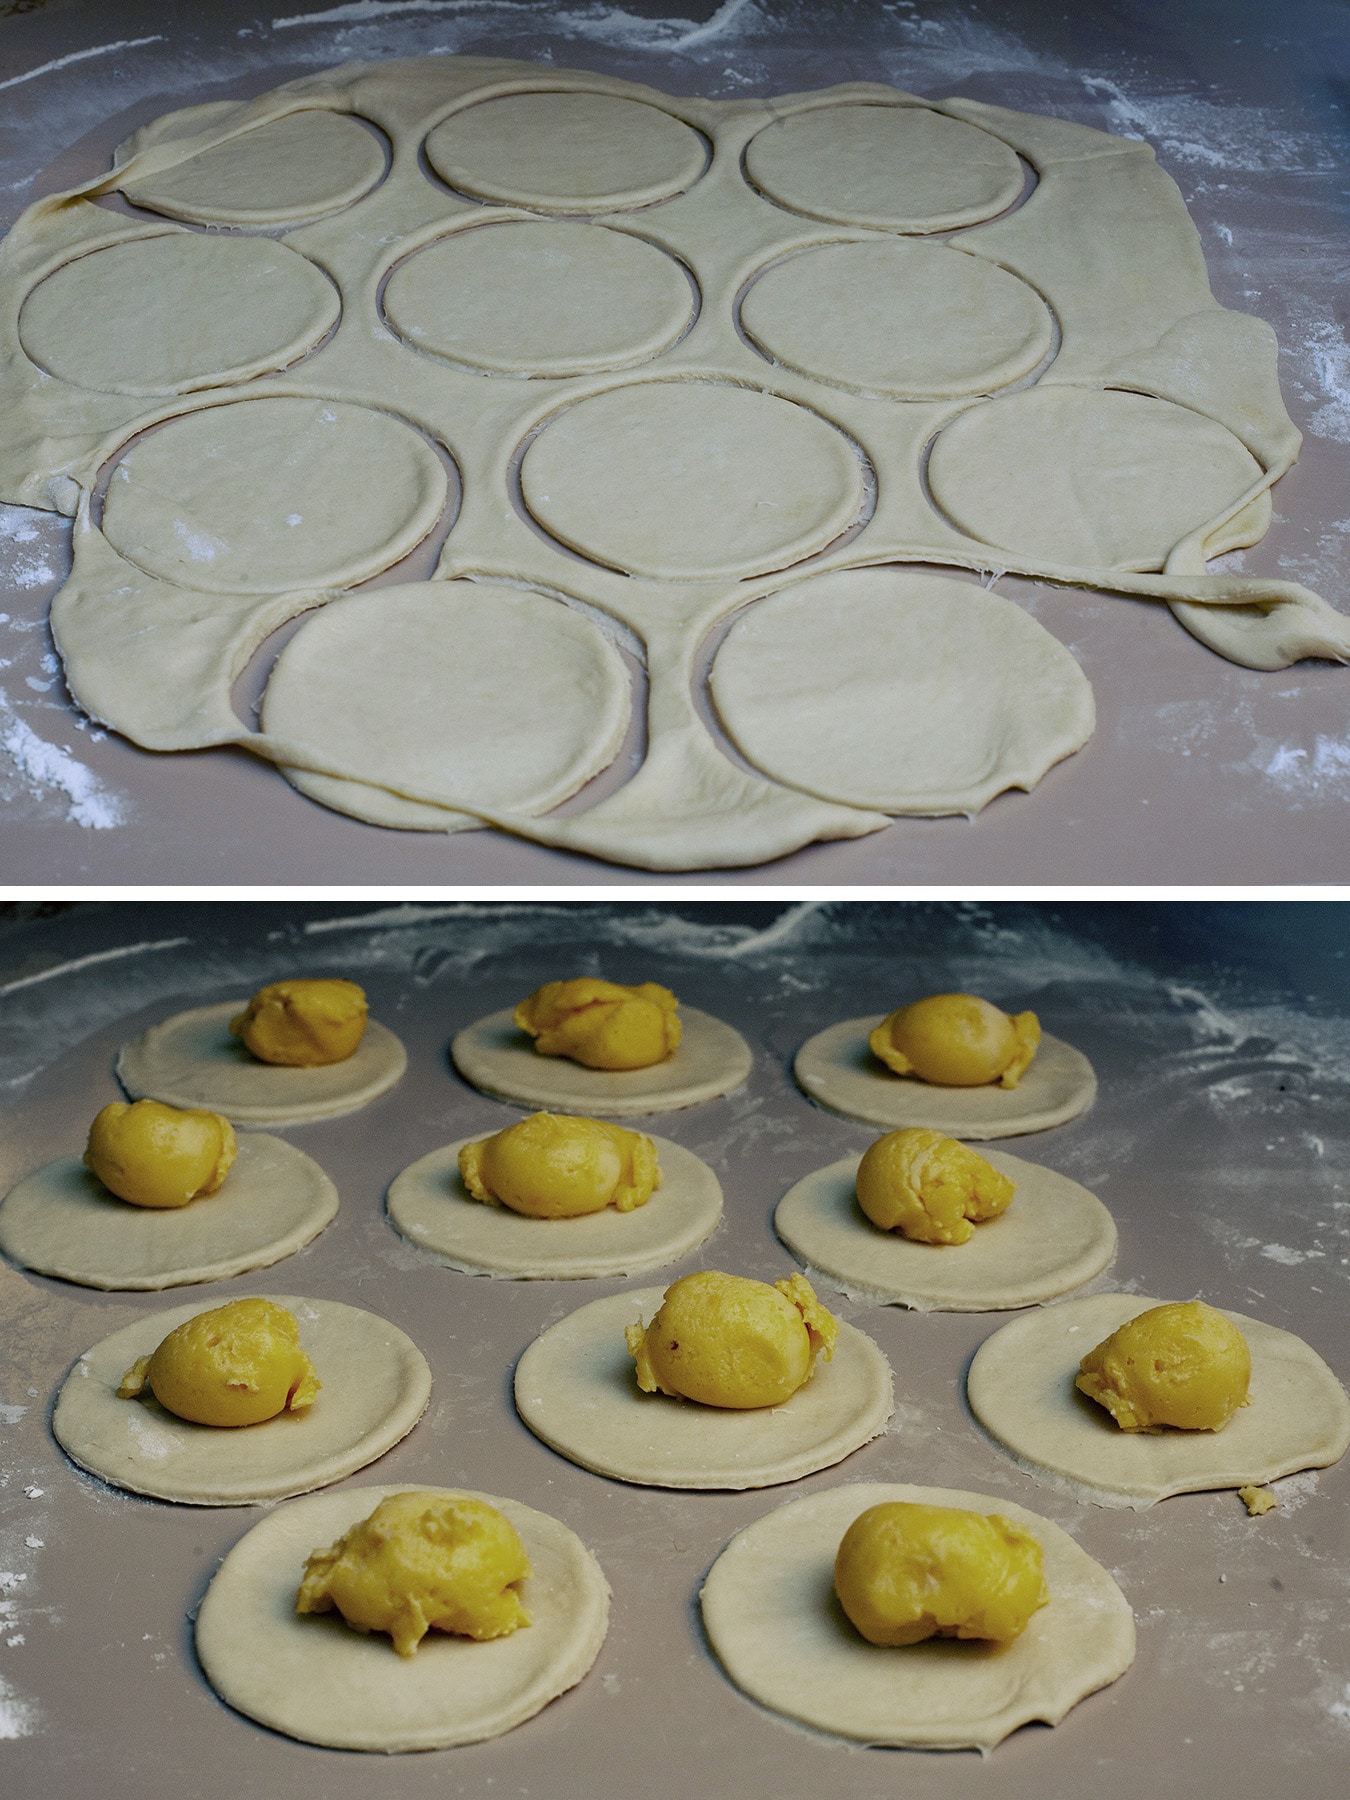
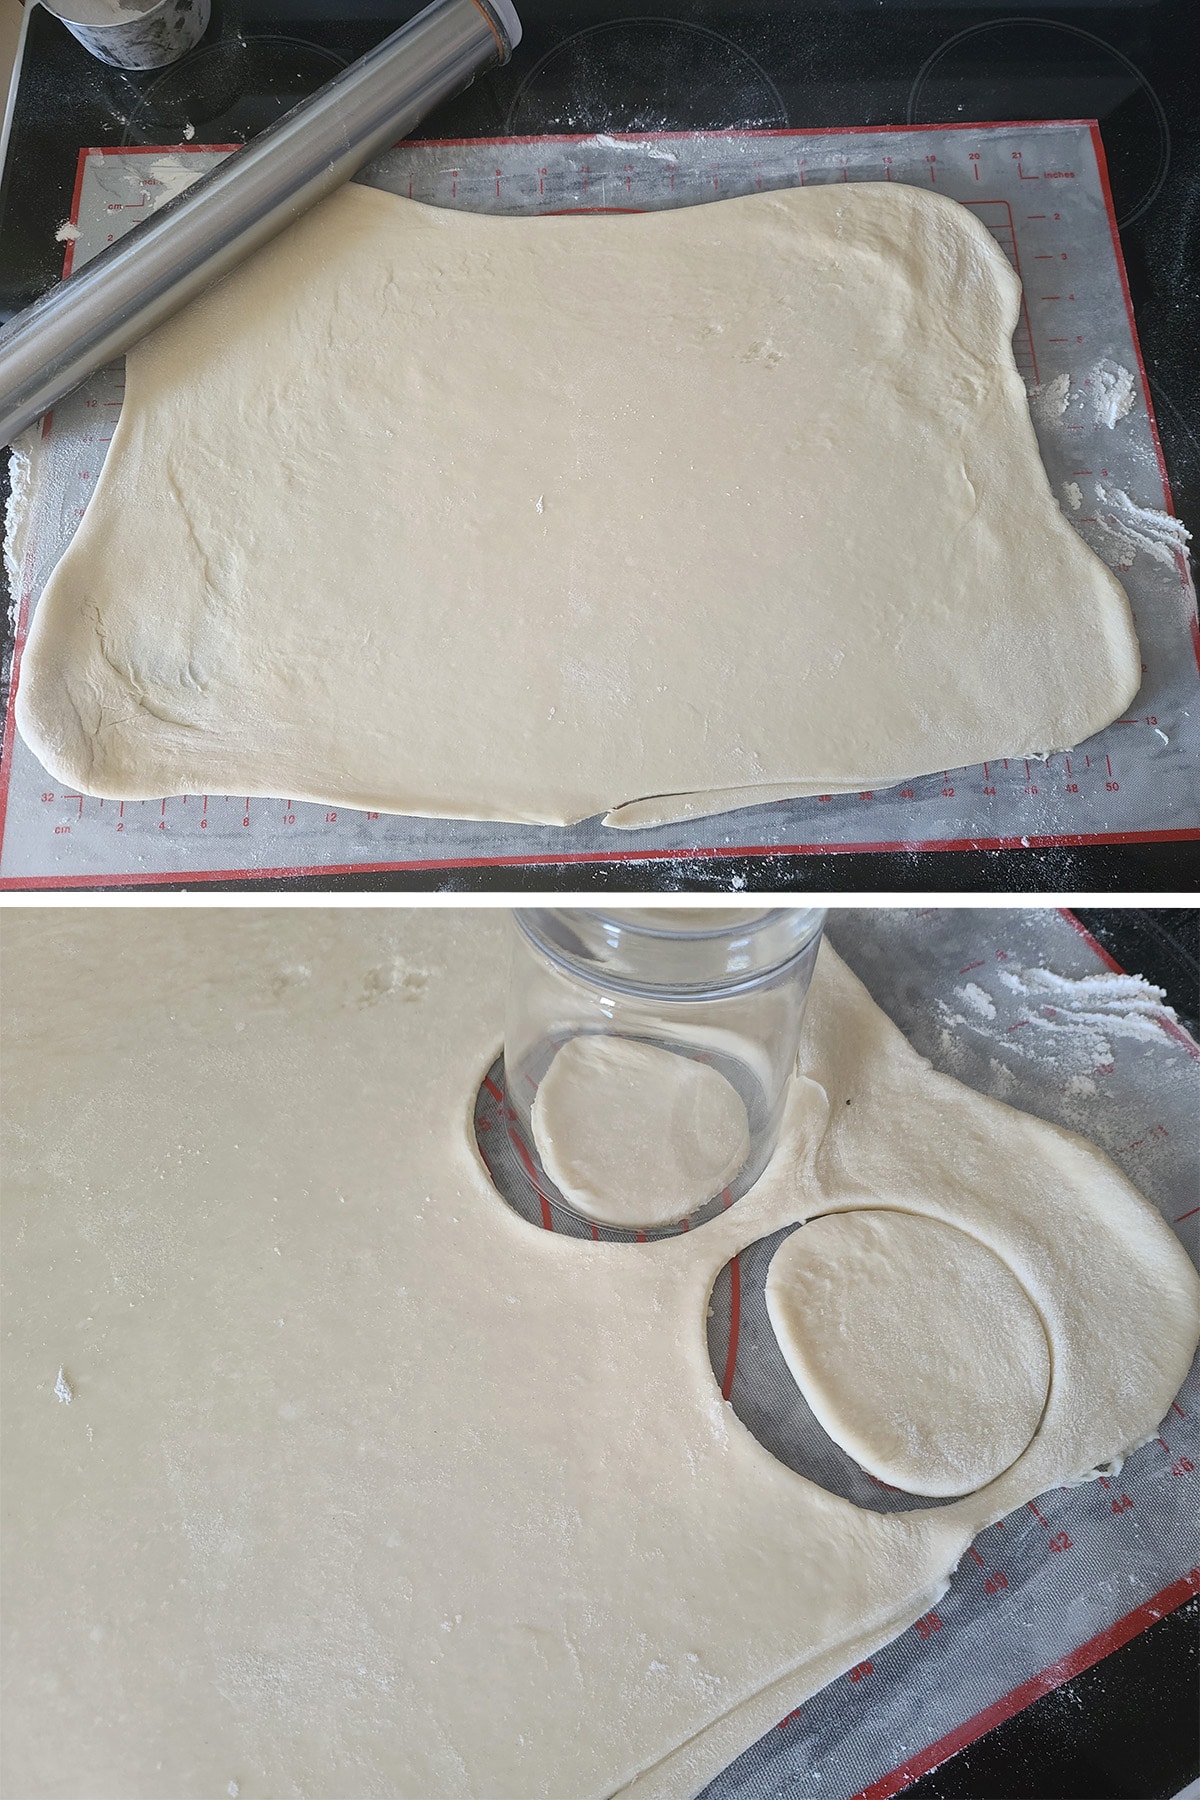
1. Roll out dough on lightly floured surface. Aim to get it pretty thin – 1/16th – ⅛″ of an inch or so.
When you’re first starting out, a bit thicker is ok – you’ll just have a bit more dough to bite through to get to your yummy filling!
2. Cut dough with large glass or round cookie cutter / biscuit cutter – I like to use a glass that’s about 3″ in diameter.
3. Place 1 tablespoon of potato mixture / filling in the center of each circle. (Hint: You can pre-roll balls while waiting for the dough to rest!)
Note: If your dough is a little sticky, you may not need to brush it with water. In the video for this post, I didn’t need it.
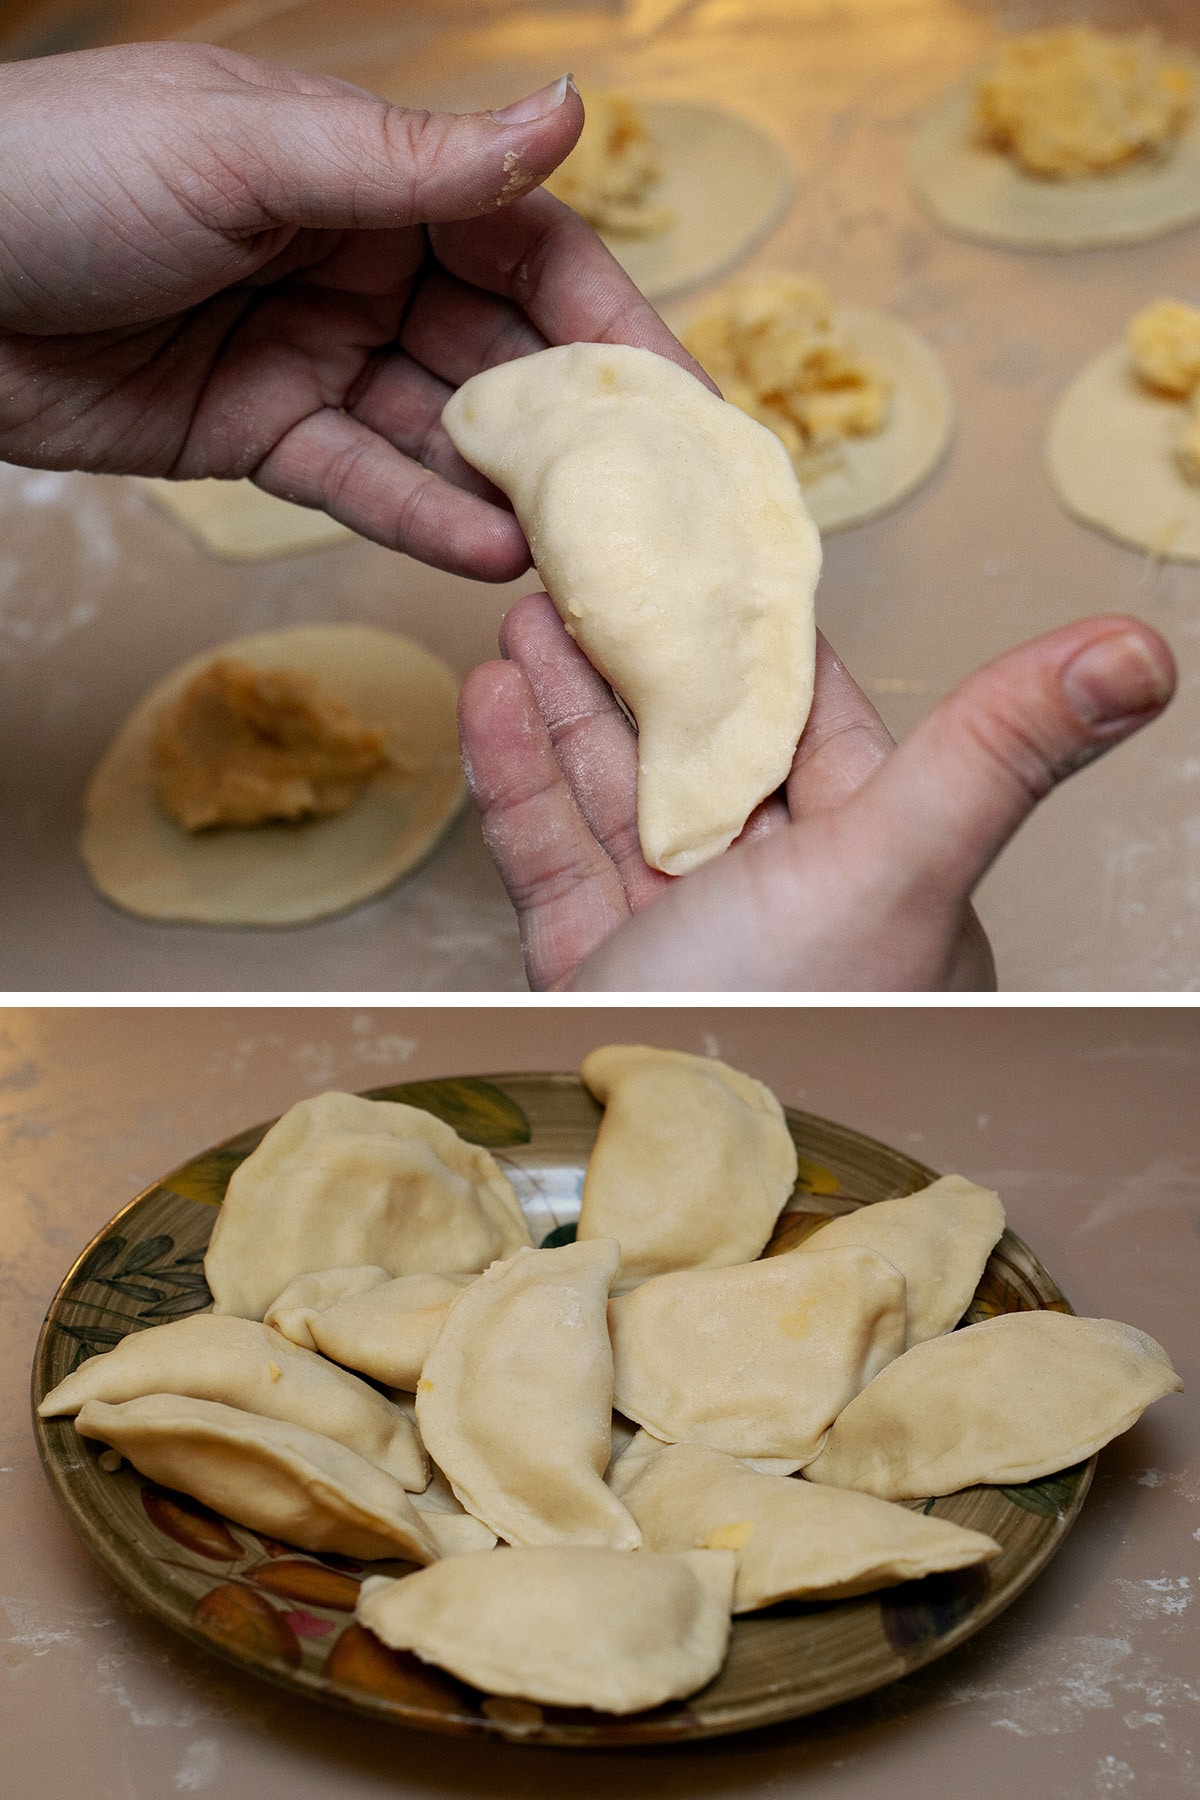
5. Pick 1 round up in your non-dominant hand, and use your good hand to fold the dough around the filling, sealing the edge from one side to the other, forming a half-moon shape dumpling.
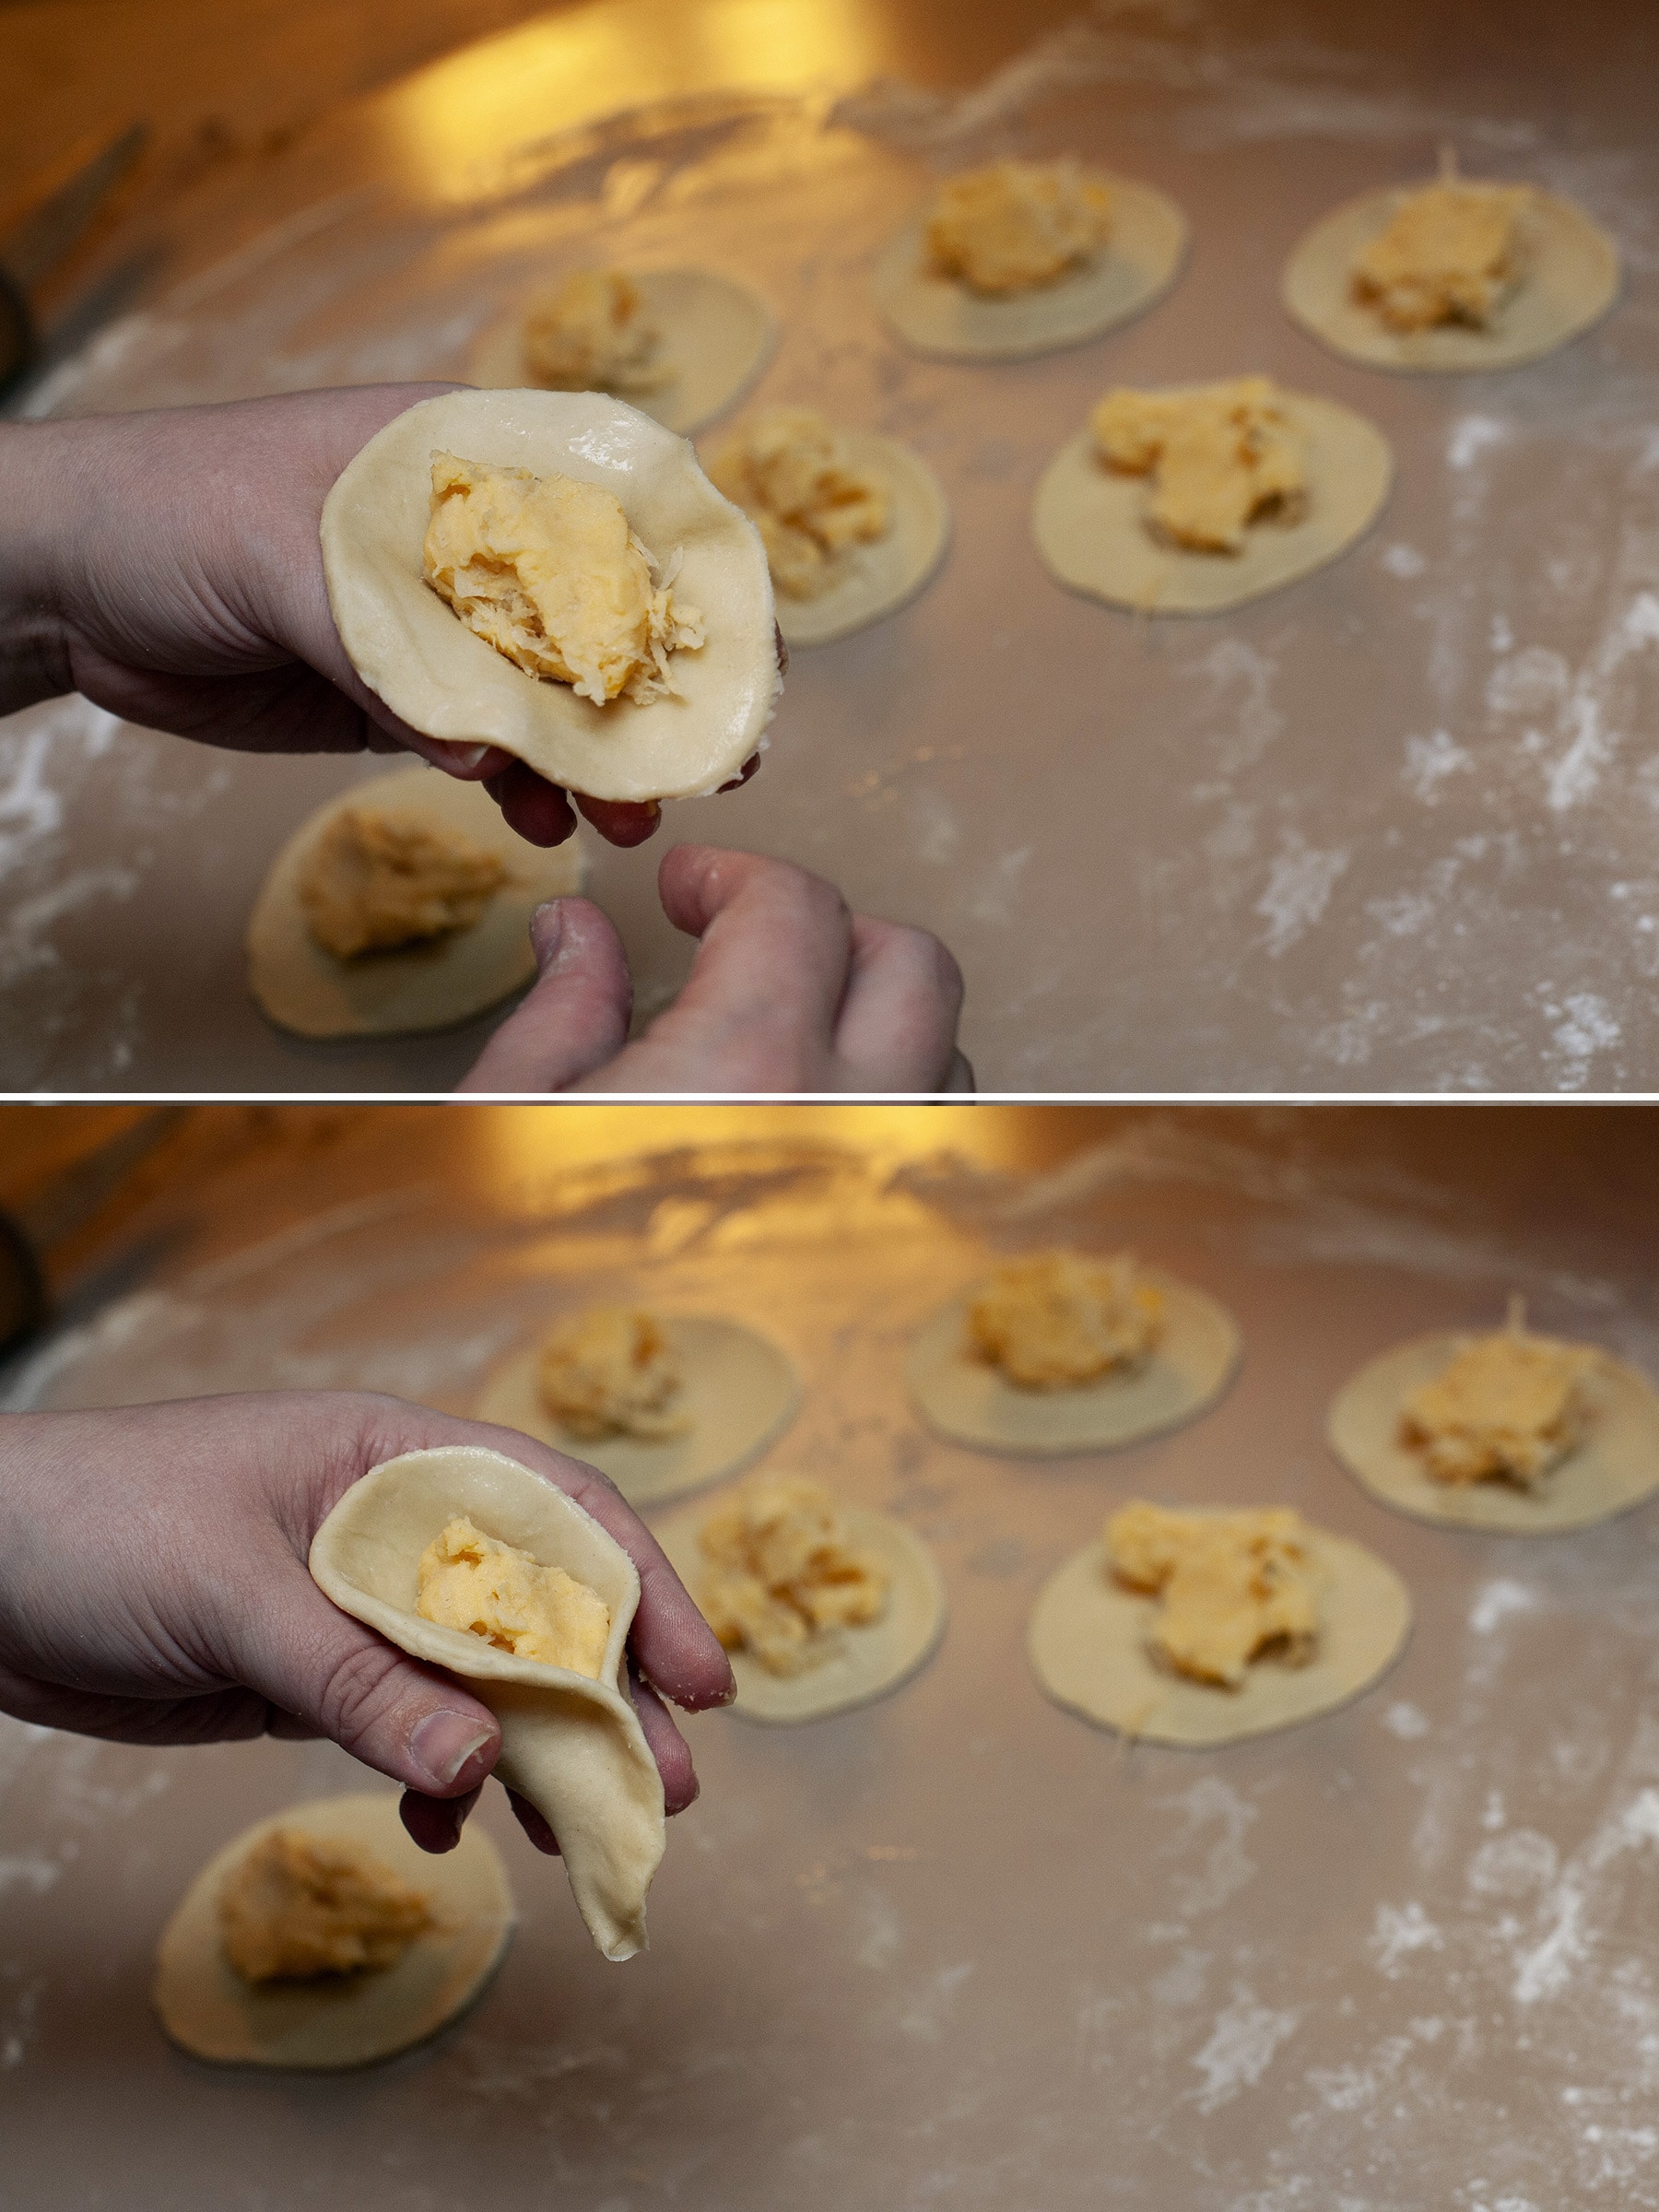
Make sure your perogies are sealed well, or they will open and leak out when you cook them!
Note: I like to assembly line this - roll, cut a bunch of circles, place a bunch of filling balls, then seal them up.
I find it more efficient than scooping filling and folding one at a time.
Repeat with the rest of the dough, until you run out of dough, filling, or both.
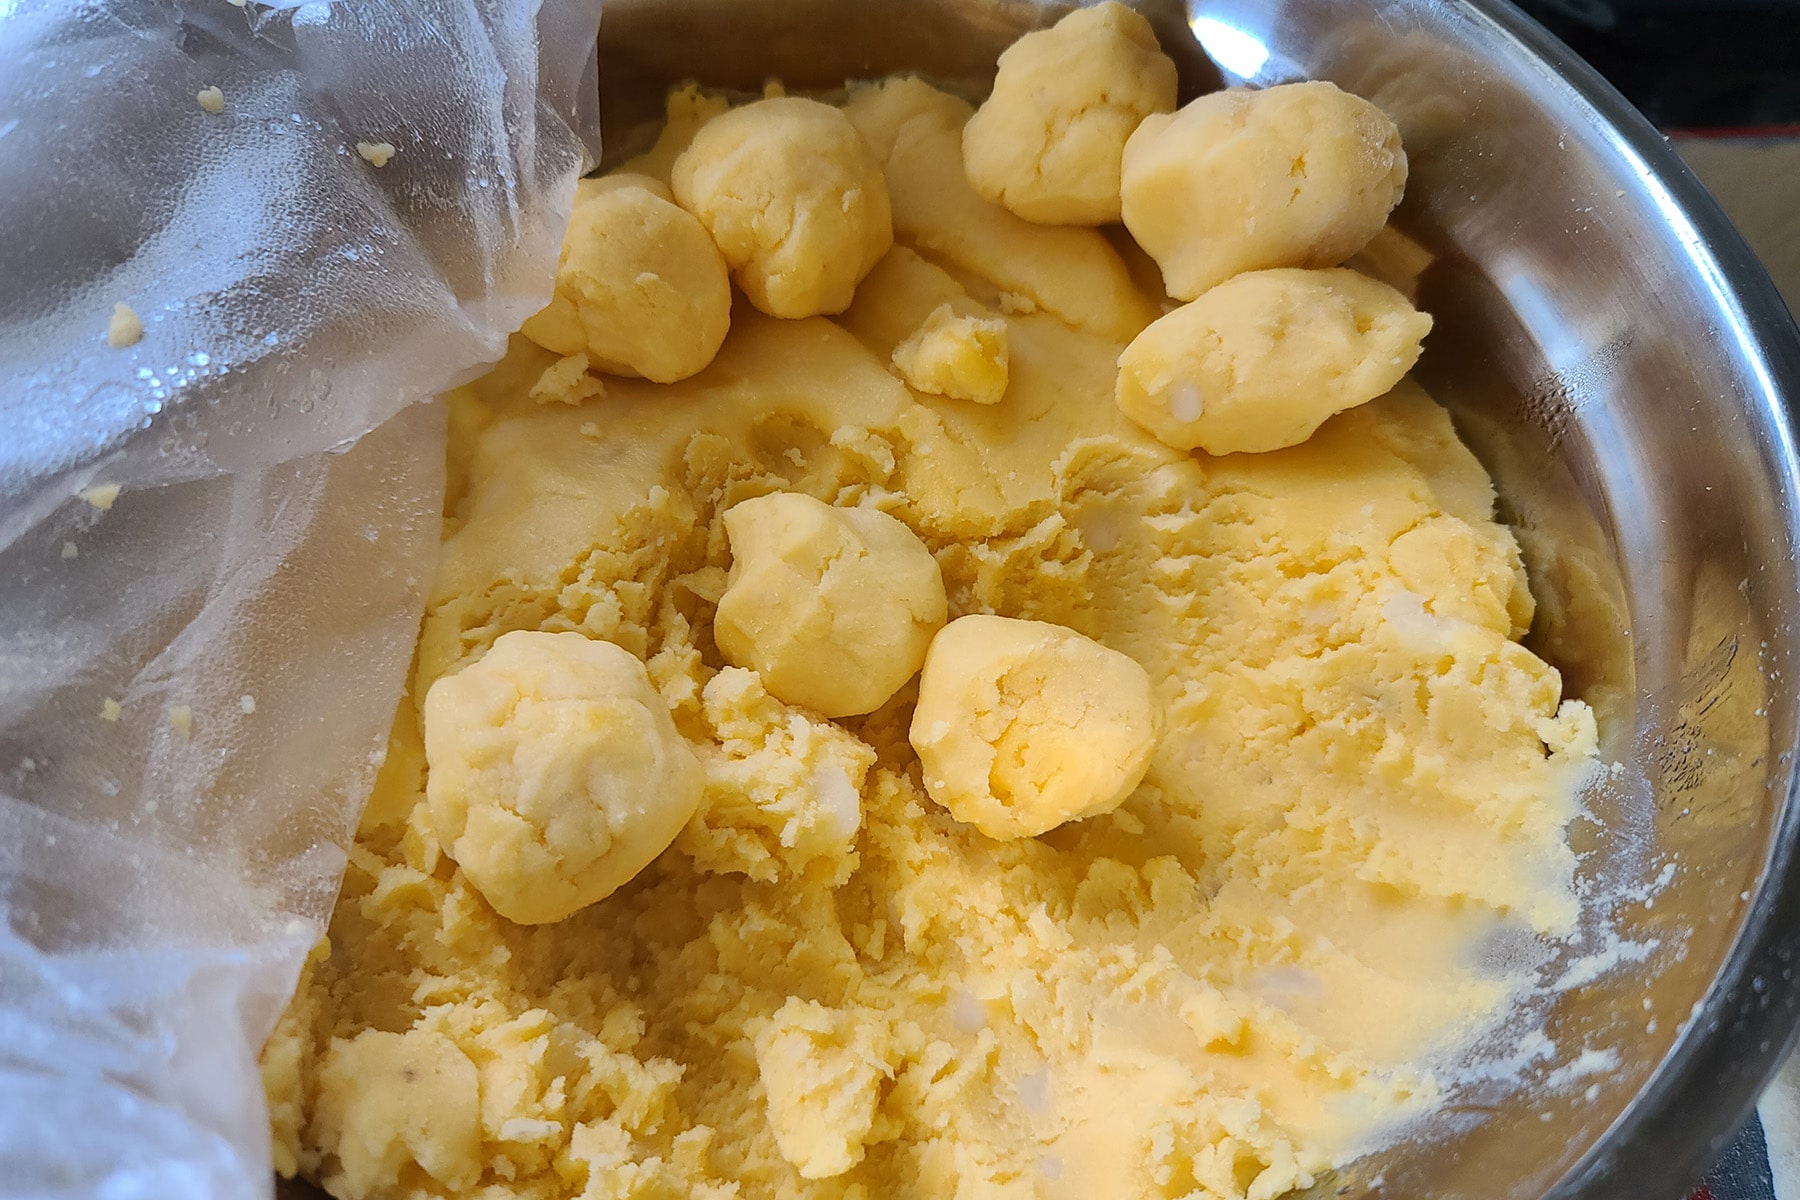
I like to pre-roll a bunch of 1" balls of filling, before rolling the dough.
How to Cook Pierogi
1. Have a large pot of salted water heated to a low boil. (Too rough of a boil will rip your perogies apart!).
I’ll usually bring the large pot of water to a boil over medium-high heat, then turn it down to medium heat or low heat.
2. Place perogies in the hot water a few at a time – our pot can take about a dozen.
They’ll sink to the bottom of the pot, then rise to the surface as they cook.
3. Cook until pierogi float to the surface, then for 2-3 minutes longer.

5. Serve immediately, or transfer buttered pierogi to an airtight container and store in the fridge.

Grandma’s Note on Forming Perogies
Grandma is very adamant that this is time consuming (wasn’t really!), and that – rather than cutting the dough into rounds, taking the scraps, and re-rolling/cutting more – I should DEFINITELY use her technique.
I didn’t. Sorry, gramma!
What she says you should do is this:
- Roll your dough out, and cut into 3″ strips.
- Cut those again into 3″ squares.
- Place filling in the middle of each square.
- Fold/seal them to make triangles.
Yes, it would be quicker than the rounds – I just don’t have the big hatred for cutting rounds that she seems to!
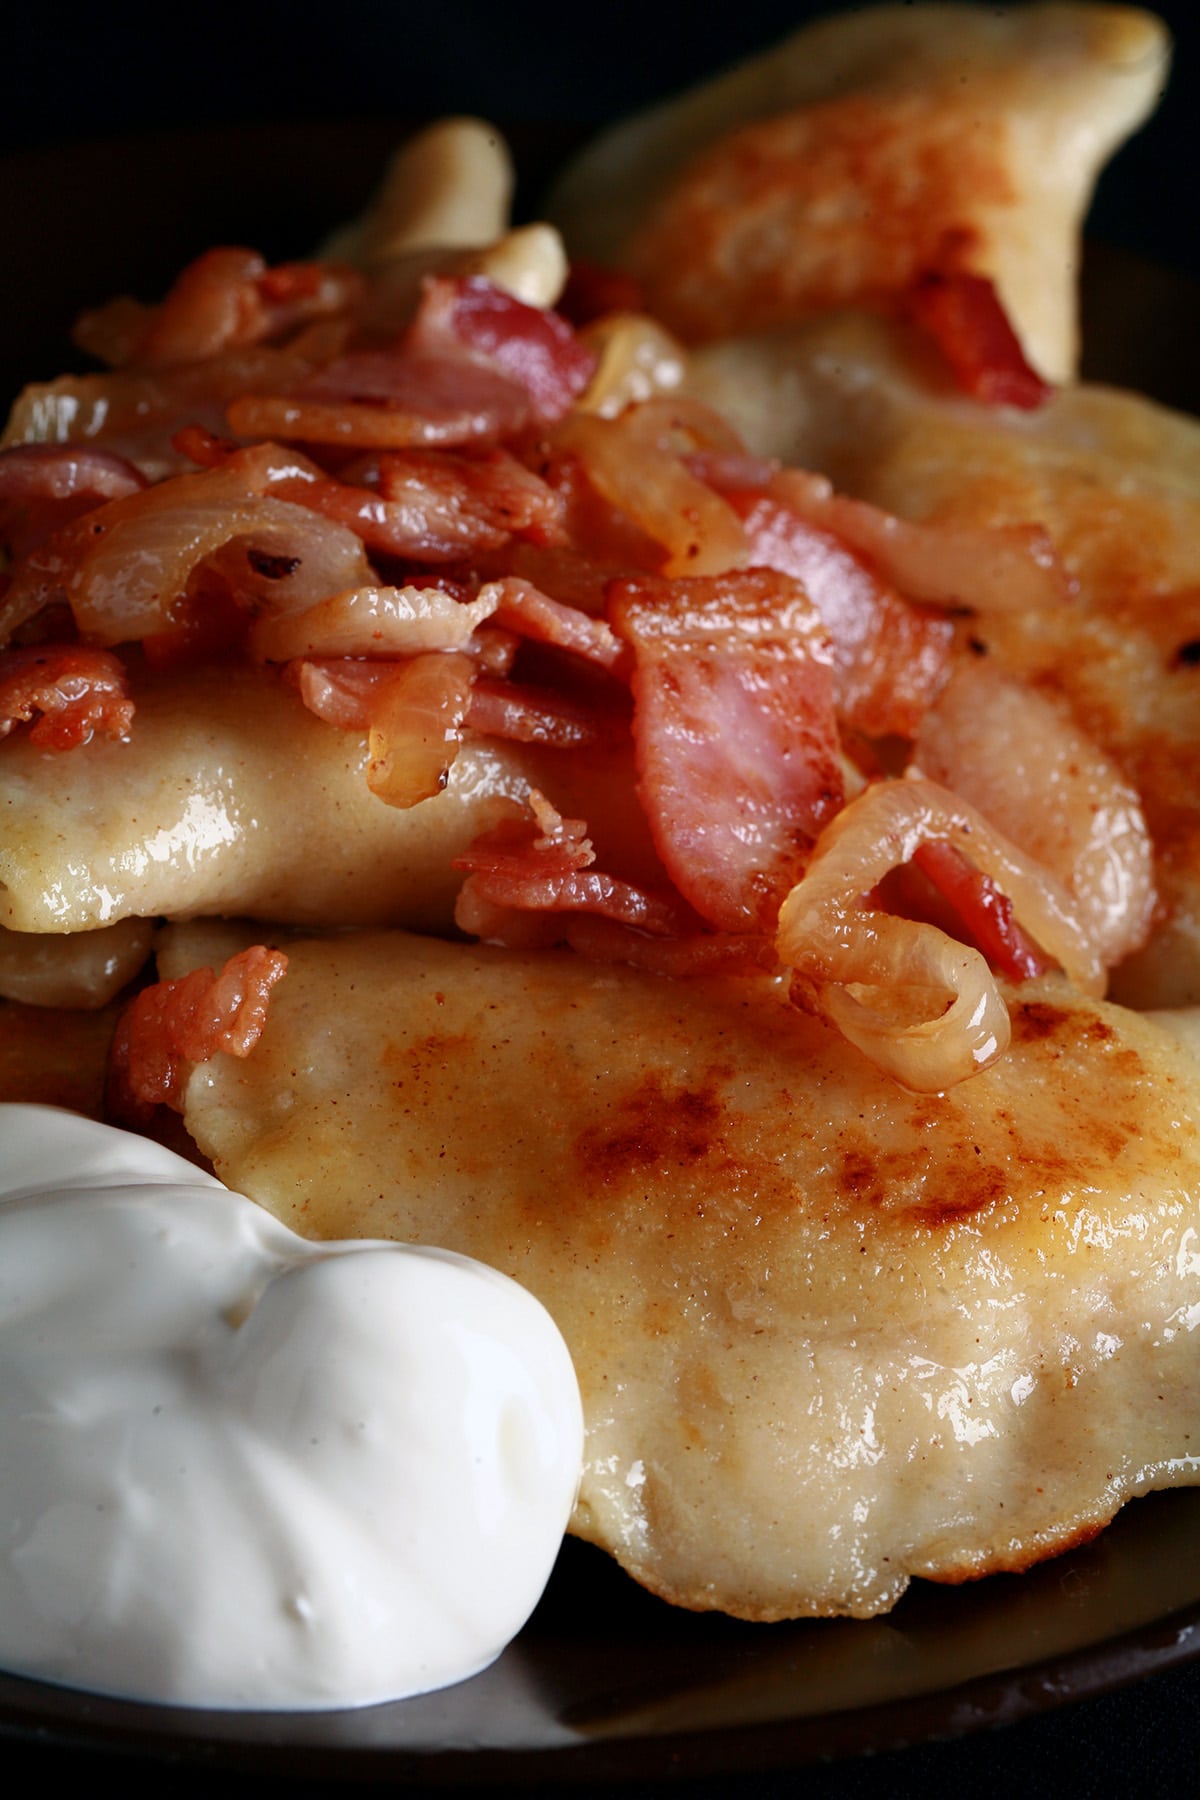
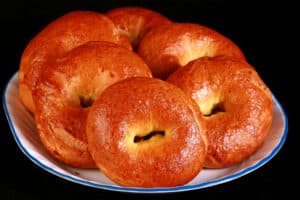
Pan fried with bacon - yum!
How to Cook Perogies
You can enjoy these as-is: Fresh out of the pot, tossed with a bit of melted butter... or you can keep going.
These are also great pan fried in a bit of butter or bacon fat.
Sauteeing chopped onions in the bacon fat before adding the perogies to the pan is *chef kiss*.
Alternatively...
Deep Fried Perogies
Deep fried, crispy pierogi are huge back home, especially as a snack at sporting events. (I used to get them at my home arena, as a kid!).
To deep fry, heat your deep frying oil to 375 F.
Carefully add your perogies - after boiling / draining / being tossed in butter - to the hot oil. Fry until golden brown and blistery.
Air Fried Perogies
A while back, we did a big experiment to come up with the best way to cook airfryer perogies.
Click that link to read alllll about it!
What to Serve with Perogies
Wondering what to eat with perogies? Well, it’s best to keep things pretty simple.
Adding some sliced Kielbasa sausage or crispy bacon is pretty standard back home.
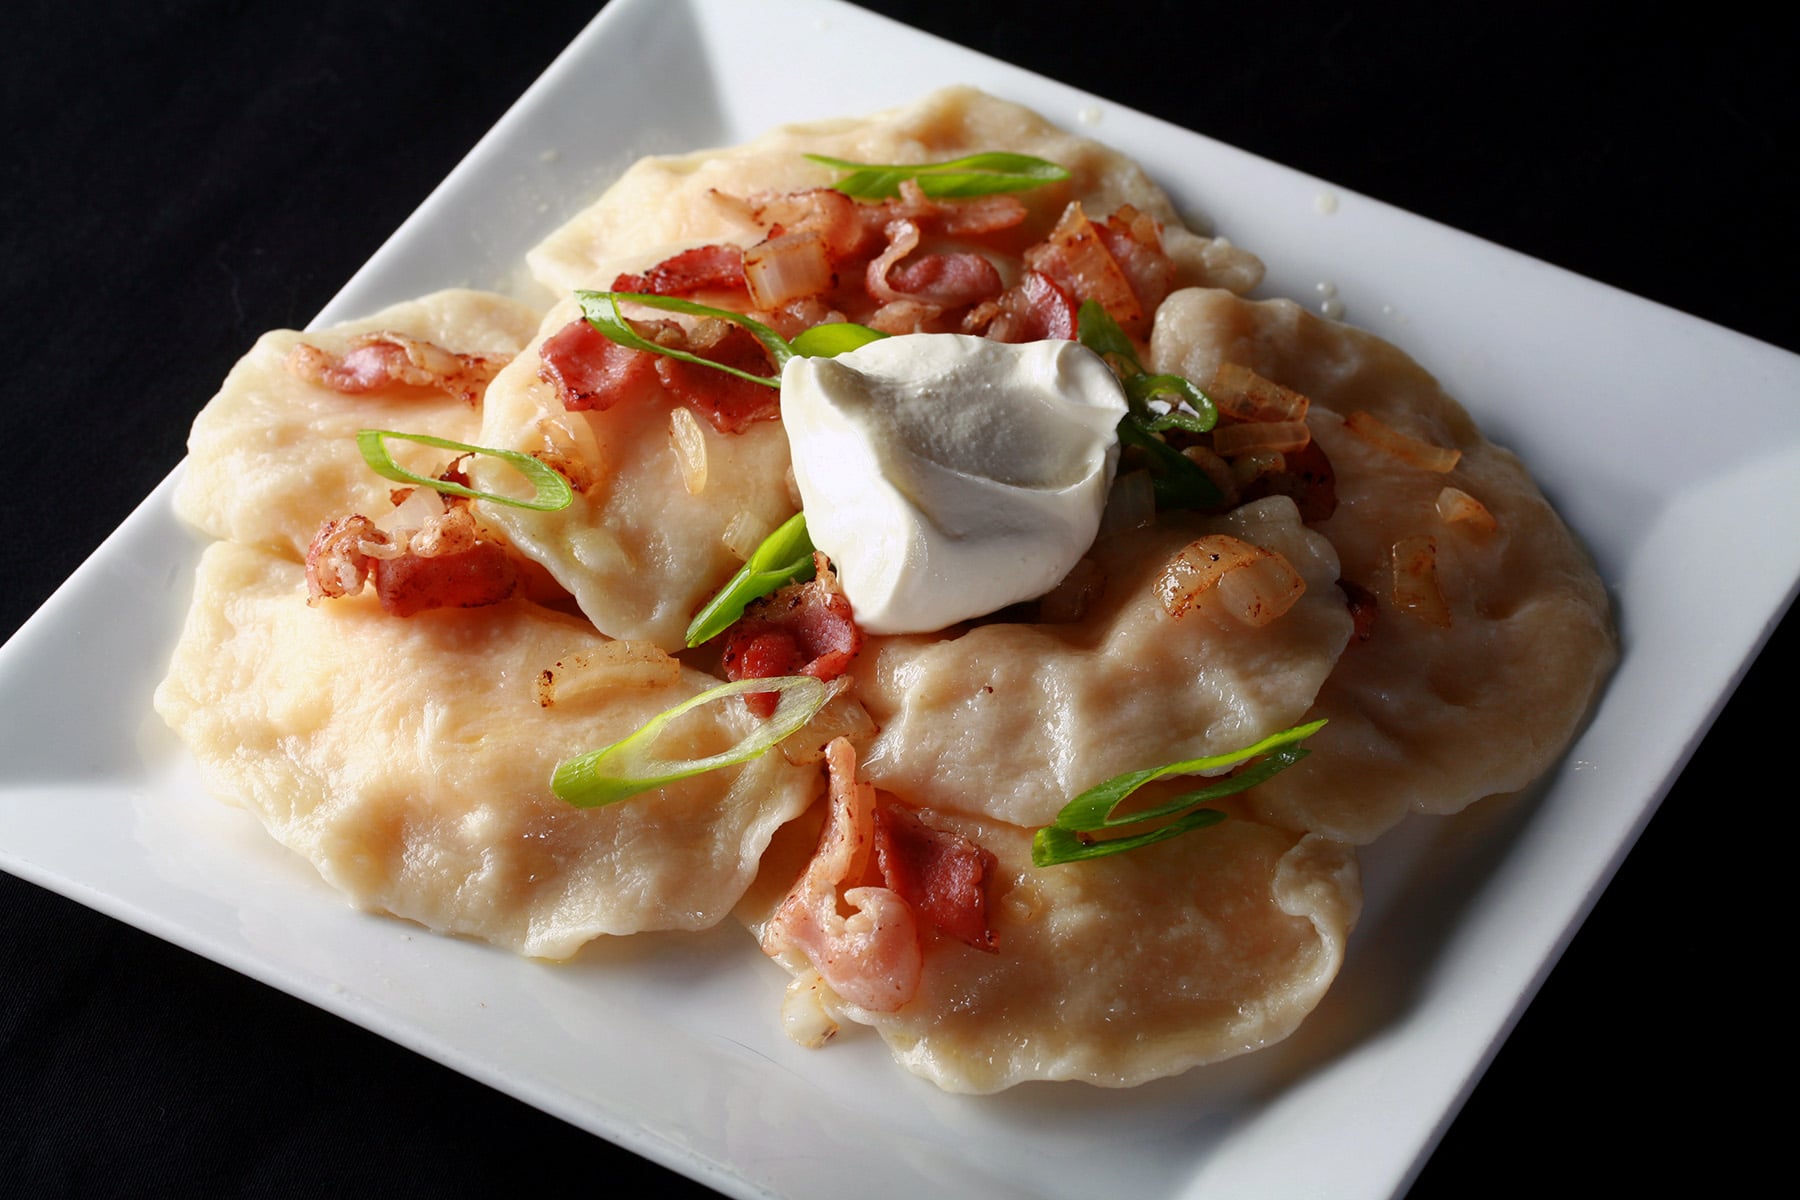
Serve it all with a generous dollop of sour cream (or Greek yogurt), maybe a side of sauerkraut and/or some caramelized onions.
I usually toss some sliced green onions on it - after plating - for a bit of colour and a punch of bright flavour, but that’s totally optional.
Brussels sprouts are a great option - I’ll usually cut them in half, toss with a bit of olive oil, salt, and pepper, and roast them at 400F for 15 minutes or so.
It’s one of our favourite savory side dishes in general, and definitely makes a plate of perogies feel a little healthier!
We’ll do the same with fresh broccoli florets, too.

Using Gadgets to Make Perogies
Waaaaay back when I was a kid, we had this perogy press thing.
It was a plastic circle with little ... not half circles, maybe more like half hexagons? Cut out of it.
The idea was that you’d roll you dough, place it over this thing, and put your filling in each of the indents.
Then you’d roll another piece of dough, place it over the whole thing, and use a rolling pin to seal it.
Rolling would also press the mass of perogies down over the edges, which would separate them into individual perogies, which would them pop out.
That sort of thing is still available, if that’s more your speed.
These are about the same amount of work as forming by hand - the rolling, cutting, and adding filling is all done the same - but result in a prettier edge.
Freezing Homemade Perogies
Theoretically, you can freeze these.. but unless you make several batches (or don’t really like perogies!), they’ll likely never make it to the freezer!
How to Freeze Homemade Pierogis
- Arrange perogies (raw OR par boiled and blotted dry) on a parchment lined baking sheet. They should be left individual, not touching each other.
- Freeze until frozen hard.
- Transfer frozen perogies to freezer bags.
- Suck as much air out as possible, and carefully seal.
We usually seal the bag off almost to the end, inserted a straw, sucked the air out, and carefully finished sealing it, as we took the straw out.
- Return to the freezer. Use within a few months.

How to Reheat Frozen Pierogi
- Heat a pot of water to boiling, then reduce to a gentle simmer.
- Add frozen perogies to the pot, cook until they’re heated through, AND floating.
- Allow perogies to float for a minute or two before removing from the water.
- Serve as-is, or pan fry in a large skillet with bacon, onions, or whatever else you’d like.
Why is My Perogy Dough Shrinking?
Updating this post in February 2022, I made a batch of this recipe to re-shoot the photos.
While this is a wonderful recipe that I’ve received hundreds of compliments on and have been making for more than a decade... It failed miserably.
The first batch dough would NOT cooperate, with each round shrinking down to about 1" in diameter as soon as it was cut.
This was the BEST I could get this batch to do! So weird!
That can happen, and it’s the reason that you’re supposed to rest it for an hour before rolling it out. So, I let it rest more... and more... For several hours.
Still the dough fussed when I tried to roll it out, and snapped back as soon as a round was cut out from it.
In frustration, I made a second batch... same thing.
I did everything the same way I always had, the dough looked and felt exactly like it should... but it was just not behaving.
There was discussion about the recipe, the conditions, the dough, the resting, and everything.
As it turns out, sometimes it just has a mind of its own, and won’t work. First time for everything, I guess!
I rested both batches some more, then finally gave up an made a giant, yeastless “perogy pizza” for my husband.
He loved it. Good enough!
To be clear, though - you can definitely still make perogies when your dough is being fussy, it’s just a bit more work - and I was out of spoons!
Roll and cut your rounds. As you pick up each, stretch it a bit before adding the filling, stretch the dough around the filling, and seal.
The filling will hold the dough in place.
Your crimping may not hold well - I’ll usually just re-crimp the edges right before boiling, and it holds up perfectly!

If all else fails, just make a pizza. Waste not, want not!
Gluten-Free Perogies
One of my BIG missions when it came to gluten-free recipe development was perogies, and I succeeded *wildly*.
The dough is such that you can roll/stretch it thin enough to see through, and it’s the reason for my Tony Stark sized ego, LOL.
Quite the accomplishment, when you’re not able to use wheat flour!
Anyway, the recipe is here: Gluten Free Perogies.
On that note, I also have a recipe for Keto Perogies - which are also gluten-free!
More Recipes that Remind me of Gramma
Since originally writing this post, my gramma has sadly passed... but her memory lives on.
Here are a few recipes that remind me of her, whether as something she taught me to make, a replica of a retail treat we used to enjoy together, or one of my own recipes that she would request whenever I’d visit, as an adult.
Chicken Cabbage Rolls
Homemade Marshmallow Cones
Homemade Clodhoppers Candy
Puffed Wheat Squares
Honey Dill Dipping Sauce
Paska - Ukrainian Easter Bread
Baking Powder Biscuits
Grandma's Potato Salad
Easy Butterfly Cupcakes
Breakfast of Champions
French Canadian Pea Soup
Beep Drink Recipe
Sponge Toffee

Share the Love!
Before you chow down, be sure to take some pics of your handiwork! If you post it to Bluesky, be sure to tag us - @CelebrationGen. We're also on Pinterest, so you can save all your favourite recipes to a board!
Also, be sure to subscribe to my free monthly email newsletter, so you never miss out on any of my nonsense. Well, the published nonsense, anyway!
Finally, if you love this recipe, please consider leaving a star rating and/or a comment below, and maybe even sharing this post on social media!

Grandma's Homemade Perogies Recipe
Equipment
- Perogi Maker, optional
Ingredients
Perogy Dough
- 2 Large eggs
- ½ teaspoon Salt
- ½ cup Vegetable oil
- 2 cups Lukewarm water
- 5-6 cups All-purpose flour
Filling
- 3 lbs Red potatoes peeled and halved/quartered
- 1.5-2 lbs Cheddar cheese shredded
- Other Fillings See post for ideas and amounts.
Instructions
Dough
- Beat eggs, add salt, oil until mixed together well. Add water, beat again.
- Add 5 cups flour, adding more flour if sticky. Lightly knead until well incorporated and smooth. Cover bowl with plastic wrap and let rest one hour. While waiting, work on filling!
Filling
- Boil potatoes until fork tender and ready to mash.
- I like to use my KitchenAid to mash my potatoes, and it works doubly well for this. You can, however, always mash and mix by hand. Either way, mash potatoes until smooth, and mix in your choice of cheese and flavorings until well incorporated
Assembly
- Roll out dough on floured counter top. Aim to get it pretty thin – 1/16th – ⅛″ of an inch or so. When you’re first starting out, a bit thicker is ok – you’ll just have a bit more dough to bite through to get to your yummy filling!
- Cut dough with large glass or round cookie cutter – I like to use a glass that’s about 3″ in diameter.
- Place 1 tablespoon of filling in the center of each round:
- Lightly brush the edges with water, which will act as a glue.
- Pick 1 round up in your non-dominant hand, and use your good hand to fold the dough around the filling, sealing the edge from one side to the other.
- Make sure your perogies are sealed well,or they will explode when you cook them! Also, I like to flatten them out a little.
- Have a large pot of water heated to a low boil. (Too rolling of a boil will rip your perogies apart!). Drop a few perogies in at a time – our pot can take about a dozen. Cook until all rise to the surface, then for 2-3 minutes longer:
- Removed cooked perogies from water, lightly toss with melted butter. This will prevent them from sticking together.
- Enjoy as-is, or fry them in butter, onions.. maybe with some Kielbasa sausage… serve with some sour cream.. YUM!


Iasmin
These are amazing! Thank you for posting the recipe 🙂
This is the third time I make them and it always turns out perfect. Im making them right now!
What's your grandmother's background? If you don't mind me asking. I'm brazilian, living in Canada.
Marie Porter
Ojibwe and UK! She'd lived in Winnipeg for most of her life though, and Winnipeg has a huge Ukranian population.
Marie Porter
Whoops, by UK I mean Scottish, Irish, English, not as an abbreviation for Ukraine!
Wendy
Oooo! I'll have to try this. Have you ever tried the varenyky over at Kramarczuk's?
Mary Tappe
I love Kramarczuk’s! I grew up in Mpls., and I go there every time I visit! I’m 63, I knew Kramarczuk’s wayyy back when!
Sharon
My grandpa and grandma always made verenky too and did the strips method. Thanks I will try this !
Jennifer
Hands down best dough recipe I have worked with. Just finished making sauerkraut and onions and potato and cheddar perogies
Karen
My Grandma always made the dry curd version. She'd have to poll all my cousins on roughly how many each wanted, and we had at least 10 adults and 15 cousins at any one time.... She and my Grandpa were Mennonites and lived in Winnipeg, having left the Ukraine in 1927. Visiting family was the highlight of my summers. I see many recipes on here that she'd make for all of us....
Doreen Lynch
My mother made them with dry cottage cheese. Her parents came from Poland. It's been a long time since I've had them and your recipe looks very tasty!
Kelly Lloyd
Just finished making them with a friend who has never made them. Thank you, this recipe reminds me of making them with family and they taste just like my Baba’s and my Moms. Great recipe.
Mariana
Marie( and Grandma)…thank you for this awesome recipe. Made it tonight in all its glory! It was delish! I am in a food coma right now because I ate too many. It really made ALOT ! What I did not boil is in the freezer for a future date! Making the potato cheese filling the day before really helped. Highly suggest that!
Mimi
I make pierogis for Christmas Eve dinner every year. I tried your dough recipe this year and I love it. The dough was so easy to work with. They came our perfect. I fill mine with sauerkraut that I saute with onion and butter. My husband and I tried them last night and, wow, they are great. I shared the recipe with my daughter, who also makes them (she makes the potato and cheese ones), she also loved this recipe. Thank you for sharing it. This will be the recipe I use from now on.
Stephanie
These are great! My grandmother is from Germany and she makes these. She puts fried onion in the potato mixture before sealing the edges. Once made, we always fry bread in oil and cut it into pieces. We place the pierogi in a bowl, add milk and fried bread. My favorite food of all time!
Trish
I made these this weekend and they were delicious. I made my own filling but working with this dough was so easy. Thank you! Got 67 out of the batch probably because a few were larger. I boiled them for three minutes and fried them in butter. Dough was crispy and everyone loved them!
Connie
I’ve never attempted perogies but wanted to try them. I read this recipe and the favourable reviews so decided to give it a try. I am really happy with how this turned out on my first try. This recipe is a keeper!