

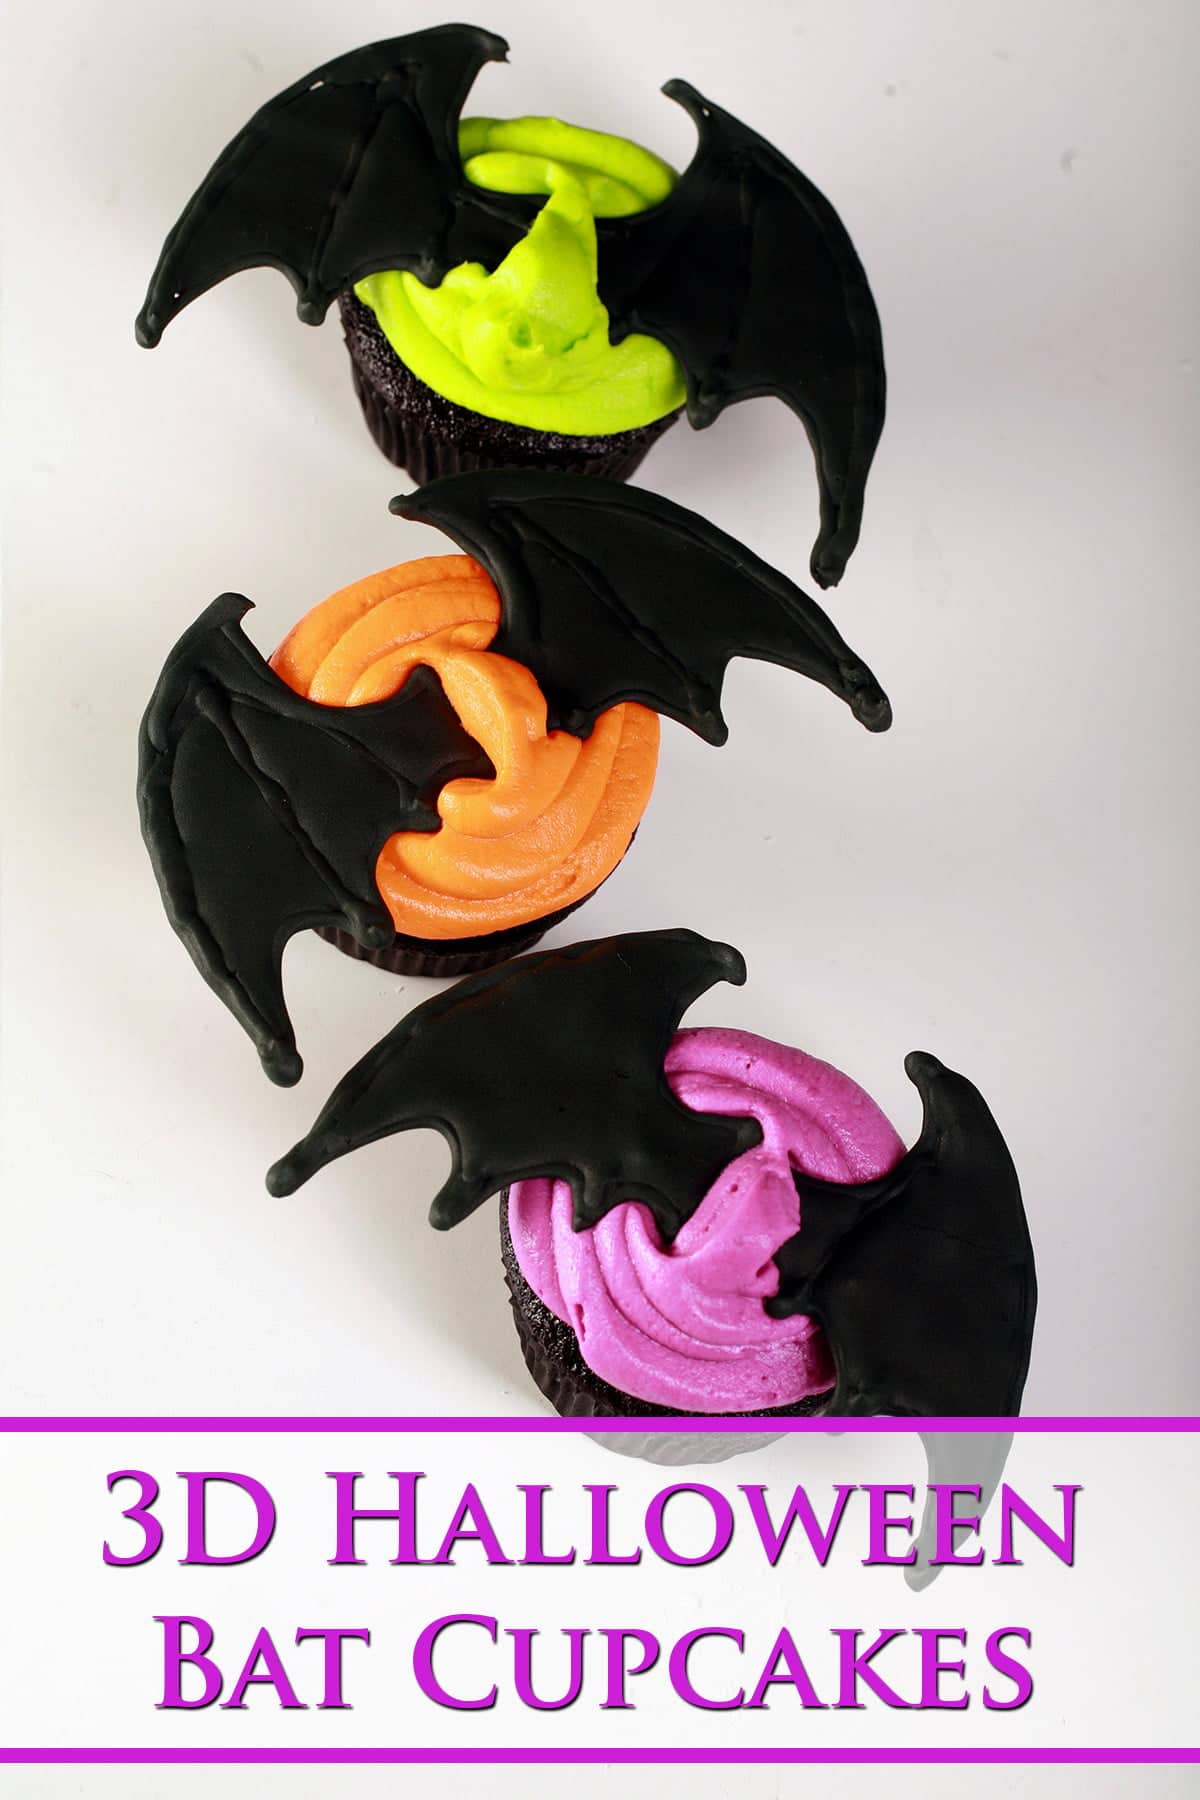
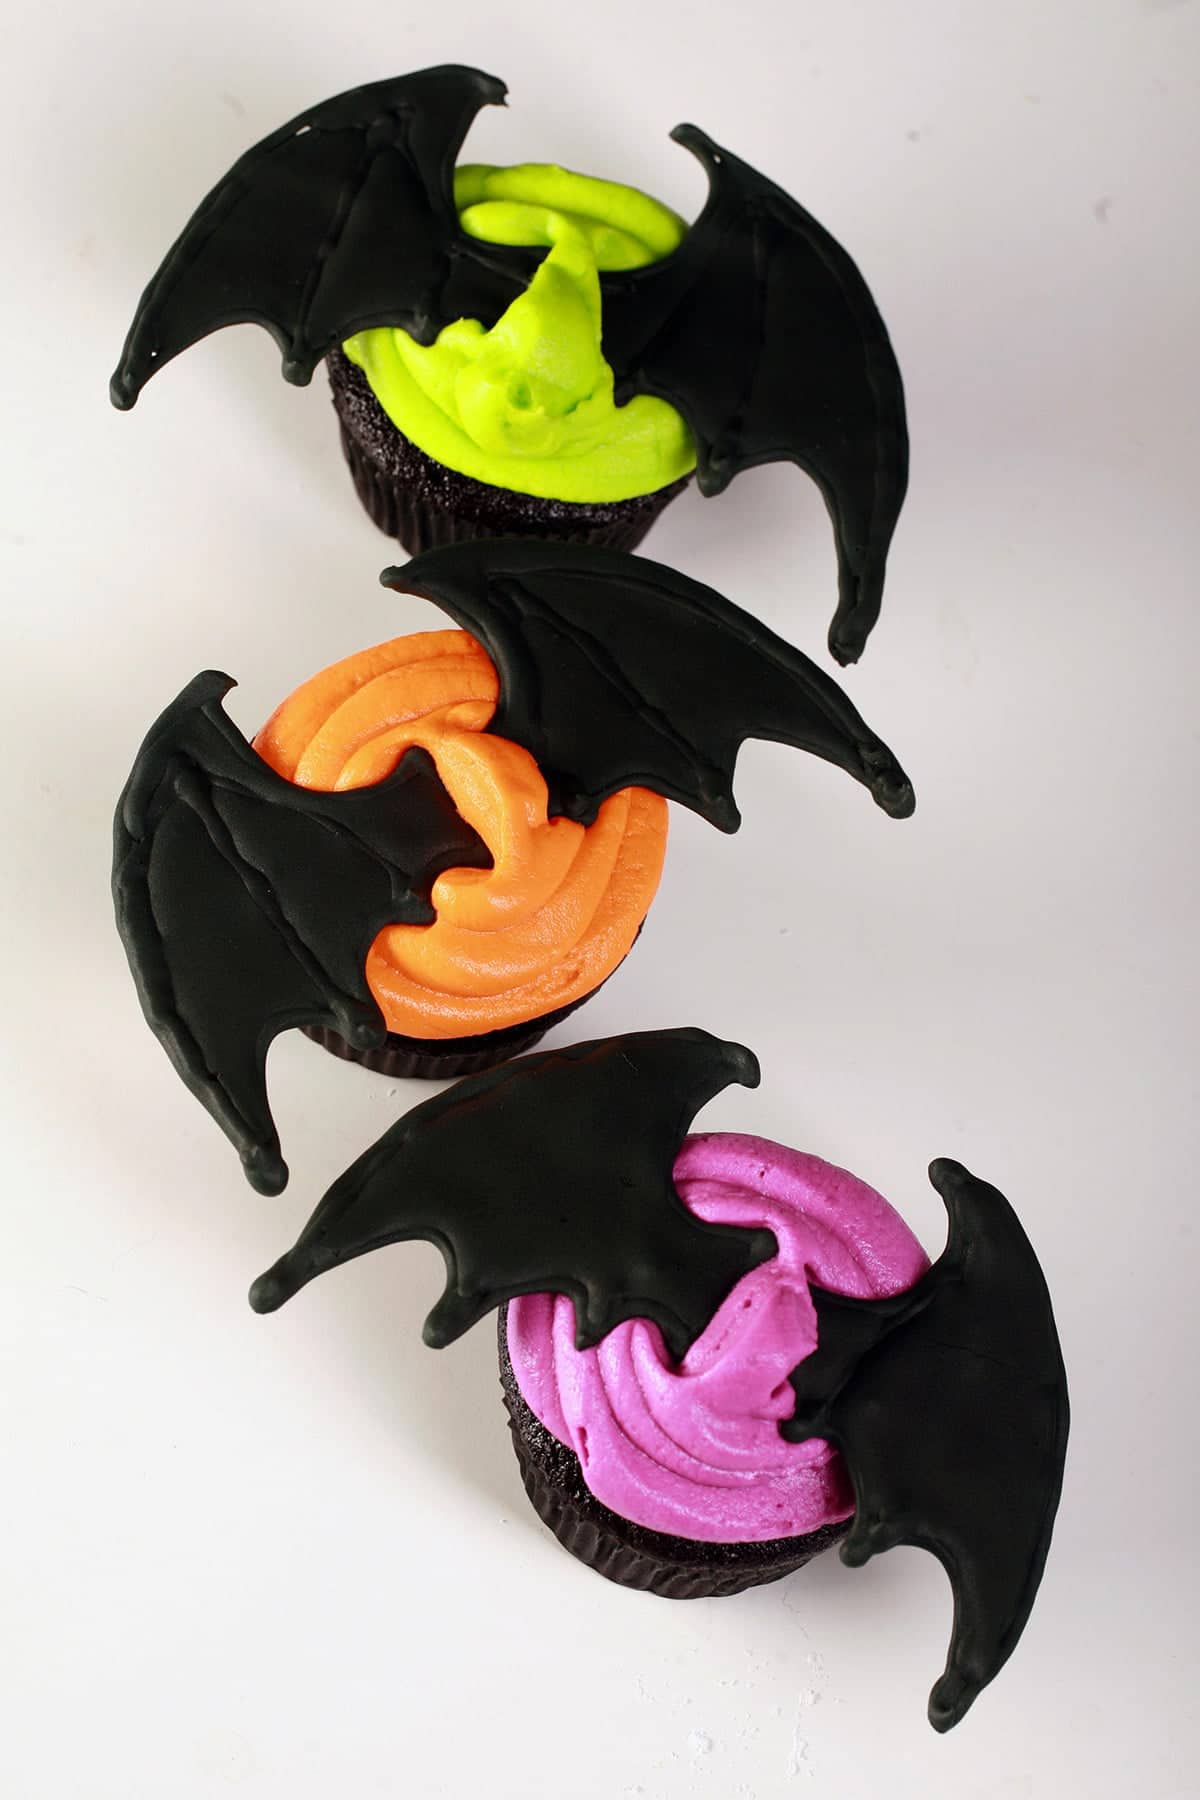
If you've got the time to start a day ahead, these 3D Royal Icing Halloween Bat Cupcakes are fun to make, highly customizable, and impressive!
Originally posted August 12, 2020. Updated 8/8/2021
Today I’m showing you a slightly more advanced - but still relatively easy! - Halloween cupcake recipe / tutorial: Using royal icing transfers to make bat wing cupcakes!
These cupcakes take only slightly more skill and effort, but they do take a fair amount of time, so you have to plan ahead!
While they’re quick to actually work up, most of that time is spent drying the wings, before they can be used on your Halloween cupcakes.
You’ll want to start the wings at least 24 hours before you want to assemble the cupcakes. Ideally, even longer in advance - just in case you end up with a batch that takes longer to dry, humid conditions, etc!
Royal Icing Transfers for Cupcakes
I mean, if you’re masochistic, you can use it to try your hand at the Lambeth Method for Cake Decorating... but I wouldn’t exactly call that “A ton of fun”, LOL!
What IS a lot of fun though, IMHO, is being able to customize cupcakes - or other sweet treats, for that matter - with almost any design you can think up.
Just like tracing a template from under some parchment paper can yield some fun results - as I showed in my Frozen Buttercream Transfer Tutorial - the same technique can be used for piping Royal Icing designs.
Then, you simply - CAREFULLY - remove it from the parchment paper, and stick it to whatever treat you want to decorate!
In this case, I wanted to make some funky 3D Bat Wings to put on top of cupcakes. Halloween is coming up, after all, and these are perfect to bring to a Halloween party!
While I’m specifically demonstrating how to make cute Halloween treats here, this technique can be used for almost any design - freehand or traced.

Before You Start
Just a few things to keep in mind, mostly around the fact that Royal Icing is FRAGILE:
- The bigger your design, the more fragile the design, and the more likely it is to break, but...
- The bigger your design, the easier it is to pipe more details.
Conversely
- A smaller design will be more durable... but
- A smaller design will need to be more simple in design
- The design shouldn’t be much wider than the top of the cupcake, or it will not fit in with the other cupcakes in the holder
- If your design stands up, make sure the container has some clearance for that design!
So, try to strike a balance between appearance, durability, and logistics when dealing with your templates.
Finally, make several extras. These are quite fragile and you will very likely break some - even just lifting them off the work surface. We all do, no judgement here!
Anyway, better to end up with too many, than too few... especially with the 12-24 hour dry time!
So, with all that said, let’s get to the 3D Halloween Bat Cupcakes Tutorial!
How to Make Royal Icing Bat Cupcakes
Full recipe follows in the recipe card at the end of this post, but here’s the decorating tutorial:
Make the Royal Icing
Follow the recipe for either my Meringue Powder Royal Icing, or my Traditional Egg White Royal Icing to make a batch of icing.
(The traditional way uses a raw egg white and lemon juice - which is not ideal for very young kids, pregnant women, etc.
The safer way uses meringue powder, which is expensive but relatively easy to come by. You can get it at any cake decorating store, larger craft store chains, or on Amazon.)
You’ll want to aim for stiff royal icing, to start.
I recommend Americolor (what I used when I was in the USA), or ChefMaster (Which is the option more readily available here!).
The black is just FAR more intense with a gel color, and is so much better to work with than liquid or paste options.
The color will develop over a few hours - and as it dries - so you can aim for a really dark grey. You don’t need to get it fully black!
You can keep the frosting at the stiff consistency, or thin it down a little to a medium consistency (see the royal icing recipe post you’re using for directions!).
Prepare Your Work Surface
You’ll need to pipe your bat wings on something flat and stable - you DON'T want them to bend or flex while they’re drying.
I like to use a cutting board, or the back of a baking sheet. Either one is small enough to make them easy to work with, but nice and sturdy to keep it safe.
Tape your design template down to your work surface. Masking tape works fine for most surfaces.

Tape some parchment paper down over your template, being sure to leave a bit of space around the edges of your design.

I like to use hockey tape here. It’s not the most amazing hold, but it’s SOME hold - which is better than most tape, and is good enough in this case!
As you tape your parchment paper down to the template and board, be sure to keep it smooth, straight, and with any excess air pushed out.
Prepare Your Piping Bag
Here’s where we - once again - get into some “do as I say, not as I do”.
You know, kind of like the time I wrote my Dalek Sugar Cookie Decorating tutorial... just with a totally different excuse this time!
As you can see in the pics - and video, below - I didn't use a coupler and tip in my piping bag.
You see, I got rid of ALL my caking stuff... sometime between when quit decorating cakes and when I moved to Canada.
Then I eventually decided to do these tutorials, so bought a little cake decorating set on Amazon. I put it aside until it was time to film and shoot this tutorial.
... and that’s when I discovered that this basic set did NOT have the smaller sizes of basic round tips. FOILED.
So, I’m demonstrating with just the very end of my Large Piping Bag cut off. It’s not as clean, the edges aren’t as pretty - but you can do it!
If you’d like to do it the more proper/professional way, I recommend using Standard Decorating Couplers and a Wilton #3 or Wilton #4 round tip.
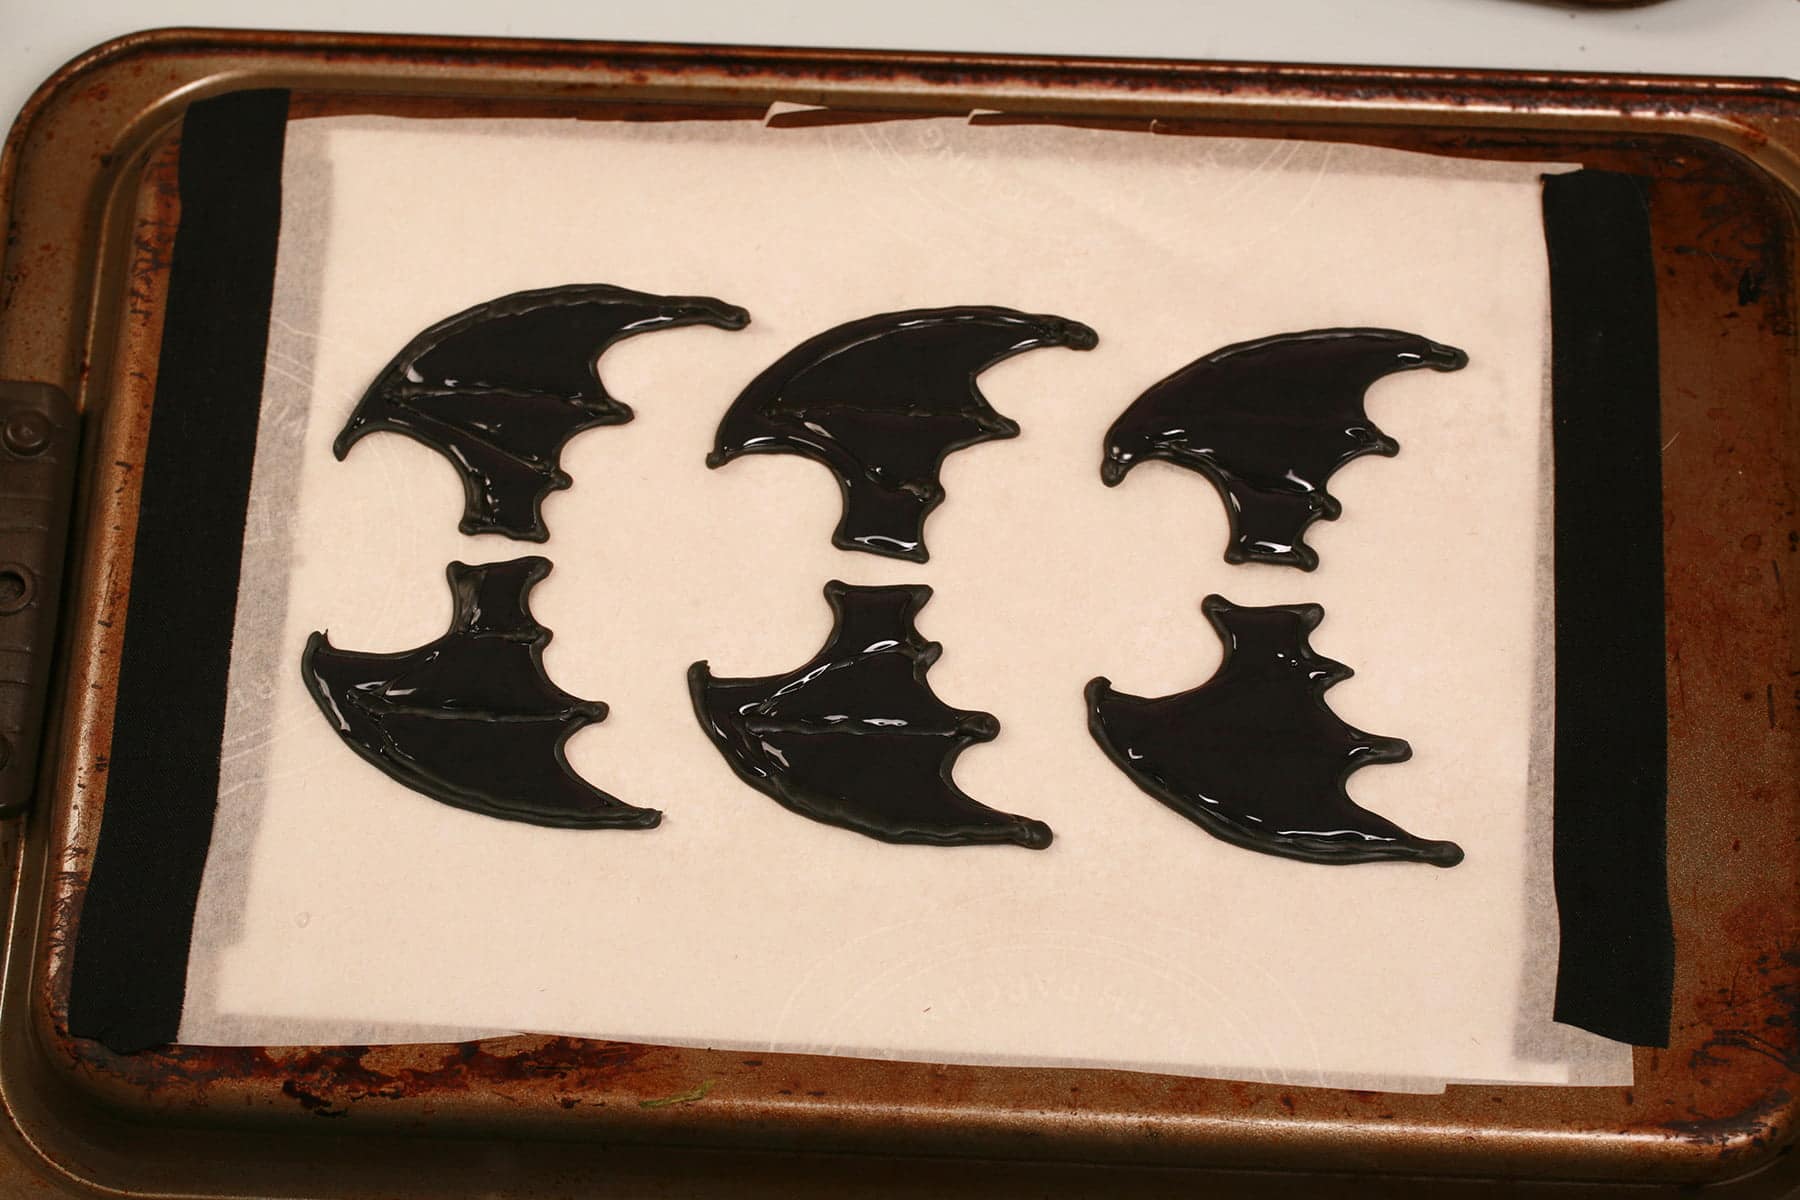
9. Start Piping
Holding the tip / end of your frosting bag about 1 cm away from the surface, carefully pipe out your outlines and design details, as shown.
I like to add a little bit of a buildup where the “body” would be, as a section that will stick into the cupcake frosting.

These lines will eventually contain the flow frosting, so make sure you don't have any breaks in the piping, or the icing will flow out to areas you don't want it!

Thin Your Icing
Before filling in the open areas, you'll need to thin the frosting so it will "flood" the decorating area. Add a few drops of water and stir well.
Use the end of your spoon to drizzle a bit of frosting back into the bowl. If it smooths out and disappears in a count of 7-10, you're good to go! If not, add a couple more drops of water until it's the right consistency.
A good way to figure out if your icing is the right consistency is to pull a spoon through the middle of the frosting bowl.
– If the frosting settles out in less than 7 seconds, it’s too runny. Add a little more powdered sugar.
– If the frosting settles out in about 7-10 seconds, you’re good to go!
– If the frosting takes longer than 10 seconds to settle, it’s too thick. Add a little water or lemon juice and try again.
If your icing is too runny, add a little powdered sugar to thicken it up. If it’s too thick, add a little water to thin it out.
Flood It!
Carefully pipe a bit of the liquid frosting into the areas you want.
At times, you'll probably not even need to squeeze the bag, just carefully guide it, nudging the icing into corners, etc.

Generally speaking, flood piping is done from the outside perimeter of an area inwards, but on these cupcakes there's so little room to work with, just do whatever feels right!

Set the work surface somewhere safe and dry, and leave it to harden overnight at minimum (depending on how humid your house is), but 24 hours as an ideal.
~ The Next Day ~
Make Your Cupcakes
If you’re using homemade cupcakes for these easy cupcakes, bake them up a couple of hours before you want to assemble them - they’ll need to fully coool to room temperature before decorating.
Most cupcake recipes would work for this. You want a fairly basic one, with no chunks or pieces of anything in it (chocolate, fruit, etc), as that can mess up the cut / wings.
I recommend my Black Velvet Cupcakes recipe follows this tutorial, but you can use any cupcakes you’d like - even just using a dark chocolate cake mix.
While you can dye a recipe for white cupcakes with food coloring, it’s better to start with chocolate cupcakes - they’ll take the dye a lot better, and you won’t end up with weird grey cupcakes.
Besides, almost everyone loves a rich chocolate cake!
Frosting
When it comes to frosting, I prefer Swiss Meringue Buttercream, but American Buttercream is cheaper and easier.
Swiss Meringue Buttercream is made from granulated sugar, egg whites, and butter, American buttercream is made from butter, milk, and powdered sugar / icing sugar.
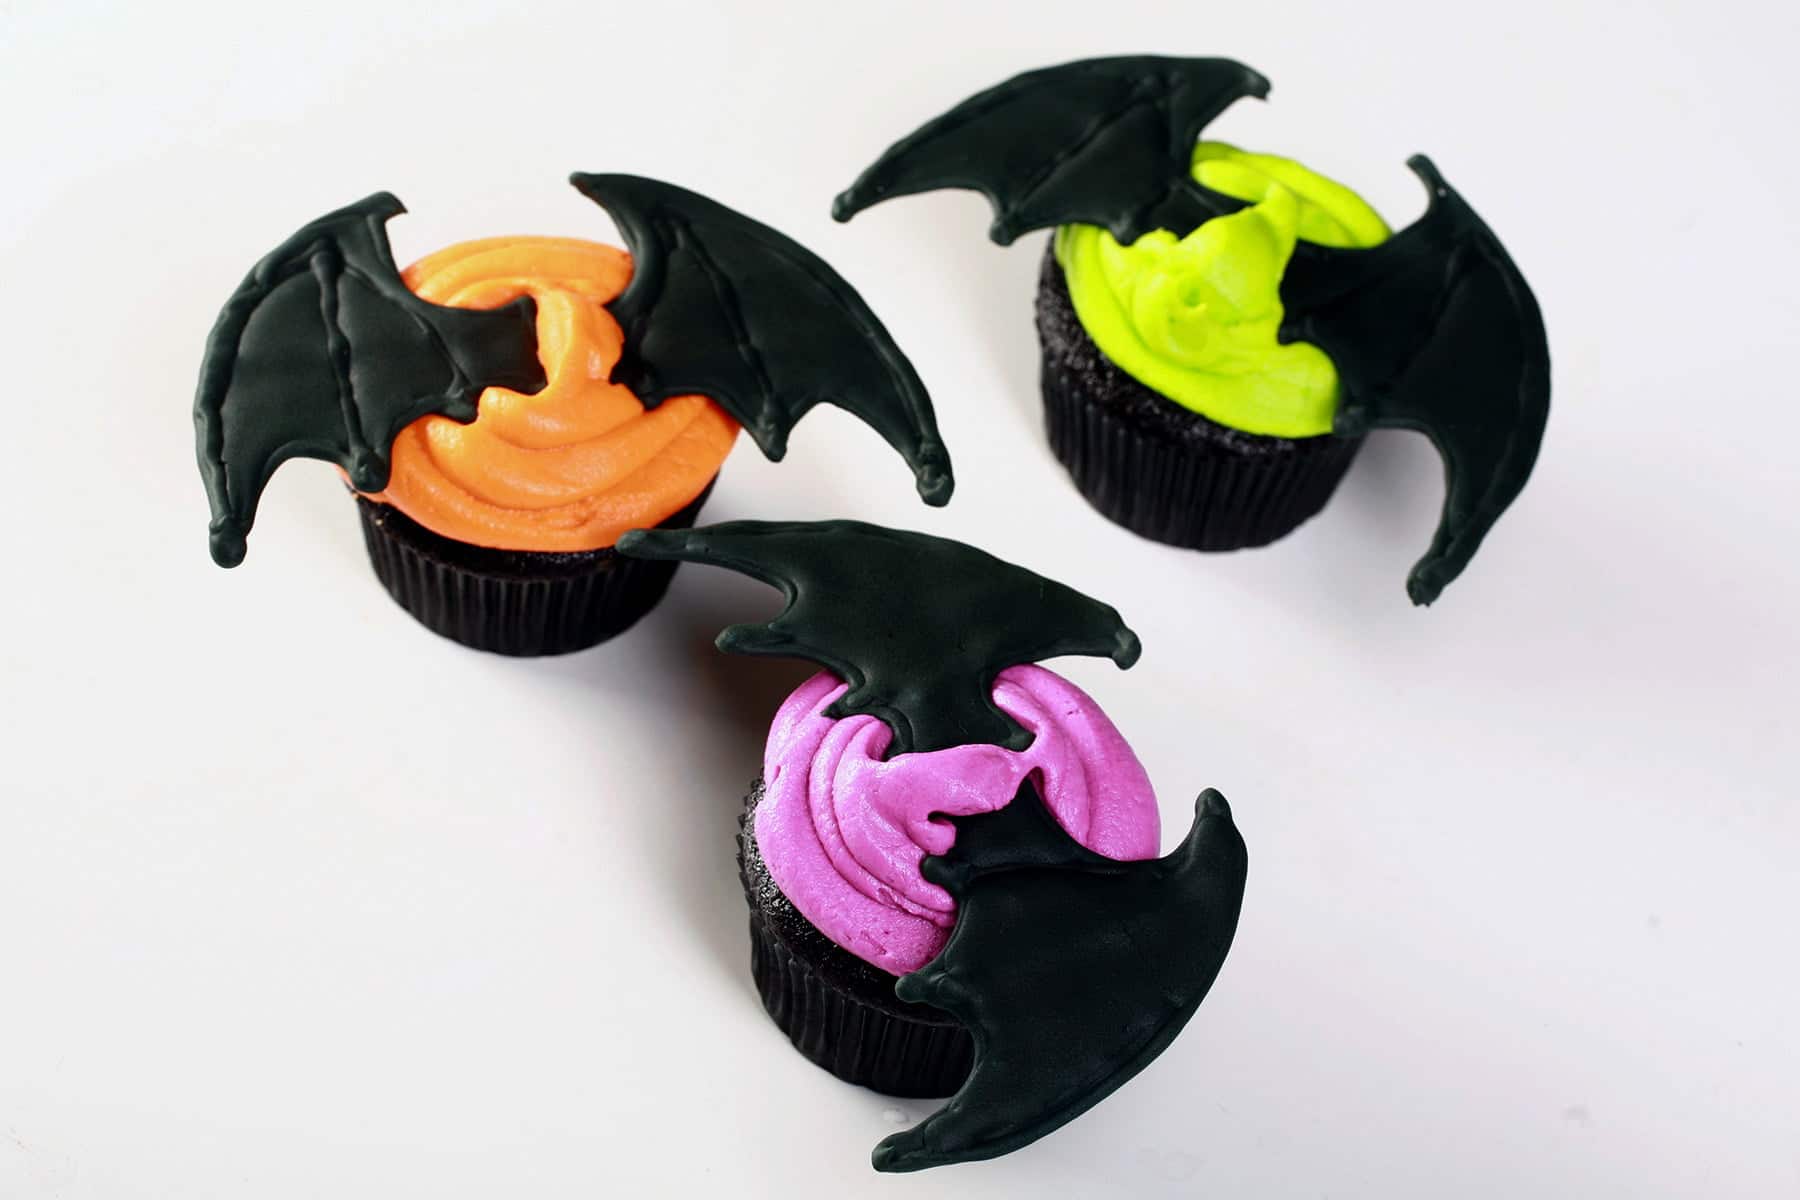
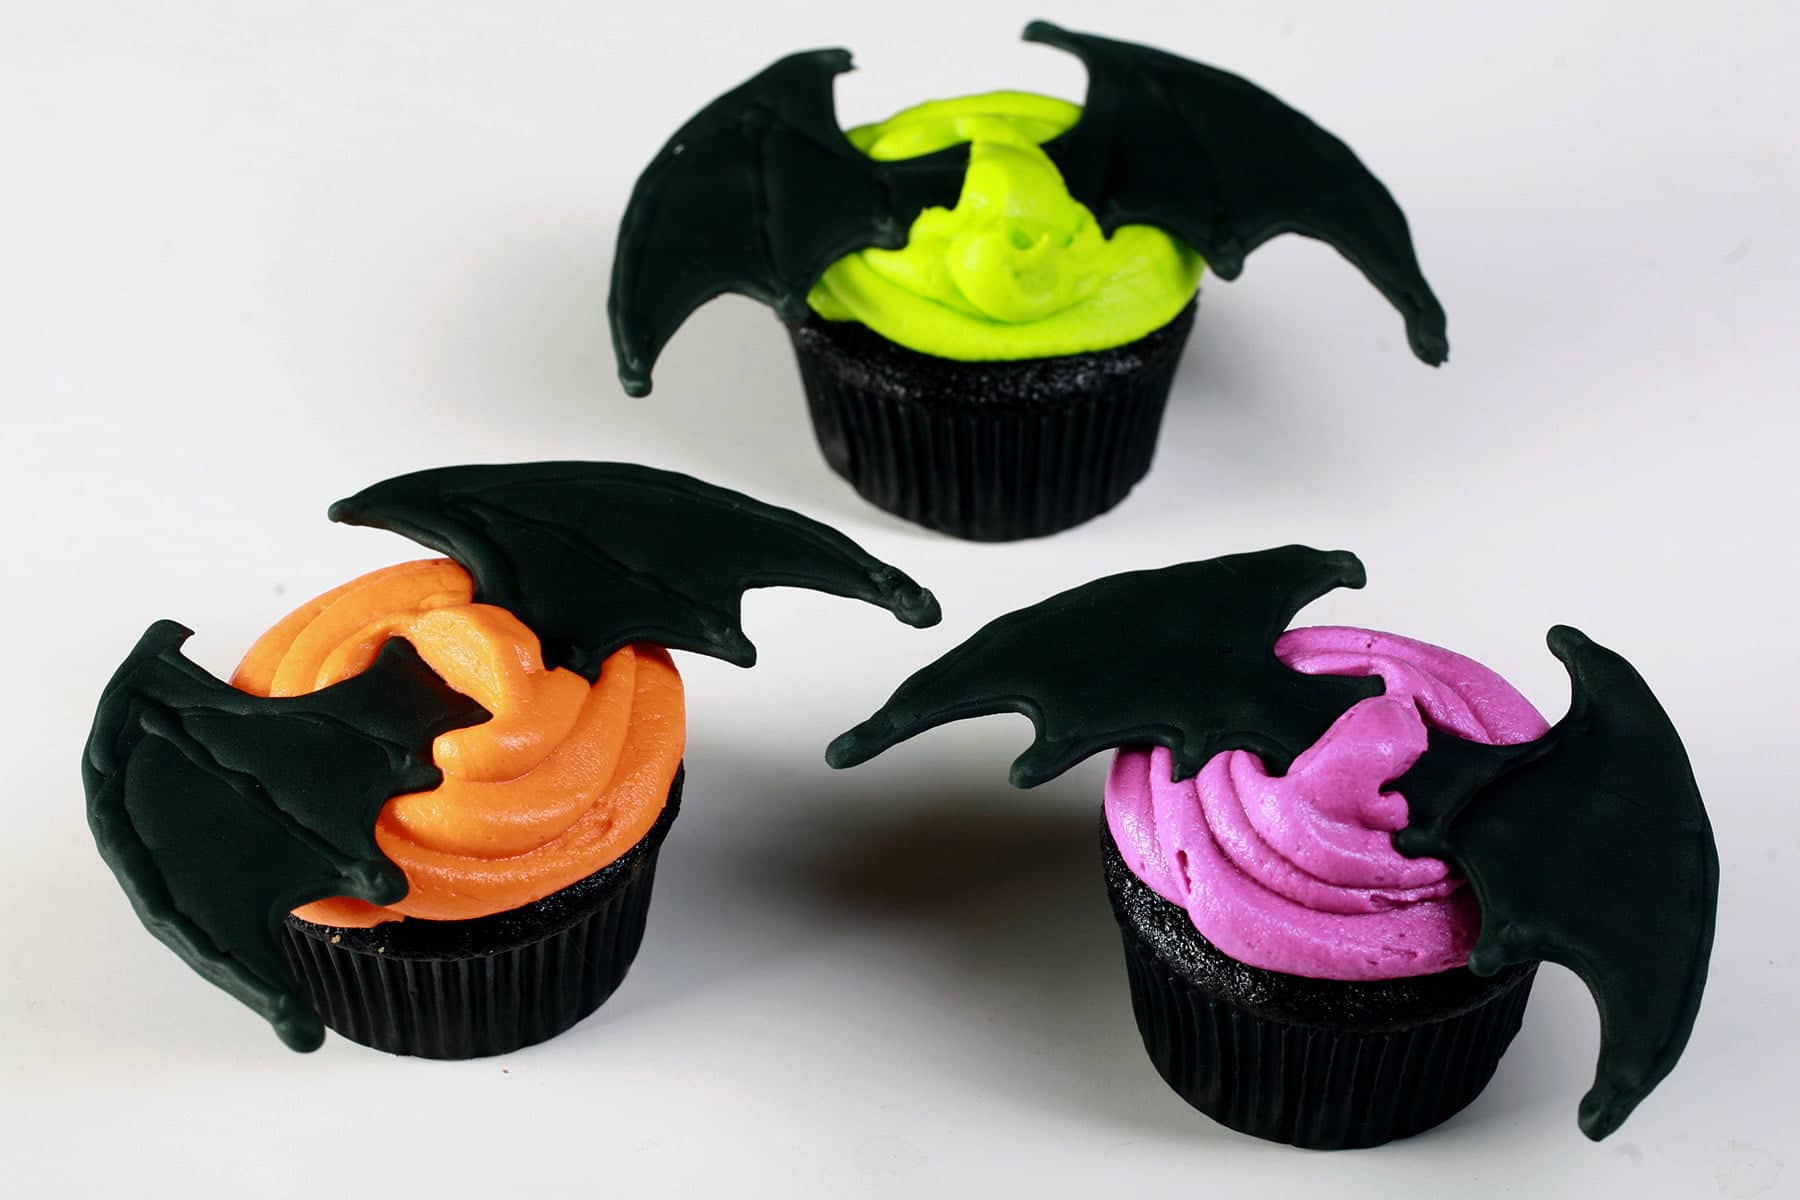
While I’ll usually pair a chocolate cupcake with chocolate frosting, I prefer to use a brightly coloring frosting. I like more contrast between the wings and the background than what you’d get from a chocolate icing.
For that matter... you can use canned, if you’d like.
Whichever way you go, tint and flavour it as desired!
I went with vanilla extract and a few bright "Halloween" colours, but was originally going to go with orange and/or yellow - as a "Moon" for the bat to be shown against!
Assemble the Cupcakes
Set up a piping bag with a coupler and a wide round or star tip (optional), or cut the end off.
Frost cupcakes with a generous swirl on top of each cupcake. Frosting is the best part - especially if we’re talking Swiss Meringue Buttercream!
VERY carefully, lift each wing from the work surface. I like to slip a fingernail under an edge and just really gently lift. If the wings feel stuck, they’re likely not dry yet - give them a few more hours!
Carefully stick each pair of wings into the frosting top of the cupcakes.

More Halloween Ideas
If you're still considering ideas for spooky Halloween recipes and other ideas, be sure to check out my:
Bacon Wrapped Mummy Meatloaf
Bloody Eyeball Cupcakes
Bloody Eyeball Halloween Punch
Breakfast Mummy Pastries
Candy Apples
Easy Halloween Bat Cupcakes
Easy Spider Web Cookies
Elegant Halloween Charcuterie Board
Fudgy Halloween Brownies
Glazed Halloween Popcorn
Gluten Free Mummy Dogs
Gluten-Free Mummy Jalapeno Poppers
Halloween Shooters
Halloween Spider Web Cupcakes
How to Carve a Pumpkin Like a Pro
Lychee "Bloody Eyeball" Pancakes
Lychee Bloody Eyeball Halloween Pavlova
Mummy Dogs
Mummy Jalapeno Poppers
Nightmare Before Christmas Cookies
Spider Bread Bowl
... and check out our Holiday Recipes section for recipes to suit any holiday!

Share the Love!
Before you chow down, be sure to take some pics of your handiwork! If you post it to Bluesky, be sure to tag us - @CelebrationGen. We're also on Pinterest, so you can save all your favourite recipes to a board!
Also, be sure to subscribe to my free monthly email newsletter, so you never miss out on any of my nonsense. Well, the published nonsense, anyway!
Finally, if you love this recipe, please consider sharing it on social media, and leaving a star rating and/or a comment below!

3D Royal Icing Halloween Bat Cupcakes
Equipment
- Parchment Paper
- Disposable Pastry Bags
- Coupler set
- Round piping tip
- 3 Muffin Tin
- 36 Cupcake Liners
Ingredients
Bats
- 1 batch Traditional Royal Icing
- or
- 1 batch Meringue Powder Royal Icing
- Black Food Colouring
Cupcakes
- 3 cups Cake flour
- ⅓ cup Cocoa powder
- 2 ¼ cups Granulated sugar
- 2 tablespoon Baking powder
- 1 ½ teaspoon Salt
- 3 ½ oz Instant vanilla pudding mix*
- 1 ½ cup Buttermilk **
- 1 ½ cups Butter melted
- 6 Eggs
- 2 tablespoon Pure vanilla extract
- Black food colouring Gel works best
Frosting
- 1 ½ batches Swiss Meringue buttercream
- or
- 1 ½ batches American buttercream
- Bright food colouring
Instructions
Make the Bat Wings
- A day or two before assembling the cupcakes, make your bat wings using the royal icing, tinted black.See instructions in post for how to make them.
Bake the Cupcakes
- Preheat oven to 350°F (180°C).
- Line 3 muffin tins with cupcake liners.
- Combine flour, cocoa, sugar, baking powder, salt, and pudding mix in a large bowl (if using an electric mixer), or the bowl of a stand mixer set with a paddle attachment.
- Carefully add buttermilk, melted butter, eggs and vanilla to the bowl of dry ingredients, mixing on medium speed until smooth.
- Use food colouring to tint batter black.
- Divide batter among prepared muffin pans. Bake until knife inserted into center of batter comes out clean - about 20-22 mins .
- Allow to cool to cool to room temperature, before decorating.
Assembly
- Prepare either Swiss meringue buttercream or American buttercream, following the applicable recipe. Once the frosting has come together, tint desired color(s). Set aside.
- Frost cupcakes: spoon or pipe your frosting on top of each cupcake. You can use a coupler and a star tip if you like, I usually just cut the end off my piping bag and do a basic swirl.
- Very gently place a pair of “Bat wings” into the top of a frosted cupcake.Repeat with remaining bat wings and cupcakes.


Leave a Reply