

Homemade Marshmallow Cones
Originally posted June 18, 2013. Updated 12/11/2020

Marshmallow Cones dipped in colourful sugar was a fun treat, growing up. Homemade Marshmallow Cones look the same, but taste WAY better, imho
Recently, I've had my mind on Canadian foods. Something about homesickness really makes you crave pretty much everything you can't find locally!
Now, I have no idea if today's recipe is actually Canadian or not, but it's an example of "Oh, you can't get them here? Well then, I MUST HAVE SOME NOW!".
I don't even remember what made me think of these little confections.
When my husband mentioned that he'd never heard of them, though... I decided that I'd have to make a homemade version.
... and here we are!
What Are Marshmallow Cones?
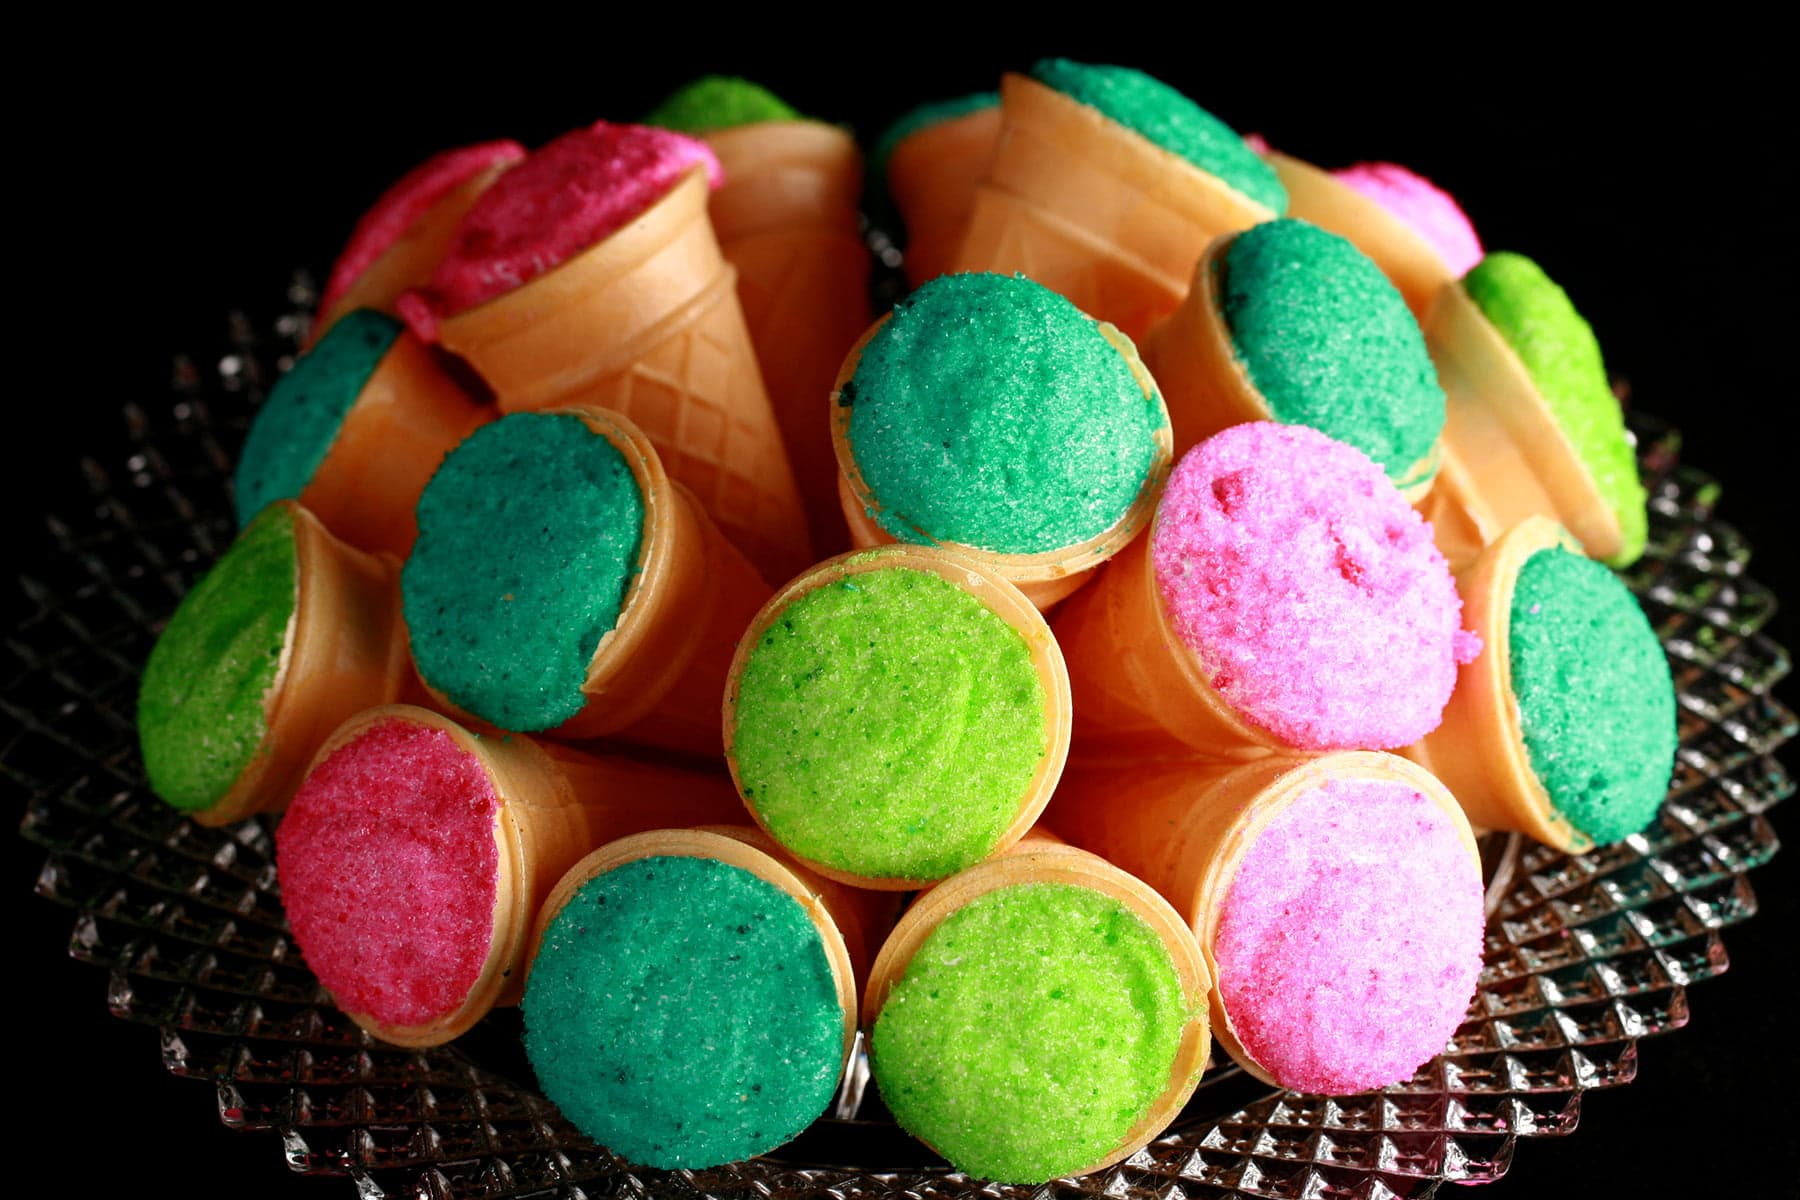
Marshmallow cones are a confection from way back in my childhood.
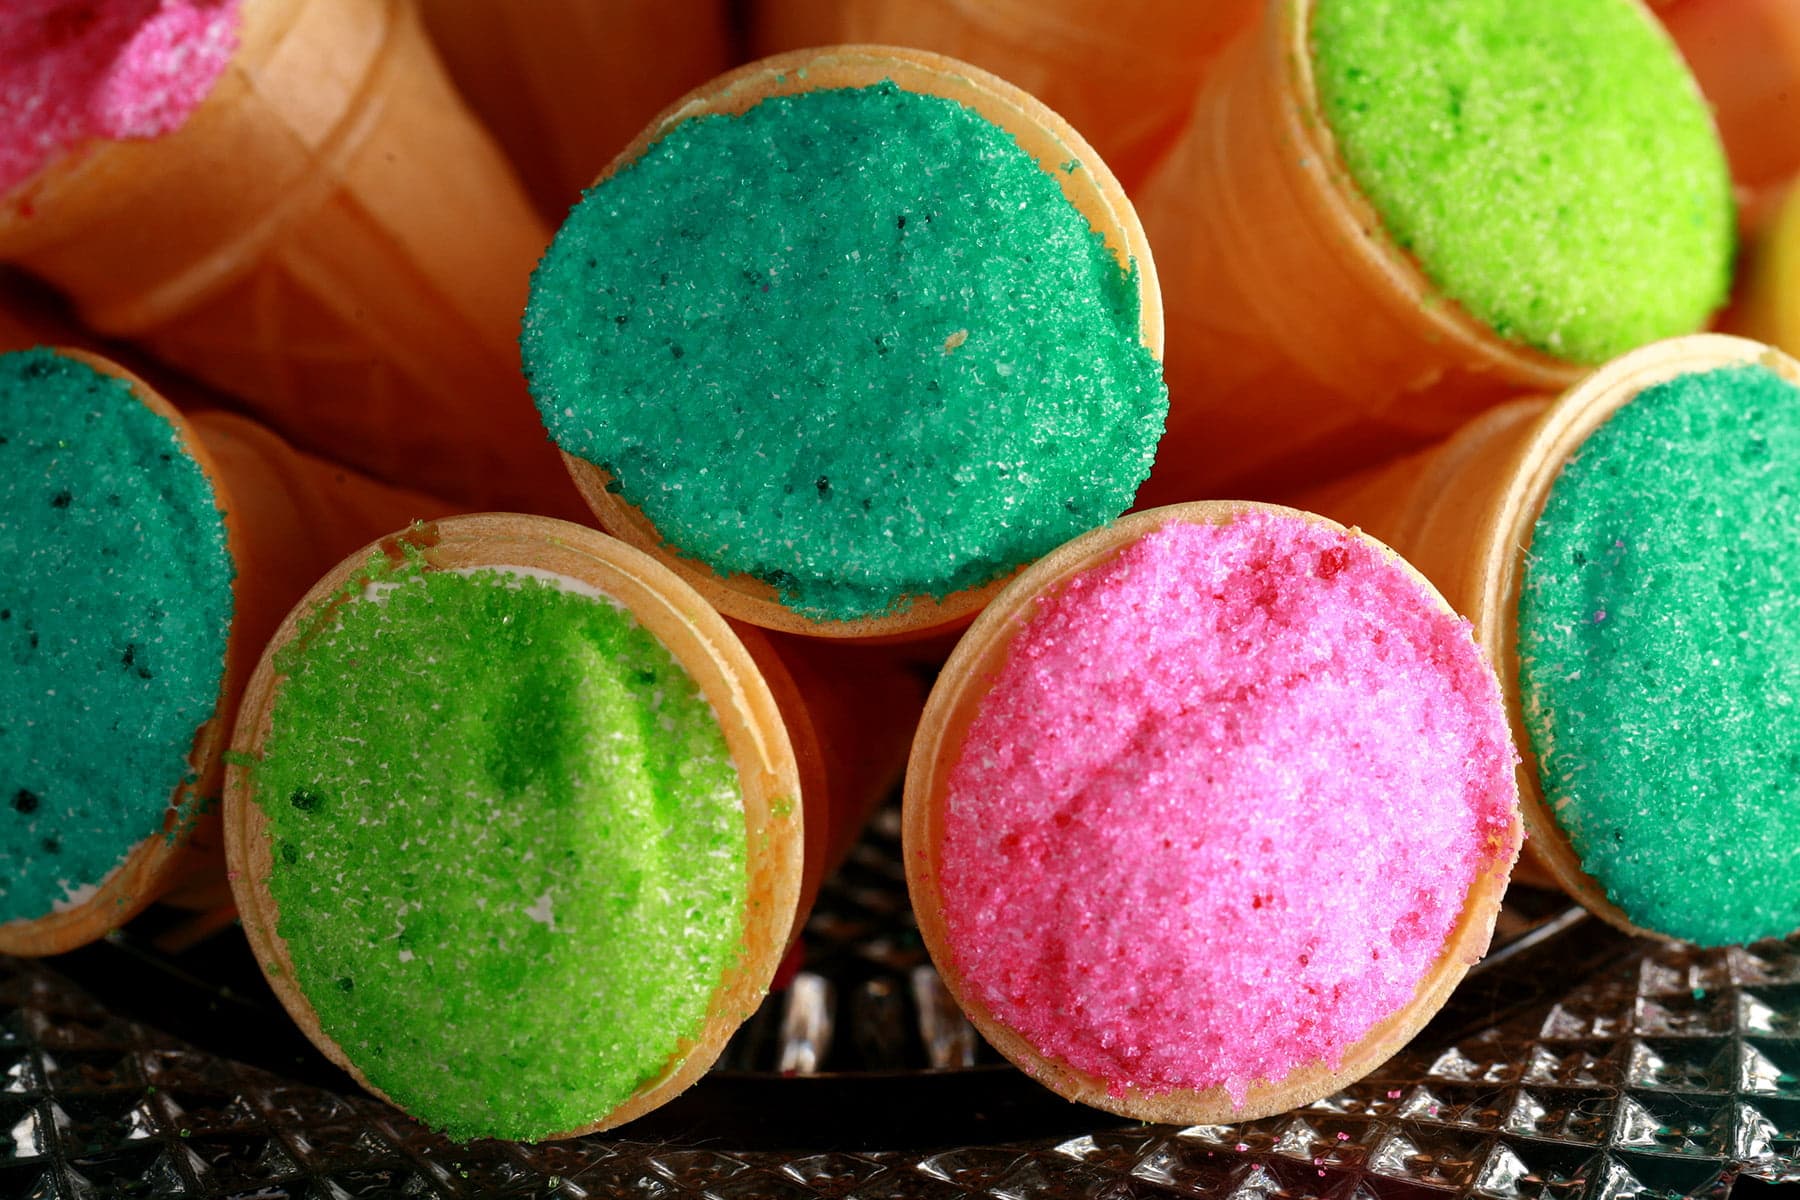
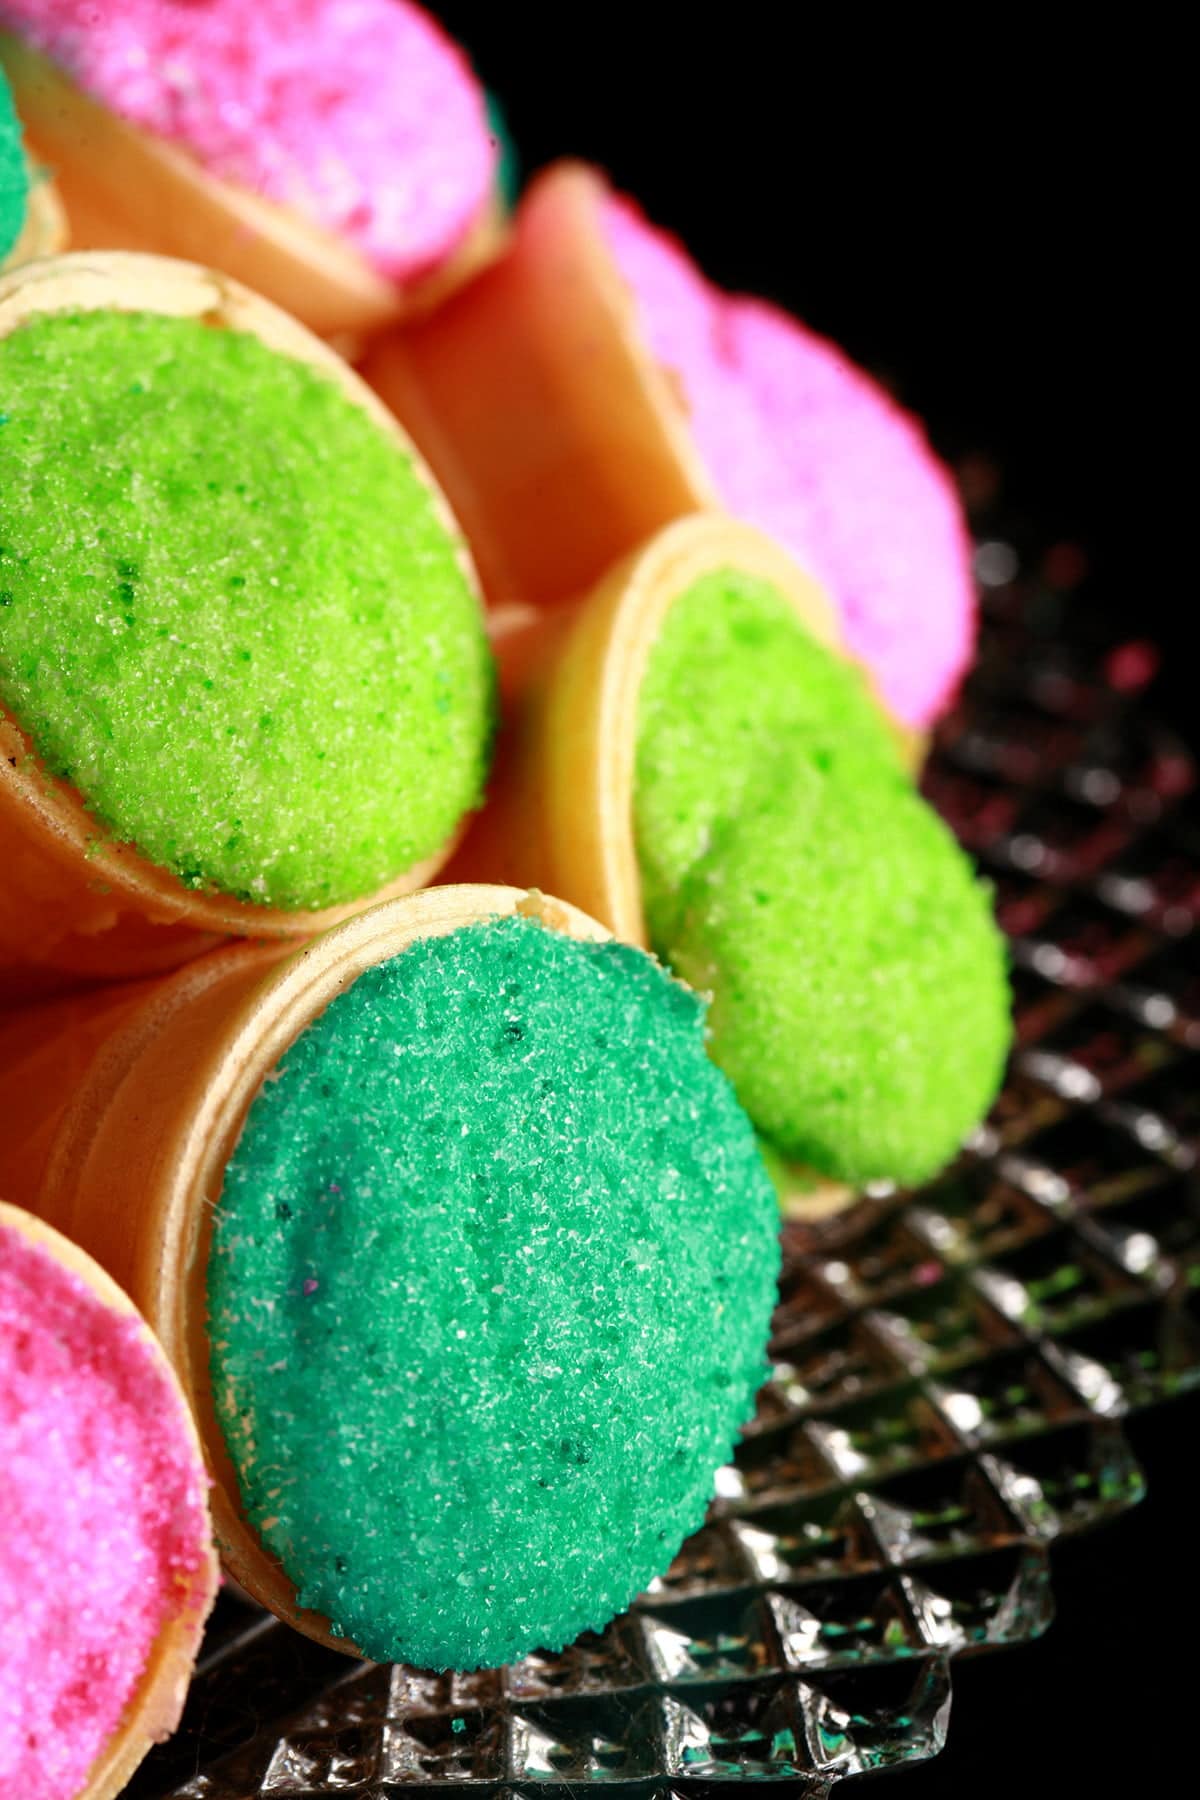
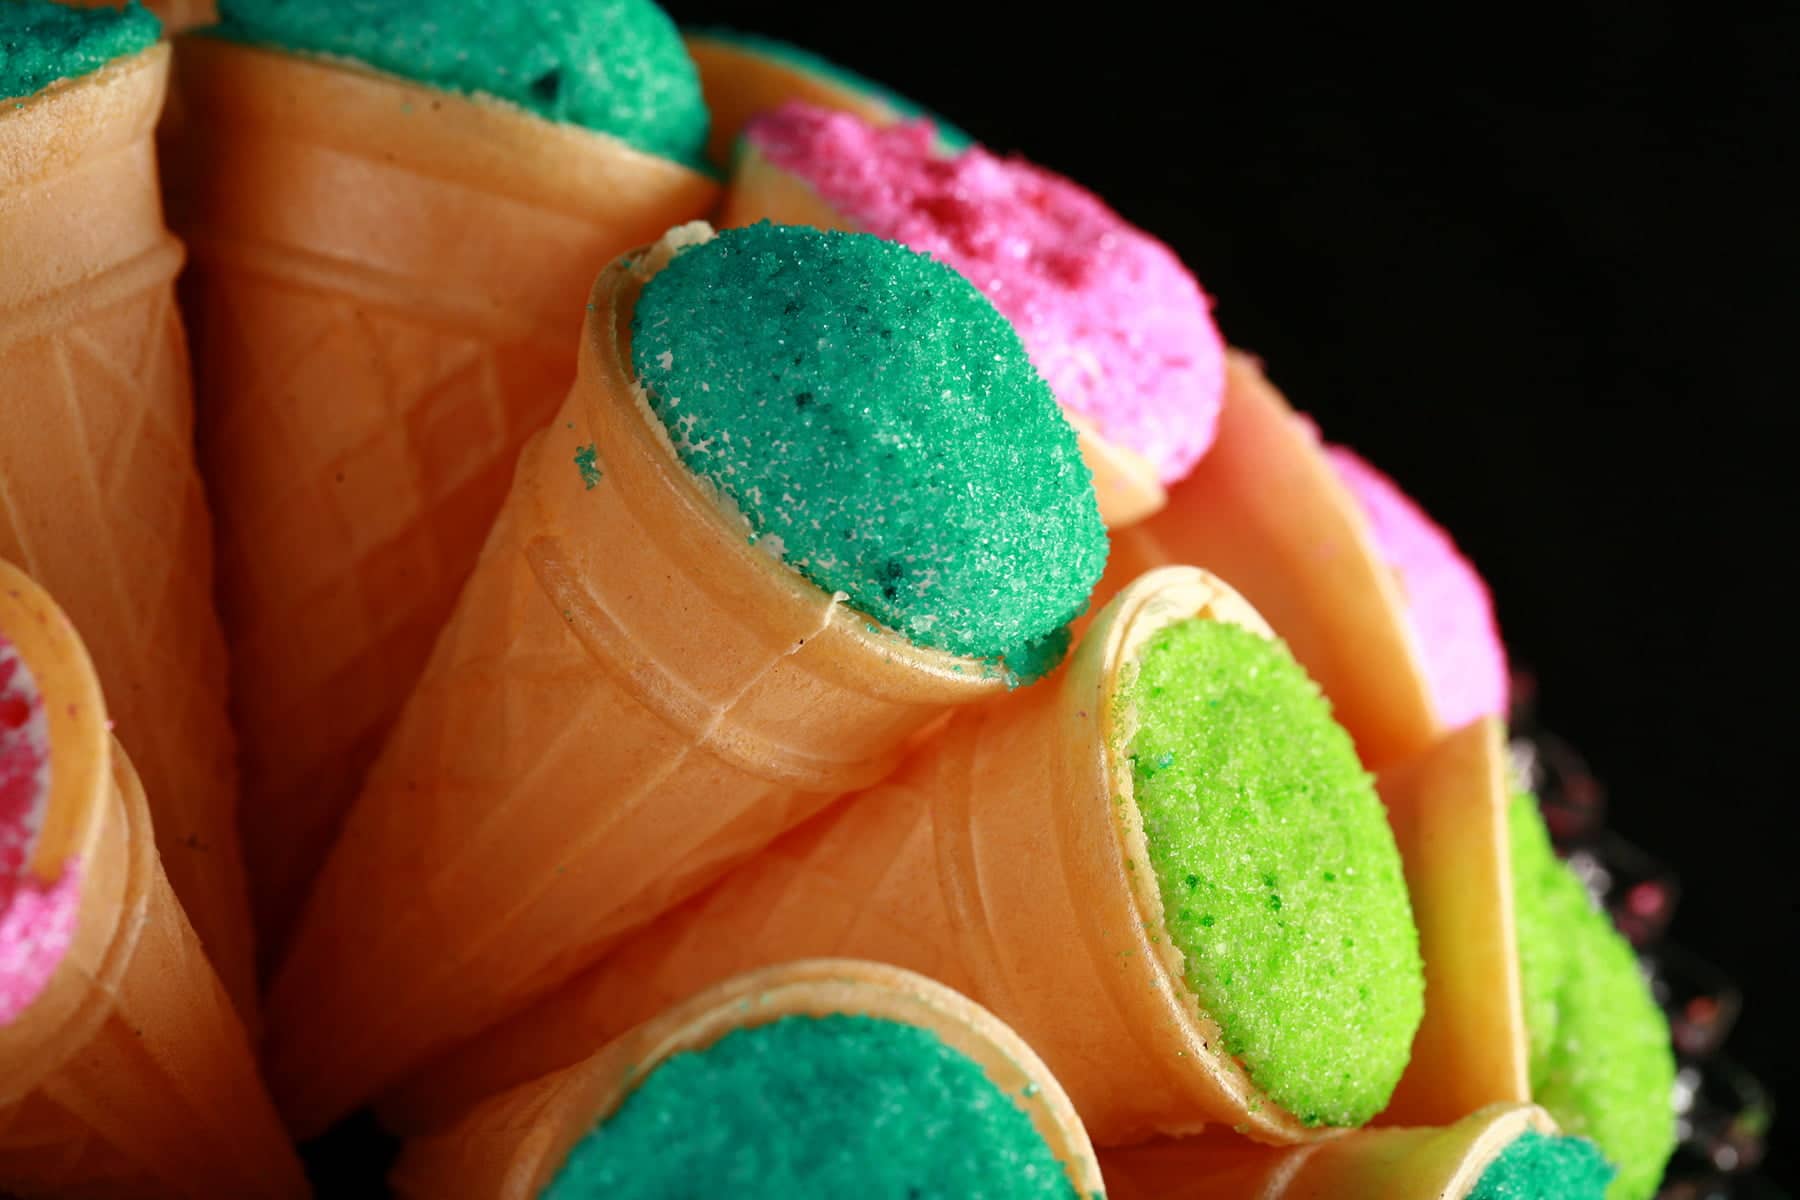
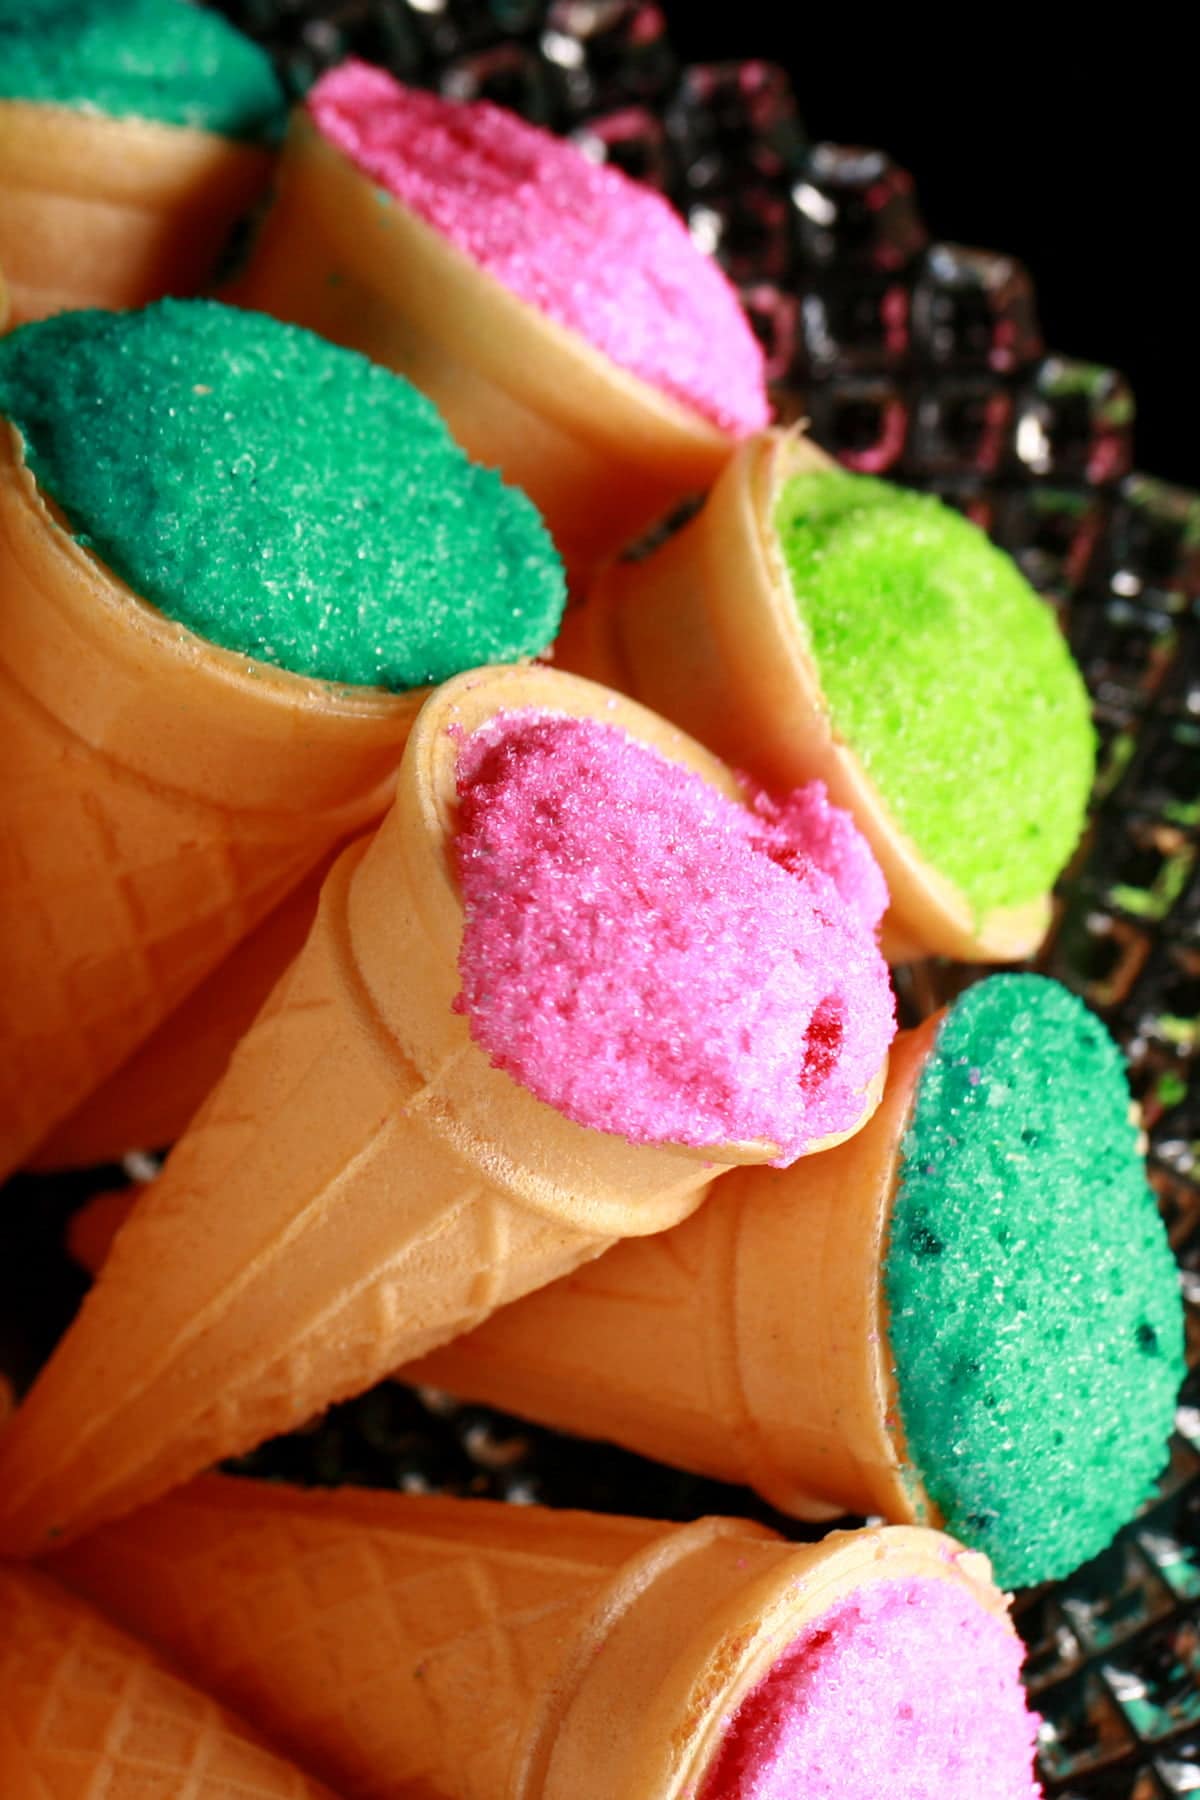
They’re a pretty basic thing: Mini ice cream cones, filled with marshmallow, topped off with coloured sugar.
You’d buy them by the bag in Zellers (like K-Mart) or whatever.
They were cute and fun, but not something that I would have considered particularly remarkable... until the craving hit!
Now, these homemade marshmallow cones are accurate in concept and appearance only.
The homemade marshmallow that these are filled with tastes downright gourmet to the store bought kind, so it's not the most authentic tasting... but that's ok, because these are *awesome*.
They'll definitely be a hit with kids, but adults will love them too - whether they have the nostalgia attached or not.
How to Make Marshmallow Cones
Ingredients
This recipe only takes a few ingredients, but they’re pretty specific. A few notes on that:
Sugar
We use plain white granulated sugar for this recipe.
Food Colouring
While pink, yellow, and plain (white) are the traditional sugar colours used for these, I went off in another direction.
You can use any food colouring you like for this, but I prefer to use a nice quality gel based colour, such as Americolor (what I used when I was in the USA), or ChefMaster (Which is the option more readily available here!)
Colour your sugar based on favorite colour, school colours, or to match a party theme!
Extract
I’ve called for vanilla extract, as that was the flavour of the source material. Feel free to switch it up and use a different flavour extract, though.
Orange or lemon would work great. Peppermint - with red and green food colouring! - would be a fun seasonal option.
Lorann Flavour Oils are a bit harder to come by, but can usually be found at your local cake or candy making supply store. It comes in a LOT more flavours than grocery store extracts do, so you can really have fun with it!
Think... Pink, blue, and white sugar with Cotton Candy flavoured marshmallows! Purple sugar for Grape flavoured marshmallow!
These flavour oils are used the same way as extracts are, but in much smaller amounts. I’d usually do ½ the amount that I’d use for extract.
Cones
You'll need about 24 Mini Ice Cream Cones - sometimes called "sample size" or “sampler” cones.
That link takes you to Amazon, which I've found to be the most reliable source of the cones. Sometimes you can find them in grocery stores, but it's definitely a bit of a hunt.
Mini cones come in both the traditional cup-style cone, and the actual conical CONE, as I use - that's traditional. Feel free to use whichever type you like / can get your hands on, though!

Technique
Prepare Your Sugar
- Divide your sugar among zip seal baggies, 1 bag for each colour you plan to use.
- Add a drop or two of food colouring to each bag, press most of the air out of the bag, and seal with the zipper.
- Gently massage the sugar around to distribute the food colouring evenly throughout the sugar, taking care to break down any clumps.
- Once the colour is evenly distributed with no clumping, transfer the sugars to individual little bowls, for dipping

Make the Marshmallow
- In a small, microwave safe bowl, sprinkle the gelatin over ¼ cup of water, set aside.
- In medium saucepan, combine remaining cup of sugar, with remaining ¼ cup of water and salt. Cook over medium heat, stirring constantly, until sugar is dissolved. Bring to a boil and continue to cook – without stirring – until mixture reaches 240°F on a candy thermometer.
- Remove from heat and add gelatin mixture, stirring until dissolved and completely combined, with no lumps of gelatin.
- Transfer sugar syrup to the bowl of a stand mixer, allow it to cool for about 5 minutes.
- Beat sugar syrup in a standing mixer (or with a hand held electric mixer) on medium speed until it becomes opaque/white.
- Once syrup is no longer clear, add the vanilla and turn the mixer speed up to high.
- Continue whipping the syrup until it is thick, white, glossy, and almost triple the original volume. This may take up to 10 minutes.
Pipe Your Marshmallow
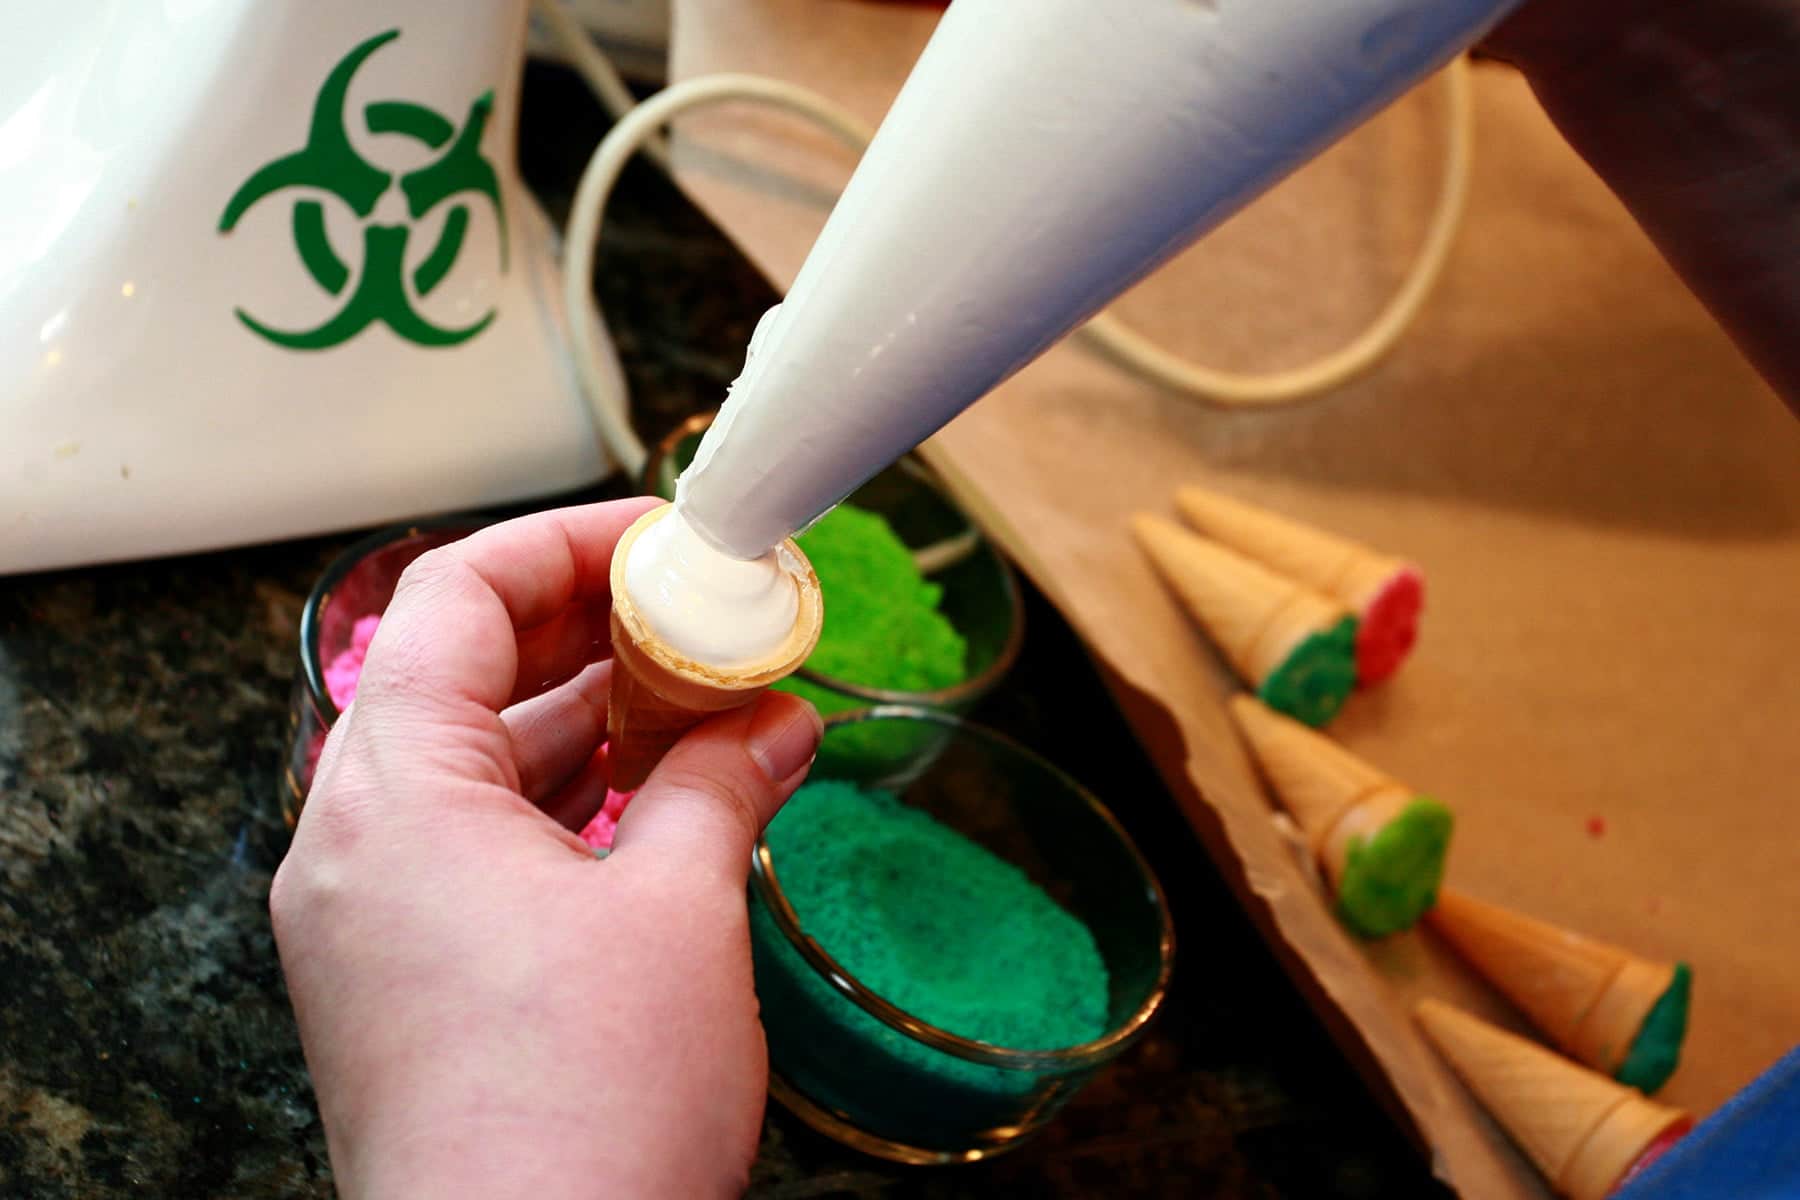
- Carefully spoon the marshmallow into a large pastry bag. Cut a small amount off the end of the pastry bag, so the opening is maybe ½″ across.
- Working quickly, insert the end of the pastry bag into one of the mini ice cream cones, gently squeezing while pulling the bag slowly out of the cone, allowing it to fill completely with marshmallow.
- Let the marshmallow form a bit of a mound on top of each cone, then stop squeezing and pull bag completely away from the cone (you may need to swirl it a bit to avoid a long end on it!)

- As you finish piping each cone, gently roll the top of the cone in the sugar color of your choice, taking care to fully coat all exposed marshmallow.
- As you dip each, lay them to rest on a baking sheet lined with parchment paper. After a few minutes, the marshmallow may have slid a little – I like to re-dip them if needed, and rotate / reposition each cone to even out the “slide”.
- Let the cones set up for a 2-3 hours, then transfer to an airtight container or zip bags to prevent them from drying out. These will last about 3 days, kept at room temperature.

More Canadian Comfort Food!
Whether you’re a Canadian in the US or not, we could all use some comfort food these days. Here are some Canadian Favourites!
Beep
Confetti Bars
Dill Pickle Dip
French Canadian Pea Soup
Homemade Deep N Delicious Cake
How to Make Peameal Bacon and Back Bacon
Maple Butter Tarts
Persians
Poutine, My Way!
Puffed Wheat Squares
Tiger Tail Ice Cream
Looking for even more Canadian recipes? Check out our full Canadian Recipes list!

This recipe is one of many fantastic Canadian recipes in my cookbook, "More Than Poutine: Favourite Foods from my Home and Native Land”. "More than Poutine" is a Canadian cookbook like no other - written by a Canadian living away, it includes both traditional home cooking recipes, as well as accurate homemade versions of many of the snacks, sauces, convenience foods, and other food items that are hard to come by outside of Canada! Order your copy here on this site, through Amazon, or through any major bookseller!
More Candy Making Recipes
In the mood to melt some sugar, make some gummies, or play with chocolate? I've got you!
Bananas Foster Pralines
Banana Walnut Brittle
Candy Apples
Clodhoppers
Dill Pickle Gummy Worms
Festive Easy Fudge
Ginger Molasses Sponge Toffee
Homemade BCAA Gummies
Homemade Crunchie Bars
Homemade Jolly Rancher Candies
Hop Flavoured Beer Lollipops (LolliHOPS!)
Jalapeno Beer Peanut Brittle
Milk Chocolate Chai Truffles
Peppermint Patties Recipe
Pistachio Brittle
Sponge Toffee
Ube White Chocolate Fudge
White Chocolate Almond Amaretto Truffles
Share the Love!
Before you chow down, be sure to take some pics of your handiwork! If you post it to Bluesky, be sure to tag us - @CelebrationGen. We're also on Pinterest, so you can save all your favourite recipes to a board!
Also, be sure to subscribe to my free monthly email newsletter, so you never miss out on any of my nonsense.
Well, the published nonsense, anyway!


Homemade Marshmallow Cones
Equipment
- Small Zip Baggies
- Mini Cones
Ingredients
- 2 ½ Cups Granulated Sugar Divided
- Food Colouring Preferably Paste Form
- 1 Packet Unflavoured Gelatin Powder
- ½ Cup Water Divided
- ¼ teaspoon Salt
- 1 tsp Vanilla Extract
- ~24 Mini, Sampler-Sized Ice Cream Cones
Instructions
- Divide 1 ½ cups of the sugar among zip seal baggies, 1 bag for each colour you plan to use. Add a drop or two of food colouring to each bag, press most of the air out of the bag, and seal with the zipper. Gently massage the sugar around to distribute the food colouring evenly throughout the sugar, taking care to break down any clumps.

- Once the colour is evenly distributed with no clumping, transfer the sugars to individual little bowls, for dipping

- In a small, microwave safe bowl, sprinkle the gelatin over ¼ cup of water, set aside.
- In medium saucepan, combine remaining cup of sugar, with remaining ¼ cup of water and salt. Cook over medium heat, stirring constantly, until sugar is dissolved. Bring to a boil and continue to cook – without stirring – until mixture reaches 240°F on a candy thermometer. Remove from heat and add gelatin mixture, stirring until dissolved and completely combined, with no lumps of gelatin.
- Transfer sugar syrup to the bowl of a stand mixer, allow it to cool for about 5 minutes.
- Beat sugar syrup in a standing mixer (or with a hand held electric mixer) on medium speed until it becomes opaque/white.
- Once syrup is no longer clear, add the vanilla and turn the mixer speed up to high. Continue whipping the syrup until it is thick, white, glossy, and almost triple the original volume. This may take up to 10 minutes.
- Carefully spoon the marshmallow into a large pastry bag. Cut a small amount off the end of the pastry bag, so the opening is maybe ½″ across.
- Working quickly, insert the end of the pastry bag into one of the mini ice cream cones, gently squeezing while pulling the bag slowly out of the cone, allowing it to fill completely with marshmallow. Let the marshmallow form a bit of a mound on top of each cone, then stop squeezing and pull bag completely away from the cone (you may need to swirl it a bit to avoid a lot end on it!)

- As you finish piping each cone, gently roll the top of the cone in the sugar color of your choice, taking care to fully coat all exposed marshmallow.

- As you dip each, lay them to rest on a baking sheet lined with parchment paper. After a few minutes, the marshmallow may have slid a little – I like to re-dip them if needed, and rotate / reposition each cone to even out the “slide”.

- Let the cones set up for a 2-3 hours, then transfer to an airtight container or zip bags to prevent them from drying out. These will last about 3 days, kept at room temperature.


Nutrition

More Recipes that Remind me of Gramma
Since originally writing this post, my gramma has sadly passed... but her memory lives on.
Here are a few recipes that remind me of her, whether as something she taught me to make, a replica of a retail treat we used to enjoy together, or one of my own recipes that she would request whenever I’d visit, as an adult.
Gramma's Perogies Recipe
Homemade Clodhoppers Candy
Puffed Wheat Squares
Honey Dill Dipping Sauce
Paska - Ukrainian Easter Bread
Baking Powder Biscuits
Grandma's Potato Salad
Easy Butterfly Cupcakes
Breakfast of Champions
French Canadian Pea Soup
Beep Drink Recipe
Sponge Toffee


Michele
Marie,
Where do you get your itty bitty cones? I've not seen them anywhere, but would LOVE to try these!
Thanks!
If you have an online source, I'd love a link.
Marie Porter
Hi Michelle,
I bought them at Cub Foods, right in with their regular ice cream cones. They're called "Sample-size cones", and the brand is "Dinky Dippers".
Hope this helps!