This post has all the basics for sugar cookie decorating - a fantastic sugar cookie recipe, a great frosting recipe, a tutorial, and Daleks!
Originally published July 15, 2013. Updated on 9/7/2021

So it's been a week since I returned from Convergence... probably about time to make good on that Dalek Cookie Decorating tutorial I was promising, huh?
Ah, Convergence. 6500+ geeks under one roof, amazing costumes, messed up conversations... and more than one reminder that I am getting OLD. I was in bed by 10 pm the first night, and was barely able to walk by Sunday. Yikes!
My husband had an AMAZING time in his Weeping Angel costume, posing for several hundred photos (Conservative guesstimate, it was likely over 1000!), sneaking up on people, photo bombing some ... he was kind of a rock star 🙂

Click here for more photos!
Geeky Cookie Decorating Party!
For my part, I taught cookie decorating for my "Cooking with an Overlord" activity.
If you were at Convergence and had NO idea what "Cooking with an Overlord" would entail, you weren't alone - *I* had no idea what it was going to be until about 2 weeks before the event, which was LONG after the program guide description was due, LOL!
(That was right around the time I was up to my eyeballs in MasterChef stuff.)
At the last minute, I decided that I wanted to teach people how to do cookie decorating, using fandom themed cookies.
Doctor Who Cookies!
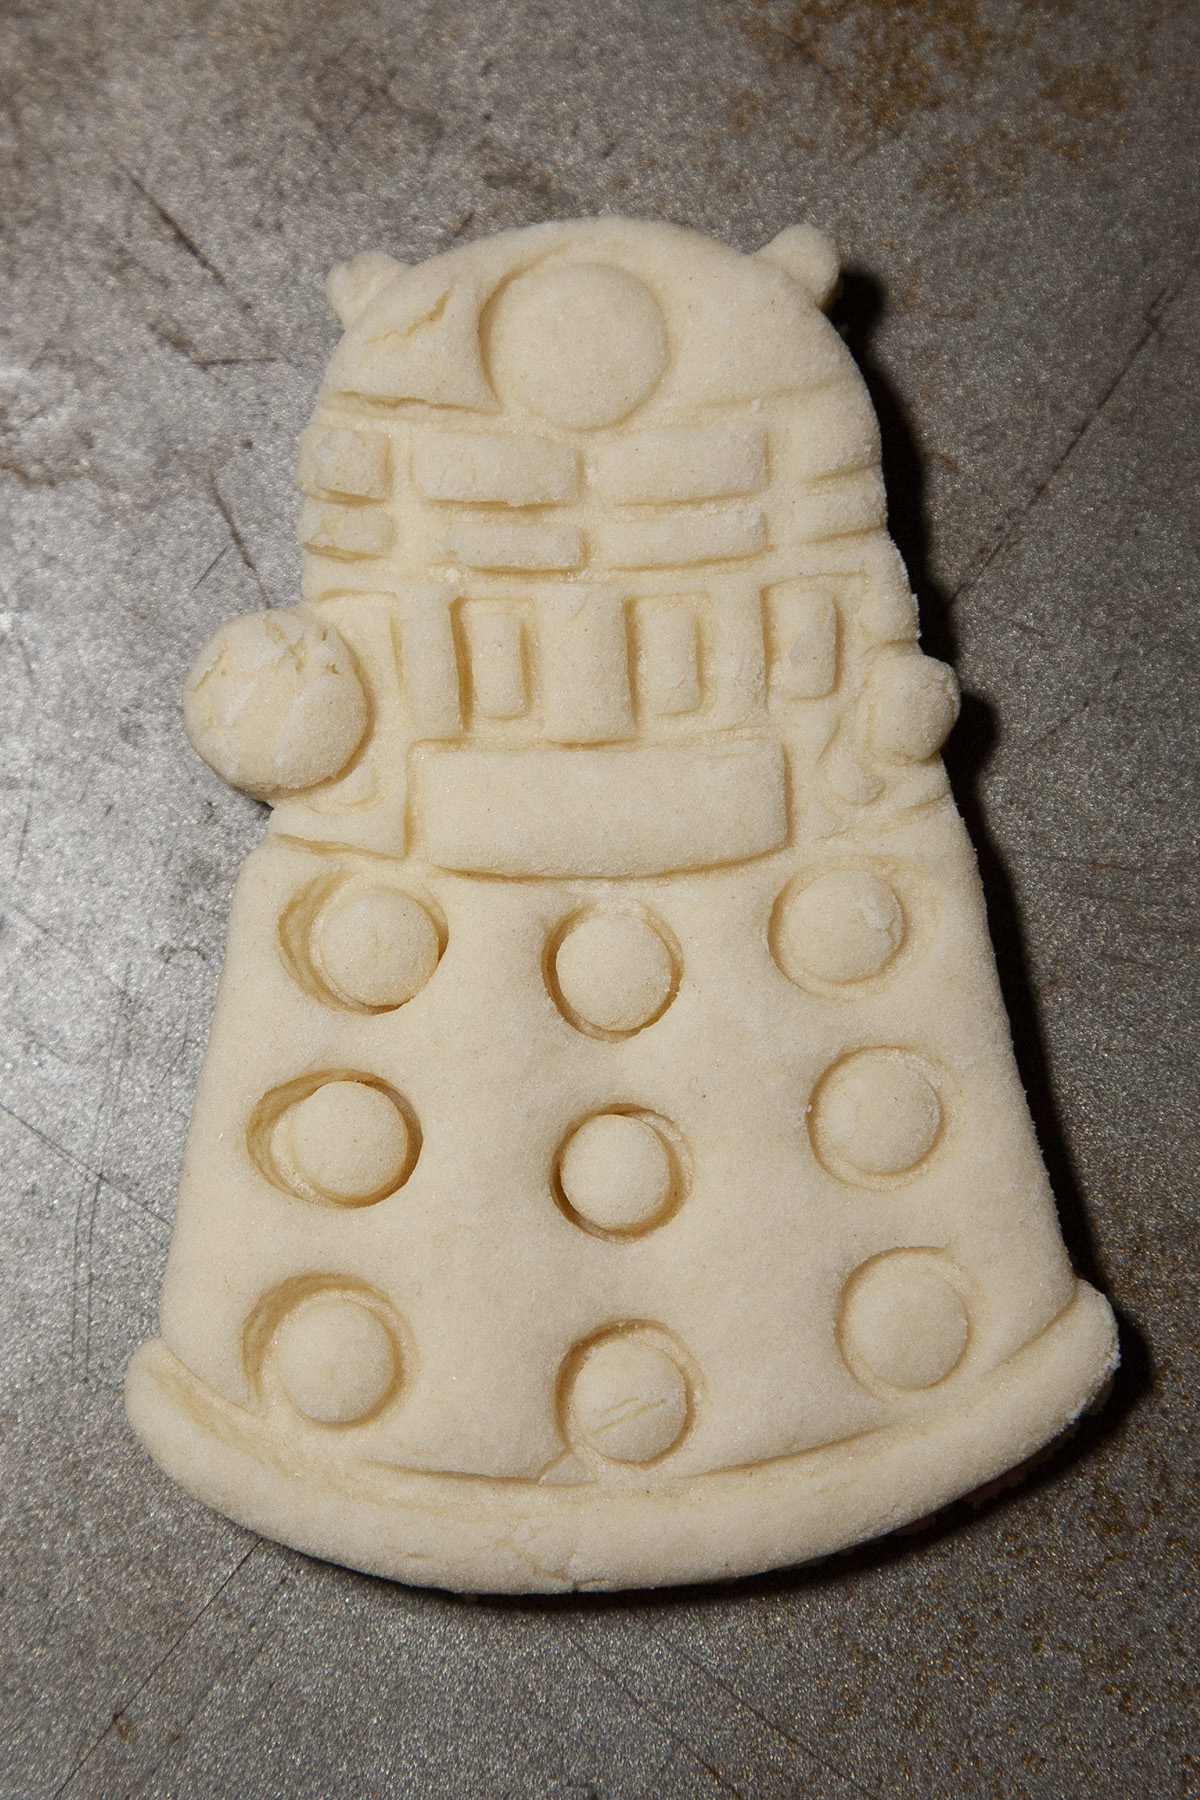
A quick Google search brought me to Warp Zone Prints on Etsy, a company that was using 3D printers to make cookie cutters - Brilliant!

I immediately ordered the three cutters pictured above, and planned the logistics for such a large class.
Note: That Etsy company no longer exists, but there are other Doctor Who cookie cutters available on the site. Click here!
I did a trial run of all three cutters, only the Dalek one was really suitable for this type of cookie decorating.
The TARDIS and Weeping Angel ones were so cute, I'd recommend dyeing your cookie dough and only doing outline decorating on them, however.)
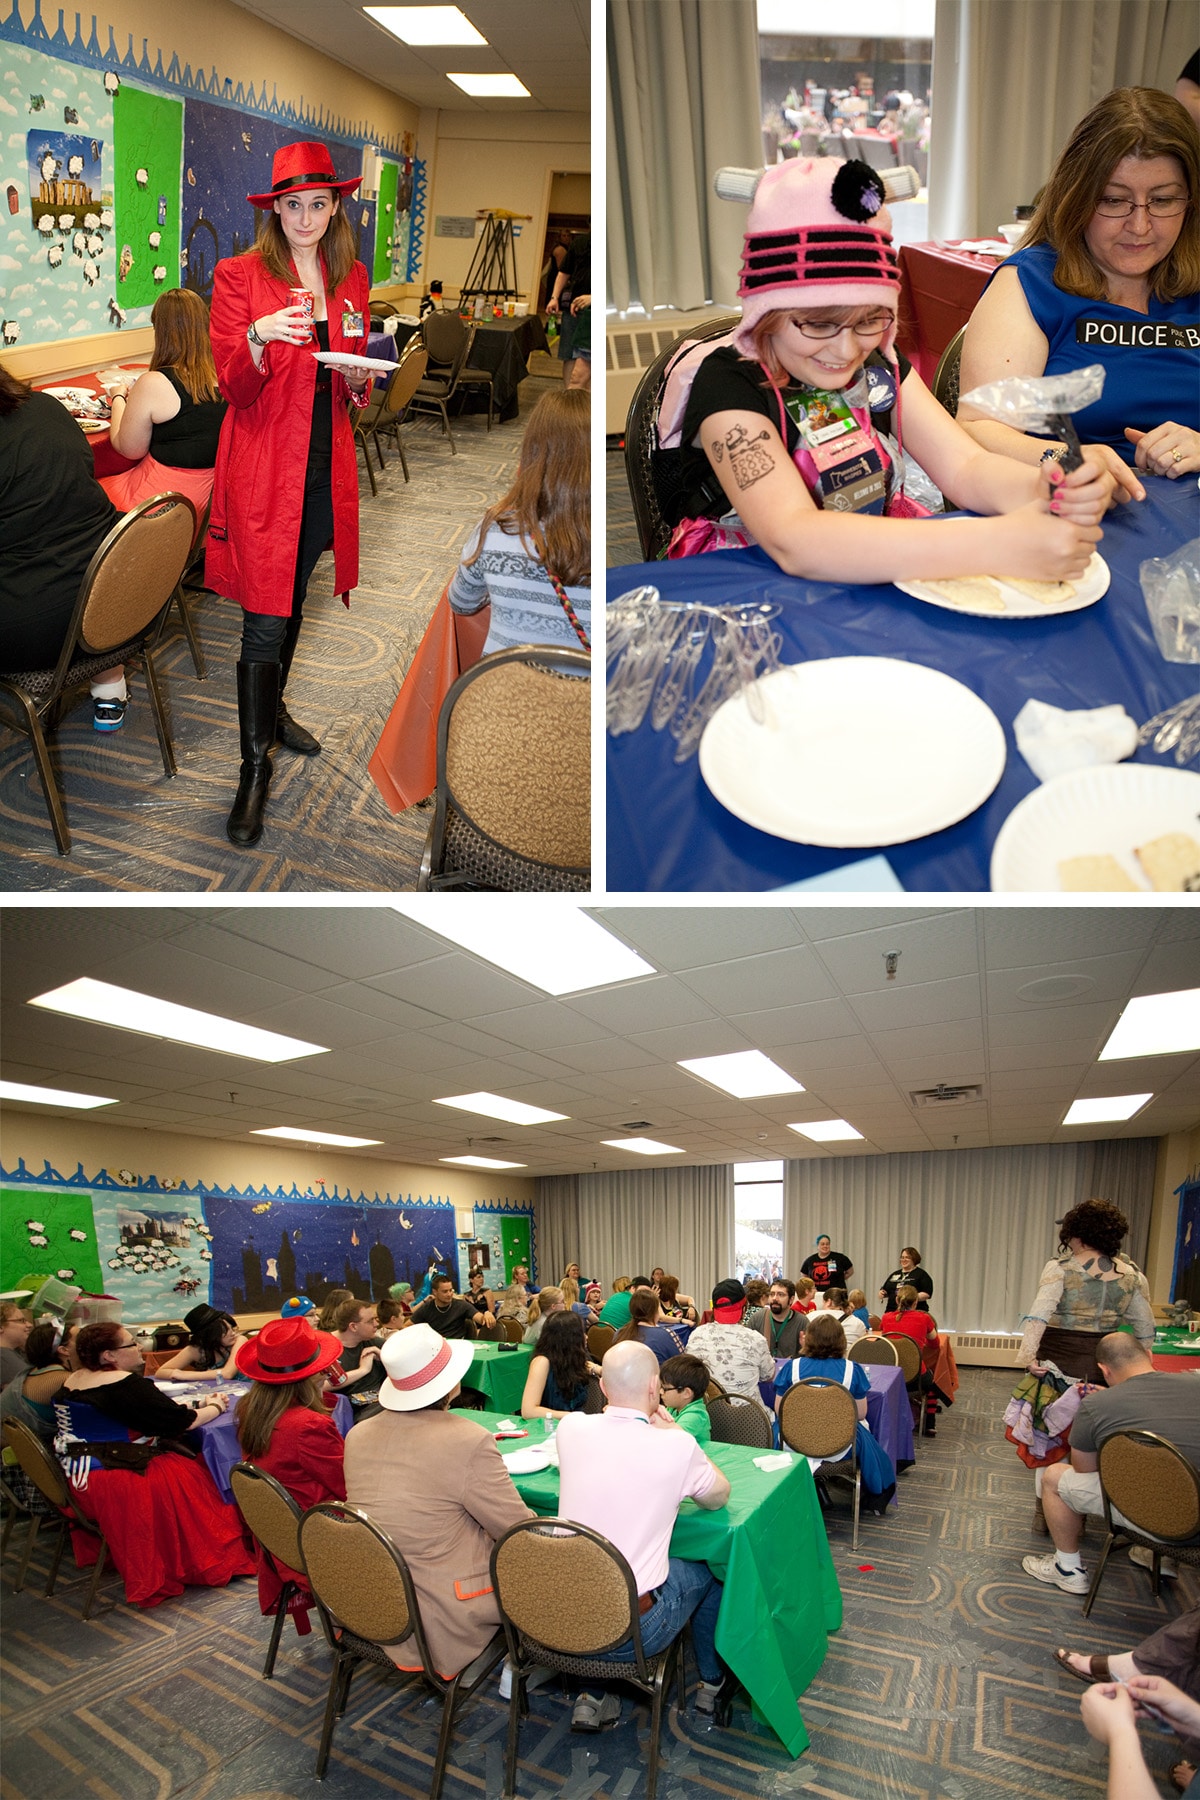
At my cookie class, I got to see Idris serve Carmen Sandiego with a warrant, so... there is that. 🙂
Carmen Sandiego is my friend Samantha, a local writer who reports on Eurovision at her blog, ESC Insider.
We also had the pleasure of meeting the famous Pink Dalek herself, Alanna... who was excited to EX-TER-MIN-ATE some cookies!

Me decorating some cookies to demonstrate to the class.
Want to make some yourself?
Let’s get to it!

Decorated Dalek Cookies
While I’m specifically walking through Dalek cookies here, the recipes and techniques are the same you’d use for any other character cookie!
Make Your Cookies
First off, make your cookies.
My favourite sugar cookie recipe is at the end of this post. If you need a gluten-free cookie, try my Gluten-Free Sugar Cookie Recipe - it rolls, cuts, and bakes up perfectly!
Delicious, too!
Whatever recipe you use, be sure to roll the dough as flat and evenly as possible.
As I mentioned in my Halloween Spider Web Cookies post, I like to use a rolling pin with height guides, when making sugar cookies for decorating.
I find it’s the best way to get a perfectly even roll. This is the rolling pin, I use and I LOVE it.
There are other brands available, of course:
Anyway, bake your cookies and allow them to cool fully, before proceeding.
Make Your Frosting
Once you’re almost ready to decorate, make your cookie icing - my recipe is in the card at the bottom of this post.
Decorate Your Daleks!
Pipe the Outlines
First, take about ¼ of your frosting and dye it black. Personally, I like the Americolor Gel line of food coloring gels.
Cover the remaining frosting tightly with plastic wrap - have the wrap sitting right on the surface with NO air pockets, vent holes, etc. The frosting dries out FAST.
I recommend using a frosting bag with a coupler and tip (#2 or #3 round tip), so please take these photos as a "do as I say, not as I do".
It was after Convergence, I was tired and burnt out, didn't feel like messing around with tips and couplers.
Also, I used pre-Convergence frosting - which was too thick for outlining - so my cookies are kinda ugly. LOL!
If you don't want to use a tip, cut the very end of the frosting bag off to leave a fairly small opening - ⅛" diameter or so.
Holding the tip/end of your frosting bag about 1 cm away from the cookie, carefully pipe out your outlines and design details.

These lines will eventually contain the flowing frosting, so make sure you don't have any breaks in the piping, or the icing will flow out to areas you don't want it!
Once all the outlines are piped, allow the cookie to dry for about 10-20 minutes.

Filling in the Colours
Next, you'll want to tint your first color of frosting - about ⅓ of the original batch.
I used a few drops each of gold and warm brown to get a sort of bronzey colour for the main body of the Daleks.
Daleks come in many colours now, though, so use whatever colour you prefer!
Once you've gotten the right colour mixed up, you'll need to thin the frosting so it will "flood" the decorating area.
Add a few drops of water and stir well.
Use the end of your spoon to drizzle a bit of frosting back into the bowl.
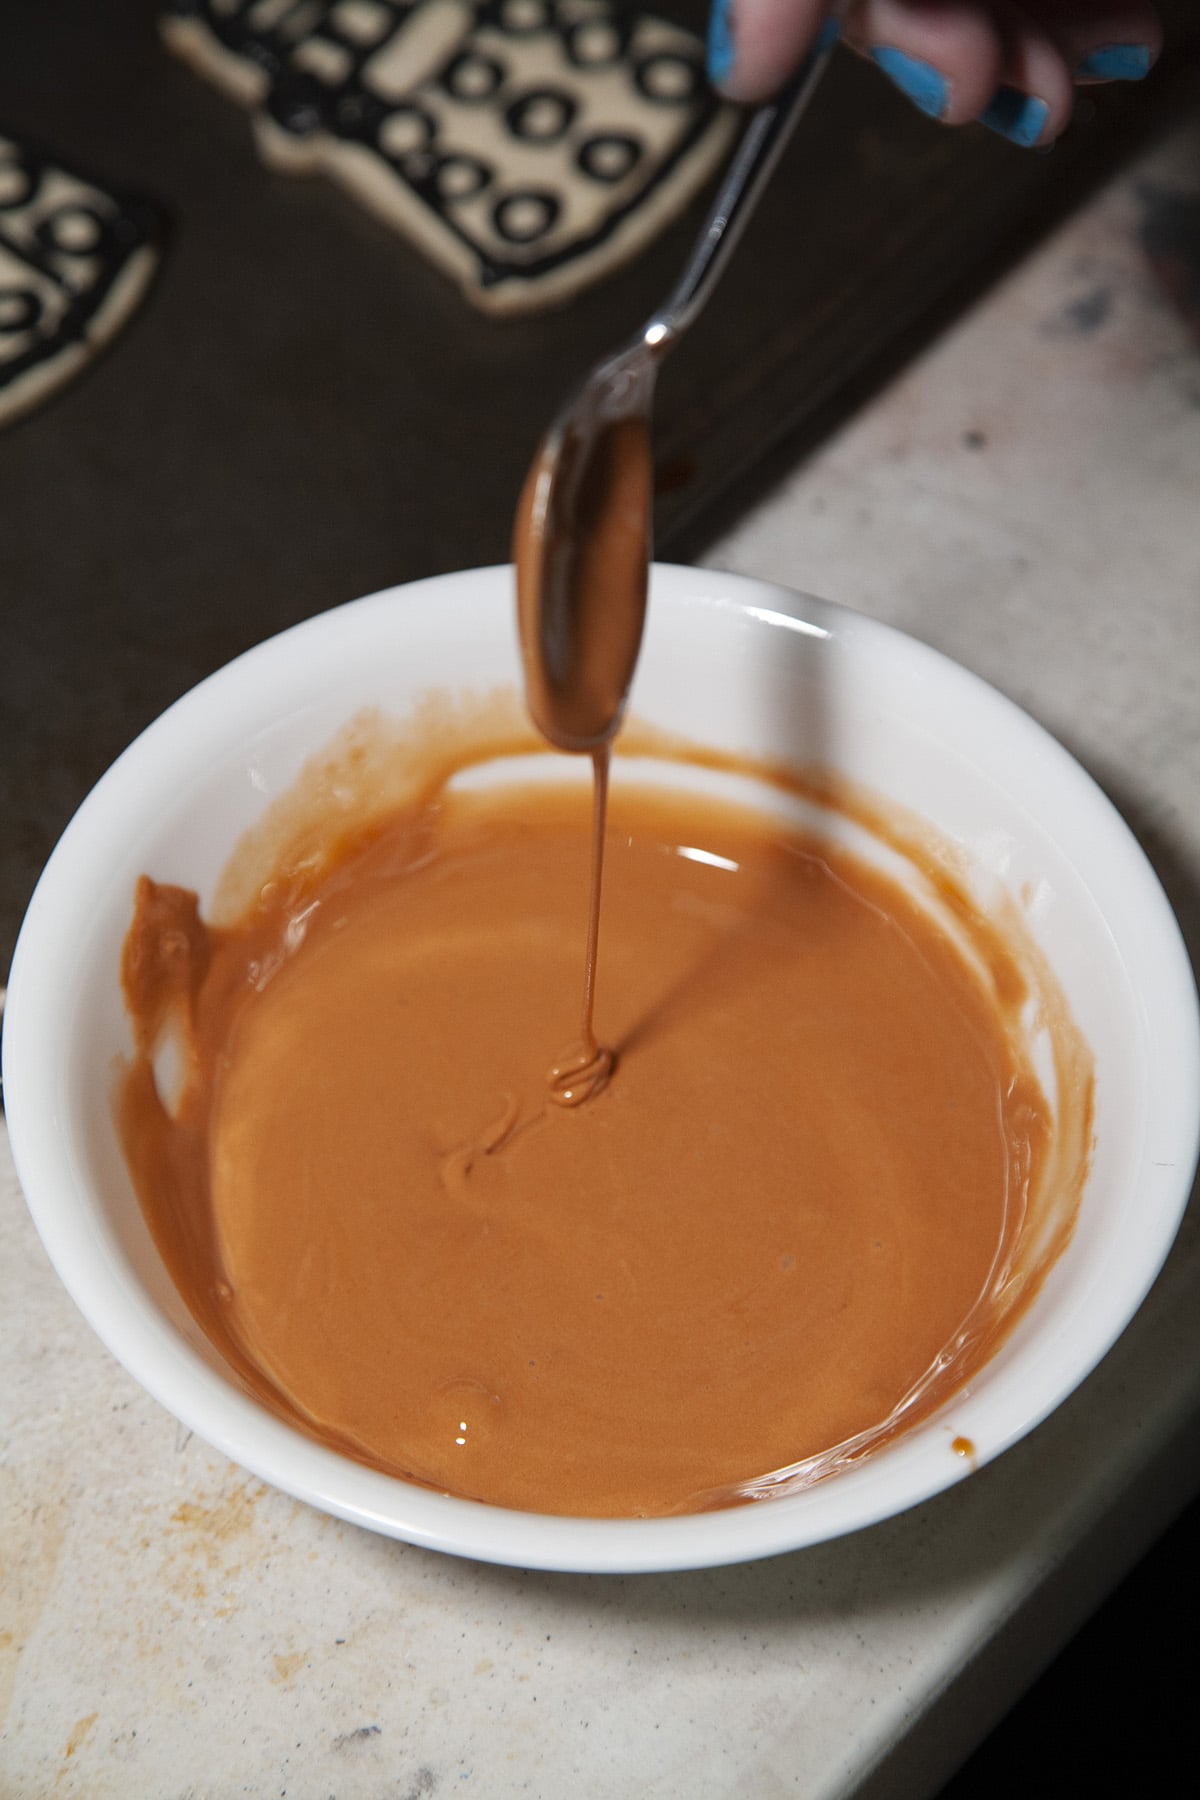
If it smooths out and disappears in a count of 3, you're good to go!
If not, add a couple more drops of water until it's the right consistency.
Carefully pipe a bit of the liquid frosting into the areas you want - you'll probably not even need to squeeze the bag, just carefully guide it, nudging it into corners, etc. This can be messy to start, just practice!
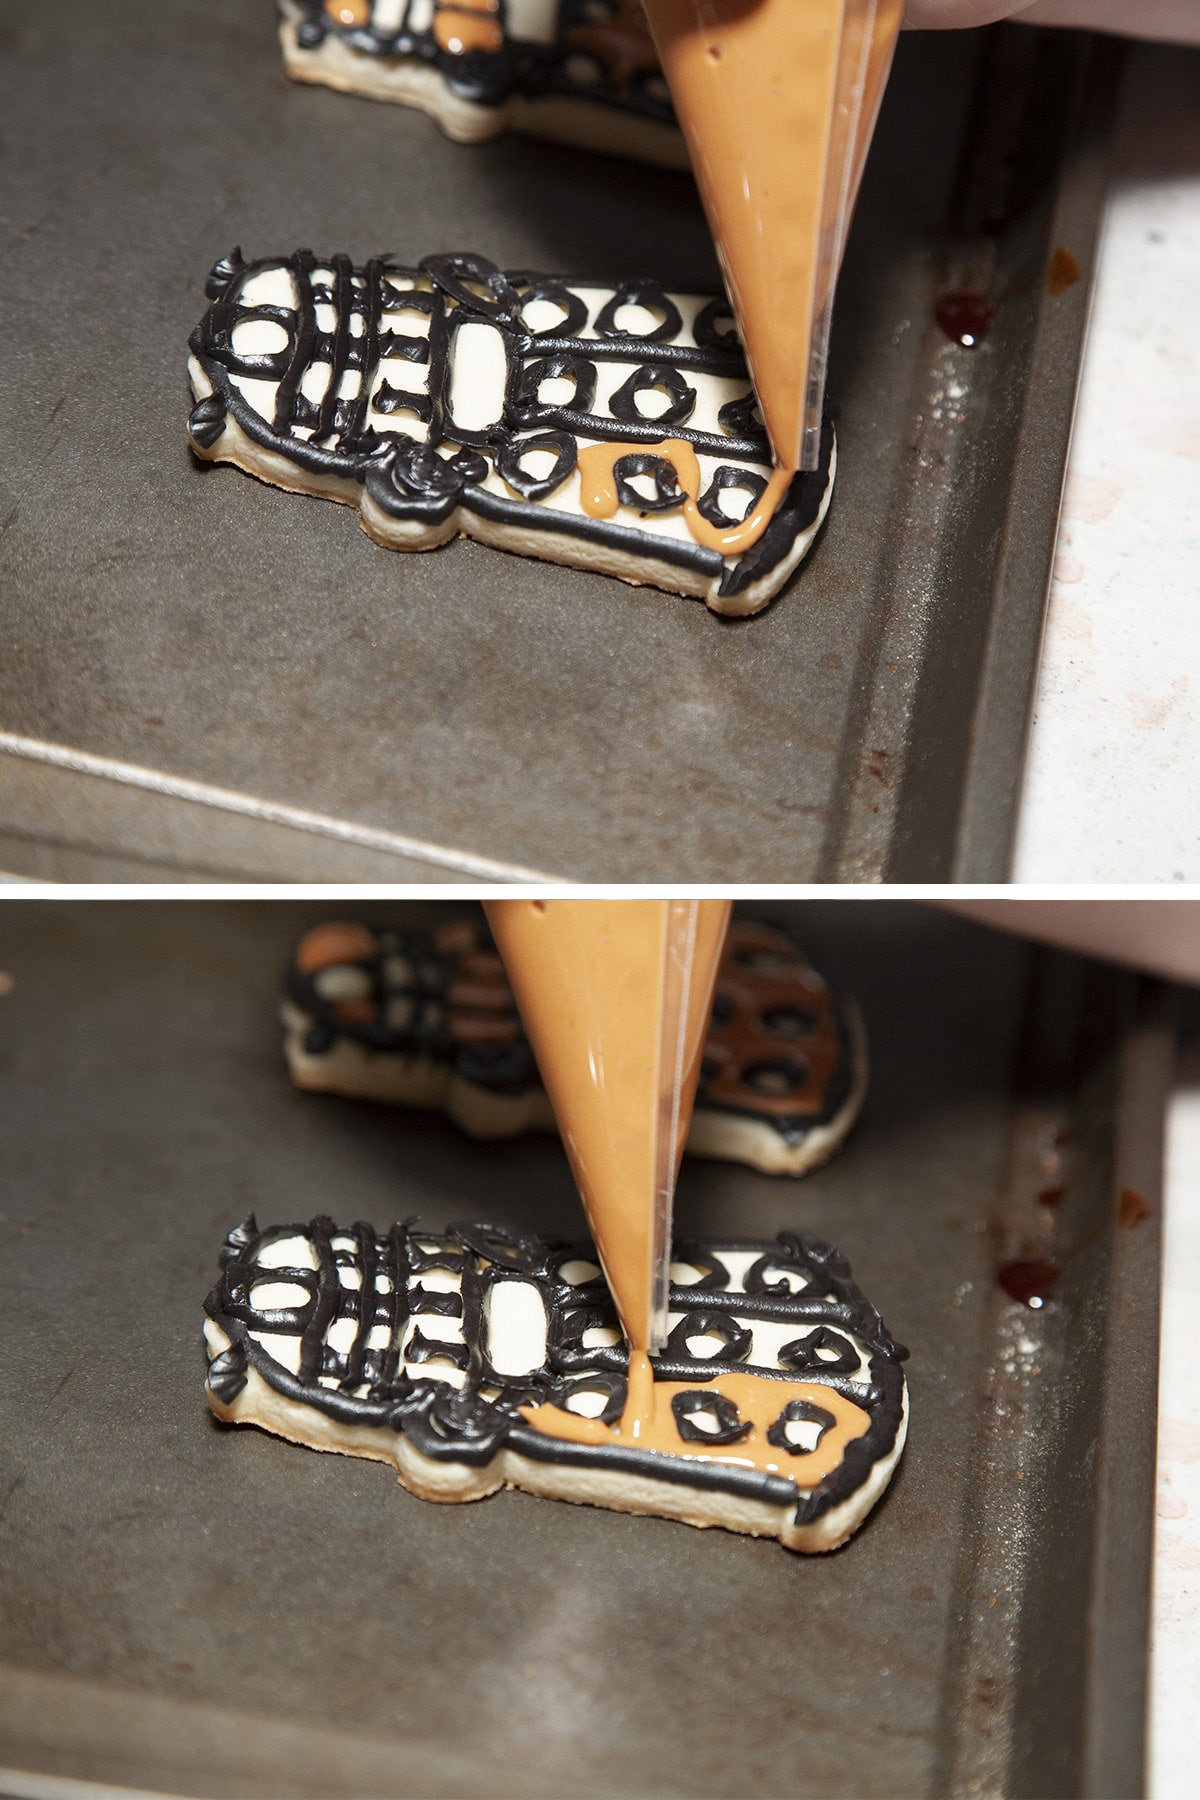
Generally speaking, flood piping is done from the outside perimeter of an area inwards, but on these cookies there's so little room to work with, just do whatever feels right!
Sit back and admire your work. (Yes, these examples are sloppy. Sorry!)

Detail the Dalek Cookies!
Following the past few steps, dye about ⅔ of the remaining frosting gold (or whatever colour you're looking at for these sections), thin it for flooding, and have at it!

Dye about ½ the remaining frosting bright turquoise blue, and flood the appropriate circle.
Note: I have no idea if "the one on the forehead" applies, given that the forehead of the actual creature would be more like ⅔ of the way up, inside what is seen. Maybe I'm overthinking this...
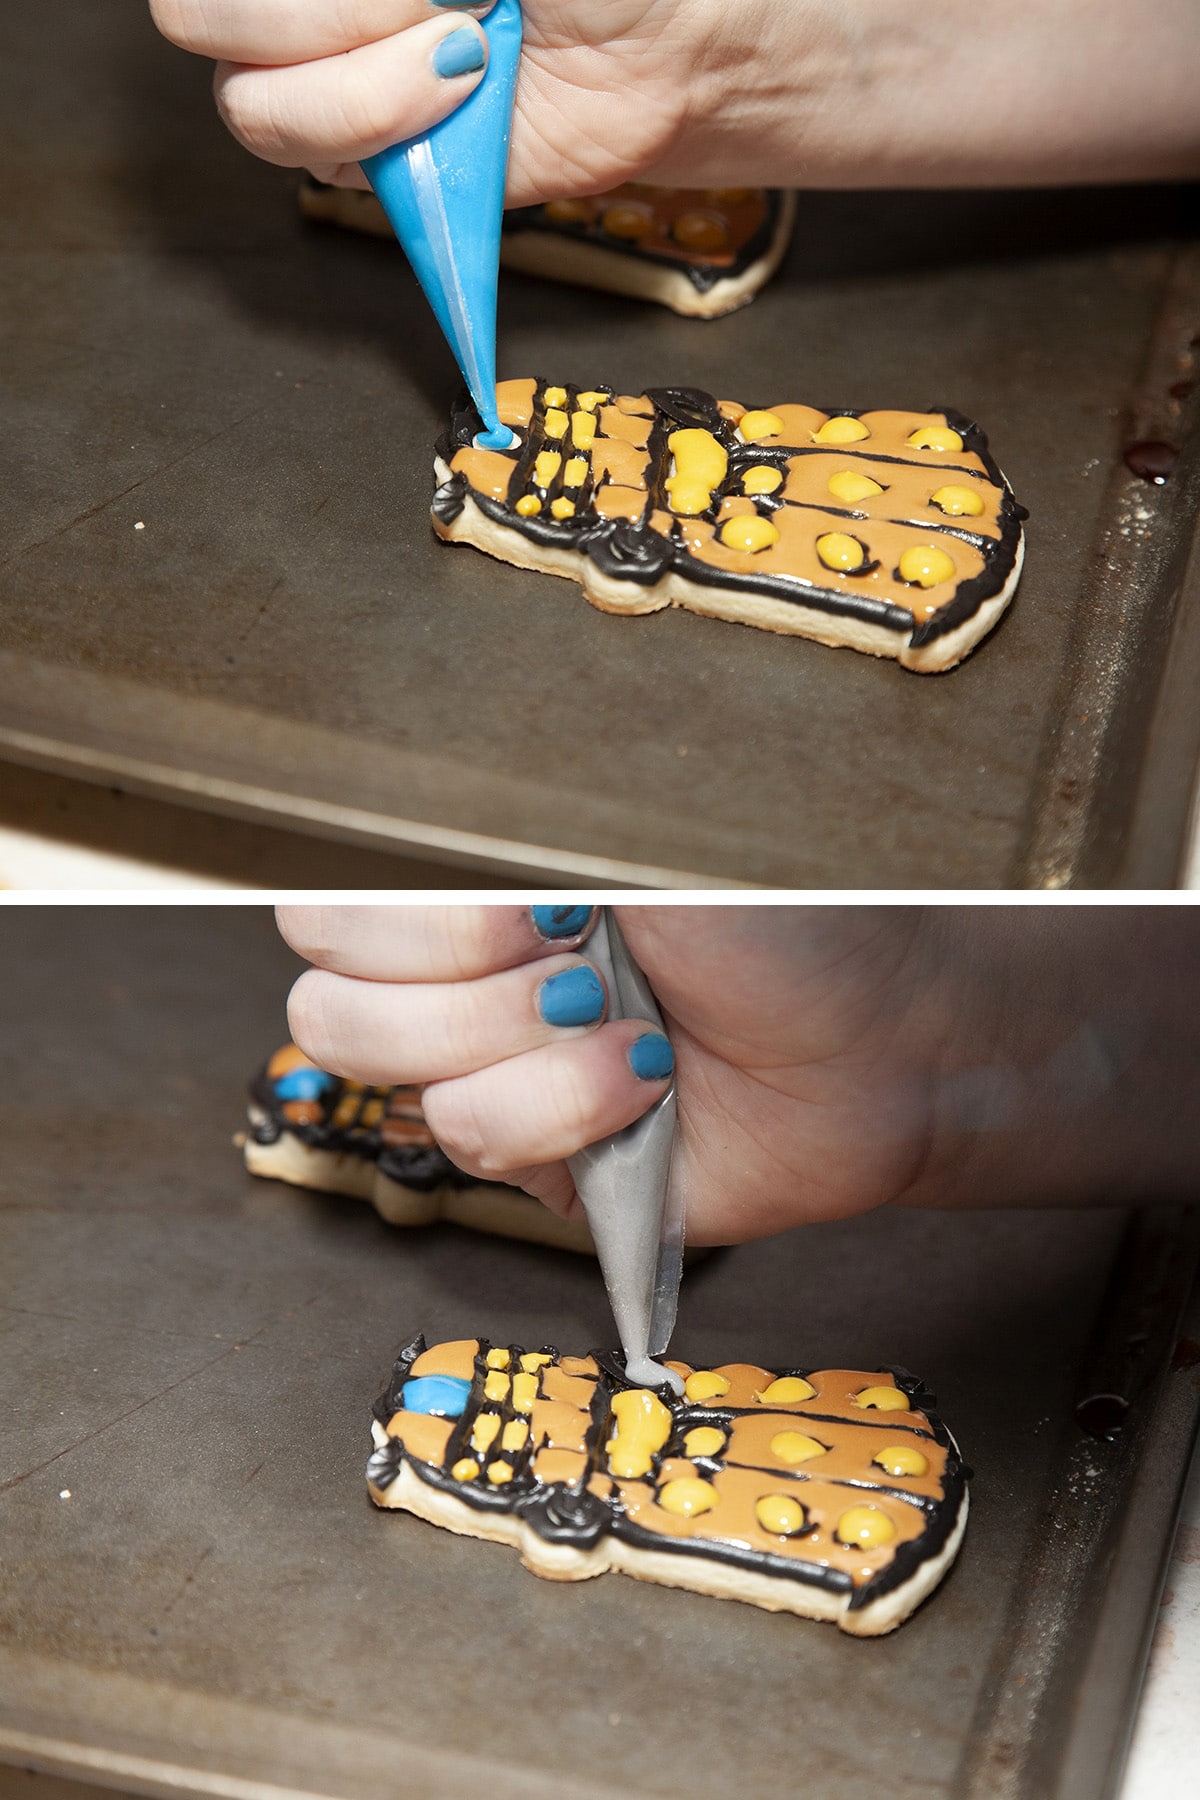
Dye remaining frosting pale grey and thin it. Pipe to fill in the ... whisk?... area!
Allow the cookies to dry overnight before packaging or serving.
Enjoy!
(Or, if like me, you are less than impressed with your own work after a loooong weekend at Convention... you can go over all of your original outlines with some more black frosting to make them stand out a bit more and "clean up" the overall appearance! Bonus points for claiming that you meant to do it that way, for extra definition!)

Wanna Nerd out With Us Some More?
There's a LOT of nerdery - and geekery - going down on this blog. Here are some favourites...
Bubble Bobble Wedding Cake
Dalek Cake for a Doctor
"Convention" Brownies
Convention Sloppy Joes
Gluten-Free Lembas
How to Make a Weeping Angel Costume
How to Design & Install a Nerdy Backsplash
Miruvor Recipe
My Convention Survival Guide
Partridgeberry Pie & Cosplay Geekery
Pi Day Pinata Tutorial
Roasted Convention Chili Recipe
That Time I made a TARDIS Cake for Geek Royalty..
The Epic Klingon Cake
The One Cheese Ring
The Silence of the Lambs Cake
The Story of Foopmallet
Tremors Wedding Cake

Share the Love!
Before you chow down, be sure to take some pics of your handiwork! If you post it to Bluesky, be sure to tag us - @CelebrationGen. We're also on Pinterest, so you can save all your favourite recipes to a board!
Also, be sure to subscribe to my free monthly email newsletter, so you never miss out on any of my nonsense.
Well, the published nonsense, anyway!

Cut-Out Rolled Sugar Cookies
Equipment
- Baking Sheets
- Parchment Paper
- Cookie Cutters
- Disposable Pastry Bags
- Cake Decorating Set (Optional)
Ingredients
Cookies
- 1 ½ cups Butter softened
- 2 ¼ cups Granulated sugar
- 4 Large eggs
- 2 teaspoon Vanilla extract
- 2 teaspoon Baking powder
- 1 teaspoon Salt
- 5+ cups All-purpose flour
Instructions
- In a stand mixer, cream together butter and sugar until smooth and fluffy.
- Add in eggs, a little at a time, beating well between each addition. Add vanilla extract, and mix until well incorporated and smooth.
- Mix remaining 3 ingredients together, carefully mix into wet ingredients until fully incorporated.
- Wrap dough in plastic film, chill for 1 hour.
- Preheat oven to 400 degrees F, line cookie sheets with parchment paper
- On a floured counter, roll cookie dough out to about ¼″ thick (can be slightly thicker).
- Use cookie cutters to cut out whatever shapes you’d like, place cookies 2″ apart on prepared cookie sheets.
- Bake cookies for 8-10 minutes, or until bottoms look lightly golden.
- Allow cookies to cool on cookie sheets for at least 5 minutes before moving. Cookies need to cool completely before decorating.






Angie Anderson
Thank you SO much for coming to the Sandbox to do this! The cookies were wonderful and I think that many people learned a lot. My mother said that she learned that decorating cookies is not one of her skills.
I'll bet there will be more royal icing on the 2013 Christmas Cookie population.
Frank
Am so ready to "exterminate" them delish cookies in one fell swoop. Nicely done!
Annie L
Thanks to Michael for being part of my favorite photo at CON: https://twitter.com/thinklynsen/status/352834995074781184 His costume was amazeballs.
Marie Porter
That was one of my favourite photos from Convergence also!
Hadass Eviatar
Hi Marie, that is totally amazing! My children are now dying for those cookie cutters, can we get them from you or do we need to order them from that Etsy store? Thanks!
Marie Porter
You can get them from the Etsy store I posted - I don't carry them, only bought one set for this project!
Hadass Eviatar
Thanks, Marie - I am in soooo much trouble now ...
menu man
I absolutely loved this Dalek cookie decorating tutorial! The step‑by‑step instructions make it so approachable even for someone like me who’s not super confident with icing yet. I especially appreciate the personal story about how this idea came from a convention — it really made the recipe feel fun and memorable. I actually just shared this post on my site as a fun inspiration for themed baking projects at home: whatameuguide.com
🍪💛 Thanks for sharing such a creative and geeky twist on sugar cookies!