

How to Design and Install a Nerdy Granite Tile Backsplash
Originally posted February 3, 2012. Updated 1/22/2021

How to Design and Install a Nerdy Granite Tile Backsplash. Using granite tiles as if they are pixels, geeky design possibilities are endless!
SO, I know it's not EXACTLY food related... but tiling an awesome back splash is KITCHEN related, and tutorials are *almost* recipes, right? I swear this is actually a food blog...!
Remember back when I debuted the photos of our finished bathroom renovation, with Fibonacci sequence tiled into the main wall, and a few digits of pi tiled behind the toilet?
It was a last minute design idea, and it was to be a subtle, small nod to our nerdiness.
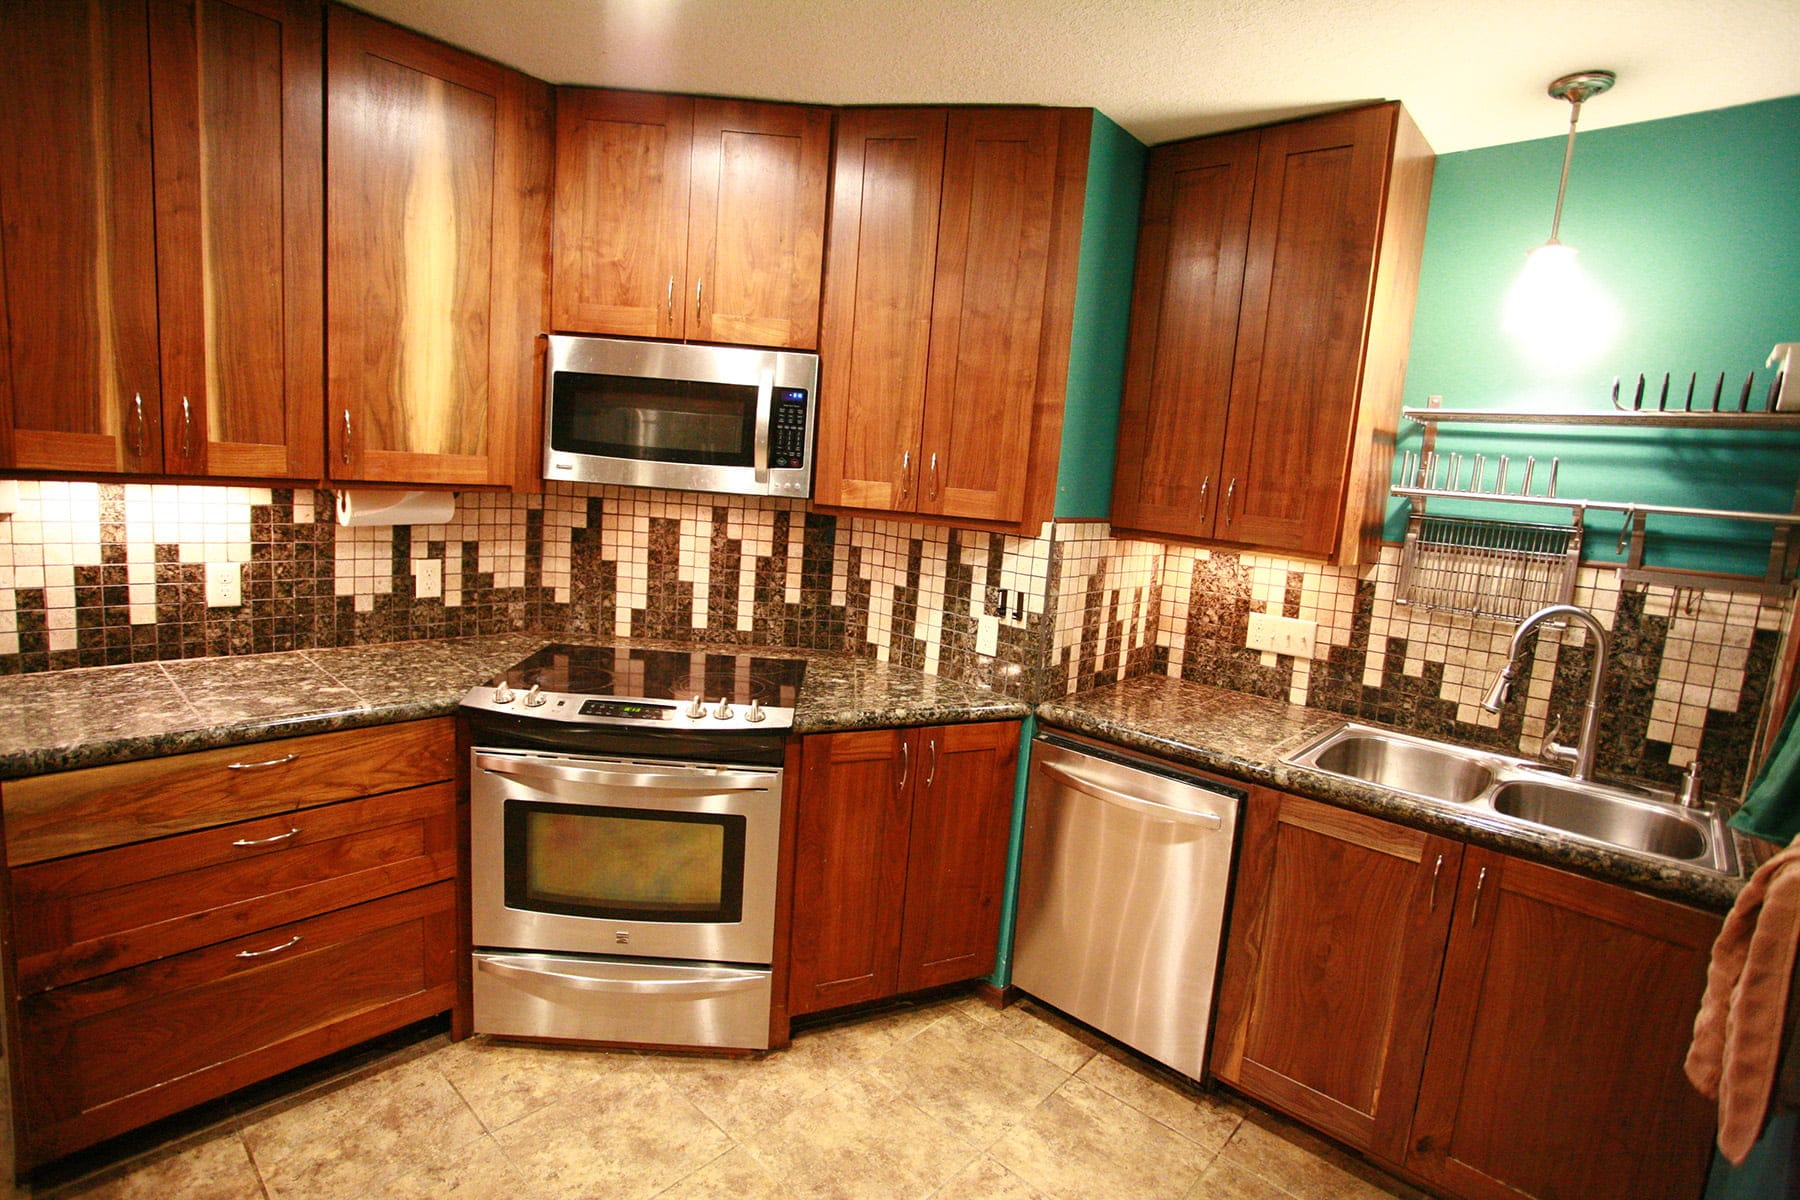
Well, one thing led to another... and now we have 159 digits of pi tiled into our kitchen backsplash.
If you follow me on Twitter, you’re probably sick of hearing about it by now... but I not only have the final photos, I have a tutorial on how to do it yourself!
Now, I know we went sort of nuts with the pi day celebrations last year... but this really takes it to a whole new level.
We're happy to have this in place in time for this year's party, but... damn. No idea how we'll top this for Pi day 2013. Or, you know, 2015, when we should really go all out! (3/14/15!)

The Forced Renovation
I guess the one good thing about getting your house destroyed by a tornado is that it forces you to get off your butt, make a bunch of design decisions and actually DO renovations on the house, rather than just talk about "someday, it would be cool if...".
We still have quite a ways to go, but the house really is looking great.
We won't have cabinet faces and doors for a WHILE - still waiting for the lumber we had milled to be properly dried, so we can build all that.
Oh well. I think the fact that the black walnut that destroyed our kitchen is being used to rebuild it is badass enough to be worth the wait! Anyway...
Pixel Art Backsplash Design
Now, I realize that the odds of anyone else tiling pi into their kitchen is fairly slim... but this tutorial is also good for anyone who wants to put in a new backsplash, but with a personal twist.
The photos and specifics here are for pi, but the principles can apply to any design you can think up, with 2" x 2" tiles.
For instance..
- Using two favorite colors to create a custom checkerboard design, should you not be happy with the small amount of pre-fab options out there.
- If you look at the tiles as “pixels”, you can do pretty much anything you can come up with that is 9-10 squares tall, by however long you want.
- Tetris!
- Music fans or musicians could make an amazing “equalizer” type design!
I can’t tell you how rewarding it is to look at a finished, completely custom backsplash, and know that it is YOURS... and it wasn’t the difficult! On to the tutorial....
How to Design and Install a Pixel Art Backsplash
Decide on Your Design & Colour Scheme
For us, we wanted to tile as many digits of pi as would fit around the areas requiring backsplash.
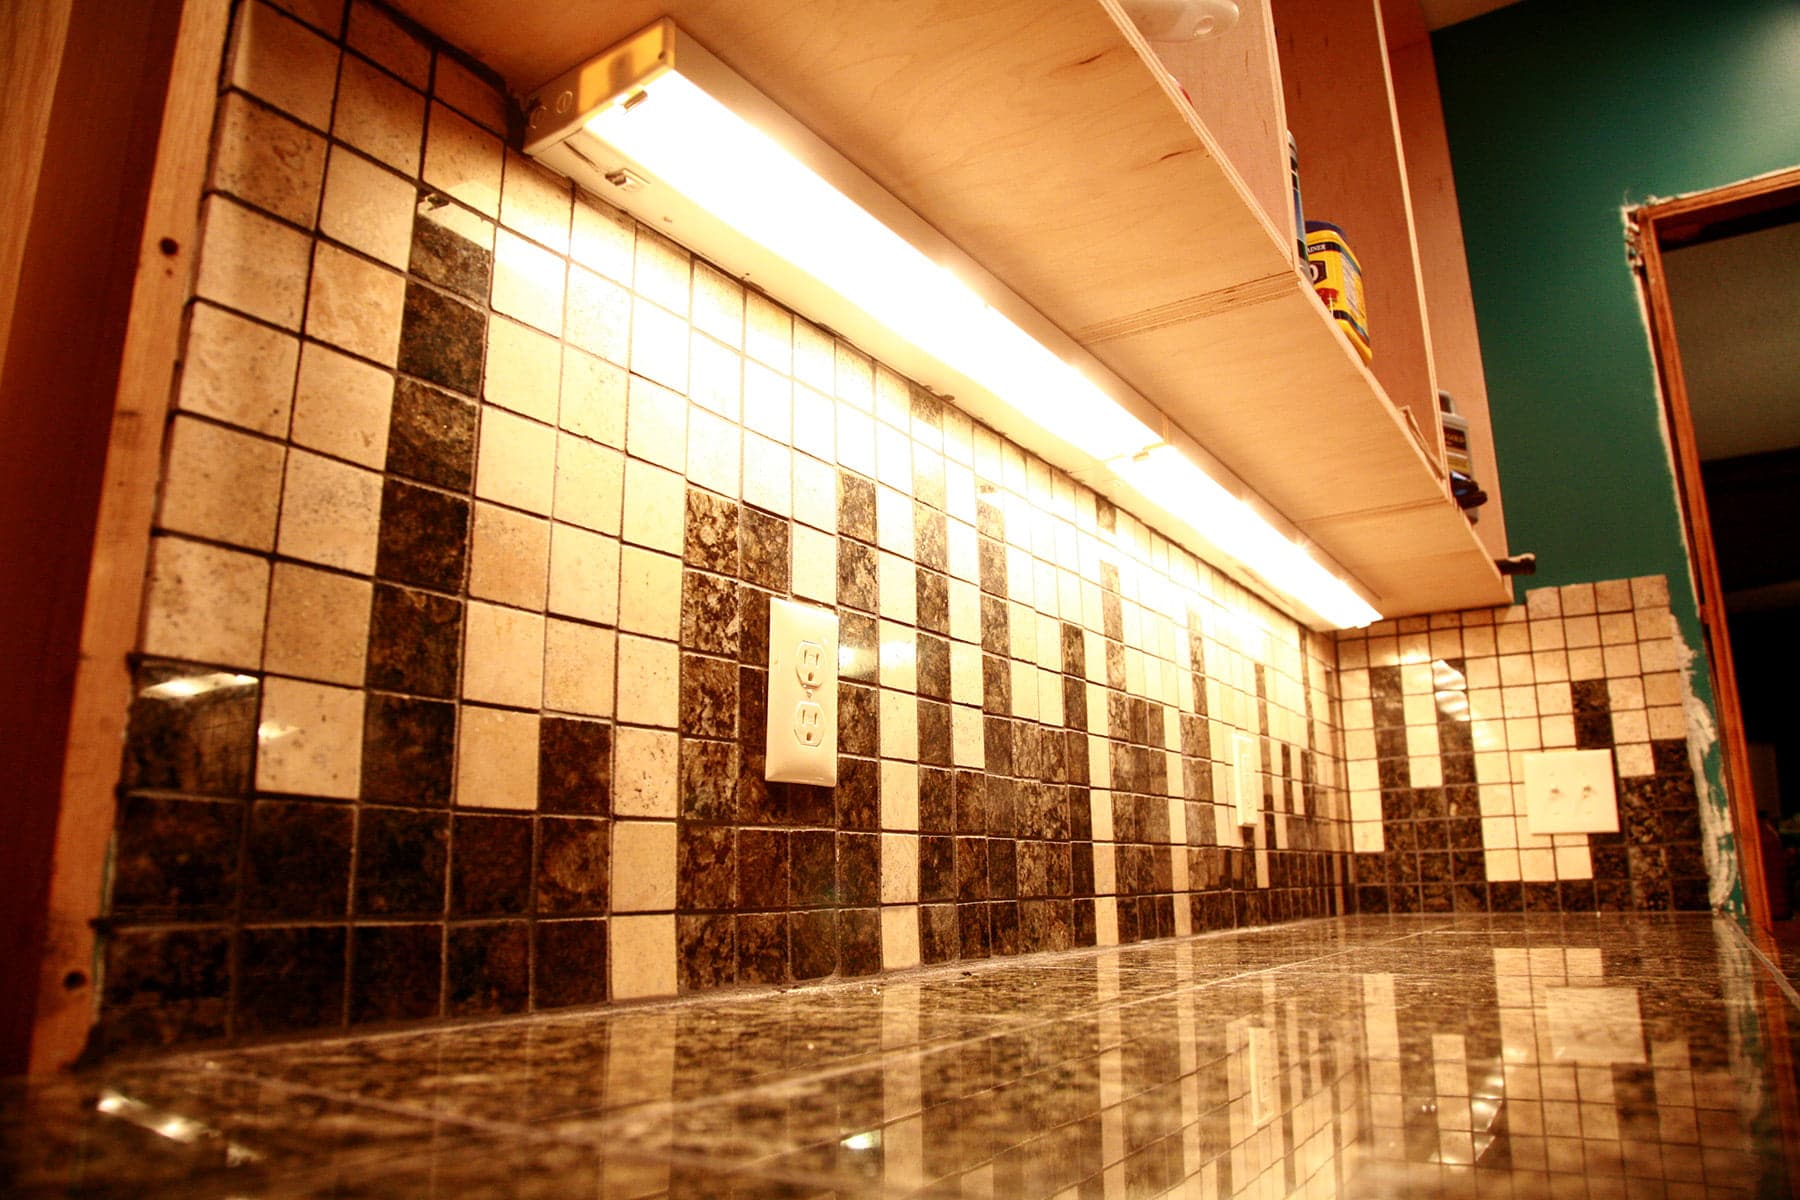
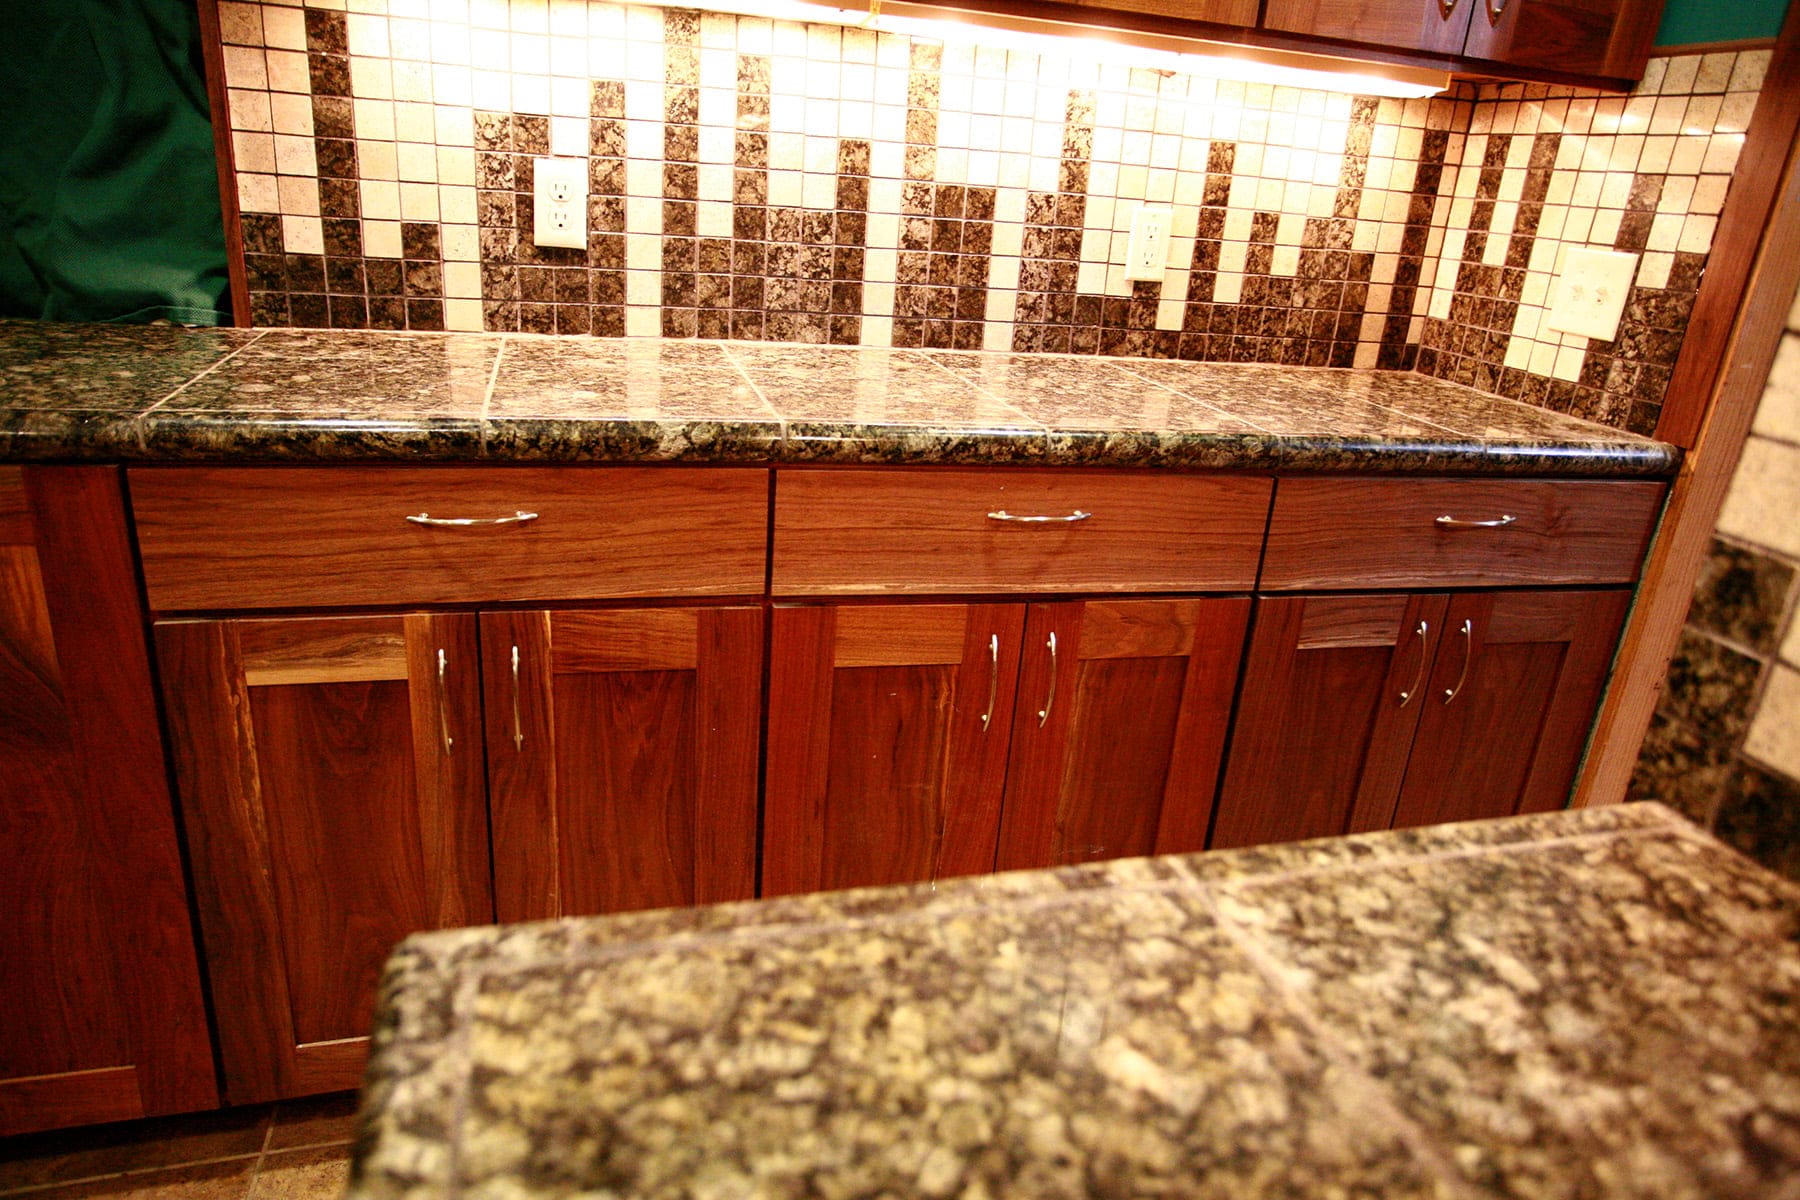
The counters were a green granite, so we wanted the matching green granite 2" tiles to extend upward from the counter, each vertical bar representing a digit of pi.
The void space above each digits bar would be a contrasting color tile - we finally settled on a sand colored travertine tile.
Measure the area of your backsplash, both the total length, and the approximate height.
Use this information to calculate how many tiles you will need.
Buy em.
Try not to have a heart attack at the price.
Start Plotting
Cut one of the pieces of tile mesh - usually 6 tiles by 6 tiles, glued to a mesh backer - and use it to measure out where everything will be going.
Start at the edge of wall you want your design to begin, make a tick on the wall between each tile.
When you come to the end of one row, make a tick at the edge of the final tile, and reposition the strip to allow for the appropriate space in between - ⅛", in this case.
When you come to corners, figure out how you want the tile to lay, and account for that when making your ticks.

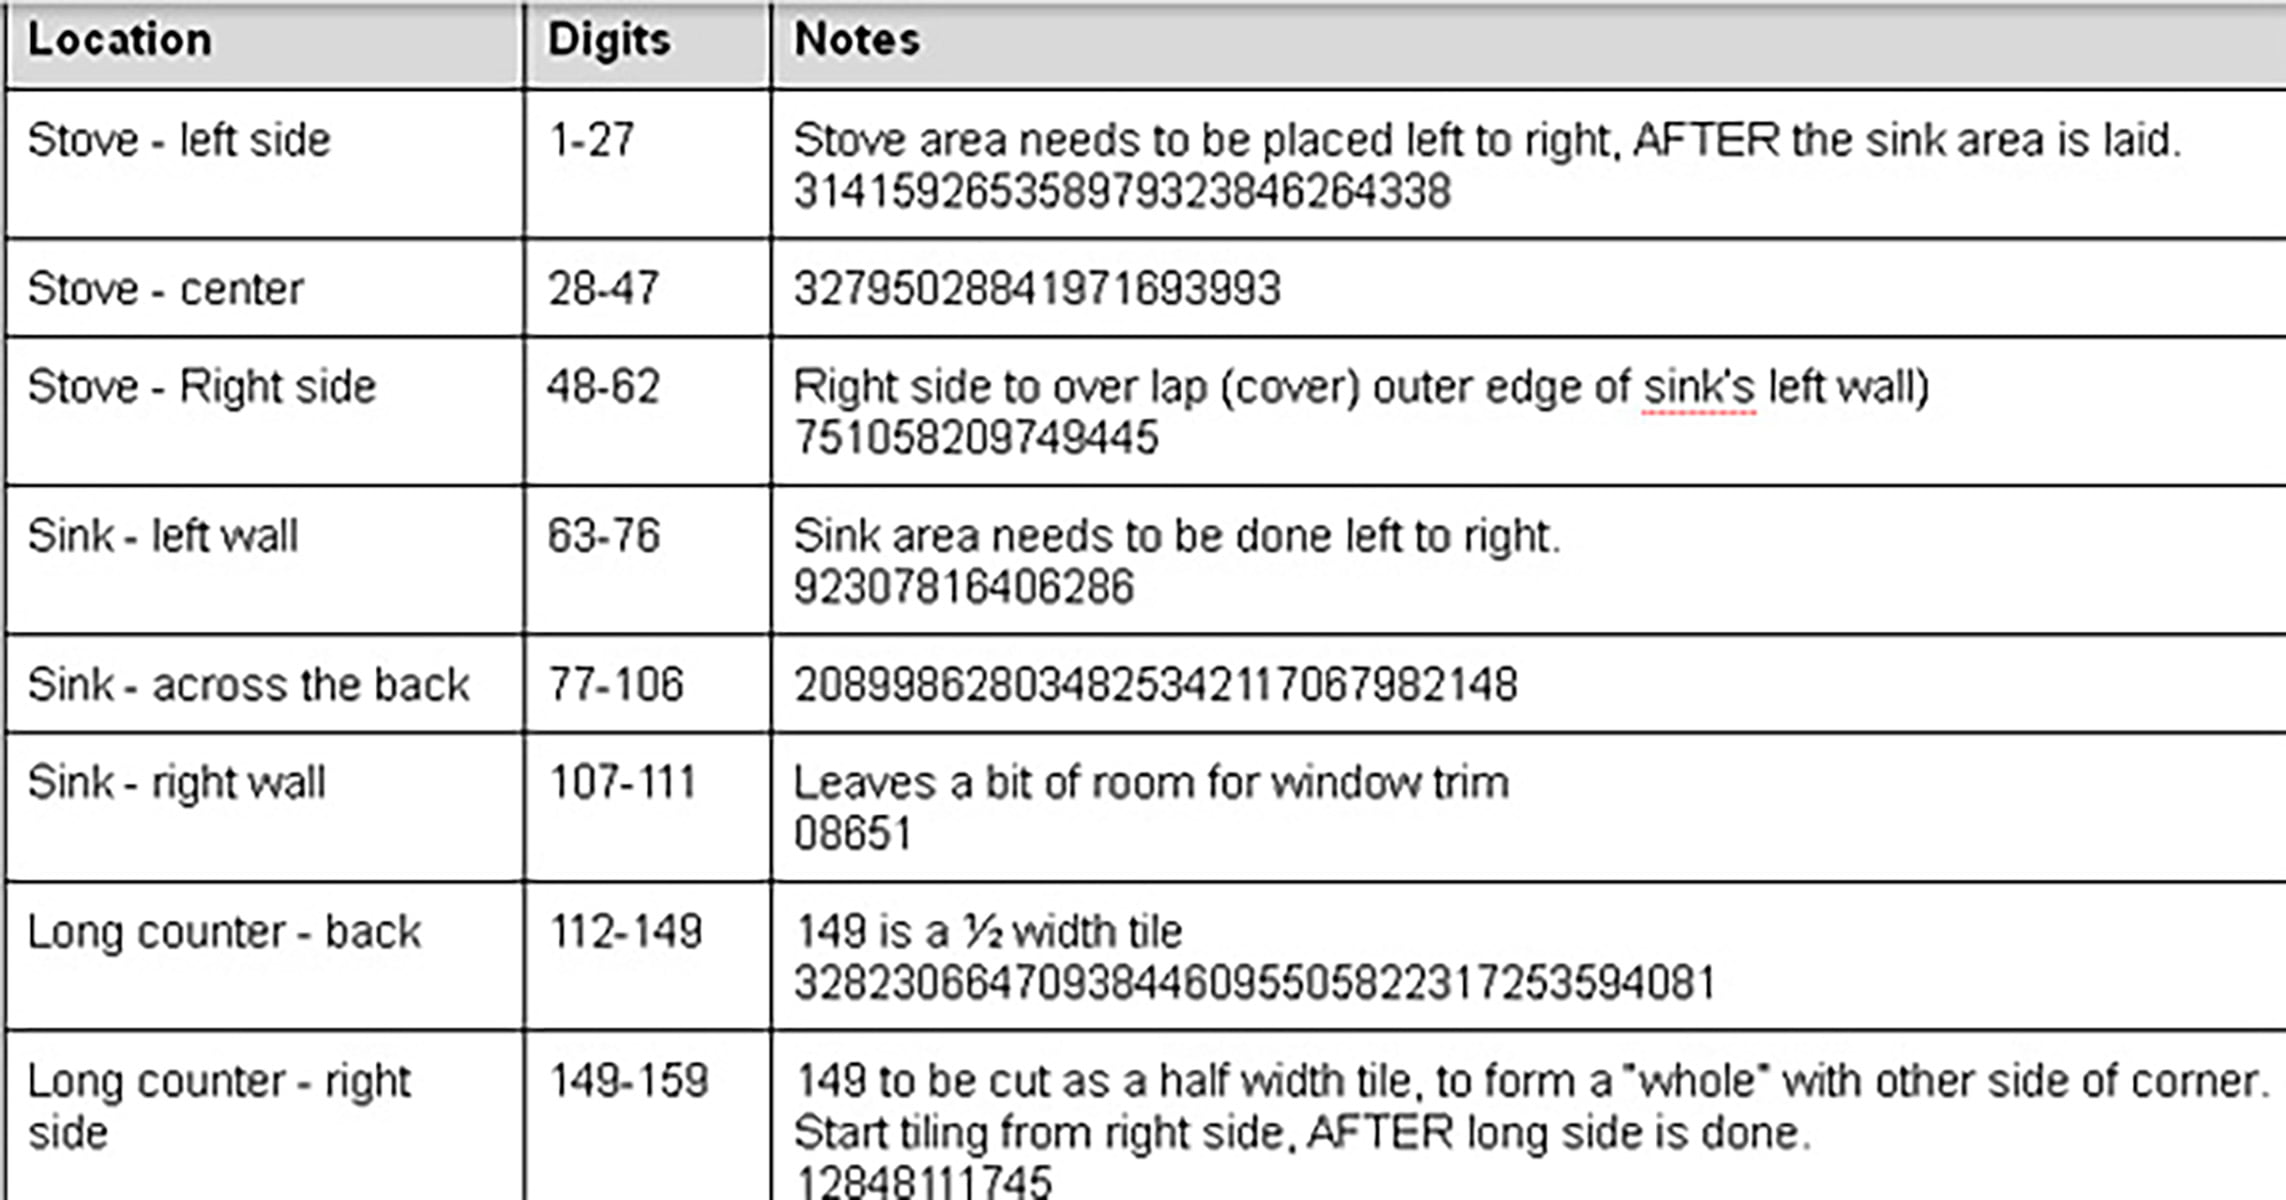
Due to the nature of our design, I numbered each tile space, so I'd know which digits of pi went where. (Not the digits themselves, just the digit position.).
Write those down! For instance, the wall to the left of our stove would be 1-27 digits of pi, the center back wall would be digits 28-47, and so on.
I transferred the digit positions - as well as the actual digits that will be represented - into a table, along with any notes I felt I needed about the locations.
I created another document where I not only listed the digits that would be on each wall, in order - I counted the number of times each digit showed up in that wall area, and created a chart.
For our purposes, our main design was 9 blocks tall. 1 green tile = "1", two tiles = "2", and so on. No greens = "0".
Once I inputted the needs for green tiles, I figured out how many beige tiles I would need to complement.
If I had five "Ones" in green, I would need five "Eights" in beige, etc.

Prepare your “Pixels” and Work Space
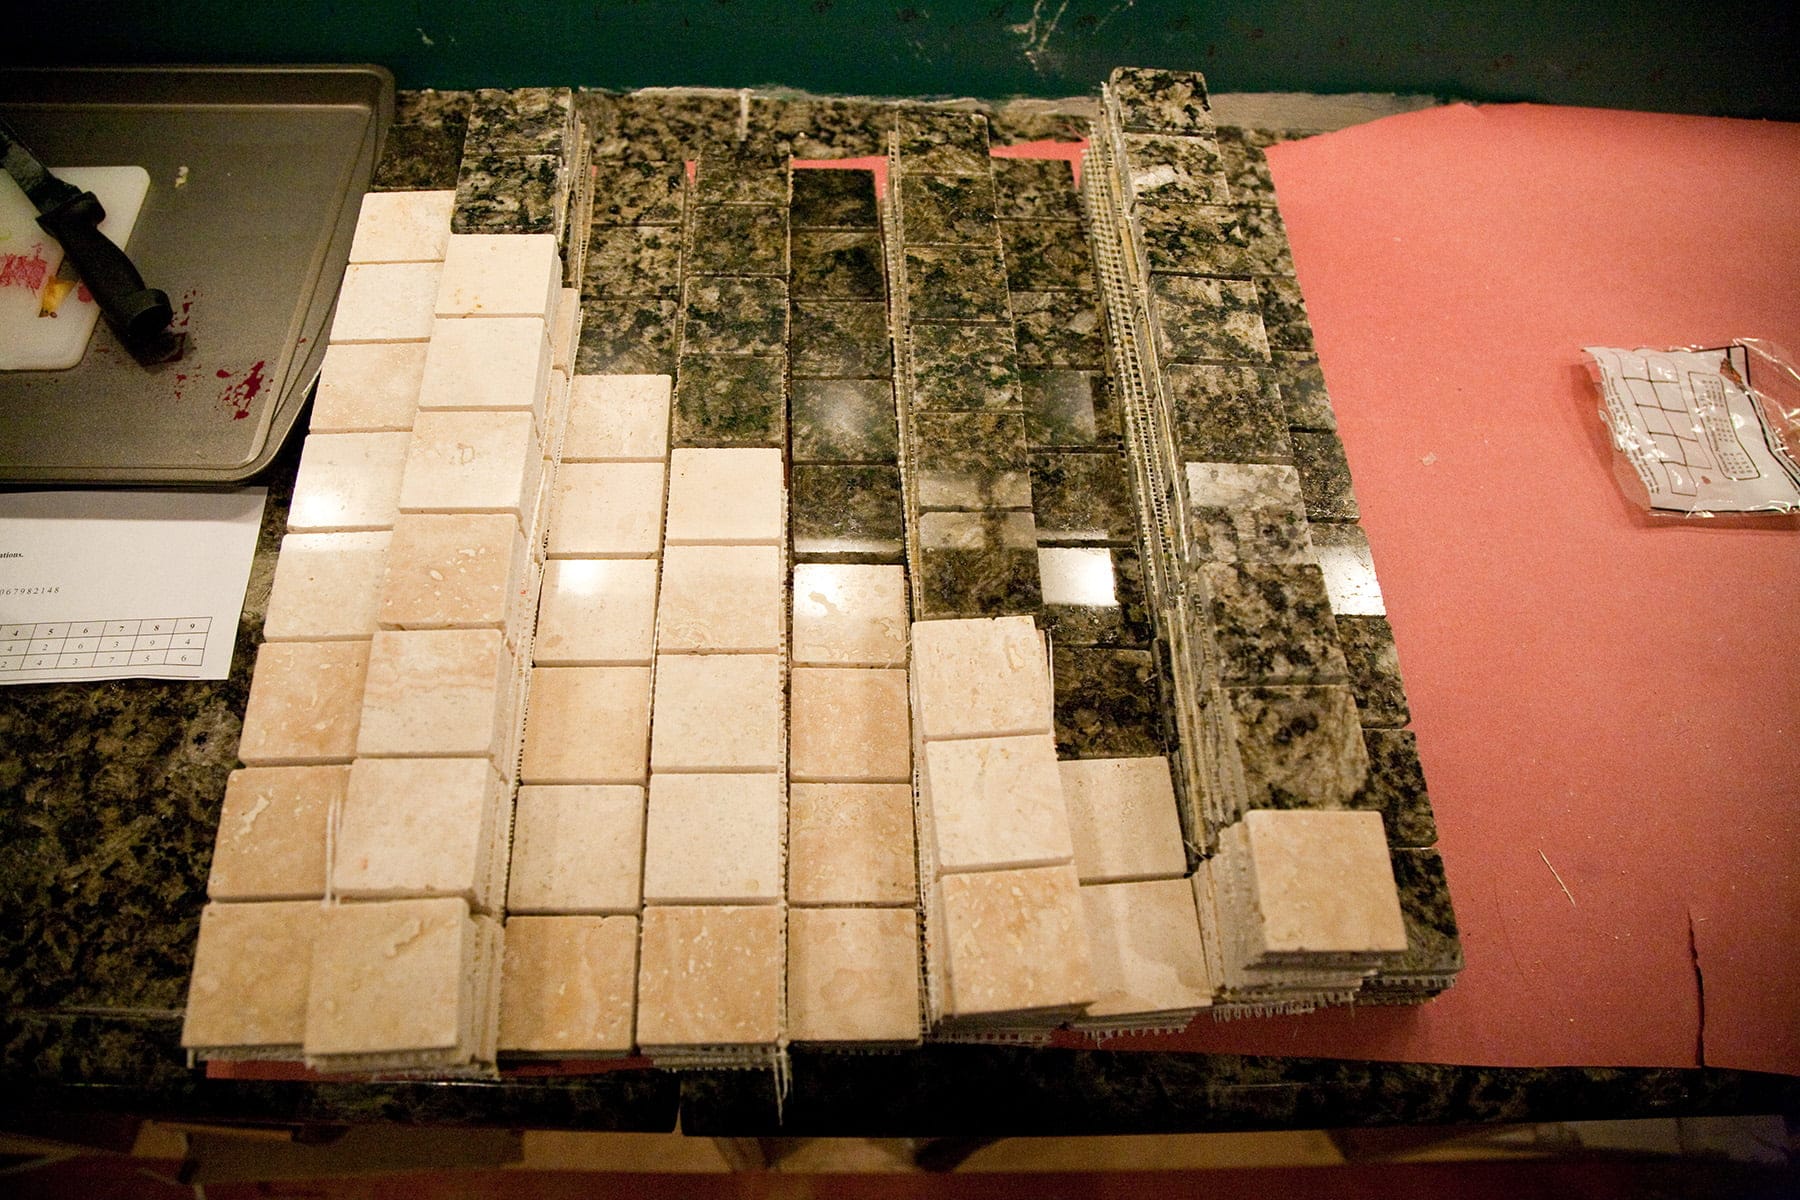
Using the chart above, I cut and prepared strips of tiles.
Be sure to cut the extra mesh from either side of the tiles, as leaving it there can lead to thicker grout lines.
(Tiles for the long counter - 3rd large block of pi - are what's pictured... NOT the "behind the stove" beginning digits mentioned in the above charts!)
Paper off your work area to protect your counter top.
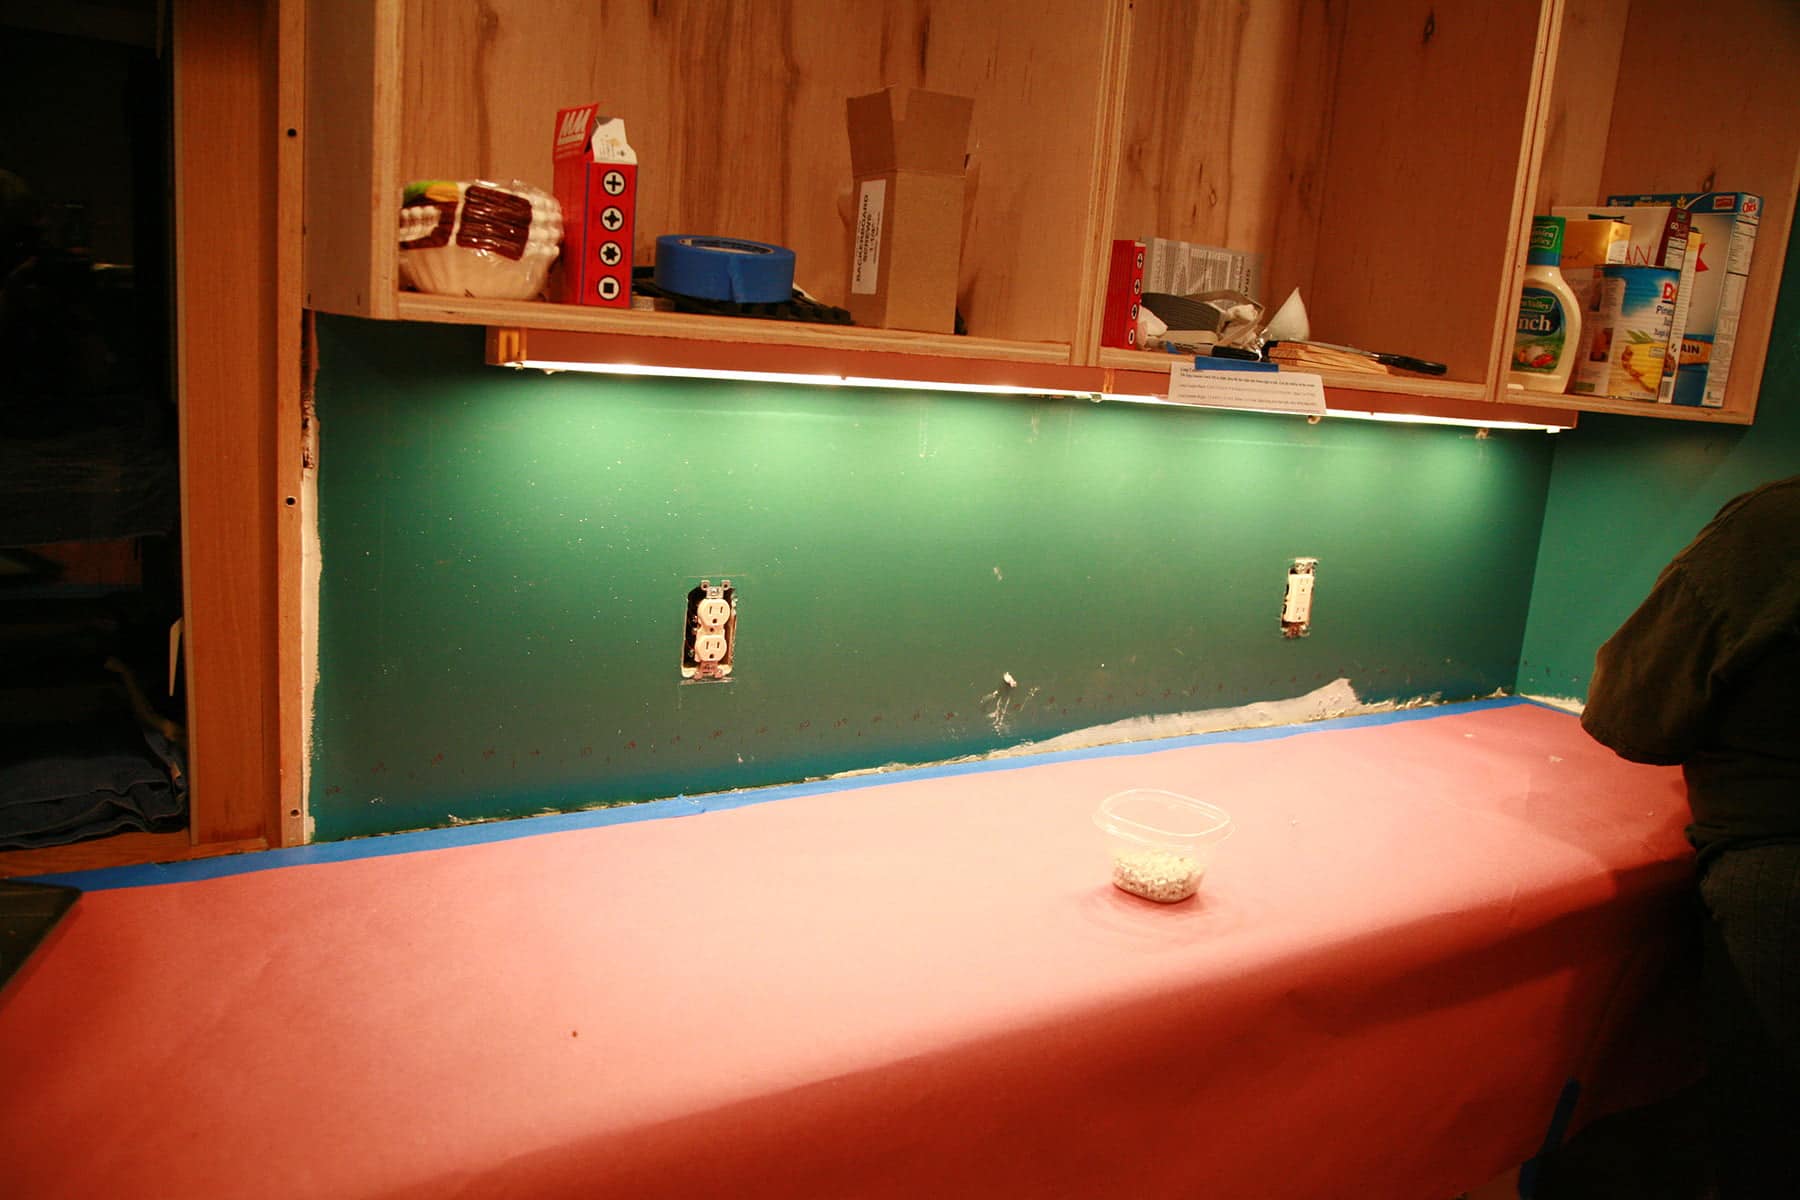
If your walls are smooth (ours were freshly painted, brand new walls!), scuff them up with a sander, so that the tile adhesive will actually stick to it.

Before mixing up your adhesive (or opening your tub of pre-made!), lay out your tools. We used tiles, tile spacers, a level, and paper towels.

Adhere Your Tiles to the Wall
Use a ¼" notched trowel to apply tile adhesive to your work surface.
Apply it to cover your work space top to bottom, but only a few feet at a time, across the horizontal. You'll be adding your columns one at a time.

Starting at one side of your work area, apply your first "digit" of pi, with it's complementing strip of lighter tiles above it.
Use tile spacers between the two strips - any tiles that are attached to a strip should remain spaced out automatically.
Use a level to check that your strip is perfectly upright, then lay the next column. You can use spacers between your vertical columns - we mostly eyeballed that.

Continue working along your adhesive-prepared workspace, adding more mortar as needed.

Carefully lay your tiles around any outlets that may be present. We removed all face plates before getting started, and loosened the screwed enough to be able to slip tiles behind each tab.
We were lucky that we didn't have to do much in the way of cutting - but a wet tile saw makes quick work of any cuts that need to be done.

Allow backsplash to dry for 24 hours, leaving all tile spacers in place.
Finish it Off!

Remove all tile spacers. If there are any globs of mortar sticking out anywhere, use a chisel to carefully remove them.
Wash backsplash, allow to dry. If using granite or another natural stone (rather than glass), apply sealer, following manufacturer's directions. Allow to dry for 24 hours.
Grout the backsplash.
Sit back and enjoy your work, nerd!
A few photos of our finished kitchen...


Wanna Nerd out With Us Some More?
There's a LOT of nerdery - and geekery - going down on this blog. Here are some favourites...
Bubble Bobble Wedding Cake
Dalek Cake for a Doctor
Dalek Sugar Cookie Decorating
"Convention" Brownies
Convention Sloppy Joes
Gluten-Free Lembas
How to Make a Weeping Angel Costume
Miruvor Recipe
My Convention Survival Guide
Partridgeberry Pie & Cosplay Geekery
Pi Day Pinata Tutorial
Roasted Convention Chili Recipe
That Time I made a TARDIS Cake for Geek Royalty..
The Epic Klingon Cake
The One Cheese Ring
The Silence of the Lambs Cake
The Story of Foopmallet
Tremors Wedding Cake
Share the Love!
Before you chow down, be sure to take some pics of your handiwork! If you post it to Bluesky, be sure to tag us - @CelebrationGen. We're also on Pinterest, so you can save all your favourite recipes to a board!
Also, be sure to follow me on Pinterest, and subscribe to my free monthly email newsletter, so you never miss out on any of my nonsense.
Well, the published nonsense, anyway!


Liz
That is AWESOME! Way to geek out!
kerry
Absolutely nerd-tastic. So awesome.
Amanda
Wow. My hubby and I cracked up over this. He's a math and science teacher, and we're nearly to the tile part of our kitchen remodel. 🙂 Nice work!
MaryJude Schmitz
Here is someone who loves pi more than me. Yay for geekiness!!
T. Marshall
It's very cool. I like it. I like pi. I'd even like to be friends with you folks. But I don't want my kitchen tiled like that. I mean, who wants a kitchen full of pi you can't eat?
Nick Stoiaken
Awesome - just friggin awesome! I love it.
Sandi Jones
And be sure to have your cat inspect the work for accuracy!
Alan Moore
I'm most curious to know how many visitors to your home insist on knowing which city's skyline it's based off of. 😉
admin
We only *just* finished it the other day, so exactly one friend has seen it so far! Also, all of our friends are nerds and geeks, so.... even if they hadn't seen us talking about it online this whole time, Think Geek may have prevented the "city skyline" guesses, LOL!
Helen
GREAT WOTK, but I think that you design should accounted for those white electrical boxes in the design ... next time :o) so the design is not interupted.
Lisa
My 13-year-old thinks that this is quite possibly the most awesome thing he's ever seen in a kitchen. Maybe if we do it, he'll actually do the dishes. 🙂 He loves that you did 159 tiles - 3.14159...