

How to Make Marshmallow Fondant

Forget everything you've heard about fondant. This Marshmallow Fondant is quick and easy to make, highly customizable, and tastes AMAZING.
As I’m beginning to do some cake decorating tutorials, I figured it’s about time to give it a proper home on this site!
Forewarning: This is going to be a LONG post (with a ton of photos, may load slowly - sorry!), but don’t be scared! Marshmallow fondant is incredibly easy to make... but it’s also highly customizable.
I like to cover all the bases on something like this, so you’ll have everything you need to know to do WHATEVER you want!
Seriously, this post is over 3000 words, but the process of making this fondant takes me about 7 minutes from the time I put the marshmallows into the microwave, til I have it wrapped and stored.
Anyway ...
- 50% of commercial fondant tastes disgusting.
- 50% of commercial fondant goes beyond “disgusting” and is straight up inedible.
- Colouring ready made fondant is way more work than it should be.
It was quick, cheap, and easy to make.
It was much easier to colour, than ready made.
It tasted GREAT. It’s just marshmallows and powdered sugar, for the base... though you can flavour it, too.
Basically? It’s a soft candy covering to cover your cake with, or to sculpt details with. Totally non-offensive!
Before I get to the recipe and tutorial stuff, let me address a couple of those points:

Flavouring Homemade Marshmallow Fondant
Marshmallows already have a vanilla / “marshmallow” flavour to them, so you don’t NEED to flavour this fondant.
However, I always figured that if I was going to put the effort into making my cakes “ridiculously delicious” inside, why not flavour the fondant to match?
There are 4 main ways I would flavour my fondant:
Flavouring with Extracts
By “extracts”, here, I’m referring to the basic food extracts you can find in any grocery store baking aisle, usually McCormick brand. Lemon flavored tastes very much like lemon Skittles! (...and the snozzberries taste like snozzberries.)
To flavour this fondant with extracts, add 1-2 teaspoon of extract to the marshmallows AFTER they come out of the microwave, and before you add it to the sugar.
Due to the nature of extracts, you don’t want to overheat them, or you’ll lose flavour intensity.
When mixing them in, be sure the extracts are completely incorporated into the marshmallow, as any liquid on the surface can cause lumps of sugar in the end fondant.
Note: While I always prefer to use Pure vanilla extract for pretty much everything - and really wouldn’t bother to add extra vanilla to fondant anyway - I should point out that pure vanilla extract is brown, and will affect the colour of your finished fondant.
Clear Vanilla Extract is a great option for this, should you want extra vanilla flavour. I prefer the Watkins brand, but there are several others available.
Adding a cap full of peppermint extract to a batch of fondant.
Using Flavour Oils
Flavour Oils - Lorann Oil is the gold standard - are a bit harder to come by, but can usually be found at your local cake or candy making supply store. It comes in a LOT more flavours than grocery store extracts do, so you can really have fun with it!
These flavour oils are used the same way as extracts are, but in much smaller amounts. I’d usually do ½-1 teaspoon of flavour oil per batch of fondant.
Flavouring with Liqueurs
One of my most popular cake options back in the day was something I called “Southern Belle”. It was an Amaretto cake with Swiss Meringue Buttercream that had been flavoured with Southern Comfort. The cake layers were all brushed with a SoCo syrup before being frosted and layered with peaches.
Augh. SO GOOD.
Anyway, whenever anyone would order that flavour, I’d give them the option of having the fondant flavoured with Southern Comfort. To this *DAY*, I maintain that Southern Comfort flavoured fondant is 100% the best way to make it.
That said, you can use any liqueur to flavour your fondant - just be mindful of the colour. Soco doesn’t really add much/any colour in the end, but something like a green Creme de Menthe needs to be planned around.
To flavour your fondant with liqueur, simply replace the water with liqueur, before microwaving your marshmallows.

Flavouring Fondant with Cocoa
This actually acts as both a flavouring AND a colourant, and can be an effective tool for achieving other colours - more on that in a bit.
Fun fact, though: Chocolate Marshmallow Fondant straight up tastes like Tootsie Rolls. So good!
Depending on what my goals were for the fondant, I’d use a normal cocoa for lighter or medium browns, or Dutch Processed cocoa when I was looking for a deeper colour.
Sometimes I’d use both - and mixed - across a few batches of fondant, when looking to make a marbled chocolate look - such as with my Tremors Wedding Cake.
- You can use other flavours with your chocolate fondant. Mint extract was always fun, for instance.
Just mix your flavour extract / oil / liqueur into your marshmallows *before* adding the cocoa. Again, you don’t want any unincorporated moisture, or you’ll get clumps.
- SIFT the cocoa in. I’ll usually just use a wire strainer. This is also about preventing clumps - are you sensing a theme here?
- Cocoa dries out the fondant more than an equivalent amount of powdered sugar will.
As a result, not only will you use less powdered sugar than you will for a non-cocoa batch (even when accounting for the volume of cocoa replacing a similar volume of powdered sugar), but - depending on how much cocoa you’re using - you’ll end up with less fondant in a cocoa batch.
- The darker your chocolate fondant, the smaller the batch will end up. A batch of very dark fondant will end up sometimes ½-2/3 the amount of a batch of white fondant.
Conversely, a batch of very light cocoa fondant will only end up slightly less than a batch of non-chocolate fondant. You may not even notice the difference, to be honest.
So, plan accordingly!

Colouring Homemade Marshmallow Fondant
You can use any food colouring you like for this, but I prefer to use a nice quality gel based colour, such as Americolor (what I used when I was in the USA), or ChefMaster (Which is the option more readily available here!)
As I’d mentioned earlier, colouring marshmallow fondant is a lot easier than colouring ready made fondant.
This is because I add the colouring to the melted marshmallows BEFORE adding the sugar, stirring it in.

It’s a lot easier than having to knead colour in for 10 minutes, ensuring it’s well distributed!
- Aim for a little more intense colour than you’ll want to end up with, as the addition of powdered sugar will mute / dilute the colour a bit.
- If you’re needing more than one batch of fondant to *match*, make note of how many drops of colouring you’re adding, and use the same amount in the following batches.
This is especially important if you’re mixing custom colours. Your notes might be something like “10 drops lavender”, or may look more like “7 drops lavender, 2 drops royal blue, 1 drop black”.
Custom matching to wedding colours was always a lot of fun!

Making Black Marshmallow Fondant
A quick tip for making black fondant: chocolate fondant!
I like to use Dutch processed cocoa and get it as dark as I can, before adding gel colour.
You’ll definitely want to use something like an Americolor or ChefMaster, rather than something like Wilton. I find Wilton is nowhere near as concentrated or vibrant.
If you don’t start with a chocolate base, it is VERY difficult - if not impossible - to achieve a true black fondant.
Even with a TON of gel colour, you’ll likely achieve more of a very dark grey, usually with a tinge of purple. Trust me - for a true, jet black - start with chocolate!
Just make sure to mix the marshmallow / water mix all the way before adding the cocoa, and have the cocoa fully incorporated before adding the colouring. Again: This helps avoid clumps of cocoa or powdered sugar in the final fondant.
Making True White Fondant
Generally speaking, I would consider a batch of fondant to be “white”, if not coloured with extracts or food colouring.
However - if you’re a stickler - it’s very slightly ivory, rather than a pure white. Marshmallows bring a slight hint of yellow to the mix.
99% of the time, no one will notice or care that it’s not WHITE - white. For that other 1% of the time, you have a few options:
1 - Add some Americolor White Gel Paste , as you would any other colouring.
2 - Airbrush it white after the fact
3 - Adding a VERY VERY SMALL amount of purple or lavender gel colour can neutralize the yellow.
I mean it: a VERY VERY VERY small amount. Use a toothpick to add the smallest speck of colour to your mix, if going this way.
It is very easy to overdo it, so this should just be a worst case scenario. You can’t un-purple your fondant if you add too much!

How to Make Marshmallow Fondant
- Before anything else, scrub your hands like you've never scrubbed them before (unless you're a doctor). Trim your nails, scrub under the nails, and wash your hands again.
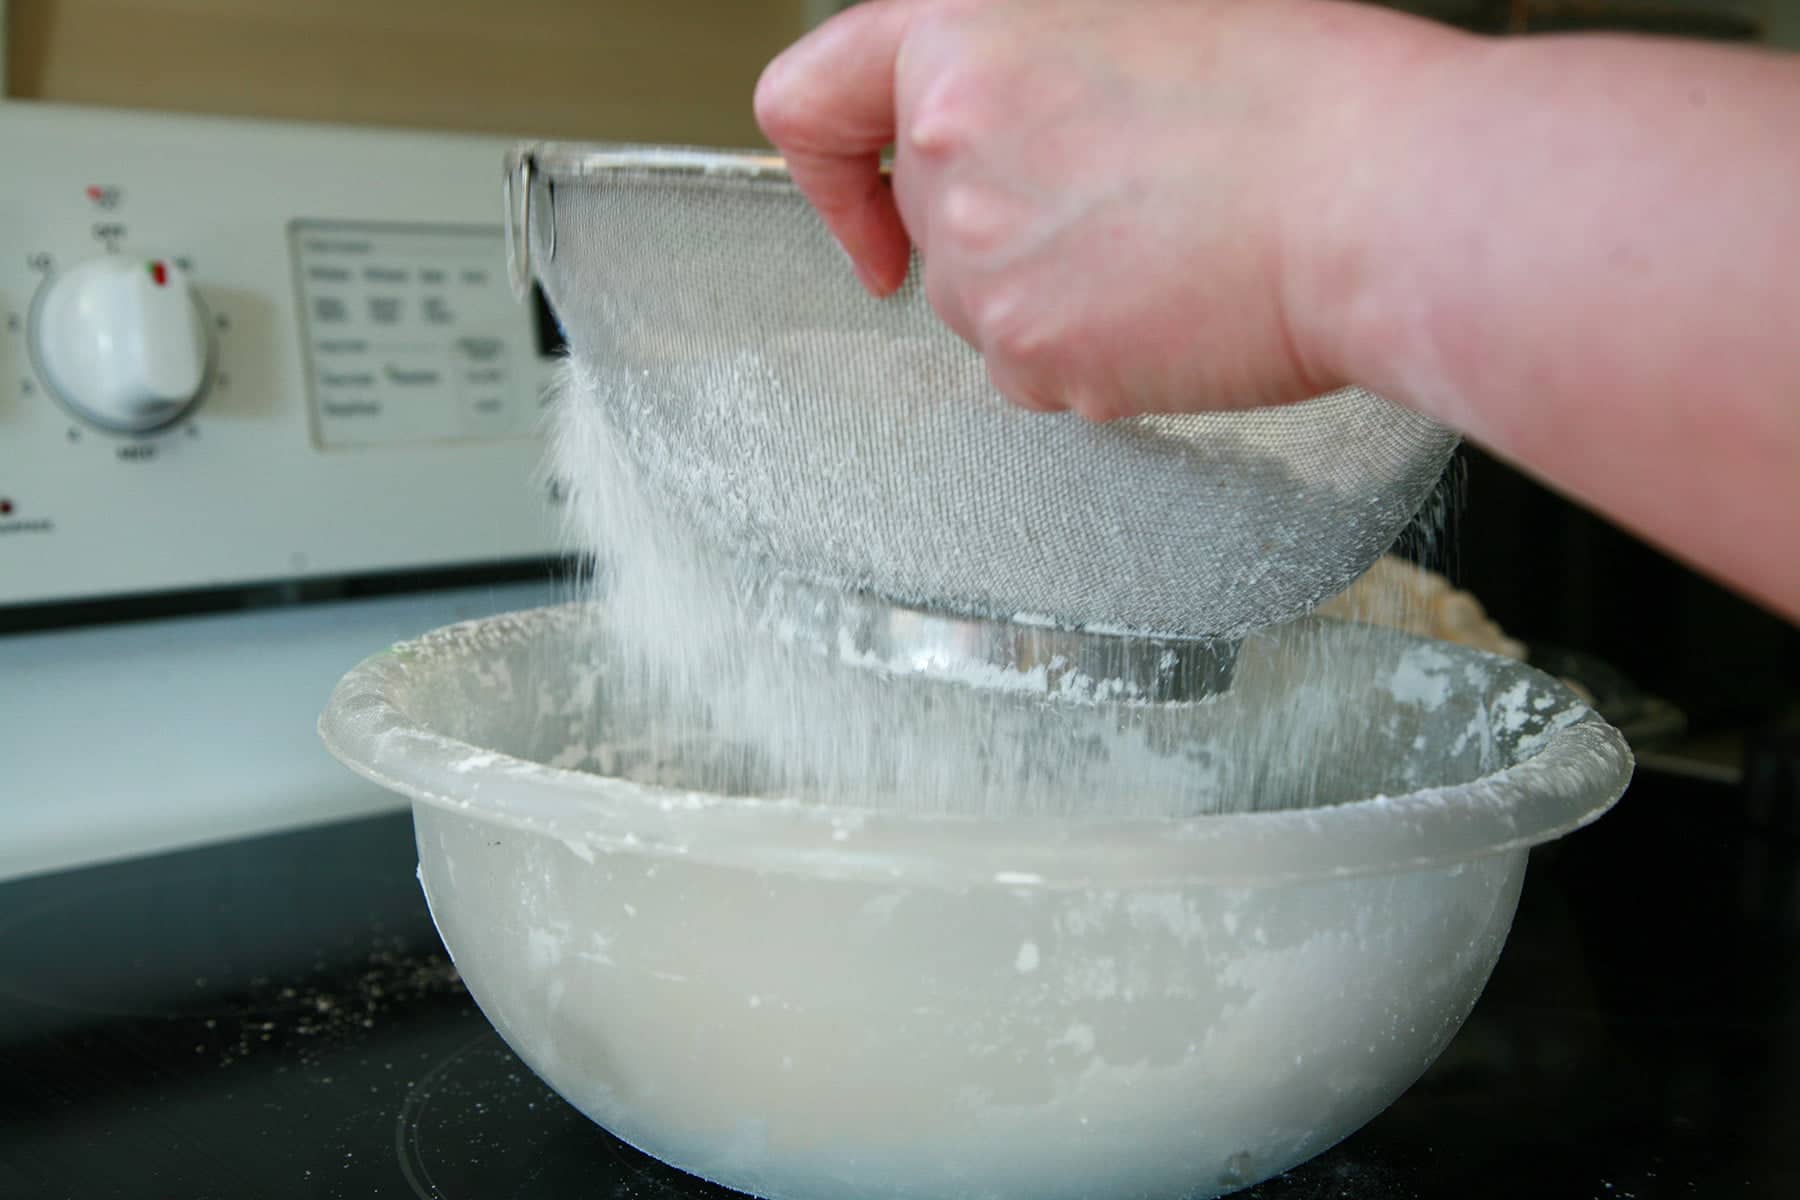
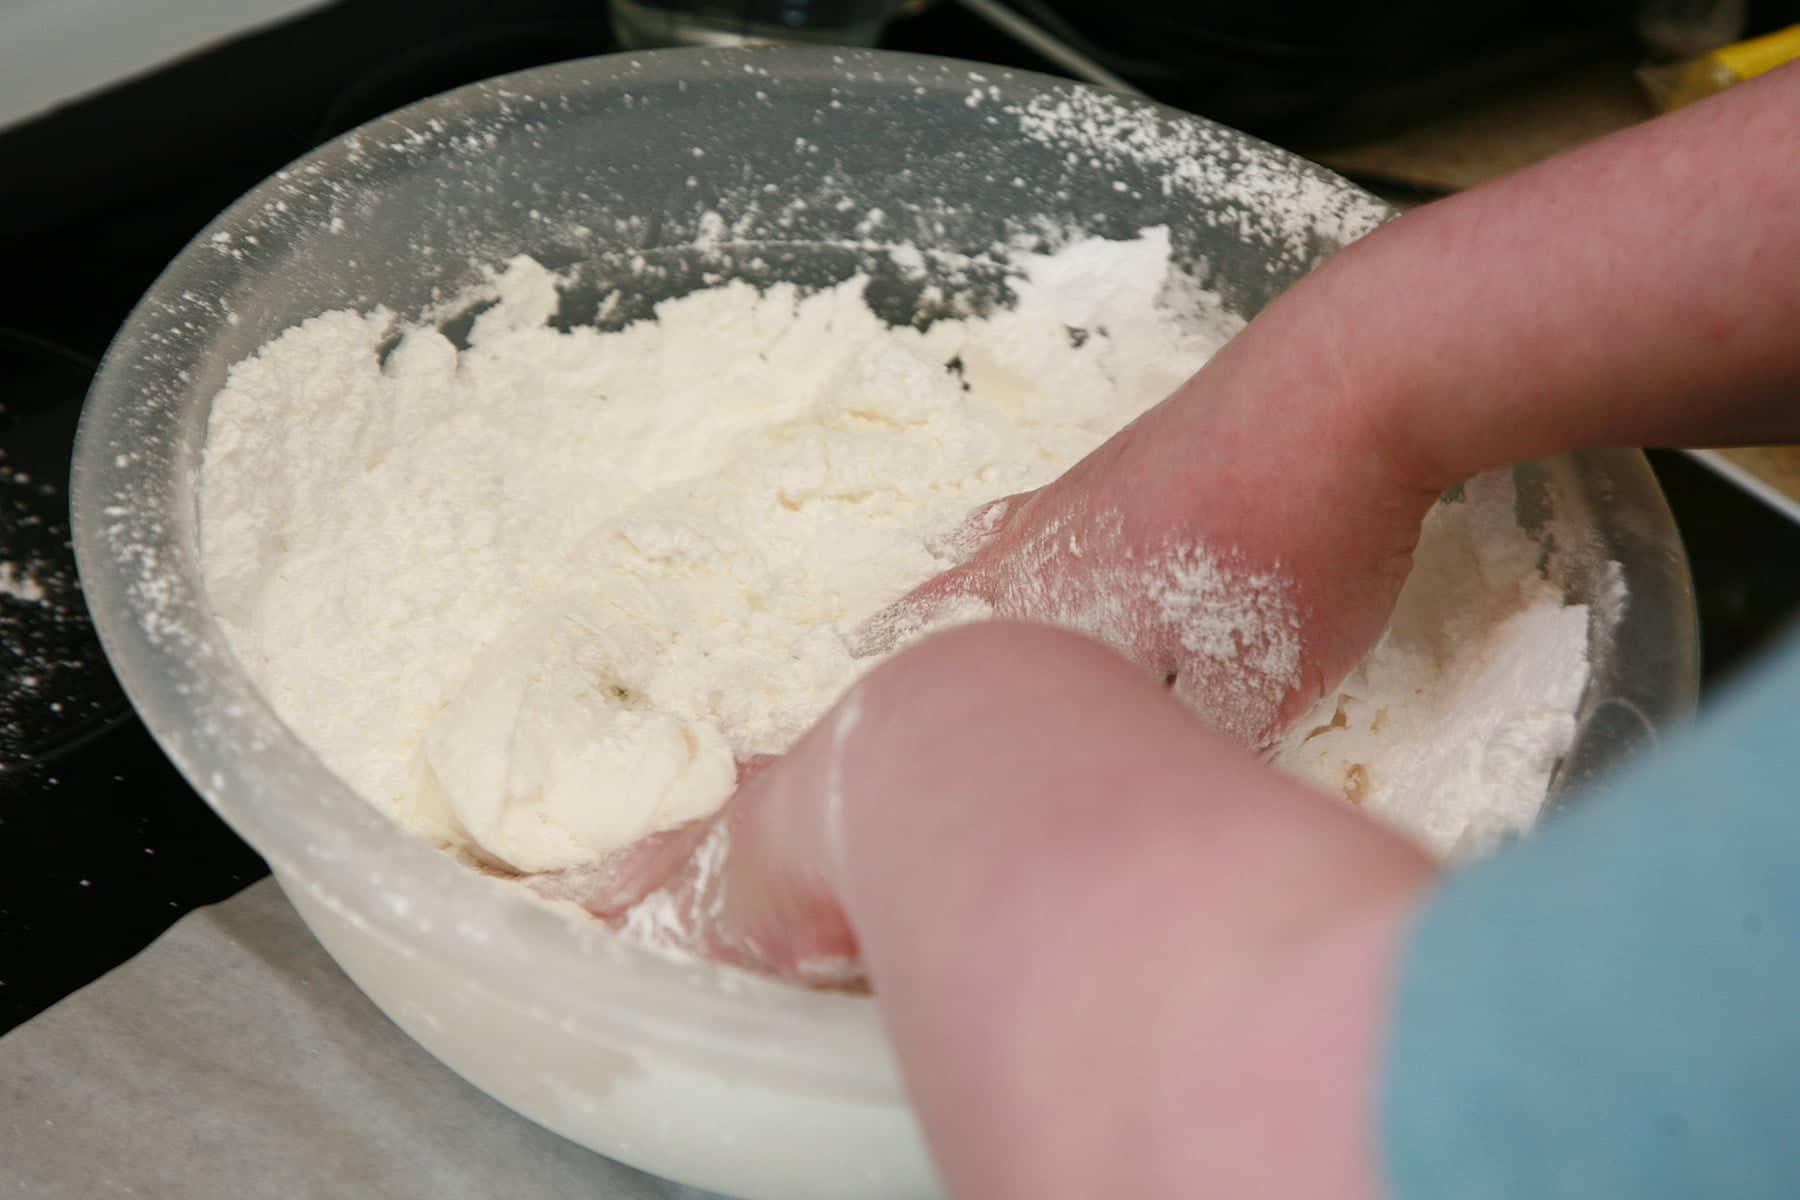
- Use the wire strainer to "sift" your icing sugar into the large mixing bowl, set aside.
- Measure water into a microwave safe glass / Pyrex bowl - Mine is about 9" across, 3" deep.
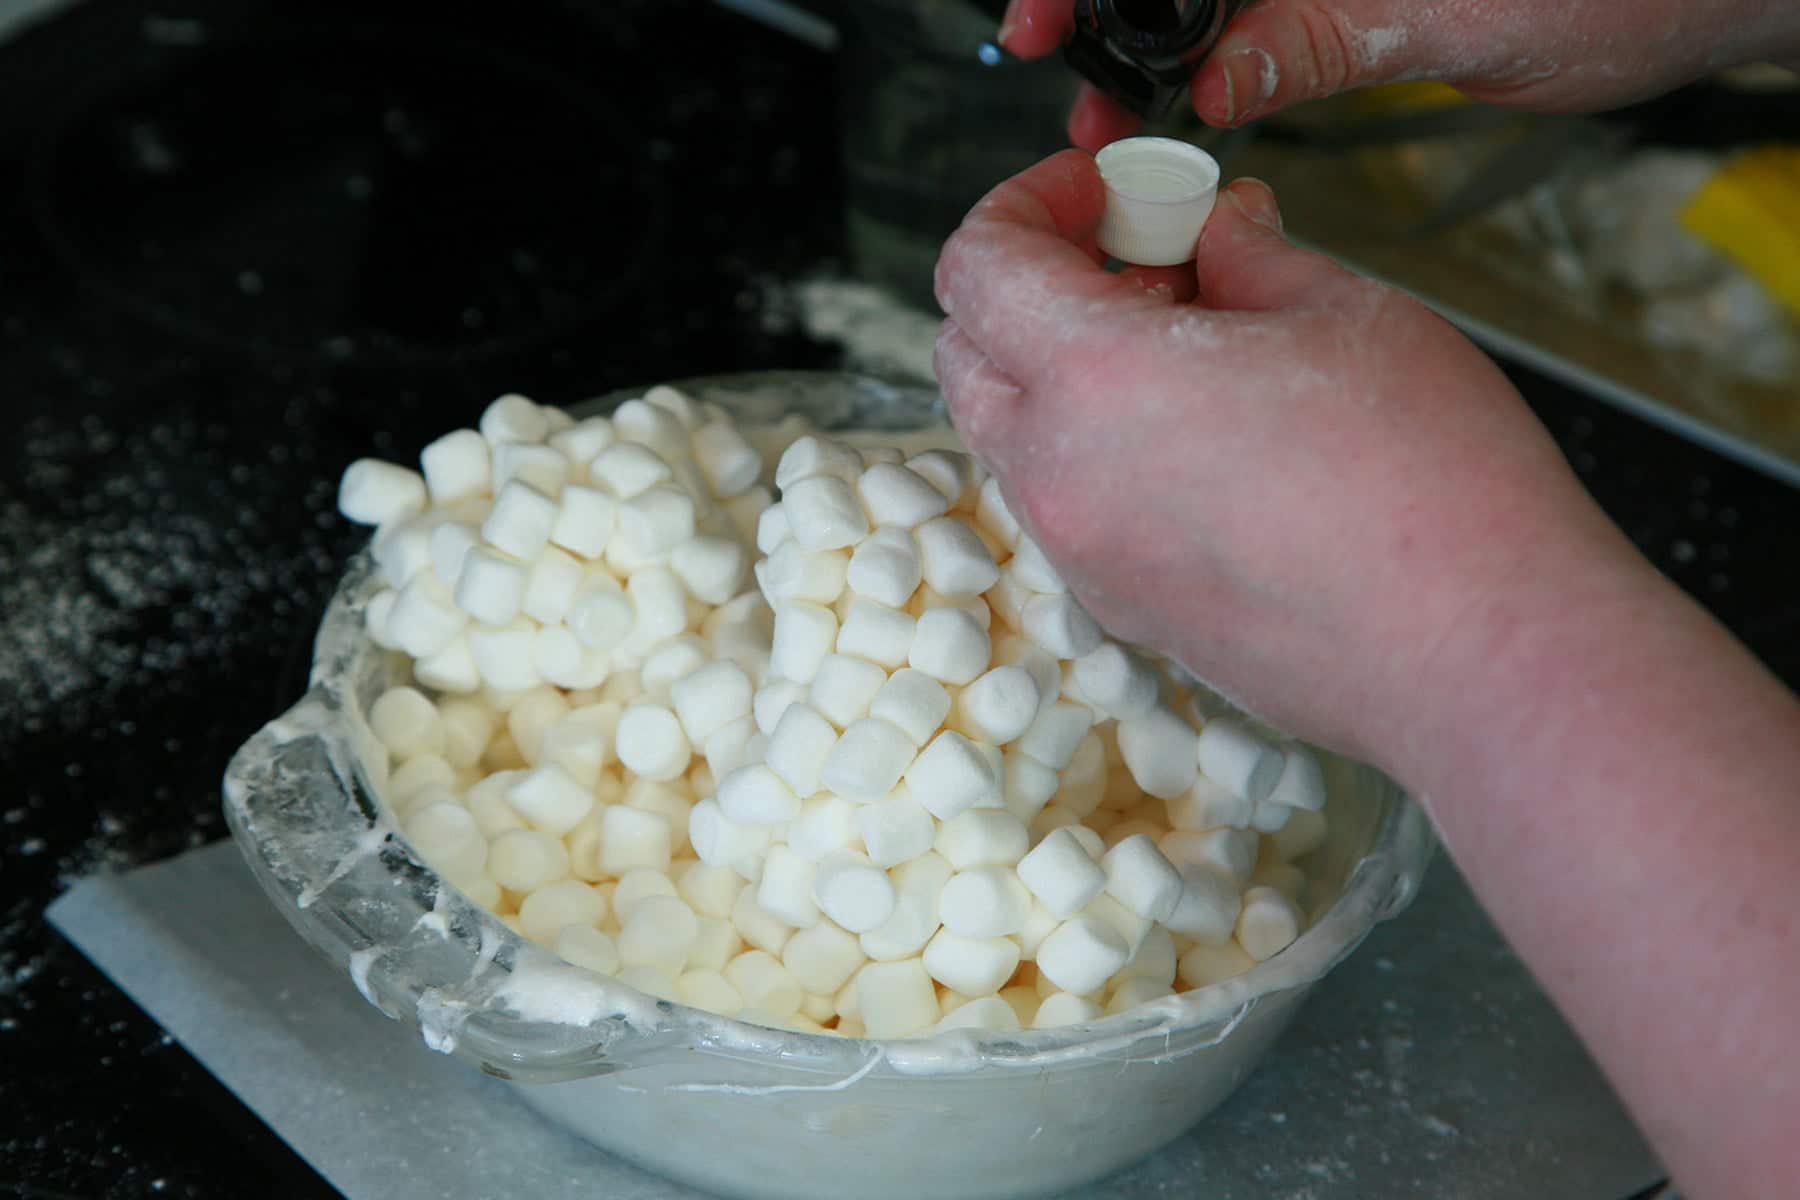
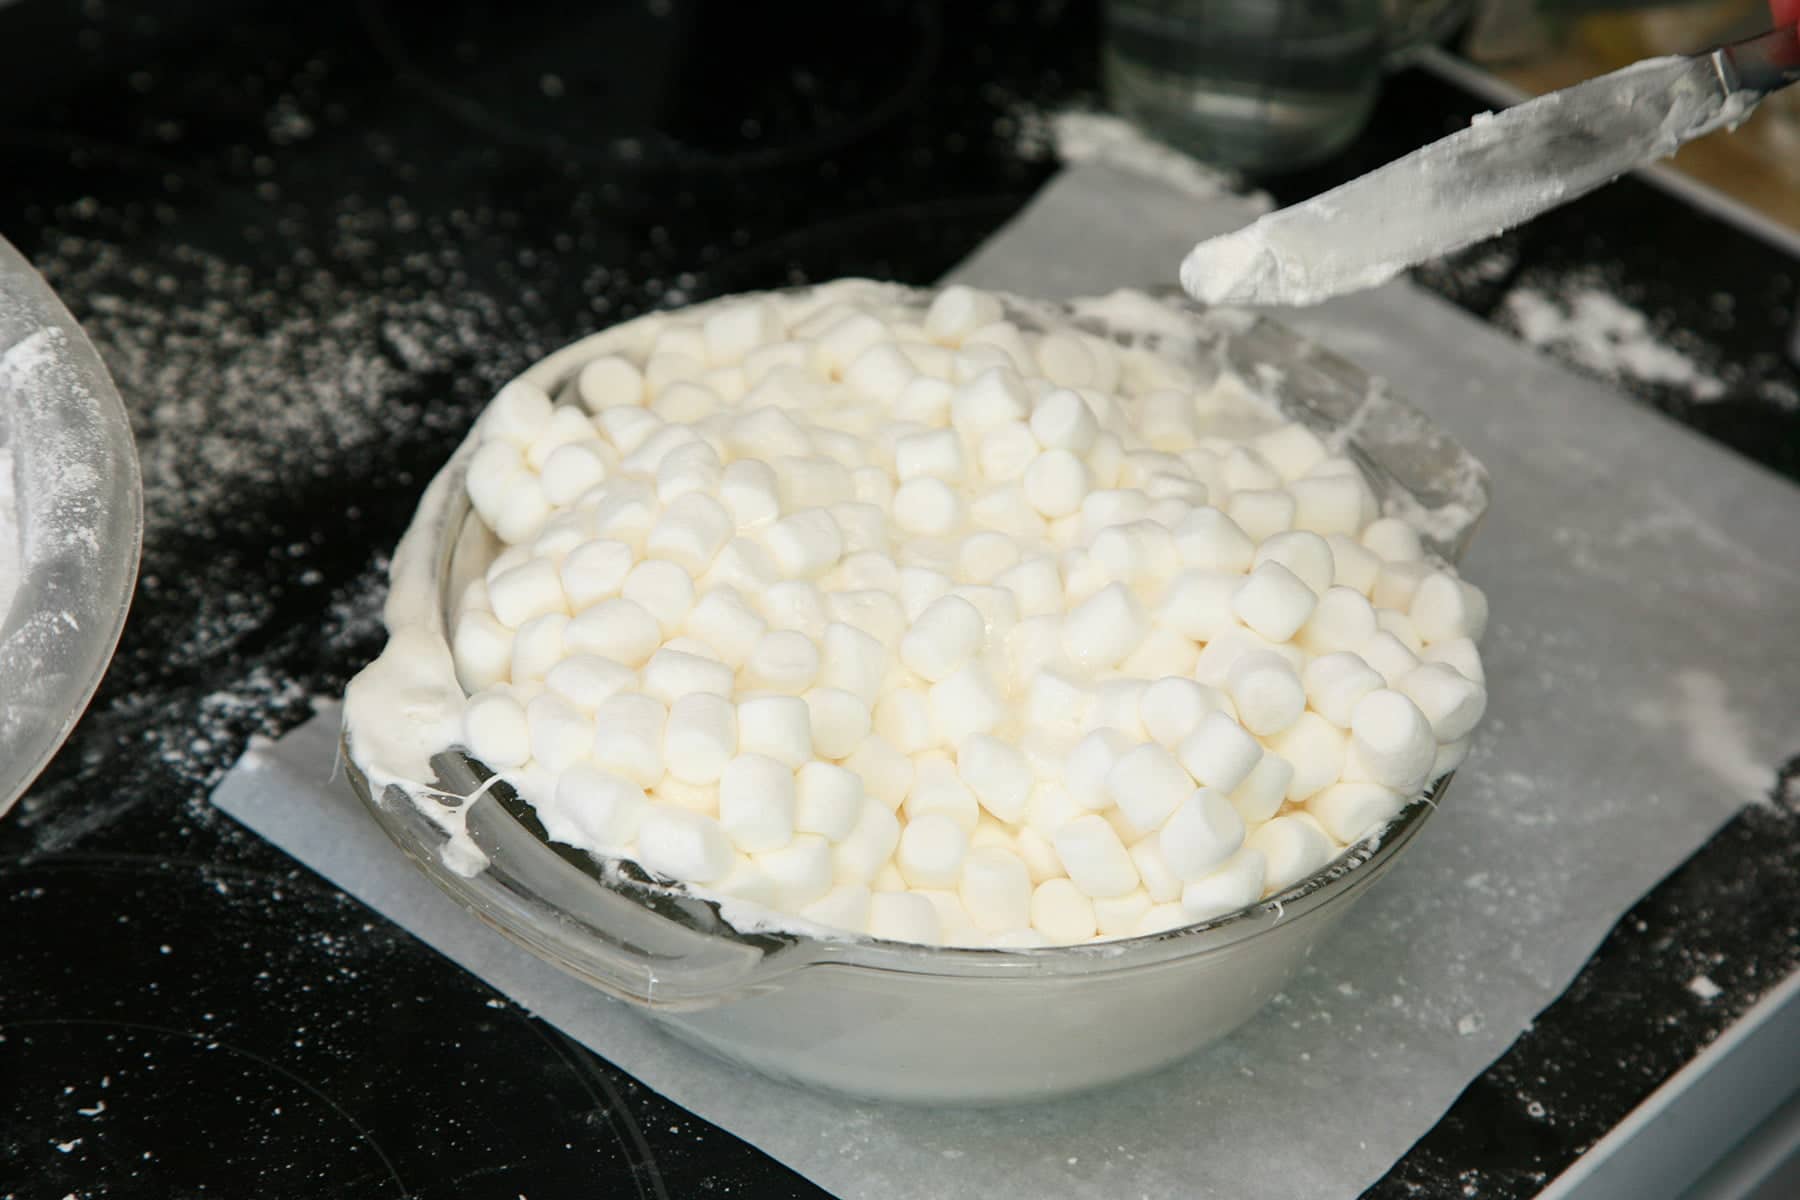
- Dump the bag of marshmallows into the glass dish - on top of the liquid - and microwave it till melted. I find it's usually 1:35 - 1:45. Don't burn it!
- Stir the marshmallows/liquid together until smooth - make sure you get ALL of the water incorporated! I grease a butter knife with a little shortening to do this.
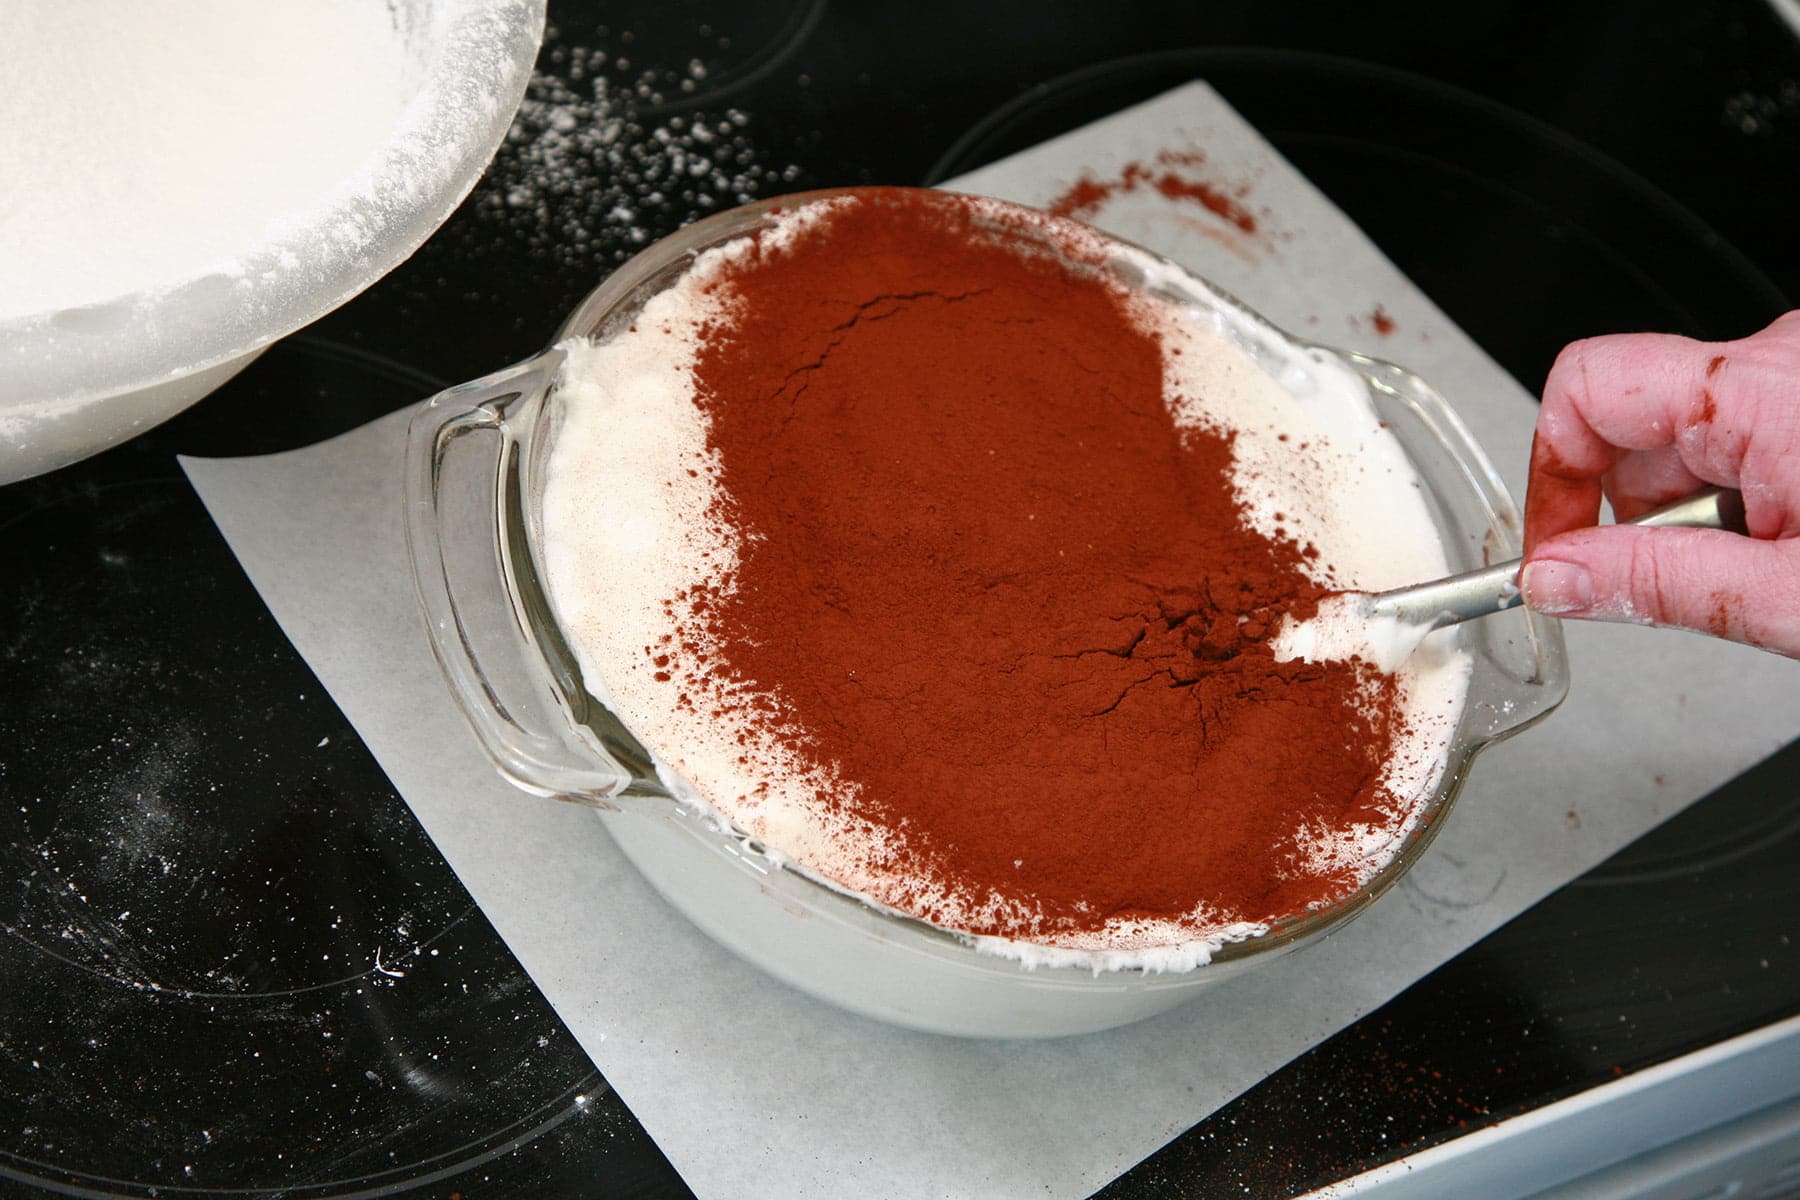
- At this point, add coloring if you plan to. You'll want to color it a bit darker than you want the final color to be.
I use the Hershey's Dark / Dutch Processed cocoa powder, and just mix it in till it's slightly too dark. I use between ¼- ½ cup of cocoa. If I'm doing a light brown color, I use regular cocoa powder, and less of it.

- Dump the melted marshmallow mix into the bowl of icing sugar, stirring with the knife until fairly well incorporated.
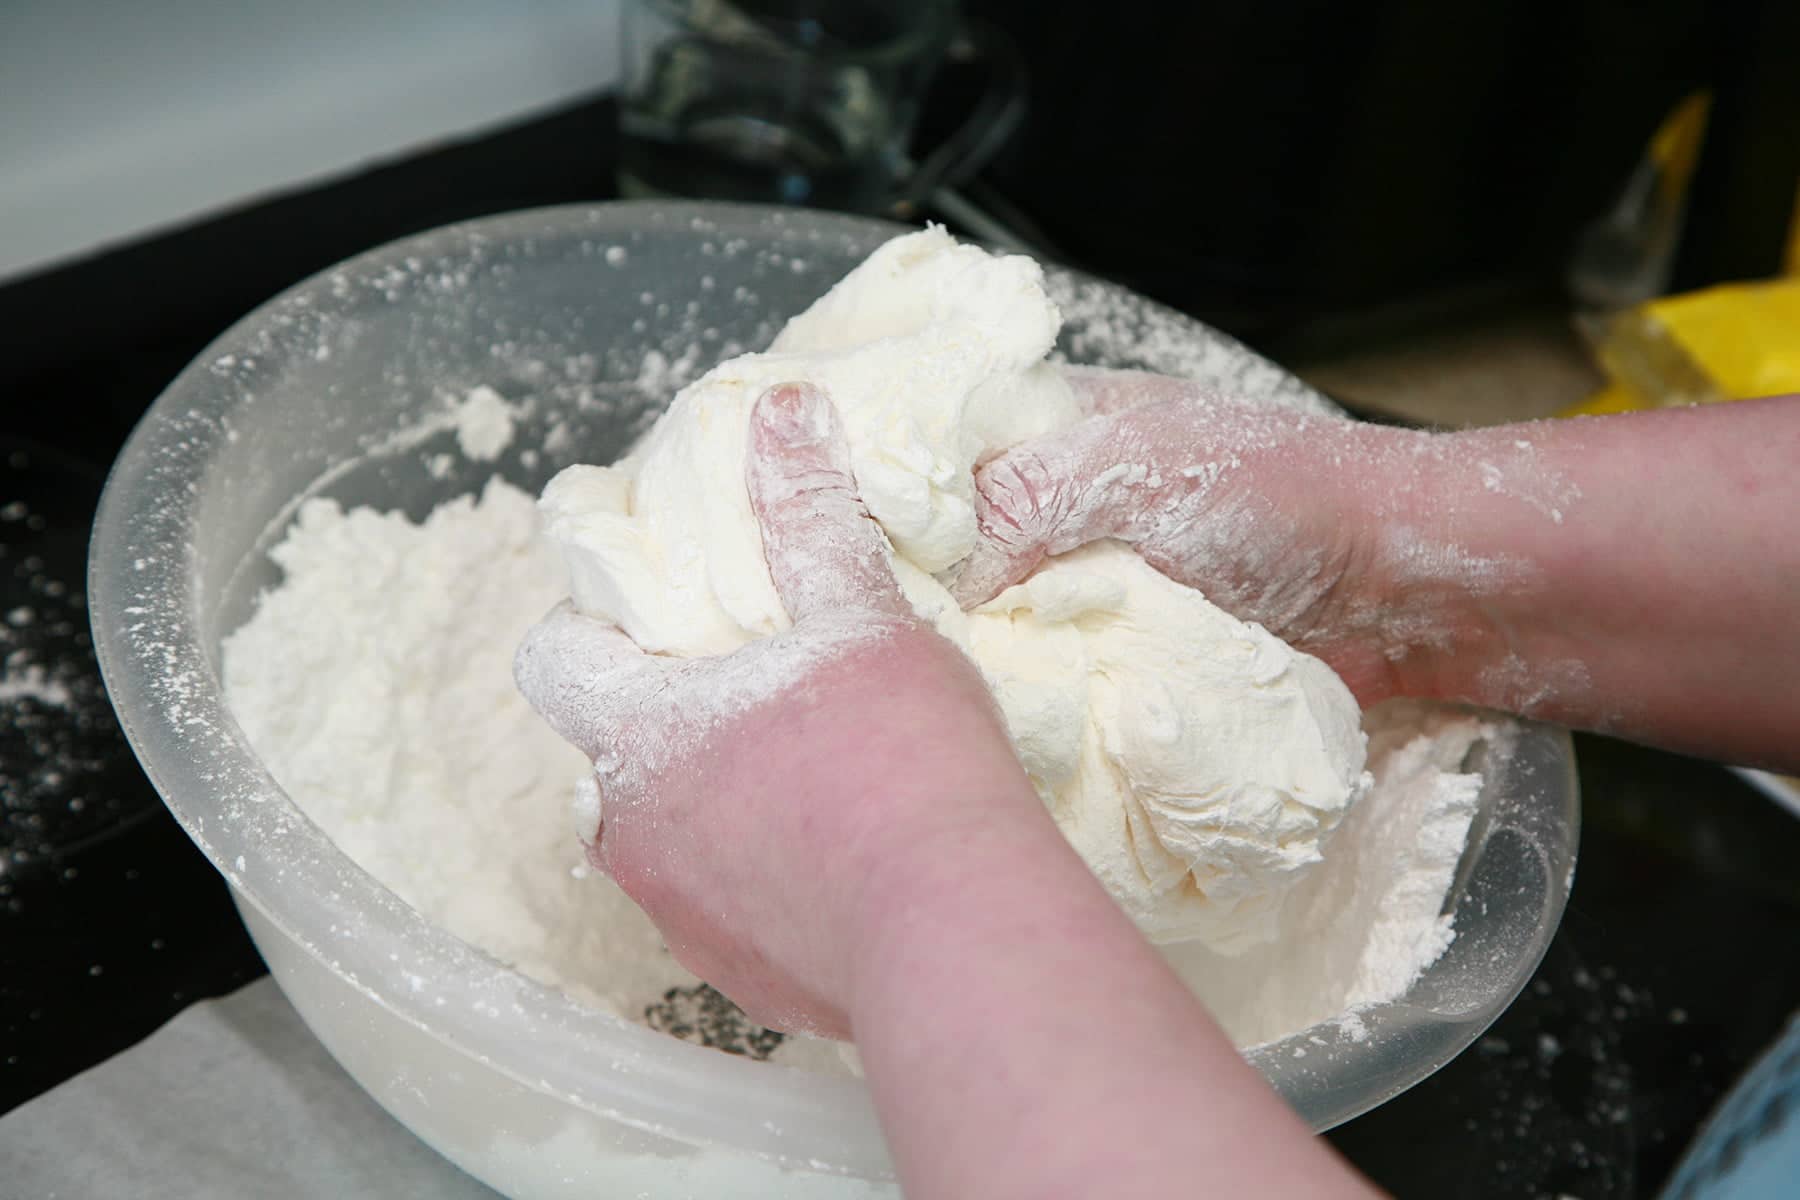
- Grease your hands up with some shortening, and knead the fondant for a couple of minutes, till it's no longer sticky. It should use about ⅔ - ¾ of the powdered sugar in the bowl.
- Turn the fondant out onto a clean, flat surface. Knead it for another minute or so until it is smooth. It should be fairly firm.
Storing Marshmallow Fondant
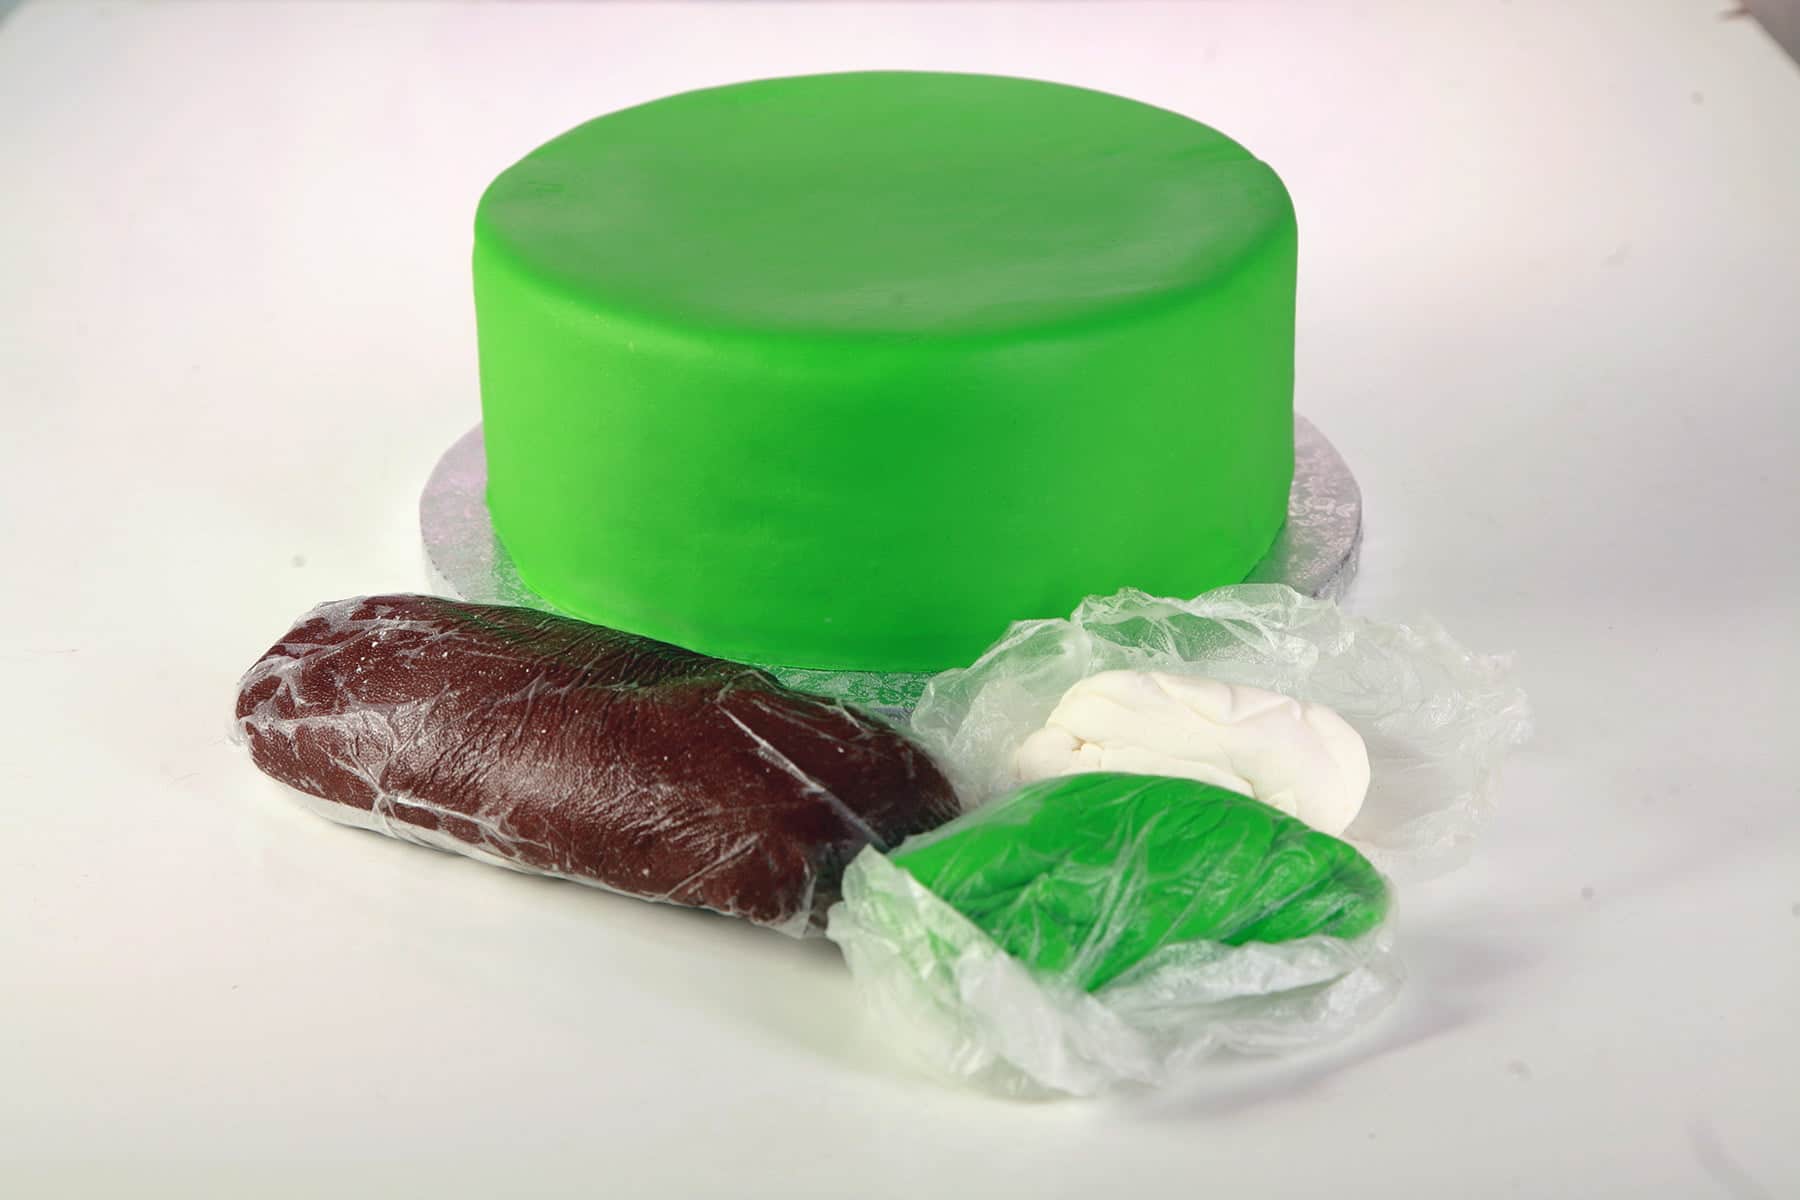
Form the fondant into a log shape, lightly grease with shortening, and tightly wrap in plastic wrap. Sometimes I’ll wrap it twice, to be safe.
From there, I’ll place it in a ziplock baggie, push the air out and seal it. If any air gets into the fondant, it will get crusty. Not good!
Properly stored fondant will last a few weeks.
Using Marshmallow Fondant
- If you’re using your fondant to cover a cake (rather than for sculpting, etc), it’s usually best to let it rest overnight before using it.
I’ll be honest, I didn’t always do this - it’s not the end of the world if you’re running late!
- Before using rested fondant, be sure to knead it well to incorporate the shortening coating into the fondant, and to get everything smooth and elastic again.
- You CAN cheat a microwave it - uncovered - for 20 seconds or so, if you’d like.
When microwaving it to soften it up a bit, be sure to carefully - and fully - knead it after heating.
Heated fondant can develop “pockets” of extra hot - even molten - marshmallow. You’ll need this fully incorporated before rolling it, or you’ll end up with a giant mess.

Covering Cakes in Fondant
Frost cake with frosting of choice. I prefer to use Swiss Meringue buttercream when working with fondant. When frosting is perfectly smooth, chill cake to firm up the frosting a bit.
For home use, I like to use this rolling pin and the silicone mat it comes with, for rolling fondant.
It's nice and long, and also has adjustable height spacers to help ensure an even thickness.
When I was making much larger cakes, I had a 2.5' long, 2" diameter length of plexiglass dowel that I would use as a rolling pin. This prevented any lines that would result from using a too-short rolling pin.
Don’t have a silicone mat? As a backup, you can use a large sheet of plexiglass or something similar. This is NOT nonstick, though, so you’ll want to grease it with a thin coat of shortening, wherever your fondant may touch.
This is not an ideal setup, though - if you can get a silicone or other nonstick food mat, I highly recommend doing so!
Note: make sure your work area is *pristine* clean. Fondant is a bit like silly putty in that it will pick up ANY bit of fuzz, hair, or whatever else that is in the area.
Roll out your fondant to ¼" thick*, and carefully position over your chilled cake. Working from the center of the top of your cake, smooth the fondant down and out, working your way to the top edges of the cake.
Carefully mold the fondant over the edges of the cake, smoothing as you go.
Continue working your way around and down the cake, bit by bit, smoothing the fondant as you go. The heat from your hands will help mold, smooth, and incorporate excess fullness as you go.
Once fondant is smoothed over entire cake, use a sharp knife to trim excess from the bottom edge of the cake.
Decorate as desired - fondant trim, piped border, whatever!
* When rolling fondant, you’ll need to consider the diameter you need, as well as the thickness. To figure out the minimum diameter you’ll want to roll your fondant to, use this formula: (Height of cake x 2) + Diameter of cake + 2 inches
For Sculpting
If you’re sculpting characters, flowers, etc out of it, you don’t necessarily need to let it rest overnight, but I’d definitely recommend letting it cool to room temperature first.
Cooled/rested fondant holds its shape better than very fresh fondant does.
Gum paste can be really expensive, fussy, and hard to find. You can cheat with marshmallow fondant! This hack will allow the fondant to dry rock hard, like gumpaste.
It’s not only great for lazy people like me, it’s a great way to ensure your gumpaste decorations *perfectly* match your fondant, when that’s needed!
Simply heat up a bit of fondant, and knead some Vegetable Gum, Tylose Powder, CMC Powder, or Gum-Tex into it.
Make sure it’s fully kneaded in, and be EXTRA careful to coat it with shortening and wrap it properly if storing. You cannot rescue marshmallow gumpaste that has hardened.

More Cake Decorating Posts
Looking to up your cake decorating game? I've got you covered!
3D Monarch Butterfly Cupcakes
American Buttercream Recipe
Chocolate Leaves Cake Tutorial
Frozen Buttercream Transfer Tutorial
Spider Web Halloween Cupcakes
Swiss Meringue Buttercream Recipe

Interested in making wickedly delicious cakes? You'll LOVE my second cookbook, Evil Cake Overlord!
We've long been known for our “ridiculously delicious” moist cakes and tasty, unique flavors. Now, you can have recipes for all of the amazing flavors on our former custom cake menu, and many more!
Bake your moist work of gastronomic art, then fill and frost your cake with any number of tasty possibilities. Milk chocolate cardamom pear, mango mojito.. even our famous Chai cake – the flavor that got us into “Every Day with Rachel Ray” magazine!
Feeling creative? Use our easy to follow recipe to make our yummy fondant. Forget everything you’ve heard about fondant – ours is made from marshmallows and powdered sugar, and is essentially candy – you can even flavor it!
Order your copy directly through my site, through Amazon, or through any major bookseller!
Cake Photos
Interested in seeing - and reading - more details of some of my favourite cakes I’ve made over the years? Check out these links:
Bubble Bobble Wedding Cake
Clarice, Have the Lambs Stopped Screaming?
Dalek Cake for a Doctor
Lambeth Wedding Cake
Snowflakes Wedding Cake
SO.. I made a Cake for Amanda Palmer (NSFW)
Spumoni Cake & The Art of Trolling Cake Competitions
That Time I Made a Cake for a Pack of Klingons
The Story of Foopmallet
TARDIS for Wil Wheaton
Tremors Wedding Cake
Share the Love!
Before you chow down, be sure to take some pics of your handiwork! If you post it to Bluesky, be sure to tag us - @CelebrationGen. We're also on Pinterest, so you can save all your favourite recipes to a board!
Also, be sure to subscribe to my free monthly email newsletter, so you never miss out on any of my nonsense.
Well, the published nonsense, anyway!
Anyway, on to that marshmallow fondant recipe!
Homemade Marshmallow Fondant
Equipment
- Large wire mesh strainer
- Large bowl
- Microwave safe bowl
Ingredients
- 1 lb Mini Marshmallows
- 2 lbs Icing powdered sugar
- 2 tablespoon water
- Flavoring optional
- Cocoa Powder optional
- Coloring optional.
- Vegetable Shortening
Instructions
- Use the wire strainer to "sift" your icing sugar into the large mixing bowl, set aside.
- Measure water into a microwave safe glass / Pyrex bowl - Mine is about 9" across, 3" deep.
- Dump the bag of marshmallows into the glass dish - on top of the liquid - and microwave it till melted. I find it's usually 1:35 - 1:45. Don't burn it!
- Stir the marshmallows/liquid together until smooth - make sure you get ALL of the water incorporated! I grease a butter knife with a little shortening to do this.
- At this point, add coloring if you plan to. You'll want to color it a bit darker than you want the final color to be.
- This is also the point you will add your cocoa - sifting it in - if you are making chocolate fondant.
- I use the Hershey's Dark / Dutch Processed cocoa powder, and just mix it in till it's slightly too dark. I use between ¼- ½ cup of cocoa. If I'm doing a light brown color, I use regular cocoa powder, and less of it.
- Dump the melted marshmallow mix into the bowl of icing sugar, stirring with the knife until fairly well incorporated.
- Grease your hands up with some shortening, and knead the fondant for a couple of minutes, till it's no longer sticky. It should use about ⅔ - ¾ of the powdered sugar in the bowl.
- Turn the fondant out onto a clean, flat surface. Knead it for another minute or so until it is smooth. It should be fairly firm.
Video
Notes
Nutrition
Cake Recipes!
Looking for some ridiculously delicious cake recipes? As the "Evil Cake Overlord", I've got you covered! (Ps: Check out my instructions for making Marshmallow Fondant, as well!)
Tortes:
B-52 Torte
Bahama Mama Torte
Blood Orange Truffle Torte
Citrus Splendor Torte
Cookies N Cream Cake
Raspberry Tiramisu Torte
Schmoo Torte
Spumoni Cake
Tiger Tail Cake
Bundt, Sheet, & Upside Down Cakes
Bananas Foster Upside Down Cake
Brandied Apple Upside Down Cake
Deep N Delicious Cake
French Martini Bundt Cake
French Martini Upside Down Cake
Mango Mojito Upside Down Cake
Pina Colada Bundt Cake
Strawberry Mango Marble Cake
Cupcakes:
3D Monarch Butterfly Cupcakes
Chai Cupcakes
Easy Butterfly Cupcakes
Fat Elvis Cupcakes
Lynchburg Lemonade Cupcakes
Pink Grapefruit Daiquiri Cupcakes
Also: I have Cake Decorating Tutorials, and posts about previous Decorated Cakes that I've made.


Leave a Reply