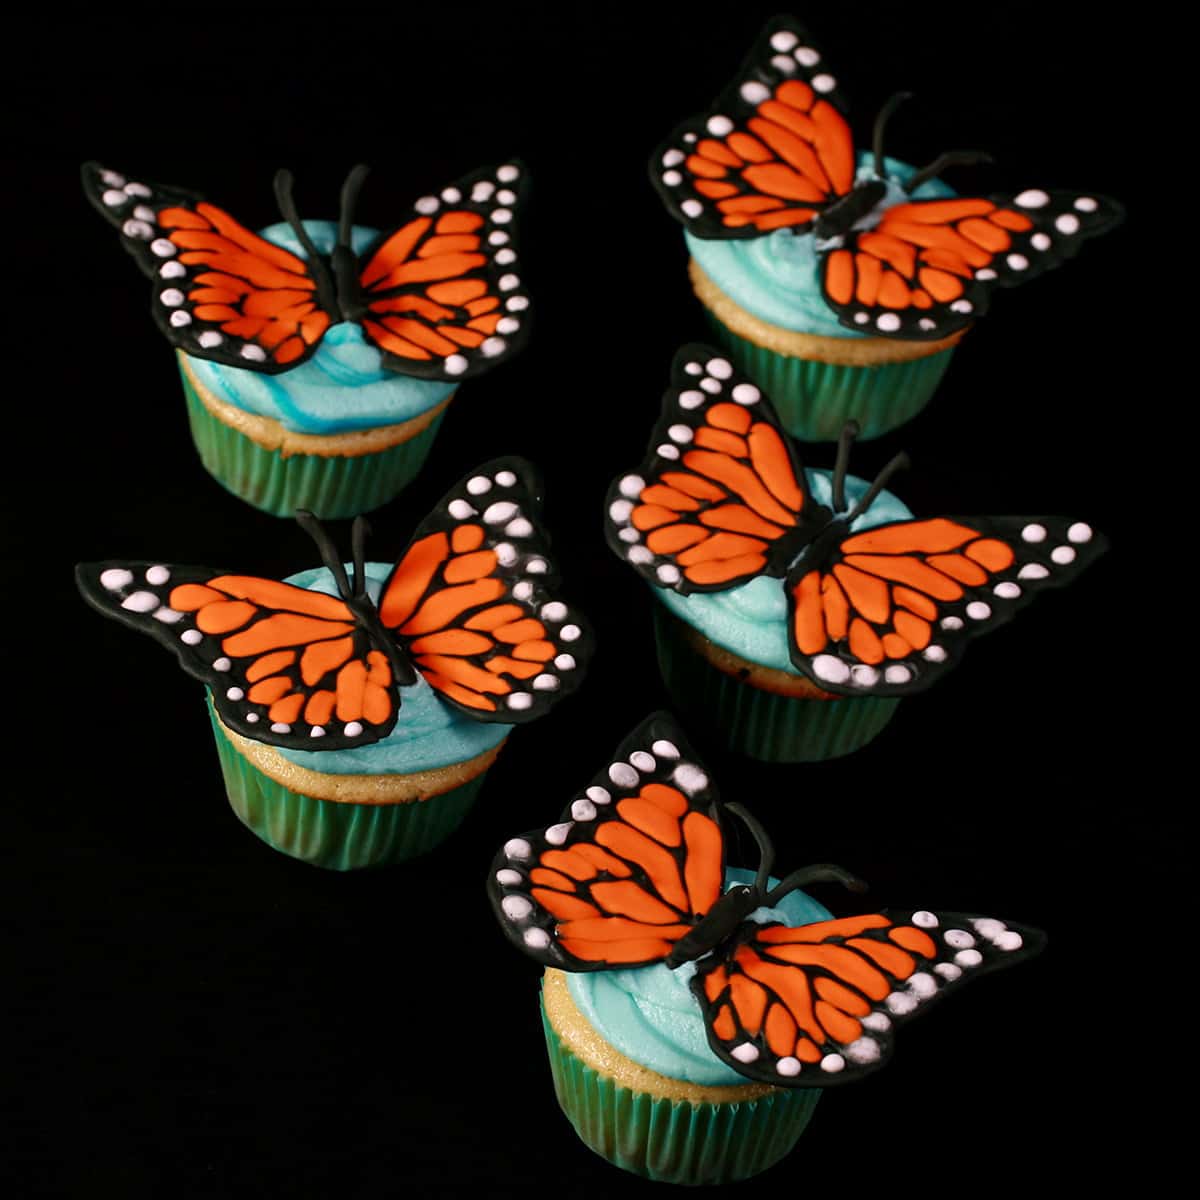
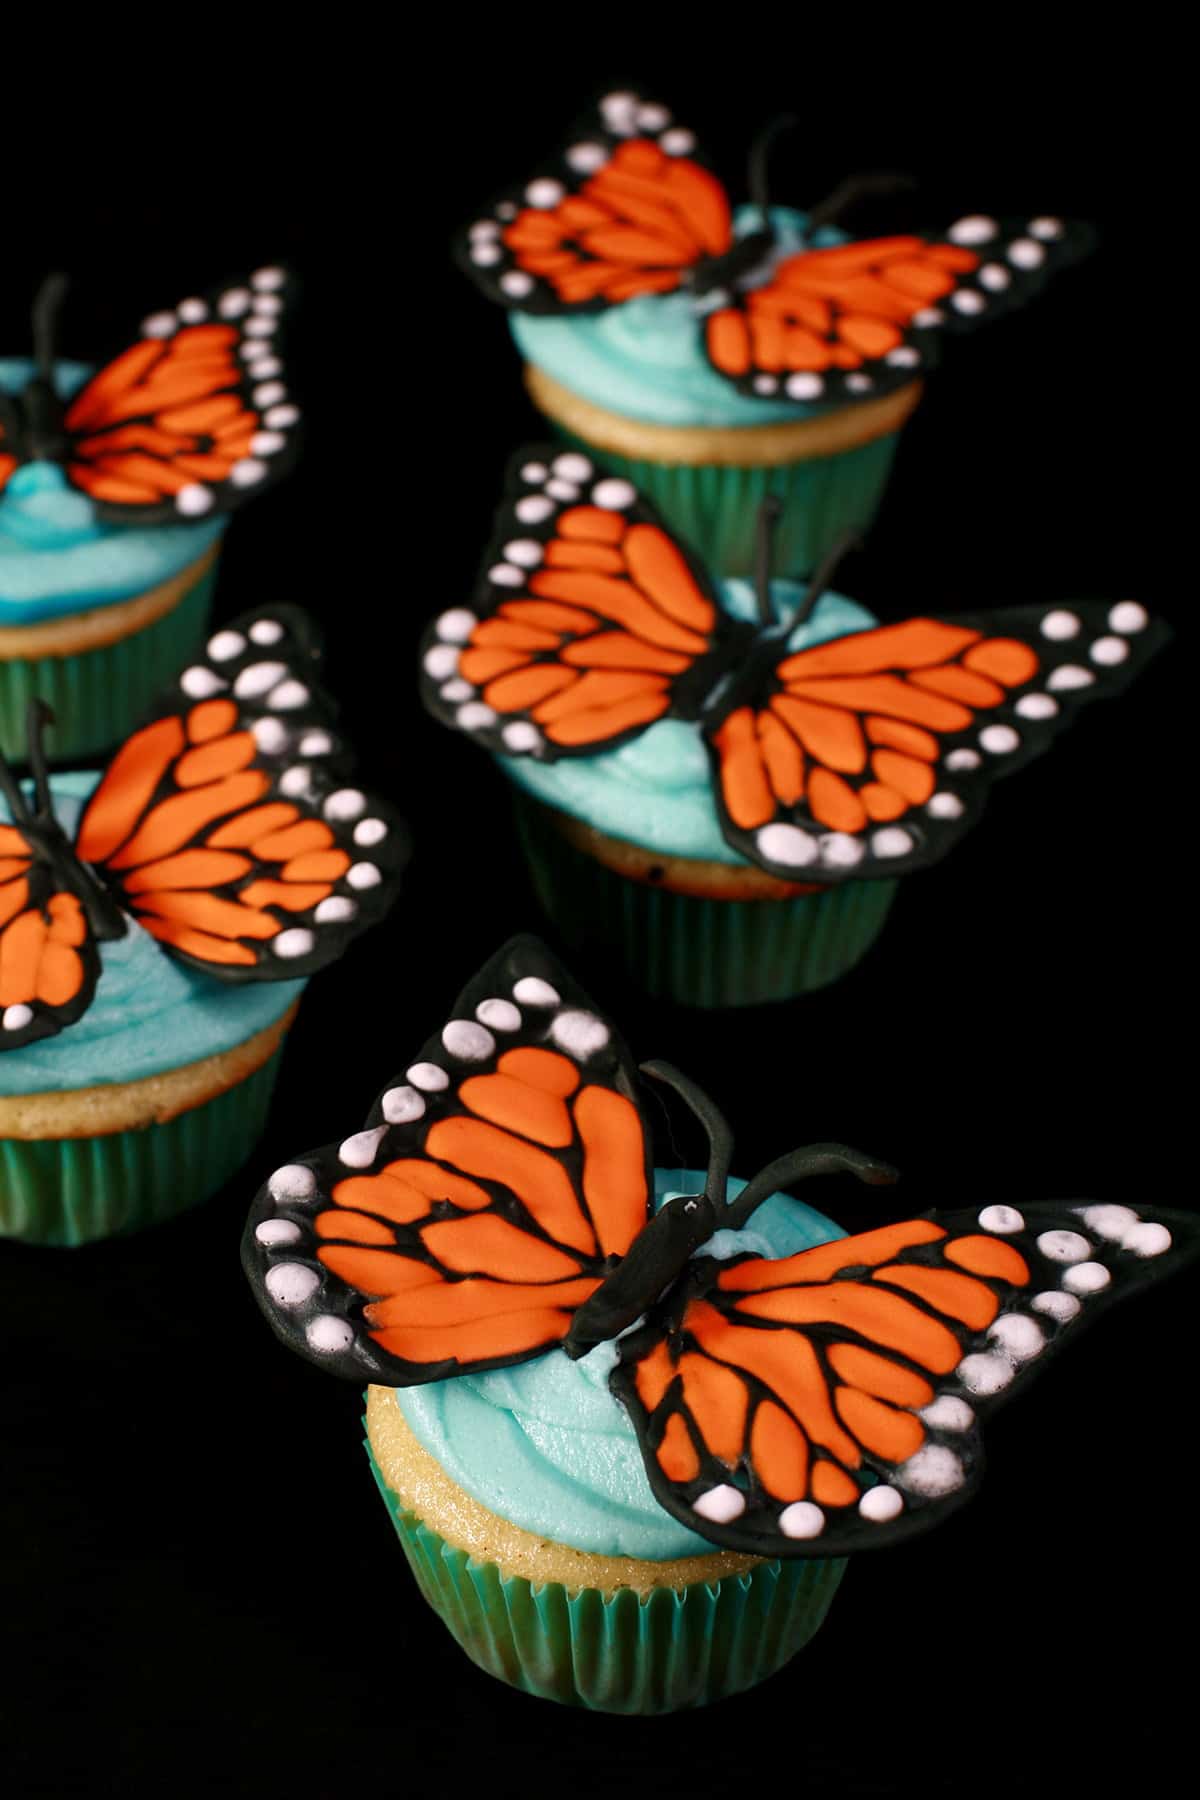
These 3D Monarch Butterfly Cupcakes may look fussy, but they're very easy to make - you just need to start a day ahead of time!
Originally posted August 12, 2020. Updated 02/19/2021

I recently posted my "Easy Butterfly Cupcakes", which I've been making since I was a kid.
Of course, like many things, I needed to come up with a more.. "extra" version. Hence: 3D Monarch Butterfly Cupcakes!
Royal icing is easy to make, and can be a ton of fun - especially when you make stuff like these "Next level" Cupcakes!
If you’re masochistic, you can use it to try your hand at the Lambeth Method for Cake Decorating... but I wouldn’t call that “A ton of fun”, LOL!
What IS a lot of fun though, IMHO, is being able to customize cakes and cupcakes with almost any design you can think up.
Much as tracing a template from under some parchment paper yields fabulous results - as I demonstrated in my Frozen Buttercream Transfer Tutorial - the same idea can be used as an aid in piping Royal Icing designs.
Unlike Frozen Buttercream Transfers, Royal Icing doesn’t get frozen - it gets left to dry out. Once it dries, it becomes quite hard. Then, you simply - CAREFULLY - remove it from the parchment paper, and affix it to whatever treat you want to adorn with your creativity!
In this case, I wanted to make some beautiful butterfly wings to put on top of cupcakes.

As it’s almost monarch migration season - and because Monarch butterflies are gorgeous - I decided to do 3D Monarch Butterfly Cupcakes.
While I’m specifically demonstrating how to make 3D Monarch Butterfly Cupcakes here, this technique can be used for almost any design - freehand or traced.
Before You Start
Just a few things to keep in mind, mostly around the fact that Royal Icing is FRAGILE:
- The bigger your design, the easier it is to pipe more details
- The bigger your design, the more fragile the design, and the more likely it is to break.
Conversely
- A smaller design will need to be more simple in design
- A smaller design will be more durable.

Additionally, you’ll want to consider your logistics. If you’re making a dozen cupcakes to transport in a cupcake holder, you need to consider that when deciding on the design.
- The design shouldn’t be much wider than the top of the cupcake, or it will not fit in with the other cupcakes in the holder
- If your design stands up, make sure the container has some clearance for that design!
So, try to strike a balance between appearance, durability, and logistics when dealing with your templates.
For me, I tend to go on Google and find an image I’m looking for. From there, I’ll size it and edit it, usually to remove detail - and colour. Plain black outlines on a white background is the easiest to work with.
If you NEED to have colour, print off a colour version to hold off to the side, as reference!

Finally, make several extras. These are very, very fragile and you will very likely break some - even just lifting them off the work surface.
Better to end up with too many, than too few... especially with a 12-24 hour dry time!
So, with all that said, let’s get to the 3D Monarch Butterfly Cupcakes Tutorial!
1. Bake Your Cupcakes
Once baked, allow them to cool to room temperature. (My Vanilla Cupcakes recipe follows this tutorial, but you can use any cupcakes you’d like - homemade or not!)
2. Make your Royal Icing
My recipes for Royal Icing follow this tutorial, just after the cupcake recipe.
The traditional way uses a raw egg white and lemon juice - which is not ideal for very young kids, pregnant women, etc.
The safer way uses meringue powder, which is expensive but relatively easy to come by. You can get it at any cake decorating store, or on Amazon.
3. Choose Your Work Surface
You’ll want to pipe your butterflies on something flat and stable - you do NOT want them to bend or flex while they’re drying.
Personally, I like to use a cutting board, or the back of a baking sheet. Small enough to make them easy to work with, but nice and sturdy.
4. Secure Template to Work Surface

Tape your design template down to your work surface. Masking tape works fine for most surfaces.
5. Affix Parchment Paper
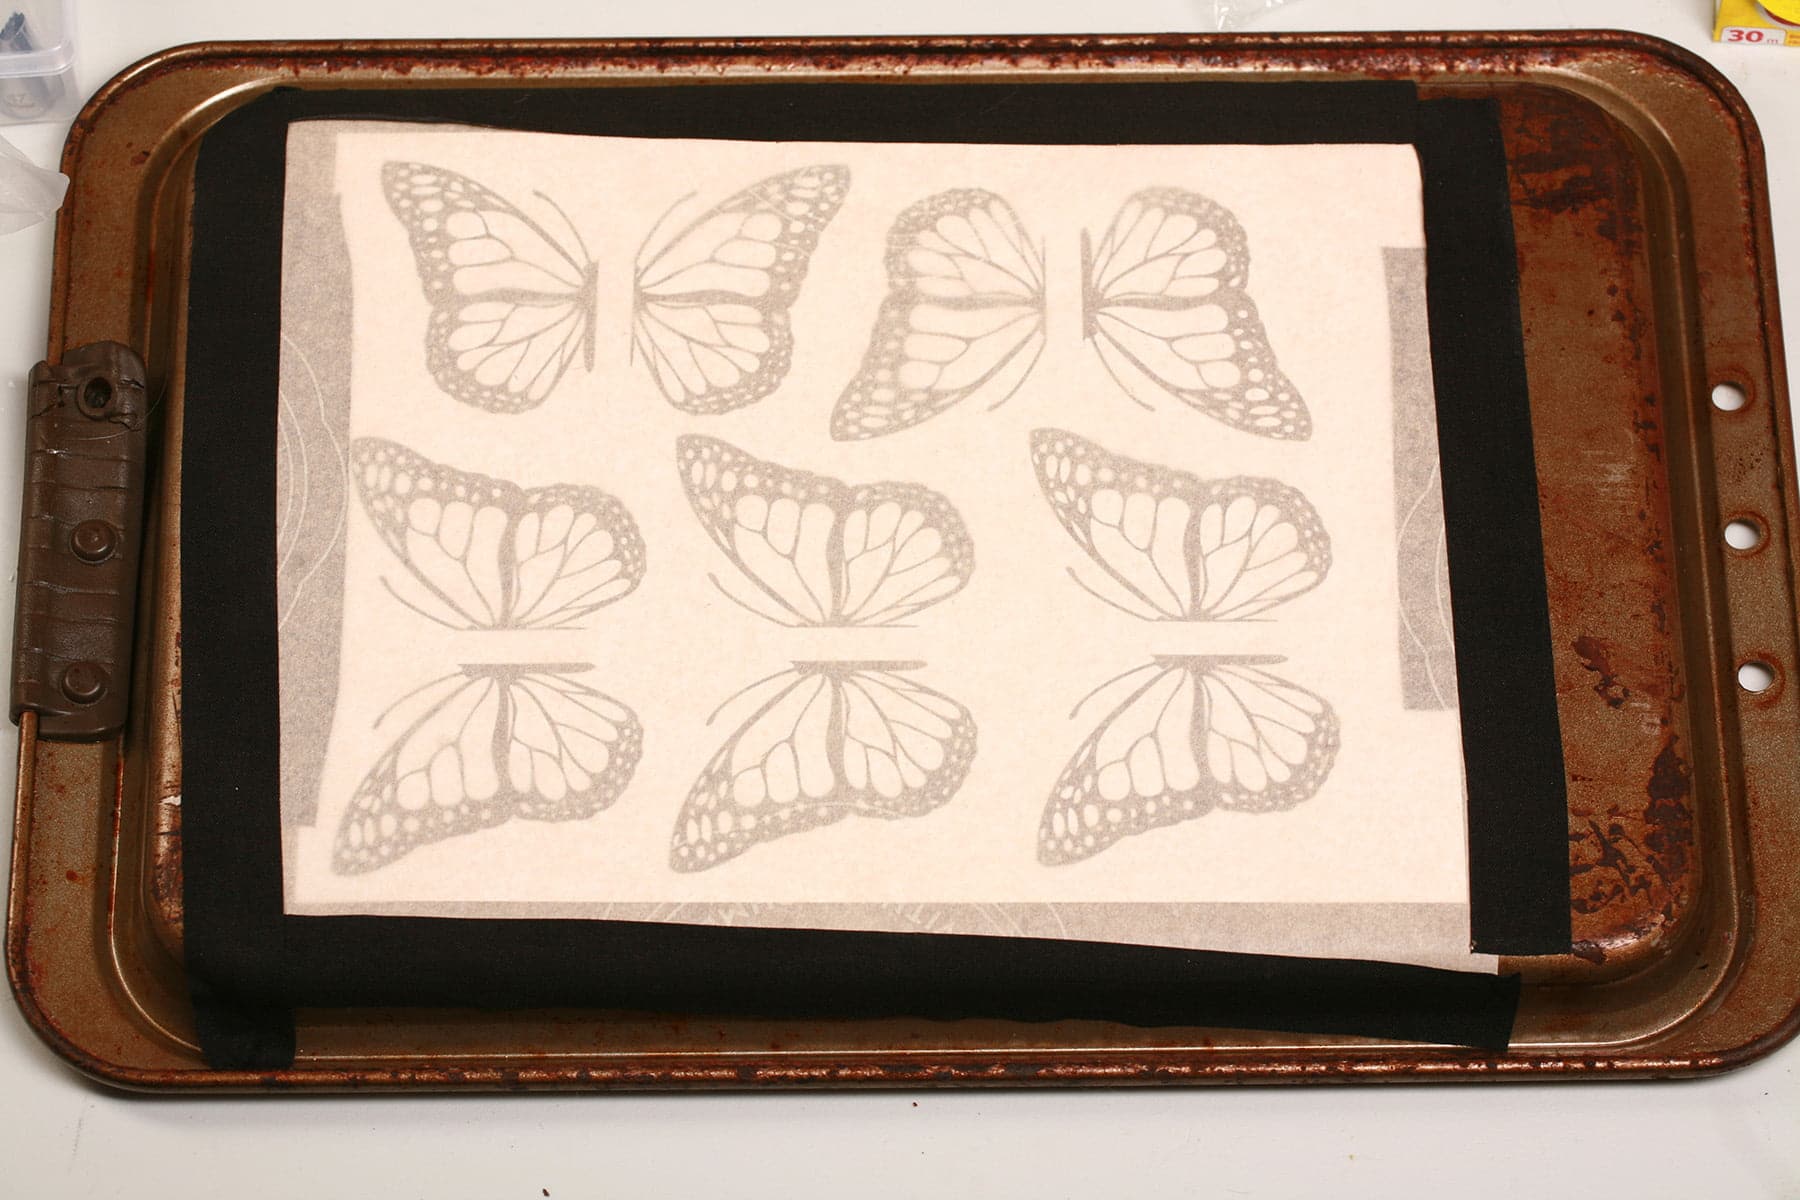
Tape a piece of parchment paper down over your template, taking care to leave a bit of space around the edges of your design.
Now, where most tapes work fine for most surfaces, parchment paper is a unique case, as most tape does NOT stick to it.
Personally, I like to use hockey tape here. It’s not the BEST hold, but it’s some hold - and that’s good enough in this case!
As you tape your parchment paper down to the template and board, be sure to keep it smooth, straight, and with any excess air pushed out.
6. Tint Some Royal Icing
Tint some icing to the colour you want to do the outline in, in this case black. I like to use gel colour, rather than paste - I find it gets a nicer colour, in general.
7. Get Your Piping Bag Ready
Here’s where we get into a bit of “do as I say, not as I do”. You know, kind of like when I did my Dalek Sugar Cookie Decorating tutorial... just with a totally different excuse this time!
As you can see in the pics - and video, below - I did not use a coupler and tip in my piping bag. I have a really good excuse for this!
You see, sometime between when quit decorating cakes and when I moved to Canada, I got rid of ALL my caking stuff.
Then I eventually decided to do these tutorials, so bought a little cake decorating set on Amazon. I put it aside until it was time to film and shoot this tutorial.
... and that’s when I discovered that this basic set did NOT have the smaller sizes of basic round tips. FOILED.
So, I’m demonstrating with just the very end of my piping bag cut off. It’s not as clean, the edges aren’t as pretty - but you can do it!
If you’d like to do it the more proper/professional way, I recommend a #2 or #3 round tip.
8. Check Icing Consistency
A good way to figure out if your icing is the right consistency is to pull a spoon through the middle of the frosting bowl.
– If the frosting settles out in less than 5 seconds, it’s too runny. Add a little more powdered sugar.
– If the frosting settles out in 5-10 seconds, you’re good to go!
– If the frosting takes longer than 10 seconds to settle, it’s too thick. Add a little water or lemon juice and try again.
If your icing is too runny, add a little powdered sugar to thicken it up. If it’s too thick, add a little water to thin it out.
9. Start Piping

Holding the tip / end of your frosting bag about 1 cm away from the surface, carefully pipe out your outlines and design details, as shown. I like to add a little bit of a buildup where the “body” is, as a piece that will sink down into the frosting on the cupcake
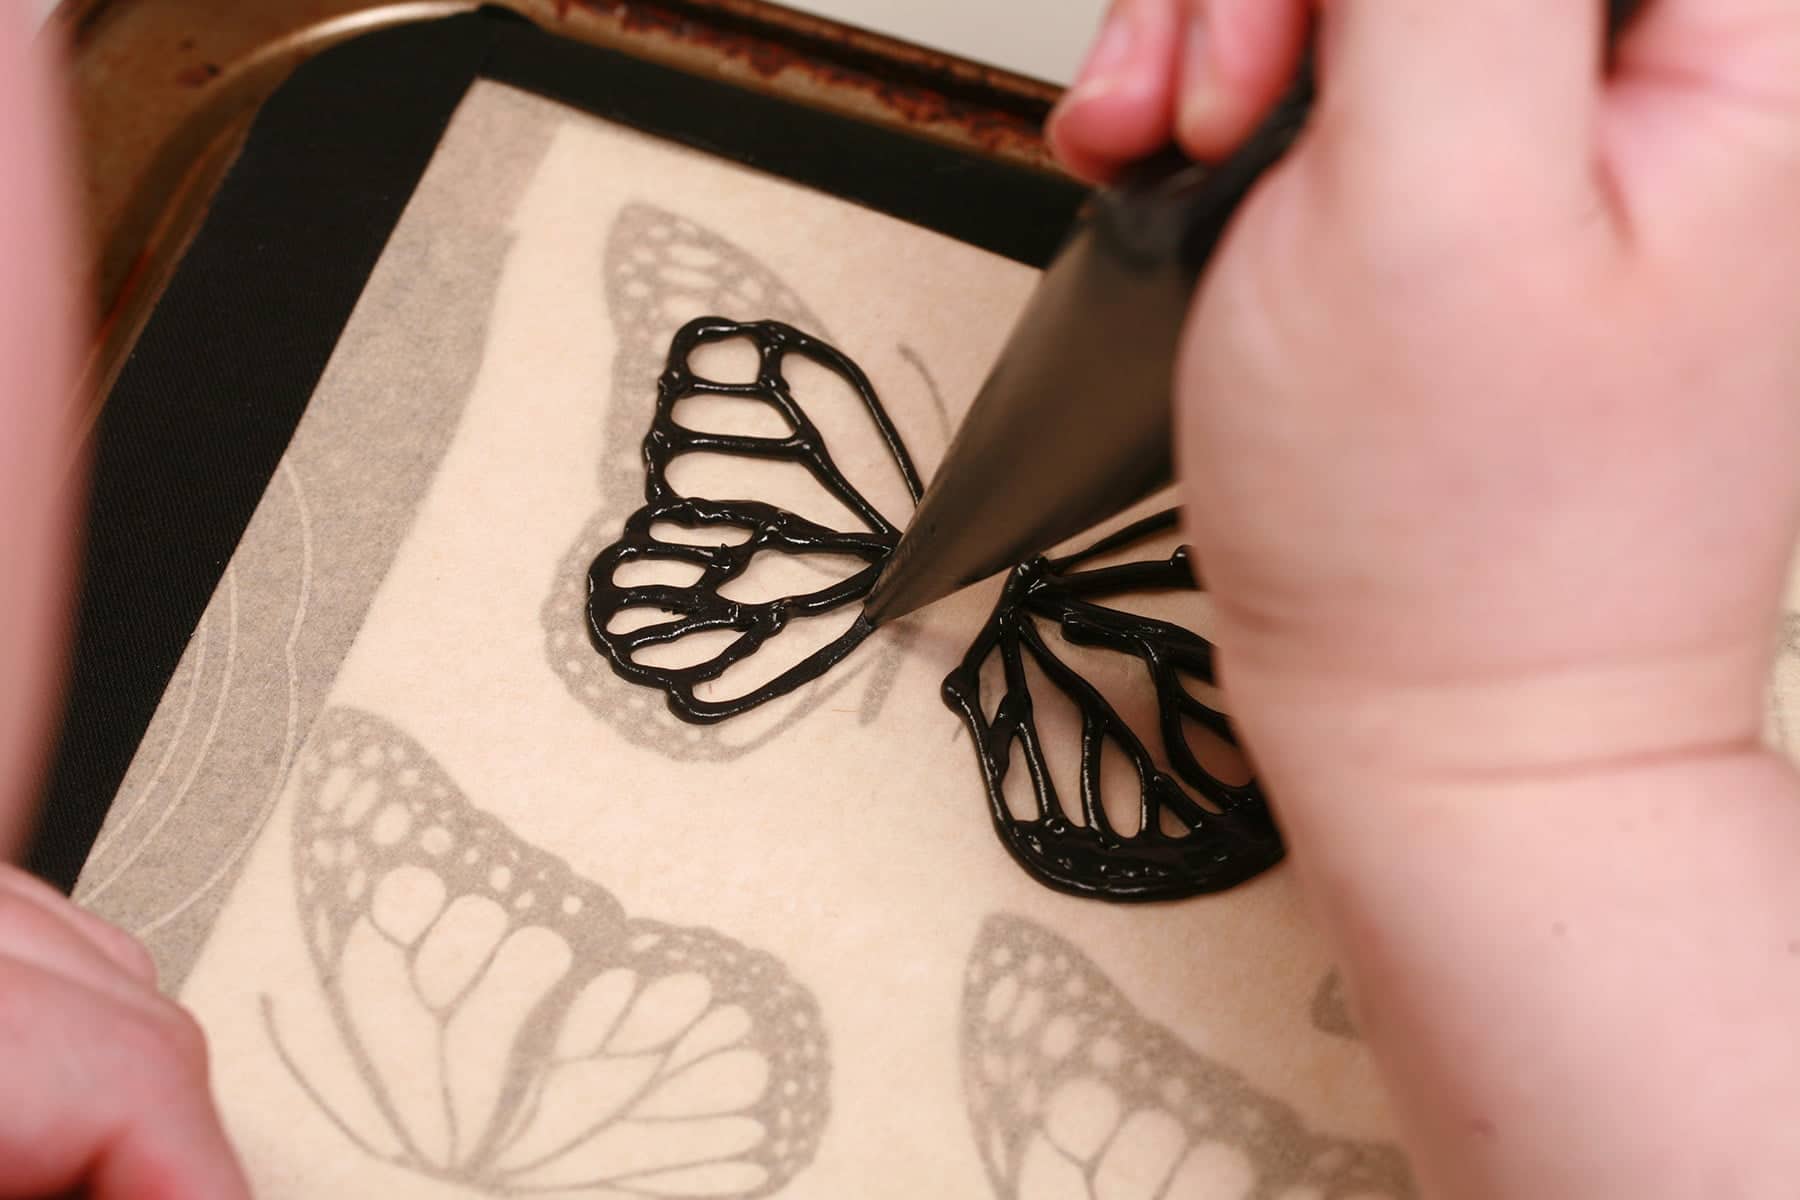
These lines will eventually contain the flowing frosting, so make sure you don't have any breaks in the piping, or the icing will flow out to areas you don't want it!
Optionally, I like to pipe some freehand “bodies” and “Antennae” off to the side.
10. Thin Your Black Icing
Before filling in the black areas, you'll need to thin the frosting so it will "flood" the decorating area. Add a few drops of water and stir well.
Use the end of your spoon to drizzle a bit of frosting back into the bowl. If it smooths out and disappears in a count of 3, you're good to go! If not, add a couple more drops of water until it's the right consistency.
11. Flood It!
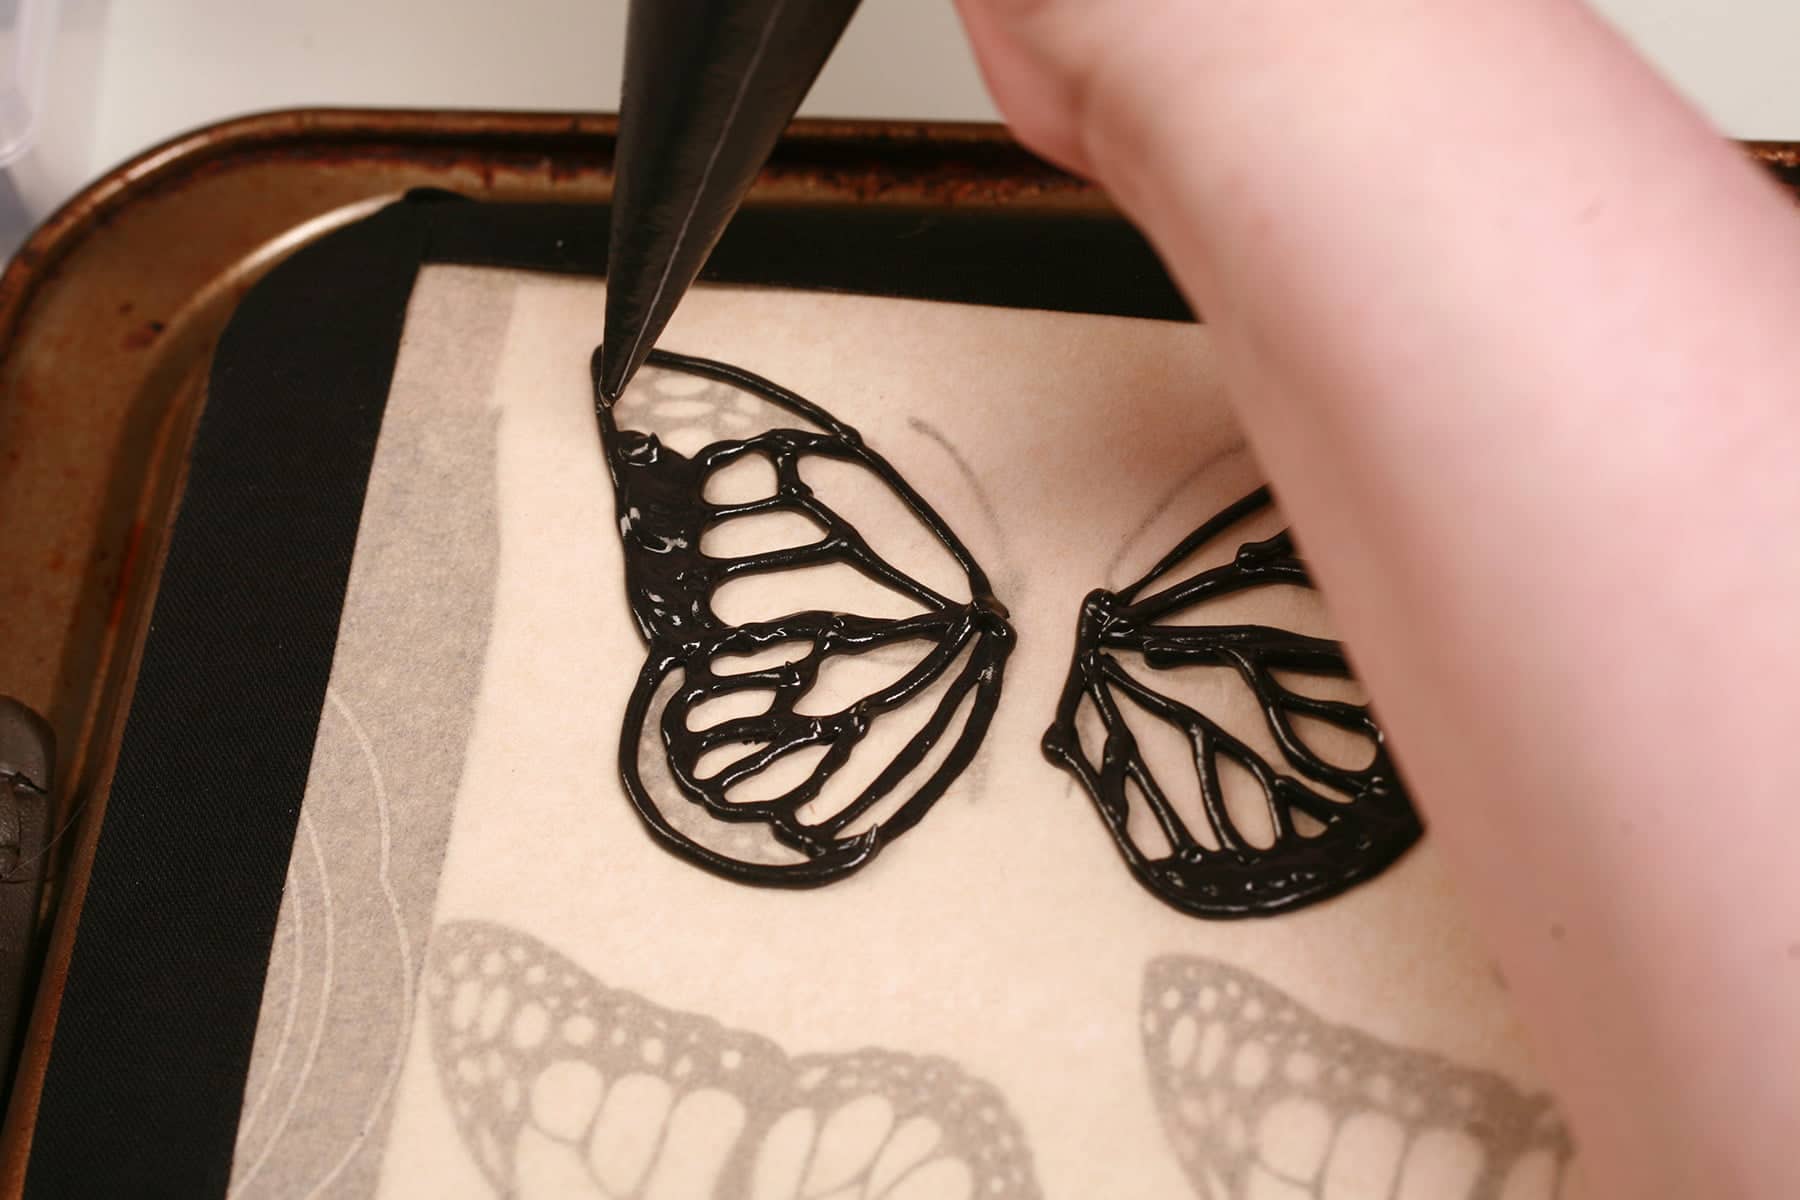
Carefully pipe a bit of the liquid frosting into the areas you want.
At times, you'll probably not even need to squeeze the bag, just carefully guide it, nudging the icing into corners, etc.
Generally speaking, flood piping is done from the outside perimeter of an area inwards, but on these cupcakes there's so little room to work with, just do whatever feels right!
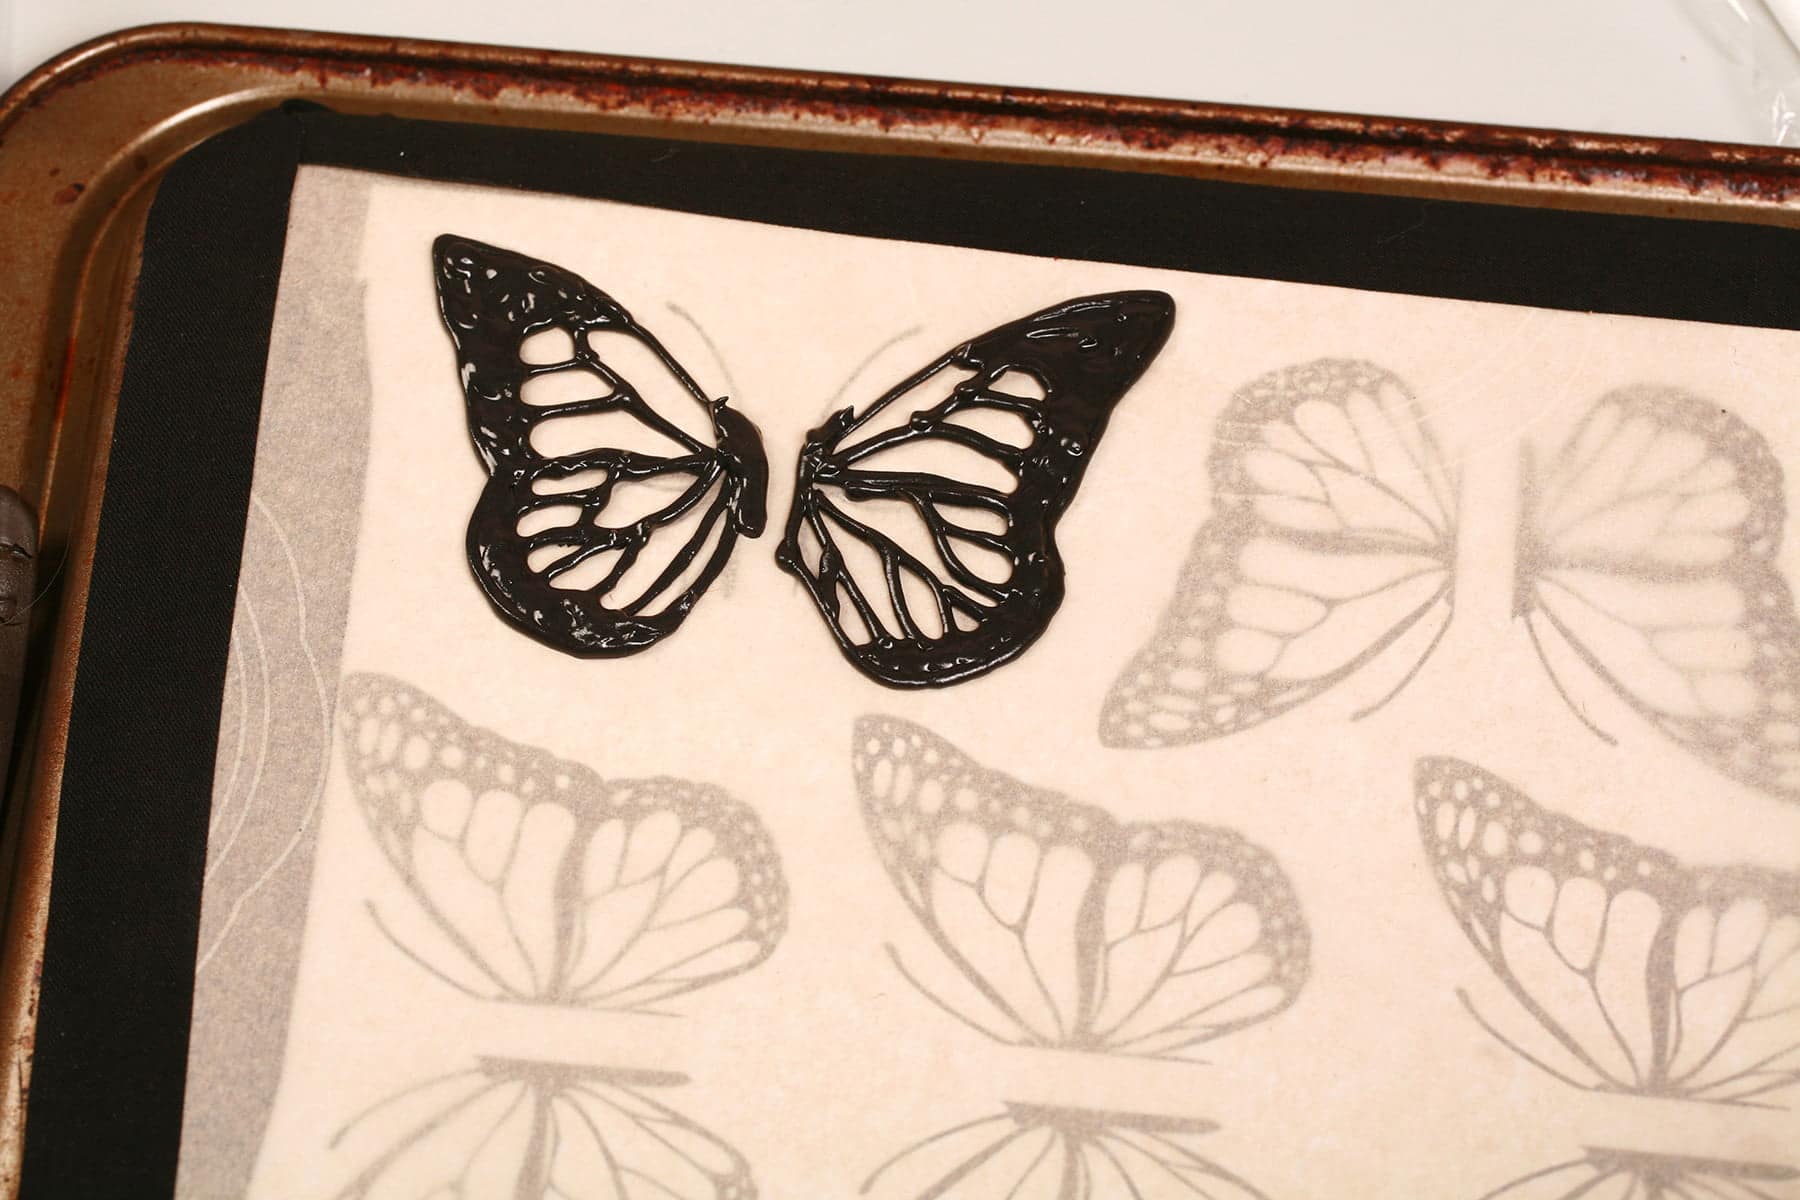
12. Add the White Dots
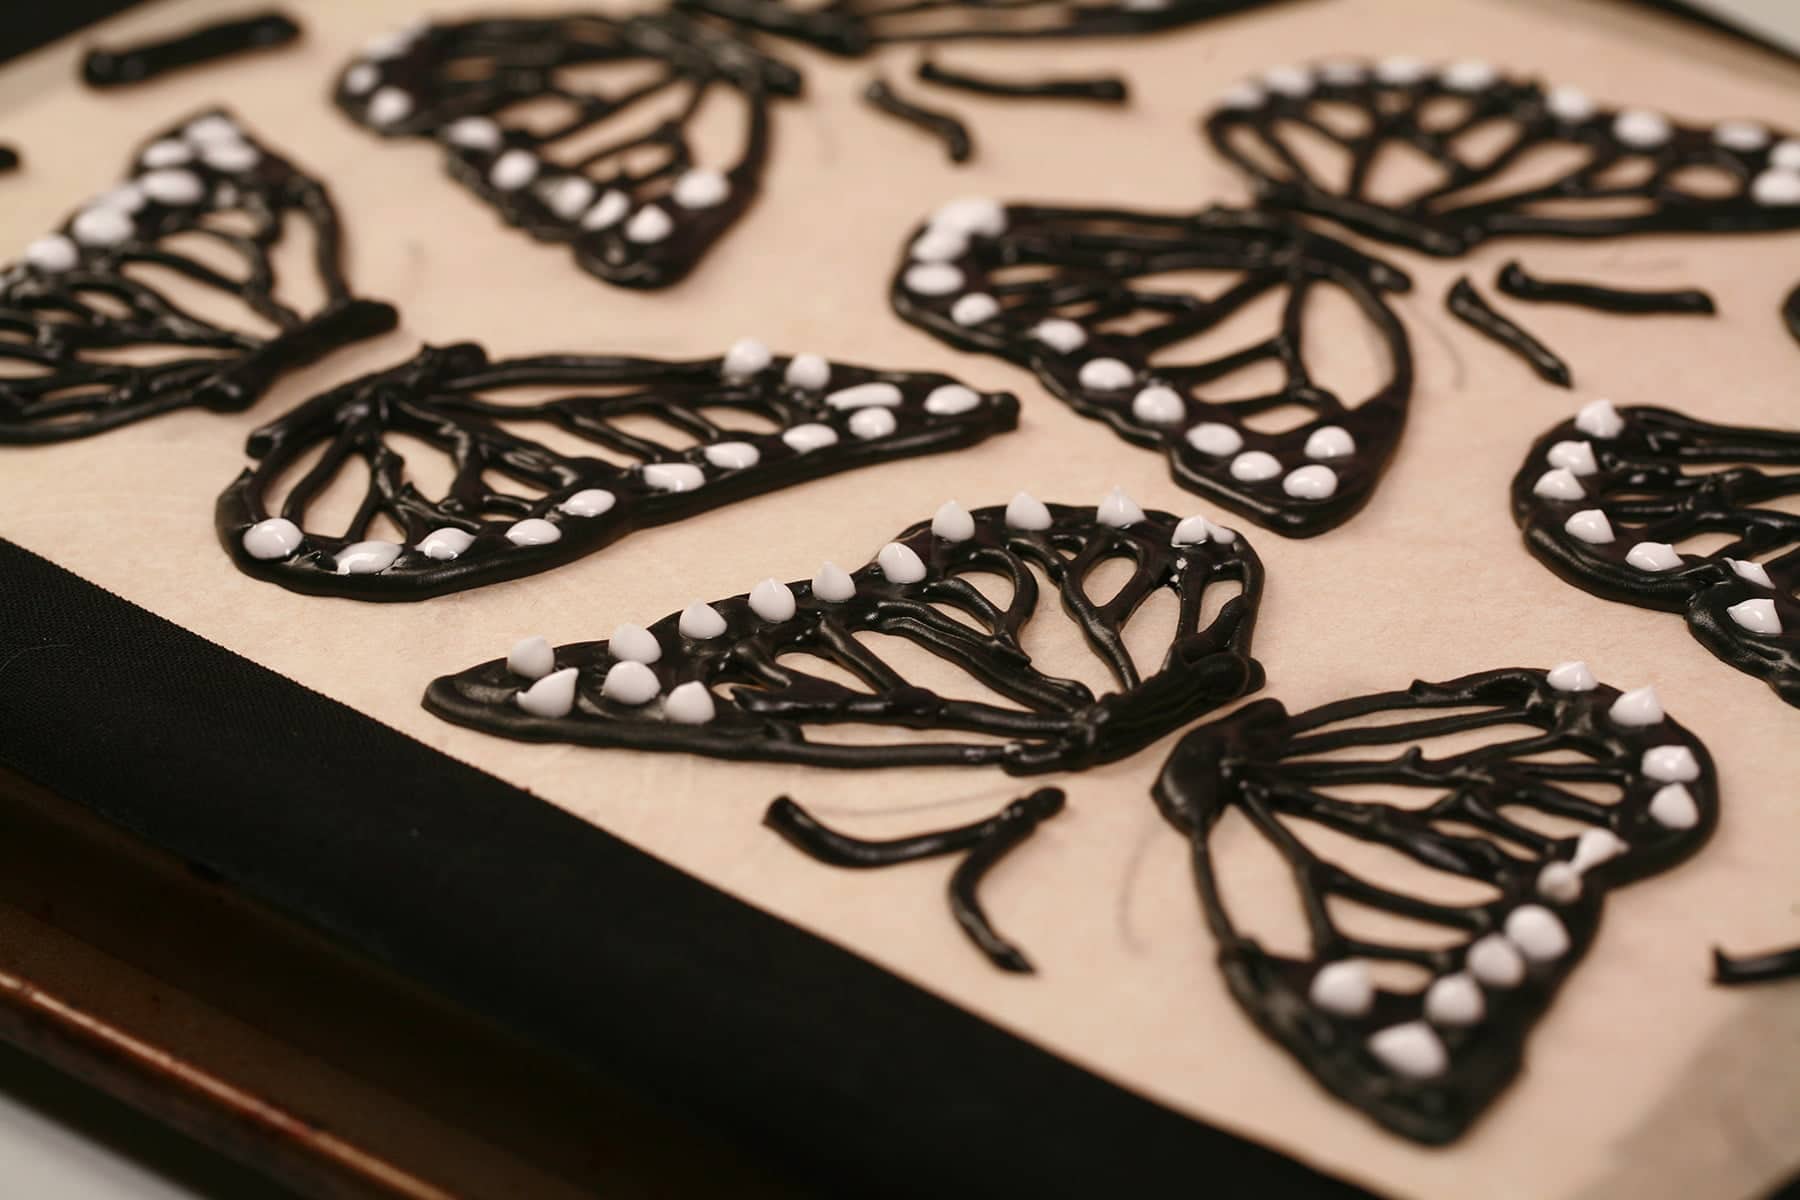
Use un-tinted royal icing to pipe white dots amidst the black. I like to use royal icing that has NOT been thinned out for this, as it gives the sharpest edge.
Using this method is likely to leave “peaks” of frosting at each dot. Wet your finger tip - I like to keep a little bowl of water nearby - and gently flatten each point down

If you want the flattest look without having to pat peaks down, you can thin it out slightly thin out the white royal icing, so it settles in to the black areas.
13. Flood The Orange Areas

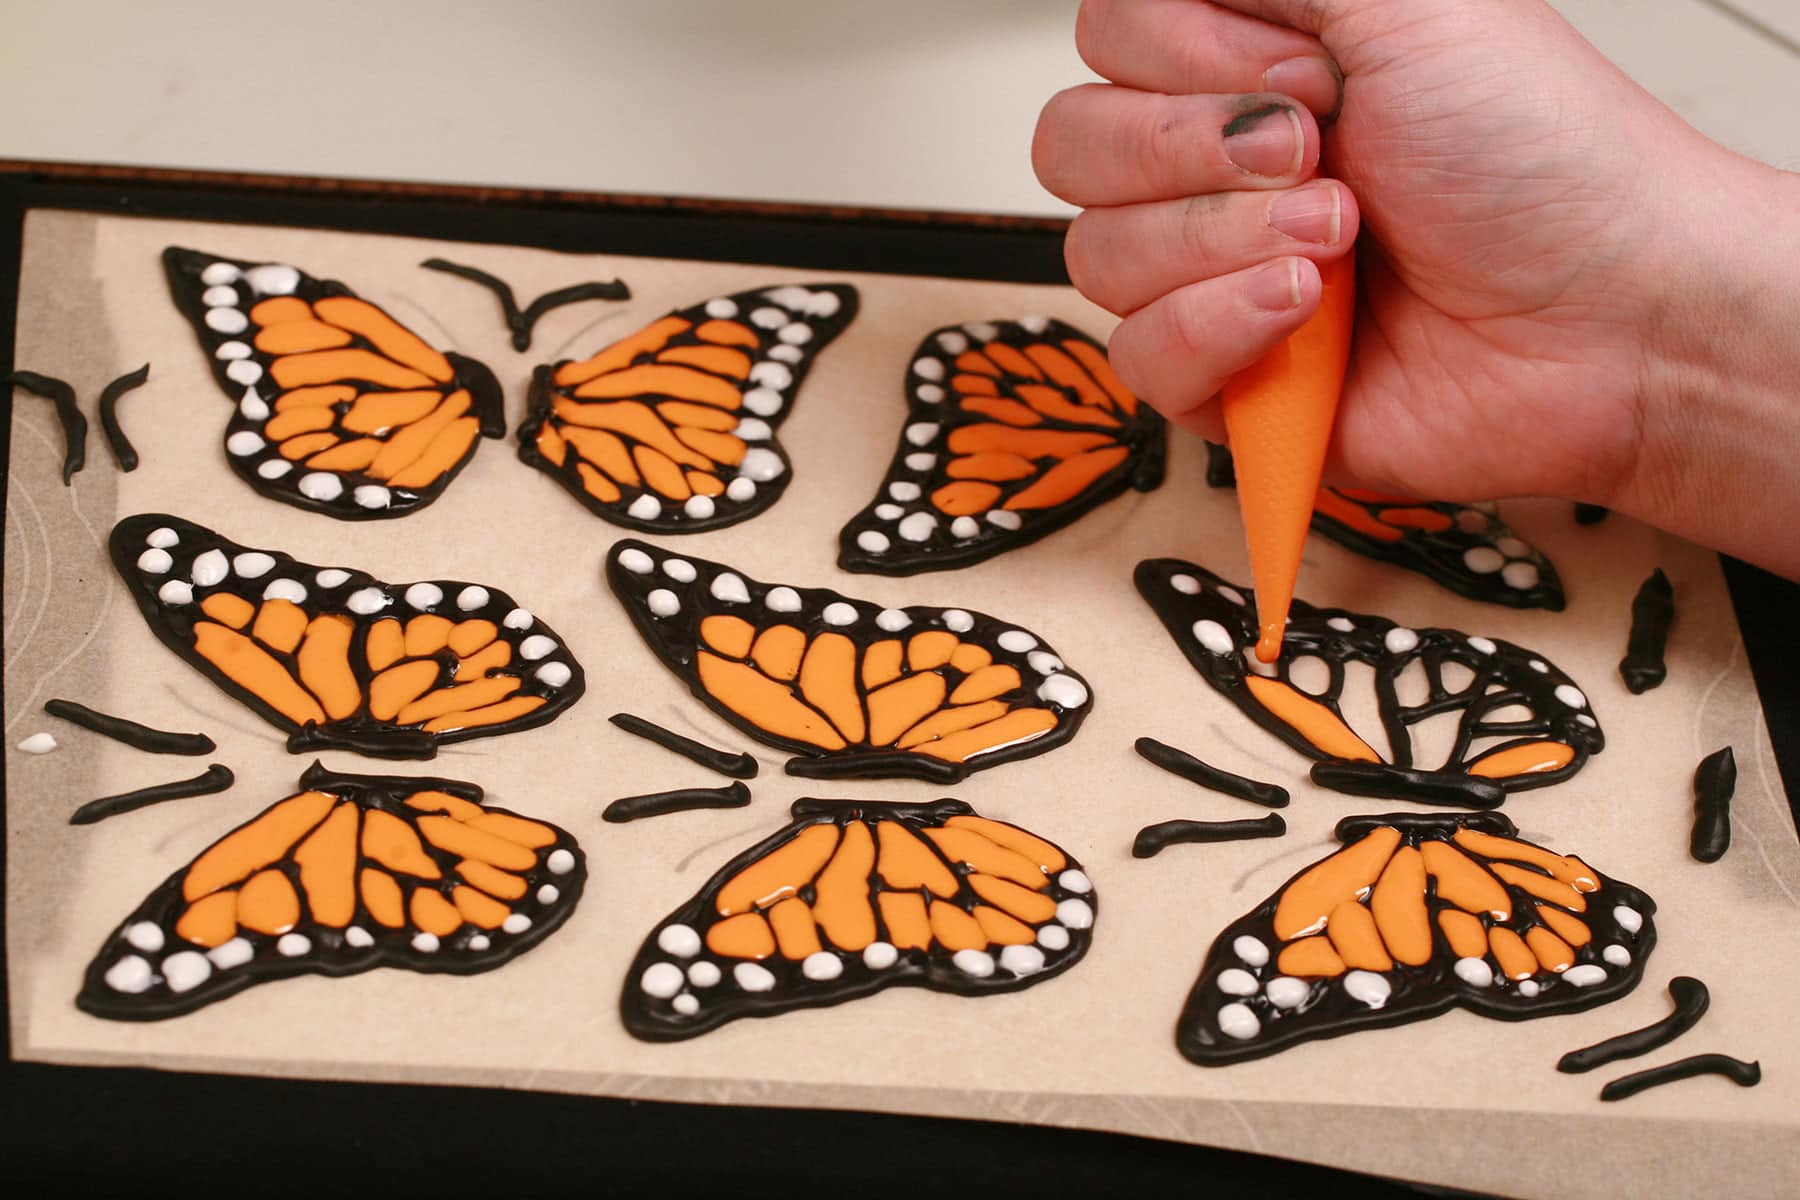
Tint some royal icing orange, and thin in the same way you did step 10. Then, flood the orange areas in the same way you did step 12.

14. Wait
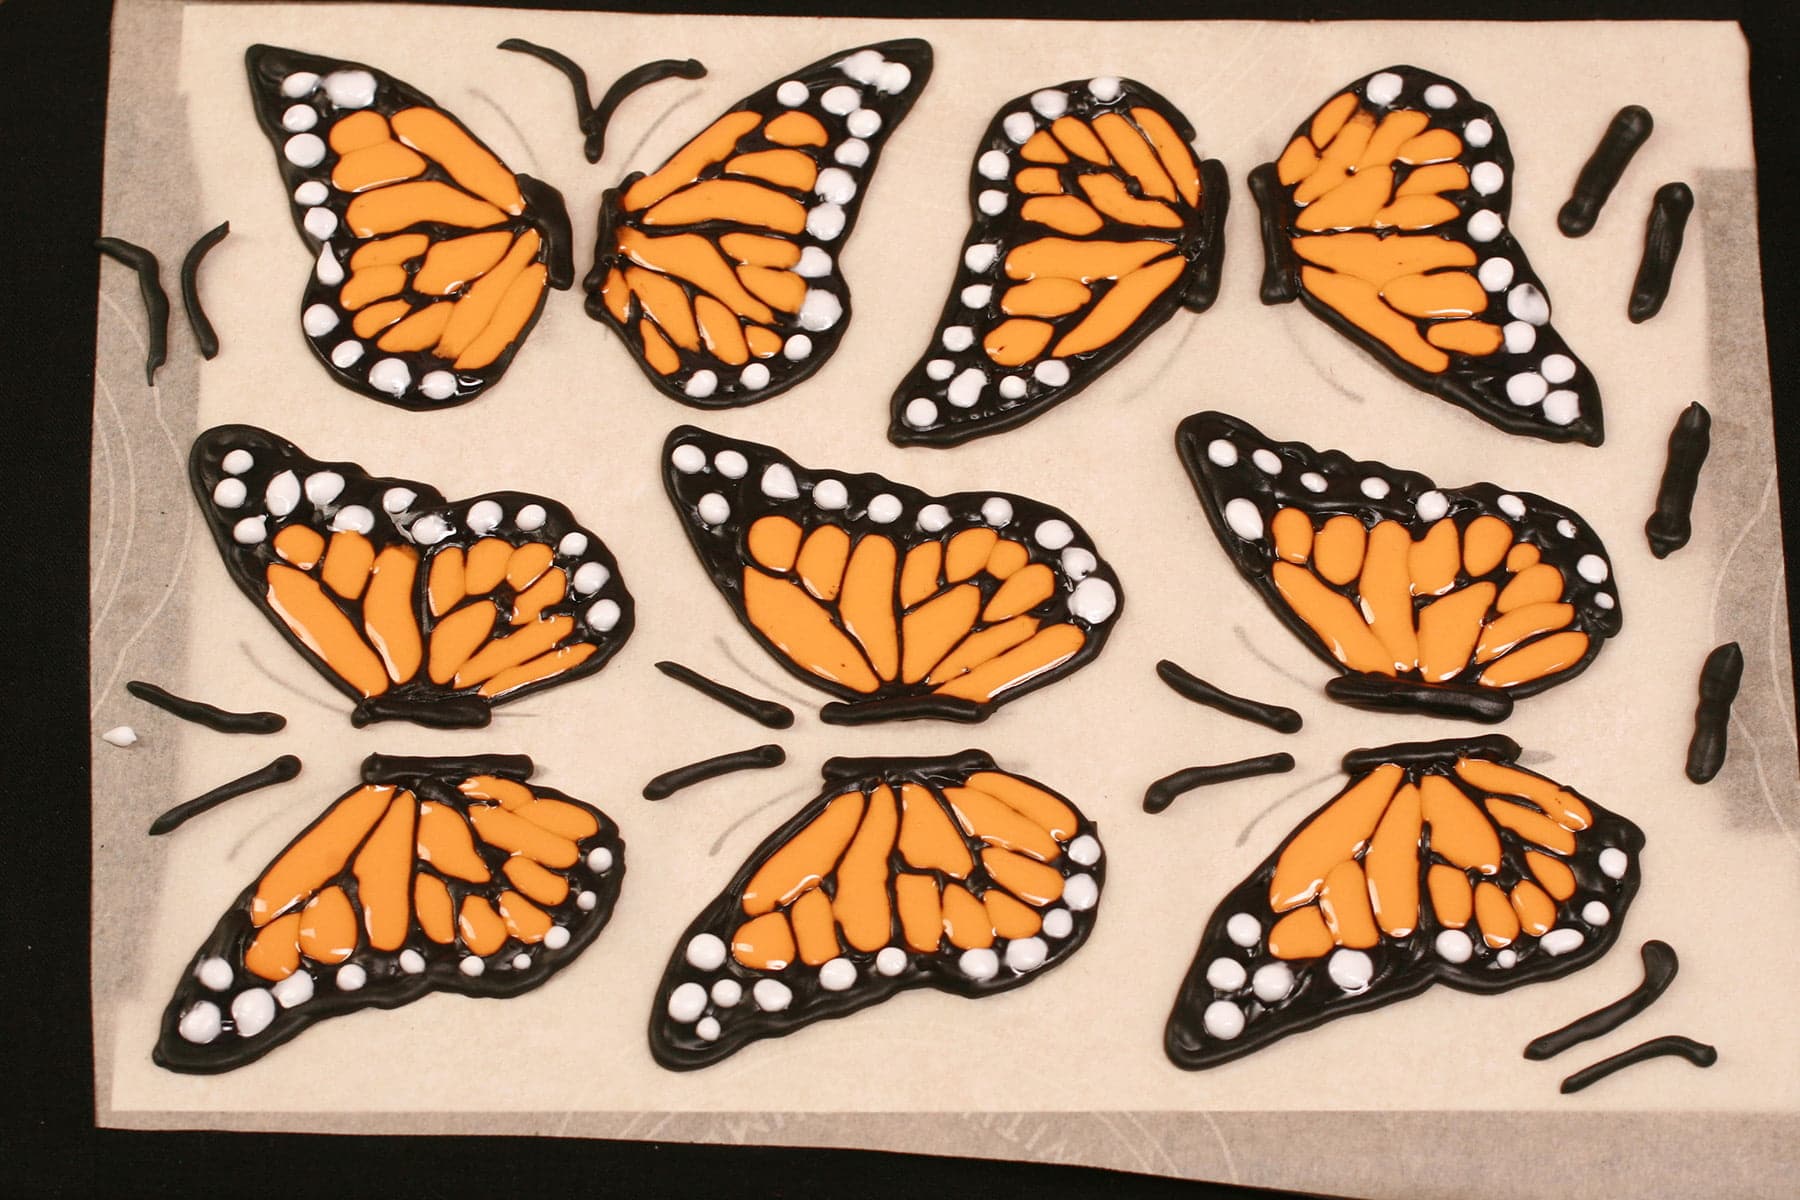
Set the work surface somewhere safe and dry, and leave it to harden overnight at minimum (depending on how humid your house is), but 24 hours as an ideal.
15. Make Your Cupcake Frosting
I prefer Swiss Meringue Buttercream, but American Buttercream is cheaper and easier. Hell, you can use canned, if you’d like.
Whichever way you go, flavour and tint it as desired.
16. Pipe Your Frosting
Set up a piping bag with a coupler and a wide round or star tip (optional), or cut the end off.
Pipe a generous helping of frosting on each cupcake. Frosting is the best part - especially if we’re talking Swiss Meringue Buttercream!
17. Liberate Your Wings!
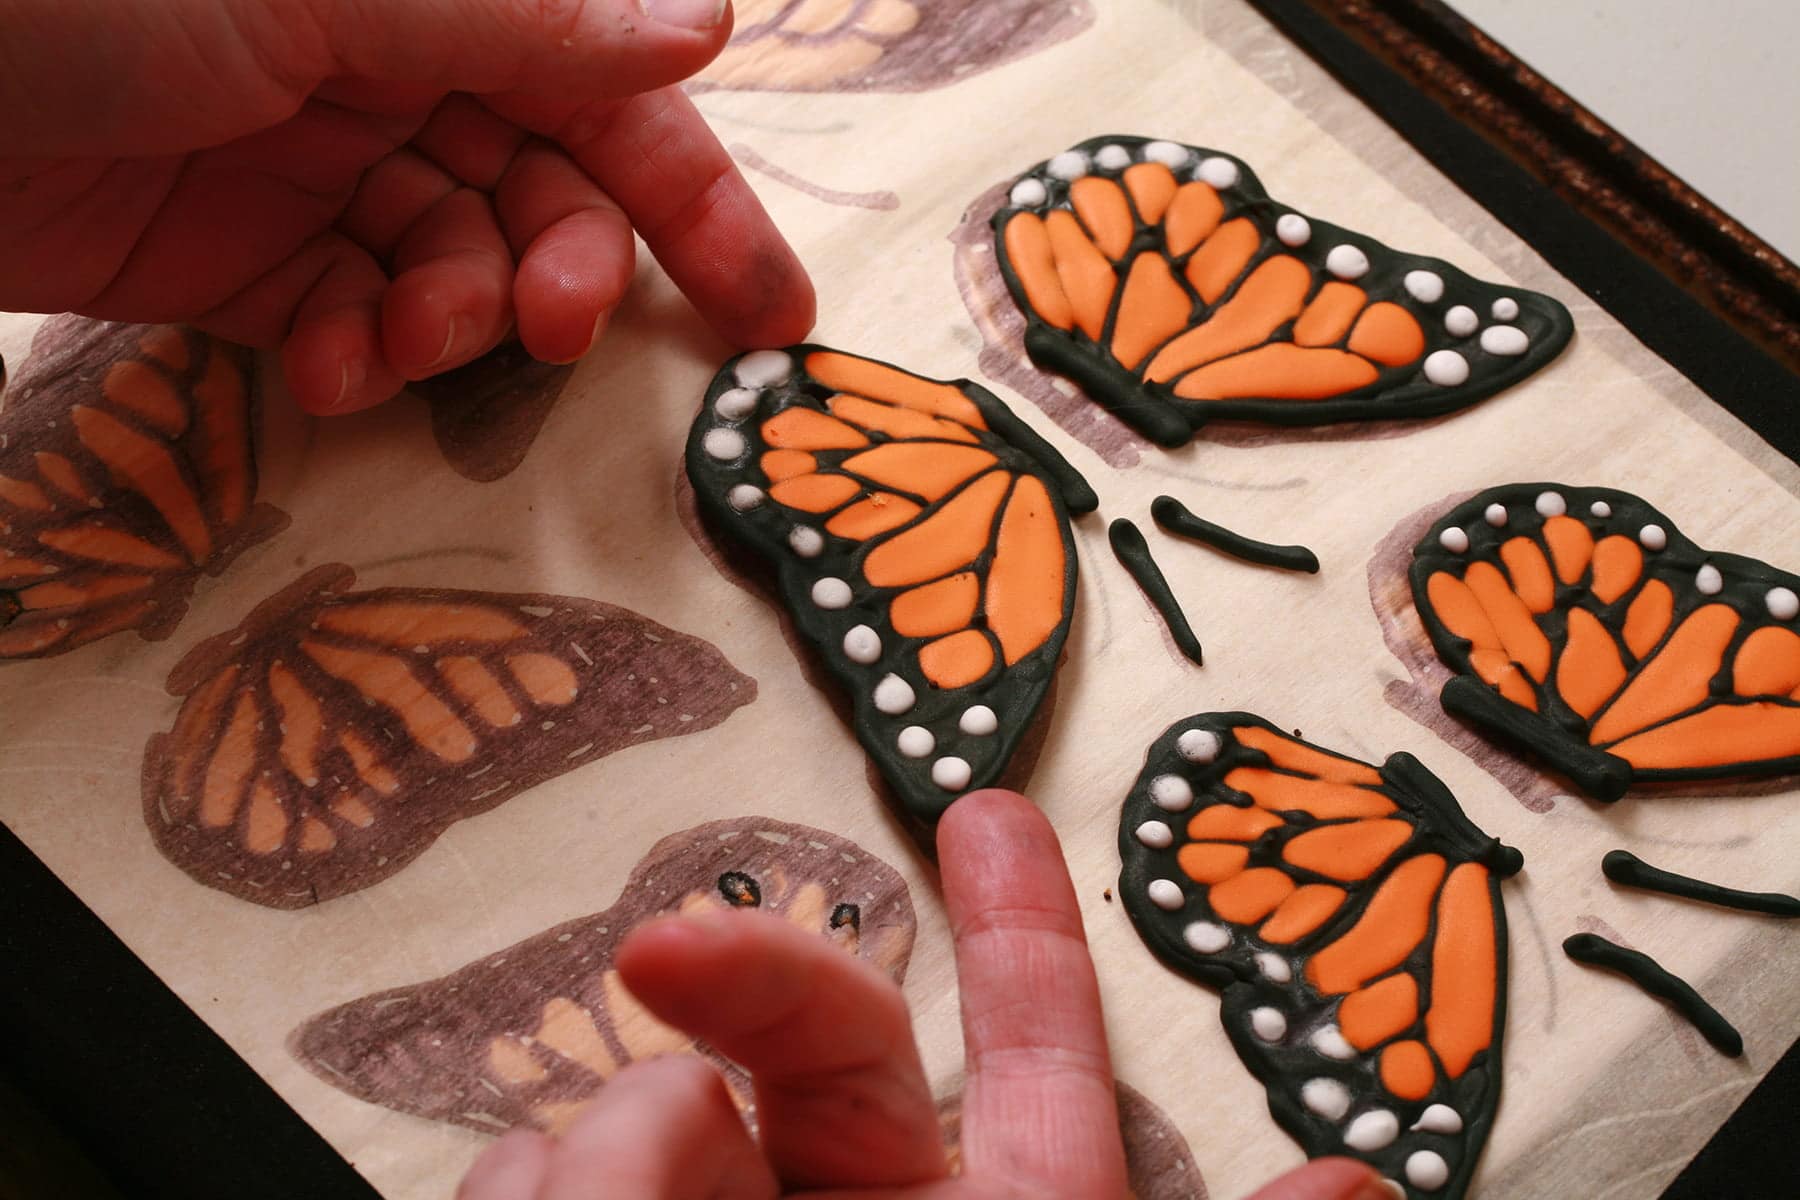
VERY carefully, lift each wing from the work surface. I like to slip a fingernail under an edge and just really gently lift.
If the wings feel stuck, they’re likely not dry yet - give them a few more hours!
18. Assemble Your Butterflies!
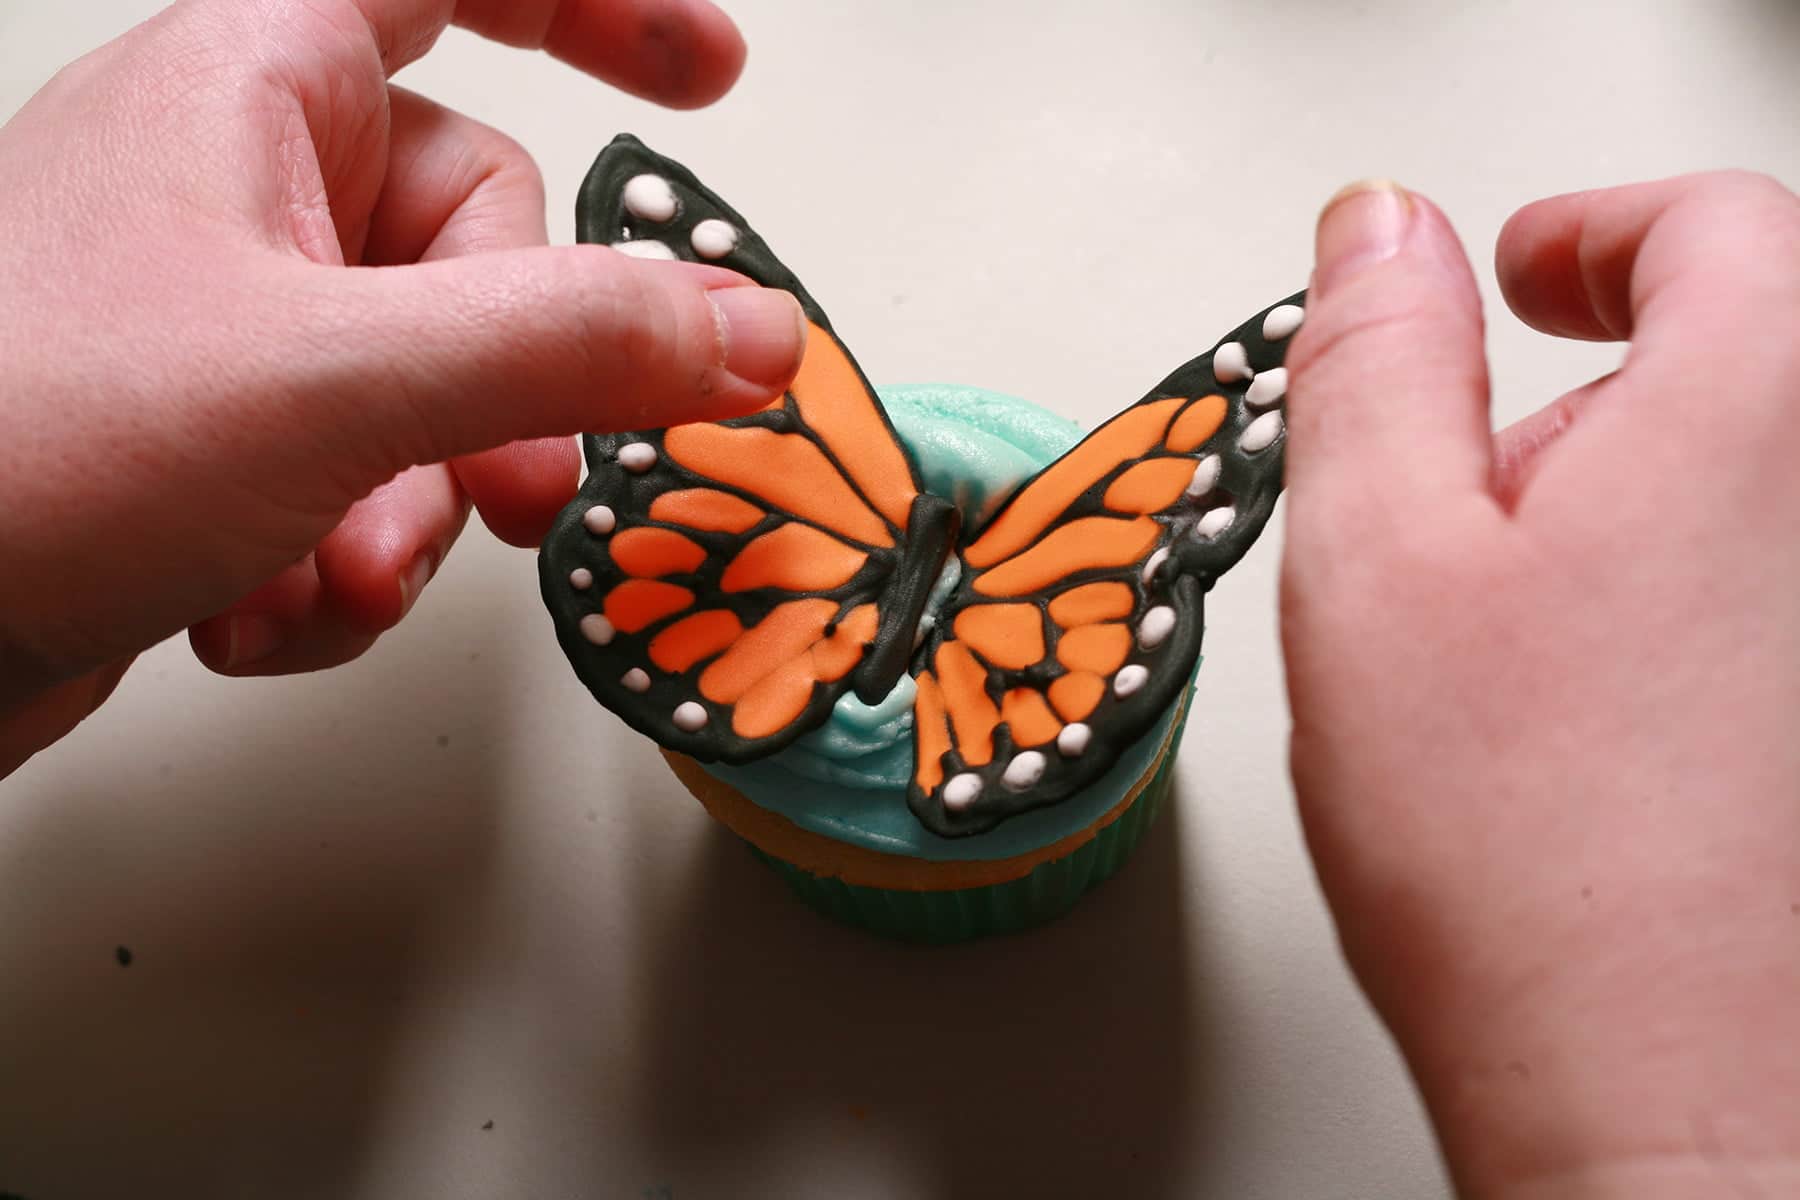
Carefully stick each pair of wings into the frosting of a cupcake.
If you’re using “bodies”, place one over the center seam, where icing pools up a little.
If you’re using “antennae”, place those as well.
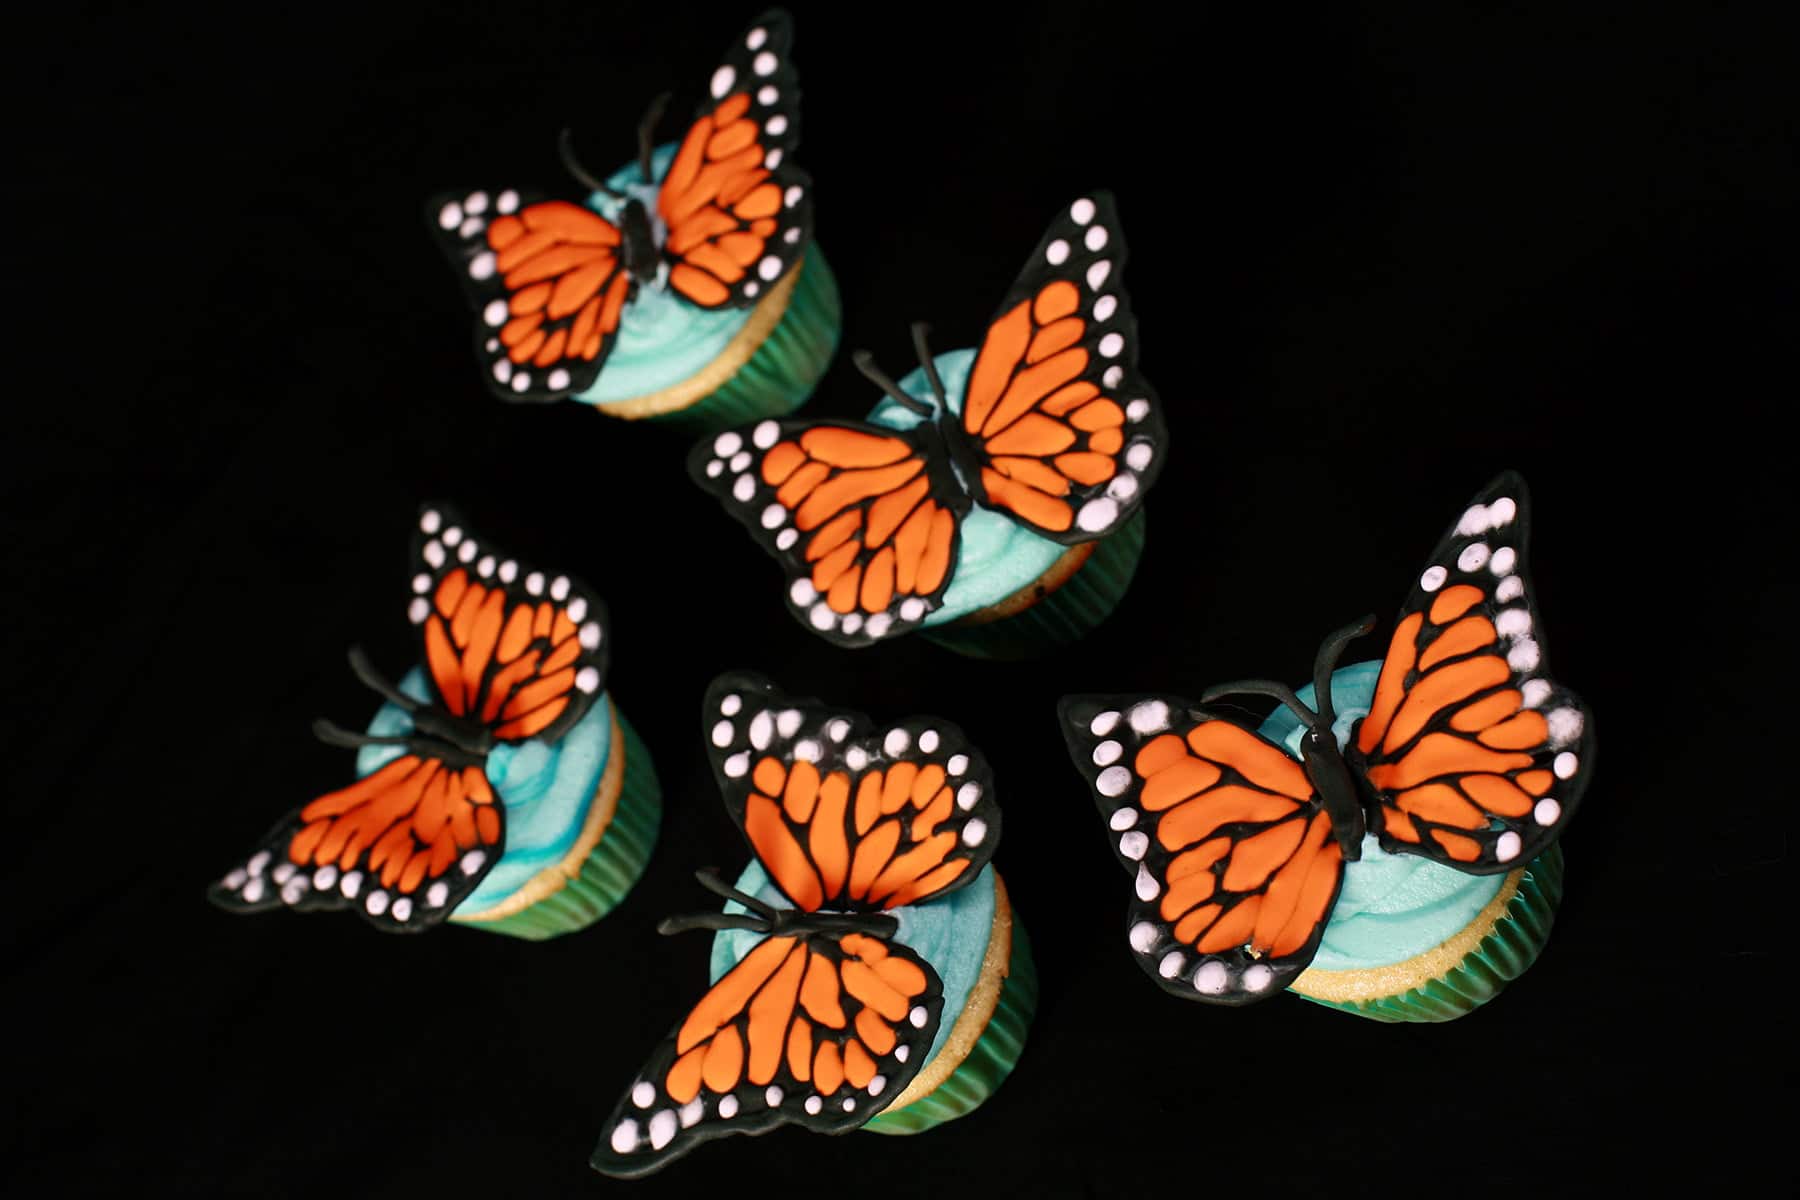
19. Admire Your Work

More Cake Decorating Posts
Looking to up your cake decorating game? I've got you covered!
American Buttercream Recipe
Chocolate Leaves Cake Tutorial
Frozen Buttercream Transfer Tutorial
How to Make Marshmallow Fondant
Spider Web Halloween Cupcakes
Swiss Meringue Buttercream Recipe

Interested in making wickedly delicious cakes? You'll LOVE my second cookbook, Evil Cake Overlord!
We've long been known for our “ridiculously delicious” moist cakes and tasty, unique flavors. Now, you can have recipes for all of the amazing flavors on our former custom cake menu, and many more!
Bake your moist work of gastronomic art, then fill and frost your cake with any number of tasty possibilities. Milk chocolate cardamom pear, mango mojito.. even our famous Chai cake – the flavor that got us into “Every Day with Rachel Ray” magazine!
Feeling creative? Use our easy to follow recipe to make our yummy fondant. Forget everything you’ve heard about fondant – ours is made from marshmallows and powdered sugar, and is essentially candy – you can even flavor it!
Order your copy directly through my site, through Amazon, or through any major bookseller!
More Cake Recipes!
Looking for more ridiculously delicious cake recipes? As the "Evil Cake Overlord", I've got you covered! (Ps: Check out my instructions for making Marshmallow Fondant, as well!)
Tortes:
B-52 Torte
Bahama Mama Torte
Blood Orange Truffle Torte
Citrus Splendor Torte
Cookies N Cream Cake
Raspberry Tiramisu Torte
Schmoo Torte
Spumoni Cake
Tiger Tail Cake
Bundt, Sheet, & Upside Down Cakes
Bananas Foster Upside Down Cake
Brandied Apple Upside Down Cake
Deep N Delicious Cake
French Martini Bundt Cake
French Martini Upside Down Cake
Mango Mojito Upside Down Cake
Pina Colada Bundt Cake
Strawberry Mango Marble Cake
Cupcakes:
Black Velvet Cupcakes
Chai Cupcakes
Easy Butterfly Cupcakes
Fat Elvis Cupcakes
Lynchburg Lemonade Cupcakes
Pink Grapefruit Daiquiri Cupcakes
Fillings, Frostings, & Etc
American Buttercream
Homemade Chocolate Cake Mix
Homemade Yellow Cake Mix
Milk Chocolate Whipped Ganache
Stabilized Whipped Cream
Swiss Meringue Buttercream
Also: I have Cake Decorating Tutorials, and posts about previous Decorated Cakes that I've made.
Share the Love!Before you chow down, be sure to take some pics of your handiwork! If you post it to Bluesky, be sure to tag us - @CelebrationGen. We're also on Pinterest, so you can save all your favourite recipes to a board! Also, be sure to subscribe to my free email newsletter, so you never miss out on any of my nonsense. Well, the published nonsense, anyway! |
Vanilla Cupcakes
Equipment
- Muffin Tin
- Cupcake Liners
Ingredients
- 3 cups Cake flour
- 2 ¼ cups Granulated sugar
- 2 tablespoon Baking powder
- 1 ½ teaspoon Salt
- 3 ½ oz Instant vanilla pudding mix**
- 6 Eggs
- 1 ½ cups Butter melted
- 2 tablespoon Pure vanilla extract
- 1 ½ cup Water
- 1 batch batch Swiss Meringue buttercream
- or
- 1 batch American buttercream
- 2 teaspoon Flavor extract of choice
- Food colouring optional
Instructions
- Preheat oven to 350°F (180°C).
- Line 24 muffin tins with cupcake liners.
- Combine flour, sugar, baking powder, salt, and pudding mix in a large mixing bowl. Add in eggs and butter, beating until smooth.
- Carefully add melted butter and vanilla to the mix, mixing on medium speed until smooth.
- Add water to batter, mix until well incorporated and smooth.
- Divide batter among prepared muffin pans. Bake until golden and knife inserted into center of batter comes out clean - about 20-22 mins .
- Allow to cool to cool to room temperature, before decorating.
- Prepare either Swiss meringue buttercream or American buttercream, following the applicable recipe and flavouring and colouring it as you like.
- Frost your cupcake as desired, enjoy!
Notes
Nutrition
Traditional Royal Icing
Equipment
- Stand Mixer or
Ingredients
- 4 Large Egg Whites
- 1 tablespoon Lemon Juice
- 4-6 cups Confectioners / Icing / Powdered Sugar
Instructions
- In clean stand mixer, whip egg whites until foamy.
- Add lemon juice, whip for another minute.
- Slowly add powdered sugar until cookie icing reaches desired consistency. You will want a fairly thick frosting – but still smooth and workable – for piping details and borders.
- If you're not using it immediately, transfer to an airtight container, cover surface with plastic wrap, and secure lid tightly.
- Re-whip before use.
Video
Notes
Nutrition
Meringue Powder Royal Icing
Equipment
- Stand Mixer or
Ingredients
- 4 Cup Icing Sugar
- ¼ cup Meringue Powder
- ½ cup Lukewarm water
Instructions
- Combine icing sugar and meringue powder in the bowl of a stand mixer - ideal - or large mixing bowl (to beat with an electric hand mixer)
- Add about ⅔ of the water, mix on low speed until combined.
- Turn speed up to high, beat for a couple minutes until thick, smooth, and glossy. Add more water, if needed.
- Check the frosting for consistency, adjust as needed for your intended usage.
- If you're not using it immediately, transfer to an airtight container, cover surface with plastic wrap, and secure lid tightly.
- Re-whip before use.









Leave a Reply